Pennock's Fiero Forum
  Technical Discussion & Questions
  Neil's Aventador build (Page 17)

Post New Topic  Post A Reply
Email This Page to Someone! | Printable Version

This topic is 19 pages long:  1   2   3   4   5   6   7   8   9   10   11   12   13   14   15   16   17   18   19 
Previous Page | Next Page
next newest topic | next oldest topic
Neil's Aventador build by Neils88
Started on: 03-02-2015 11:34 PM
Replies: 731 (67190 views)
Last post by: RCR on 11-17-2023 07:57 AM
shemdogg
Member
Posts: 1750
From: The Ghetto CA USA
Registered: Apr 2017


Feedback score: N/A
Leave feedback

Rate this member

Report this Post05-06-2018 08:00 PM Click Here to See the Profile for shemdoggSend a Private Message to shemdoggEdit/Delete MessageReply w/QuoteDirect Link to This Post
If u didnt say anything about the exhaust I woulda never noticed. Its barely off. U wanna see "off" look at my car lol

shem
IP: Logged
Neils88
Member
Posts: 4045
From: Jeddore,Nova Scotia
Registered: Aug 2013


Feedback score: N/A
Leave feedback


Total ratings: 56
Rate this member

Report this Post05-06-2018 09:27 PM Click Here to See the Profile for Neils88Send a Private Message to Neils88Edit/Delete MessageReply w/QuoteDirect Link to This Post
 
quote
Originally posted by shemdogg:

If u didnt say anything about the exhaust I woulda never noticed. Its barely off. U wanna see "off" look at my car lol

shem


Unfortunately my OCD takes over... now that I've seen some mistakes I probably won't sleep until they are fixed lol (... and I pointed out a slight misalignment in Car-lo's exhaust so I know he'll never let me get away with one lol )
IP: Logged
shemdogg
Member
Posts: 1750
From: The Ghetto CA USA
Registered: Apr 2017


Feedback score: N/A
Leave feedback

Rate this member

Report this Post05-06-2018 10:02 PM Click Here to See the Profile for shemdoggSend a Private Message to shemdoggEdit/Delete MessageReply w/QuoteDirect Link to This Post
Im ocd too- but lazy. When I see something I go work on something else. Productive procrastination. ill get to it eventually lol

shem
IP: Logged
355Fiero
Member
Posts: 548
From: Victoria, BC Canada
Registered: Dec 2004


Feedback score: (2)
Leave feedback

Rate this member

Report this Post05-21-2018 01:23 PM Click Here to See the Profile for 355FieroSend a Private Message to 355FieroEdit/Delete MessageReply w/QuoteDirect Link to This Post
All the way back on page 3 already.

Any updates Neil?

Cheers
Don
IP: Logged
Neils88
Member
Posts: 4045
From: Jeddore,Nova Scotia
Registered: Aug 2013


Feedback score: N/A
Leave feedback


Total ratings: 56
Rate this member

Report this Post05-22-2018 12:04 AM Click Here to See the Profile for Neils88Send a Private Message to Neils88Edit/Delete MessageReply w/QuoteDirect Link to This Post
 
quote
Originally posted by 355Fiero:

All the way back on page 3 already.

Any updates Neil?

Cheers
Don


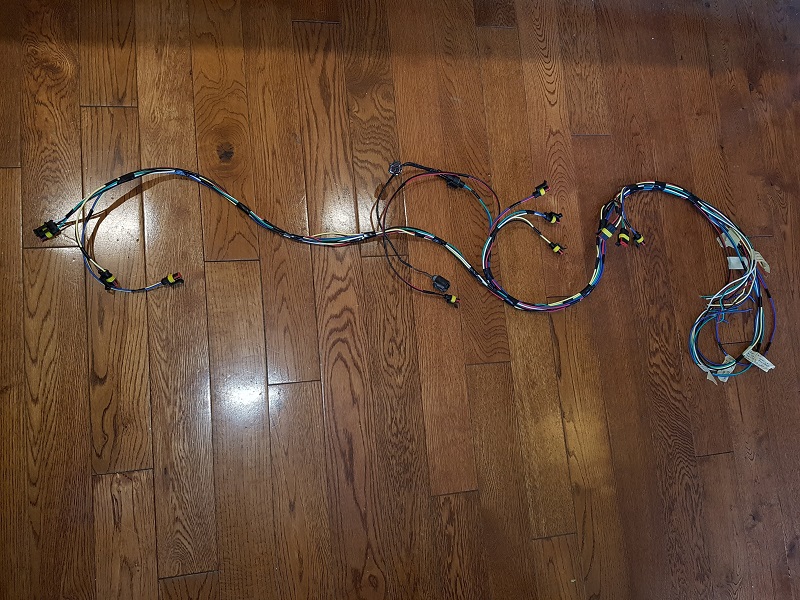
I'm currently wiring the rear end. I've built a wiring harness for the rear brake lights, turn signals, reverse lights, fog lights, license plate lights, active vent actuators, spoiler motor, spoiler position sensor and rear camera power connections. I'm using watertight automotive connectors. The harness will run into a rear control unit (Arduino based) that will operate everything as required. The microcontroller might seem like overkill but it's great for running things like the vents and spoiler which have timing requirements and pwm dimming control of LEDs. We'll see how things go once I prototype the system.
IP: Logged
RCR
Member
Posts: 4397
From: Shelby Twp Mi
Registered: Sep 2002


Feedback score:    (7)
Leave feedback


Total ratings: 102
Rate this member

Report this Post05-22-2018 12:11 PM Click Here to See the Profile for RCRSend a Private Message to RCREdit/Delete MessageReply w/QuoteDirect Link to This Post
Sounds pretty cool (hi-techie), Neil.

Bob
IP: Logged
Neils88
Member
Posts: 4045
From: Jeddore,Nova Scotia
Registered: Aug 2013


Feedback score: N/A
Leave feedback


Total ratings: 56
Rate this member

Report this Post05-27-2018 08:43 PM Click Here to See the Profile for Neils88Send a Private Message to Neils88Edit/Delete MessageReply w/QuoteDirect Link to This Post
The new rear end wiring harness is nearing completion.


quote
Originally posted by RCR:

Sounds pretty cool (hi-techie), Neil.

Bob


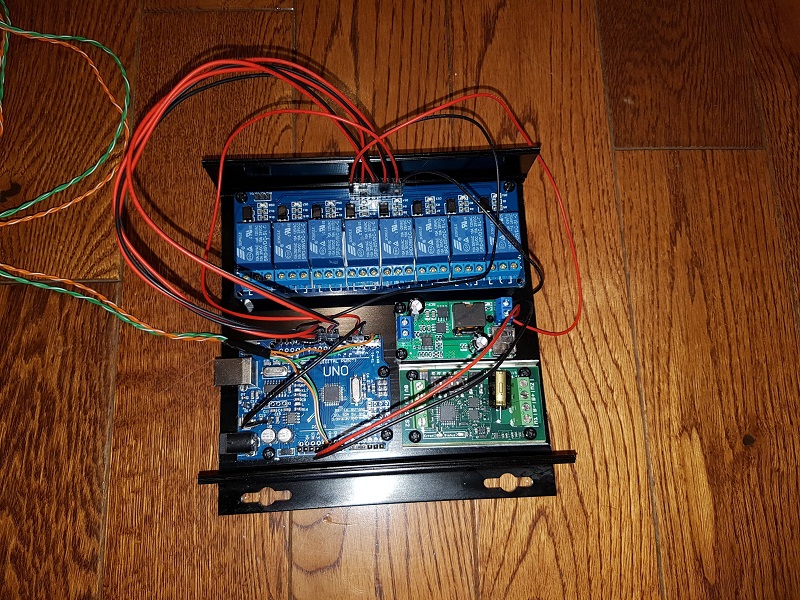
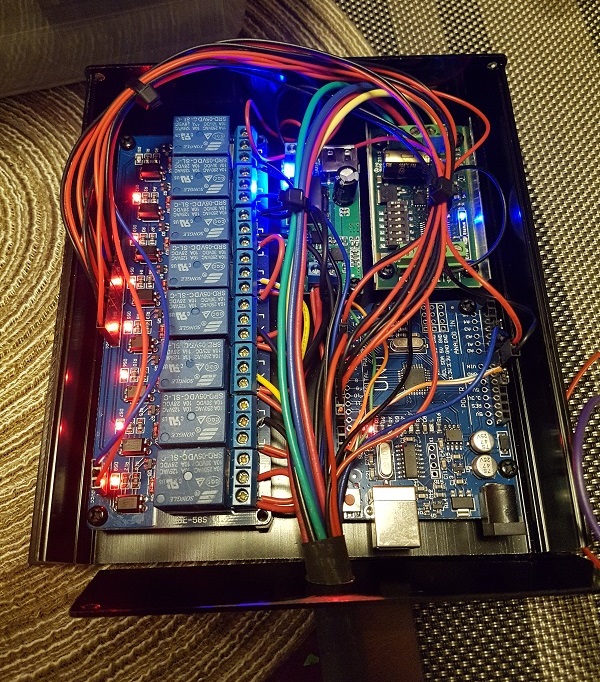
Here's the hi-techie components... (the controller is about 50% wired up right now, and the LED controllers aren't installed yet. The orange/green wires are also just a temporary serial communication line that ultimately will connect to the main on board computer...sort of a poor-mans CAN Bus system. For testing, I'll just use my laptop to send the control commands).


The only part that isn't sitting in the control box is the controller I'm using for the active vents, though control of the controller will still come from the control box..(I just had to say that...)


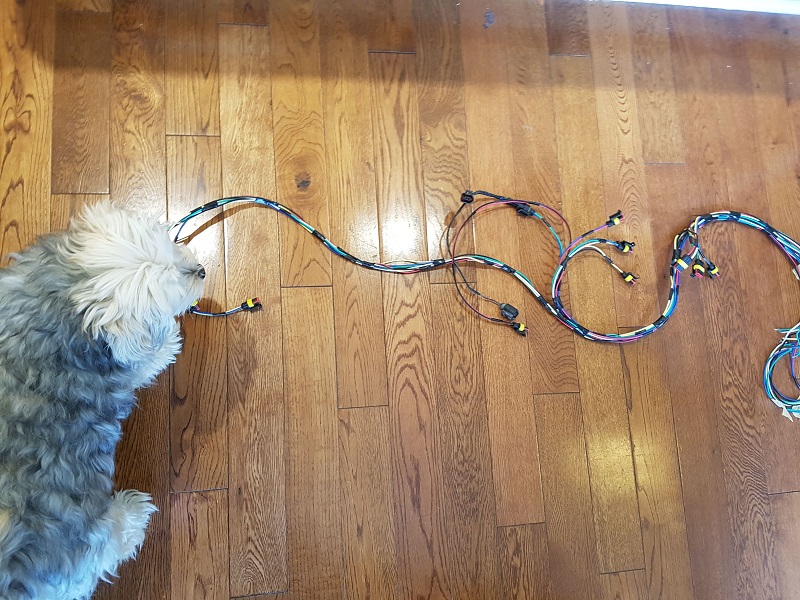
Mindy is inspecting my work. I'm sure the cat will come by shortly to ensure that the wiring harness meets the correct standard in chewability....


IP: Logged
RCR
Member
Posts: 4397
From: Shelby Twp Mi
Registered: Sep 2002


Feedback score:    (7)
Leave feedback


Total ratings: 102
Rate this member

Report this Post09-03-2018 06:05 PM Click Here to See the Profile for RCRSend a Private Message to RCREdit/Delete MessageReply w/QuoteDirect Link to This Post
Hey Neil,

It's been three months. Hope all is well.

Bob
IP: Logged
Neils88
Member
Posts: 4045
From: Jeddore,Nova Scotia
Registered: Aug 2013


Feedback score: N/A
Leave feedback


Total ratings: 56
Rate this member

Report this Post09-04-2018 09:10 PM Click Here to See the Profile for Neils88Send a Private Message to Neils88Edit/Delete MessageReply w/QuoteDirect Link to This Post
 
quote
Originally posted by RCR:

Hey Neil,

It's been three months. Hope all is well.

Bob


Hi Bob!

Unfortunately, I've been taking a long health break from the project. I did get a few things done...but not much. I was never in a rush to get finished so I'm happy to leave it sitting until I have a little more energy.

The pics below don't really represent that much work, but I guess it counts as a little progress...

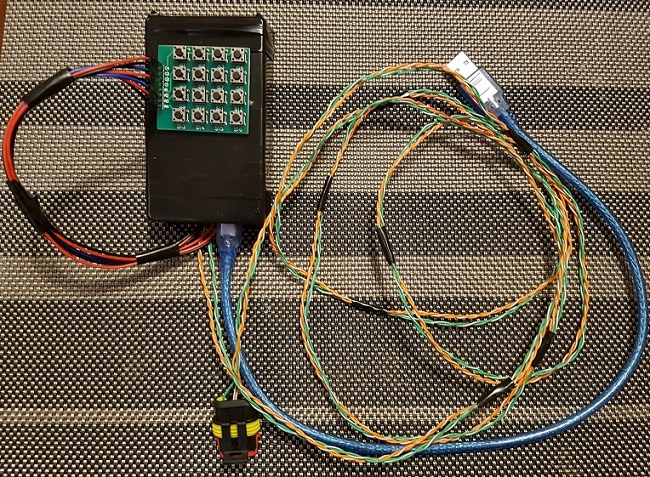
As mentioned a few times before, I am using a microcontroller to drive all the body and light functions in the rear of the car (as I will do for the rest of the car later). The first pic below shows the hand-held microprocessor used for testing. When a button is pressed on the hand-held controller, a serial message is sent to the rear-controller to relay instructions. The hand-held unit (which allows me to stand behind the car while testing functions) will ultimately be replaced by the main processor installed under the dash.


Here is the rear-controller with all internal connections completed.


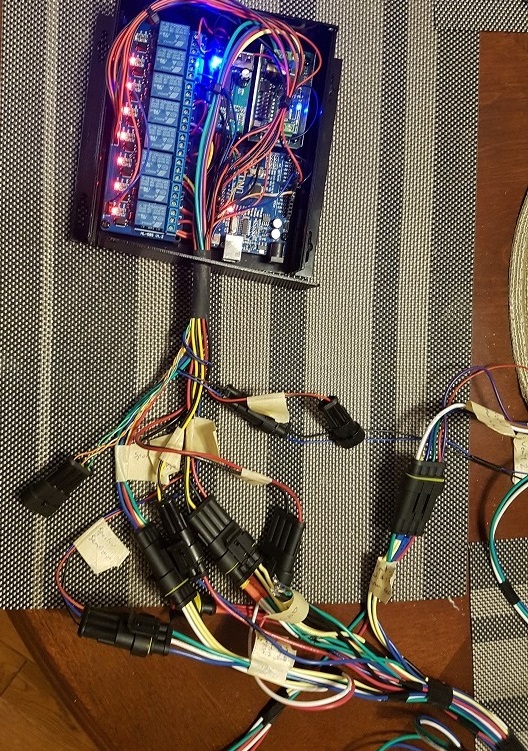
One problem I quickly ran into was the number of connectors (obviously I want the ability to unplug and remove the rear-controller if required. As you can see below, that many connectors can make quite a mess...


I have "temporarily" replaced all the connectors with a single connector (black connector with all the white wires). I ensured each connection was properly soldered and wrapped with heat-shrink tubing....because "temporary" components often get forgotten and become permanent...


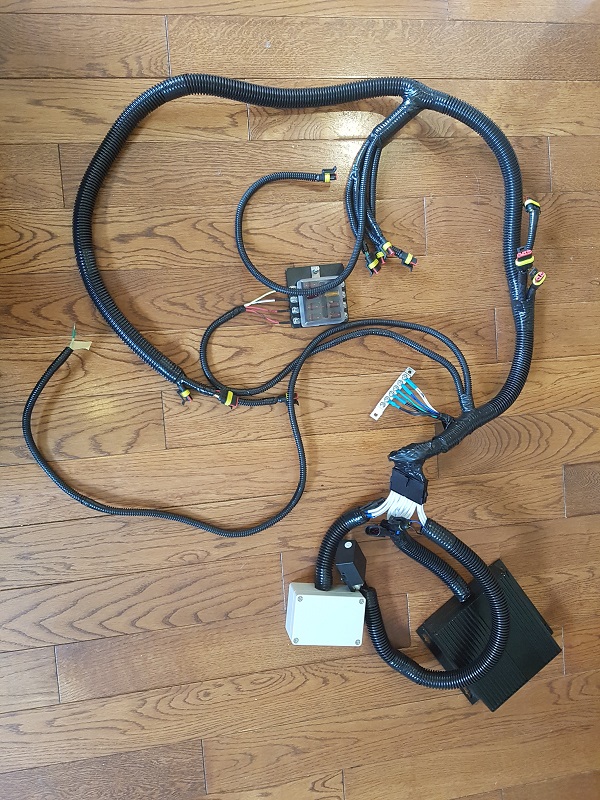
Finally...I have completed the harness and added the split plastic protector. Also note that I have added a small fuse panel and a ground bus bar to the harness. This is now ready for installation.


Neil
IP: Logged
pmbrunelle
Member
Posts: 4376
From: Grand-Mère, Québec
Registered: Sep 2008


Feedback score: N/A
Leave feedback


Total ratings: 62
Rate this member

Report this Post09-04-2018 09:56 PM Click Here to See the Profile for pmbrunelleSend a Private Message to pmbrunelleEdit/Delete MessageReply w/QuoteDirect Link to This Post
 
quote
Originally posted by Neils88:
I was never in a rush to get finished so I'm happy to leave it sitting until I have a little more energy.


How much are you doing this project for the process of doing it, versus doing it for the end result?

Did you not want to implement a normal CAN bus?
Is it just that the Arduino has a UART, but not a CAN peripheral?

I suppose that the benefit of a modified car for personal use is that you're free to do whatever non-standard thing you like.

To make the UART a little more "automotive grade", I would implement a CRC, and possibly a sequential message counter.

[This message has been edited by pmbrunelle (edited 09-04-2018).]

IP: Logged
Neils88
Member
Posts: 4045
From: Jeddore,Nova Scotia
Registered: Aug 2013


Feedback score: N/A
Leave feedback


Total ratings: 56
Rate this member

Report this Post09-04-2018 10:22 PM Click Here to See the Profile for Neils88Send a Private Message to Neils88Edit/Delete MessageReply w/QuoteDirect Link to This Post
 
quote
Originally posted by pmbrunelle:


How much are you doing this project for the process of doing it, versus doing it for the end result?

Did you not want to implement a normal CAN bus?
Is it just that the Arduino has a UART, but not a CAN peripheral?

I suppose that the benefit of a modified car for personal use is that you're free to do whatever non-standard thing you like.

To make the UART a little more "automotive grade", I would implement a CRC, and possibly a message counter.


You are right...I love the build process. While the end result is exciting, I love all the little "design and build" sub-projects that present themselves.

There is an Arduino CAN Bus shield available (I have a couple). The advantage of a true CAN Bus is that messages go out on a common bus that allows communications prioritization, with all devices able to read the information flow and use it if relevant. Huge amounts of information constantly flows on the CAN Bus necessitating the hierarchy structure (i.e. a system that allows higher priority devices to override lower priority devices when they both try to speak at the same time on the Bus). I'm only passing a small amount of information which makes a simple serial communication set-up much simpler to implement. There are many ways to confirm information flow (e.g. repeaters, checksums, etc).
IP: Logged
PFF
System Bot
RCR
Member
Posts: 4397
From: Shelby Twp Mi
Registered: Sep 2002


Feedback score:    (7)
Leave feedback


Total ratings: 102
Rate this member

Report this Post09-05-2018 07:02 AM Click Here to See the Profile for RCRSend a Private Message to RCREdit/Delete MessageReply w/QuoteDirect Link to This Post
Hey Neil,
Glad to see you up and at 'em. Hope you feel better soon, I'm certainly sympathetic to your woes.

best regards,

Bob

[This message has been edited by RCR (edited 09-05-2018).]

IP: Logged
Neils88
Member
Posts: 4045
From: Jeddore,Nova Scotia
Registered: Aug 2013


Feedback score: N/A
Leave feedback


Total ratings: 56
Rate this member

Report this Post12-26-2018 02:03 PM Click Here to See the Profile for Neils88Send a Private Message to Neils88Edit/Delete MessageReply w/QuoteDirect Link to This Post
Merry Christmas to everyone!

Unfortunately, this hasn't been a great year for me due to health issues. However, I did want to make a post to let people know that though the project has stalled a little, I've started to feel a little better and have even managed to spend some time in the garage. Hopefully in the next few weeks I'll have something done that I can post in the thread.


Neil
IP: Logged
RCR
Member
Posts: 4397
From: Shelby Twp Mi
Registered: Sep 2002


Feedback score:    (7)
Leave feedback


Total ratings: 102
Rate this member

Report this Post12-26-2018 06:57 PM Click Here to See the Profile for RCRSend a Private Message to RCREdit/Delete MessageReply w/QuoteDirect Link to This Post
Hi Neil,
Sorry for the health issues. Sure hope you're on the mend.

Thanx for your post in my thread. Have a great new year...

Bob

[This message has been edited by RCR (edited 12-26-2018).]

IP: Logged
Neils88
Member
Posts: 4045
From: Jeddore,Nova Scotia
Registered: Aug 2013


Feedback score: N/A
Leave feedback


Total ratings: 56
Rate this member

Report this Post02-16-2019 09:01 PM Click Here to See the Profile for Neils88Send a Private Message to Neils88Edit/Delete MessageReply w/QuoteDirect Link to This Post
I figure it's time for me to post something. I'm slowly puttering around when I'm able.

As usual, I have looked at some of the work I had done previously and decided that it may be functional...but not at the quality I would like. I consider the first attempt at something more of a concept prototype, and then the rebuild to be the more permanent solution.

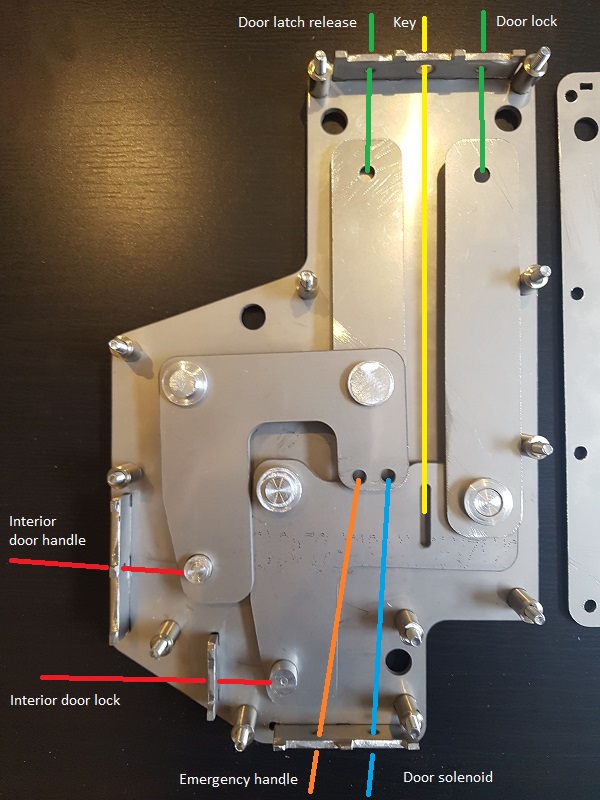
The door latch/lock connection mechanism is a prime example. I need to connect the latch and lock mechanism (which unlike most cars is actually in the door jamb, not the door) to a number of components; the interior manual handle, the interior manual lock, the electric popper (triggered by the external door switch), the external emergency key and the external emergency release handle. There is no stock item available to handle all these functions unless I splurge for OEM Aventador components. As you can imagine, that's not a cheap option.

Here was my original solution...


While fully functional, there is definitely the chance for component failure eventually. I knew I could do a lot better.

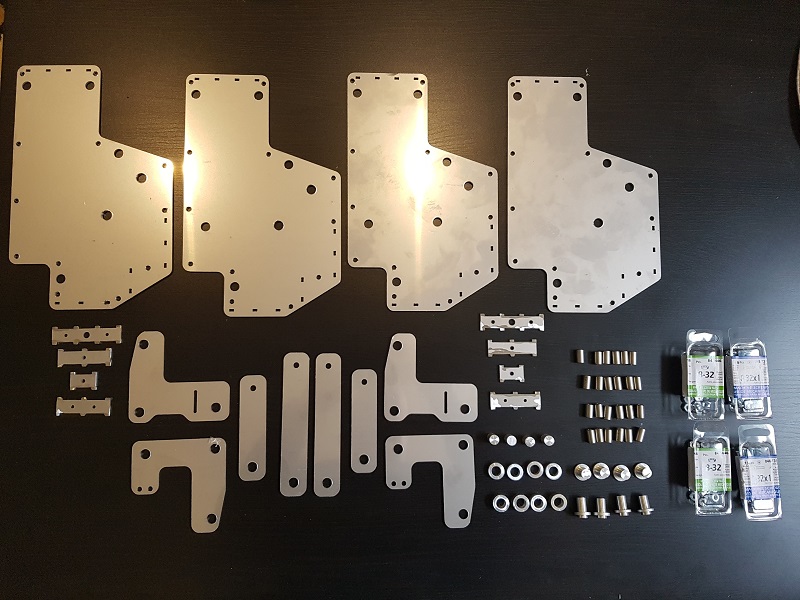
So I redesigned the system and had the components water-jet cut from 316 stainless steel. This covered most of the components. The remaining components were machined on my lathe. (note...there are about a half dozen small connectors that are not shown in the pics below. I also had to make adjustments to a couple of the minor parts as a result of a little binding).

Here's everything laid out...
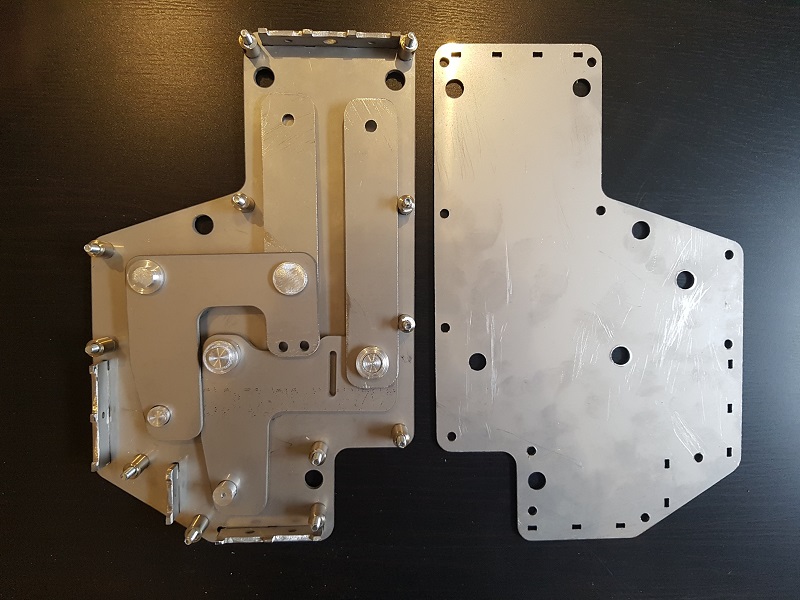


Basic assembly...


Here's a description of how things connect...


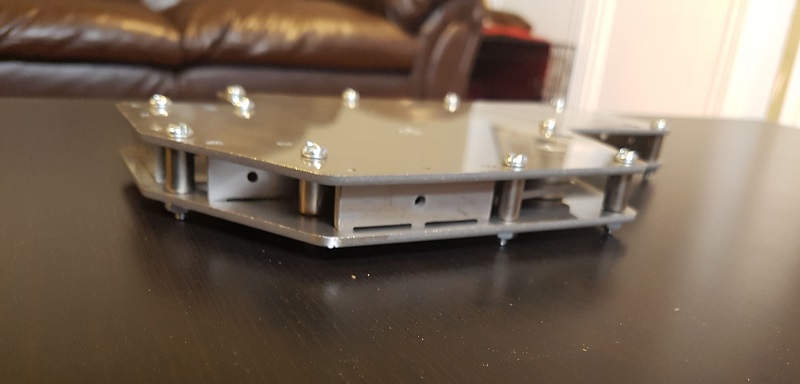
The assembled mechanism is just under 3/4" thick...


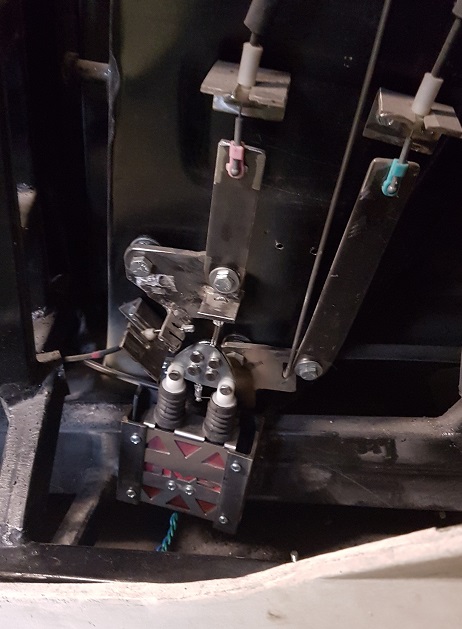
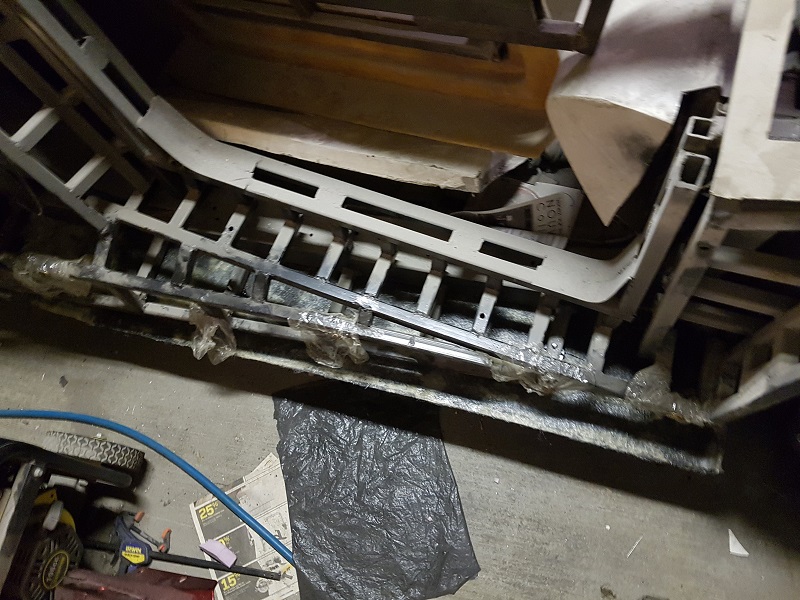
The new system (mostly) hooked up and installed...


This new system is much more rugged, corrosion resistant and should be much more reliable.
IP: Logged
pmbrunelle
Member
Posts: 4376
From: Grand-Mère, Québec
Registered: Sep 2008


Feedback score: N/A
Leave feedback


Total ratings: 62
Rate this member

Report this Post02-16-2019 11:40 PM Click Here to See the Profile for pmbrunelleSend a Private Message to pmbrunelleEdit/Delete MessageReply w/QuoteDirect Link to This Post
 
quote
Originally posted by Neils88:
As usual, I have looked at some of the work I had done previously and decided that it may be functional...but not at the quality I would like. I consider the first attempt at something more of a concept prototype, and then the rebuild to be the more permanent solution.


That's basically the difference between my first and second Fieros.

IP: Logged
shemdogg
Member
Posts: 1750
From: The Ghetto CA USA
Registered: Apr 2017


Feedback score: N/A
Leave feedback

Rate this member

Report this Post02-17-2019 10:52 PM Click Here to See the Profile for shemdoggSend a Private Message to shemdoggEdit/Delete MessageReply w/QuoteDirect Link to This Post
Its always better the second or third time lol. Thats a sweet latch you made man, glad youre back at it!

shem
IP: Logged
RCR
Member
Posts: 4397
From: Shelby Twp Mi
Registered: Sep 2002


Feedback score:    (7)
Leave feedback


Total ratings: 102
Rate this member

Report this Post02-19-2019 06:54 PM Click Here to See the Profile for RCRSend a Private Message to RCREdit/Delete MessageReply w/QuoteDirect Link to This Post
Very nice, Neil.

Bob
IP: Logged
Neils88
Member
Posts: 4045
From: Jeddore,Nova Scotia
Registered: Aug 2013


Feedback score: N/A
Leave feedback


Total ratings: 56
Rate this member

Report this Post03-03-2019 02:36 PM Click Here to See the Profile for Neils88Send a Private Message to Neils88Edit/Delete MessageReply w/QuoteDirect Link to This Post
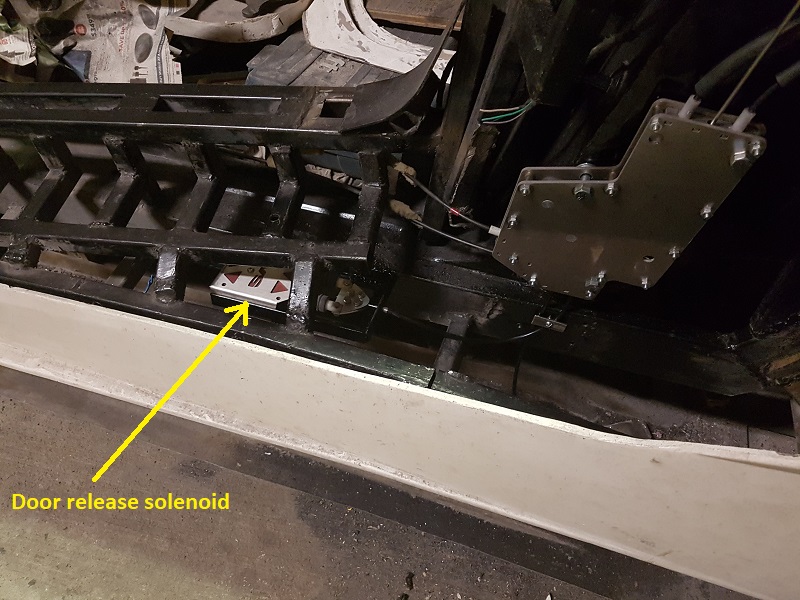
I started to install the AVS door latch solenoid on the driver's side today. I built a small bracket to hold the solenoid and secure the cable. It's amazing how much space was there, yet it still took forever to figure out where to mount it. Unfortunately, there wasn't a great spot to mount it where I'll be able to easily access it whenever needed. I'll be able to get to it... but I'm sure it'll involve some curse words. I put a little paint into the bracket. Once it dries, I'll mount the solenoid and take a pic.
IP: Logged
Neils88
Member
Posts: 4045
From: Jeddore,Nova Scotia
Registered: Aug 2013


Feedback score: N/A
Leave feedback


Total ratings: 56
Rate this member

Report this Post03-03-2019 10:49 PM Click Here to See the Profile for Neils88Send a Private Message to Neils88Edit/Delete MessageReply w/QuoteDirect Link to This Post

Neils88

4045 posts
Member since Aug 2013
The solenoid sitting in the new bracket, tucked behind the rocker panel.

IP: Logged
Neils88
Member
Posts: 4045
From: Jeddore,Nova Scotia
Registered: Aug 2013


Feedback score: N/A
Leave feedback


Total ratings: 56
Rate this member

Report this Post03-10-2019 06:26 PM Click Here to See the Profile for Neils88Send a Private Message to Neils88Edit/Delete MessageReply w/QuoteDirect Link to This Post
So somehow, I have misplaced the keys for the car... specifically for the door locks I was planning on using. Unfortunately, I've been forced to order some new locks as a result.

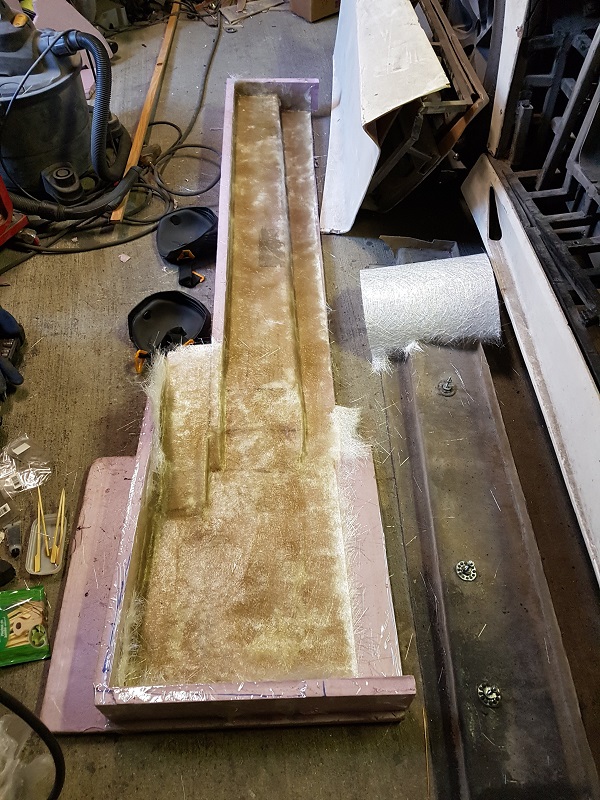
While waiting for the replacement keys/locks to show up, I decided to tackle something that I actually started 3 years ago... the scuff plates under the rocker panels. A lot of work for something that no one will see. As with the driver's side (which had been completed previously), I created a mold using polystyrene foam sheets cut and filed to shape. The parts are glued together with a hot- glue gun and then sealed with packing tape. It's a great way to quickly make a mold, especially ones with large flat areas. In this case, the finish isn't really important since these parts are hidden from view. If everything goes as planned, I'll try to get it fiberglassed tomorrow.
IP: Logged
PFF
System Bot
Neils88
Member
Posts: 4045
From: Jeddore,Nova Scotia
Registered: Aug 2013


Feedback score: N/A
Leave feedback


Total ratings: 56
Rate this member

Report this Post03-13-2019 02:26 PM Click Here to See the Profile for Neils88Send a Private Message to Neils88Edit/Delete MessageReply w/QuoteDirect Link to This Post
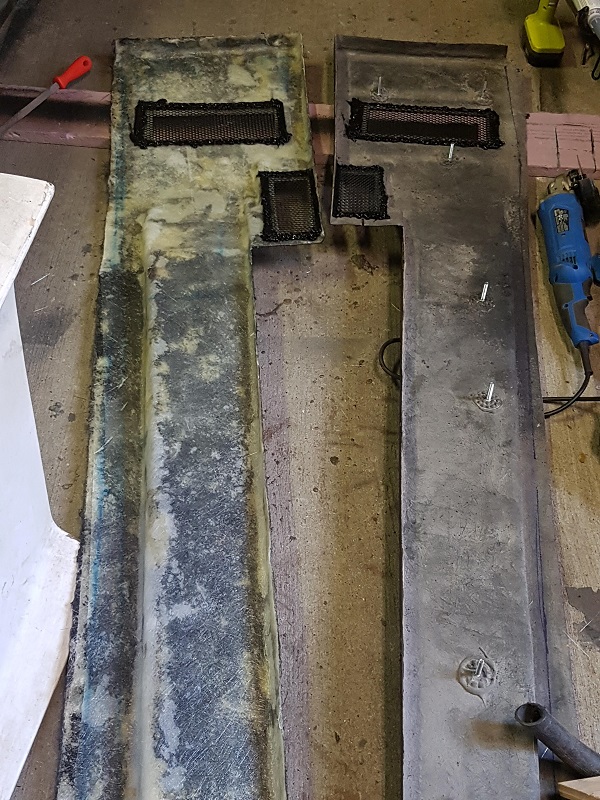
I finally finished fiberglassing the passenger side scuff plate. Took me a couple days longer than I had wanted, but at least it's finished. Almost. I still need to trim the edges and cut the two vent holes. Also, before the two scuff plates are permanently installed, I'll spray them both with a layer of undercoating.... easier to do before they are installed.

My new keys/locks arrived today... so hopefully I can get them installed quickly as well.
IP: Logged
Neils88
Member
Posts: 4045
From: Jeddore,Nova Scotia
Registered: Aug 2013


Feedback score: N/A
Leave feedback


Total ratings: 56
Rate this member

Report this Post03-17-2019 08:34 PM Click Here to See the Profile for Neils88Send a Private Message to Neils88Edit/Delete MessageReply w/QuoteDirect Link to This Post
The scuff plates are ready to be installed. The passenger side scuff plate still needs to be trimmed along the edge to match the rocker panel, but I'll do that after it is installed.

Scuff plate in mold...


Grills (rock guards/vents) were mounted into a bead of urethane...


Rubberized undercoating...


IP: Logged
RCR
Member
Posts: 4397
From: Shelby Twp Mi
Registered: Sep 2002


Feedback score:    (7)
Leave feedback


Total ratings: 102
Rate this member

Report this Post03-18-2019 06:02 AM Click Here to See the Profile for RCRSend a Private Message to RCREdit/Delete MessageReply w/QuoteDirect Link to This Post
Nice job Neil.

At the risk of sounding stupid (maybe the coffee hasn't kicked in yet), where do the scuff plates mount? Up under the rockers???


Bob
IP: Logged
Neils88
Member
Posts: 4045
From: Jeddore,Nova Scotia
Registered: Aug 2013


Feedback score: N/A
Leave feedback


Total ratings: 56
Rate this member

Report this Post03-18-2019 09:23 AM Click Here to See the Profile for Neils88Send a Private Message to Neils88Edit/Delete MessageReply w/QuoteDirect Link to This Post
 
quote
Originally posted by RCR:

Nice job Neil.

At the risk of sounding stupid (maybe the coffee hasn't kicked in yet), where do the scuff plates mount? Up under the rockers???


Bob


Thanks, Bob.

Yes, they mount under the rockers (from just behind the front wheels, all the way back to under the radiators). As you can see from previous pics, the car has the additional framing outside of the Fiero spaceframe and there are a number of items mounted in that area. I want to keep water, rocks, debris, etc. from getting up into that area.
IP: Logged
Neils88
Member
Posts: 4045
From: Jeddore,Nova Scotia
Registered: Aug 2013


Feedback score: N/A
Leave feedback


Total ratings: 56
Rate this member

Report this Post03-20-2019 09:21 PM Click Here to See the Profile for Neils88Send a Private Message to Neils88Edit/Delete MessageReply w/QuoteDirect Link to This Post
I attached all of the necessary "bonding bolts" to the scuff plates using 3M panel bonding adhesive. However, in addition to bolting the scuff plates in place, I will also use a urethane adhesive between the framing and the plates to ensure they don't come off.


IP: Logged
Neils88
Member
Posts: 4045
From: Jeddore,Nova Scotia
Registered: Aug 2013


Feedback score: N/A
Leave feedback


Total ratings: 56
Rate this member

Report this Post03-27-2019 06:07 PM Click Here to See the Profile for Neils88Send a Private Message to Neils88Edit/Delete MessageReply w/QuoteDirect Link to This Post
I decided it was time to get the passenger side of the car caught up with the driver's side. Everything is fun the first time round... less fun when you have to duplicate it. The first step is to modify the section of the body where the latch/ lock connection mechanism gets mounted. As with the driver's side, it needs to be moved in to allow for the curved body panel that forms the main vent. I spent some time today cutting away the old body work and framing that interferes with the new panels. Hopefully tomorrow I can weld in a new plate to seal it all up.


IP: Logged
pmbrunelle
Member
Posts: 4376
From: Grand-Mère, Québec
Registered: Sep 2008


Feedback score: N/A
Leave feedback


Total ratings: 62
Rate this member

Report this Post03-27-2019 09:26 PM Click Here to See the Profile for pmbrunelleSend a Private Message to pmbrunelleEdit/Delete MessageReply w/QuoteDirect Link to This Post
Whenever I have multiples of something to make, I always build all instances of them in parallel, so they all get done at the same time.

I do this to make the quality of my work equal across all parts. I wouldn't want to start doing something super-attentively, and then have the last parts look sloppy because I ran out of patience.

[This message has been edited by pmbrunelle (edited 03-27-2019).]

IP: Logged
Neils88
Member
Posts: 4045
From: Jeddore,Nova Scotia
Registered: Aug 2013


Feedback score: N/A
Leave feedback


Total ratings: 56
Rate this member

Report this Post03-28-2019 05:56 PM Click Here to See the Profile for Neils88Send a Private Message to Neils88Edit/Delete MessageReply w/QuoteDirect Link to This Post
 
quote
Originally posted by pmbrunelle:

Whenever I have multiples of something to make, I always build all instances of them in parallel, so they all get done at the same time.

I do this to make the quality of my work equal across all parts. I wouldn't want to start doing something super-attentively, and then have the last parts look sloppy because I ran out of patience.


That's always my plan when building an "item"...but it doesn't always work that way when you are prototyping a full setup of something. It can sometimes take me several months to get the prototype side set up satisfactorily. When many things are being built to work together, certain parts can be built, then pulled apart and rebuilt multiple times before you're happy with it. In those cases, there isn't any point duplicating anything until you know exactly what you are duplicating.
IP: Logged
Neils88
Member
Posts: 4045
From: Jeddore,Nova Scotia
Registered: Aug 2013


Feedback score: N/A
Leave feedback


Total ratings: 56
Rate this member

Report this Post03-29-2019 10:04 PM Click Here to See the Profile for Neils88Send a Private Message to Neils88Edit/Delete MessageReply w/QuoteDirect Link to This Post
I managed to get the plate welded in place and painted today. This modification effectively eliminates the interference between the Fiero spaceframe and the OEM Aventador vent panel.
IP: Logged
Neils88
Member
Posts: 4045
From: Jeddore,Nova Scotia
Registered: Aug 2013


Feedback score: N/A
Leave feedback


Total ratings: 56
Rate this member

Report this Post04-01-2019 06:27 PM Click Here to See the Profile for Neils88Send a Private Message to Neils88Edit/Delete MessageReply w/QuoteDirect Link to This Post
I drilled the mounting holes for the latch/ lock mechanism on the passenger side. Of course once I put everything together, the latch seemed to be jammed. I had the same problem with the driver's side... now if I could just remember what I did to fix it... I'll take everything apart, ensure everything is moving smoothly and nothing is catching before it goes back together and gets installed. I also built new emergency lock/ handle mounting plates that fit behind the little access holes (I'll post some pics later to clear up what I'm referring to). They just need to be welded in place.

As with the driver's side, I also enlarged the lower half of the door frame. I had built the frames to match the fiberglass door pieces that I have. But since I'm using a lot of OEM components (such as seals and glass), I needed to enlarge the opening slightly. I'll later modify the fiberglass components accordingly.
IP: Logged
PFF
System Bot
RCR
Member
Posts: 4397
From: Shelby Twp Mi
Registered: Sep 2002


Feedback score:    (7)
Leave feedback


Total ratings: 102
Rate this member

Report this Post04-02-2019 06:47 AM Click Here to See the Profile for RCRSend a Private Message to RCREdit/Delete MessageReply w/QuoteDirect Link to This Post


Bob
IP: Logged
Neils88
Member
Posts: 4045
From: Jeddore,Nova Scotia
Registered: Aug 2013


Feedback score: N/A
Leave feedback


Total ratings: 56
Rate this member

Report this Post04-04-2019 07:54 PM Click Here to See the Profile for Neils88Send a Private Message to Neils88Edit/Delete MessageReply w/QuoteDirect Link to This Post
I found the part that was binding. Just had to file about 10 thou off one connector and now everything moves smoothly. Once I get the solenoid popper installed, the passenger side will completely match the driver's side.
IP: Logged
Neils88
Member
Posts: 4045
From: Jeddore,Nova Scotia
Registered: Aug 2013


Feedback score: N/A
Leave feedback


Total ratings: 56
Rate this member

Report this Post04-09-2019 07:52 PM Click Here to See the Profile for Neils88Send a Private Message to Neils88Edit/Delete MessageReply w/QuoteDirect Link to This Post
I installed the passenger side door release actuator and bracket today. Both sides are at the same point finally.
IP: Logged
Neils88
Member
Posts: 4045
From: Jeddore,Nova Scotia
Registered: Aug 2013


Feedback score: N/A
Leave feedback


Total ratings: 56
Rate this member

Report this Post05-03-2019 04:47 AM Click Here to See the Profile for Neils88Send a Private Message to Neils88Edit/Delete MessageReply w/QuoteDirect Link to This Post
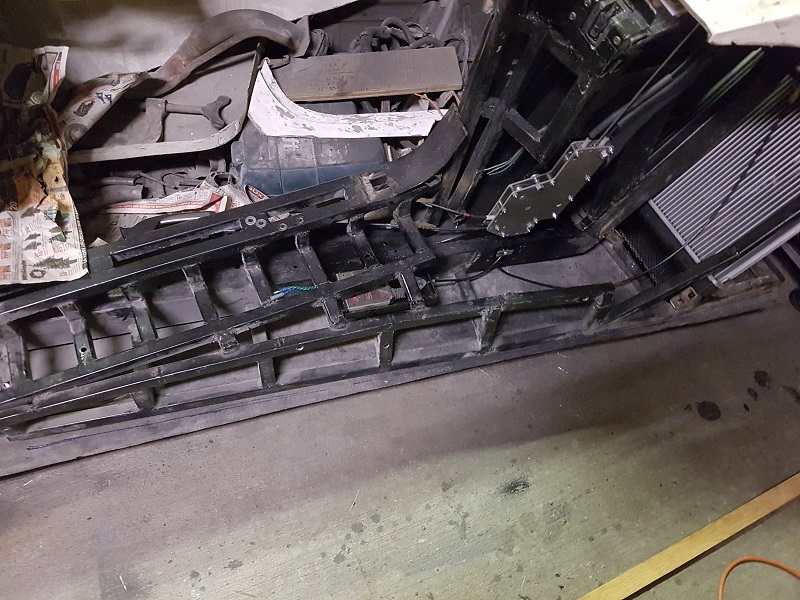
Slow week unfortunately. But I did manage to get mounting brackets installed for one of the OEM panels that I'm using. The curved panel that holds the grill for the main vent... much nicer than what I had built myself. To celebrate, I'm heading to Cancun for two weeks. I'll post some pics once I get home (of the panels.... not Cancun... )
IP: Logged
Neils88
Member
Posts: 4045
From: Jeddore,Nova Scotia
Registered: Aug 2013


Feedback score: N/A
Leave feedback


Total ratings: 56
Rate this member

Report this Post09-16-2019 08:37 PM Click Here to See the Profile for Neils88Send a Private Message to Neils88Edit/Delete MessageReply w/QuoteDirect Link to This Post
It has been 5 months since I last posted an update... I haven't made a lot of progress in that time, but I did want to let everyone know that I am still working on it when I'm feeling up to it.

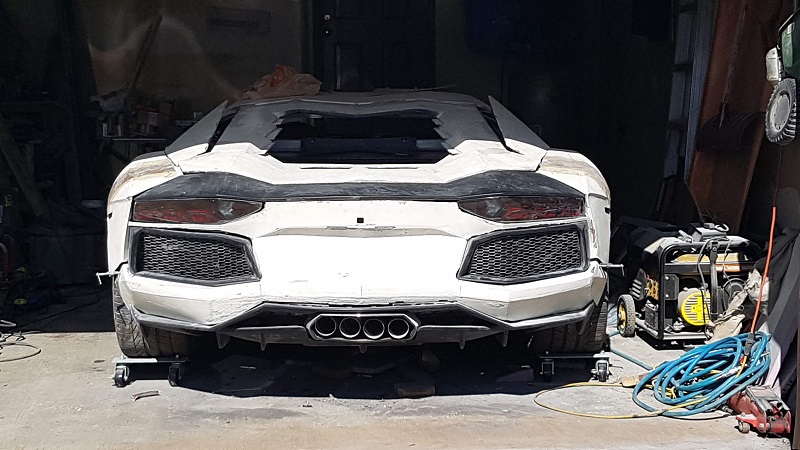
In general (sorry for the lack of details), I reworked the exhaust, adjusted the spoiler lift system, changed the spoiler and finalized it's alignment, changed the rear diffuser and finalized it's alignment, re-aligned the tail lights, installed the rear grill and housing brackets, made additional adjustments to the bumper positioning and alignment, and a few other things that I can't remember right now. Essentially, I have been focused on everything at the rear end. I haven't really started any of the actual bodywork, but I'm hoping that will go fairly fast once I have completed alignment of all components. The fenders and active vents are still sitting loose, but I'm slowly working my way towards them.


IP: Logged
shemdogg
Member
Posts: 1750
From: The Ghetto CA USA
Registered: Apr 2017


Feedback score: N/A
Leave feedback

Rate this member

Report this Post09-16-2019 09:59 PM Click Here to See the Profile for shemdoggSend a Private Message to shemdoggEdit/Delete MessageReply w/QuoteDirect Link to This Post
I was thinkin about this thread, missed reading updates. Good to see yer still at it!
Looking good

shem
IP: Logged
Neils88
Member
Posts: 4045
From: Jeddore,Nova Scotia
Registered: Aug 2013


Feedback score: N/A
Leave feedback


Total ratings: 56
Rate this member

Report this Post12-06-2019 07:10 PM Click Here to See the Profile for Neils88Send a Private Message to Neils88Edit/Delete MessageReply w/QuoteDirect Link to This Post
I'm just testing to see how easy it is to post pictures directly from my phone using the new mobile addition to PFF...

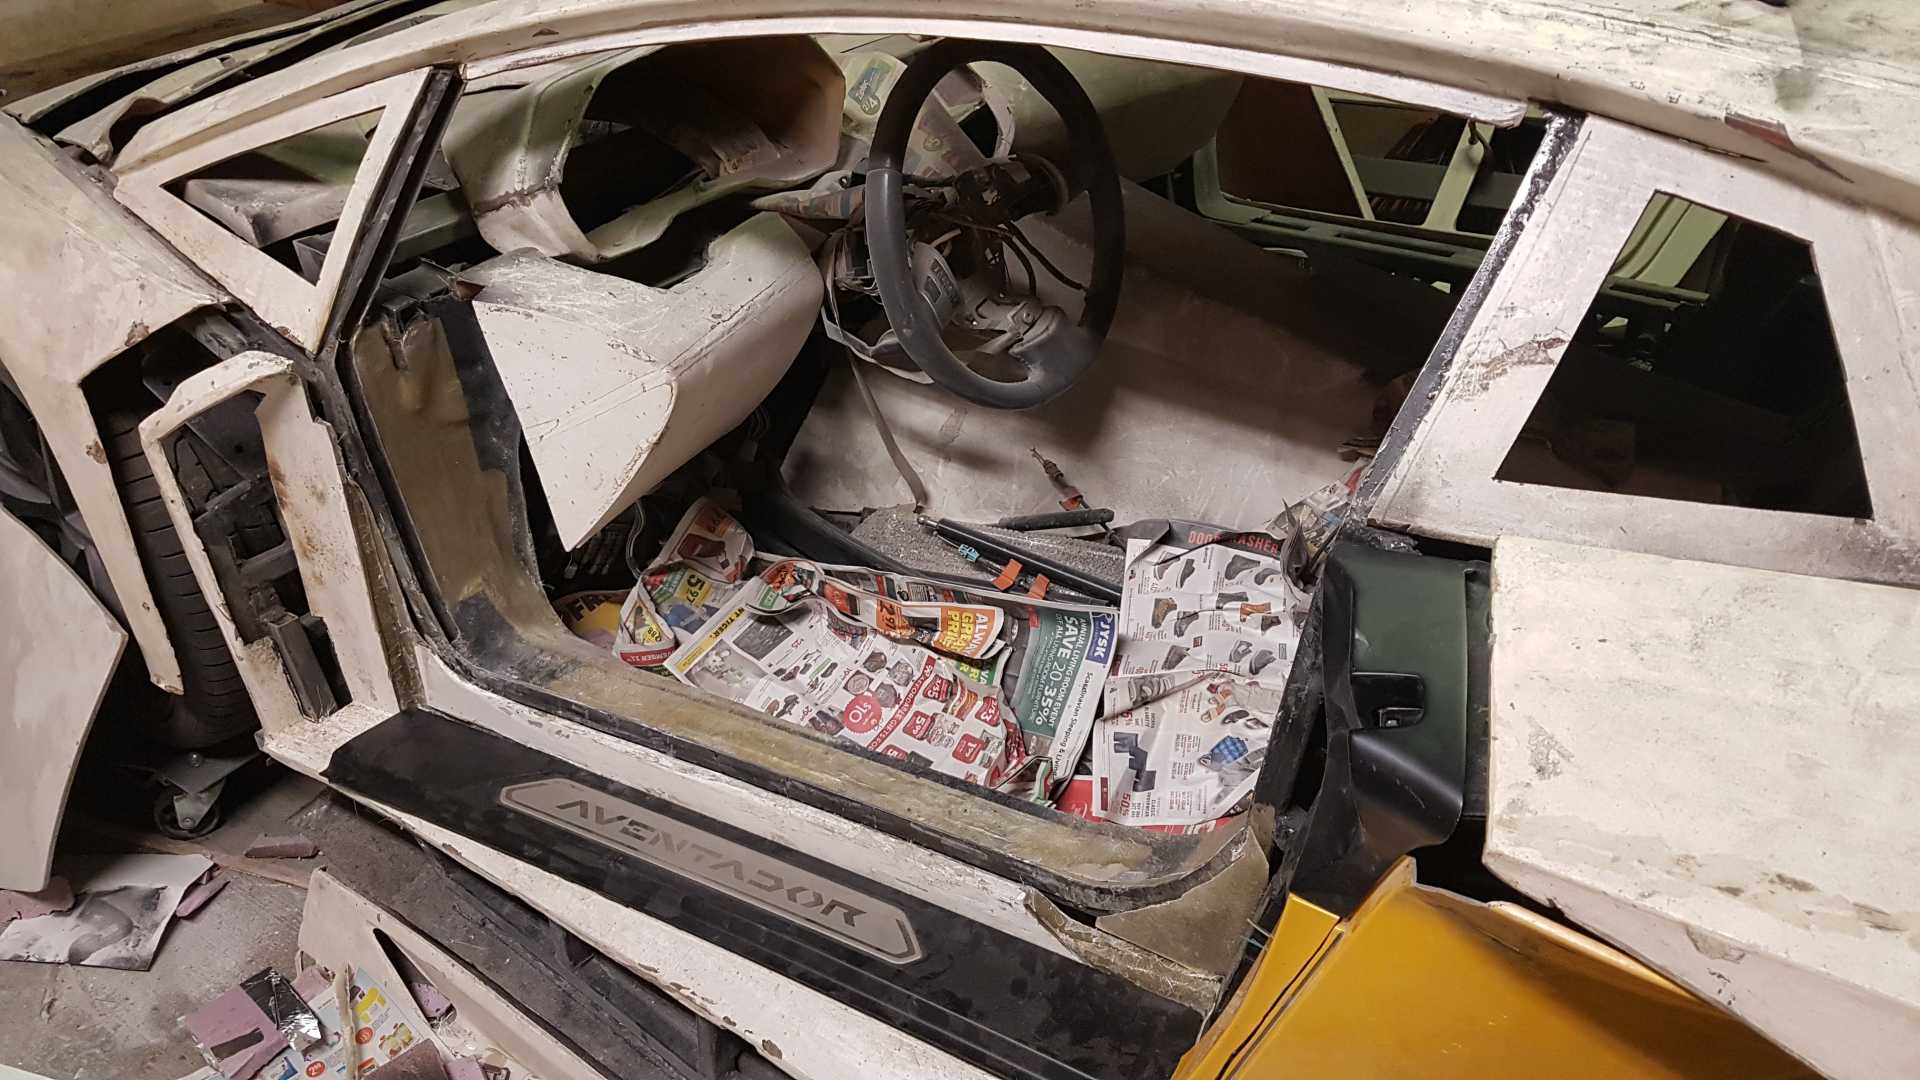
But while I'm here, I may as well give a partial update. I did a little work on the door openings. I made a lip that goes all the way around the opening so the I can install the OEM door seals. I've also fiberglassed some areas of the opening so that I can begin to give it a more finished look.

[This message has been edited by Neils88 (edited 12-06-2019).]

IP: Logged
Reallybig
Member
Posts: 974
From: Calgary Alberta Canada
Registered: Mar 2011


Feedback score: N/A
Leave feedback

Rate this member

Report this Post12-11-2019 03:42 AM Click Here to See the Profile for ReallybigSend a Private Message to ReallybigEdit/Delete MessageReply w/QuoteDirect Link to This Post
Glad to see you're still at it! Looking forward to more pics of your work!
IP: Logged
ttt123
Member
Posts: 314
From: lapeer,mi,usa
Registered: Jan 2008


Feedback score: N/A
Leave feedback

Rate this member

Report this Post12-12-2019 11:20 AM Click Here to See the Profile for ttt123Send a Private Message to ttt123Edit/Delete MessageReply w/QuoteDirect Link to This Post
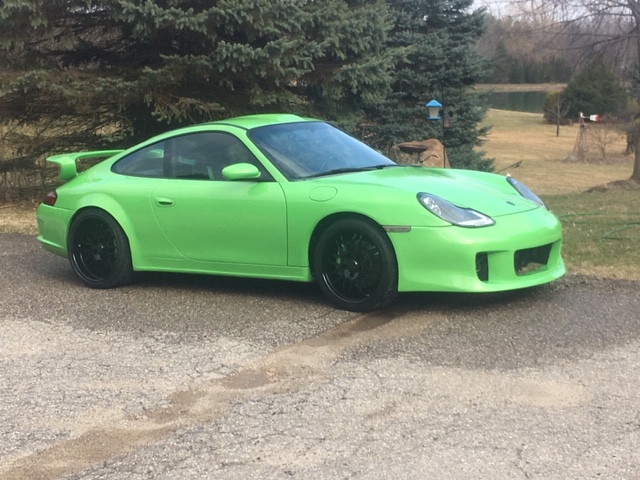
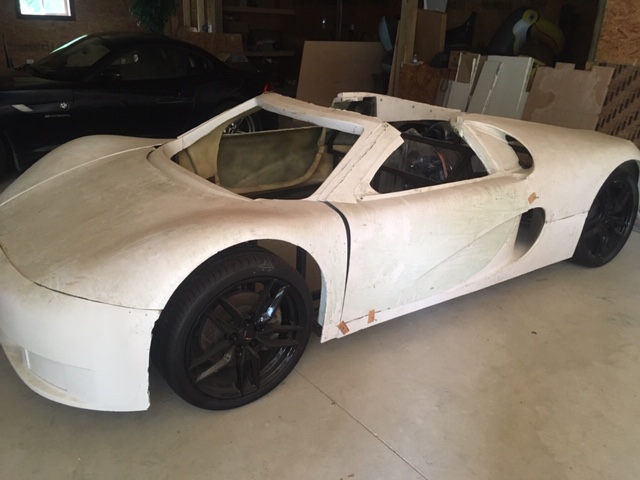
very cool build!! I did a partial rebody for my Carrera 911(lots of fiberglass) last winter and I'm working on a car from scratch currently and looking through this.. its a labor of love lol.

keep up the good work. other people getting this elbow deep in there cars keeps me going and is so inspiring.
Brian


IP: Logged
Previous Page | Next Page

This topic is 19 pages long:  1   2   3   4   5   6   7   8   9   10   11   12   13   14   15   16   17   18   19 
next newest topic | next oldest topic

All times are ET (US)

Post New Topic  Post A Reply
Hop to:

Contact Us | Back To Main Page

Advertizing on PFF | Fiero Parts Vendors
PFF Merchandise | Fiero Gallery | Ogre's Cave
Real-Time Chat | Fiero Related Auctions on eBay


Copyright (c) 1999, C. Pennock