Pennock's Fiero Forum
  Technical Discussion & Questions
  Neil's Aventador build (Page 16)

Post New Topic  Post A Reply
Email This Page to Someone! | Printable Version

This topic is 19 pages long:  1   2   3   4   5   6   7   8   9   10   11   12   13   14   15   16   17   18   19 
Previous Page | Next Page
next newest topic | next oldest topic
Neil's Aventador build by Neils88
Started on: 03-02-2015 11:34 PM
Replies: 731 (67185 views)
Last post by: RCR on 11-17-2023 07:57 AM
RCR
Member
Posts: 4397
From: Shelby Twp Mi
Registered: Sep 2002


Feedback score:    (7)
Leave feedback


Total ratings: 102
Rate this member

Report this Post10-15-2017 08:55 AM Click Here to See the Profile for RCRSend a Private Message to RCREdit/Delete MessageReply w/QuoteDirect Link to This Post
 
quote
Originally posted by Neils88:

I was attempting to get some more prep work done on the spoiler...until my trusty orbital sander decided to be dramatic and started to spit out internal parts. I'll try again tomorrow...hopefully the new sander will be more cooperative.


Bob
IP: Logged
RCR
Member
Posts: 4397
From: Shelby Twp Mi
Registered: Sep 2002


Feedback score:    (7)
Leave feedback


Total ratings: 102
Rate this member

Report this Post10-15-2017 09:42 AM Click Here to See the Profile for RCRSend a Private Message to RCREdit/Delete MessageReply w/QuoteDirect Link to This Post

RCR

4397 posts
Member since Sep 2002
Ooops, Double post. Hey, I own a page

Bob

[This message has been edited by RCR (edited 10-15-2017).]

IP: Logged
Neils88
Member
Posts: 4045
From: Jeddore,Nova Scotia
Registered: Aug 2013


Feedback score: N/A
Leave feedback


Total ratings: 56
Rate this member

Report this Post10-15-2017 04:31 PM Click Here to See the Profile for Neils88Send a Private Message to Neils88Edit/Delete MessageReply w/QuoteDirect Link to This Post
 
quote
Originally posted by RCR:

Ooops, Double post. Hey, I own a page

Bob


That's ok Bob...sanders spitting parts across the garage deserve double posts...
IP: Logged
Neils88
Member
Posts: 4045
From: Jeddore,Nova Scotia
Registered: Aug 2013


Feedback score: N/A
Leave feedback


Total ratings: 56
Rate this member

Report this Post11-07-2017 09:25 PM Click Here to See the Profile for Neils88Send a Private Message to Neils88Edit/Delete MessageReply w/QuoteDirect Link to This Post
My posts are getting fewer and farther apart. Hopefully I will get back to posting more often.

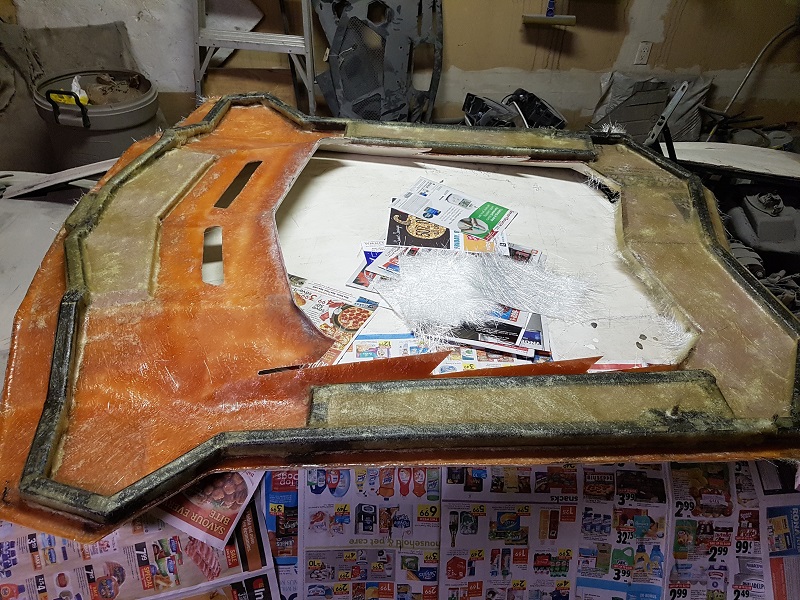
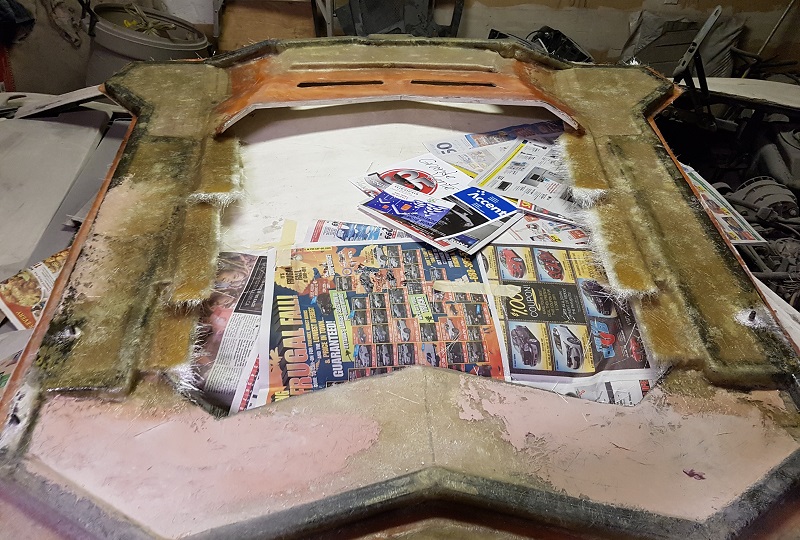
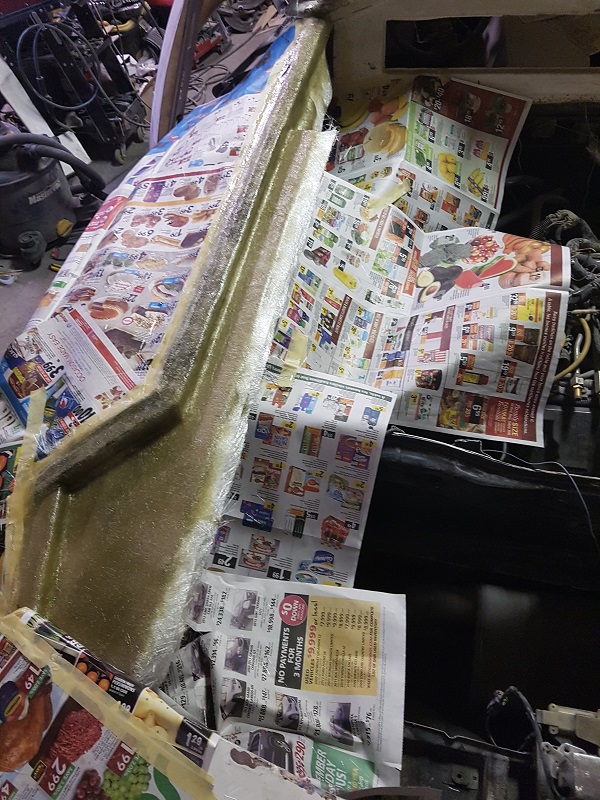
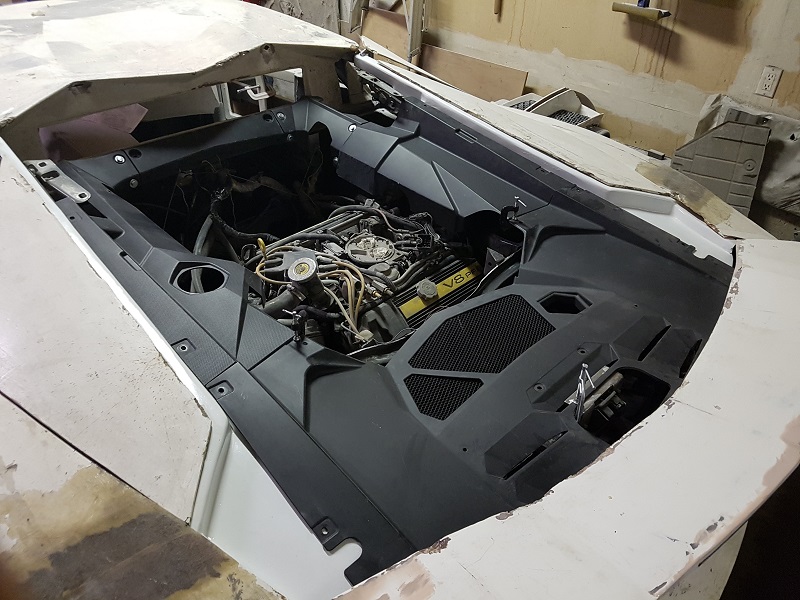
I started work on the inside of the engine hatch. I've fiberglassed the frame to the hatch and will finish it off with a little body fill to smooth it out.


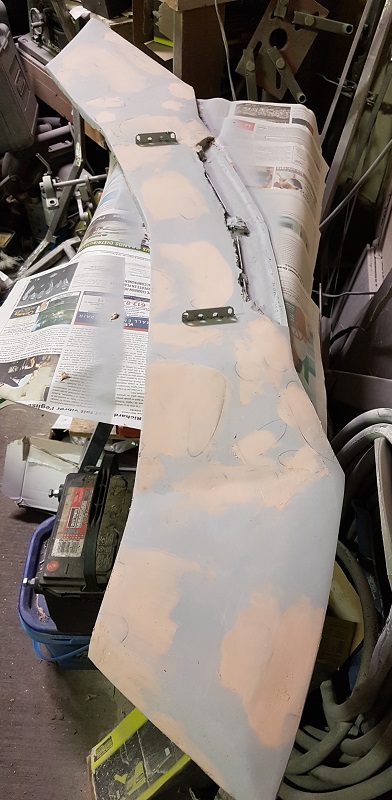
I also primed the underneath of the spoiler....and subsequently found several dozen flaws that needed some attention. Should just need a final sanding now.


IP: Logged
Neils88
Member
Posts: 4045
From: Jeddore,Nova Scotia
Registered: Aug 2013


Feedback score: N/A
Leave feedback


Total ratings: 56
Rate this member

Report this Post11-13-2017 06:24 PM Click Here to See the Profile for Neils88Send a Private Message to Neils88Edit/Delete MessageReply w/QuoteDirect Link to This Post
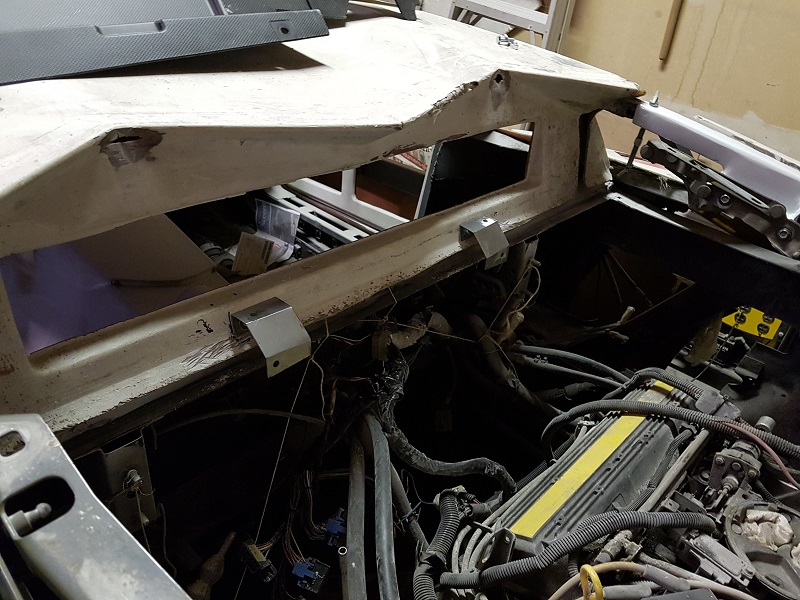
I added ledges to the engine hatch today (used to hold the glass panels). They were cut from flat strips of fiberglass (4 layers) that were larger than the required finished ledges. The first step was just to align them and get them bonded in place with some body filler. I'll strengthen them with multiple layers of fiberglass to properly bond them in place and complete the underneath shape of the hatch. Once they are properly secured I'll be able to flip the hatch over and then cut them to the finished dimensions.


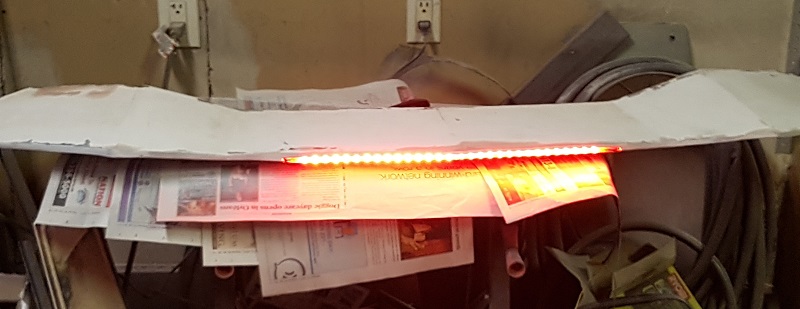
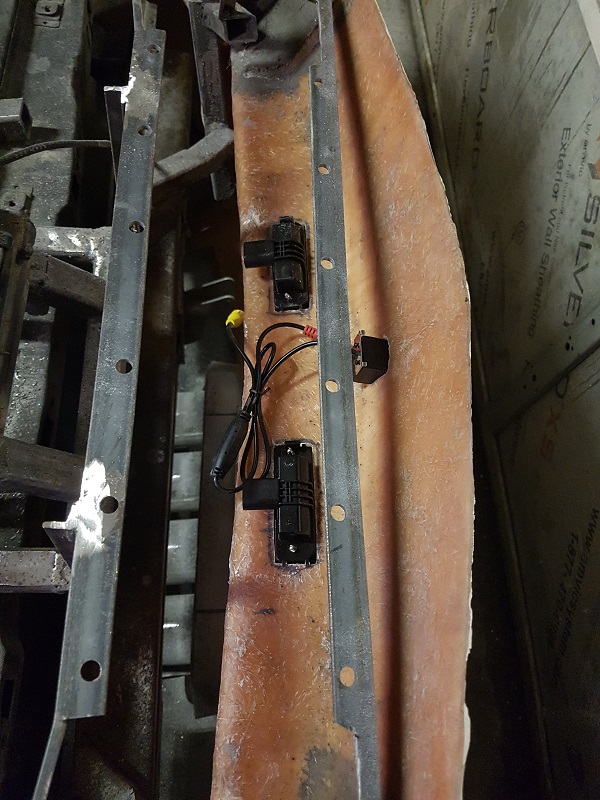
First test of the (oem) third brake light that is embedded in the spoiler...


IP: Logged
Neils88
Member
Posts: 4045
From: Jeddore,Nova Scotia
Registered: Aug 2013


Feedback score: N/A
Leave feedback


Total ratings: 56
Rate this member

Report this Post11-18-2017 11:05 PM Click Here to See the Profile for Neils88Send a Private Message to Neils88Edit/Delete MessageReply w/QuoteDirect Link to This Post
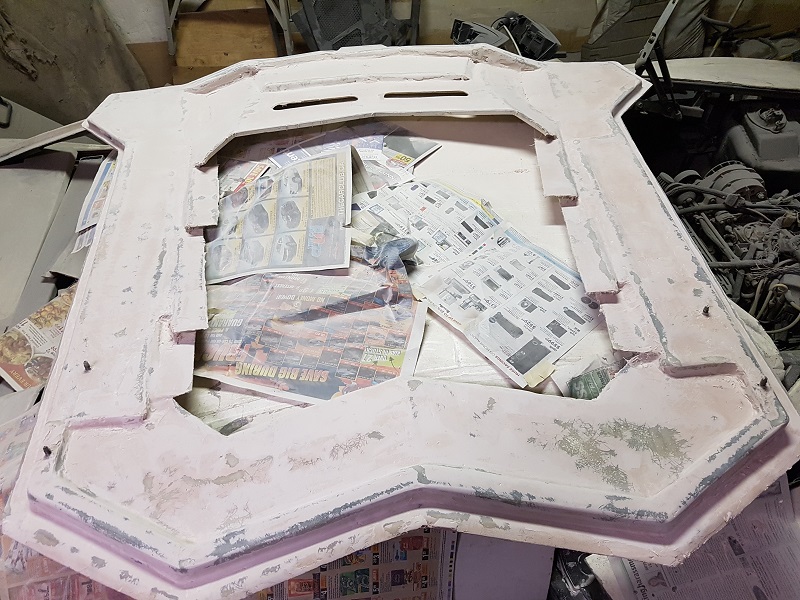
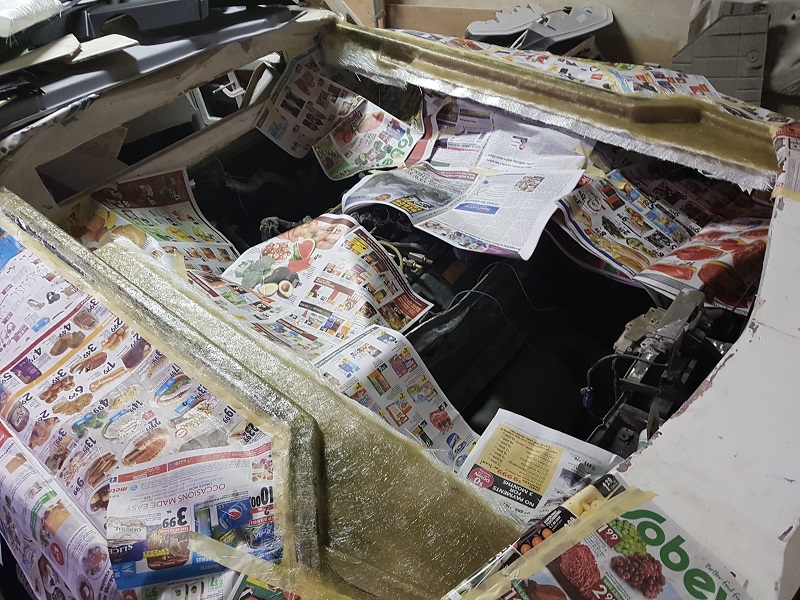
I've now finished fiberglassing the back side of the engine hatch. I still have to add a finishing layer of body fill to smooth out the surface, and then I'll cut the ledges to their final shape.


IP: Logged
Neils88
Member
Posts: 4045
From: Jeddore,Nova Scotia
Registered: Aug 2013


Feedback score: N/A
Leave feedback


Total ratings: 56
Rate this member

Report this Post11-21-2017 11:22 PM Click Here to See the Profile for Neils88Send a Private Message to Neils88Edit/Delete MessageReply w/QuoteDirect Link to This Post
Quick video of the active spoiler working (finally). Not the best quality video...but you'll get the idea.


I'm just hooking the motor directly to the battery...no controller at the moment, which means that it is actually rising up a little higher than it should. Once the controller is in place I'll program it to stop at the correct angle. I'll also try to get a better video later...preferably from behind the car.
IP: Logged
RCR
Member
Posts: 4397
From: Shelby Twp Mi
Registered: Sep 2002


Feedback score:    (7)
Leave feedback


Total ratings: 102
Rate this member

Report this Post11-22-2017 06:52 AM Click Here to See the Profile for RCRSend a Private Message to RCREdit/Delete MessageReply w/QuoteDirect Link to This Post
It all looks great, Neil.

I'm eager to get back at it. It's been too long. I went out last Sunday and it was snowing... I turned around and went back in.

Living through your trials and tribulations.

Take care ...

Bob

[This message has been edited by RCR (edited 11-22-2017).]

IP: Logged
shemdogg
Member
Posts: 1749
From: The Ghetto CA USA
Registered: Apr 2017


Feedback score: N/A
Leave feedback

Rate this member

Report this Post11-22-2017 03:51 PM Click Here to See the Profile for shemdoggSend a Private Message to shemdoggEdit/Delete MessageReply w/QuoteDirect Link to This Post
that looks awesome man, I love how it rotates in an arc. Good stuff!

shem
IP: Logged
Neils88
Member
Posts: 4045
From: Jeddore,Nova Scotia
Registered: Aug 2013


Feedback score: N/A
Leave feedback


Total ratings: 56
Rate this member

Report this Post11-22-2017 07:40 PM Click Here to See the Profile for Neils88Send a Private Message to Neils88Edit/Delete MessageReply w/QuoteDirect Link to This Post
Thanks Bob/shem!

It's funny how little work gets done when the weather is perfect for working on the car.... now that it has taken a turn for the worse I should be in the garage all the time
IP: Logged
Neils88
Member
Posts: 4045
From: Jeddore,Nova Scotia
Registered: Aug 2013


Feedback score: N/A
Leave feedback


Total ratings: 56
Rate this member

Report this Post12-03-2017 07:50 PM Click Here to See the Profile for Neils88Send a Private Message to Neils88Edit/Delete MessageReply w/QuoteDirect Link to This Post
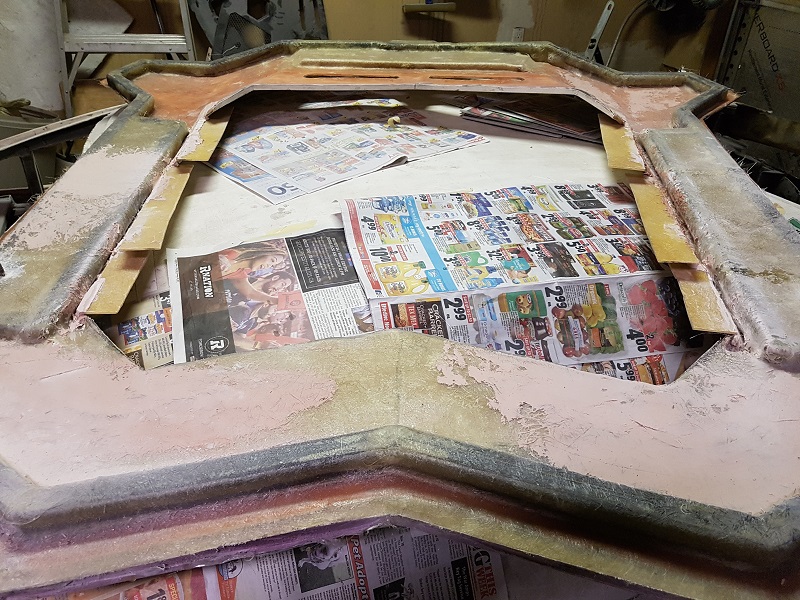
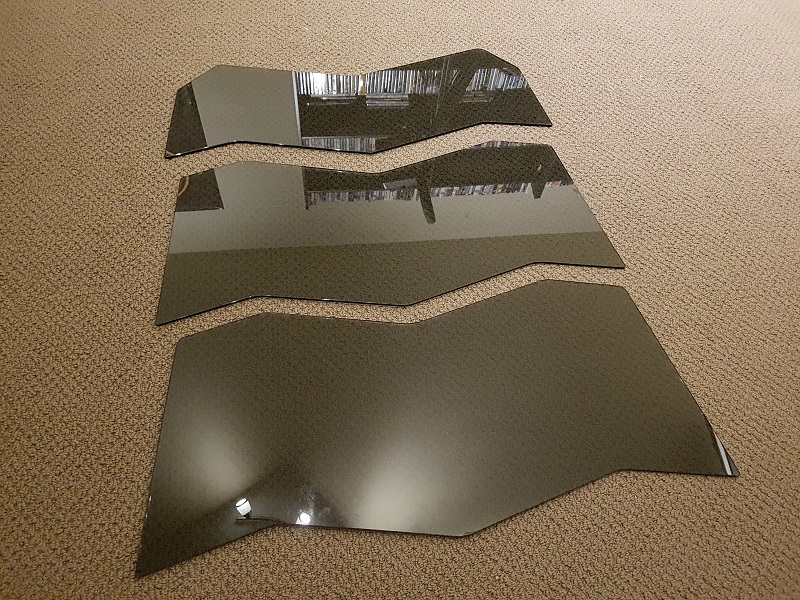
Getting a little closer with the rear hatch. I've finished with installing the core, the inner fiberglass layers and an initial Bondo layer. I've also ordered custom cut glass panels for the hatch. They have a complex profile so it took a while for me to find a shop that could cut and temper them from the MDF templates I made up.


IP: Logged
PFF
System Bot
motoracer838
Member
Posts: 3751
From: Edgewater Co. USofA
Registered: Jan 2006


Feedback score: (2)
Leave feedback


Total ratings: 83
Rate this member

Report this Post12-04-2017 05:30 PM Click Here to See the Profile for motoracer838Send a Private Message to motoracer838Edit/Delete MessageReply w/QuoteDirect Link to This Post
Lookin' good.

Joe
IP: Logged
Neils88
Member
Posts: 4045
From: Jeddore,Nova Scotia
Registered: Aug 2013


Feedback score: N/A
Leave feedback


Total ratings: 56
Rate this member

Report this Post12-04-2017 06:15 PM Click Here to See the Profile for Neils88Send a Private Message to Neils88Edit/Delete MessageReply w/QuoteDirect Link to This Post
 
quote
Originally posted by motoracer838:

Lookin' good.

Joe


Thanks Joe!
IP: Logged
wftb
Member
Posts: 3692
From: kincardine,ontario,canada
Registered: Jun 2005


Feedback score: (4)
Leave feedback

Rate this member

Report this Post12-05-2017 09:52 AM Click Here to See the Profile for wftbSend a Private Message to wftbEdit/Delete MessageReply w/QuoteDirect Link to This Post
Great work I have been following a long time. But that spoiler is amazing!
IP: Logged
Neils88
Member
Posts: 4045
From: Jeddore,Nova Scotia
Registered: Aug 2013


Feedback score: N/A
Leave feedback


Total ratings: 56
Rate this member

Report this Post12-06-2017 08:58 PM Click Here to See the Profile for Neils88Send a Private Message to Neils88Edit/Delete MessageReply w/QuoteDirect Link to This Post
 
quote
Originally posted by wftb:

Great work I have been following a long time. But that spoiler is amazing!


Thanks!! I'm really happy with how the spoiler came out in the end. I must remember to take a better video of it though.
IP: Logged
Neils88
Member
Posts: 4045
From: Jeddore,Nova Scotia
Registered: Aug 2013


Feedback score: N/A
Leave feedback


Total ratings: 56
Rate this member

Report this Post12-09-2017 05:05 PM Click Here to See the Profile for Neils88Send a Private Message to Neils88Edit/Delete MessageReply w/QuoteDirect Link to This Post
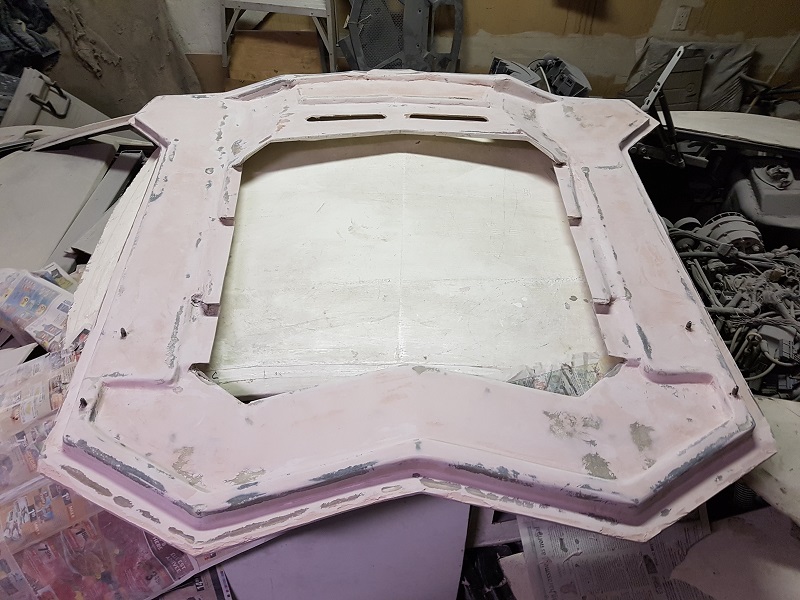
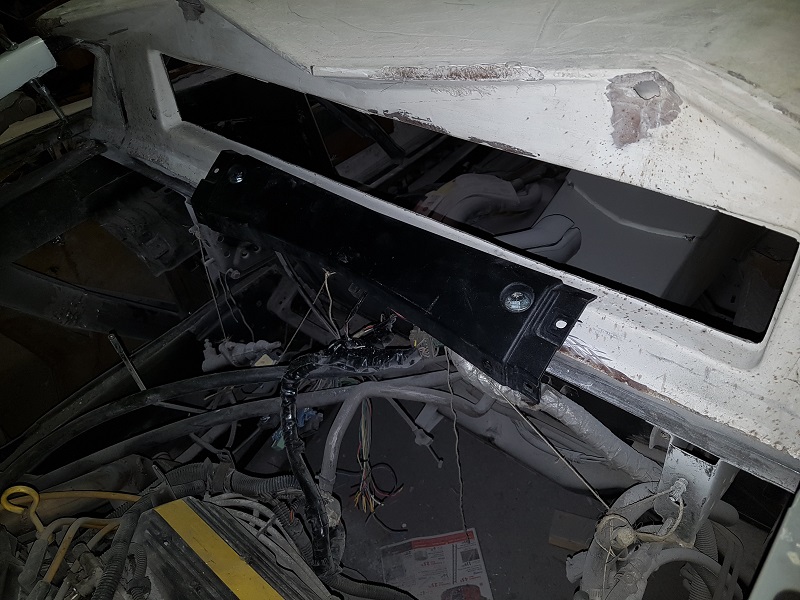
The hatch is almost ready now. Of course there are still lots of minor imperfections that will need to be filled. The ledges are cut straight and to the correct thickness.


IP: Logged
Neils88
Member
Posts: 4045
From: Jeddore,Nova Scotia
Registered: Aug 2013


Feedback score: N/A
Leave feedback


Total ratings: 56
Rate this member

Report this Post12-16-2017 08:11 PM Click Here to See the Profile for Neils88Send a Private Message to Neils88Edit/Delete MessageReply w/QuoteDirect Link to This Post
I sanded down the hatch's inside surface and gave it a quick coat of primer. I still have a number of imperfections that will need some attention.


IP: Logged
Neils88
Member
Posts: 4045
From: Jeddore,Nova Scotia
Registered: Aug 2013


Feedback score: N/A
Leave feedback


Total ratings: 56
Rate this member

Report this Post12-26-2017 08:45 PM Click Here to See the Profile for Neils88Send a Private Message to Neils88Edit/Delete MessageReply w/QuoteDirect Link to This Post
Happy holidays to everyone!!

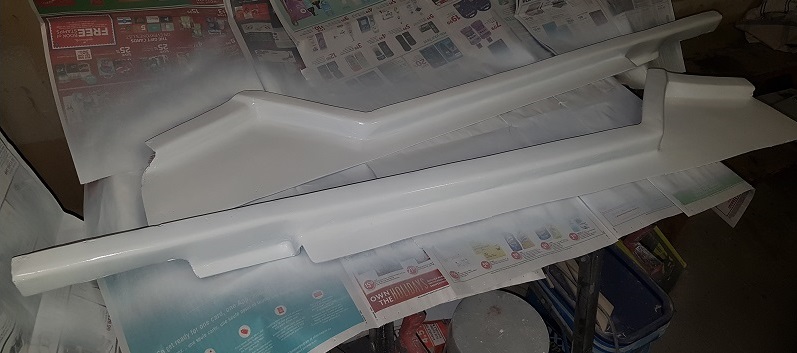
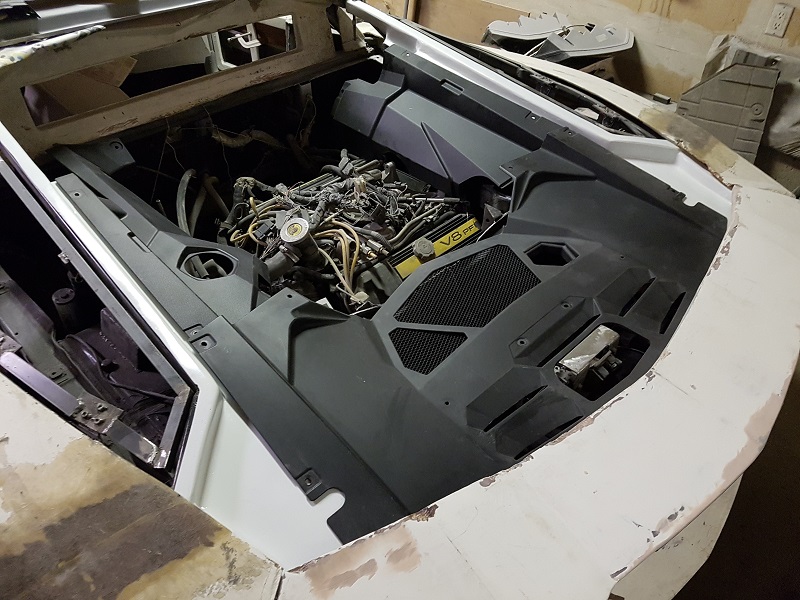
I started to do some interesting fiberglassing work around the engine bay. These two pieces are used to cover the framing and also become a mounting point for the engine bay trim pieces. These two pieces still need to be finished (trimmed and smoothed out with a little bondo). I had to remove the alternator and belt tensioner since they interfered with everything. I'll need to find a new spot to mount the items I removed. Of course I'll have to pull the engine to do that...damn. Think I'll procrastinate on that for a while, lol. When I do finally get around to pulling the engine again, I'll also mount the AC compressor.


IP: Logged
Neils88
Member
Posts: 4045
From: Jeddore,Nova Scotia
Registered: Aug 2013


Feedback score: N/A
Leave feedback


Total ratings: 56
Rate this member

Report this Post01-03-2018 11:18 PM Click Here to See the Profile for Neils88Send a Private Message to Neils88Edit/Delete MessageReply w/QuoteDirect Link to This Post
I finished the engine bay edge trim pieces with Bondo, primer and paint. They came out really well.


The final step will be to urethane them in place and drill screw holes to mount the black oem trim pieces. I'll also need to make some mounting brackets that fit just below the rear window,


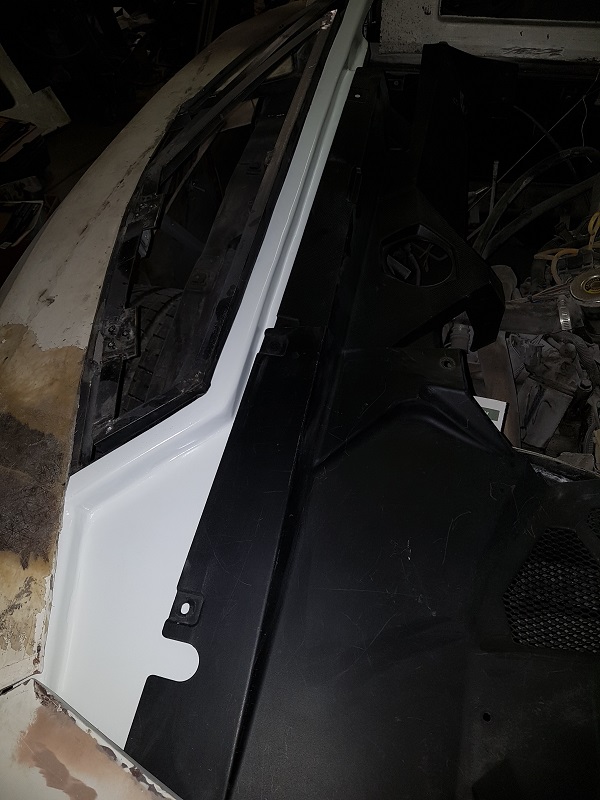
All the trim pieces are sitting loose in these pics, but it shows roughly how everything goes together.

[This message has been edited by Neils88 (edited 01-03-2018).]

IP: Logged
shemdogg
Member
Posts: 1749
From: The Ghetto CA USA
Registered: Apr 2017


Feedback score: N/A
Leave feedback

Rate this member

Report this Post01-05-2018 12:43 PM Click Here to See the Profile for shemdoggSend a Private Message to shemdoggEdit/Delete MessageReply w/QuoteDirect Link to This Post
bro that looks awesome!

shem
IP: Logged
RCR
Member
Posts: 4397
From: Shelby Twp Mi
Registered: Sep 2002


Feedback score:    (7)
Leave feedback


Total ratings: 102
Rate this member

Report this Post01-06-2018 01:28 PM Click Here to See the Profile for RCRSend a Private Message to RCREdit/Delete MessageReply w/QuoteDirect Link to This Post


Bob
IP: Logged
PFF
System Bot
Neils88
Member
Posts: 4045
From: Jeddore,Nova Scotia
Registered: Aug 2013


Feedback score: N/A
Leave feedback


Total ratings: 56
Rate this member

Report this Post01-08-2018 10:10 PM Click Here to See the Profile for Neils88Send a Private Message to Neils88Edit/Delete MessageReply w/QuoteDirect Link to This Post
Thanks Shem, Bob!

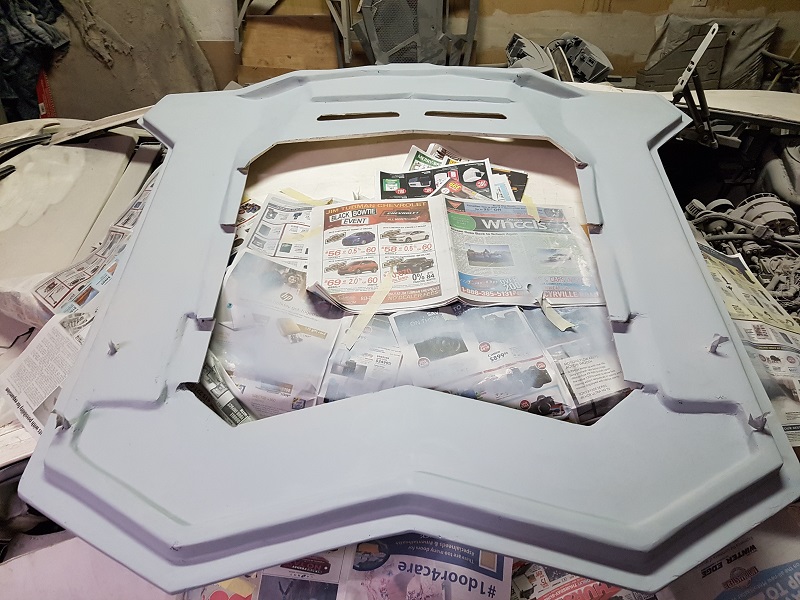
I picked up the new custom glass panels for the rear hatch (thanks to Peter and the guys at Centennial Glass in Ottawa!!) These are close replicas to the oem pieces, just cut specifically for my rear hatch dimensions. They are 1/4" tempered glass panels, with a 50% grey tint. Can't wait to install them...though it'll be a little longer for me to finish the rear hatch. I will also need to get some "frit paint" to paint the edges where the glass mounts to the hatch.


IP: Logged
Neils88
Member
Posts: 4045
From: Jeddore,Nova Scotia
Registered: Aug 2013


Feedback score: N/A
Leave feedback


Total ratings: 56
Rate this member

Report this Post01-13-2018 05:17 PM Click Here to See the Profile for Neils88Send a Private Message to Neils88Edit/Delete MessageReply w/QuoteDirect Link to This Post
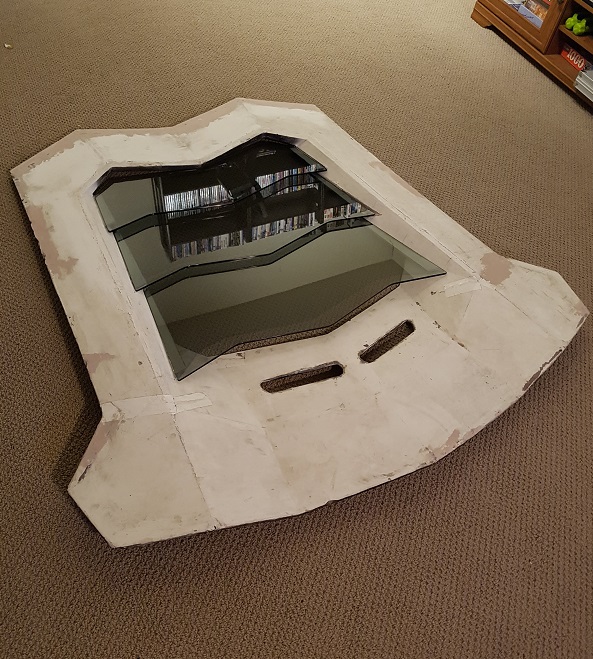
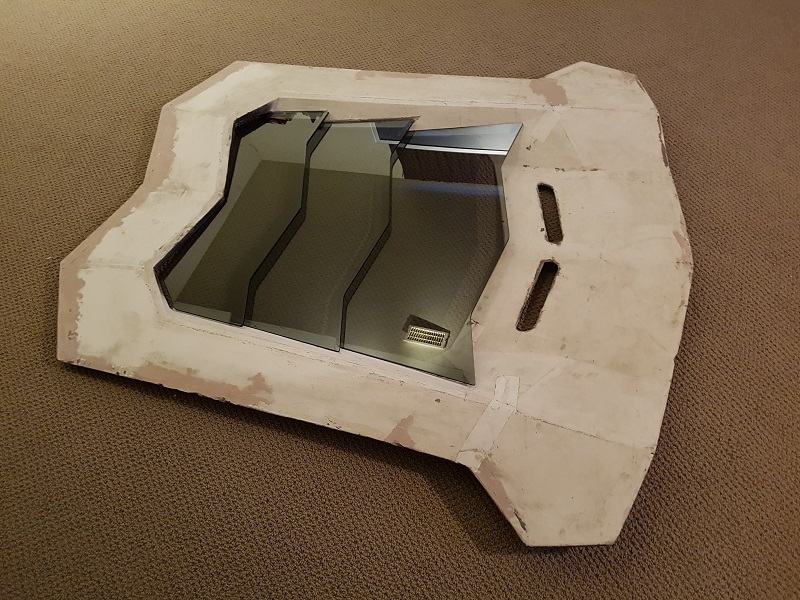
Here's a couple pics of the glass sitting on the hatch. The pieces fit really well for a first try. I'll still need to sand away a couple of interference points and then the glass can be properly aligned so the overhangs are correct. I'll do all the hatch bodywork before securing the glass.


IP: Logged
Neils88
Member
Posts: 4045
From: Jeddore,Nova Scotia
Registered: Aug 2013


Feedback score: N/A
Leave feedback


Total ratings: 56
Rate this member

Report this Post01-20-2018 09:52 PM Click Here to See the Profile for Neils88Send a Private Message to Neils88Edit/Delete MessageReply w/QuoteDirect Link to This Post
The full engine bay trim is now lined up and ready to be bolted in place. Unfortunately the plastic clips I was planning on using don't seem to work. The oem cam-lock screws and hardware are great, but they are quite expensive so I'll have to find another option. You'd think it would be easy to find simple black screws/bolts that fit....


IP: Logged
pcgold
Member
Posts: 311
From: Canada
Registered: Apr 2014


Feedback score: N/A
Leave feedback

Rate this member

Report this Post01-21-2018 11:34 AM Click Here to See the Profile for pcgoldSend a Private Message to pcgoldEdit/Delete MessageReply w/QuoteDirect Link to This Post
Beautiful work Neil

Will any of these help?

https://www.ebay.com/itm/30...p2060353.m1438.l2649
IP: Logged
RUNDLC
Member
Posts: 802
From: Elk Grove, California
Registered: Jul 2005


Feedback score: (2)
Leave feedback

Rate this member

Report this Post01-21-2018 04:46 PM Click Here to See the Profile for RUNDLCSend a Private Message to RUNDLCEdit/Delete MessageReply w/QuoteDirect Link to This Post
Just read this thread front to back, wow my friend you've got some serious skilzz
IP: Logged
Neils88
Member
Posts: 4045
From: Jeddore,Nova Scotia
Registered: Aug 2013


Feedback score: N/A
Leave feedback


Total ratings: 56
Rate this member

Report this Post01-21-2018 07:03 PM Click Here to See the Profile for Neils88Send a Private Message to Neils88Edit/Delete MessageReply w/QuoteDirect Link to This Post
 
quote
Originally posted by pcgold:

Beautiful work Neil

Will any of these help?

https://www.ebay.com/itm/30...p2060353.m1438.l2649


Thanks pcgold! I originally tried to use plastic clips similar to ones in the kit you referenced. Unfortunately, they didn't work well on all points and I'll need something that does a better job of clamping. I'll either use black button head bolts or be forced to break down and buy the oem cam-locks.

 
quote
Originally posted by RUNDLC:

Just read this thread front to back, wow my friend you've got some serious skilzz


Thanks RUNDLC!
IP: Logged
Neils88
Member
Posts: 4045
From: Jeddore,Nova Scotia
Registered: Aug 2013


Feedback score: N/A
Leave feedback


Total ratings: 56
Rate this member

Report this Post01-27-2018 10:28 PM Click Here to See the Profile for Neils88Send a Private Message to Neils88Edit/Delete MessageReply w/QuoteDirect Link to This Post
The engine trim looked good sitting in place, but it still required a couple of brackets to be attached below the rear window to mount the center trim piece. It's amazing how simple brackets can end up taking half a day to build and put in place...


IP: Logged
Neils88
Member
Posts: 4045
From: Jeddore,Nova Scotia
Registered: Aug 2013


Feedback score: N/A
Leave feedback


Total ratings: 56
Rate this member

Report this Post02-03-2018 08:48 PM Click Here to See the Profile for Neils88Send a Private Message to Neils88Edit/Delete MessageReply w/QuoteDirect Link to This Post
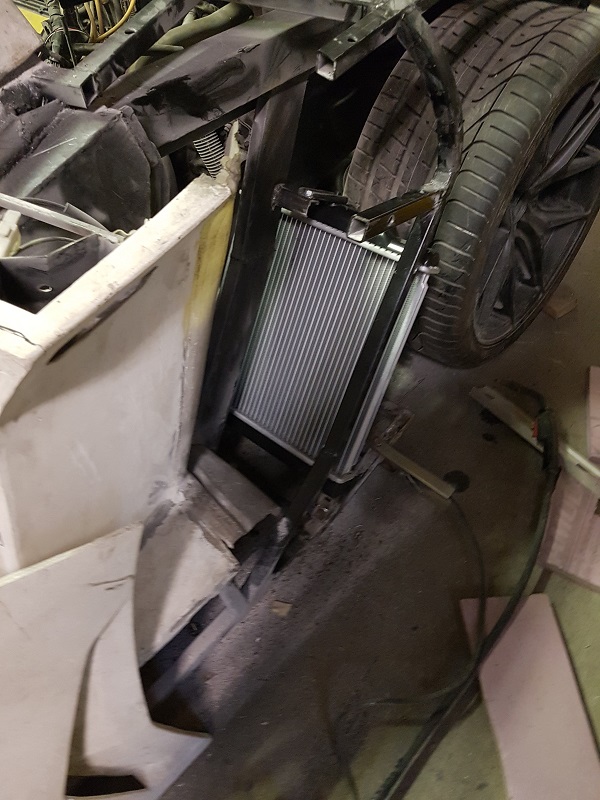
I have decided to use a different radiator than I had originally planned (shown earlier in the build thread). The spacing was just too tight above and below the radiator, and I would have had to make a large notch in the frame rail on the passenger side. So, instead of those ones, I picked up a couple of smaller Honda civic radiators to use as "disposable" templates (the stock ones are really cheap). Once everything is finished I will swap them out for some high performance radiators (with shrouds and fans). In the meantime, I need the radiators in place to finish everything in the area and guaranteed they'll end up beaten and bashed.

I finished the mounting brackets and installed both radiators (driver's side shown in picture below). I still need to add a little rubber on the mounting points.


IP: Logged
Neils88
Member
Posts: 4045
From: Jeddore,Nova Scotia
Registered: Aug 2013


Feedback score: N/A
Leave feedback


Total ratings: 56
Rate this member

Report this Post02-10-2018 09:38 PM Click Here to See the Profile for Neils88Send a Private Message to Neils88Edit/Delete MessageReply w/QuoteDirect Link to This Post
Quick update...no pics...

I built a center support bracket that sits just forward of the rear hatch latch. This bracket holds the middle of the large engine bay trim piece in place and eliminates the sagging. I've also put together some additional brackets that serve to adjust the taillight alignment and lock the taillights in place. However, while putting those together, I found the right rear taillight needed to be shifted out about 1/2". This was a tougher alignment adjustment since the taillight sits in a fiberglass pocket that is bonded to the bumper. Unfortunately, the only way to adjust it was to cut the pocket off and re-fiberglass it back to the bumper.
IP: Logged
Neils88
Member
Posts: 4045
From: Jeddore,Nova Scotia
Registered: Aug 2013


Feedback score: N/A
Leave feedback


Total ratings: 56
Rate this member

Report this Post02-17-2018 05:11 PM Click Here to See the Profile for Neils88Send a Private Message to Neils88Edit/Delete MessageReply w/QuoteDirect Link to This Post
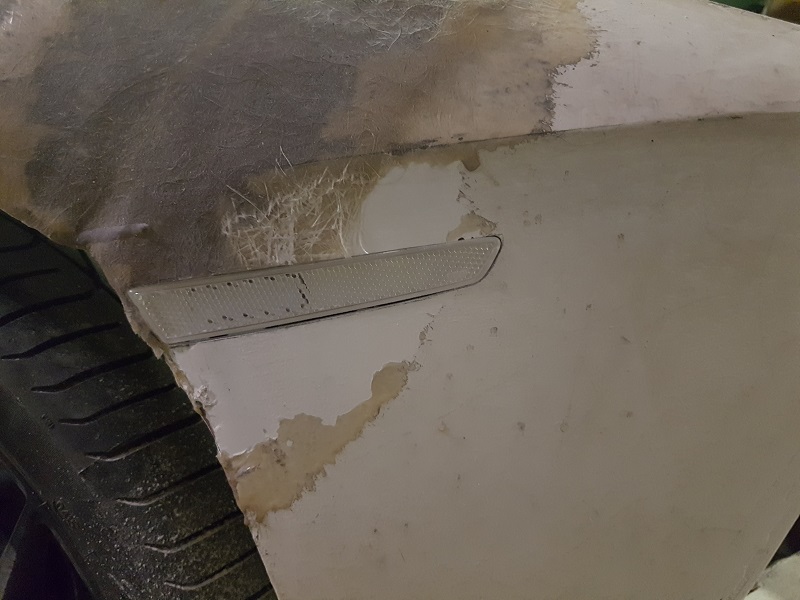
A few things done today. I cut the holes for the license plate lights, the rear view camera and the side reflectors. I wanted to get the license plate lights and rear view camera done now, since they are in a difficult spot to deal with once the spoiler is bolted down. I'm using oem Aventador license plate lights...but the camera is from a Mercedes I think...unfortunately it's the closest one I could find, but it's still a little smaller than the oem one. I may look for other options to see if I get one that is closer to the correct size (maybe I'm just being picky... ). I'll still need to build a bracket to hold the camera in place. I started by building jigs so I could route out all the holes properly. I quickly gave up on the jigs since they were very difficult to clamp in place. I ended up routing the holes with my Dremel almost to size and then filing to the exact size.


The reflectors fit nicely...but lots of bodywork required on the quarter panels...


IP: Logged
PFF
System Bot
Neils88
Member
Posts: 4045
From: Jeddore,Nova Scotia
Registered: Aug 2013


Feedback score: N/A
Leave feedback


Total ratings: 56
Rate this member

Report this Post02-18-2018 05:29 PM Click Here to See the Profile for Neils88Send a Private Message to Neils88Edit/Delete MessageReply w/QuoteDirect Link to This Post
I was on a roll yesterday with cutting things so I decided to keep it going and cut the openings for the front marker lights. Next step is to get the rear bumper, lights, grills, spoiler, etc properly lined up and permanently secured. Looks like this is not going to be a fun job...
IP: Logged
RCR
Member
Posts: 4397
From: Shelby Twp Mi
Registered: Sep 2002


Feedback score:    (7)
Leave feedback


Total ratings: 102
Rate this member

Report this Post03-25-2018 07:16 PM Click Here to See the Profile for RCRSend a Private Message to RCREdit/Delete MessageReply w/QuoteDirect Link to This Post
Jonesing for a fix, Neil. What's happening?

Bob
IP: Logged
Neils88
Member
Posts: 4045
From: Jeddore,Nova Scotia
Registered: Aug 2013


Feedback score: N/A
Leave feedback


Total ratings: 56
Rate this member

Report this Post03-25-2018 10:32 PM Click Here to See the Profile for Neils88Send a Private Message to Neils88Edit/Delete MessageReply w/QuoteDirect Link to This Post
Unfortunately I haven't made any dramatic progress in the last month...and didn't bother to take any pics on my less than impressive progress.

Having said that, I did get the spoiler mount adjusted properly (which involved removal and fitting all new supports) and then painted the entire rear end framing. I also did the final alignment of the rear bumper...which did make me happy. The rear bumper has now been permanently secured. I chose to remove the two taillight buckets that I had made. I need to make some alignment changes to the taillights, but adjustments are hampered by the buckets. I'll have to break down and make some adjustable mounting brackets instead.

I also got to crawl all over a real Aventador at the local auto-show on Friday. They let me go past the ropes and take lots of up-close photos...great help when you need details on how to get certain parts to fit properly. ...it definitely motivated me!
IP: Logged
Cheeper2keeper
Member
Posts: 69
From: Over there
Registered: Oct 2010


Feedback score: N/A
Leave feedback

User Banned

Report this Post03-26-2018 03:53 PM Click Here to See the Profile for Cheeper2keeperSend a Private Message to Cheeper2keeperEdit/Delete MessageReply w/QuoteDirect Link to This Post
Awesome work. Makes me wish I never sold my Mercialago kit.
IP: Logged
Neils88
Member
Posts: 4045
From: Jeddore,Nova Scotia
Registered: Aug 2013


Feedback score: N/A
Leave feedback


Total ratings: 56
Rate this member

Report this Post03-26-2018 05:29 PM Click Here to See the Profile for Neils88Send a Private Message to Neils88Edit/Delete MessageReply w/QuoteDirect Link to This Post
 
quote
Originally posted by Cheeper2keeper:

Awesome work. Makes me wish I never sold my Mercialago kit.


There's always time to start another one...
IP: Logged
Cheeper2keeper
Member
Posts: 69
From: Over there
Registered: Oct 2010


Feedback score: N/A
Leave feedback

User Banned

Report this Post03-27-2018 09:43 PM Click Here to See the Profile for Cheeper2keeperSend a Private Message to Cheeper2keeperEdit/Delete MessageReply w/QuoteDirect Link to This Post
Not unless I get a deal on another kit like the last one. Right now I have a Yamaha jet boat and a golf cart to rebuild first.
IP: Logged
Neils88
Member
Posts: 4045
From: Jeddore,Nova Scotia
Registered: Aug 2013


Feedback score: N/A
Leave feedback


Total ratings: 56
Rate this member

Report this Post04-29-2018 08:47 PM Click Here to See the Profile for Neils88Send a Private Message to Neils88Edit/Delete MessageReply w/QuoteDirect Link to This Post
I've taken another health break from the project, but was finally able to get back at it this weekend. As mentioned earlier, I had originally built fiberglass pockets for the taillights. Now that I am in the process of working through the final panel alignment I discovered that the pockets limited the ability to fine tune the alignment of the taillights. This became a problem now that the spoiler and rear bumper have been properly aligned...some fine tuning of the taillight alignment is definitely required. I've removed the pockets and will replace them with frame mounted brackets to secure the taillights. However, in order to build the required brackets, I decided to create temporary alignment jigs that rigidly hold the taillights but still allow for fine tuning. I've got a little more tweaking to go, but once I'm happy with the alignment, then I can easily create the permanent connections to the frame. (sorry for the long-winded explanation without any useful pics )
IP: Logged
RCR
Member
Posts: 4397
From: Shelby Twp Mi
Registered: Sep 2002


Feedback score:    (7)
Leave feedback


Total ratings: 102
Rate this member

Report this Post04-30-2018 07:53 AM Click Here to See the Profile for RCRSend a Private Message to RCREdit/Delete MessageReply w/QuoteDirect Link to This Post
Hey Neal,
Good to see you back at it. Hopefully you're feeling better and it's not too serious.

I have a vivid imagination, so don't worry about the pics

Take care.

Bob
IP: Logged
Neils88
Member
Posts: 4045
From: Jeddore,Nova Scotia
Registered: Aug 2013


Feedback score: N/A
Leave feedback


Total ratings: 56
Rate this member

Report this Post05-06-2018 07:44 PM Click Here to See the Profile for Neils88Send a Private Message to Neils88Edit/Delete MessageReply w/QuoteDirect Link to This Post
Taillight brackets are now welded in place. Unfortunately, I have a number of alignment issues (such as the exhaust) that I'll need to address before beginning any significant bodywork.


IP: Logged
Previous Page | Next Page

This topic is 19 pages long:  1   2   3   4   5   6   7   8   9   10   11   12   13   14   15   16   17   18   19 
next newest topic | next oldest topic

All times are ET (US)

Post New Topic  Post A Reply
Hop to:

Contact Us | Back To Main Page

Advertizing on PFF | Fiero Parts Vendors
PFF Merchandise | Fiero Gallery | Ogre's Cave
Real-Time Chat | Fiero Related Auctions on eBay


Copyright (c) 1999, C. Pennock