Pennock's Fiero Forum
  General Fiero Chat
  13" Brake Rotor Upgrade for the 88's (Page 3)

Post New Topic  Post A Reply
Email This Page to Someone! | Printable Version

This topic is 6 pages long:  1   2   3   4   5   6 
Previous Page | Next Page
next newest topic | next oldest topic
13" Brake Rotor Upgrade for the 88's by fieroguru
Started on: 10-26-2011 08:08 PM
Replies: 231 (9504 views)
Last post by: fieroguru on 09-07-2013 08:17 AM
fieroguru
Member
Posts: 12112
From: Champaign, IL
Registered: Aug 2003


Feedback score:    (45)
Leave feedback


Total ratings: 257
Rate this member

Report this Post11-27-2011 10:14 PM Click Here to See the Profile for fieroguruSend a Private Message to fieroguruEdit/Delete MessageReply w/QuoteDirect Link to This Post
 
quote
Originally posted by mattwa:


This is disappointing, I was going to use a half set of this kit with the 16" rims I was planning to get from a friend locally, but I guess not. Could you make the bracket for the 12" Vette rotors?


How wide are your 16's and what is the offset. Mine are 16x7 with 35mm. A skinnier wheel or with less offset might clear. Also, stainless brake line with a button head type bolt might gain more clearance as well.
IP: Logged
fieroguru
Member
Posts: 12112
From: Champaign, IL
Registered: Aug 2003


Feedback score:    (45)
Leave feedback


Total ratings: 257
Rate this member

Report this Post11-27-2011 10:16 PM Click Here to See the Profile for fieroguruSend a Private Message to fieroguruEdit/Delete MessageReply w/QuoteDirect Link to This Post

fieroguru

12112 posts
Member since Aug 2003
 
quote
Originally posted by RULOOKIN:

Pm sent on compleate set cross drilled sweeps and if you can zinc coated


The drilled/slotted rotors are zinc coated. I haven't looked into the additional shipping costs to Canada, but the box will be close to 80 lbs.
IP: Logged
mattwa
Member
Posts: 7106
From: Lorain, Ohio
Registered: Sep 2008


Feedback score:    (41)
Leave feedback


Total ratings: 88
Rate this member

Report this Post11-27-2011 10:38 PM Click Here to See the Profile for mattwaSend a Private Message to mattwaEdit/Delete MessageReply w/QuoteDirect Link to This Post
 
quote
Originally posted by fieroguru:


How wide are your 16's and what is the offset. Mine are 16x7 with 35mm. A skinnier wheel or with less offset might clear. Also, stainless brake line with a button head type bolt might gain more clearance as well.


Yea I'm sure the ones I was thinking about getting would be worse. I believe they are 16x7.5 with around 40mm offset.
IP: Logged
jscott1
Member
Posts: 21676
From: Houston, TX , USA
Registered: Dec 2001


Feedback score:    (15)
Leave feedback


Total ratings: 415
Rate this member

Report this Post11-28-2011 01:31 AM Click Here to See the Profile for jscott1Send a Private Message to jscott1Edit/Delete MessageReply w/QuoteDirect Link to This Post
 
quote
Originally posted by fieroguru:
Now the bad news for the 16" wheel guys... The retaining bolt for the rear brake hose hits the inside of the wheel. I could use a spacer to clear it, but will probably just run 17's.


You think my 20s would clear???

Did I miss how to order?
IP: Logged
fieroguru
Member
Posts: 12112
From: Champaign, IL
Registered: Aug 2003


Feedback score:    (45)
Leave feedback


Total ratings: 257
Rate this member

Report this Post11-28-2011 07:37 AM Click Here to See the Profile for fieroguruSend a Private Message to fieroguruEdit/Delete MessageReply w/QuoteDirect Link to This Post
 
quote
Originally posted by jscott1:


You think my 20s would clear???

Did I miss how to order?


I am not taking orders until I complete the test fit AND another PFFer installs the test kit on his car for confirmation. When everything checks out, then I will start a thread in the mall.
IP: Logged
Raydar
Member
Posts: 40686
From: Carrollton GA. Out in the... country.
Registered: Oct 1999


Feedback score:    (13)
Leave feedback


Total ratings: 460
Rate this member

Report this Post11-28-2011 11:33 AM Click Here to See the Profile for RaydarSend a Private Message to RaydarEdit/Delete MessageReply w/QuoteDirect Link to This Post
 
quote
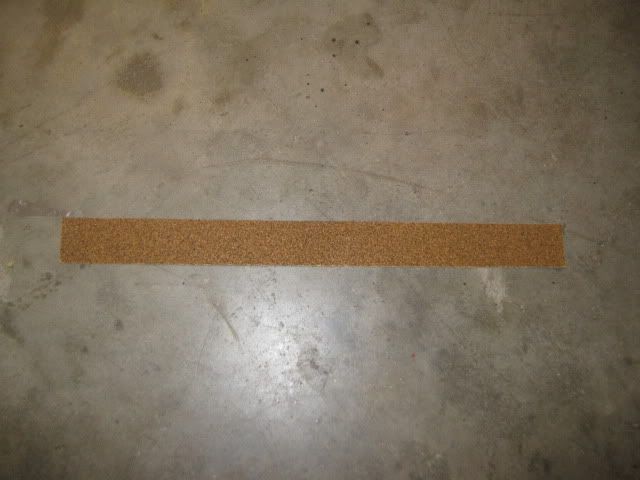
Originally posted by fieroguru:
...
Use a 1" wide piece of sand paper (it helps to put clear tape on the back side to keep it from tearing) to clean up the rust/corrosion on the hub where the concentric rings will sit:


Do you suppose that a rotary wire brush in a drill will suffice for this?

 
quote

I need to remove the front spring and cycle the suspension with the wheels locked to each side to see if there is any a-arm/caliper/hose interference.


This is why I stopped my Corvette rotor install, using the 1st gen (offset) brackets. The rubber brake hose was being jammed against the back edge of the upper control arm.
IMHO, the stock hoses should be replaced with the Fiero store braided hoses. They are not any more expensive than the stock replacement hoses, but are more flexible and have swivel heads that make installation and orientation much easier.

MHO, of course. Others may differ.

[This message has been edited by Raydar (edited 11-28-2011).]

IP: Logged
fieroguru
Member
Posts: 12112
From: Champaign, IL
Registered: Aug 2003


Feedback score:    (45)
Leave feedback


Total ratings: 257
Rate this member

Report this Post11-28-2011 07:01 PM Click Here to See the Profile for fieroguruSend a Private Message to fieroguruEdit/Delete MessageReply w/QuoteDirect Link to This Post
 
quote
Originally posted by Raydar:

Do you suppose that a rotary wire brush in a drill will suffice for this?


Possibly, but clearance to get to the hub is restricted by the lug nuts. The sand paper works.
IP: Logged
fieroguru
Member
Posts: 12112
From: Champaign, IL
Registered: Aug 2003


Feedback score:    (45)
Leave feedback


Total ratings: 257
Rate this member

Report this Post11-28-2011 07:17 PM Click Here to See the Profile for fieroguruSend a Private Message to fieroguruEdit/Delete MessageReply w/QuoteDirect Link to This Post

fieroguru

12112 posts
Member since Aug 2003
More pics of the test fit...

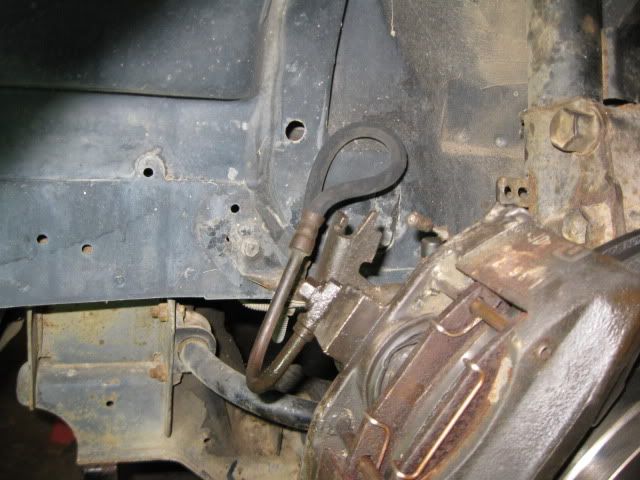
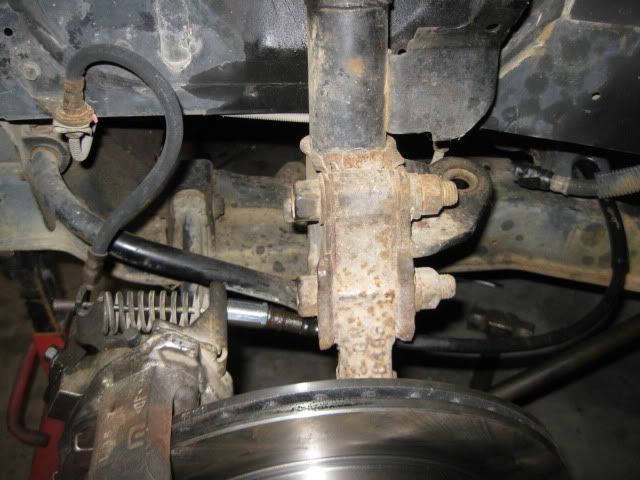
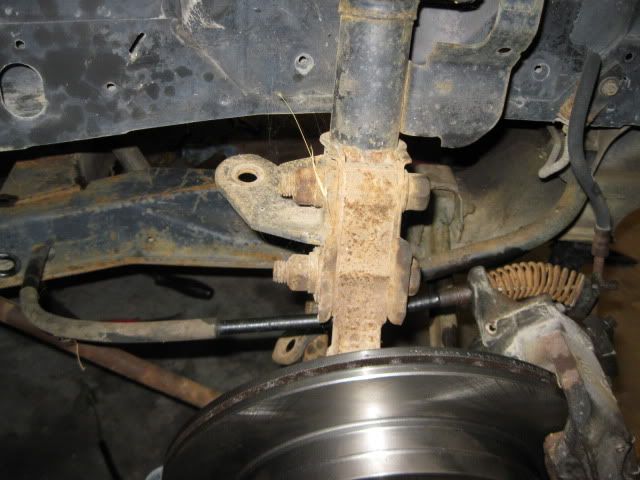
With the front spring out, the suspension loaded on the bump stops, and turned full lock in both directions, there is plenty of clearance to everything. Based on these pics, I am pretty confident that the front will be issue free with the stock brake hoses (with the mounting bracket on the upper a-arm relocated), or you could buy new braided stainless ones from Fiero Store or other vendor:


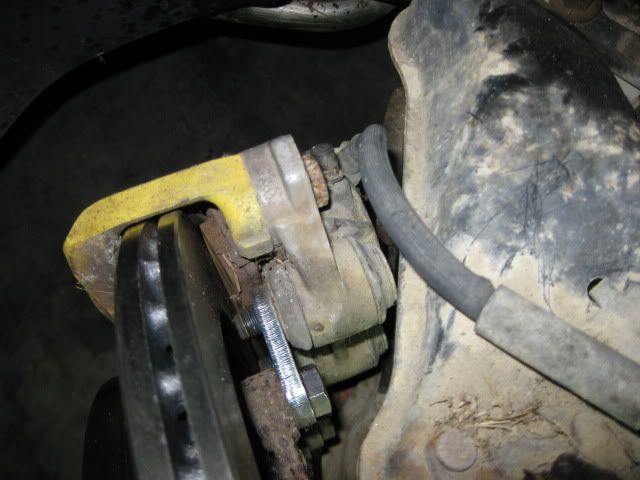
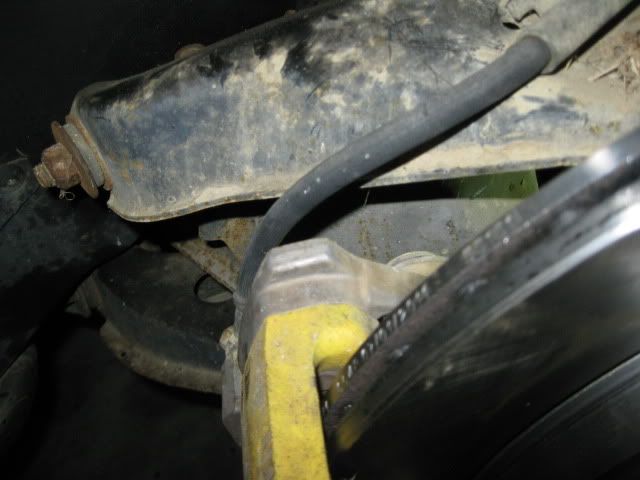
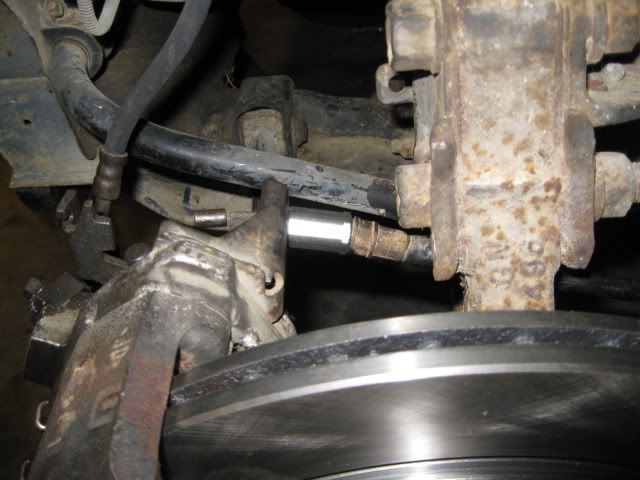
With the rear spring remove, the rear suspension was loaded on the bump stop as well. The stock brake line has plenty of clearance/movement and the parking brake cable can remain in the caliper bracket, but it is a bit snug on the PS (still need to check the DS).


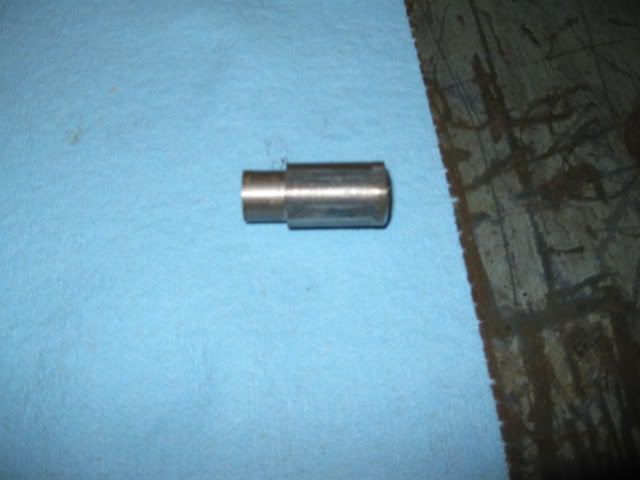
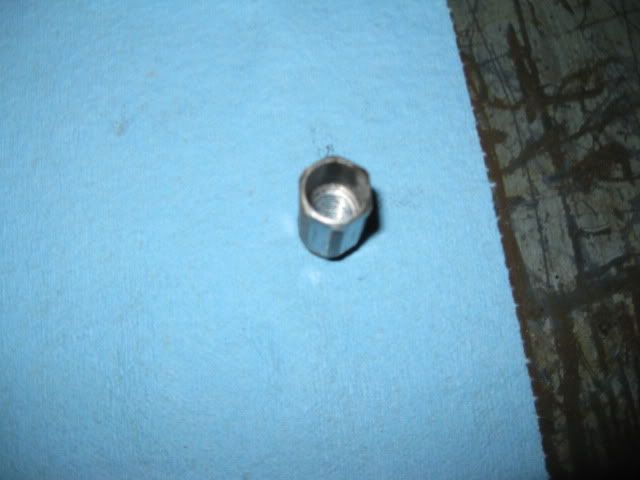
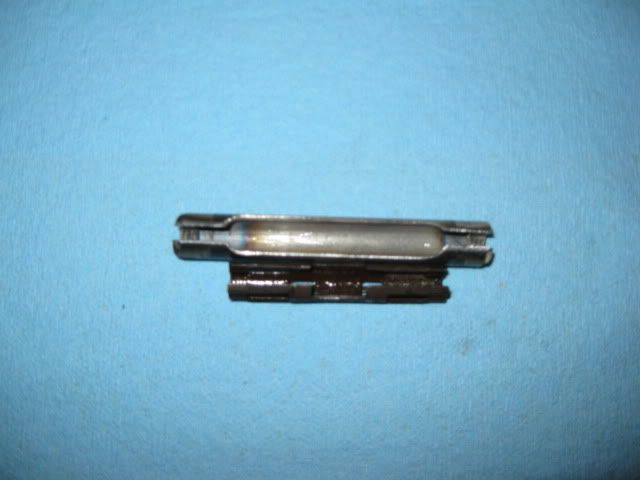
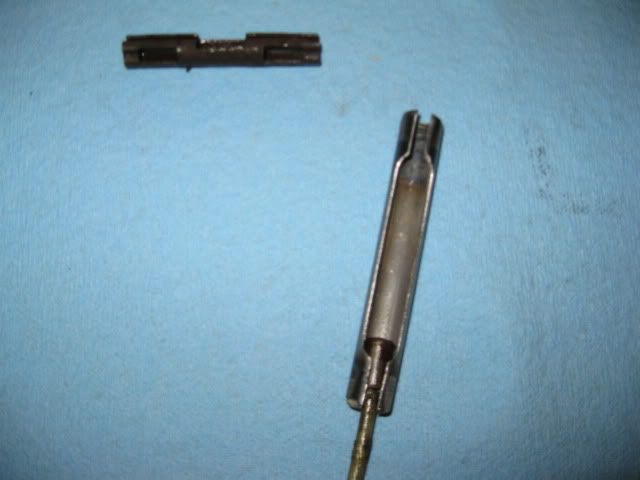
Based on the rear test fit, I will most likely include cable sleeves and the extended e-brake coupler. Here is a prototype of the 1" cable sleeve spacer. It started life as a 1/2" threaded coupler, and I turned one end to accept the parking brake cable, and the other end to slide into the caliper bracket. The ones for the kit will probably be made from aluminum, but this was handy.


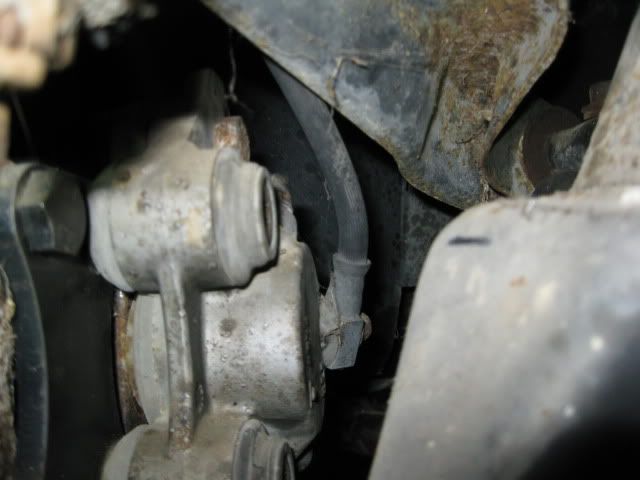
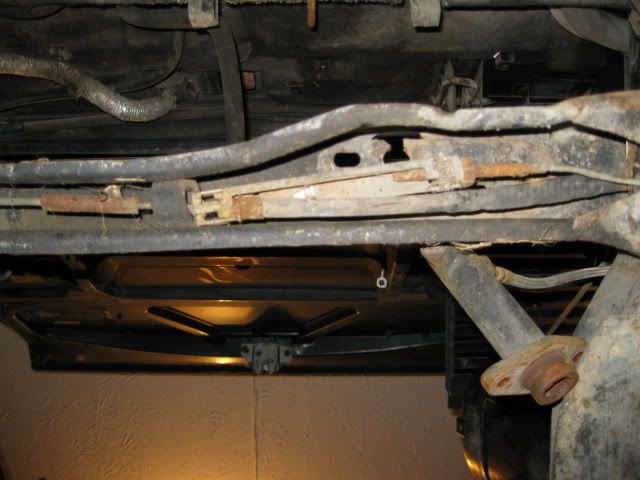
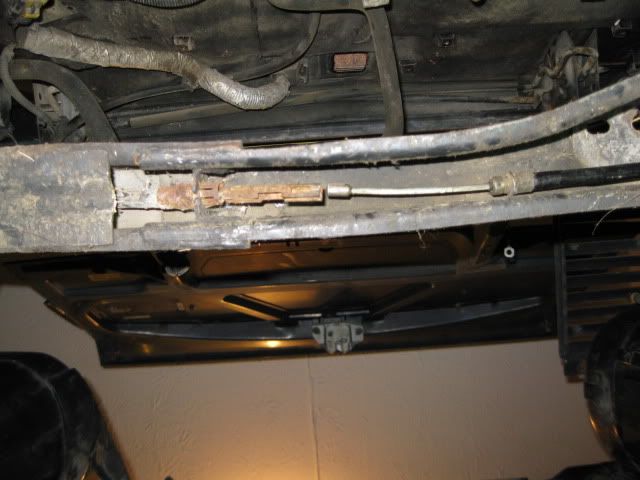
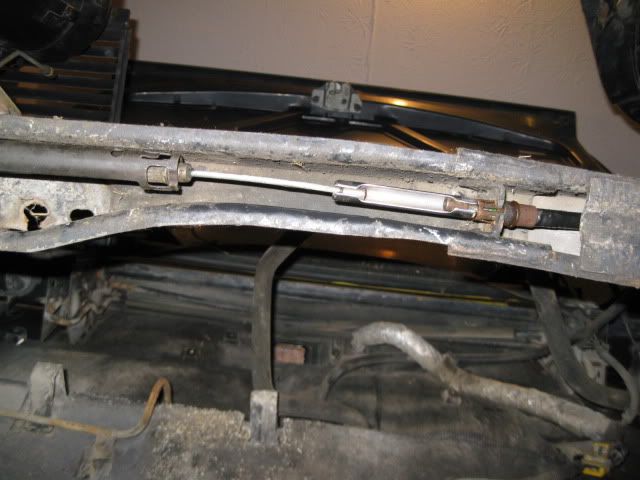
On the 88's, the parking brake cable adjuster is inside the front crossmember. The small link on the left is the one I am planning on extending (or source a longer alternative), the threaded portion of the one on the right might be long enough to accommodate the sleeve w/o modification.


IP: Logged
oldrock2401
Member
Posts: 248
From: East Central, Illinois
Registered: Dec 2007


Feedback score: (2)
Leave feedback

Rate this member

Report this Post11-28-2011 07:52 PM Click Here to See the Profile for oldrock2401Send a Private Message to oldrock2401Edit/Delete MessageReply w/QuoteDirect Link to This Post
only if we could get a kit like this for the 84-87s...stupid 88s lol
IP: Logged
fieroguru
Member
Posts: 12112
From: Champaign, IL
Registered: Aug 2003


Feedback score:    (45)
Leave feedback


Total ratings: 257
Rate this member

Report this Post11-28-2011 07:56 PM Click Here to See the Profile for fieroguruSend a Private Message to fieroguruEdit/Delete MessageReply w/QuoteDirect Link to This Post
 
quote
Originally posted by oldrock2401:

only if we could get a kit like this for the 84-87s...stupid 88s lol


I am working on a solid rotor 12 3/4" kit for the 84-87's as well, but I am much further along on the 88 one.
//www.fiero.nl/forum/Forum1/HTML/087538.html
IP: Logged
fieroguru
Member
Posts: 12112
From: Champaign, IL
Registered: Aug 2003


Feedback score:    (45)
Leave feedback


Total ratings: 257
Rate this member

Report this Post11-29-2011 08:07 PM Click Here to See the Profile for fieroguruSend a Private Message to fieroguruEdit/Delete MessageReply w/QuoteDirect Link to This Post
I was able to install all the parking brake cables and confirmed that I need a longer cable coupler:


That will be the project for Wednesday night. Then I should be able to paint the brackets and start boxing everything up for shipment.
IP: Logged
PFF
System Bot
fieroguru
Member
Posts: 12112
From: Champaign, IL
Registered: Aug 2003


Feedback score:    (45)
Leave feedback


Total ratings: 257
Rate this member

Report this Post11-30-2011 07:12 PM Click Here to See the Profile for fieroguruSend a Private Message to fieroguruEdit/Delete MessageReply w/QuoteDirect Link to This Post
I could not find a longer coupler that I liked, so I made one that was 1" longer to make up for the 1" spacer:


So that concludes the fabrication for the test kit and the mock up on my 88. On Thursday I will paint the brackets/coupler/spacer parts and start boxing up the rotors. Everything is on schedule to ship this first kit on Friday to my tester.
IP: Logged
jscott1
Member
Posts: 21676
From: Houston, TX , USA
Registered: Dec 2001


Feedback score:    (15)
Leave feedback


Total ratings: 415
Rate this member

Report this Post11-30-2011 10:11 PM Click Here to See the Profile for jscott1Send a Private Message to jscott1Edit/Delete MessageReply w/QuoteDirect Link to This Post
 
quote
Originally posted by fieroguru:
Everything is on schedule to ship this first kit on Friday to my tester.


EXCELLENT! (and yes I'm shouting)

IP: Logged
fieroguru
Member
Posts: 12112
From: Champaign, IL
Registered: Aug 2003


Feedback score:    (45)
Leave feedback


Total ratings: 257
Rate this member

Report this Post12-01-2011 07:30 PM Click Here to See the Profile for fieroguruSend a Private Message to fieroguruEdit/Delete MessageReply w/QuoteDirect Link to This Post
The aluminum material arrived for the cable sleeve spacer, so I made a new one out of aluminum to replace the steel one I made for the mock up.

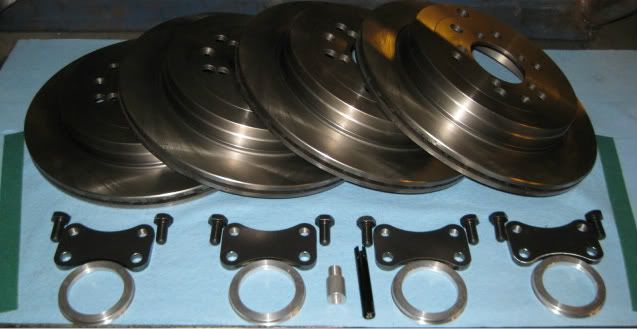
Here is a pic of all the components of the kit:

4 13" rotors drilled for 5x100 (standard version)
4 caliper brackets
4 concentric rings
8 M12 bolts (10.9 grade)
2 strips of sand paper to clean the hubs
1 parking brake cable sleeve extension
1 longer cable connector for parking brake

The only part missing to be 100% complete with functioning parking brake is the brake pads (and opinions very quite a bit on what people like in brake pads).

Also used the wife's postal scale and weighted everything.
Items removed per corner: 11.7 lbs
Stock 88 rotor: 11.0 lbs
Stock dust cover & bolts: 0.7 lbs

Items added per corner: Maximum = 18.1 (gain of 6.4 lbs/corner), Minimum = 17.4 (gain of 5.7 lbs/corner)
13" standard rotor: 17.3 lbs
13" drilled/slotted w/1 set of holes: 16.6 lbs
Bracket, Ring, Bolts: 0.8 lbs

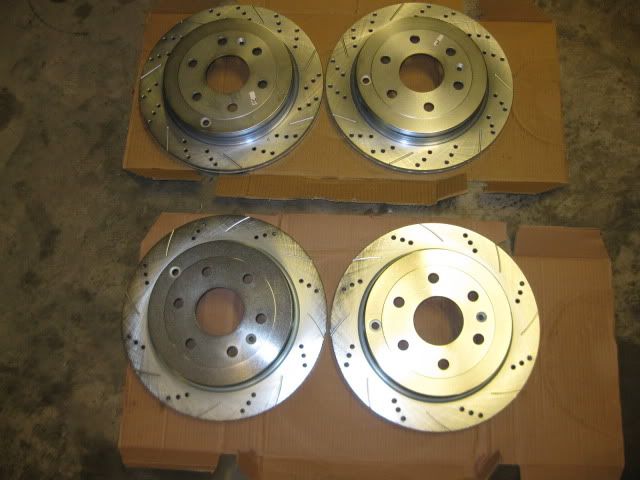
I have 2 different type of drilled/slotted rotors for pretty much the same price. They have slightly different patterns, but both are zinc coated. The top one has more holes, but if you look closely at the pattern it is not uniform (7 slots and the spacing between the slots/holes isn't uniform). The one on the bottom has fewer holes, but uniform spacing, and weighs about 2oz less than the top one. The top one probably has more "bling" appeal, but the unequal spacing would drive me nuts looking at it (which is why I found the lower one). I will probably give the buyer a choice between the two styles.


Just waiting for the brackets to dry and the test set will be ready to ship in the morning.
IP: Logged
jscott1
Member
Posts: 21676
From: Houston, TX , USA
Registered: Dec 2001


Feedback score:    (15)
Leave feedback


Total ratings: 415
Rate this member

Report this Post12-01-2011 07:41 PM Click Here to See the Profile for jscott1Send a Private Message to jscott1Edit/Delete MessageReply w/QuoteDirect Link to This Post
 
quote
Originally posted by fieroguru:


... The top one probably has more "bling" appeal, but the unequal spacing would drive me nuts looking at it (which is why I found the lower one). I will probably give the buyer a choice between the two styles.


Considering that drilled and slotted is mostly about bling I'll go with the more bling option. Thanks for doing this!


IP: Logged
Alex4mula
Member
Posts: 7403
From: Canton, MI US
Registered: Dec 1999


Feedback score:    (11)
Leave feedback


Total ratings: 153
Rate this member

Report this Post12-01-2011 09:08 PM Click Here to See the Profile for Alex4mulaSend a Private Message to Alex4mulaEdit/Delete MessageReply w/QuoteDirect Link to This Post
Save me a set of the bottom ones (lighter).
IP: Logged
Rare87GT
Member
Posts: 5044
From: Wichita, KS USA
Registered: Oct 2001


Feedback score:    (7)
Leave feedback


Total ratings: 173
Rate this member

Report this Post12-02-2011 01:05 AM Click Here to See the Profile for Rare87GTSend a Private Message to Rare87GTEdit/Delete MessageReply w/QuoteDirect Link to This Post
What exactly does Phil's master cylinder upgrade do? I've been in the process of possibly changing out my booster to a bigger one to add the issue with my vacuum and my bigger cam on my 3800. I'd like to know if upgrading to a bigger master cylinder is a good upgrade to use. I currently have 12" rotors on the car now.

Thanks,
Amir

------------------

1 of 2: Graphite Grey Pearl 87 GT 5 spd: 2.8L (Best 1/4 mile: 15.57@87mph, 2.0 60ft)
2 of 2: Ferrari Red 88 Formula/4T65EHD: 2000 L67 Motor (Best 1/4 mile: 12.0@118mph, 1.89 60ft w/True Street Radial Tires not Drag Radials!)
New Engine on the Road again! FTW Motorsports style!
312rwhp/332rwtq

My CarDomain Site

IP: Logged
fieroguru
Member
Posts: 12112
From: Champaign, IL
Registered: Aug 2003


Feedback score:    (45)
Leave feedback


Total ratings: 257
Rate this member

Report this Post12-02-2011 06:37 AM Click Here to See the Profile for fieroguruSend a Private Message to fieroguruEdit/Delete MessageReply w/QuoteDirect Link to This Post
 
quote
Originally posted by Rare87GT:

What exactly does Phil's master cylinder upgrade do? I've been in the process of possibly changing out my booster to a bigger one to add the issue with my vacuum and my bigger cam on my 3800. I'd like to know if upgrading to a bigger master cylinder is a good upgrade to use. I currently have 12" rotors on the car now.

Thanks,
Amir


The S10 brake booster has more internal surface area so for the same pedal input pressure, you will see more caliper pressure, which should result in faster braking performance. If you are running less than stock engine vacuum, then the larger size will help restore the brake assist back to the stock level (or possibly slightly higher - all depends on what your vacuum level is).
IP: Logged
fieroguru
Member
Posts: 12112
From: Champaign, IL
Registered: Aug 2003


Feedback score:    (45)
Leave feedback


Total ratings: 257
Rate this member

Report this Post12-02-2011 06:39 AM Click Here to See the Profile for fieroguruSend a Private Message to fieroguruEdit/Delete MessageReply w/QuoteDirect Link to This Post

fieroguru

12112 posts
Member since Aug 2003
Placed the order for more drilled/slotted rotors so I will have 3 full sets here sometime next week (2 full sets of the blingy ones, 1 full set of the less blingy & lighter weight).

[This message has been edited by fieroguru (edited 12-02-2011).]

IP: Logged
blackrams
Member
Posts: 31839
From: Hattiesburg, MS, USA
Registered: Feb 2003


Feedback score:    (9)
Leave feedback


Total ratings: 229
Rate this member

Report this Post12-02-2011 07:56 AM Click Here to See the Profile for blackramsSend a Private Message to blackramsEdit/Delete MessageReply w/QuoteDirect Link to This Post
 
quote
Originally posted by fieroguru:

Placed the order for more drilled/slotted rotors so I will have 3 full sets here sometime next week (2 full sets of the blingy ones, 1 full set of the less blingy).


I have to be honest here, "blingy" is not a term I would expect to here from you.

Oh yeah, bump for a great thread.

------------------
Ron
The key thing is to wake up breathing! All the rest can be fixed. (Except Stupid - You can't fix that)

IP: Logged
fieroguru
Member
Posts: 12112
From: Champaign, IL
Registered: Aug 2003


Feedback score:    (45)
Leave feedback


Total ratings: 257
Rate this member

Report this Post12-02-2011 07:35 PM Click Here to See the Profile for fieroguruSend a Private Message to fieroguruEdit/Delete MessageReply w/QuoteDirect Link to This Post
 
quote
Originally posted by blackrams:

I have to be honest here, "blingy" is not a term I would expect to here from you.


Yeah, it isn't one of my common phrases... but it seems to be quite descriptive.
IP: Logged
PFF
System Bot
fieroguru
Member
Posts: 12112
From: Champaign, IL
Registered: Aug 2003


Feedback score:    (45)
Leave feedback


Total ratings: 257
Rate this member

Report this Post12-02-2011 07:41 PM Click Here to See the Profile for fieroguruSend a Private Message to fieroguruEdit/Delete MessageReply w/QuoteDirect Link to This Post
Finished the Installation Instructions tonight. There will probably be some revisions based on feedback from my tester, but they are a good start (5 pages in total with 10 installation pics in the appendix).

From the instructions:
 
quote

Thanks for purchasing a fieroguru 13” brake rotor upgrade. My goal developing this kit was to take a clean sheet approach and find the best fitting rotor to eliminate the common interference issues with the C4 12” rotor upgrade. The rotors used for my kit are from a late model application and quite common, so this rotor will be around and fairly inexpensive for many years to come. Some of the key benefits of this kits are:
• Use of stock calipers keeps the upgrade cost to a minimum
• Use of stock calipers retains the stock brake bias and parking brake function
• 25% increase in brake rotor diameter for improved visual impact behind 17+” wheels
• 29% increase in brake system mechanical advantage due to caliper being further from wheel center
• 20% increase in rotor/pad surface area to reduce potential for brake fade.
• Available in Drilled/Slotted w/zinc coating to minimize additional weight and improve appearance.
• No interference issues between the rotor/caliper and the front suspension a-arms.

IP: Logged
Sourmug
Member
Posts: 4538
From: Calgary, Alberta, Canada
Registered: Sep 2002


Feedback score:    (29)
Leave feedback


Total ratings: 144
Rate this member

Report this Post12-02-2011 08:51 PM Click Here to See the Profile for SourmugSend a Private Message to SourmugEdit/Delete MessageReply w/QuoteDirect Link to This Post
The kit looks great! I'll be interested in hearing the feedback from your tester.

Nolan
IP: Logged
fieroguru
Member
Posts: 12112
From: Champaign, IL
Registered: Aug 2003


Feedback score:    (45)
Leave feedback


Total ratings: 257
Rate this member

Report this Post12-07-2011 06:24 PM Click Here to See the Profile for fieroguruSend a Private Message to fieroguruEdit/Delete MessageReply w/QuoteDirect Link to This Post
At least 1 of the 2 boxes has arrived at the tester, and my house sitter said that a couple more sets of the drilled/slotted rotors have arrived back home.

Been on vacation since Saturday chasing the girls and wife!
IP: Logged
fieroguru
Member
Posts: 12112
From: Champaign, IL
Registered: Aug 2003


Feedback score:    (45)
Leave feedback


Total ratings: 257
Rate this member

Report this Post12-10-2011 01:20 AM Click Here to See the Profile for fieroguruSend a Private Message to fieroguruEdit/Delete MessageReply w/QuoteDirect Link to This Post
The second box arrived at the tester today!

[Shipping Company Rant]
2 identical flat rate (priority mail) boxes are shipped from the same location, at the same time (last Friday), and sent to the same destination (about 350 miles away). One arrives the following Monday (which is what I expected)...the second one bounces around who knows where in the USPS system and finally shows up on Friday.

7 days for a priority shipment to go 350 miles (that was insured and had delivery confirmation) is less than acceptable...

The problem is, there just isn't any good shipping company. UPS lost one of my transmissions (a year ago), Fed Ex lost the first set of drilled/slotted rotors for this project a few weeks back, and now the USPS can't deliver their own flat rate box w/o it getting temporarily lost in transit... aggravating...
[/rant]

IP: Logged
jscott1
Member
Posts: 21676
From: Houston, TX , USA
Registered: Dec 2001


Feedback score:    (15)
Leave feedback


Total ratings: 415
Rate this member

Report this Post12-10-2011 01:23 AM Click Here to See the Profile for jscott1Send a Private Message to jscott1Edit/Delete MessageReply w/QuoteDirect Link to This Post
 
quote
Originally posted by fieroguru:

7 days for a priority shipment to go 350 miles (that was insured and had delivery confirmation) is less than acceptable...


Don't worry...the USPS is bankrupt, and will probably be shut down in less than 5 years. Wait for the rants when it costs $10 to send a first class letter across town.
IP: Logged
fieroguru
Member
Posts: 12112
From: Champaign, IL
Registered: Aug 2003


Feedback score:    (45)
Leave feedback


Total ratings: 257
Rate this member

Report this Post12-12-2011 07:21 PM Click Here to See the Profile for fieroguruSend a Private Message to fieroguruEdit/Delete MessageReply w/QuoteDirect Link to This Post
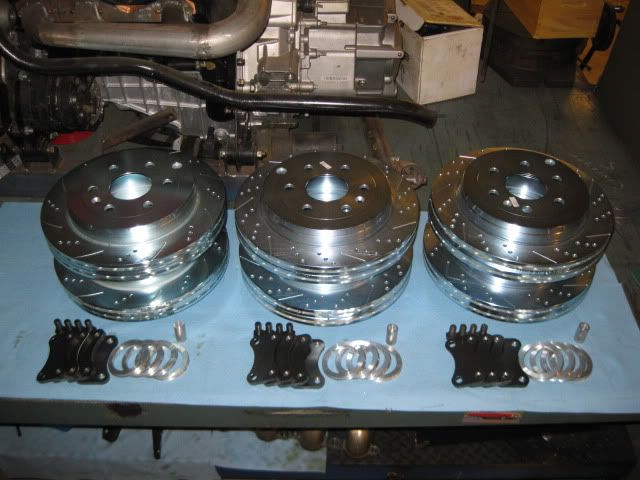
Here is an impressive sight (I still need to drill the rotors, machine the sleeve spacers, and fabricate the cable connectors, but the first 3 kits are nearing completion):


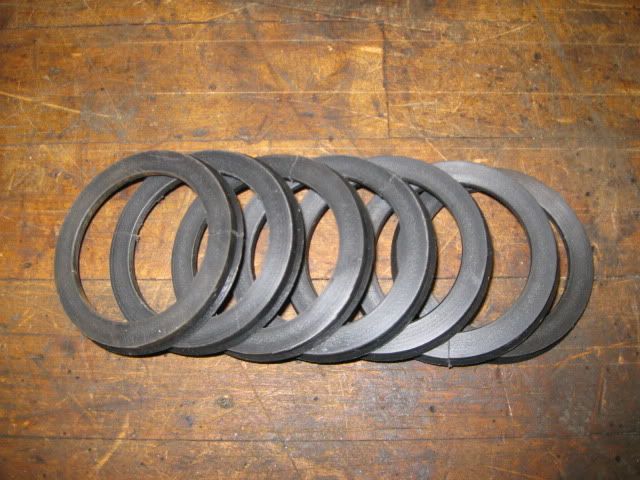
The addition of the brake hardware was going to drive up the cost of the kit, so I found some off the shelf concentric rings for aftermarket wheels than can be modified pretty quick and used for this kit. The use of these plastic rings vs. the aluminum ones will help keep the cost of the kit at the same price I quoted on page 1:

$565 shipped to the lower 48 for the Standard 13" Brake Rotor Kit (w/ 4 standard rotors, 4 brackets, 4 rings, 8 grade 10.9 bolts, 1 brake cable sleeve extension, 1 brake cable coupler)
$640 shipped to the lower 48 for the Cross-Drilled/Slotted 13" Brake Rotor Kit (w/ 4 cross-drilled/slotted rotors,4 brackets, 4 rings, 8 grade 10.9 bolts, 1 brake cable sleeve extension, 1 brake cable coupler)

1/2 kits will be half price.

Here are the plastic rings:


No progress to report from the tester as of this time.

[This message has been edited by fieroguru (edited 12-12-2011).]

IP: Logged
mattwa
Member
Posts: 7106
From: Lorain, Ohio
Registered: Sep 2008


Feedback score:    (41)
Leave feedback


Total ratings: 88
Rate this member

Report this Post12-12-2011 10:07 PM Click Here to See the Profile for mattwaSend a Private Message to mattwaEdit/Delete MessageReply w/QuoteDirect Link to This Post
I'm not sure about others, but If I were to buy this kit, I would spend a bit more and get the aluminum rings, I'm not really liking the idea of plastic rings.
IP: Logged
Raydar
Member
Posts: 40686
From: Carrollton GA. Out in the... country.
Registered: Oct 1999


Feedback score:    (13)
Leave feedback


Total ratings: 460
Rate this member

Report this Post12-18-2011 12:58 PM Click Here to See the Profile for RaydarSend a Private Message to RaydarEdit/Delete MessageReply w/QuoteDirect Link to This Post
Eye candy

Comparison of Paul's rotors with the Corvette rotors.


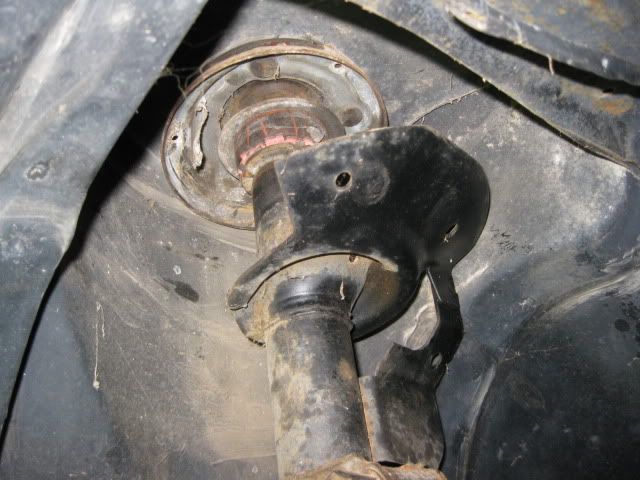
The starting point, after all the stock pieces are removed


The centering ring in place


The rotor in place


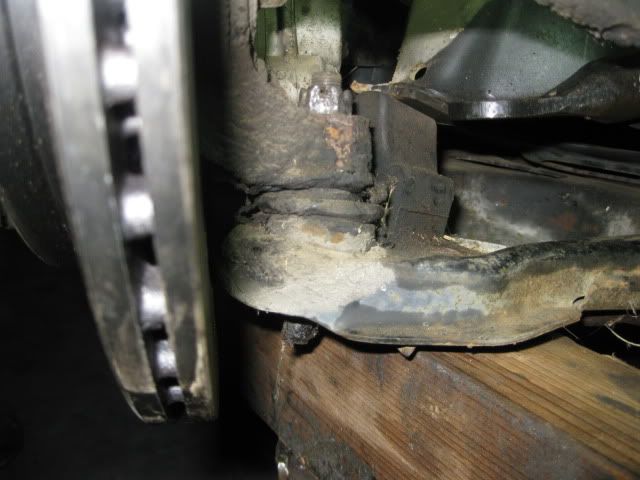
Caliper in place
Note that the suspension is at full extension, and wheel is at full right lock.
This is the most extension you'll see on a stock brake line. It'll work just fine.
Full left lock is okay too. Doesn't bind the line against anything as the original Corvette kit does.


The back half of the assembly


Again, with the rotor in place


The "footprint" of the stock pads is absolutely perfect for the width of this rotor.
Outside edge of pads


Inside edge of pads


LCA to rotor gap (One of the issues with the corvette-based kit - not an issue here.)


Brake line. Zip tied through the original holes in the UCA.
I left the "tails" in place so that you can see how they're fastened.
I left them loose enough to allow movement.


Caliper to wheel


Rotor to wheel


I'm going downstairs to do the back, in a few.
More info later.

[This message has been edited by Raydar (edited 12-18-2011).]

IP: Logged
Raydar
Member
Posts: 40686
From: Carrollton GA. Out in the... country.
Registered: Oct 1999


Feedback score:    (13)
Leave feedback


Total ratings: 460
Rate this member

Report this Post12-18-2011 11:18 PM Click Here to See the Profile for RaydarSend a Private Message to RaydarEdit/Delete MessageReply w/QuoteDirect Link to This Post

Raydar

40686 posts
Member since Oct 1999
It's done. Back on the ground.

Everything worked as designed. This is a very well engineered kit.
Nothing left over to buy "extra" or deal with.

Unfortunately, I won't be able to post a driving impression until tomorrow afternoon or evening.

I've got a few more pics to post, too.
IP: Logged
Greenmeansgo
Member
Posts: 233
From: Dallas, Texas
Registered: Sep 2011


Feedback score: (4)
Leave feedback

Rate this member

Report this Post12-19-2011 02:11 AM Click Here to See the Profile for GreenmeansgoSend a Private Message to GreenmeansgoEdit/Delete MessageReply w/QuoteDirect Link to This Post
I already have viper rotors and rings but need the caliper brackets, will you sell them separately and pm me what calipers those are
IP: Logged
PFF
System Bot
redraif
Member
Posts: 1460
From: GA
Registered: May 2005


Feedback score: (1)
Leave feedback

Rate this member

Report this Post12-19-2011 07:52 AM Click Here to See the Profile for redraifSend a Private Message to redraifEdit/Delete MessageReply w/QuoteDirect Link to This Post
NICE
Can't wait to see it in person!
------------------
Rescued & resuscitated 1984 Indy Fiero SE Pace Car Replica #770 presently reversibly modified!
SE: Stormtrooper Edition


Everything is the Previous owners fault

[This message has been edited by redraif (edited 12-19-2011).]

IP: Logged
fieroguru
Member
Posts: 12112
From: Champaign, IL
Registered: Aug 2003


Feedback score:    (45)
Leave feedback


Total ratings: 257
Rate this member

Report this Post12-19-2011 08:02 AM Click Here to See the Profile for fieroguruSend a Private Message to fieroguruEdit/Delete MessageReply w/QuoteDirect Link to This Post
 
quote
Originally posted by Greenmeansgo:

I already have viper rotors and rings but need the caliper brackets, will you sell them separately and pm me what calipers those are


My brackets will not work with the Viper Rotors - different offsets between the two.
IP: Logged
fieroguru
Member
Posts: 12112
From: Champaign, IL
Registered: Aug 2003


Feedback score:    (45)
Leave feedback


Total ratings: 257
Rate this member

Report this Post12-19-2011 08:03 AM Click Here to See the Profile for fieroguruSend a Private Message to fieroguruEdit/Delete MessageReply w/QuoteDirect Link to This Post

fieroguru

12112 posts
Member since Aug 2003
 
quote
Originally posted by Raydar:

It's done. Back on the ground.

Everything worked as designed. This is a very well engineered kit.
Nothing left over to buy "extra" or deal with.

Unfortunately, I won't be able to post a driving impression until tomorrow afternoon or evening.

I've got a few more pics to post, too.


Raydar, thanks for taking the time to test out this kit!
IP: Logged
Alex4mula
Member
Posts: 7403
From: Canton, MI US
Registered: Dec 1999


Feedback score:    (11)
Leave feedback


Total ratings: 153
Rate this member

Report this Post12-19-2011 08:39 AM Click Here to See the Profile for Alex4mulaSend a Private Message to Alex4mulaEdit/Delete MessageReply w/QuoteDirect Link to This Post
 
quote
Originally posted by Raydar:

...
Unfortunately, I won't be able to post a driving impression until tomorrow afternoon or evening.

...


Looking forward to that. Bet you wished to have these at last RFTH, eh?? Me too
IP: Logged
Raydar
Member
Posts: 40686
From: Carrollton GA. Out in the... country.
Registered: Oct 1999


Feedback score:    (13)
Leave feedback


Total ratings: 460
Rate this member

Report this Post12-19-2011 09:04 AM Click Here to See the Profile for RaydarSend a Private Message to RaydarEdit/Delete MessageReply w/QuoteDirect Link to This Post
 
quote
Originally posted by Alex4mula:
Looking forward to that. Bet you wished to have these at last RFTH, eh?? Me too


Indeed!
My stock brakes, even with new pads, were ready to check out and go home, about 20 miles before the end of the run.
IP: Logged
Raydar
Member
Posts: 40686
From: Carrollton GA. Out in the... country.
Registered: Oct 1999


Feedback score:    (13)
Leave feedback


Total ratings: 460
Rate this member

Report this Post12-19-2011 05:39 PM Click Here to See the Profile for RaydarSend a Private Message to RaydarEdit/Delete MessageReply w/QuoteDirect Link to This Post

Raydar

40686 posts
Member since Oct 1999
And the verdict is...
It works!
Since my brakes never really sucked anyway, until they got hot, I didn't notice a huge reduction in pedal effort. Moderate, but not huge.
It seems like the big difference is in maximum stopping power. They haul the car down from speed with ease.

They will likely get better as I perform a few much needed maintenance procedures to my brake system.
I can't remember the last time they were bled. I didn't bleed them this time (even though it was recommended) because I didn't open the system. This was already delayed for a week due to me getting sick. I wanted to "git 'er done" and report back.

I noticed a tendency for the left front to lock up, at the limit. The car was like this before the upgrade, however.
I'm guessing that once everything is bled, that braking will be more even, and better.

I should mention that this was with new pads on all 4 wheels. (I replaced the new Monroe pads that I put on the front, just before RFTH.)
I'm now running the recently discontinued Raybestos pads, that I've had in the box for 3-4 years.

I only made a few stops. Just far enough to drive around the neighborhood circuit.
Since the pads were new, I didn't try to get them really hot. I want to bed them in, correctly, before I go nuts with it.
Once the new pads and the new rotors become friends, they should get better still.

Paul said that he was concerned about the parking brake pieces.
They worked perfectly. My parking brake adjusted the same as it always has.
IIRC, the manual recommends 3-4 clicks to "fully applied". I didn't adjust mine that tight. More like 5-6 clicks.
But I'd rather have it too loose, than too tight. It's still plenty tight enough to hold the car on a hill.

If anyone has any questions, please feel free to ask.

I'd like to thank Paul for allowing me to test this kit.
I've given him my candid observations concerning the install and instructions, and posted my observations here.

[This message has been edited by Raydar (edited 12-19-2011).]

IP: Logged
Raydar
Member
Posts: 40686
From: Carrollton GA. Out in the... country.
Registered: Oct 1999


Feedback score:    (13)
Leave feedback


Total ratings: 460
Rate this member

Report this Post12-19-2011 05:57 PM Click Here to See the Profile for RaydarSend a Private Message to RaydarEdit/Delete MessageReply w/QuoteDirect Link to This Post

Raydar

40686 posts
Member since Oct 1999
A few more pics...

Left rear


Another left rear. I straightened and re-bent the hook that holds the cable, since the new location of the caliper tends to make the cable a little "shorter".
It's possible that the hook can be removed entirely. I ran out of daylight and time to check that, tonight.


Right rear.
You can see the cable sleeve extender, where the cable goes through the bracket.
Everything adjusted up, normally.
IP: Logged
ALJR
Member
Posts: 3765
From: Massachusetts
Registered: Jul 2009


Feedback score:    (18)
Leave feedback

Rate this member

Report this Post12-19-2011 09:40 PM Click Here to See the Profile for ALJRSend a Private Message to ALJREdit/Delete MessageReply w/QuoteDirect Link to This Post
Are the ebrake parts in this required because the caliper is moved further to the rear, or is it for another reason?

[This message has been edited by ALJR (edited 12-19-2011).]

IP: Logged
fieroguru
Member
Posts: 12112
From: Champaign, IL
Registered: Aug 2003


Feedback score:    (45)
Leave feedback


Total ratings: 257
Rate this member

Report this Post12-19-2011 10:29 PM Click Here to See the Profile for fieroguruSend a Private Message to fieroguruEdit/Delete MessageReply w/QuoteDirect Link to This Post
 
quote
Originally posted by ALJR:

Are the ebrake parts in this required because the caliper is moved further to the rear, or is it for another reason?


They are needed because the calipers are moved further to the rear. The passenger cable needs to effectively be longer and the supplied parts accomplish this while retaining the stock 88 parking brake cables vs. needing a custom set.
IP: Logged
Previous Page | Next Page

This topic is 6 pages long:  1   2   3   4   5   6 
next newest topic | next oldest topic

All times are ET (US)

Post New Topic  Post A Reply
Hop to:

Contact Us | Back To Main Page

Advertizing on PFF | Fiero Parts Vendors
PFF Merchandise | Fiero Gallery | Ogre's Cave
Real-Time Chat | Fiero Related Auctions on eBay


Copyright (c) 1999, C. Pennock