Pennock's Fiero Forum
  General Fiero Chat
  JohnWPB 1986 GT Fastback worklog (Page 13)

Post New Topic  Post A Reply
Email This Page to Someone! | Printable Version

This topic is 17 pages long:  1   2   3   4   5   6   7   8   9   10   11   12   13   14   15   16   17 
Previous Page | Next Page
next newest topic | next oldest topic
JohnWPB 1986 GT Fastback worklog by JohnWPB
Started on: 12-03-2010 12:28 AM
Replies: 648 (28094 views)
Last post by: JohnWPB on 06-01-2016 10:35 PM
JohnWPB
Member
Posts: 5181
From: West Palm Beach, Florida
Registered: May 2009


Feedback score:    (21)
Leave feedback


Total ratings: 144
Rate this member

Report this Post01-12-2016 03:10 PM Click Here to See the Profile for JohnWPBClick Here to visit JohnWPB's HomePageSend a Private Message to JohnWPBEdit/Delete MessageReply w/QuoteDirect Link to This Post
I think I may have found an engine..... Included with the engine are the north-star throttle body and the adapter plate, the FieroFlyer 3800 Fiero wiring harness and computer. It is programmed already to work with the Automatic transmission and this A/C equipped engine. (Still in the original box it was shipped to him in)

The seller thinks he has the rest of the 3800 mounts for the Fiero, he just has to look around for them.

Looks like my 3800 journey could officially start here.

[This message has been edited by JohnWPB (edited 04-02-2016).]

IP: Logged
GTGeff
Member
Posts: 2027
From: Up Nort
Registered: Dec 2001


Feedback score:    (6)
Leave feedback

Rate this member

Report this Post01-12-2016 06:21 PM Click Here to See the Profile for GTGeffSend a Private Message to GTGeffEdit/Delete MessageReply w/QuoteDirect Link to This Post

John,

I talked with PR on Saturday night. He may have mounts you need. ( He advised he has some inventory before he would need to make a major investment on raw materials for another batch.)

Jeff
IP: Logged
JohnWPB
Member
Posts: 5181
From: West Palm Beach, Florida
Registered: May 2009


Feedback score:    (21)
Leave feedback


Total ratings: 144
Rate this member

Report this Post01-12-2016 10:45 PM Click Here to See the Profile for JohnWPBClick Here to visit JohnWPB's HomePageSend a Private Message to JohnWPBEdit/Delete MessageReply w/QuoteDirect Link to This Post
Thanks Jeff, I will keep Shawn in mind then. I am gonna wait a little bit though, as they may be included with my engine purchase price if he is able to find them.
IP: Logged
JohnWPB
Member
Posts: 5181
From: West Palm Beach, Florida
Registered: May 2009


Feedback score:    (21)
Leave feedback


Total ratings: 144
Rate this member

Report this Post01-13-2016 11:29 PM Click Here to See the Profile for JohnWPBClick Here to visit JohnWPB's HomePageSend a Private Message to JohnWPBEdit/Delete MessageReply w/QuoteDirect Link to This Post
I have a question I have not seen in any of the 3800 threads that I have been reading over the past couple months, and I have read a LOT of them! How does one go about moving the coil packs from the "Front of the engine" in a front wheel drive setup (Near the alternator), to where they are on the rearward facing side of the engine in the Fiero. (The back left close to the intake) Is it just a wiring harness "bundle" that needs extended? If so, are these for sale, or is it up to making one from scratch?


IP: Logged
JohnWPB
Member
Posts: 5181
From: West Palm Beach, Florida
Registered: May 2009


Feedback score:    (21)
Leave feedback


Total ratings: 144
Rate this member

Report this Post01-30-2016 05:34 PM Click Here to See the Profile for JohnWPBClick Here to visit JohnWPB's HomePageSend a Private Message to JohnWPBEdit/Delete MessageReply w/QuoteDirect Link to This Post
WARNING: Future Red X's possible. I have always TRIED to use PIP, but it fails miserably 90% of the time. I used PostImage.org for these images.


Ok, I have sealed the deal, and rented a U-Haul trailer to head to Alabama in a couple weeks to get the engine. It's a 3800 Series III with around 80,000 miles on it. It comes with a bunch of goodies to get me started

Here is the donor engine, just begging to be cleaned up and painted!


As the Series III is throttle by wire, a Northstar Throttle body can be used with an adapter plate. I am glad to say they are both included:


Lastly, for now, and most importantly..... The FieroFlyer wiring harness for the 4T65HD transmission, with A/C. Included is the ECM that has already been programmed for this engines setup.


He also has a single mount for the 4T65HD transmission to the cradle:


The major parts I still will need are the motor mounts, Alternator relocation bracket, and the axles. There will be a lot more of course, but that's the major stuff.

[This message has been edited by JohnWPB (edited 01-30-2016).]

IP: Logged
Alex4mula
Member
Posts: 7403
From: Canton, MI US
Registered: Dec 1999


Feedback score:    (11)
Leave feedback


Total ratings: 153
Rate this member

Report this Post01-30-2016 05:54 PM Click Here to See the Profile for Alex4mulaSend a Private Message to Alex4mulaEdit/Delete MessageReply w/QuoteDirect Link to This Post
You have the most important parts. Motor mounts are easy to get. Axles you can build them. Why you want to relocate the alternator? Looks? Do you have the exhaust? If not that is the most complicated if you want a good one.
IP: Logged
JohnWPB
Member
Posts: 5181
From: West Palm Beach, Florida
Registered: May 2009


Feedback score:    (21)
Leave feedback


Total ratings: 144
Rate this member

Report this Post01-30-2016 11:13 PM Click Here to See the Profile for JohnWPBClick Here to visit JohnWPB's HomePageSend a Private Message to JohnWPBEdit/Delete MessageReply w/QuoteDirect Link to This Post
The exhaust........ I totally forgot to even mention it! That is one of THE biggest hurdles remaining. I have yet to figure that part out completely. I do know I want it to be quiet. I have heard 3800 exhausts that have a nice deep rumble on a couple Fieros, and it sounds great! Then you get in the car at 70 MPH and you can not hear yourself think, let alone be able to talk on the phone (Bluetooth through the stereo), or enjoy the radio. I want it as quiet as possible without sacrificing too much HP to do so. A nice compromise of the two.


IP: Logged
Alex4mula
Member
Posts: 7403
From: Canton, MI US
Registered: Dec 1999


Feedback score:    (11)
Leave feedback


Total ratings: 153
Rate this member

Report this Post01-31-2016 09:59 AM Click Here to See the Profile for Alex4mulaSend a Private Message to Alex4mulaEdit/Delete MessageReply w/QuoteDirect Link to This Post
 
quote
Originally posted by JohnWPB:

The exhaust........ I totally forgot to even mention it! That is one of THE biggest hurdles remaining. I have yet to figure that part out completely. I do know I want it to be quiet. I have heard 3800 exhausts that have a nice deep rumble on a couple Fieros, and it sounds great! Then you get in the car at 70 MPH and you can not hear yourself think, let alone be able to talk on the phone (Bluetooth through the stereo), or enjoy the radio. I want it as quiet as possible without sacrificing too much HP to do so. A nice compromise of the two.


Take a ride with Brygida on my old GT.
IP: Logged
JohnWPB
Member
Posts: 5181
From: West Palm Beach, Florida
Registered: May 2009


Feedback score:    (21)
Leave feedback


Total ratings: 144
Rate this member

Report this Post02-07-2016 12:35 AM Click Here to See the Profile for JohnWPBClick Here to visit JohnWPB's HomePageSend a Private Message to JohnWPBEdit/Delete MessageReply w/QuoteDirect Link to This Post
Ok, one week from today I Drive the 12 hours to Alabama to get the engine. The U-Haul trailer is reserved and waiting. In preparation, bought a new engine stand today. I went a little overkill and bought the 1,000 pound stand. I like the fact that the legs fold up to conserve space.


IP: Logged
Vernon8360
Member
Posts: 1106
From: Pittsburgh, PA
Registered: Feb 2008


Feedback score: (2)
Leave feedback

Rate this member

Report this Post02-08-2016 03:40 PM Click Here to See the Profile for Vernon8360Send a Private Message to Vernon8360Edit/Delete MessageReply w/QuoteDirect Link to This Post
You know you need to take that thing to MAACO to be painted so it matches the car.

------------------
1988 GT
Medium Red Metallic
Manual, Gray Leather
K Beck LEDs & StuWipes
Frazee: 2011, 2014

IP: Logged
JohnWPB
Member
Posts: 5181
From: West Palm Beach, Florida
Registered: May 2009


Feedback score:    (21)
Leave feedback


Total ratings: 144
Rate this member

Report this Post02-08-2016 06:54 PM Click Here to See the Profile for JohnWPBClick Here to visit JohnWPB's HomePageSend a Private Message to JohnWPBEdit/Delete MessageReply w/QuoteDirect Link to This Post
 
quote
Originally posted by Vernon8360:

You know you need to take that thing to MAACO to be painted so it matches the car.


Art, it has been a pleasure knowing you......... We're done.


IP: Logged
PFF
System Bot
JohnWPB
Member
Posts: 5181
From: West Palm Beach, Florida
Registered: May 2009


Feedback score:    (21)
Leave feedback


Total ratings: 144
Rate this member

Report this Post02-14-2016 02:08 PM Click Here to See the Profile for JohnWPBClick Here to visit JohnWPB's HomePageSend a Private Message to JohnWPBEdit/Delete MessageReply w/QuoteDirect Link to This Post
After getting up at 6am working, and then leaving after work Friday night at 6pm, drove straight through to Montgomery, Alabama and picked the engine up at 7am. I left Montgomery at 8am and drove to Atlanta to meet up with the Georgia Fiero Club at a diner for lunch at 1:30 pm. After lunch made it somewhere south of Atlanta before crashing.... make that collapsing at around 6pm. After 24 hours on the road, straight through, other than food and gas stops, I was just beyond exhausted!

Got up at 8 am and am now just South of Daytona Beach. Only 4 or 5 hours to go!

Look what followed me home

[This message has been edited by JohnWPB (edited 03-30-2016).]

IP: Logged
Neils88
Member
Posts: 4045
From: Jeddore,Nova Scotia
Registered: Aug 2013


Feedback score: N/A
Leave feedback


Total ratings: 56
Rate this member

Report this Post02-14-2016 07:48 PM Click Here to See the Profile for Neils88Send a Private Message to Neils88Edit/Delete MessageReply w/QuoteDirect Link to This Post
 
quote
Originally posted by JohnWPB:
... After lunch made it somewhere south of Atlanta before crashing....


...you made my heart skip a beat...
IP: Logged
JohnWPB
Member
Posts: 5181
From: West Palm Beach, Florida
Registered: May 2009


Feedback score:    (21)
Leave feedback


Total ratings: 144
Rate this member

Report this Post02-14-2016 09:36 PM Click Here to See the Profile for JohnWPBClick Here to visit JohnWPB's HomePageSend a Private Message to JohnWPBEdit/Delete MessageReply w/QuoteDirect Link to This Post
 
quote
Originally posted by Neils88:
...you made my heart skip a beat...


Yikes! I didn't realize that, till I just re-read my post now! Poor choice of words!

I Just got back to my house about a half hour ago. What a LONG trip to go get an engine! 50 total hours, and a total mileage of 1578. The engine is still on the trailer, and is going to stay right there until tomorrow..... at this point, I do not care that the U-Haul trailer was supposed to be back this evening!

I am quite happy with everything now that I have it back home. For $900 I got the 3800SC Series III with around 80,000 miles on it. The northstar throttle body and the adapter plate, FieroFlyer wiring harness, and the ECM he programmed for this engine with A/C and Auto trans, Transmission mount, Smaller pulley and the pulley removal tool to change it out on the Super Charger, and some miscellaneous new sensors.

I can't wait to start stripping it down, replacing all the gaskets, water pump and other hardware, then cleaning, and painting it all up. I already bought a pint of Vista Blue, the same color my car was painted, for the valve covers and the super charger.

IP: Logged
tshark
Member
Posts: 4388
From:
Registered: Feb 2014


Feedback score:    (6)
Leave feedback


Total ratings: 68
Rate this member

Report this Post02-15-2016 08:57 AM Click Here to See the Profile for tsharkSend a Private Message to tsharkEdit/Delete MessageReply w/QuoteDirect Link to This Post
What, not going to MAACO?
IP: Logged
JohnWPB
Member
Posts: 5181
From: West Palm Beach, Florida
Registered: May 2009


Feedback score:    (21)
Leave feedback


Total ratings: 144
Rate this member

Report this Post02-15-2016 07:32 PM Click Here to See the Profile for JohnWPBClick Here to visit JohnWPB's HomePageSend a Private Message to JohnWPBEdit/Delete MessageReply w/QuoteDirect Link to This Post
 
quote
Originally posted by tshark:

What, not going to MAACO?


No.......

I had to go buy a 2 Ton engine hoist to get the damn engine off the trailer. Wow that thing is heavy with the transmission on it. I was able to get it under my carport, and even managed to get the transmission removed. For me this was a pretty big accomplishment, as I am NOT a mechanic, and have never tried to work on an engine like this before. Honestly, I could not figure it out completely on my own. I had all the bolts (or so I though) removed, and it still would not come loose. I Youtube'd "Removing a 3800 transmission" and learned of a hidden bolt that you need to remove the power steering pump to get to. Then, you need to assemble every extension you can find in your collection of tools, and reach way back in to get it out. Now I need to figure out where to get the bolts that are needed to mount the engine to the engine stand. The ones from the transmission are far too short, something I did not know until I just tried today.

Here is the engine on the base of the engine stand to roll it around for now:
(Photos to document what it looked like before I did anything to it)


I will get some more pictures during the daylight tomorrow of where it all stands now. I plan to document everything I can as reference for anyone else, with NO experience doing something like myself.

I just realized, my car is watching everything I do very closely

[This message has been edited by JohnWPB (edited 03-27-2016).]

IP: Logged
JohnWPB
Member
Posts: 5181
From: West Palm Beach, Florida
Registered: May 2009


Feedback score:    (21)
Leave feedback


Total ratings: 144
Rate this member

Report this Post02-16-2016 06:49 PM Click Here to See the Profile for JohnWPBClick Here to visit JohnWPB's HomePageSend a Private Message to JohnWPBEdit/Delete MessageReply w/QuoteDirect Link to This Post
Well I got the engine on the engine stand today. What a chore! The way the legs are "V" shaped on both the engine hoist, and on the stand make it near impossible to get the stand where it needs to be to connect it to the engine. I had to put one of the legs for the engine stand over the top of the hoist to line it up, I pushed the stand back as I slowly lowered the hoist to get it back on solid ground.

I removed most of the wiring harness today, and gave it it's first go at de-greasing. Tomorrow I plan to continue cleaning the engine, both for ease of working on (No spending an hour to de-grease myself after just touching the thing) as well as prepping for paint. I figure I have to 100% de-grease and clean it anyway, I may as well do it first, and save being covered in grease up to my elbows from working on it.


IP: Logged
Raydar
Member
Posts: 40686
From: Carrollton GA. Out in the... country.
Registered: Oct 1999


Feedback score:    (13)
Leave feedback


Total ratings: 460
Rate this member

Report this Post02-16-2016 08:38 PM Click Here to See the Profile for RaydarSend a Private Message to RaydarEdit/Delete MessageReply w/QuoteDirect Link to This Post
Looking good!
IP: Logged
JohnWPB
Member
Posts: 5181
From: West Palm Beach, Florida
Registered: May 2009


Feedback score:    (21)
Leave feedback


Total ratings: 144
Rate this member

Report this Post02-22-2016 06:33 PM Click Here to See the Profile for JohnWPBClick Here to visit JohnWPB's HomePageSend a Private Message to JohnWPBEdit/Delete MessageReply w/QuoteDirect Link to This Post
This post is a combination of posts from another thread where I asked for advice on items. I copied it here to archive in my build thread

The mount for the coil packs, on the 3800 needs to be cut for the decklid to close properly. You need to retain the lower portion as it houses a tensioner as well as an idler pulley.

I took the engine mount / pulley assembly off:


I then went to 2 different machine shops. Neither said they had the equipment to cut it (I am thinking to myself you ARE a machine shop, correct?!) . The one shop has been in business since 1982 and has a long waiting list of months to get some stuff done there. Kinda crazy they can not cut a cast iron motor mount. Any suggestions on how to get this done?

Also the bearing in the idler pulley is SHOT, so it's good to dissemble everything and check it all out before putting it all back together.

[This message has been edited by JohnWPB (edited 03-12-2016).]

IP: Logged
ignorant prodigy
Member
Posts: 621
From: taunton, ma, usa
Registered: Mar 2006


Feedback score: (3)
Leave feedback

Rate this member

Report this Post02-22-2016 06:50 PM Click Here to See the Profile for ignorant prodigySend a Private Message to ignorant prodigyEdit/Delete MessageReply w/QuoteDirect Link to This Post
I used a metal cutting blade on my sawzall and cut the bracket, no machine shop necessary lol
IP: Logged
JohnWPB
Member
Posts: 5181
From: West Palm Beach, Florida
Registered: May 2009


Feedback score:    (21)
Leave feedback


Total ratings: 144
Rate this member

Report this Post02-23-2016 04:48 PM Click Here to See the Profile for JohnWPBClick Here to visit JohnWPB's HomePageSend a Private Message to JohnWPBEdit/Delete MessageReply w/QuoteDirect Link to This Post
I called around today, and found one place that would do it. He explained how, being cast iron, he would go through quite a bit of material / blades, and the time involved, would be around $150 ! ! ! !

Then I remembered this advice:

 
quote
Originally posted by ignorant prodigy:
I used a metal cutting blade on my sawzall and cut the bracket, no machine shop necessary lol


Spoon said the same thing in another thread. I stopped by Home Depot today, and picked up a pack of 5 blades for metal for $10. It took all of about 5 to 10 minutes, and I only used a single blade out of the pack.

About 1/2 way through:


Finished!

[This message has been edited by JohnWPB (edited 02-23-2016).]

IP: Logged
PFF
System Bot
Danyel
Member
Posts: 6087
From: Lévis, Québec, Canada
Registered: Sep 2008


Feedback score:    (91)
Leave feedback


Total ratings: 171
Rate this member

Report this Post02-23-2016 07:41 PM Click Here to See the Profile for DanyelClick Here to visit Danyel's HomePageSend a Private Message to DanyelEdit/Delete MessageReply w/QuoteDirect Link to This Post
Nothing better than using "Good old comon sense and HOME tools

------------------

Black Widow Build Thread 2007 - 2014 Tylers Toy
My Low Profile Buckets for sale My LED Sidemarkers for sale

IP: Logged
JohnWPB
Member
Posts: 5181
From: West Palm Beach, Florida
Registered: May 2009


Feedback score:    (21)
Leave feedback


Total ratings: 144
Rate this member

Report this Post02-24-2016 06:55 PM Click Here to See the Profile for JohnWPBClick Here to visit JohnWPB's HomePageSend a Private Message to JohnWPBEdit/Delete MessageReply w/QuoteDirect Link to This Post
Got a little bit more done today. I removed the fuel rail, and then the Supercharger. I can get that prepped and ready for paint sometime here soon.


I also have been researching gasket kits on eBay, but I am not sure which one to get, as they all need the VIN#. Does anyone know what the "Forth Digit" is for the VIN on this engine? I have no way of finding this out, and a lot of parts searches as for this info. This engine is a 3.8L Supercharged, that came out of a 2004 Grand Prix GTP.
IP: Logged
tshark
Member
Posts: 4388
From:
Registered: Feb 2014


Feedback score:    (6)
Leave feedback


Total ratings: 68
Rate this member

Report this Post02-24-2016 07:42 PM Click Here to See the Profile for tsharkSend a Private Message to tsharkEdit/Delete MessageReply w/QuoteDirect Link to This Post
I thought the VIN was on the engine block.
IP: Logged
Raydar
Member
Posts: 40686
From: Carrollton GA. Out in the... country.
Registered: Oct 1999


Feedback score:    (13)
Leave feedback


Total ratings: 460
Rate this member

Report this Post02-24-2016 08:35 PM Click Here to See the Profile for RaydarSend a Private Message to RaydarEdit/Delete MessageReply w/QuoteDirect Link to This Post
I thought the engine code was the 8th digit of the VIN.
IP: Logged
Raydar
Member
Posts: 40686
From: Carrollton GA. Out in the... country.
Registered: Oct 1999


Feedback score:    (13)
Leave feedback


Total ratings: 460
Rate this member

Report this Post02-24-2016 08:55 PM Click Here to See the Profile for RaydarSend a Private Message to RaydarEdit/Delete MessageReply w/QuoteDirect Link to This Post

Raydar

40686 posts
Member since Oct 1999
If the engine is a Series II, it's an L67 and the VIN code should be "1".
If it's a Series III, it's an L32, and the VIN code should be "4".
http://www.grandprixforums....II-engine-L67-vs-L32

I don't know that much about 3800s. There are plenty of much more knowledgeable people here.

[This message has been edited by Raydar (edited 02-24-2016).]

IP: Logged
JohnWPB
Member
Posts: 5181
From: West Palm Beach, Florida
Registered: May 2009


Feedback score:    (21)
Leave feedback


Total ratings: 144
Rate this member

Report this Post02-25-2016 04:51 PM Click Here to See the Profile for JohnWPBClick Here to visit JohnWPB's HomePageSend a Private Message to JohnWPBEdit/Delete MessageReply w/QuoteDirect Link to This Post
 
quote
Originally posted by Raydar:

If the engine is a Series II, it's an L67 and the VIN code should be "1".
If it's a Series III, it's an L32, and the VIN code should be "4".
http://www.grandprixforums....II-engine-L67-vs-L32


LOL! This proves I have done a LOT of research I read that very thread that you linked to from top to bottom a few weeks ago for unrelated reasons. There is no mention in that thread about a VIN# though......

Thanks for the info, the parts place was asking if it was a "1" or a "4". So now I know it is a "4".

IP: Logged
JohnWPB
Member
Posts: 5181
From: West Palm Beach, Florida
Registered: May 2009


Feedback score:    (21)
Leave feedback


Total ratings: 144
Rate this member

Report this Post02-25-2016 04:54 PM Click Here to See the Profile for JohnWPBClick Here to visit JohnWPB's HomePageSend a Private Message to JohnWPBEdit/Delete MessageReply w/QuoteDirect Link to This Post

JohnWPB

5181 posts
Member since May 2009
 
quote
Originally posted by tshark:
I thought the VIN was on the engine block.


Me Too! I scoured the block, and found all sorts of codes, and such, no VIN number. Then I did a search and came across THIS THREAD where everyone agrees that the VIN number is not on the block

Here is one message from that thread

 
quote
Originally posted by darkhorizon:
No VIN will be on the engine anywhere... Sorry.

[This message has been edited by JohnWPB (edited 02-25-2016).]

IP: Logged
JohnWPB
Member
Posts: 5181
From: West Palm Beach, Florida
Registered: May 2009


Feedback score:    (21)
Leave feedback


Total ratings: 144
Rate this member

Report this Post02-27-2016 12:15 AM Click Here to See the Profile for JohnWPBClick Here to visit JohnWPB's HomePageSend a Private Message to JohnWPBEdit/Delete MessageReply w/QuoteDirect Link to This Post
I have been spending an hour or two each day when I get off work tinkering on the engine if you have not figured that out already This is all new to me. I am an IT guy, computers, office work ect. That was till I bought the Fiero. If you would have told me 5 years ago, I would drive 1,300 miles to go get a used engine, drag it home, buy an engine stand to put it on, and start tearing it apart..... well I would have told you to set the crack pipe down, and step away! LOL

Today, I was able to get the water pump off, and degrease the engine some more. It is taking multiple times, and a small brush at times to get into all the areas so the paint will stick when I am ready to shoot it. I also dissembled the super charger, ready for new PCV valve, bearings and other parts.

Here is today's progress:


While I was cleaning the supercharger, I noticed a bit of scoring inside, and shot a quick video. Is this just normal wear and tear, or something I need to be concerned about?

[This message has been edited by JohnWPB (edited 02-27-2016).]

IP: Logged
tshark
Member
Posts: 4388
From:
Registered: Feb 2014


Feedback score:    (6)
Leave feedback


Total ratings: 68
Rate this member

Report this Post02-27-2016 11:27 AM Click Here to See the Profile for tsharkSend a Private Message to tsharkEdit/Delete MessageReply w/QuoteDirect Link to This Post
Ok. I read that thread. How could anyone prove an engine was or wasn't original, then? How could an engine be proven stolen or not? How could anyone have a ”number-matching” engine and transmission? Why would anyone pull the original engine and tranny so that the originals could later be put back so that the numbers matched?

I'm pretty sure I've seen the VIN in the block, but that was older engines...'70s-'80s.
IP: Logged
JohnWPB
Member
Posts: 5181
From: West Palm Beach, Florida
Registered: May 2009


Feedback score:    (21)
Leave feedback


Total ratings: 144
Rate this member

Report this Post02-27-2016 03:10 PM Click Here to See the Profile for JohnWPBClick Here to visit JohnWPB's HomePageSend a Private Message to JohnWPBEdit/Delete MessageReply w/QuoteDirect Link to This Post
I also have ALWAYS thought VIN numbers were on the engine block. However, I can say, that I have searched this block from top to bottom, and there definitely is not VIN number on it. I have the engine on a stand, and I can see every square inch of the block. This sux, as the engine was pulled out of a 2004 GTP that has been crushed, so no way to get that number to verify mileage ect.
IP: Logged
PFF
System Bot
JohnWPB
Member
Posts: 5181
From: West Palm Beach, Florida
Registered: May 2009


Feedback score:    (21)
Leave feedback


Total ratings: 144
Rate this member

Report this Post02-29-2016 11:54 PM Click Here to See the Profile for JohnWPBClick Here to visit JohnWPB's HomePageSend a Private Message to JohnWPBEdit/Delete MessageReply w/QuoteDirect Link to This Post
Ok, got the super charger all apart, sensors and such removed, degreased, wire brushed, sanded, degreased and thoroughly rinsed, and FINALLY coated in self etching primer.


Tomorrow I hope to tackle the valve coves after work..... These are the only pieces (Valve covers & Supercharger) that are going to be the Vista Blue body color. I want to have them all prepped and spray them all at once, verses cleaning the paint gun multiple times

[This message has been edited by JohnWPB (edited 03-01-2016).]

IP: Logged
JohnWPB
Member
Posts: 5181
From: West Palm Beach, Florida
Registered: May 2009


Feedback score:    (21)
Leave feedback


Total ratings: 144
Rate this member

Report this Post03-01-2016 06:53 PM Click Here to See the Profile for JohnWPBClick Here to visit JohnWPB's HomePageSend a Private Message to JohnWPBEdit/Delete MessageReply w/QuoteDirect Link to This Post
After watching TONS of Youtube videos, doing some research on paint types and such, It has ALL paid off! I painted the Super Charger main body and the snout today after work. I did a fine mist of the base coat, and let that sit for a few minutes. I then did the full coat, and allowed that to flash over for 15 minutes. I then did the same with the clear coat, misting, then a full coat after 15 minutes. Then a second, and final clear coat 15 minutes after that.

I am VERY happy with the results!

Here are the main body, as well as the snout after the final clear coat:


Here is a closeup of part of the snout, it came out like GLASS!

[This message has been edited by JohnWPB (edited 03-03-2016).]

IP: Logged
Napoleon_Tanerite
Member
Posts: 683
From: Columbus, MS
Registered: Sep 2015


Feedback score:    (10)
Leave feedback

Rate this member

Report this Post03-01-2016 08:09 PM Click Here to See the Profile for Napoleon_TaneriteSend a Private Message to Napoleon_TaneriteEdit/Delete MessageReply w/QuoteDirect Link to This Post
Wow, very nice. I've very interested to see how these turn out. Our two cars are VERY similar colors, so I want to see how the blue parts look in a blue car.
IP: Logged
JohnWPB
Member
Posts: 5181
From: West Palm Beach, Florida
Registered: May 2009


Feedback score:    (21)
Leave feedback


Total ratings: 144
Rate this member

Report this Post03-01-2016 08:43 PM Click Here to See the Profile for JohnWPBClick Here to visit JohnWPB's HomePageSend a Private Message to JohnWPBEdit/Delete MessageReply w/QuoteDirect Link to This Post
 
quote
Originally posted by Napoleon_Tanerite:
I want to see how the blue parts look in a blue car.


Honestly, so do I LOL! I am hoping it is not TOO much. I want to do the engine in silver and the brackets / pulleys / braces, parts in black. I was hoping to tie everything together with just the valve covers and Supercharger done in the body color. I don't THINK it's going to be too much, but I have nothing prove otherwise till I can actually see it finished.

This is my very first time painting in 3 stages, etching primer, base coat, clear coat. I just went out to the shed to have a look at it again, and wanted to bring inside just so I can look at it more LOL!

[This message has been edited by JohnWPB (edited 03-01-2016).]

IP: Logged
redraif
Member
Posts: 1460
From: GA
Registered: May 2005


Feedback score: (1)
Leave feedback

Rate this member

Report this Post03-01-2016 08:44 PM Click Here to See the Profile for redraifSend a Private Message to redraifEdit/Delete MessageReply w/QuoteDirect Link to This Post
Awesome
IP: Logged
Slammed
Member
Posts: 783
From: Sumner, WA
Registered: Mar 2015


Feedback score:    (8)
Leave feedback


Total ratings: 79
Rate this member

Report this Post03-01-2016 09:04 PM Click Here to See the Profile for SlammedSend a Private Message to SlammedEdit/Delete MessageReply w/QuoteDirect Link to This Post
That is a gorgeous color! It's going to look awesome
IP: Logged
JohnWPB
Member
Posts: 5181
From: West Palm Beach, Florida
Registered: May 2009


Feedback score:    (21)
Leave feedback


Total ratings: 144
Rate this member

Report this Post03-01-2016 10:08 PM Click Here to See the Profile for JohnWPBClick Here to visit JohnWPB's HomePageSend a Private Message to JohnWPBEdit/Delete MessageReply w/QuoteDirect Link to This Post
 
quote
Originally posted by redraif:
Awesome


quote
Originally posted by Slammed:
That is a gorgeous color! It's going to look awesome


Thank you! Yea, I spent a LONG time trying to find THE blue that I wanted to paint my Fiero. All my friends got sick of me pointing out every blue car on the highway, roads, parking lots, ect. This went on for a few months hahaha..... I ended up going to a CarMax close to me and looking at TONS of cars. The color I settled with is off of a 2012 Mustang GT, "Vista Blue".
IP: Logged
Vernon8360
Member
Posts: 1106
From: Pittsburgh, PA
Registered: Feb 2008


Feedback score: (2)
Leave feedback

Rate this member

Report this Post03-02-2016 09:10 AM Click Here to See the Profile for Vernon8360Send a Private Message to Vernon8360Edit/Delete MessageReply w/QuoteDirect Link to This Post
That's really nice. Did you use a special kind of brush?
IP: Logged
lateFormula
Member
Posts: 1047
From: Detroit Rock City
Registered: Jul 2002


Feedback score: (2)
Leave feedback

Rate this member

Report this Post03-02-2016 12:54 PM Click Here to See the Profile for lateFormulaSend a Private Message to lateFormulaEdit/Delete MessageReply w/QuoteDirect Link to This Post
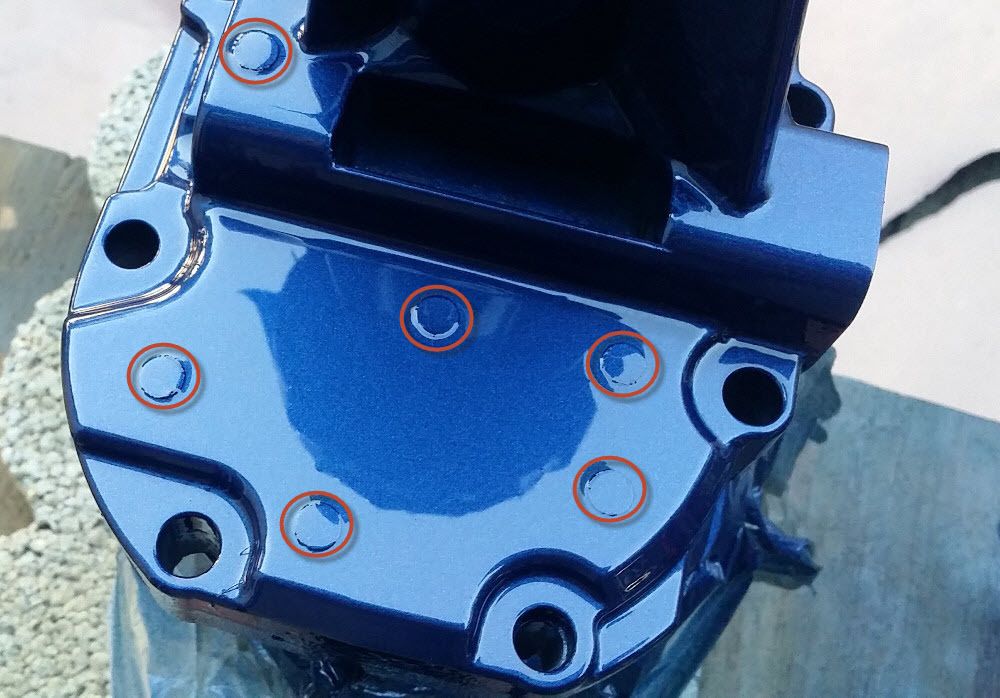
John it's your car, your call, but if I were going to invest the time, money and resources to partially dismantle an engine to clean it up and paint it to match the car I would have spent some time smoothing out the parts before priming and painting. In this picture I would have sanded off all of the ejector marks:
IP: Logged
Previous Page | Next Page

This topic is 17 pages long:  1   2   3   4   5   6   7   8   9   10   11   12   13   14   15   16   17 
next newest topic | next oldest topic

All times are ET (US)

Post New Topic  Post A Reply
Hop to:

Contact Us | Back To Main Page

Advertizing on PFF | Fiero Parts Vendors
PFF Merchandise | Fiero Gallery | Ogre's Cave
Real-Time Chat | Fiero Related Auctions on eBay


Copyright (c) 1999, C. Pennock