You really should use one of Rodney's new slaves. The cast iron bore gets really nasty over the years, albeit the lower seal on the MR2 piston will help scrape it clean and prevent the top seal from leaking. Wayne had me install one on his GT. I took it apart to look at everything and its a great design for the money.
Joe finished fabricating the piece to get the last two water hoses hooked up to the water pump. So a little work and some hose clamps later, that was done!
Now getting the last screw for the water pump in place was a PAIN. It had an allen-key head, and was too close to everything else to get a rachet up there. The screw was also too close to pump housing to replace it with a bolt and use an open ended wrench. The Solution? Joe cut off the right sized allen key head, and quickly welded it into a tiny wrench. I got under the car after finding a good position to get at it, and started working on it. It was very, very slow. Only a quarter turn each time, and sometimes getting the tool to line up and seat in the screw was tough. But I eventually got it!
I then began filling the cooling system... and didn't know/remember that my new radiator had a drain valve on the bottom of it. Thankfully I could feel it from under the car and screwed it shut, but lost about a half gallon of fluid. The rear of the car was jacked up at this time and I was filling it through the big hose that runs from the top of the engine block to the radiator. Once it reached the top of the radiator, we capped it and stopped (for then) since it was still in the air.
Wires for the thermostat are connected and I managed to zip tie them up out of the way (very difficult, required using four zip ties to "fish" the line over and then back down to where I could grab it).
Greg masterfully put in my new master and slave clutch with the MR2 piston with the double seal. After about 45 minutes of uncertain panic, the clutch worked correctly (short-full version -Greg was worried that my hydraulic throwout bearing was not in there, and pondering the easiest way to get in the transmission).
After that, I asked him to reassemble the interior, thinking that Jeff told me that he found and fixed the short. At the end of the night, when we were working on getting power to the secondary fuel pump... Greg discovered the short (again), when the wires he was going to tap were energized and shouldn't have been. He has a nifty voltemeter that has an sound-alarm-warning for when doing continuity testing, so after some back and for between us, him running through the fuses in the car, and us tapping and unplugging stuff in the engine bay - we found the culprit! --- the two ****ing red wires that run from the key relay to power the water pump and electric choke on my car.
It was too late at night to re-tear the interior apart any further than the armrest/glovebox thingie. Greg though said he'd coordinate with Joe to be back out there on Thursday and hunt down the short.
I did test my headlights though. I'm glad I managed to install/wire something up correctly and without any major issues. One was a bit delayed from the other, but the motors haven't run in over a year, and I probably need to play with how tight I have them cranked at the hinges, maybe a little lubrication.
The decklid had some bizarre reaction to the paint in some areas... it was... really, really weird looking. I should have taken a picture. So Joe started to sand down those spots, and laid on some more primer, and will be repainting those places.
I picked up some butt crimp connectors to get that last wire for the A/C, didn't get to that yet. This late in the year, not too worried about getting the A/C working, just keeping my hopes up that the compressor is good when I *do* use it next year.
Got everything ready for my throttle-spring-return, just need to screw it into place and do a final check on it (couldn't due to the car being jacked up the majority of the day again.
So the list shrunk... and then grew again!!! Gahhh!
But a HUGE thanks to Greg (CowsPatoot) for taking up 13 hours of his day, PLUS travel, to help me out. And going back out there to finish chasing down the wiring nightmares. Sharon (FierFly on Pennocks) came along too.
The car is up and running. There are still things left to be re-snugged (valve covers, for one... that's going to be a challenge). The decklid is receiving it's final coat of clear tonight and will be put on tomorrow and then I will be leaving with the car (lots of issues with the final paint on the decklid).
Found out that I have a very, very tiny axel seal leak. And my A/C Compressors SQUEELS!!! Oh it's horrible... it's not constant, but close enough. Joe is worried that it's from a bad bearing, I'm wondering if it's from being unhooked for so long and not lubricated. Is there a way to lubricate that thing without getting it charged?
I will make an uber post tomorrow, after I've gotten some sleep, and I'm sure CowsPatoot will chime in with my errors and additional info I forgot.
A massive, MASSIVE "Thank you" to CP again for all the help. It'd probably be there for another three weeks or so if not for his efforts. And thank you for answering all my questions and being a generally good sport.
Thursday - I was feeling kinda crappy, general malaise and having focus issues. In my job, rapidly juggling multiple data sources accurately - sometimes while on the phone as well, is a requirement. So not being able to stay focused could mean that 'big trouble' mistakes could happen. I finished what work I had, and then left for the day. Tooling around on the car takes focus, but not normally having to rapidly juggle multiple things.
So I headed down to the shop to meet up with Greg and Sharon. Greg had a solid 2.5 hours on me, so he'd need to fill in what he was up to besides the following. The two wires that ran from the cabin into the engine compartments, one was for my electric choke, the other for the water pump. He was pulling through a slightly heavier gauge wire and cleaning up the connections, as well as checking pretty much all of the wiring in the car. I pulled up stats on the water pump and fuel pump so we cold make sure they'd be properly fused and (in the case of the fuel pump) hooked into something that could support it's power draw.
I then got the E-brake coupler put on, and continued filling up the coolant system. To hear fluid dribbling out. Again. Only this time I wasn't so lucky as to have it be an open valve or loose hose clamp. I also got the throttle return spring bracket in place.
Some SBC blocks have a second, much smaller hole, tapped into the water jacket. My old block did not, my new block did. Joe noticed the hole, but assumed that it had been plugged. It hadn't been. He had the right kind of plug for it... unfortunately the arm of the waterpump covered the hole by a fraction, making it impossible to get the plug in with the pump on. Figures.
So going back to using the handtool that Joe crafted to slowly work out the tough-to-get bottom bolt, and than a combination of hand tools and sockets to get out the other three from up top. Then of course we had to dry out the area so when we put in the plug (with some RTV on it) it would seat properly and the RTV would be making contact with the block. Since we were reusing the seal on the water pump, we smeared a super thin layer of RTV on both sides of that, too. Just to be safe. Because getting this pump off took over an hour.
Putting it back on went faster, Joe did the top-access bolts while I worked on the bolt-of-doom. Joe did manage to find a bolt that had a small enough hex head so that a wrench could get on it, so that went faster than the hex-head bolt it came with. We then finished filling the cooling system, with only a few dribbles and drips from hose clamps that needed to be turned down a little more.
So now, the electric was mostly done - we had to rule out one "false" short, Greg would need to explain it again, but something about the "open door" sensor running through a relay along with the gauges that can cause a false short/continuity. So the interior stayed apart, and the fuse pulled from the gauges for now. Greg finished wiring in the Holley fuel pump.
So we kicked the car to "Run" (didn't crank it yet) to make sure the pumps were running, and to make sure that the cooling system was filled properly. Once that was done we disconnected the distributor so we could crank it a bit in short bursts to push oil back up and coat things. I hit the key and the starter made a horrible grinding sound, I stopped immediately. It was also "weak" sounding, so the battery charger went on. Another attempt a little while later, same grinding sound, so we called it a night till we could look at the starter the next day.
Friday - Joe climbed under the car and found that the starter (which is bolted to a block of billet and that is bolted to the bell housing) was not engaging the flywheel - just the tips were catching each other. So after about an hour or so of messing with that, the starter was dead on.
We then connected the distributor back up and fired it up! It started without any trouble, though we did have some fuel pressure issues. Scott - the guy who built the engine, came over after he closed shop to check things out. He helped with chasing/fixing some dribbles, and got the carb tuned. He found that at least one of the jets was clogged - dust/dirt/carbon from sitting around for a year+, and we got it to clear itself some. He showed me how to adjust the idle speed, saying it'd need to be tweaked as the carb worked the rest of the garbage out. A can of SeaFoam went into the tank to help with that.
The decklid was still giving Joe issues. Whatever was contaminating it was causing the primer and paint to come up in spots like dried mud. He kept sanding, cleaning, and trying again, each time with better results. He finally got all of it to lay nice, but since he shop wasn't heated and he was trying to spray on the clear Saturday night, the clear was a bit chilly and I got some "orange peel" going on. He didn't have time to redress my hood, which has areas that need to be re-sprayed with clear.
Saturday - Greg came out again to help get the interior back together, brought me an InfiniteWill trunk seal, and a bunch of other little odds and ends to finish getting the trim pieces on and in place. After that was all done, and another engine run and checking for drips, I baby'd it around the parking lot to make sure the gears were shifting right. Discovered the brakes had to be bleed again.
Thankfully I had picked up a MightyVac, so Greg was able to tear through bleeding the brakes in no time (and teflon taped the bleed screws to help deal with air getting pulled in around them by the vac.) So completely fresh fluid for the clutch and brakes, yay!
We then took it down the road a bit to see how it handled and to find out how badly it needed an alignment. Because the front suspension had gone untouched, it wasn't too bad at all - he still said I should have it checked to be sure. We found out the hardway that my headlights need some serious time being adjusted. And it's not terribly easy to do them with the Hella lamps I got. I'll probably need to pop off the headlight covers in order to do it quickly, or else it'll be alot of "hood down, check. hood up, adjust. repeat."
The car is now home today! Picked it up and helped Joe put the decklid on. SOMEONE lifted the car by the latch, as we had to hammer the latch down a bit to get it to catch correctly - this despite my instructions to both Joe and Jeff to not do that.
I have Rodney Dickmans hydraulic decklid lifter on there, but I think it needs to be adjusted. When I pop the trunk it doesn't go up, once I lift it about an inch or so it starts to push it up. It makes using the electric-release... well, unusable! Drove nearly 100 miles, the engine temp never got above 170. AND!!! NO SQUEEL!!! No idea why, but I am NOT complaining!!
Also, no HORRIBLE cabin drone at 45 mph. Driving it I did not find ANY speed that I got drone, but the mufflers did not quiet it down as much as I hoped. So now I'll need to revisit putting more stuff in the engine side of the firewall and behind/under the seats in the cabin to try to quiet it down. Cruising you can still have a reasonable conversation - highway speeds it gets alot tougher.
Things left to do now:
Inspection. A/C recharge. Replace Gregs InfiniteWill trunk seal. Headlight adjustment. transmission axle seals. Replace all the coolant piping with the stainless steel stuff from Fiero store. Alignment.
I think that's it, then the car is done until I get the EFI swap ready to go! Maybe brakes first. Debating on that.
And yes. I can turn a wrench. After many questions and a tutorial...
But seriously, my fear is more from not knowing what I"m turning a wrench on, which could result in broken stuff. Never good.
Now trying to figure out why I'm not getting notifications on posts to my own thread.... lol
No issues on the way home, just still a few little dribbles as I mentioned, and that one drip-rail-trim-piece-thingie on the passanger side likes to keep popping part way off. I think it's because that rear quarter panel on that side is sitting about a 1/4 inch lower than it should. You can see the drop now that the decklid is on there. No squeel on the way home earlier, either. Though this morning when I did the "Car shuffle" to get the Town Car out, it was come-and-go.
[This message has been edited by Trinten (edited 11-15-2010).]
Okay, so drove the car to work yesterday without any issues, the voltmeter was sitting steady at 14/15 (one to two tick marks after 13). Not a squeel, not a peep.
I leave work, and notice the needle is now sitting *right* on 13. I didn't pay it much mind. (also had a the arm pop off a headlight motor. Need to get a retaining clip for that apparently).
Today on the way to Koreys meet... the needle sat at 11/12. On the way home... it started off at 11, and slowly dropped down to betwen between 9 and 10 (all highway driving, goosing the gas had no impact on the needle).
Not only is this troubling, but as an added annoyance, it made my signals blink about ONCE A MINUTE! lol
Now there is a little oil getting out from under my valve covers.. is it possible some is hitting my belt and making it too slick to spin the alternator at proper speed? Or is this alternator a dud -- meaning I need to find that receipt...!
Pop it off and take it to a local parts store which can do an electrical load test. It also helps to mention which kind of alternator it is. SI (one wire) alternators are incredibly straightforward, but CS style alternators and the like require a constant power feed to energize the rotor. I've had my share of alternator troubles in the past, and your description sounds like faulty equipment, but I don't know how your charging system is setup. It's possible you have a poor ground or small diameter wire that's generating resistance. First step: find out if the generator passes the load test.
[This message has been edited by L67 (edited 11-20-2010).]
Due to concerns of having to make changes to make anything else fit and wanting to get the car done ASAP (by that time, at least), I had just gotten a new stock replacement alternator for the Fiero from O'Reillys. It was an Ultima 94 amp alternator. I wanted to do one of those CS-144 (I think it's the 144??) but didn't want to add another wrinkle to the progress at that time.
Joe had to change the pulley, swapped it off my old one.
As for taking it off... it'll probably have to be driven/towed someplace to have that done. I'll have to ask a few people if/when they'd be able to help me with it. Depending on how far I have to take it, I might finally use my AAA to do it... with the power running low, the engine is running hotter - likely because the water pump and radiator fan aren't running at full capacity.
Which is inside the darn alternator. Figures. lol. Thanks for the info!
I will slide under there tomorrow to check the connections just in case, but it was new ground cables and such hooked up, the positive cable was reused. I'll keep my fingers crossed that something just came loose.
Thank you very much for the suggestions and info! (and hope I can find the receipt so I can get a refund if it's not just a loose/corroded connection...)
Okay, got my two test LED bulbs from SuperbrightLEDS today. I bought one each of the following: 1157-R45-T 1157-R24-WV "WIDE" Polarized
The R45-T is much like the ones I got for my PONTIAC emblem (WLED-RHP9 "Pure Red"), only with more LEDs and the proper base.
The WV is sorta like a flashlight LED, with all of the bulbs pointing in the same direction. Since the inside of the housing isn't reflective, I thought they might be better. I was wrong.
In the following pic - the top is my original 2057 bulbs.
The bottom - the two "inside" bulbs are still the 2057. The one on the outside left is the WV, the outside right is the R45. You can see that the difference in brightness between the 2057 and R45 is subtle (in the R45 favor), but HUGE between the WV and 2057 (in the 2057 favor). This applied even running around my street like an idiot checking at different angles.
Plus, as Ogre warns in his write up, they are not TOO bright, as to make it tough to judge the distance between the back of my car and any following vehicle. So I guess I'm ordering three more of the R45s!!
We did an alternator swap. While we had the old one out, we had it tested at Advance Auto....it tested good. We decided to continue with the swap anyway to get the higher amps of the CS. We put in a 140 amp CS Power Master alternator from Summit. We pulled the plug off a spare 88 harness I had, and wired it up. Fired it up, and we had 15 volts. Woo hoo. So, Vince pulled out to head home. He got to the stop sign, realized his blinkers weren't working, and saw that it had dropped to under 13 volts again. Same problem as before.
I am at a loss. Not so much that it isn't working (there could be a wiring issue anywhere else in the car), but more because it worked for a moment, then died again. I am pulling out the wiring diagrams....but would love to have some ideas on where to start.
The charging issue is still being investigated by Greg (CowsPatoot). To my understanding - he's chased and tested everything out the engine bay for the issue, and all that stuff looks good, so he thinks the issue might be in the engine wiring harness.
He has removed my existing harness and took one of his spares, and is in the process of building a new cleaned up harness for me! No more snipped and electric-taped off wires!
If this - for some strange reason doesn't fix the charging issue, at least it'll make it easier to chase things down.
He also knows a guy near him that can lengthen my A/C hoses! Greg is really going all out on getting things fixed up and tweaked. I can't express my appreciation enough.
I just really hope once this charging issue is fixed, it'll be the last (difficult) problem to creep up for a long, long time...
He got it all apart and inspected and said it looks great, if I wanted to be paranoid I could stand to replace the synchros. He's going to pull the gears off the main shaft so I can send the gears off to be shot peened and cryotreated, and just having the main shaft cryo treated. Then once I get those back, he'll put the whole thing back together for me and I can start making arrangements to have it installed!
CowsPatoot is making progress on the new harness, hoping that resolves the charging issue - or at least makes it easier to find.
Mechanically, with the exception of a small/slow trans fluid leak around the seals, and having to retorque the valve covers... it's all working now!
The F23 is being reassembled, I wanted to hold off on putting it in until I got the LSD for it, but since the Muncie would need to come out to have the seals done (right?) I figured I'd just move ahead with the new transmission getting put in for now.
Got TLG's markers in the front, had to drop him a PM about an issue with the rear ones. Also got his courtesy lights and the trunk light. The stuff that hooked up right is very slick. Also got all the lights in the back of the car replaced with nifty LEDs, save the Amber (wrong base, my fault) and the backups (which I didn't see a point to doing).
Still quite a bit I want to do to it... but I'm just thrilled I can drive it! (with a top off on transmission fluid every 6 months or so for now. heh).
Yeah, one of them there isn't enough room to double nut it. If I loose any more, I'll definitely find some bolts that have that safety-wire option. I think ARP actually made some specifically for that... I might have to hunt them down.
Pics! There are some pics in the linked thread. I don't have a decent camera. Just my lousy camera phone -- I lost my digital camera when we moved to Greensboro. I know Paul is going to have a lot of pics in his tutorial thread on the F23 swap, though!
As for vanity pics... my car is so filthy right now. lol. I haven't had a chance to get it washed, every weekend I've been pretty busy. Maybe this weekend! Maybe.
As excited as I am to just blurt out the numbers it put down, here's the events of the day.
Woke up at a horribly early time (for me), to be at Pro-Dyno by 9am (which is when he said for us to get there). Pro Dyno does tuning as well as has a full service performance shop. We get there about 5 minutes late, and there's a fox body Mustang on the dyno already, just built and in to be tuned.
So while Dan (the owner and head tuner, and all around a nice guy) worked on that, Brian went about putting on the bigger injectors and MAF on his T-bird that was getting retuned today (awesome news on that too).
The Mustang (which was up there for nearly two hours after we got there) had a calamity, due to a wastegate malfunction, so was trailered. By this time Brian had the new injectors and MAF in.
Dan told us he had another job that was going to be real quick, then he'd focus on ours. It was a brand new Mustang with very little done, mod wise. And it was on and off there very quickly.
Dan rolls Brians T-bird on there next, which had a mild peak increase, but a fantastic overall curve increase on the rest of the band, up around 30 HP/TQ in some places.
My turn. He gets in the Fiero and starts it up, and gives me this surprised look. "It sounds like an old Corvette! What the hell do you got in here?" "You'll see."
He gets it up on the Dyno and I open the trunk. He looks around, hops down, goes to the shop side, and calls all of them over to check it out. So that was pretty cool. They hung around for the first pull.
Wideband o2 goes in, wire reader (for the RPM) goes on, he starts it up, and looks at the screen funny -- because it's showing 18.5 on the AFR. He calls out to one of the other guys. "You got that sensor in right?" "Yeah!"
He gives it a little gas, and the AFR starts to get better, he gradually speeds it up, bringing it up to around 3k, and calls out to me. "What's your redline?" "6500!" he raises his brow and gives me the 'not-bad-nod', and starts sharply accelerating, my AFR gets rich... real rich, real fast.
Second pull, he only goes up to 4th gear.
Third pull, still only goes up to 4th, but gets on it harder. Shuts it down, gets out and says "We normally only put up the cars we tune on Facebook, but this thing is going on there!" he looks at one of his employees "Get this on there, call it Monster Fiero or something like that."
So the employee takes a few pictures and goes about doing that. Dan looks at me.
"Your primary jets are too lean, your secondaries are WAY too rich. I could feel it bogging down when they kicked in." and he shows me the AFR fuel line thingie, and explains more of it to me, and ends with "So get the jetting on the primary brought up a little, and on the secondary brought down a little." "How much more power will that get me? Like 3 or 4?" Dan shook his head. "Try 10 or 20." "Seriously?" "Seriously. Get it done."
So now that you know that my car impressed a guy who builds and tunes performance cars all day long, and knowing that there's more power to be had... the numbers! Dun Dun DUNNNN:
371 HP at a little over 6k, and 381 Torque at right on 4.75k.
Already called Scott and left him a voicemail to see about getting the jetting changed on the carb, and then going to go back.
Besides that awesome news, I"m even more excited about the fact that Scott told me once I get the fuel injection done, my curve will likely be much better, and I'll probably make better peak power. So I'm really glad I'm getting this carb dynos done so I have some before and afters.
The dynograph I have is printed on some glossy paper, but I don't think it'll cause any issues with scanning, going to try to get that done now and I'll get it up.
Edit: Here's the dyno sheet! I rotated it in Webshots, so the quality dropped some, but it's still readable. I can always turn on my PC with a real photo program and re-upload it if anyone thinks it's necessary.
My roommate had taken some video of the car on the Dyno, here are the two videos he shot. He was already hit up by a well-known Fiero Troll, one of the more active members over on RFT - I'm sure that's all I need to say for everyone here to know exactly who I'm talking about. lol Here's the video links.
Those are some pretty good numbers! Dial in the A/F ratio to 13.0 : 1 and you might get real close to breaking 400 whp. With the stock wheels, that thing has to be scary on the street.
Do you know the camshaft and heads you are running?
Comp Cams 280 XFI HR13 with their lifters as well. Heads are AFR 195cc Eliminator heads.
Edit: Actually it's pretty well behaved on the street, just a tad louder than I'd like. Easing it into first from a dead stop without making a bunch of racket, or without the engine bogging/car jerking is tough. Outside of that, with the Yokohamas I have on there, it's been a great little street car. But then again, I try to limit my stupidity to the track.
[This message has been edited by Trinten (edited 05-13-2012).]
That low rpm jerking is probably due to the lean A/F mixure or too much low rpm ignition advance for the camshaft. Tweak those two and you will greatly improve your drive-ability.
Have you put enough miles on it to know what kind of mpg it will get on the highway?
Yes! I've been driving it around for a while now. At one point I got about 21 MPG, however, that was mostly highway. After my friend Ted adjusted the spark timing on it and played with the carb some last weekend, I noticed that the MPG has fallen down to around 19 - again, mostly highway driving. By mostly highway, I am referring to trips of 90 miles or more, with only two-four miles of it being stop-and-go to get on, or off, the highways.
I just wish Ted had picked up on the A/F thing, but it's not like he has a whole lot of high end tools, we were working with just a vacuum gauge. lol
Yes! I'm sorry I forgot to update this thread (I've been keeping it updated on the ncfiero forum). Here's the consolidated posts from that:
This was posted there on August 11th:
Alright! Got to Pro Dyno about fifteen minutes early, Scott was running about 15 minutes behind. Dan pulled the Fiero up onto the dyno and got it all setup. All in all, we did about 3 "cruise runs" (going at a normal acceleration to 70 mph to watch A/F) and 6 pulls.
Air temp was about the same as it was last time I was there, but the humidity was double!
When Scott showed up, he had Dan run a pull first to get a baseline. I was shocked to see how much of a difference humidity can make - down 14 HP and Torque!
From here on out, Scott changed the springs, metering rods, adjusted the idle, and played with timing. After the A/F was pretty much nailed down he tried adjusting the timing, first pushing it up two degrees, then back two, to see if it liked it any better. The "blue line" pull in the upcoming scan is from the advanced timing - I wonder if the dip and odd behavior of the car is when the belt popped off.
That's right, the belt popped off. Thankfully didn't snap. Just popped off. Dan didn't notice it because he's staring out the driving side window watching the computer monitors during the run. We didn't notice till he backed the car off and we saw the belt laying there. So Scott was wondering if it would have done better with that little bit more timing (or just in general), since it would have full juice coming from the alternator to the ignition system, and not just from the battery. Despite this, the engine made a horsepower more and the same amount of torque - in other words, we picked up 15 HP and 14 torque from the baseline.
Regardless, he set the timing back to where it was to start with, and we did a final pull, from "the blue pull" as a guide I lost 10 HP and 7 torque, but no oddities with the engine.
I debated on asking Dan to put it back on there when I got the belt back on (he was nice enough to loan me a floor jack, stand, wrench, and pry bar), so Scott could bump the timing again, but he was already occupied with something in the build-side of his shop when I was finished.
Regardless, after Scott was done, it was back near what it put down under better conditions, and Dan agreed - "You put it up here at 70 degrees and 19% humidity, it'll be a huge difference."
So picked up roughly 10 HP and 10 ft/lbs torque, and might have better mileage now that the A/F is fixed. Along with the possibility of another 5 HP/TQ lurking in the timing. I doubt I'll have a chance to put it on a dyno again before the EFI, but if I do, I'll bump the timing and see what it does.
If those gains translate directly (which I don't know if it works that way), that puts my car at around 381 HP and 391 ft/lbs torque in 28% humidity (versus the 48%-56% today).
Now just to wait and see how my gas mileage does, how it does at the track in a few weeks, and what it puts down once the EFI is on there!
*end of that post*
I've had it to the track since then, slips up in the 1/4 mile thread. My gas mileage dropped about 1 mpg on the highway. Though that was driving up into West Viriginia, so I'm not sure what kind of impact the mountains would have had on my MPG, compared to the (relatively) flat highways I normally drive on.
Also busted a tripod at the track (hope that's all it is, troubleshot it on the phone with CowsPatoot), so looking into doing the tripod swap from the Berettas in the short term, see how they hold up. If I get more failures there, I'll see if the DSS axles have upgraded tripods too, or if their strength rating is just for the actual axle.
Thinking about trying to figure out how to do a "Safety loop" for the axles, near the transmission, so if it breaks in a really bad spot, it won't whip around and smash my transmission.
So, no updates because nothing much has been going on! (Except I need to redo the pictures, since webshots closed their doors, and all the picture links are broken)
Between work, family and the next step of my car requiring someone with far better skills than I, just not much has happened.
But starting this Wednesday, that will change!
Someone with commendable skills (and equipment) at his disposal, agreed to do my EFI swap, get my A/C working, redo my exhaust a bit (to try to make it quieter without constriction, and ceramic coat it), dyno tune, and get it setup with a freaking sweet Serpentine belt setup, with an idler pulley! So no more squeaky belt! No more belts snapping (as often)! Better arrangement of my coolant pipes!
Plus he's going to put my stock decklid on there, which is not in as nice condition as my current one (current one has a relatively new coat of paint), but if the scoop isn't functional/necessary, I don't see a reason to keep it on.
He knows I pay for quality work, and that I wouldn't haggle with him over the cost, and I think that's why he took the job.
He said he was also going to clean up the engine bay, move the C500 connector, and remotely setup my water pump.
I'm not saying who it is yet, because I don't know if he wants to publicize that he's doing this work for me just yet.
Oh! He's also going to be putting in my rockers and the stock-height valve covers - when I bought my valvetrain setup, I didn't realize that everything was designed for 1.6 rockers, and I bought 1.5 rockers. There's some other stuff I've asked him about too, but I'm going to wait on posting the full list after it's all said and done.
Yes, I'm one of those guys that mostly "just write checks", but I always give credit where it's due, and would rather see it done with fantastic results the first time (and not have to worry about it breaking), getting that piece of mind, rather than the sense of accomplishment that comes with trying to do this stuff myself (most of which I couldn't, anyway... it would require a bunch of machining equipment).
As Trinten stated above, his SBC/F23 car is finally going to get some proper attention and love. His car showed up at the house today and kicked the LS4/F40 car out of the garage for a few months.
The car already has a pretty stout engine with the chassis dyno chart to prove it (371 whp), so its doesn't need much upgrading there (roller rockers and valve springs). I get the honor of performing the upgrade to fuel injection to this setup while refining the rest of the swap into something he can be proud to show off.
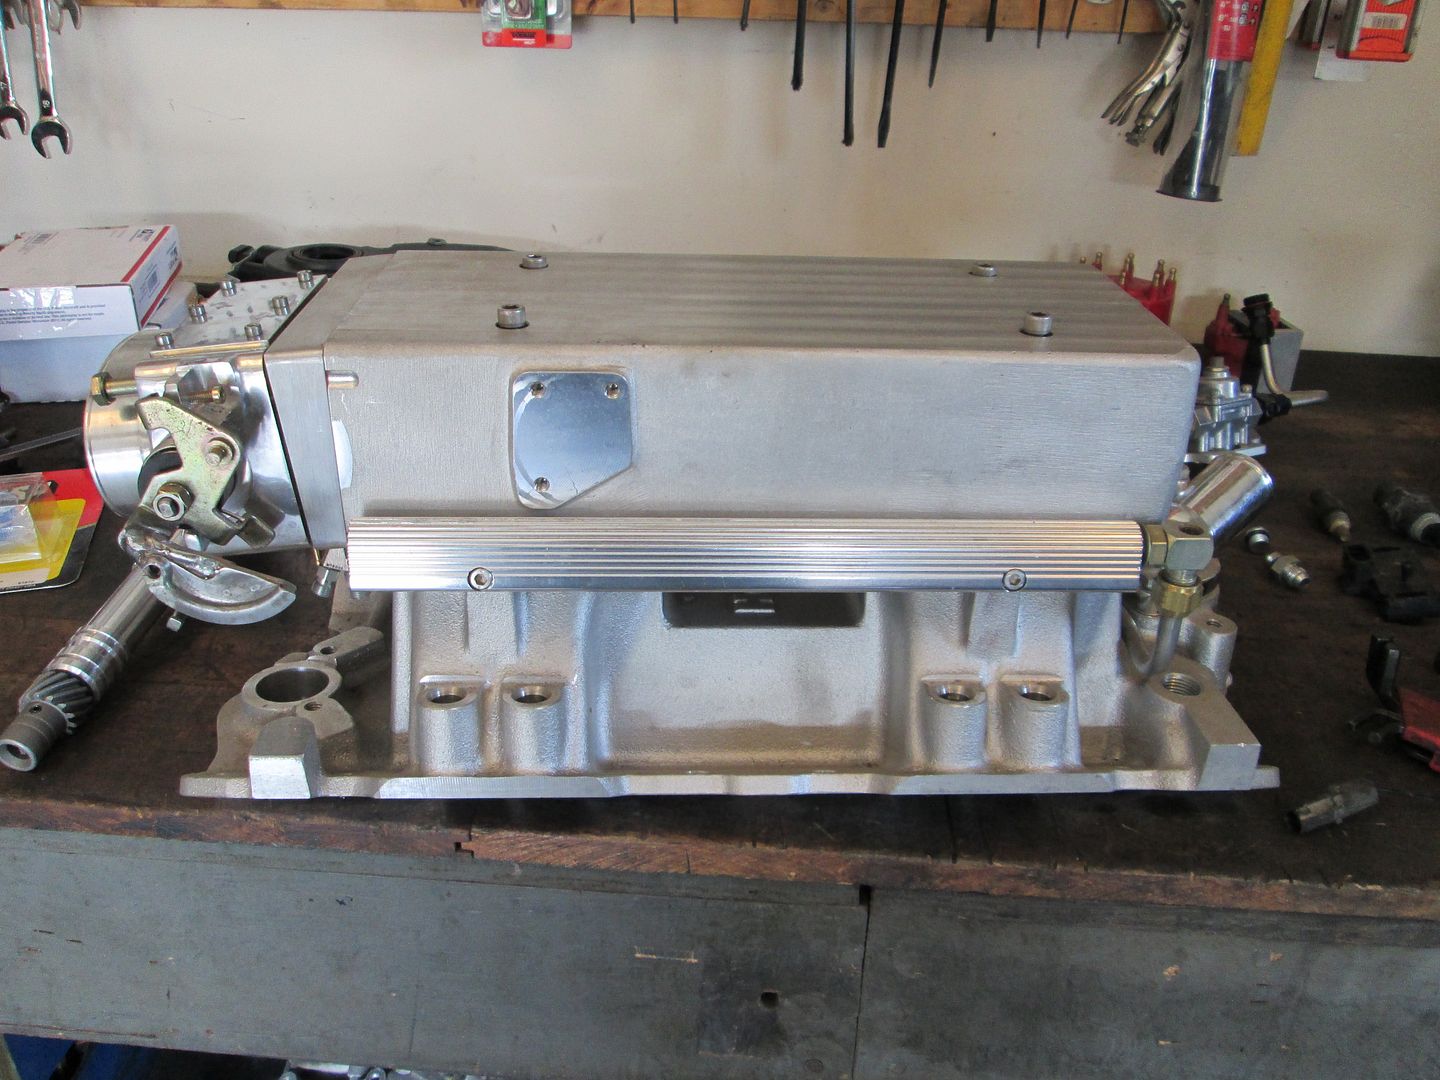
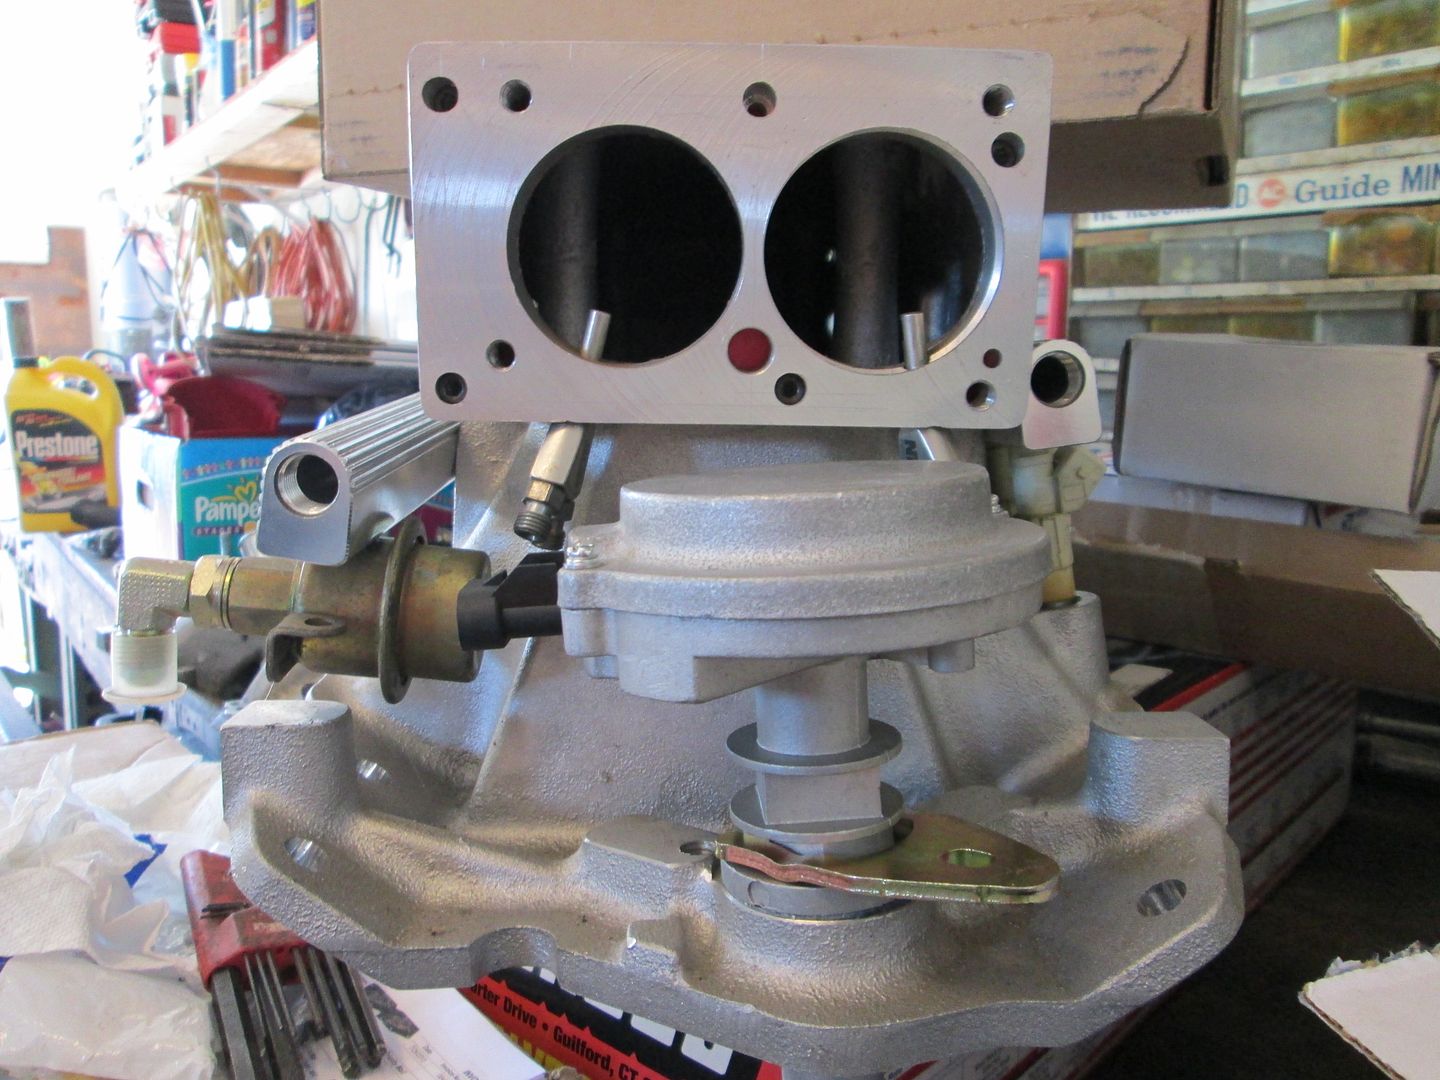
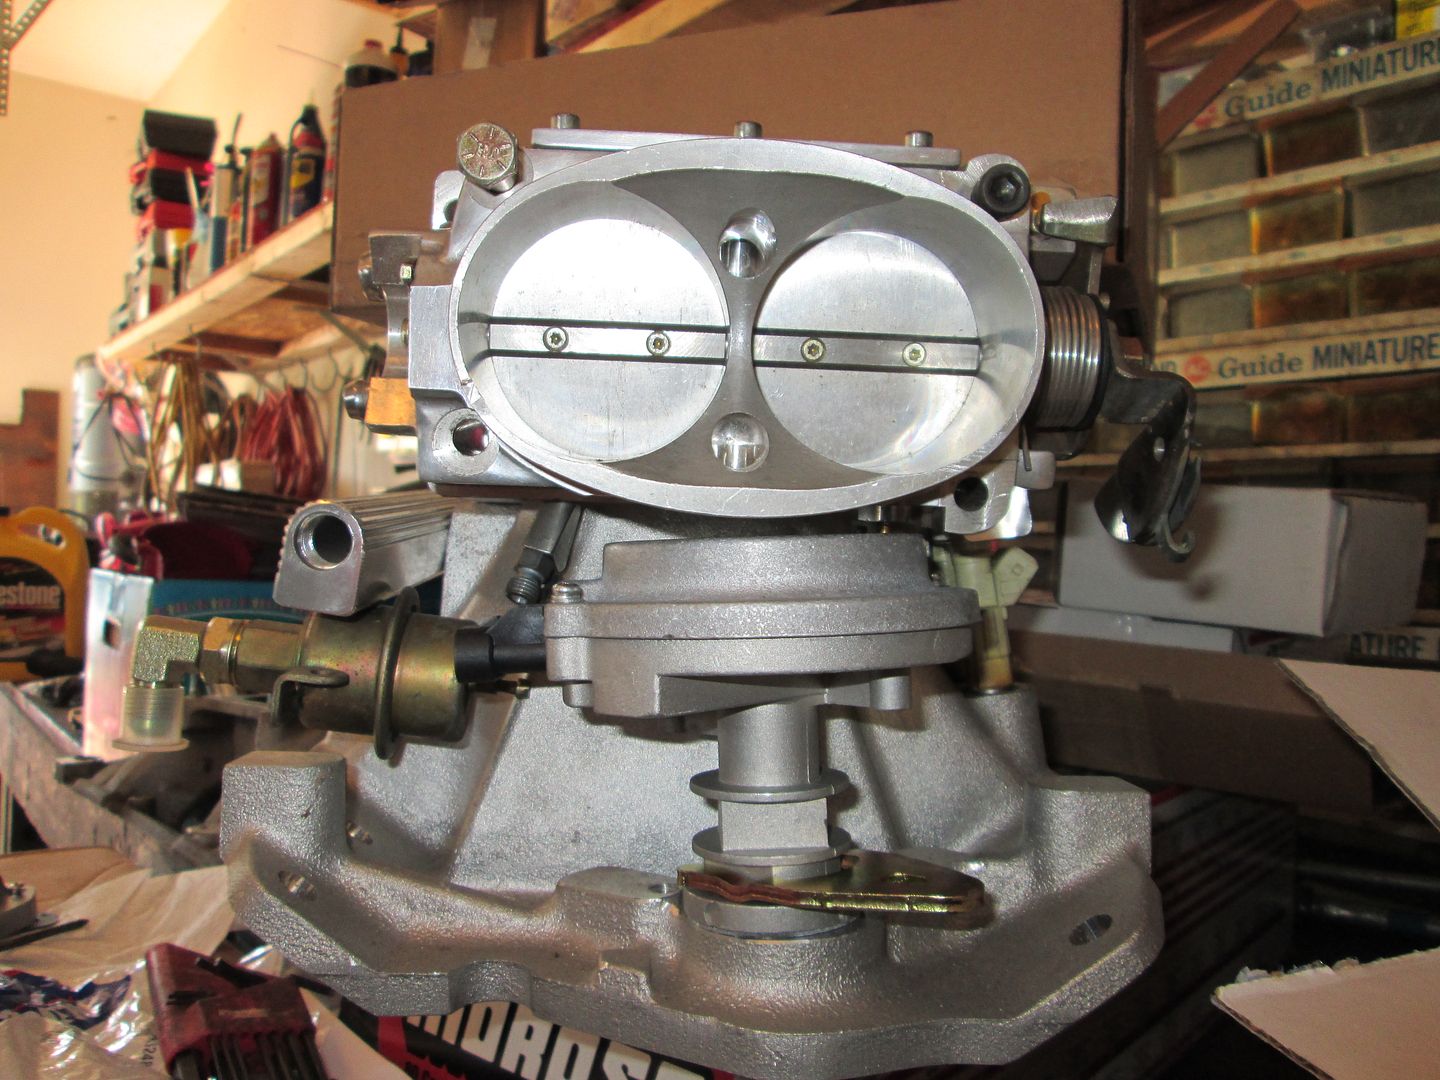
The fuel injection conversion will use a modified Holley Stealth Ram intake controlled via an LS1 ecm. Here is a teaser pic:
It will also have the mounting system reworked (engine isn't level), the coolant system revised, the accessory drive converted to serpentine, the exhaust reworked and the engine bay detailed in similar fashion as my LS4/F40 swap... Stay tuned.
Guru is crazy-efficient. That car was in his driveway around 4pm Eastern today (I know, I called CowsPatoot, who transported it on his trailer, a few minutes to 5pm, and he was saying they were just getting ready to leave after he zipped around in my car a bit chasing Guru's Fiero). So in three hours, he has:
Gone over my intake system. Inspected my car. Detailed some issues with it, sent me a VERY thorough PM about all of his findings and questions. Drove it to use up some of the gas in the tank (I had a near full tank, but there's been so much rain in Charlotte for the last two months I haven't been able to drive it as much as I wanted) Did his posts here with pictures. In less than 3 hours.
That's on par with L67 dropping the engine/cradle by himself in like, 90 minutes and sending me pictures of it, when he'd never really messed with a V8 Fiero before.
Thanks again to FieroGuru for taking this project on. I'm really looking forward to everything!!
[This message has been edited by Trinten (edited 07-25-2013).]
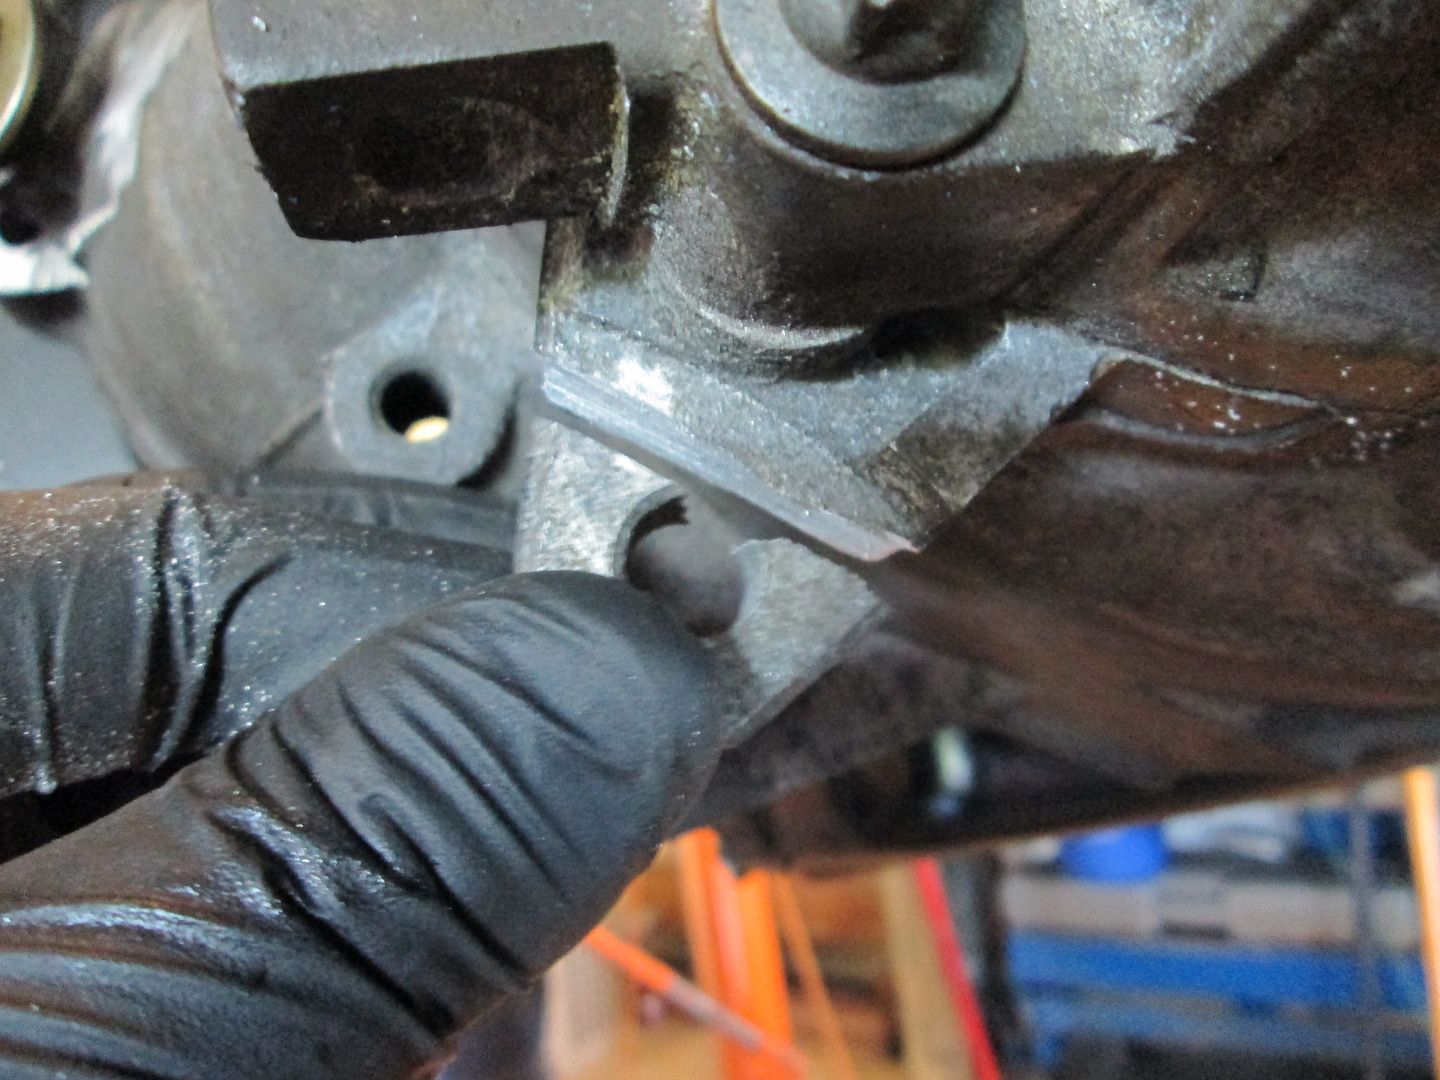
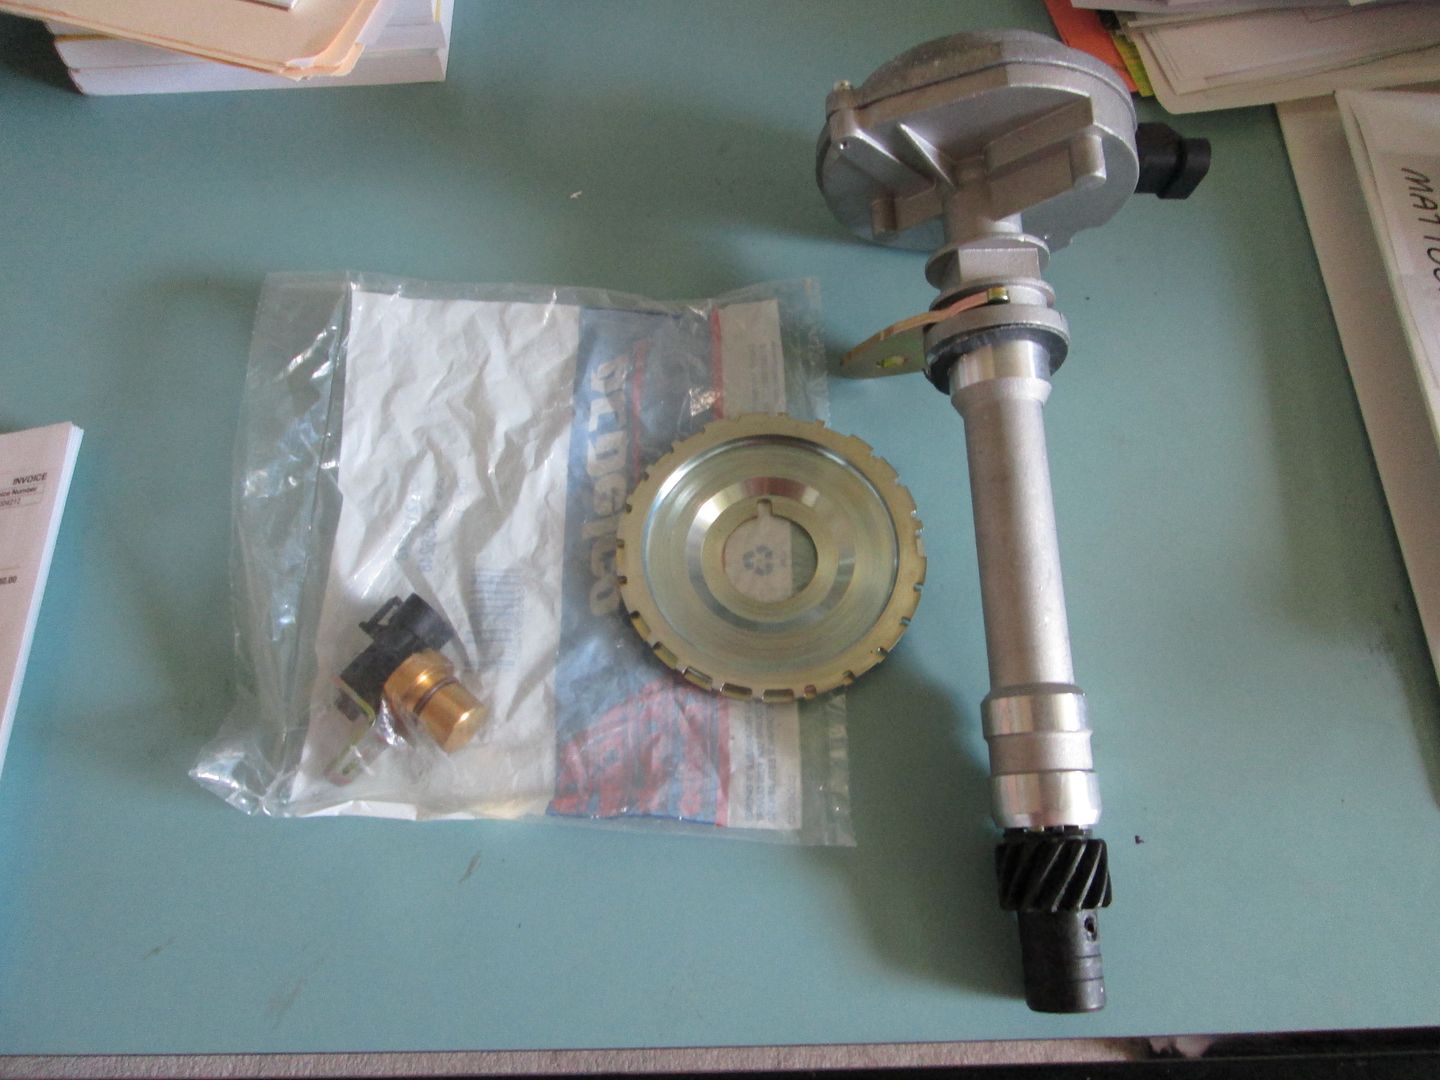
One of the more interesting aspects of this car is the electric water pump was bolted to the engine without cutting into the wheel well sheet metal. Instead to make the needed clearance they hammered the area outward for clearance. I hadn't ever seen one done this way and think this approach might be better than cutting the hole as it keeps the pump protected from wheel well debris. The pump will be remote mounted as part of the work.
Here is a teaser pic of what the engine swap will look like when done... HSR intake, upper plenum flipped, twin 58mm throttle body. The engine will be lowered as part of the rework to gain the needed clearance for this intake to clear the decklid. Disclaimer: the height of this particular HSR is 9", but a stock one is 10" tall. This intake was modified by gusshotrod to make it lower several years ago, and this modification is what allows it to have a chance of fitting w/o a decklid support notch.
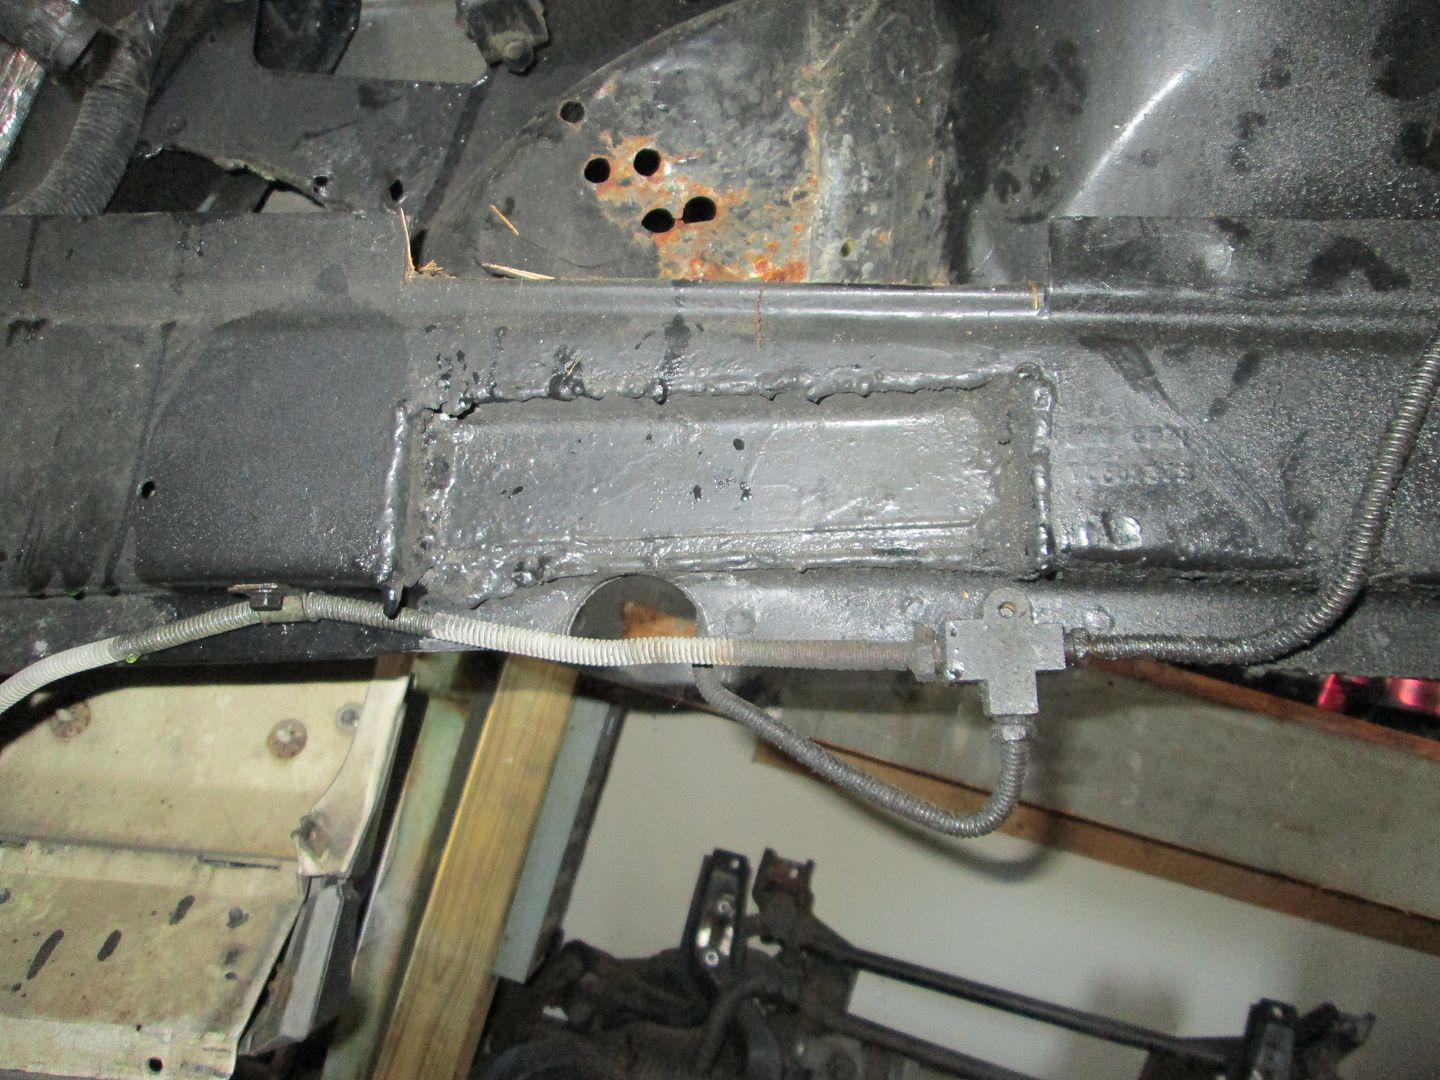
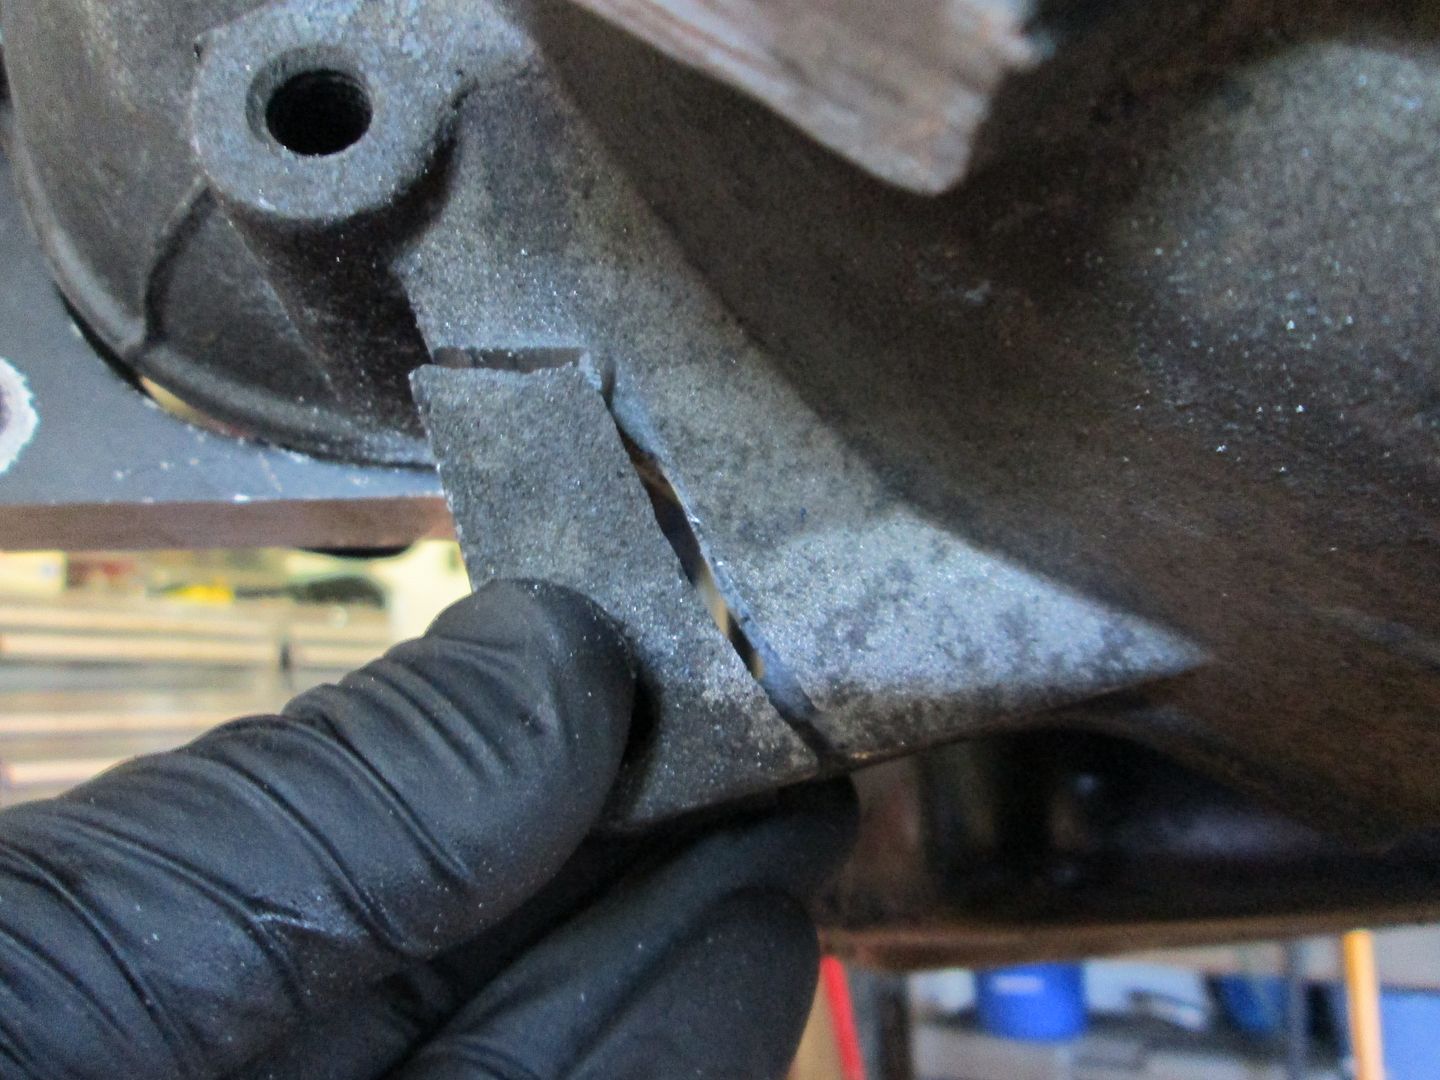
Prior to removing the engine, I added 2 bolts that show the clearance to the frame rail:
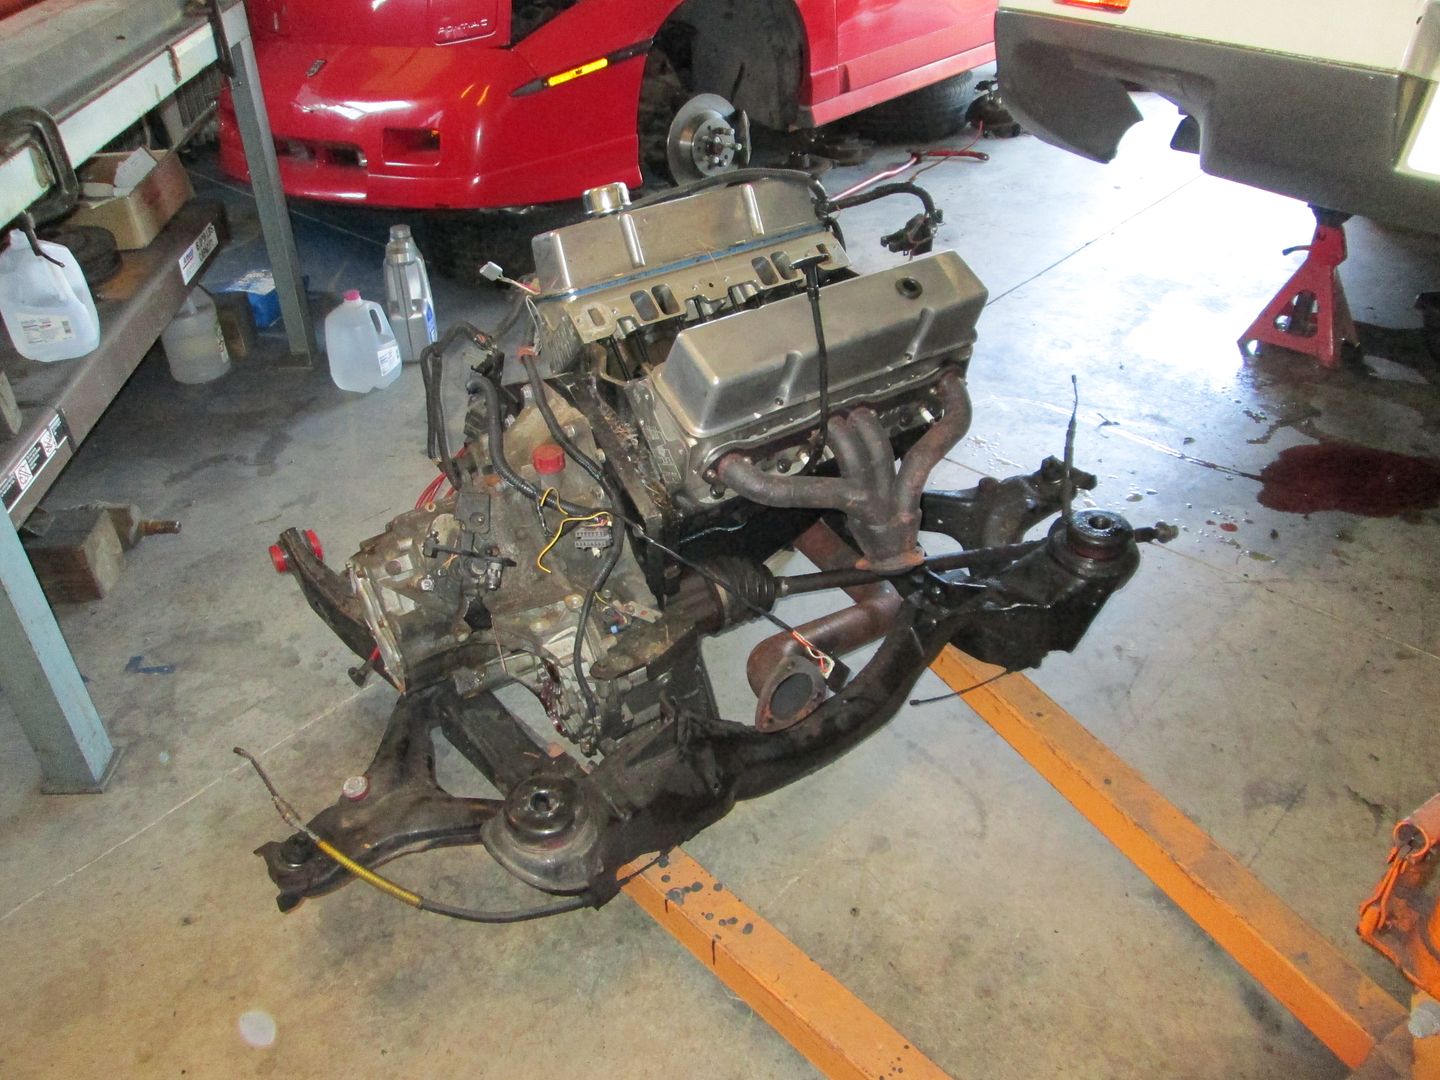
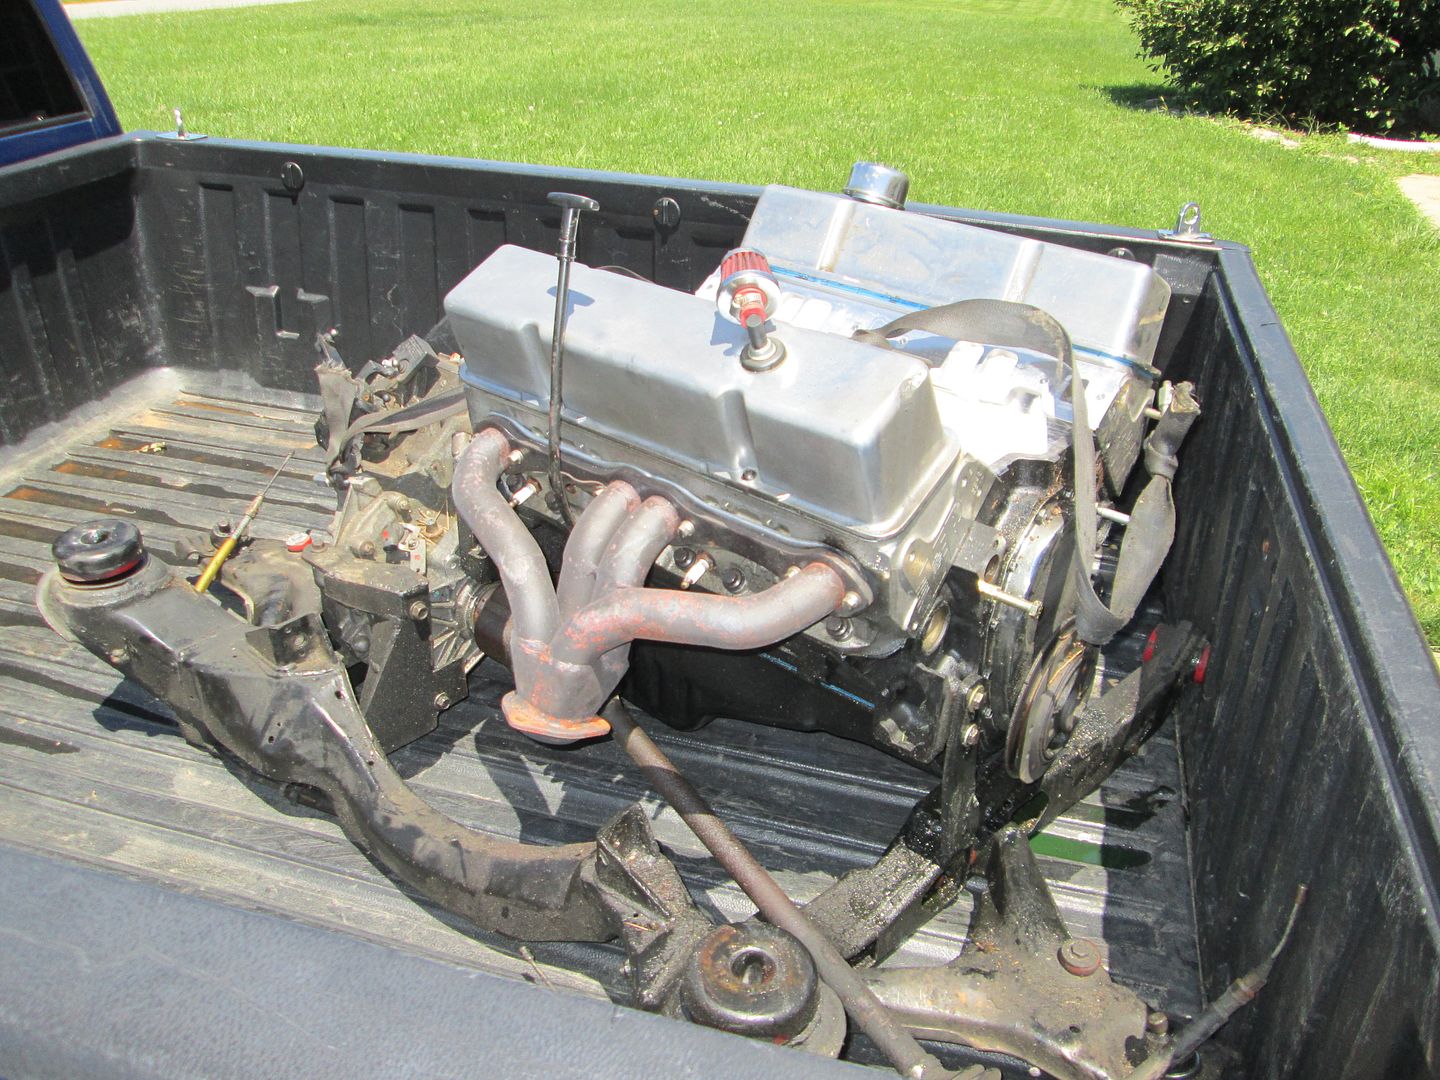
Engine/transmission/cradle are out:
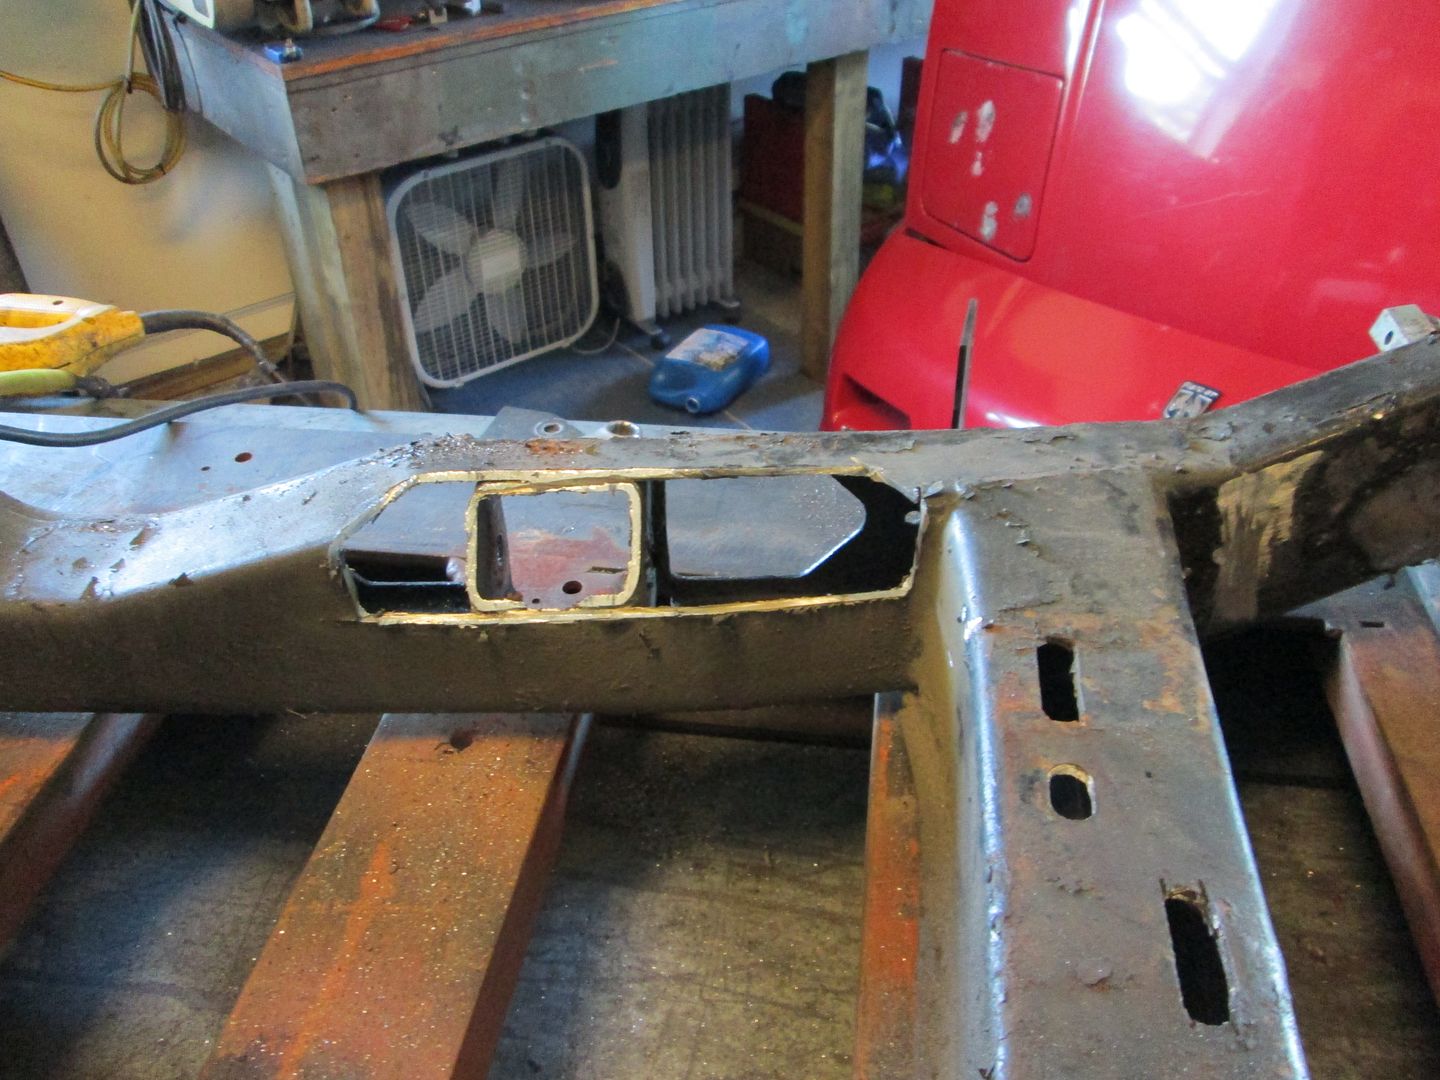
The chassis already has a frame notch large enough for the serpentine conversion. It is actually a little too large, so I will add some metal back in to make it smaller and more visually appealing:
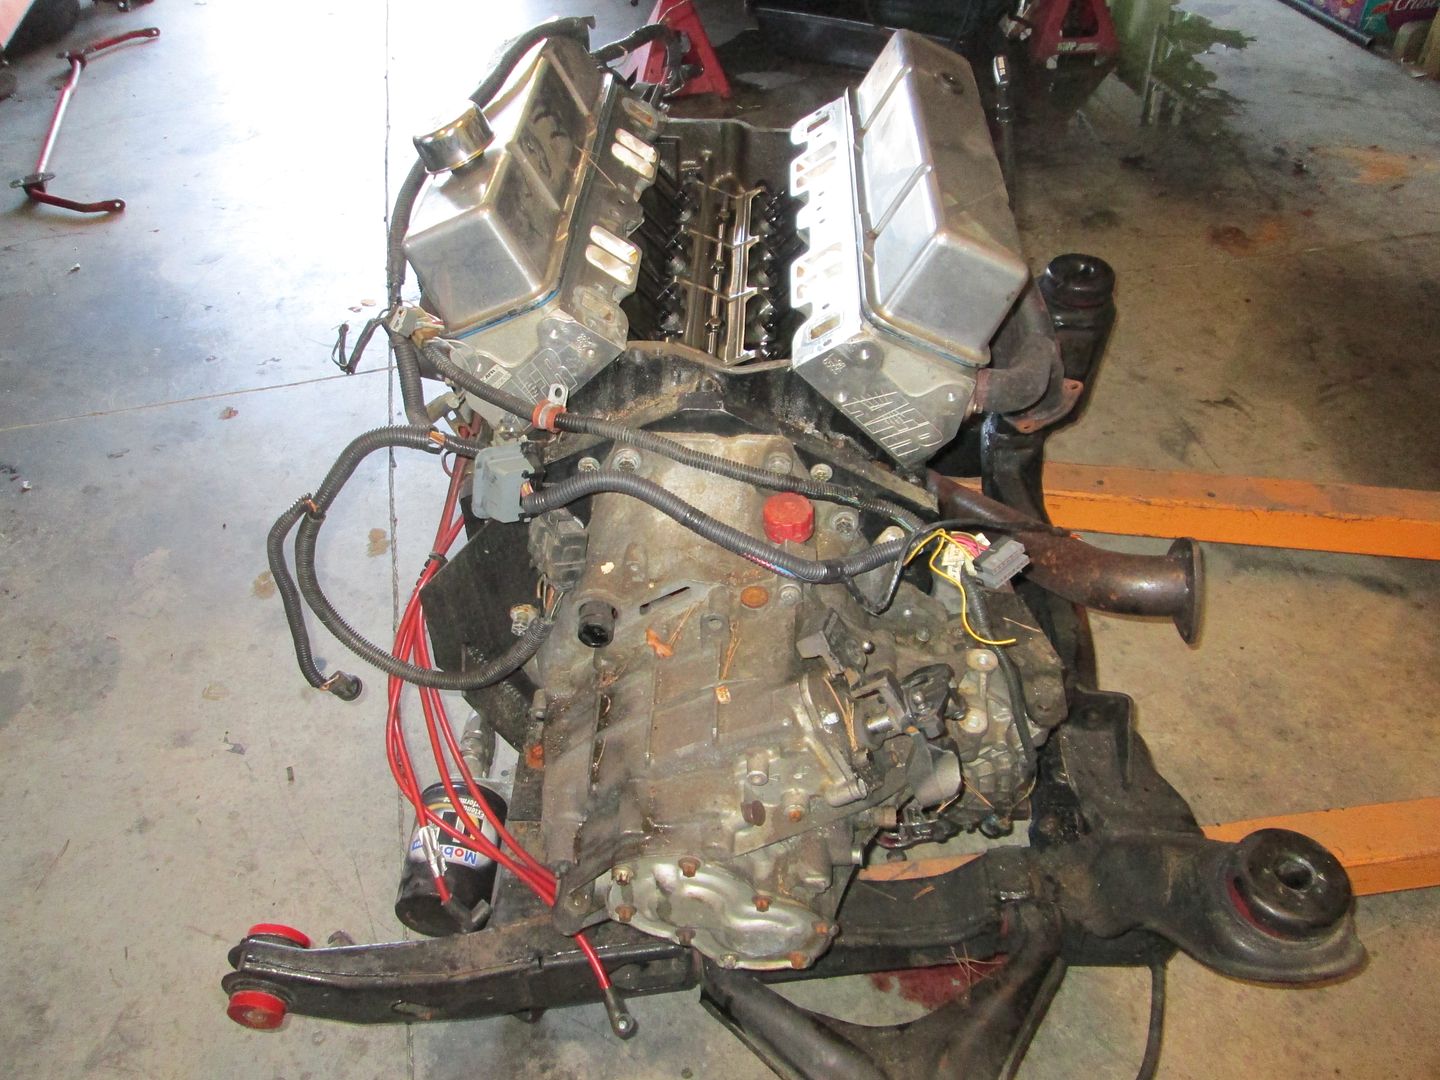
Engine/transmission/cradle off to the car wash:
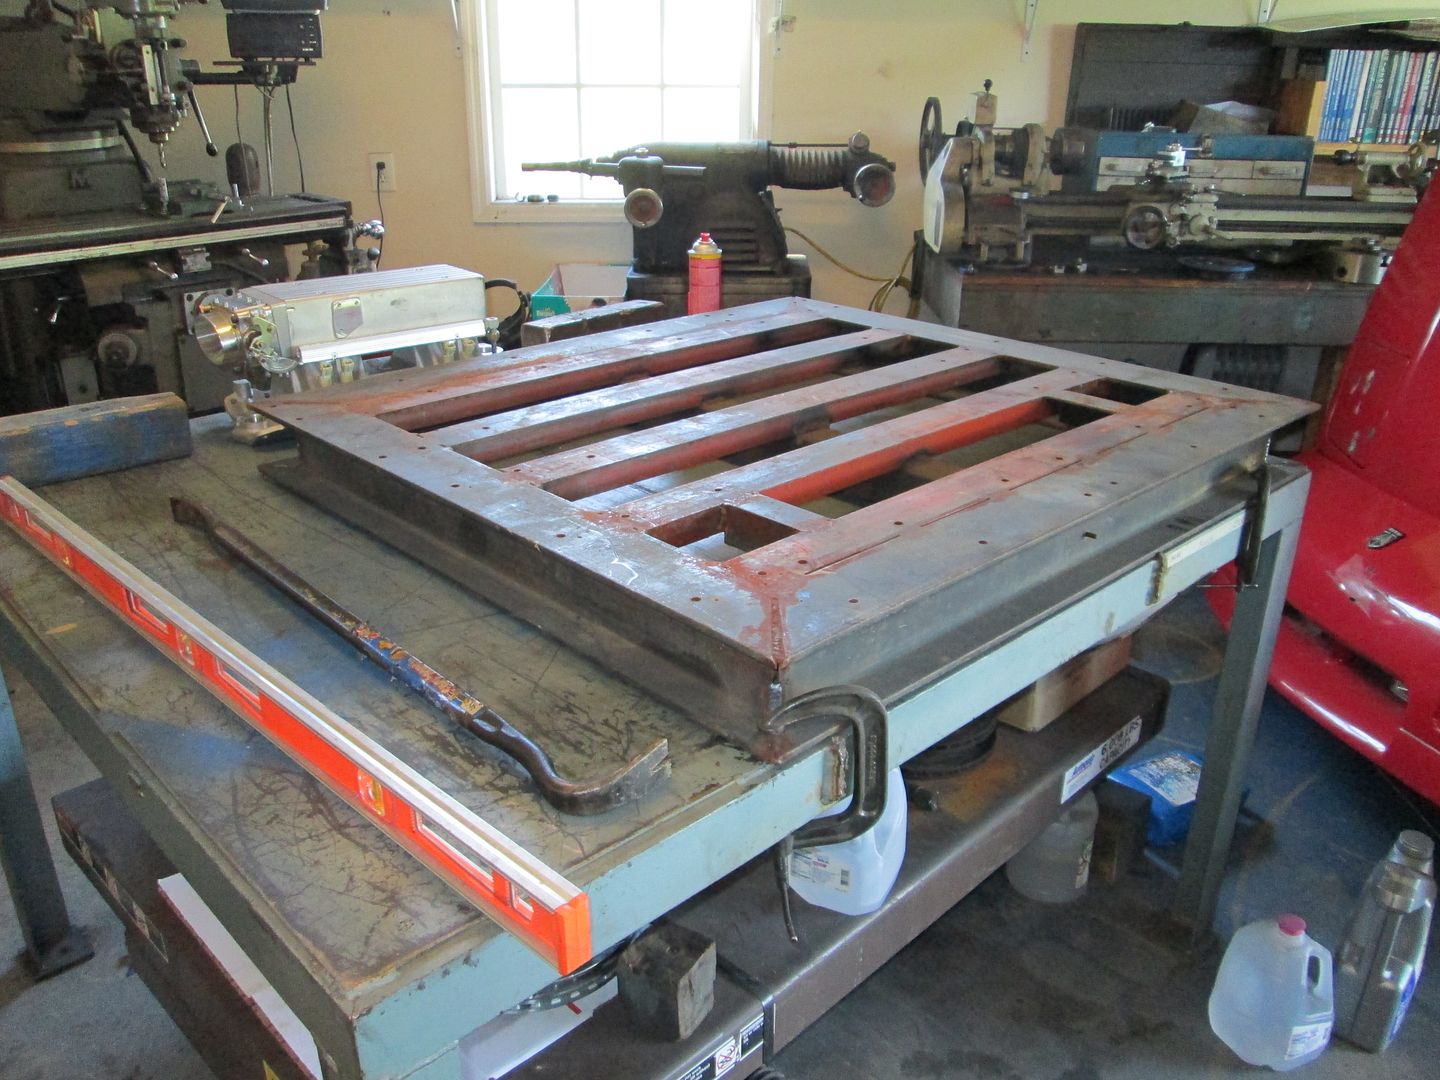
Cradle fixture leveled and clamped to the table:
Engine/transmission/cradle just sitting on the cradle fixture. I need to bring the attachment brackets down from the attic and get it bolted down so I can start reworking the mounts to lower the drivetrain and square/level it as the same time:
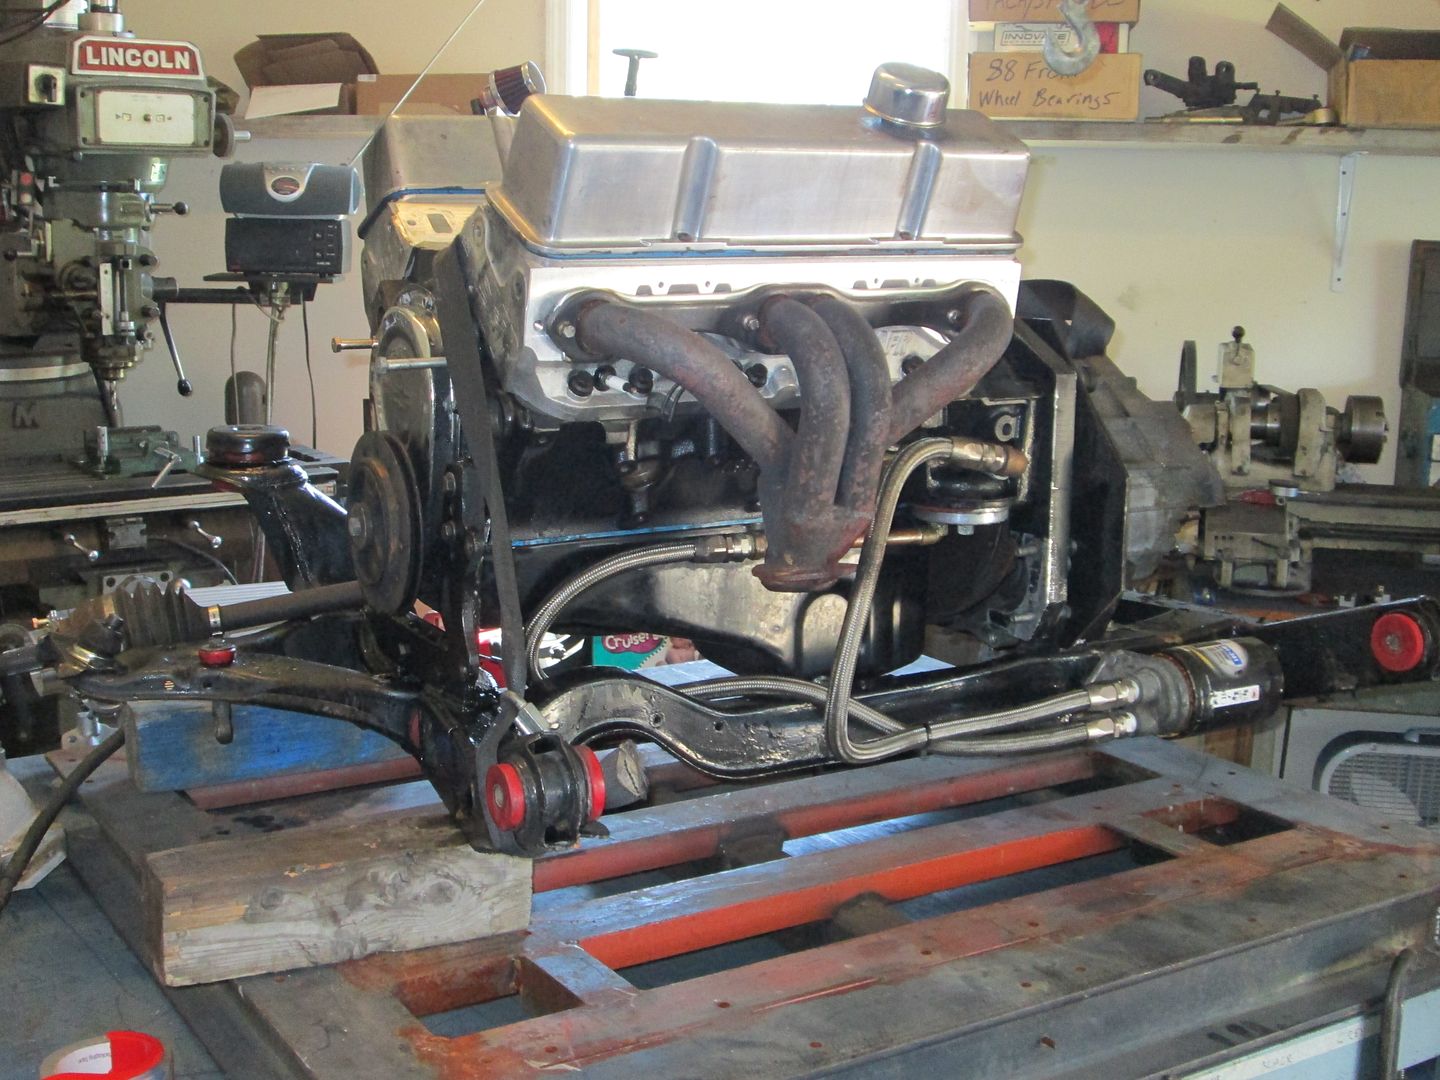
Here the drivetrain is mocked up sitting 1 1/4" lower than it was originally.
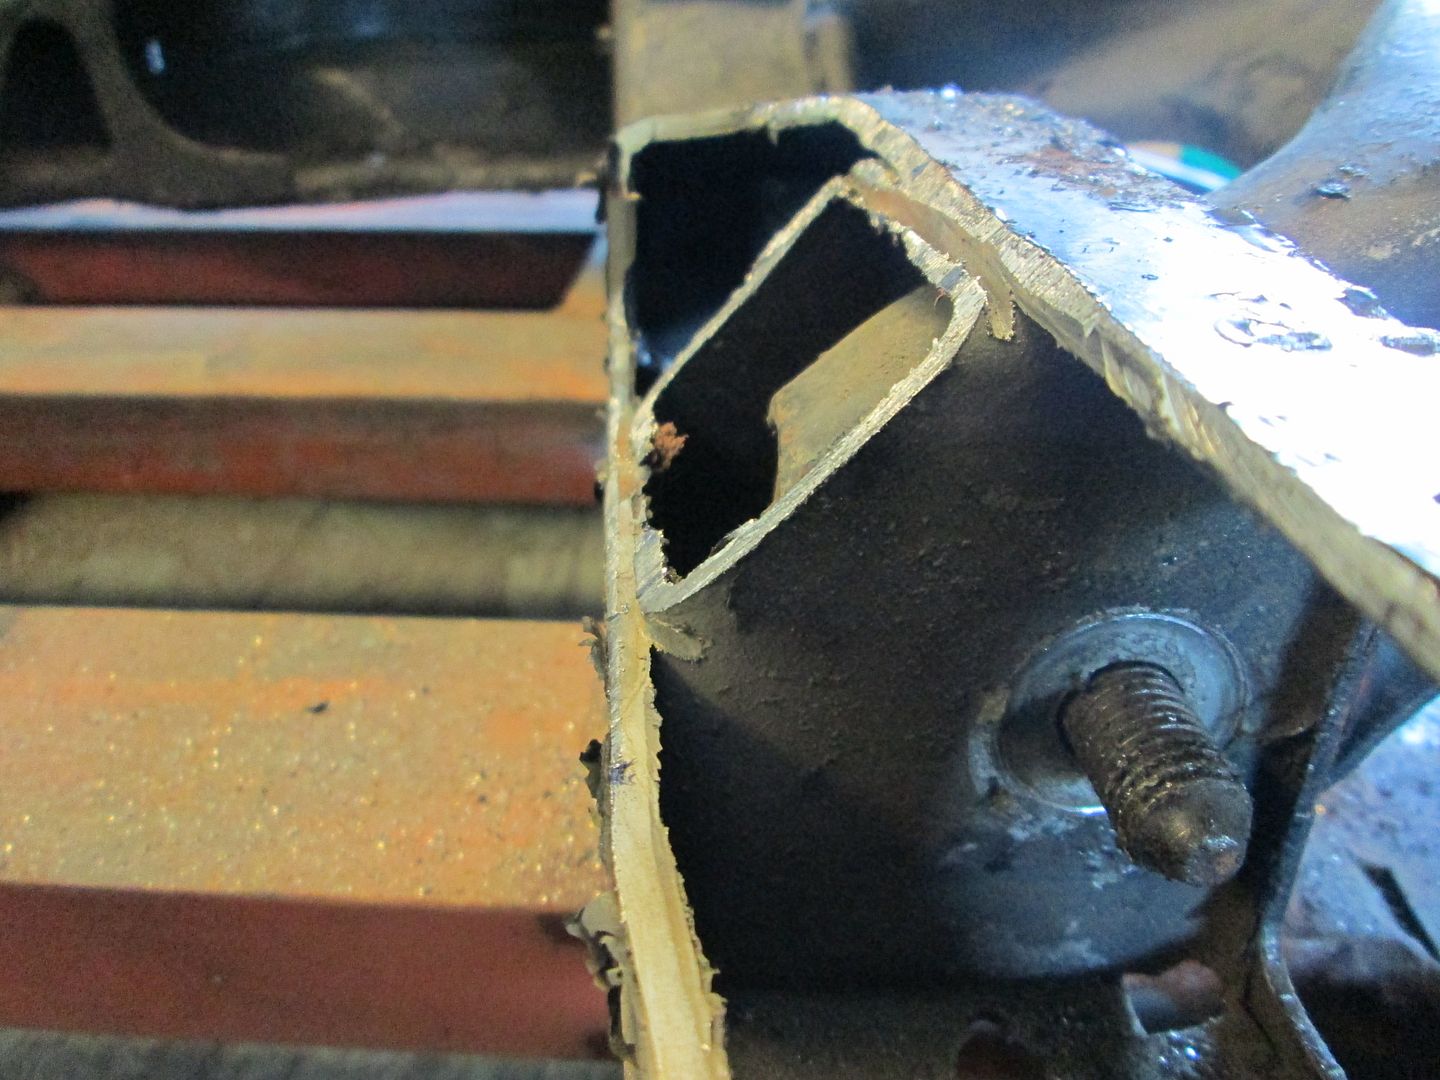
Due to the lowering and other items, I will be completely reworking the F23 mount setup for this car. No these mounts won't be transferable to other engine swaps nor will they be available for purchase for other F23 swaps. They will be one-off solid mounts for this SBC/F23 combo (I am not interested in developing an F23 kit).
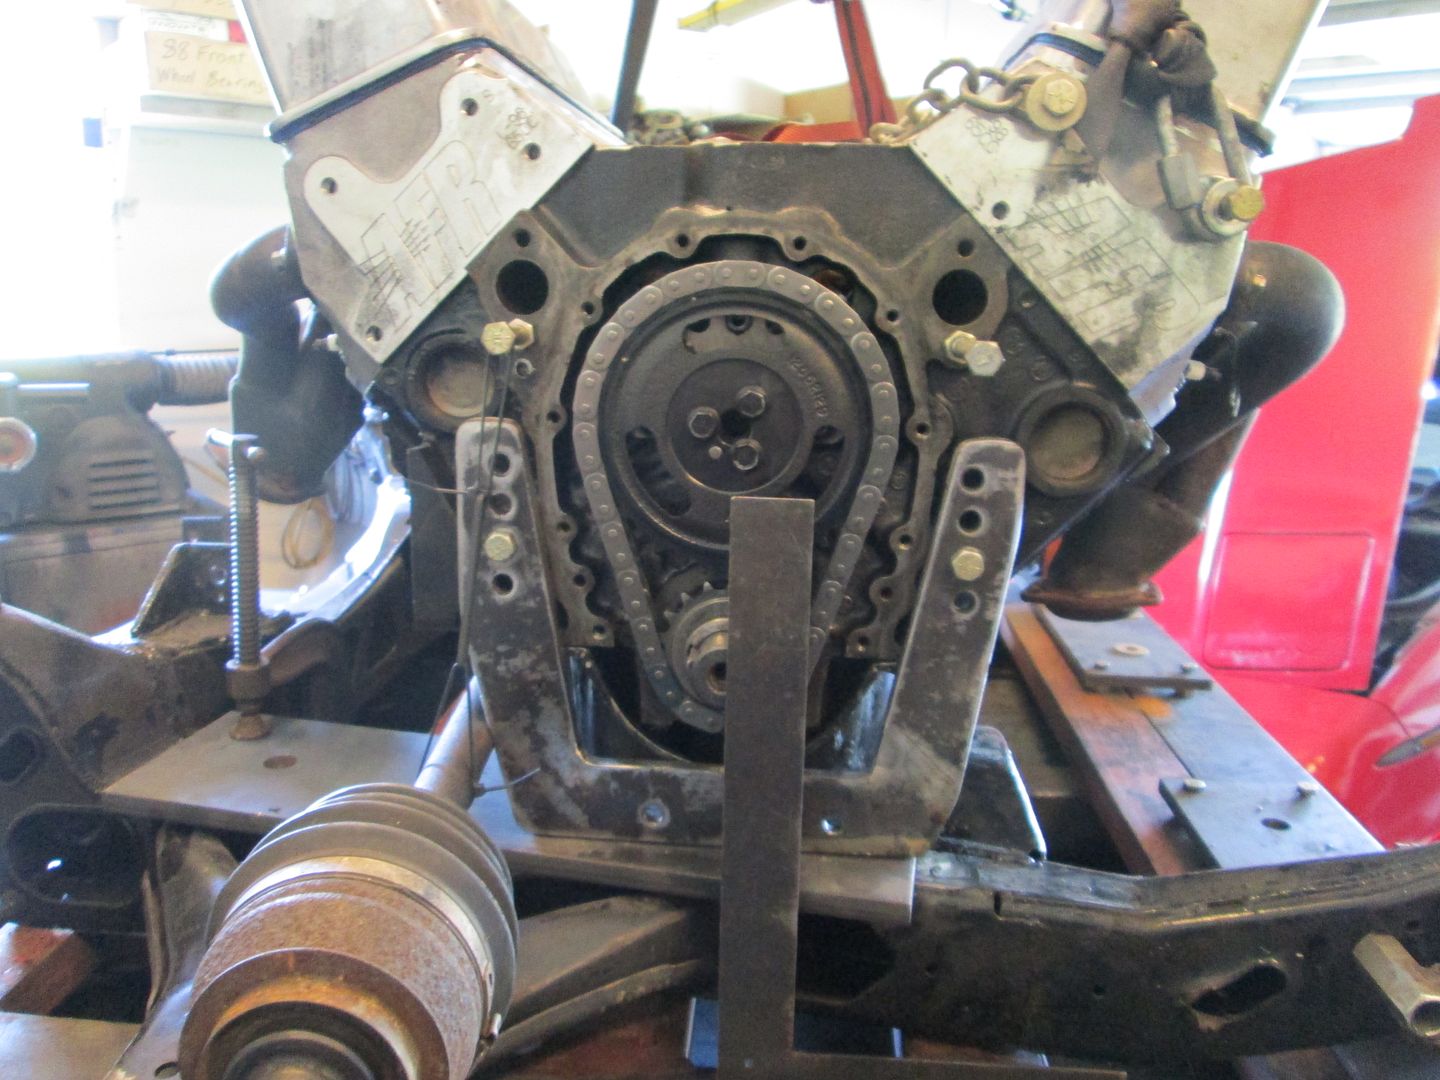
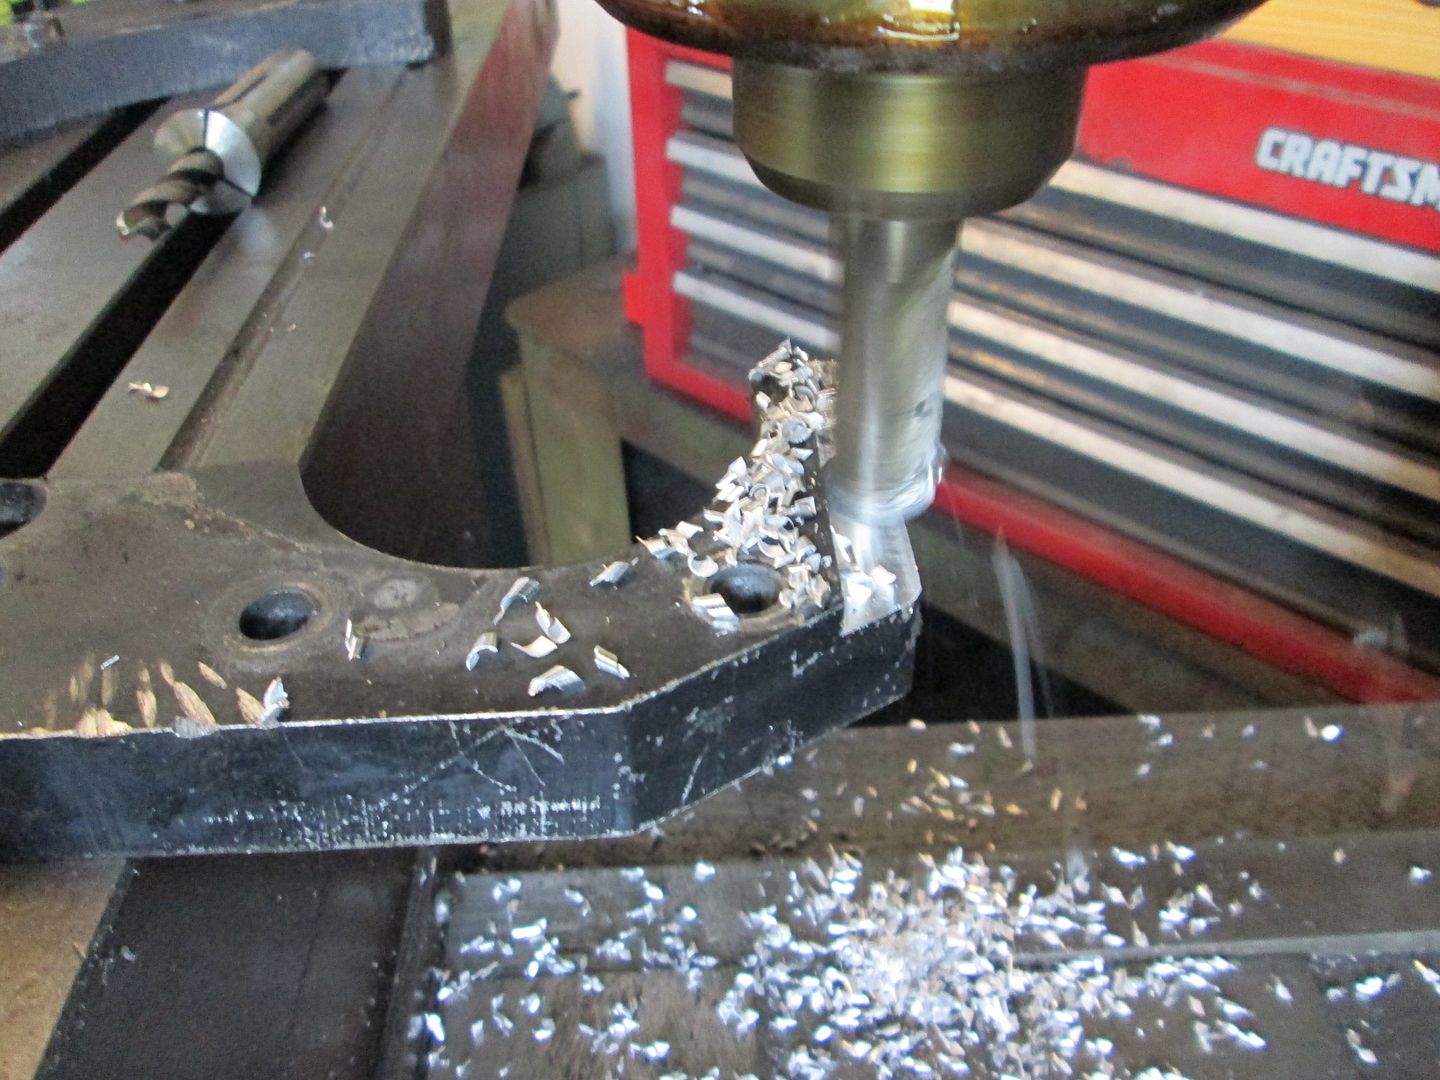
To get it this low, I had to mill 1/2" off the bottom of the adapter plate, remove a couple of unused bolt bosses on the transmission and notch the driver side of the cradle. I will also need to modify the Archie engine mount as well. The cuts on the transmission will be cleaned up further and the cradle notch boxed in.
The EFI connection parts have arrived (vortec timing cover isn't shown, but is part of the kit):
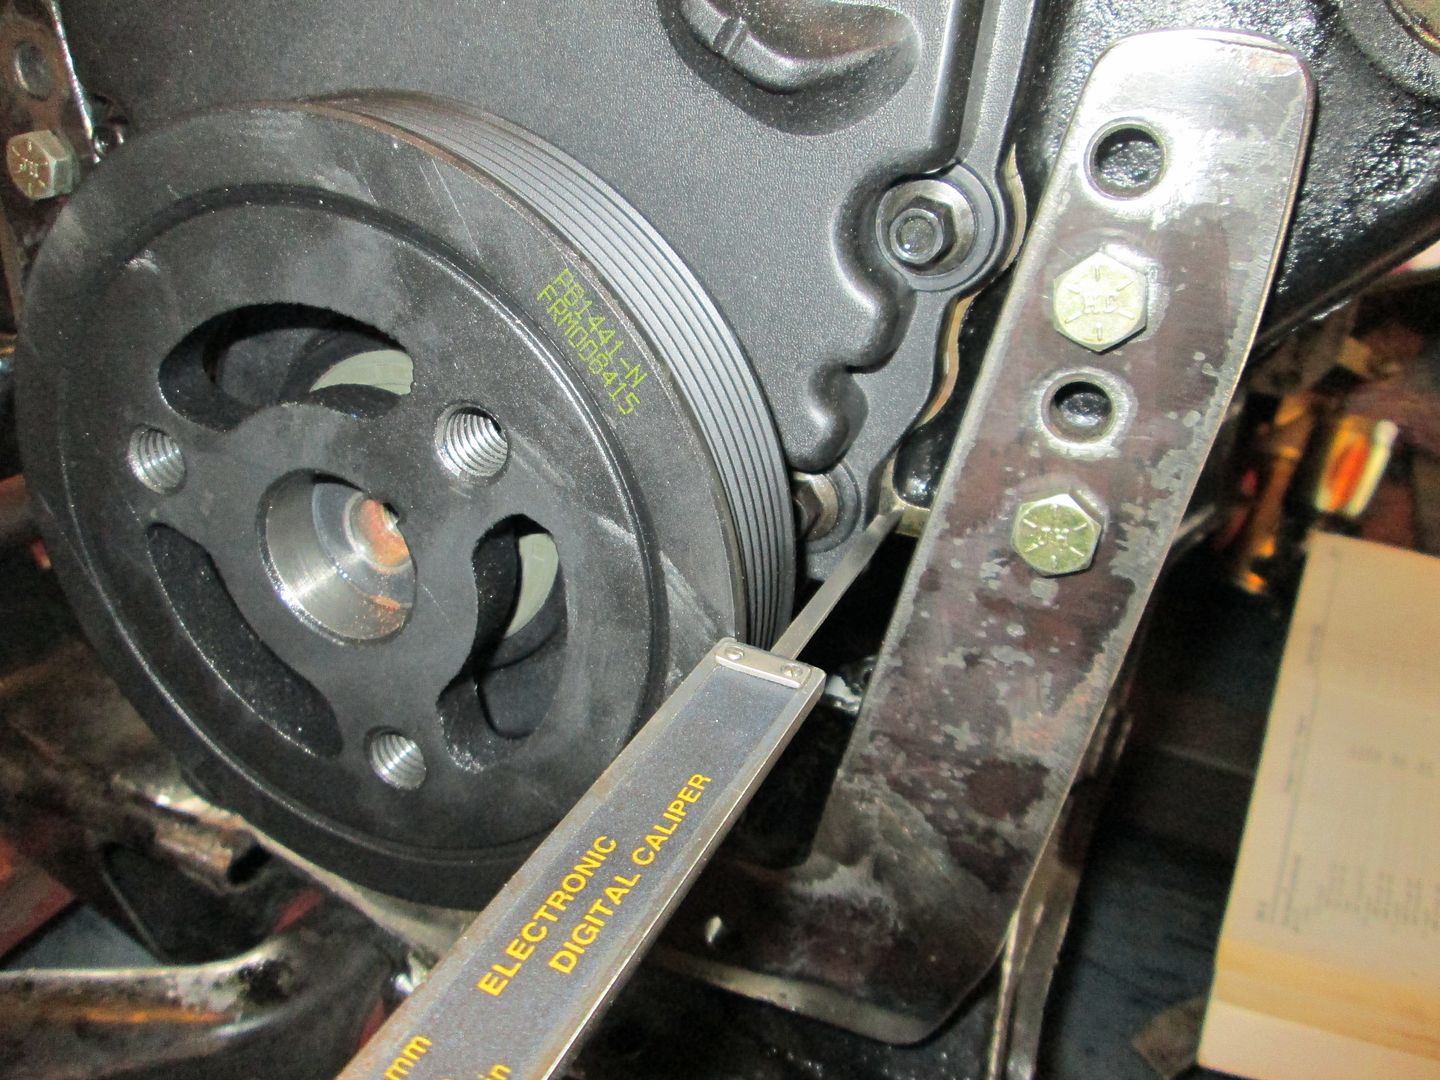
Did a mockup of the serpentine balancer, sensor and timing cover. The edge of the balancer will be 2 3/8" from the machined face of the block. The Archie balancer was 2 1/4" (but not as tight to the engine as it could have been).
Also mocked up the distributor/cam sensor:
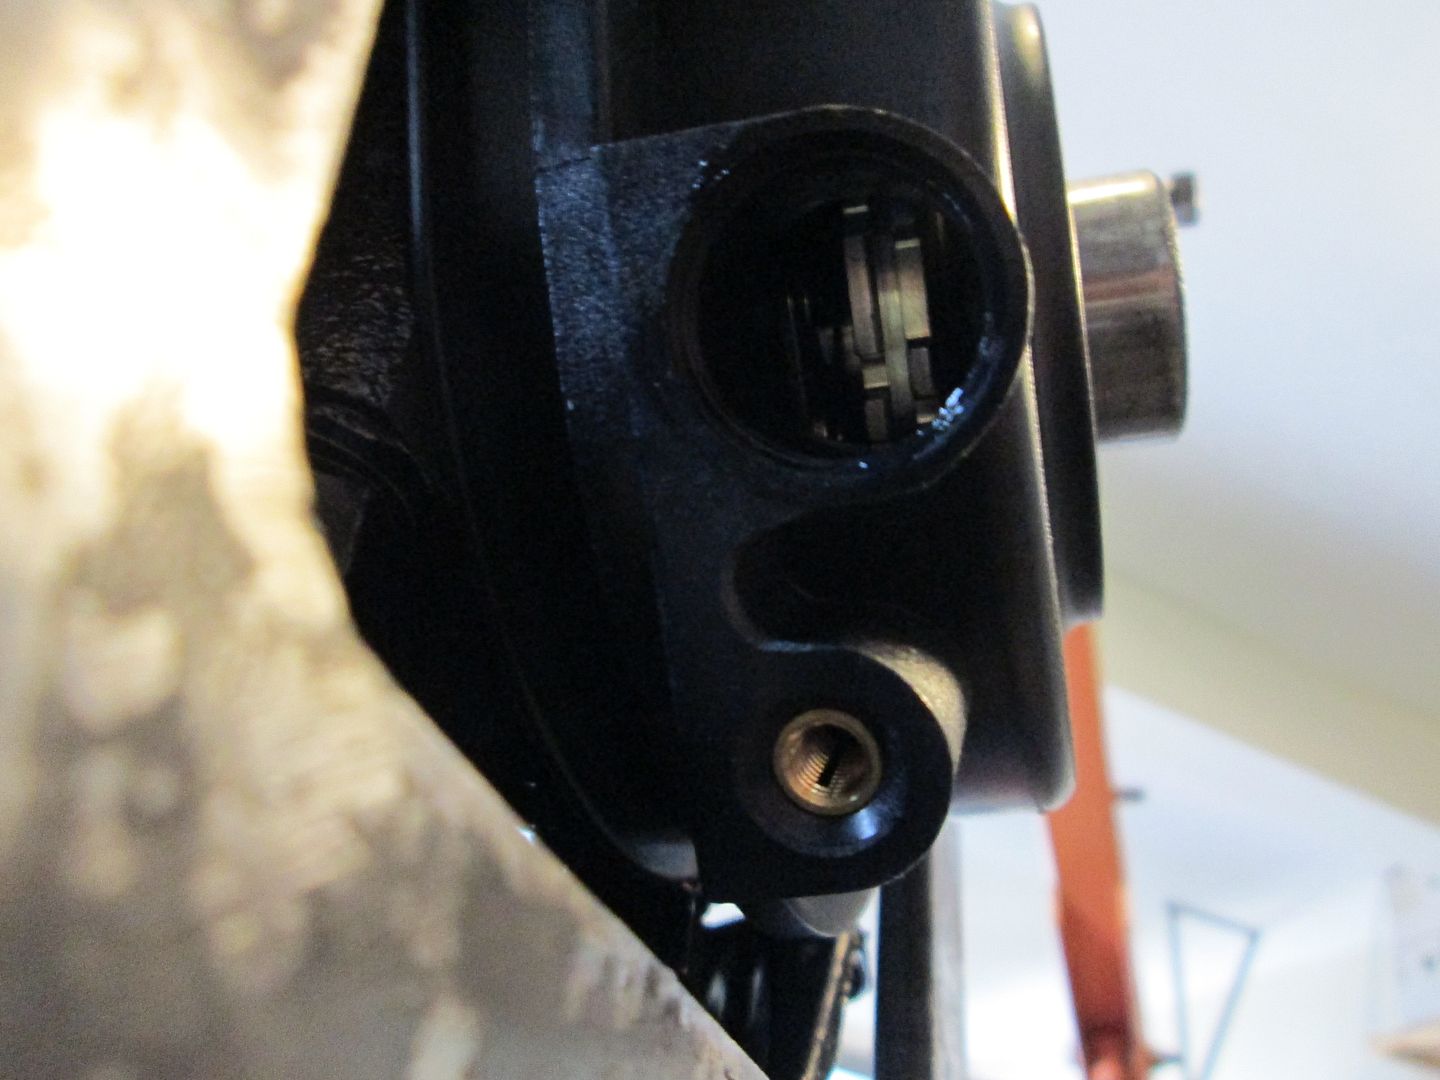
One of the hurdles is finding room for the IAC as it doesn't fit between the throttle body and the distributor cover. One option is to mod the distributor to be lower and the other is to remote mount the IAC valve somewhere else - like under the plenum between the two sets of runners and out of sight.
[This message has been edited by fieroguru (edited 08-05-2013).]
i spy some fun mounted behind those throttle blades!
I just got approval to remove those and will likely remove the aluminum angled spacer they are mounted to. They came with the intake setup, but are in the way of the distributor. I had to turn one of them so now it would spray toward cylinder #5 vs. towards the far back wall of the plenum.
Yup, it was neat that it came with the plate and the nozzles (and about a dozen jets), plus it came with the throttle switch, and some other misc. parts.
If I do decide to go with nitrous, there's other delivery systems I can look into. Always other power adders, too.
The car already has a pretty stout engine with the chassis dyno chart to prove it (371 whp), so its doesn't need much upgrading there (roller rockers and valve springs). I get the honor of performing the upgrade to fuel injection to this setup while refining the rest of the swap into something he can be proud to show off.
The fuel injection conversion will use a modified Holley Stealth Ram intake controlled via an LS1 ecm. Here is a teaser pic:
Awww... I thought you were going to First. I really wanted to see that... not gonna crap on the HSR though.
Thank you for this picture! I was curious to see where the F23 cables fell on other people's swaps and this is just what I needed to confirm my thoughts! Good bye stock air box!
Yes, the F.I.R.S.T. intake was my original route - however I couldn't pass on the deal I got with that HSR setup, and from the information I could find with people that had played with both setups, the air flow and performance from both was very similar.
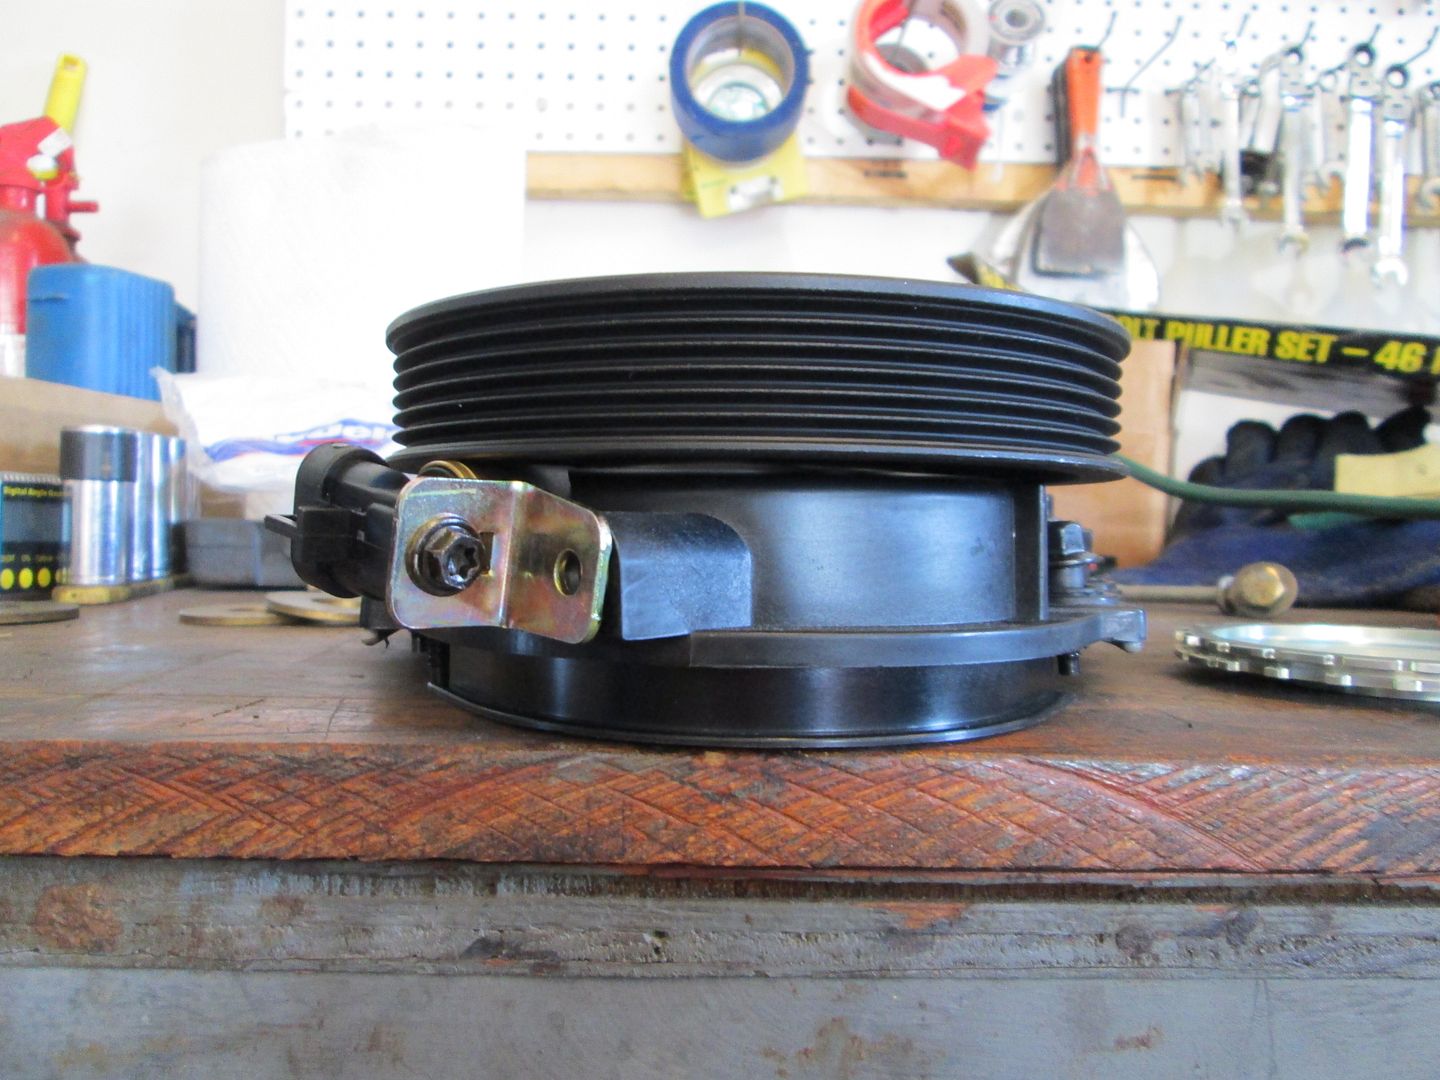
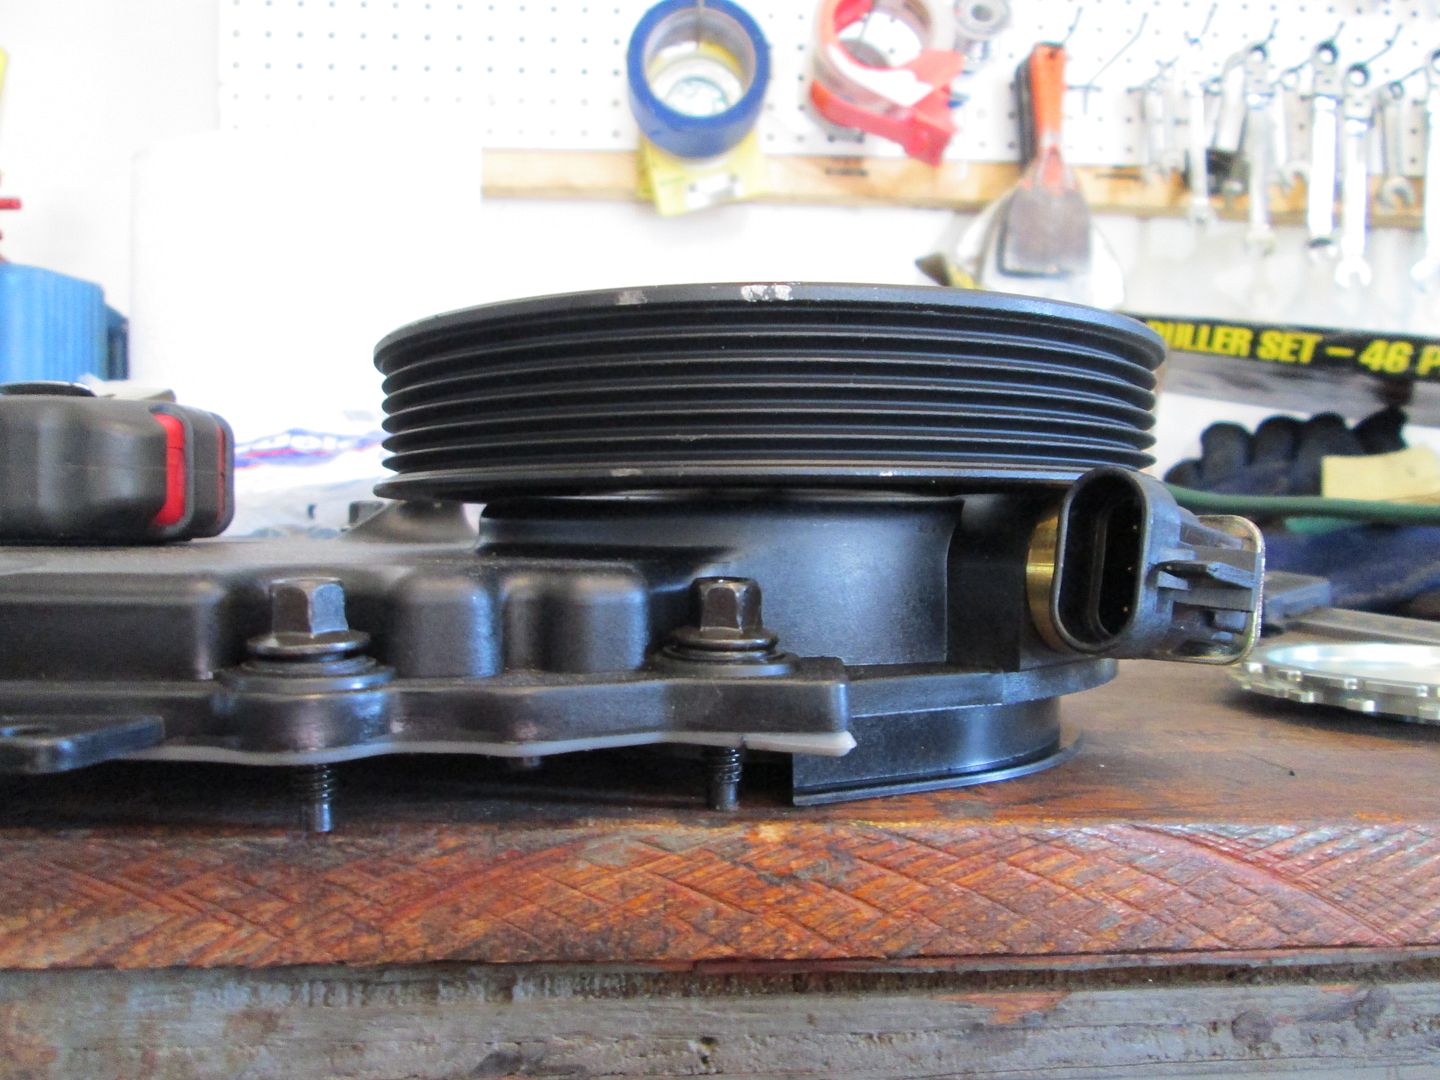
Knocked out the reluctor, timing cover, and balancer setup as well as the AC clutch conversion today.
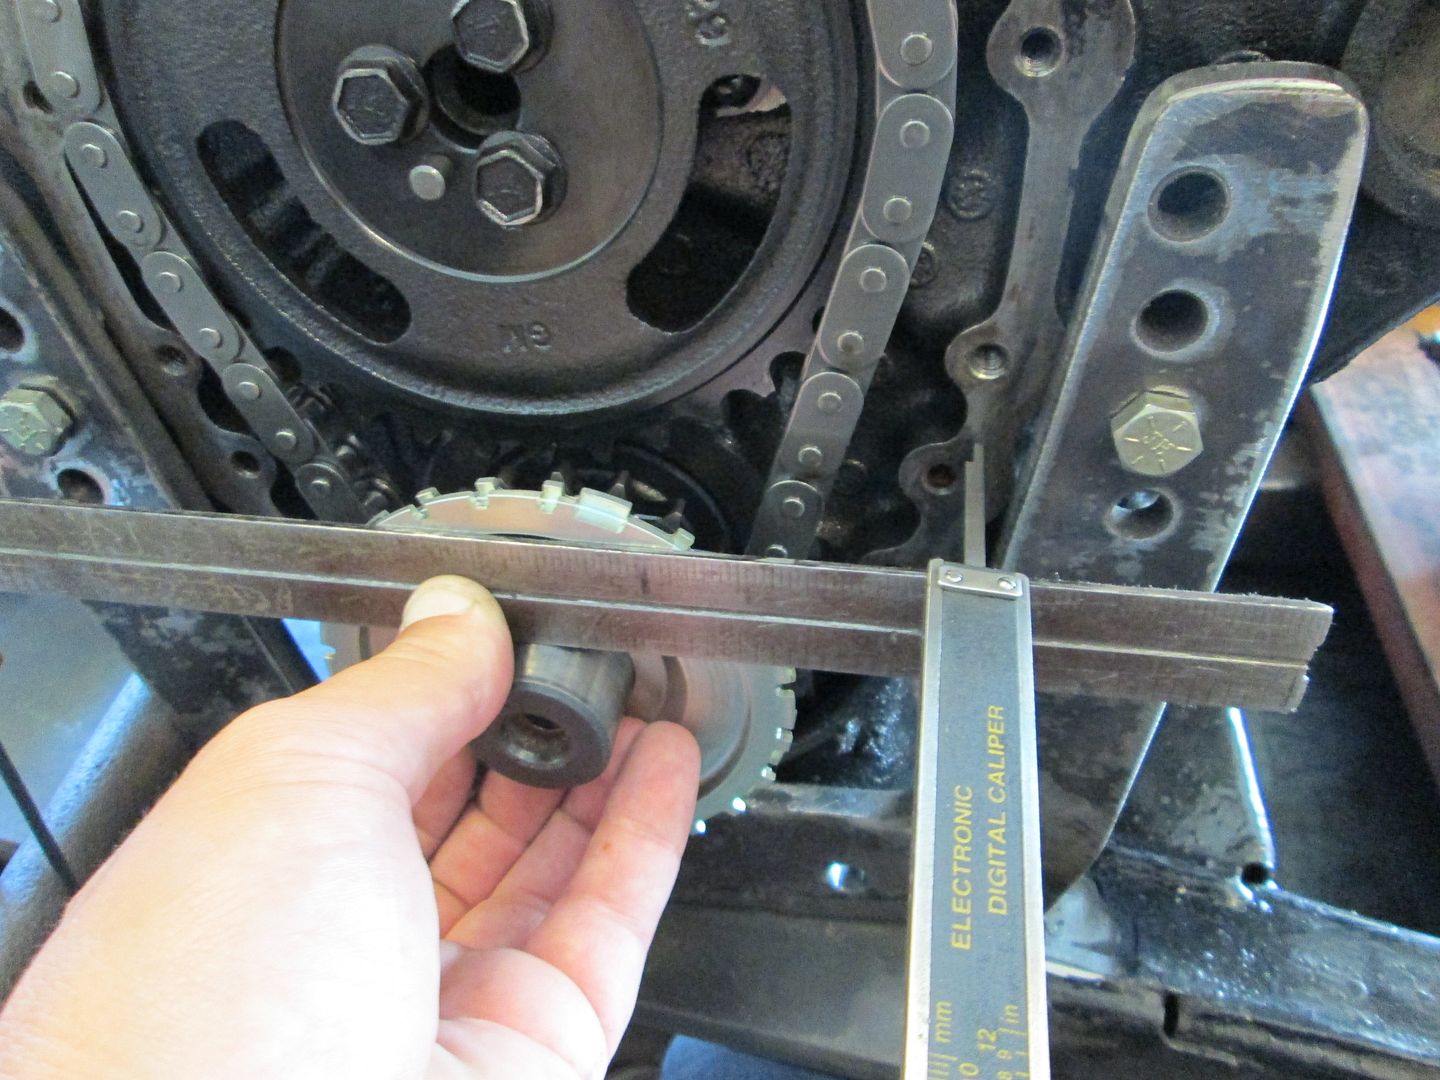
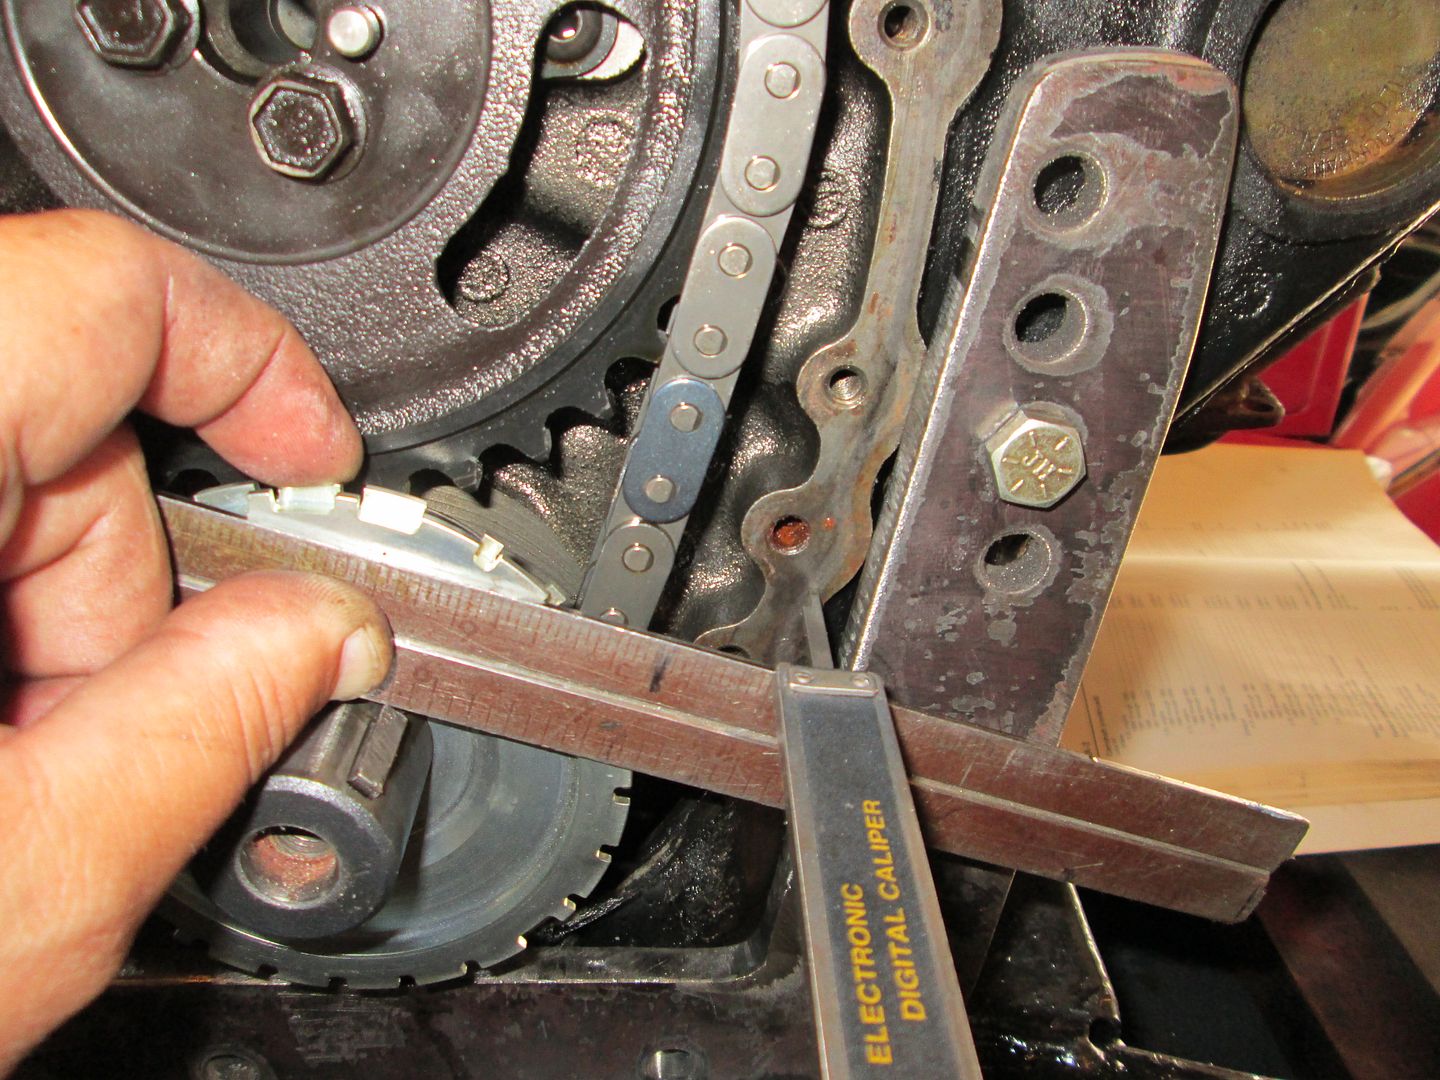
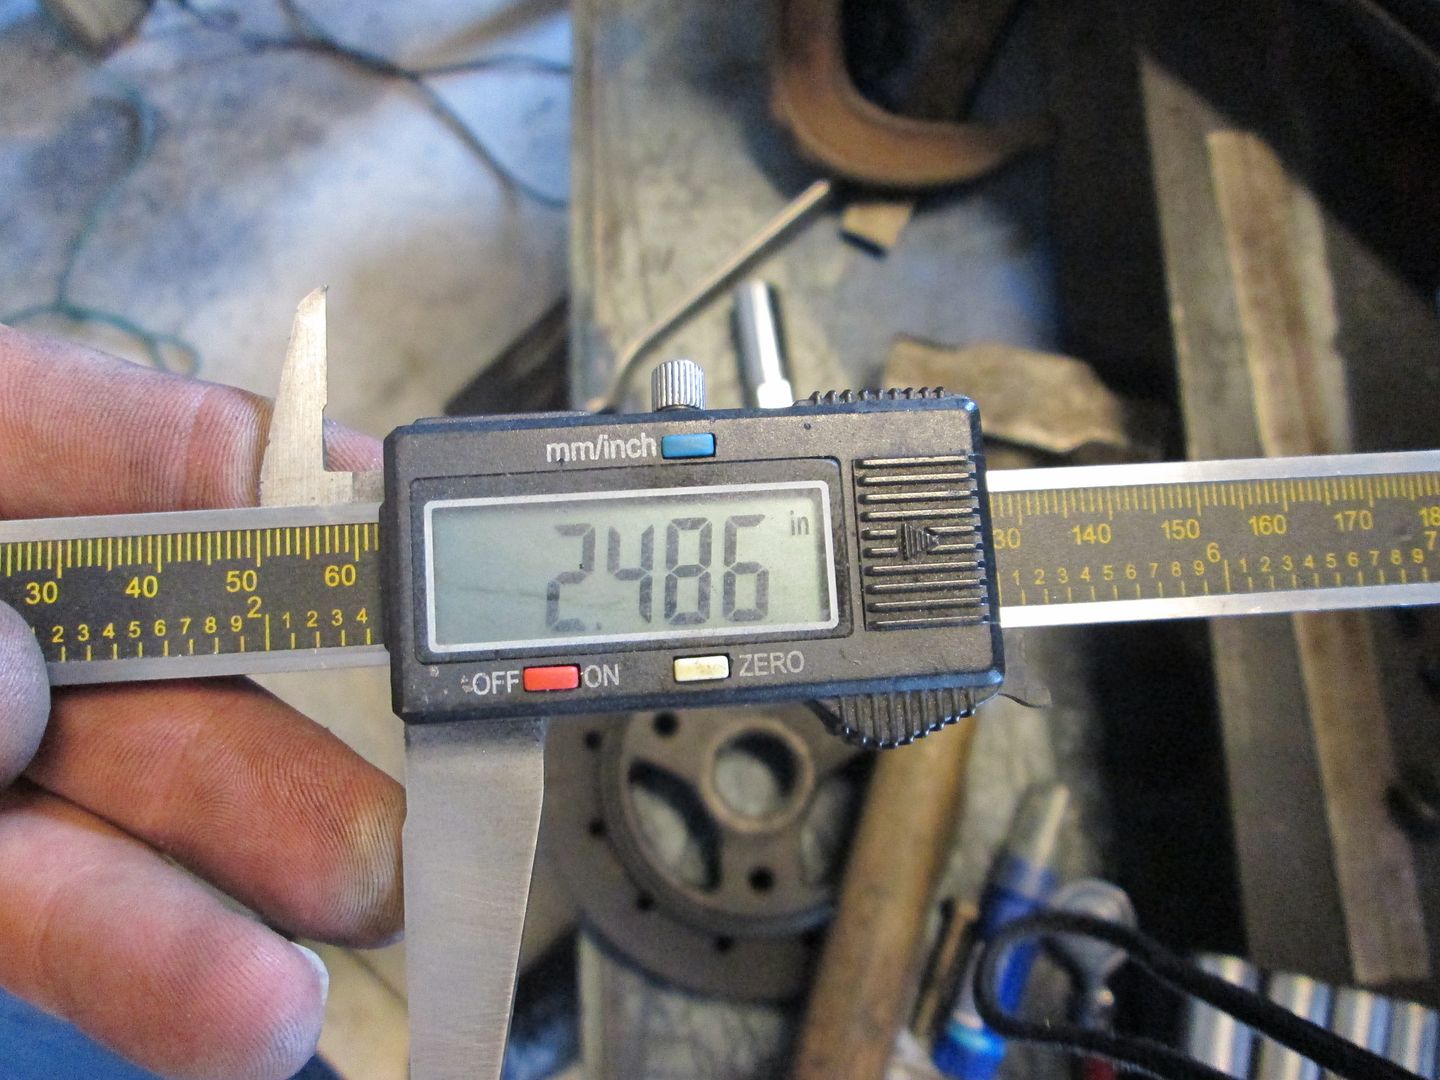
The wheel needed to be between 1.000 and 1.017, but this is where it was when I just slid in on the crankshaft:
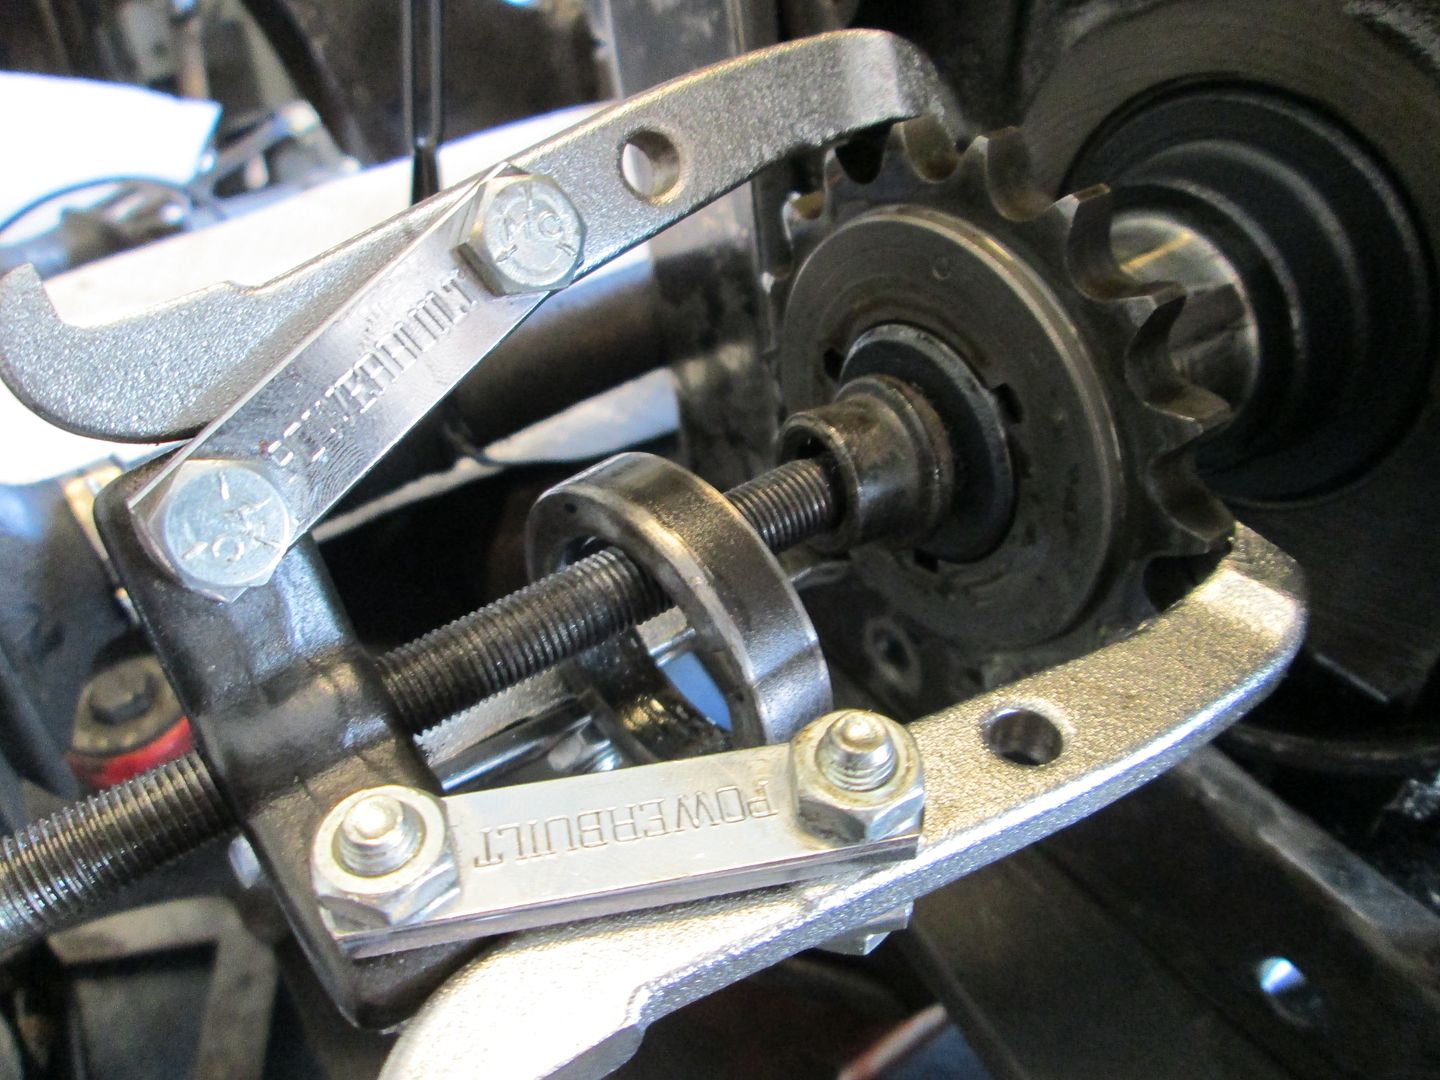
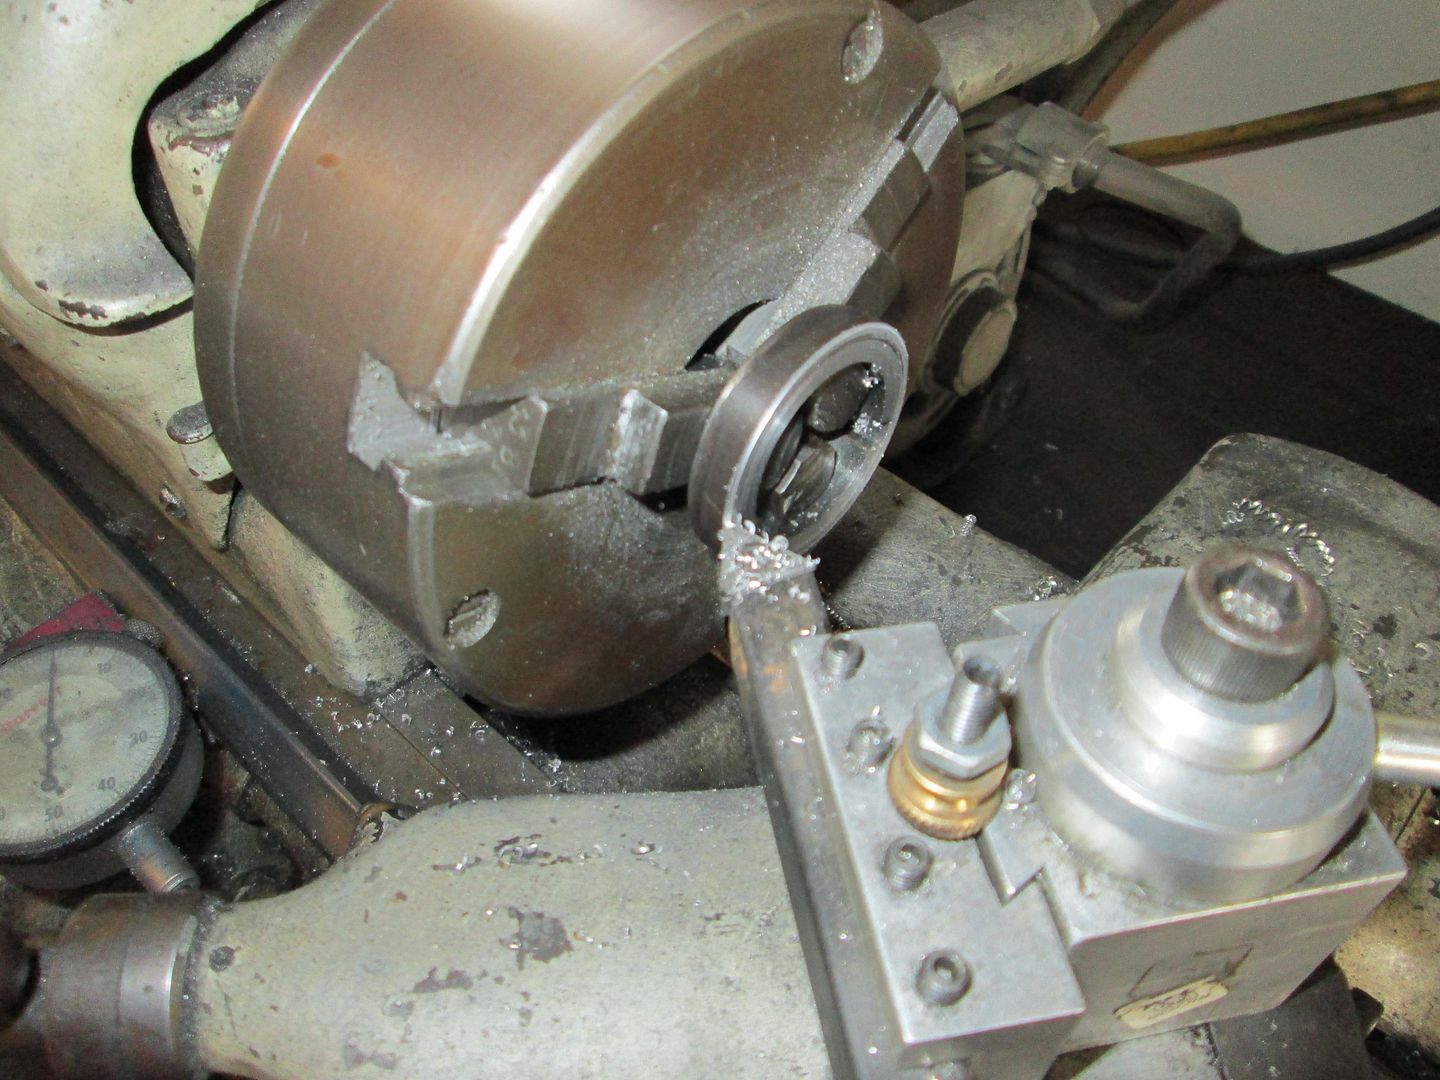
So I started to take the lower timing gear off to machine it, then found that there was a spacer there already:
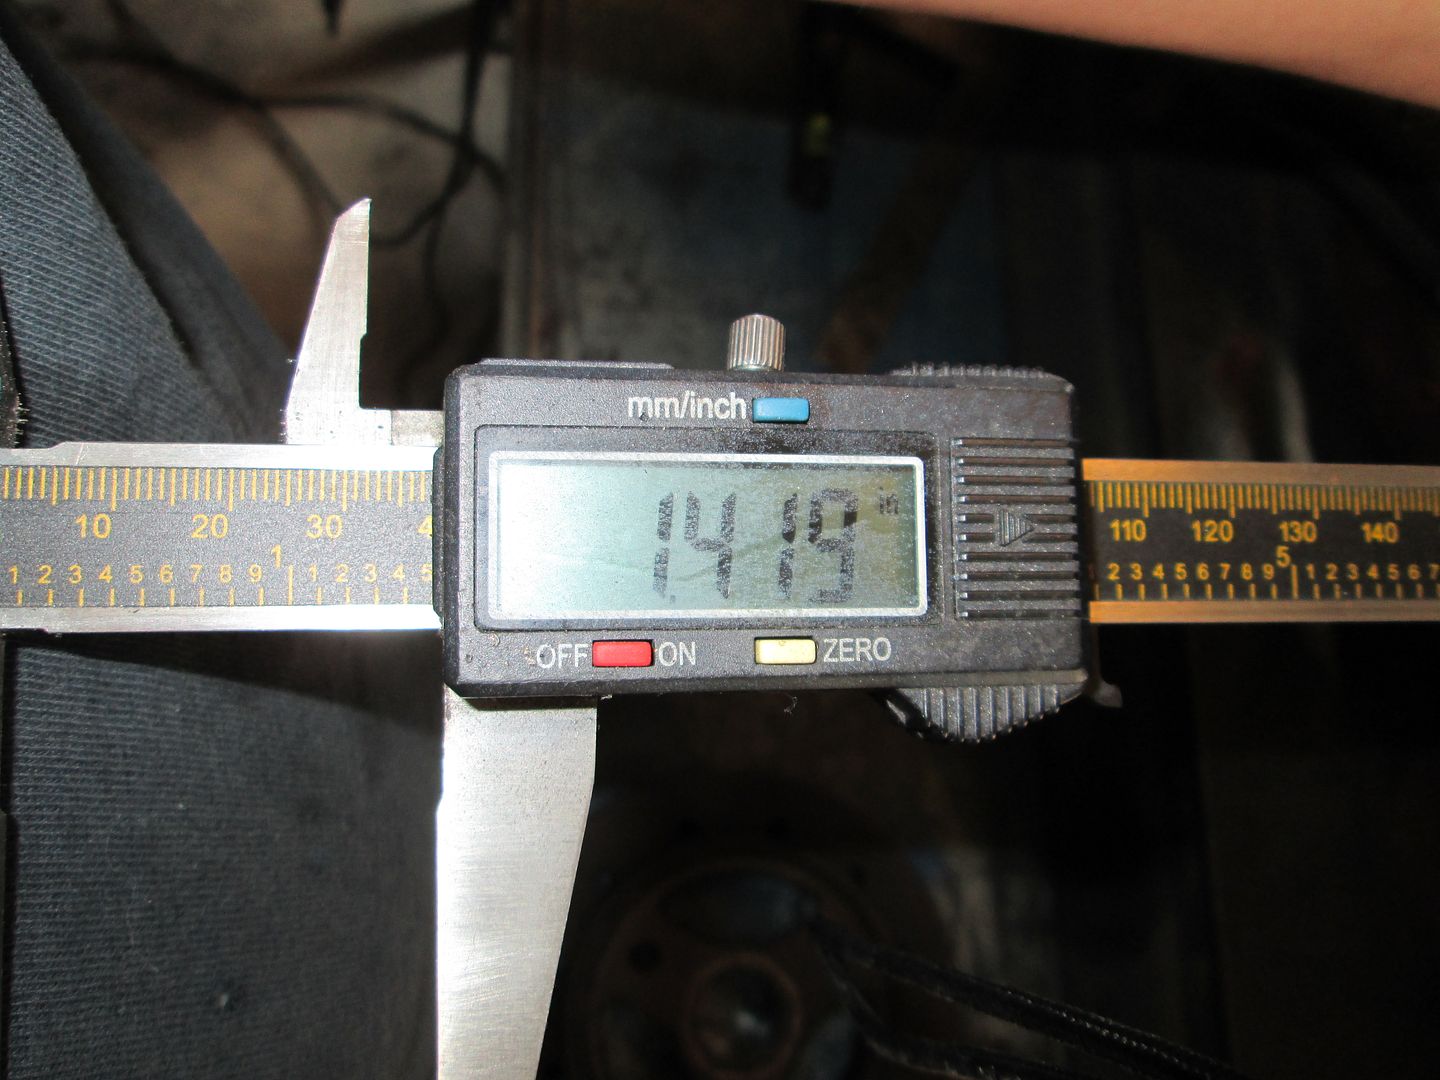
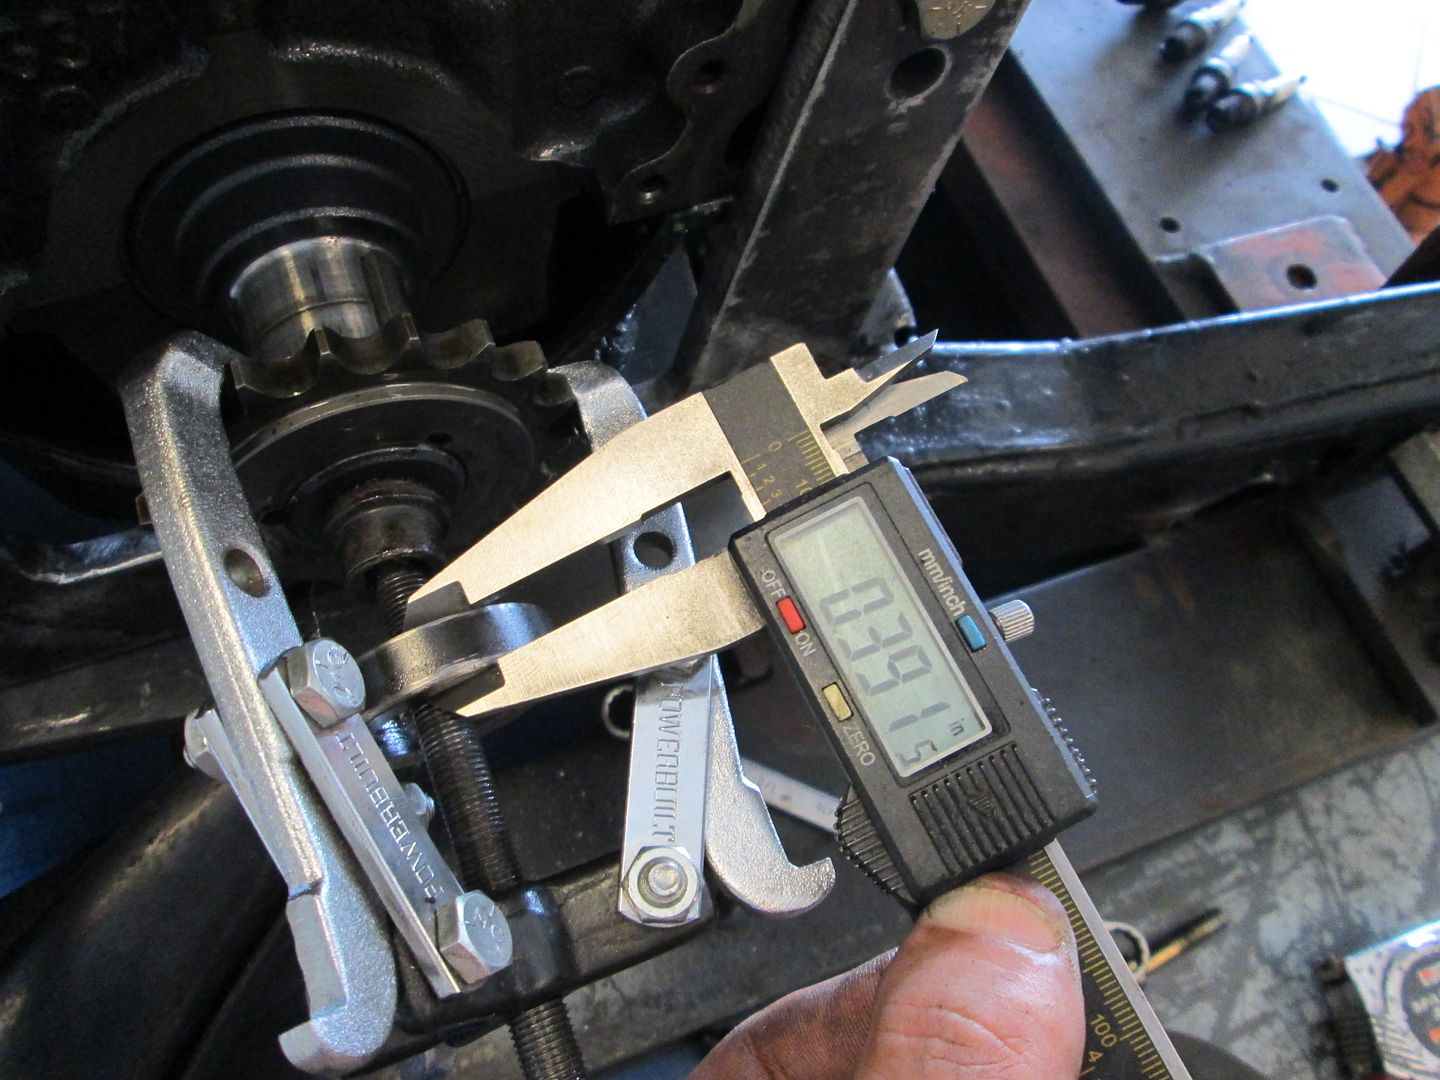
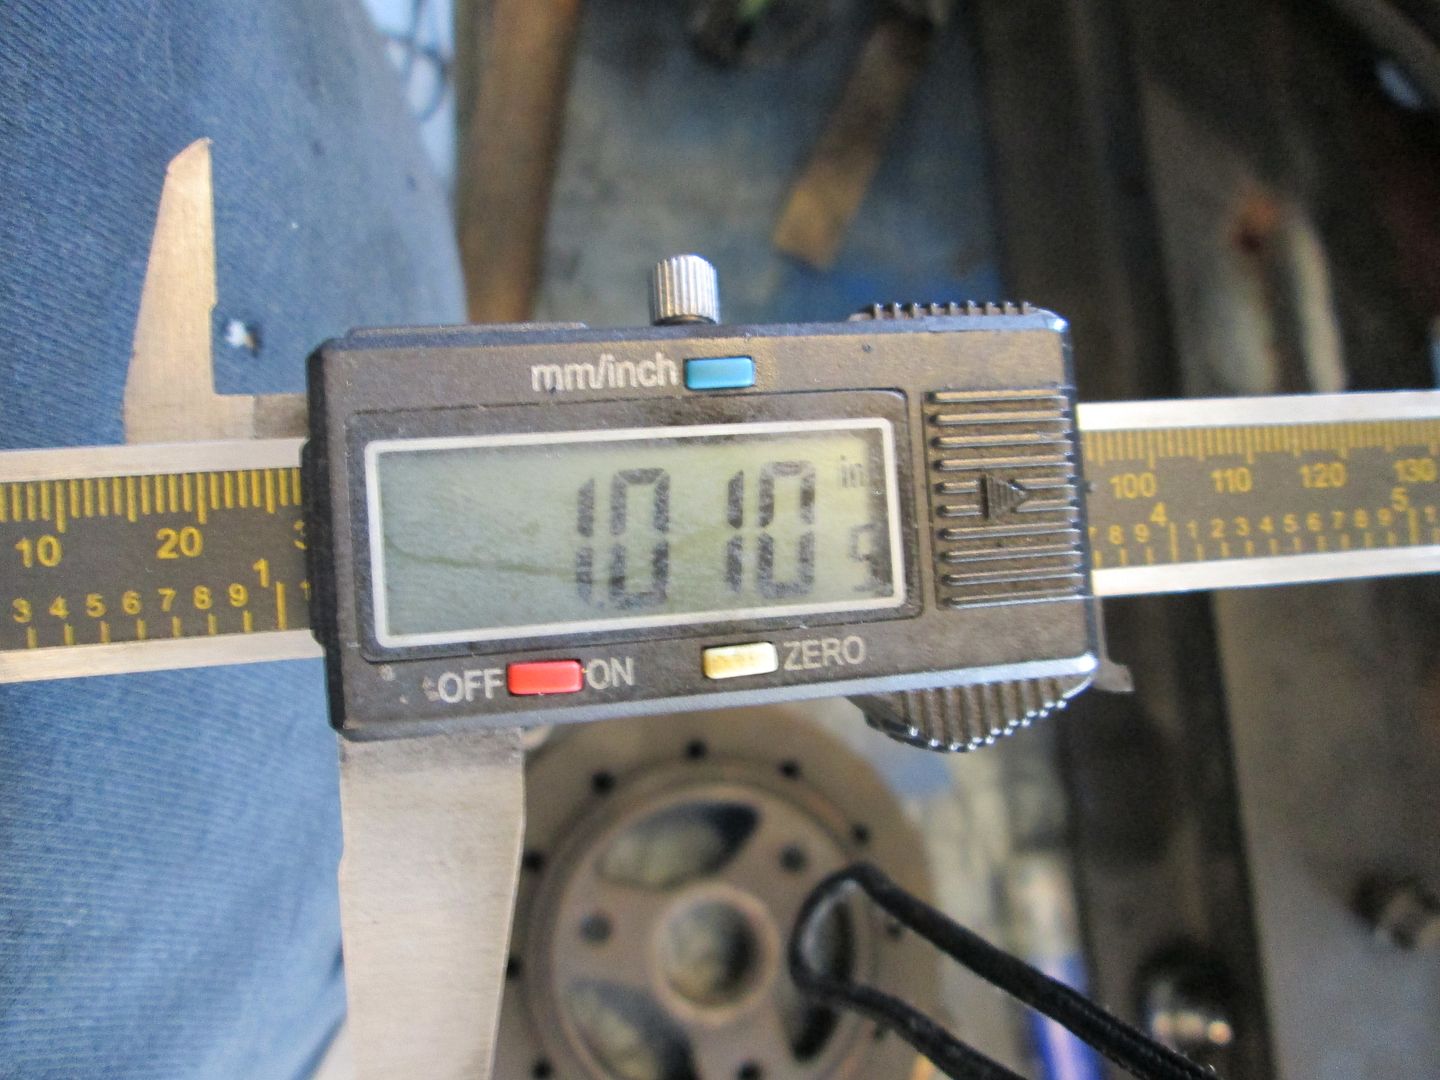
Removing this spacer allowed the reluctor to slide into place within the needed range (calipers were zero'd to the width of the ruler):
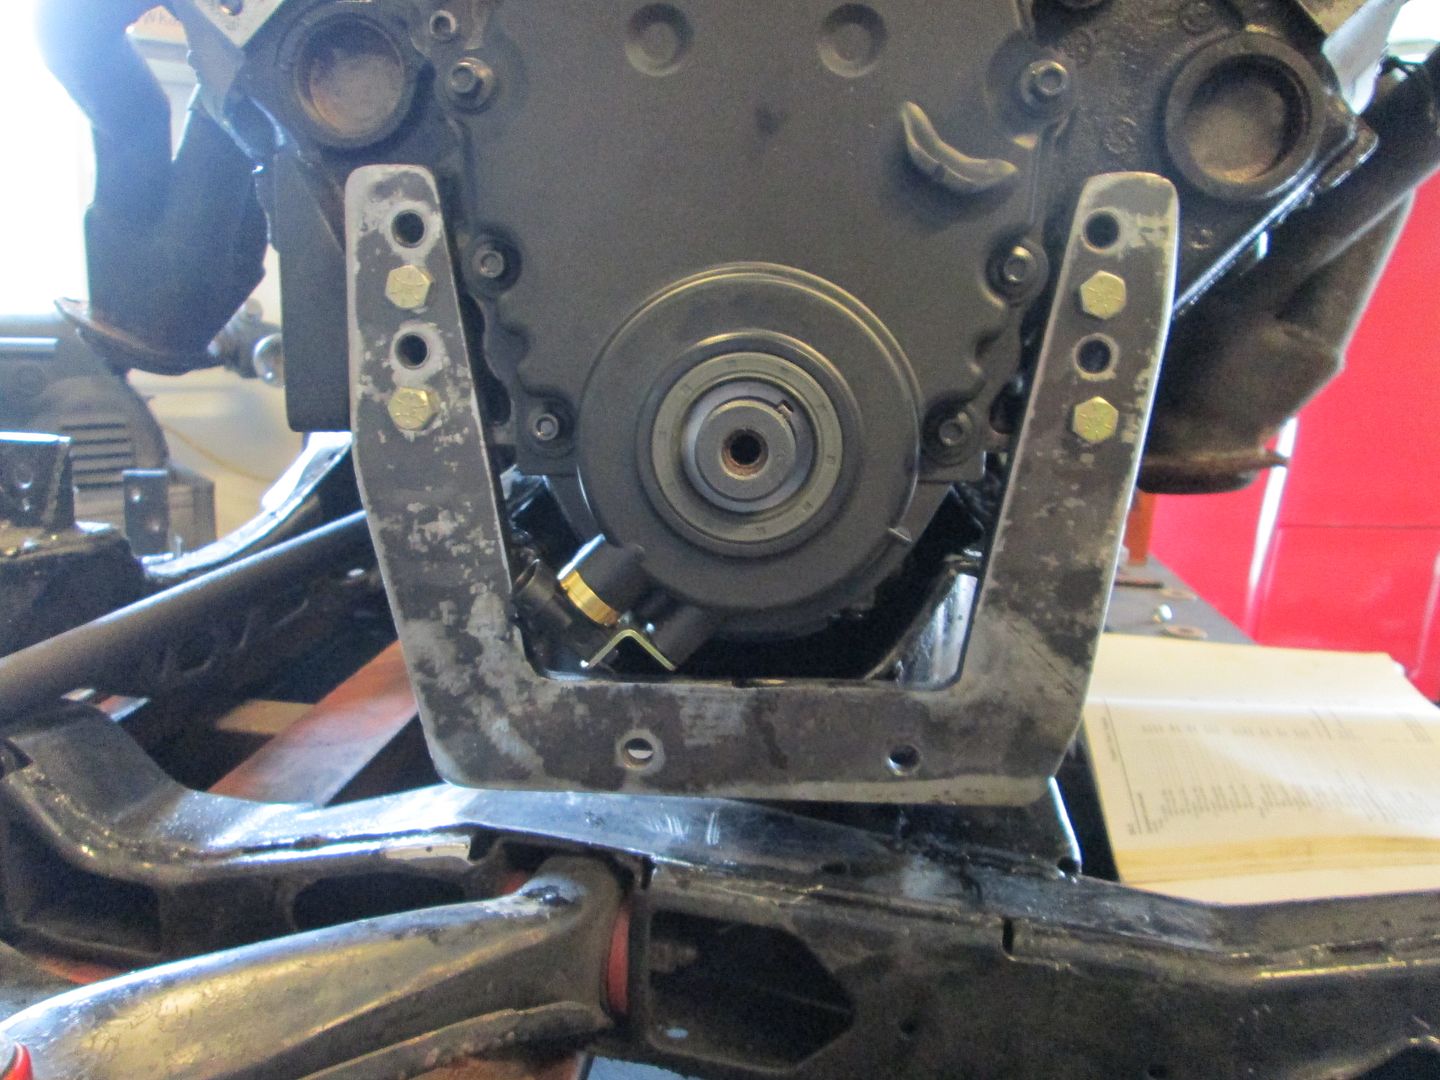
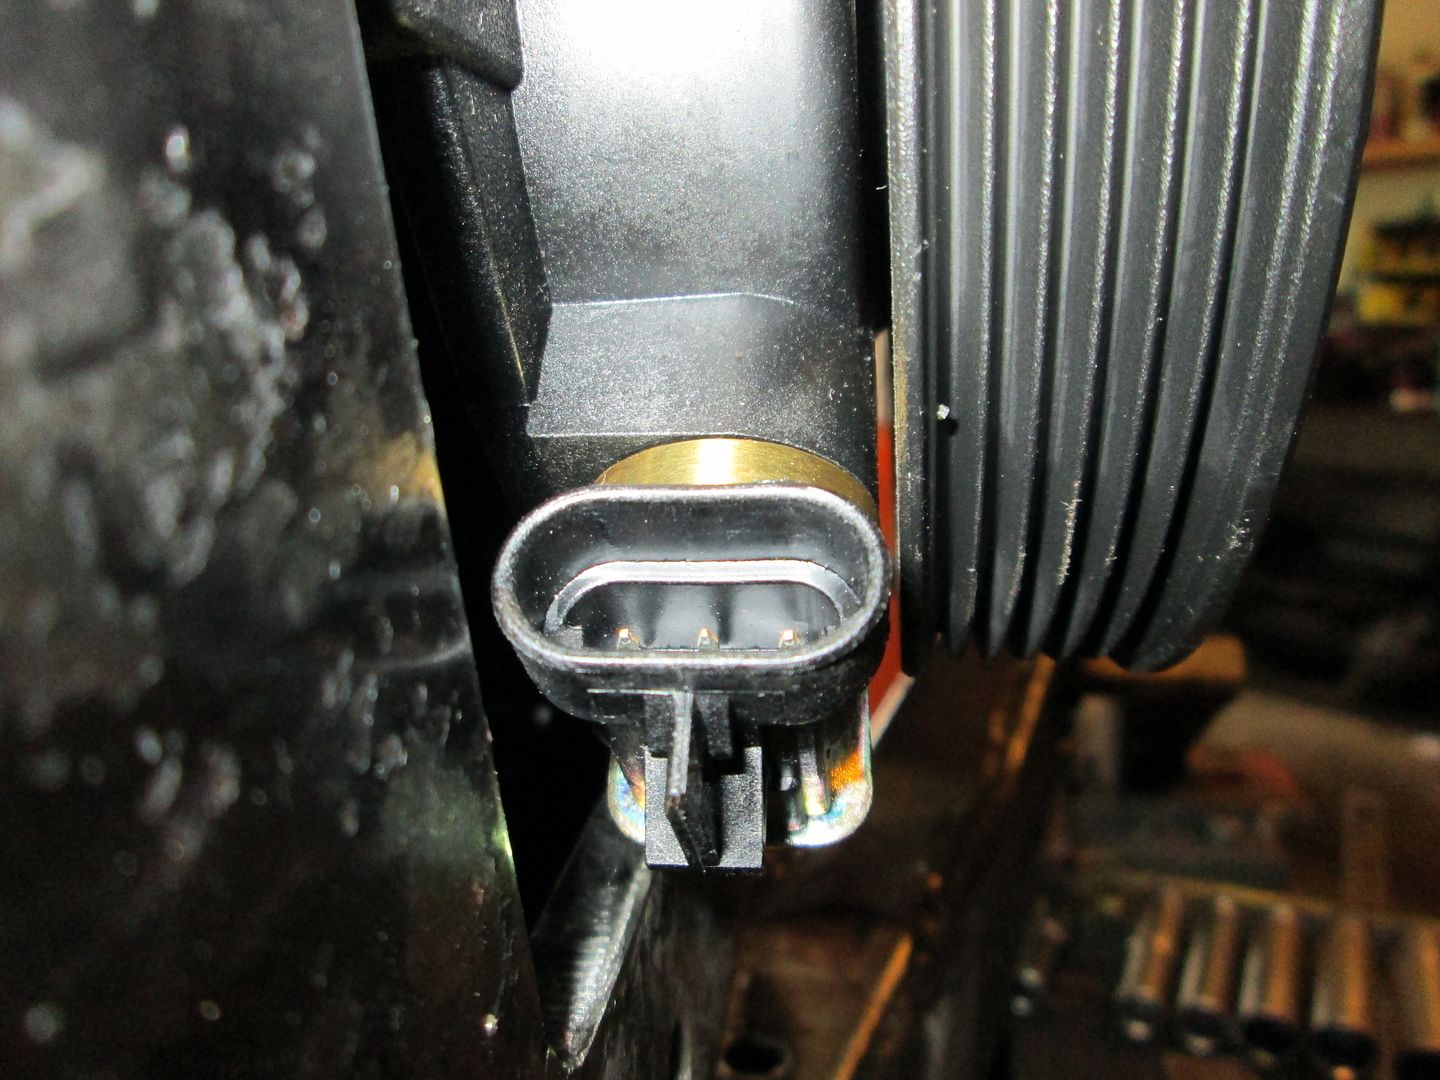
I shifted the Archie bracket down 1 hole so it cleared the crankshaft sensor:
Now to get the engine back down where it needs to be, I will end up trimming about 1/2" off the bottom of the Archie bracket and drilling 4 other holes in the bottom to mount it to the cradle:
So then the spacer needed trimmed slightly to properly position the balancer where it needed to be:
Now the balancer fits where it should be:
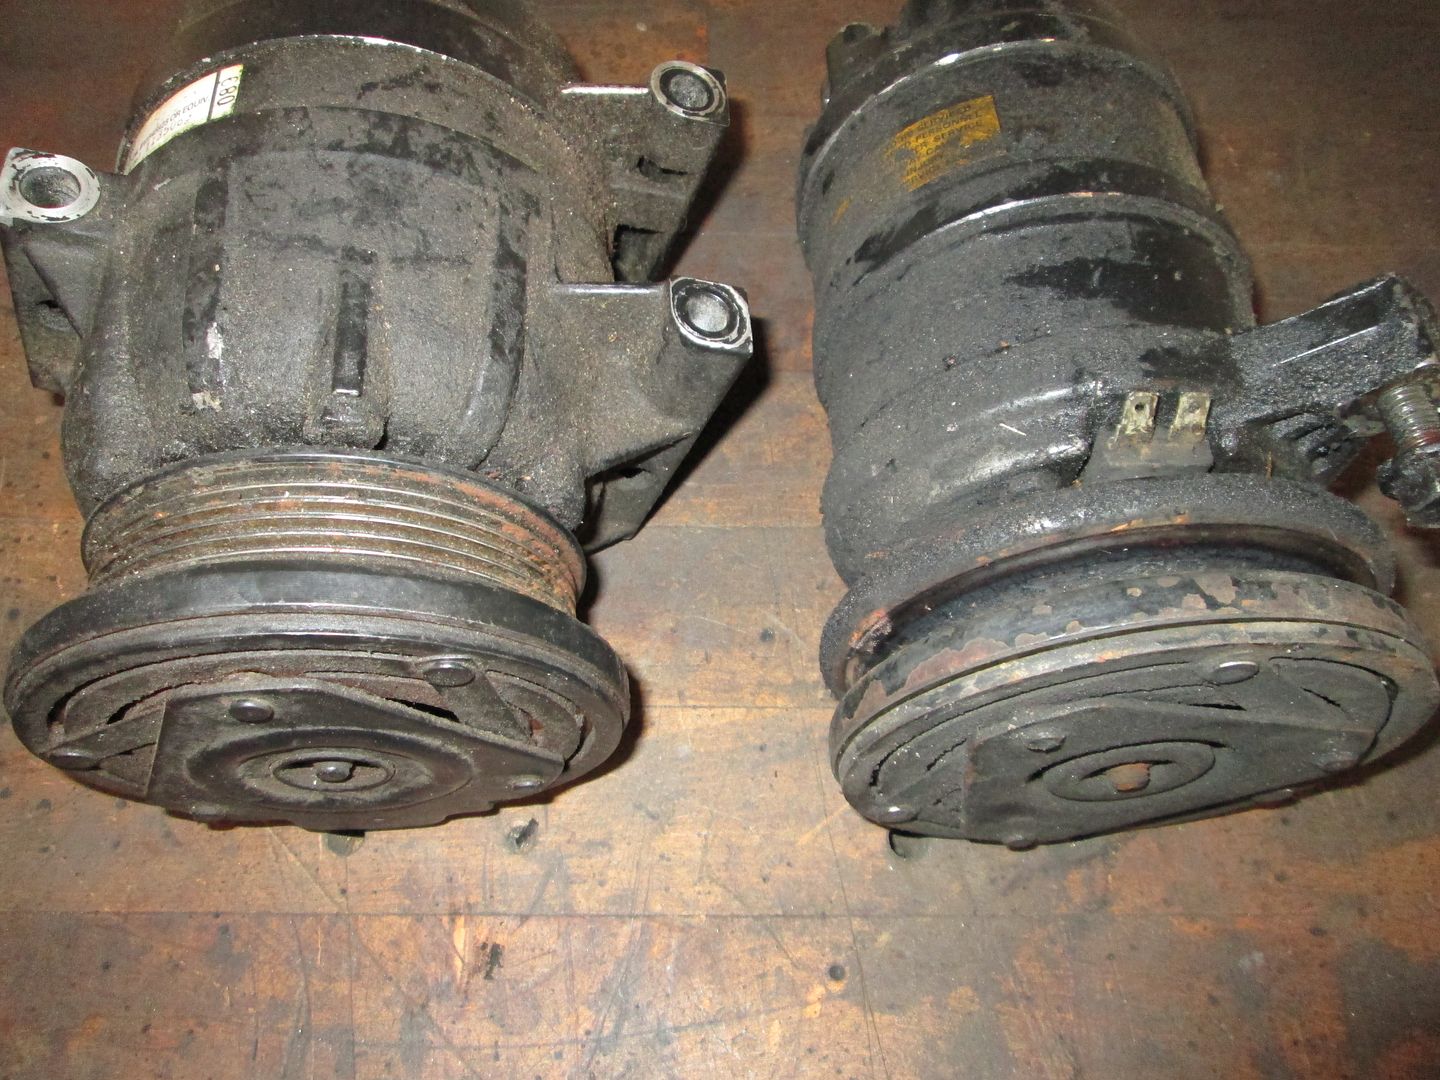
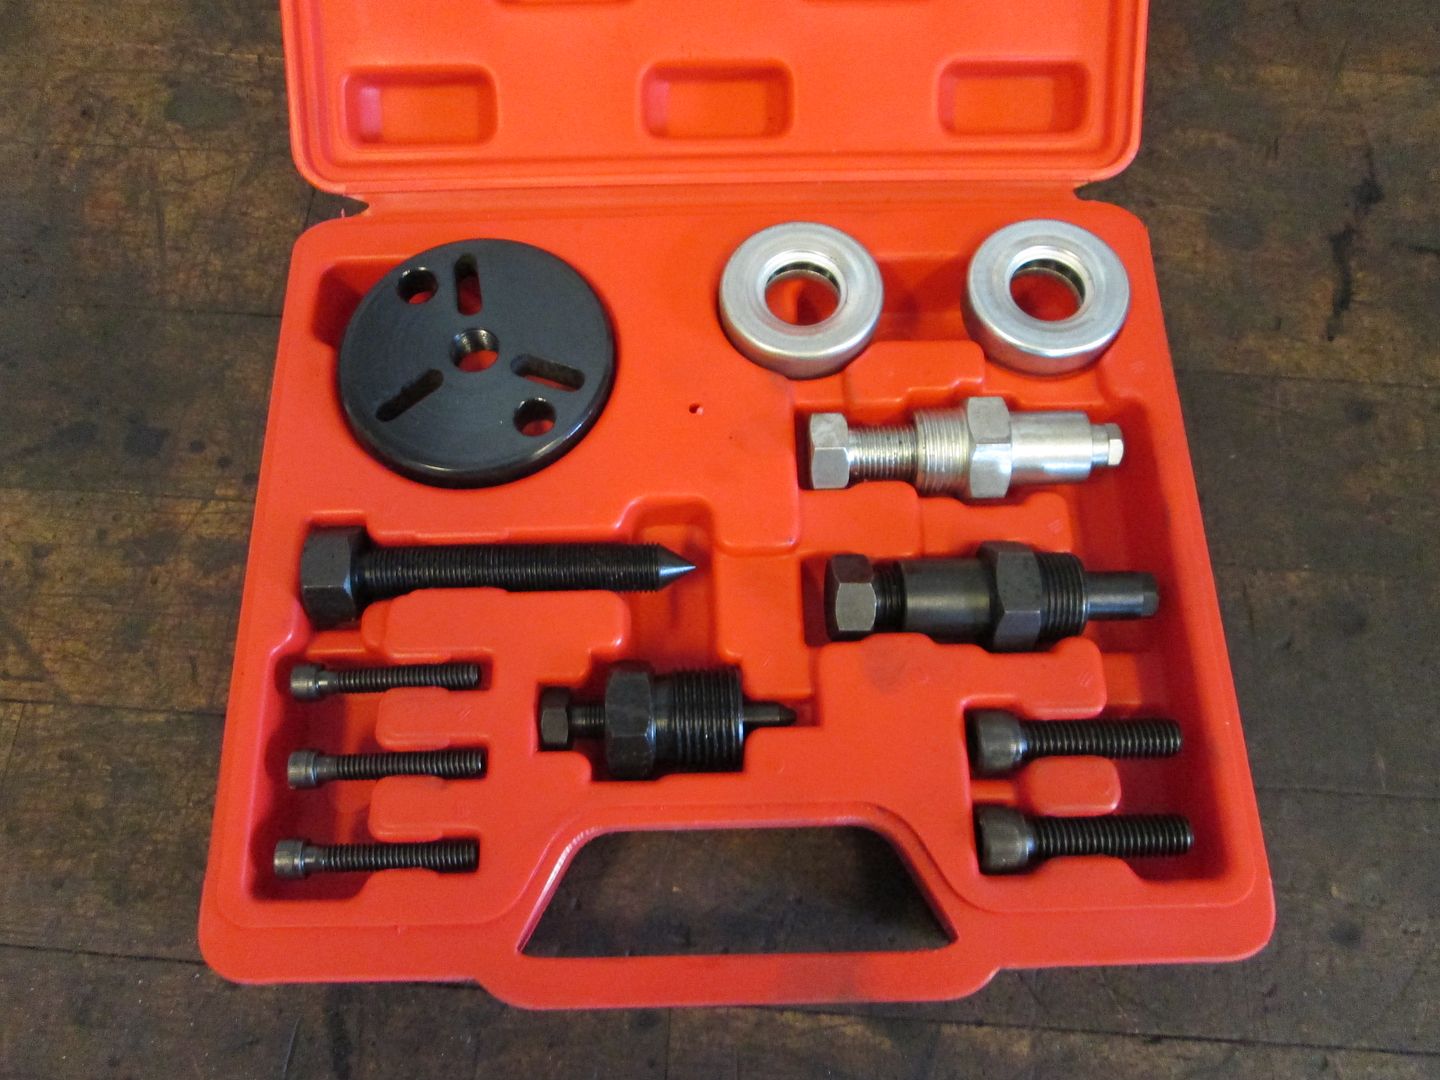
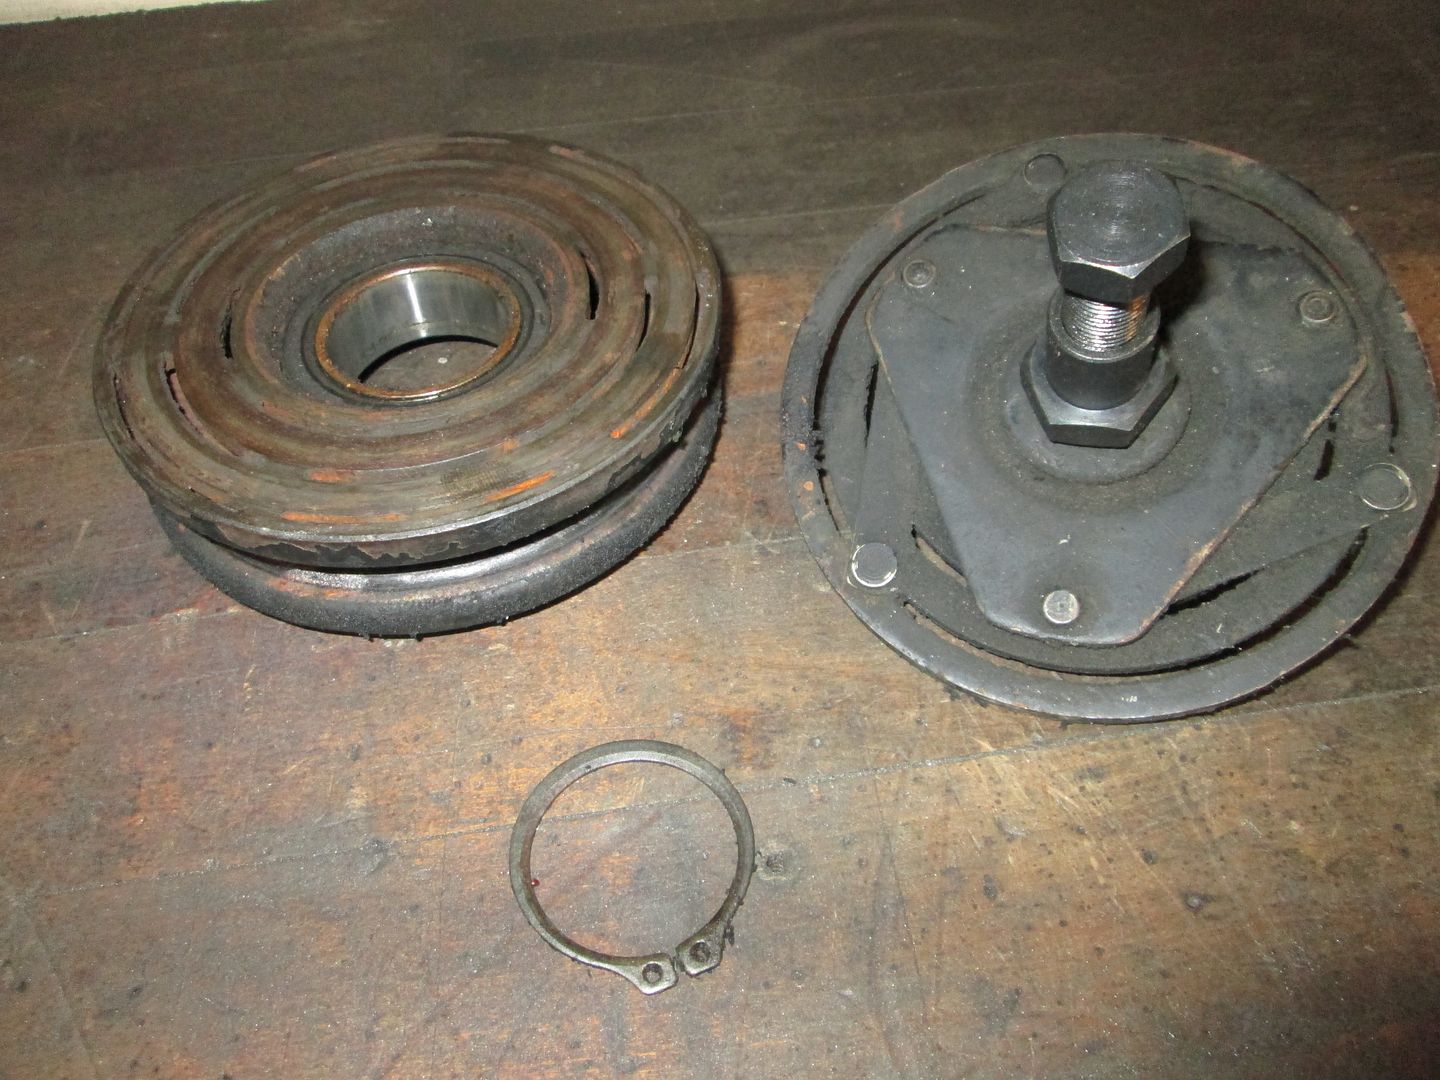
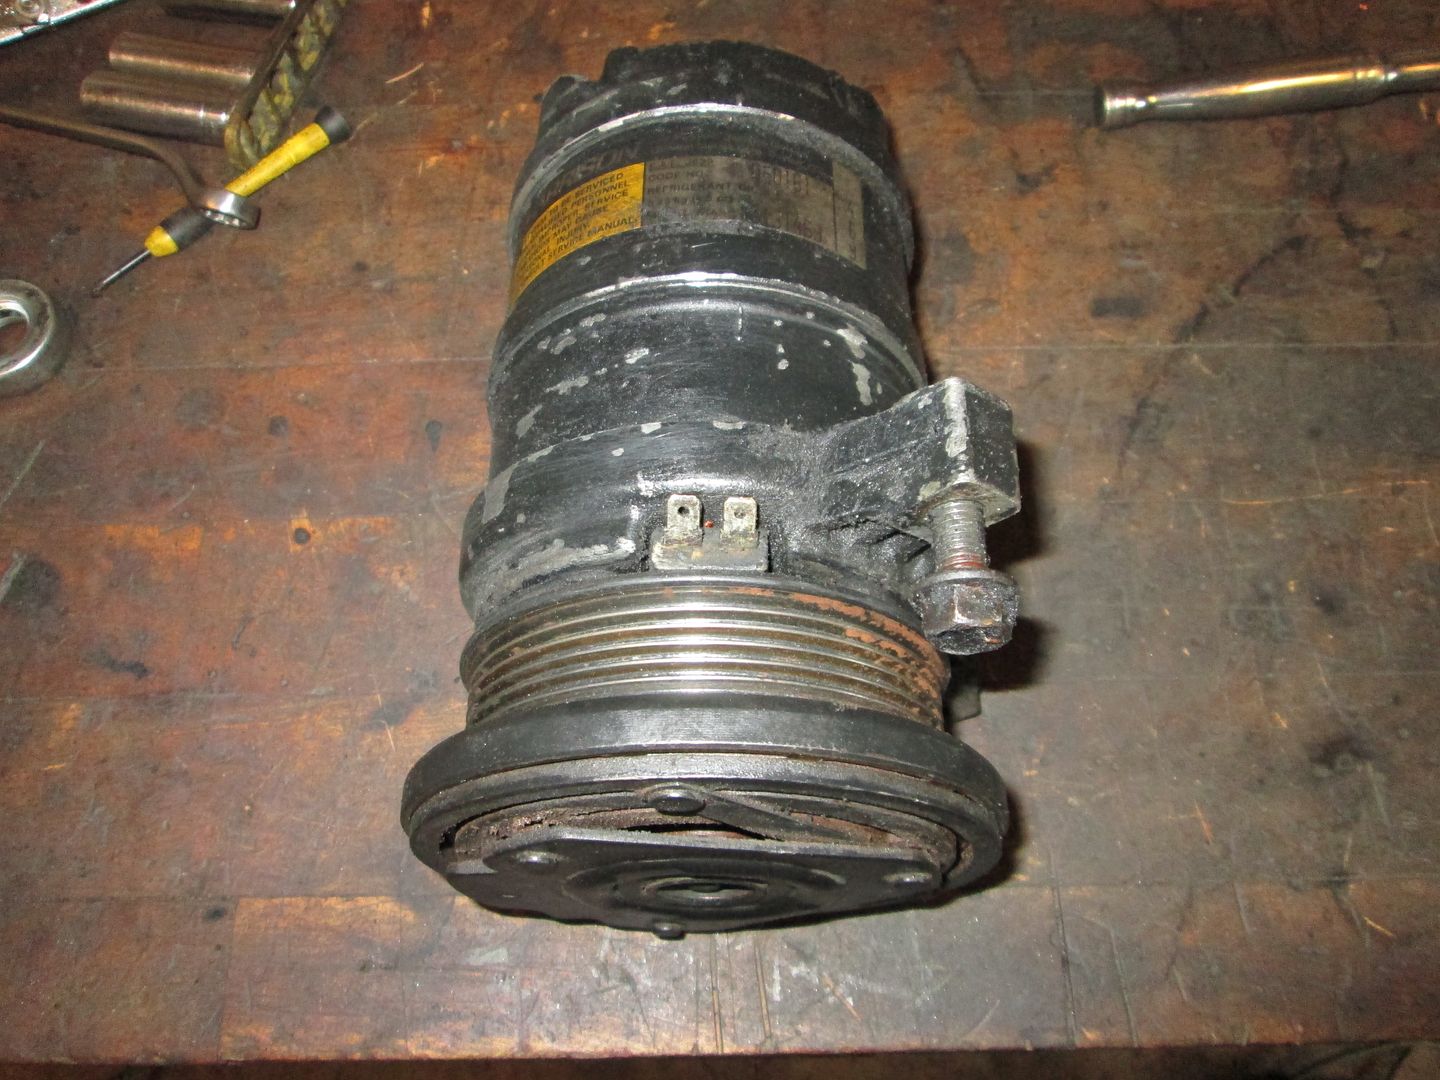
Then started working on converting the AC clutch to a serpentine version:
Now I need to pickup a serpentine pulley for the alternator at the alternator rebuilder in the morning and then start working on the needed spacers to get the pulleys lines up.


 Topic Closed


 I thought you were going to First. I really wanted to see that... not gonna crap on the HSR though.
 Good bye stock air box!