Ok, now is a little tip for the front fenders. I am just showing the drivers side in this post. The stock hood has a very nice curve to it but the IMSA fenders are straight as a board. To correct this, you either need to add fiberglass to the front or remove fiberglass from the "bow" in the hood. I am going to be removing the curve. To do this, I realized that I had a really cool tool from my building days. It is a laser level on a tripod. The laser does not bend with the surface which allows an accurate measurement of the curve. This is a view from the drivers side pillar looking forward along the fender. Here is the fender with the lights on....notice the way the fender gap changes from the front to the rear...It is wider in front, and thinner near the middle and them gets wider towards the rear. And here are the markings after the laser is turned off.
Tomorrow, I will be posting more of the panel bonding and fixing to the car.
By the way, I scrapped the intake idea since it looked like crap in the end !!!!
Troy & Archie what did you guys do? Straight or curved?
IP: Logged
12:23 PM
Archie Member
Posts: 9436 From: Las Vegas, NV Registered: Dec 1999
So today was a day of messy adhesives. I finally got all my adhesives and fillers and started to bond the front and rear sections together. The first step is to prep the surfaces by sanding down to bare fiberglass and then cleaning the surface with lacquer thinner. The next step is to do a test fit to ensure that all of your previously drilled holes line up. The adhesive that I am using is made by 3M, requires its own 2 piston gun, and it is pretty expensive but since this is a car that I would like to last another 20 years, I'll go with only the best products. The gun auto mixes the resin and hardner in the applicator tube so you simply apply a bead to both surfaces, spread the adhesive with a spreader and bond the surfaces together. I have about 90 minutes of working time before the adhesive sets up. This is a look at the rear section bolted together and bonded. Here is the front along with a peanut surprise for me !!!! I also bonded the roof panel to the factory skin. I have already fitted and cut it to the proper dimensions to fit the new rear end.
For those of you who want to do this build, I can tell you that it is a great project to take on if you have the desire to do this. Since I am in the bonding/filling/sanding/priming stage, the updates will slow down a little because filler can only dry so quick. I will try to do a "bulk" update once a week with plenty of photos. Hopefully by tomorrow, I can make another post about the fitting and bonding of the rear wing. I am going to add a few extra mounting points to the wing so stay tuned.....
IP: Logged
03:08 PM
Apr 13th, 2007
drumwzrd Member
Posts: 236 From: San Mateo,Ca Registered: Aug 2006
So today, I took off the rear lid and started on the rear wing. Since I had already made the cut in the decklid and posted that previously, I will just get into the permanent mounting of the wing. First, I test fitted the wing and make sure that everything lined up. I then drilled 8 - 1/4" holes to really sucure the wing to the decklid and again did a little test fit with rivets to ensure nothing moved. After the test fit, I added 1/4" extra wide washers on the wing at the holes that I drilled to give the rivets something extra to grab on to. These were glued with the panel adhesive. The next step was to prep the decklid for the adhesive by removing all of the finish in the areas to be bonded. I then applied the panel adhesive to all areas to be bonded and assembled the wing with the rivets around the edges. The next step was to bond the front of the wing to the stock skin. This is fairly easy since the skin is already loose from the cut. Simply pry up and glue. Once this was dry, I used an Evercoat Vette Panel filler to fill in the 1/4" gap between the wing and skin. This actually took about 3 coats and I will apply 1 more tomorrow. I am really against any type of filler so I am trying to use as little as possible. The wing looks rough but trust me, it is smooth as glass. One thing you may notice is what appears to be black "runs" at the edges of the filler at the body lines. This is the area underneath the paint and primer. When you remove these coats, it creates a small dip in the panel at these locations. I will also have to build these up slightly to keep the smooth transition from panel to wing. After one more coat of filler, it should be ready to go. For those wondering, this is the adhesive that I use. It is a "must have" for this type of work. Be prepared to pay for the quality,however....$35.00 per tube and $250.00 for the gun....OUCH. Anyway, they say rain for tomorrow so hopefully, I'll post more images on Sunday.
IP: Logged
07:04 PM
Apr 18th, 2007
drumwzrd Member
Posts: 236 From: San Mateo,Ca Registered: Aug 2006
To be honest, I used it just because it was 10 times faster than glassing the parts together. The glue is only to bond the panels to the structure. It is pretty much permanent.
IP: Logged
09:28 PM
Apr 22nd, 2007
drumwzrd Member
Posts: 236 From: San Mateo,Ca Registered: Aug 2006
My usual weekend update....I am currently filling and sanding the rear section where the bumper joins to the rear quarter panels. I am also doing the same for the front end. I will post a lot of pics during the next week showing the progress of the build. I also am receiving an APC cold air intake kit on Wednesday to compensate for the offset of the rear fenders. While I am at it, I decided to change the brake lines to stainless steel, change the fluid to synthetic, and I just rebuilt the calipers. I also changed the rotors to slotted/cross-drilled ones. I also am recoating the wheel wells with a rubberized coating to get the nice dark black color back. More to come.....
IP: Logged
10:41 PM
May 5th, 2007
drumwzrd Member
Posts: 236 From: San Mateo,Ca Registered: Aug 2006
Sorry about the lack of updates. My wife and I are expecting our first son so my focus is on her and our soon-to-be child. This week, I wanted to give you guys a pretty good option for an intake. I recently won an APC Universal Intake kit on Ebay for $20.00. It contains the filter, chrome pipe, adapters, clamps, smog hose, and a really cool heavy duty flex pipe.
I mounted the rubber adapter and the flex tube with the supplied clamps to the stock air cleaner mount.
I then test fit it into the car. It fit perfectly and gives me the ability to do whatever I need with the intake. What is really funny is how much tubing they give you. You literally can run this from the stock airbox to the roofline if you wanted.
You can also run this from the stock intake manifold all the way to the side vent and use the aftermarket air filter if you like. It gives you plenty of flex tube. You just have to worry about the vacuum hoses and make adjustments for the fit.
Now I just have to figure out what to do with this piece....I can't really use it.
This intake was available for about $60.00 from Jegs racing. I don't know if they stock this anymore.
I am still adjusting the front end of the car. I was told that this is pretty difficult and I am finding out that this is true. Like they say...."It's the little stuff that kills you" Hopefully, I can post more pics soon. I only post pics of my progress on the build so progress is very slow now. Hopefully, I can get more photos posted soon.
IP: Logged
07:50 PM
May 28th, 2007
drumwzrd Member
Posts: 236 From: San Mateo,Ca Registered: Aug 2006
No major updates right now....sanding and filling the roofline now. As I said, the wife and I are expecting in July so the updates have slowed a little. When I do resume, expect about 2 pages of photos covering the build......Stay tuned.
IP: Logged
07:07 PM
PFF
System Bot
Jul 25th, 2007
drumwzrd Member
Posts: 236 From: San Mateo,Ca Registered: Aug 2006
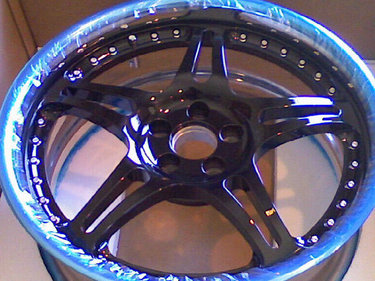
Just a quick update.....The wife and I had our first son on Monday and everything is great !!! ( This is the reason my build stopped in May ) One of the most amazing things about my wife is that she is already asking me to continue with this build because she knows how much fun I have doing this while she watches our son..... so over the next couple of weeks the updates will resume and hopefully, the car will be completed before I go back to work in September. I visited with Madcurl last week and he convinced me to go with at least a 17" wheel.....In the end, I may go with the 18" HRE and have them powdercoat the centers to match the final car color.....that will come later. For now, I look forward to continuing this build and posting tons of pics for you guys and gals.
IP: Logged
08:31 PM
Jul 26th, 2007
SNMFX Member
Posts: 436 From: Los Angeles, CA 90026 Registered: Mar 2004
I visited with Madcurl last week and he convinced me to go with at least a 17" wheel.....In the end, I may go with the 18" HRE and have them powdercoat the centers to match the final car color.....that will come later. For now, I look forward to continuing this build and posting tons of pics for you guys and gals.
Something to carry you through Sept.
IP: Logged
01:00 PM
Aug 4th, 2007
drumwzrd Member
Posts: 236 From: San Mateo,Ca Registered: Aug 2006
Alright....finally back to business !!! Today, I focused on one of the harder parts of the vehicle.....removing the curve from the hood, trimming the front facia, and lining up the front end to fit perfectly. I wanted to leave a 1/4" gap all the way around the hood. Since this is not a perfect fit kit, I also had to be aware of the rocker panels in relation to the front fenders and how the doors open with the lower door panels.
First, I measured and marked the hood to make it straight. The blue tape indicates my cut line. Keep in mind that the IMSA kit has straight fender lines, not curved like the stock hood.
While the hood was off the car, I then trimmed the edge of the from fascia to increase the gap between the front of the hood and the fascia.
Here is a picture with the hood roughly installed after the trimming was complete.
After adjusting the fenders and the hood hinges, this is the gap that I wanted...
For some reason in this pic, the gap looks incorrect but it is 1/4"....must have been the camera angle
Now I just need to clean up my cuts, round over the lip of the hood so the edges are not sharp, and do a little minor filling of the front fascia to level it with the front of the hood. While taking a break from this part of the build, I decided to draw and cut the intake port and test fit the screen that I will be using. I am also making an air box to fit behind the screen.
Tomorrow the work continues......until then
IP: Logged
07:00 PM
Aug 7th, 2007
drumwzrd Member
Posts: 236 From: San Mateo,Ca Registered: Aug 2006
Ok, today I wanted to get as much done on the rear of the car as possible. The first thing was mounting and aligning the rear clip. Since this is not an exact fit using factory mounting locations, a measurement must be made to ensure that the clip is centered on the vehicle....if it is not, you will have a 10" wide wheel on one side and a 12" on the other Once the measurements were done, I attached the clip by only the rear bumper mounting points. I still have to install the side intake so I need the flexibility of being able to move the front portion out to work. I also temporarily installed the gas cap door and one of my new tinted quarter windows from Ken Hines products.....just to tease myself
I really wanted to attack the taillights today because this kit is very unforgiving with the rear end !!! Nothing lines up and this probably is one of the more labor intese areas as far as cutting, filling, sanding and almost making it custom for your particular vehicle. There is a trim strip that covers the bumper at the trim level and it is a pain to get this piece to fit under the lights. Lots of fab work and here is what I came up with today.
Tomorrow, I am hoping to finish the wing and get it mounted. I have some custom nascar air ducts coming this week. They are a split intake so one of the 3" pipes goes to the intake and the other goes to the rear to add cooling to whatever...brakes...engine?? I am making both side intakes work on this car. There is no point in having fake intakes....this isn't a Mustang
Now to see who actually pays attention to my thread.....whoever wants one of these in any size from 10" up to 32" wide, shoot me am email. I now have the file for my vinyl machine for this design. Still looking for the shield design though.
IP: Logged
12:45 AM
RCR Member
Posts: 4397 From: Shelby Twp Mi Registered: Sep 2002
Not much of an update for today....still finishing the whale tail. Hopefully, I can get it primered and mounted today as well as primering the rear clip. Stay tuned....
IP: Logged
04:53 AM
drumwzrd Member
Posts: 236 From: San Mateo,Ca Registered: Aug 2006
Well, I got a little sidetracked today when my order from the Fiero store came in. The IMSA body has the older grooved moldings formed into the panels. My 87 has the smooth moldings so I could either round over the IMSA or change mine to grooved.....I went for the grooved look. Fiero store offers the reproduction grooved side marker lights and used grooved door moldings as well as the grooved caps that are behind the door handles. Here is a pic of these nice new lights and used moldings.
This is a picture of my current molding and the IMSA front fender molding.
Here is a pic of the factory GT side marker with the round molding built in. Notice the cutout on the fender....these would never work.
After some cutting and filing, the fender is ready for the new side marker.
And as usual....nothing seems fit on this vehicle so....I cringed doing this.....I filed the new marker lights to fit the fender
Here are a couple of pictures of the marker fitted. On this pic, you really can see the amount of work it will take to "line up" the IMSA grooves with the sidemarker grooves. Before I prime the car...as a final step, I am going to "harden" the lines on the body. Right now, they are too soft and flowing....I want them to be sharper to match the marker grooves.
Also, my intake scoop came. This is going to be pretty nice when I am done. Since I am using a fairly open screen for the grille on the intake, you will be able to see into the scoop....it should look kinda cool I am using these on both sides.
[This message has been edited by drumwzrd (edited 08-08-2007).]
IP: Logged
08:41 PM
PFF
System Bot
Aug 12th, 2007
drumwzrd Member
Posts: 236 From: San Mateo,Ca Registered: Aug 2006
Today, I started to ajust the gap on the roof line. This IMSA kit is open in the center so you have to cut out the center section of your stock roof and use it. The front seam lines up perfectly with the skin of the forward roof. The rear area does not line up however. The lip is off by about the thickness of the material so sanding is not an option.
Here is what I started with.
This is what I mean when I say that the back lip does not line up.
After drawing a line across the skin and directly above the factory mounting strip, I cut a groove across the roof and removed the rear piece.
After cleaning the excess old adhesive and strands, here is the part ready to be glued...notice the lip of the factory mounting piece on the roofline.
One the glue has been applied, the part is assembled and taped to hold it in place. The purpose of me cutting and regluing the strip right back on is that the cutter bit is about 1/8" wide. It removed just enough material to allow me to remount the piece and have the part fit almost perfect.
Here is the adjusted piece. The "before" picture is the 3rd one down and this is the "after"
This will be my end result when done. I am removing all seams and blending the rear clip into the roof to make the car really flow.
Until next time......
IP: Logged
08:54 PM
88White3.4GT Member
Posts: 1604 From: Hayward, CA Registered: Dec 2003
Well, I didn't know the adhesive would dry so fast so here is another update. I am a firm believer in using as little filler as possible. I hate cars that are 90% Bondo. Here, I filled in the gaps lightly with Vette Panel Filler. Tomorrow, I will remove all of the excess filler from around the joints and add a little more to finish filling the gaps.
IP: Logged
12:45 AM
RCR Member
Posts: 4397 From: Shelby Twp Mi Registered: Sep 2002
So today, I made the rear clip one with the roof panel and I finished the roofline as planned. I put on 1 coat of House of Kolor primer to check my work and make sure everything was smooth. Here is the finished product.....and yes, I am changing the sunroof weatherstrip so I didn't care about the overspray !!
I am also going to shorten the roof trim piece. Originally, it went from the front fender, over the door, and down to the rear of the quarter window. In the first and second picture, you will notice a slight change in the roofline just above the quarter window. It looks like a mistake but this transitions the roofline up to the quarter window body line. Now that this car is slowly coming together, it is really going to kick a$$ when I'm done....if I say so myself
IP: Logged
01:30 AM
Aug 15th, 2007
88White3.4GT Member
Posts: 1604 From: Hayward, CA Registered: Dec 2003
Real quick update. For some reason, the whale tail was very difficult to sculpt which is why I have been working on it for so long. I mounted it and gave it a very light coat of House of Kolor primer just to check my body work and make sure the body lines were straight. Still needs some filling of some pinholes but overall, it came out nice.
[This message has been edited by drumwzrd (edited 08-20-2007).]
IP: Logged
12:50 AM
Aug 20th, 2007
drumwzrd Member
Posts: 236 From: San Mateo,Ca Registered: Aug 2006
Not too much to update today but I do have some info to share. As you may or may not know, I'm trying to keep this as close to the original IMSA race car as possible. I spoke to Joe Huffaker today from Huffaker Engineering and got the specs from the original IMSA racer from the 80's. He said that they used a ..... Front wheel: 16X10, with Goodyear 24.0 X 12.0-16 racing slicks......Rear wheel: 16X12, with Goodyear 26.5 X 14.0-16 racing slicks. I don't know how a 16x10 would fit on the front so I have to do some testing with the size. Here is a pic of his car.
IP: Logged
08:09 PM
Aug 26th, 2007
madcurl Member
Posts: 21401 From: In a Van down by the Kern River Registered: Jul 2003
Not too much to update today but I do have some info to share. As you may or may not know, I'm trying to keep this as close to the original IMSA race car as possible. I spoke to Joe Huffaker today from Huffaker Engineering and got the specs from the original IMSA racer from the 80's. He said that they used a ..... Front wheel: 16X10, with Goodyear 24.0 X 12.0-16 racing slicks......Rear wheel: 16X12, with Goodyear 26.5 X 14.0-16 racing slicks. I don't know how a 16x10 would fit on the front so I have to do some testing with the size. Here is a pic of his car.
Geezs, I hope you can send your build-up pics to me so that this thread can remain alive.
IP: Logged
03:32 PM
PFF
System Bot
Mr.PBody Member
Posts: 3172 From: Cincinnati, Ohio, USA Registered: Oct 2006
------------------ Fiero Thomas 85 Fiero GT 86 Fiero GT 88 Formula T-Top C+C # 1239 of 1252, Build Digit 26,224 of 26,402 NIFE Member Fiero News dot net
IP: Logged
09:19 PM
wftb Member
Posts: 3692 From: kincardine,ontario,canada Registered: Jun 2005
i cant think of anything bad that he has done to get banned .some people jealous of talent , maybe ?.it would be nice if cliff pennock looked in to this , it does not make any sense .
IP: Logged
10:44 PM
AkursedX Member
Posts: 2890 From: Lackawanna NY Registered: Aug 2000
Based on that thread, I don�t see anything that should have banned him. But I suppose there may have been something said we�re not privy too. Still it sucks, I really enjoyed following this build-up.
IP: Logged
09:08 AM
Fiero Thomas Member
Posts: 4668 From: Round Lake Beach, IL Registered: Jul 2005
------------------ Fiero Thomas 85 Fiero GT 86 Fiero GT 88 Formula T-Top C+C # 1239 of 1252, Build Digit 26,224 of 26,402 NIFE Member Fiero News dot net


 For some reason in this pic, the gap looks incorrect but it is 1/4"....must have been the camera angle

 Once the measurements were done, I attached the clip by only the rear bumper mounting points. I still have to install the side intake so I need the flexibility of being able to move the front portion out to work. I also temporarily installed the gas cap door and one of my new tinted quarter windows from Ken Hines products.....just to tease myself


