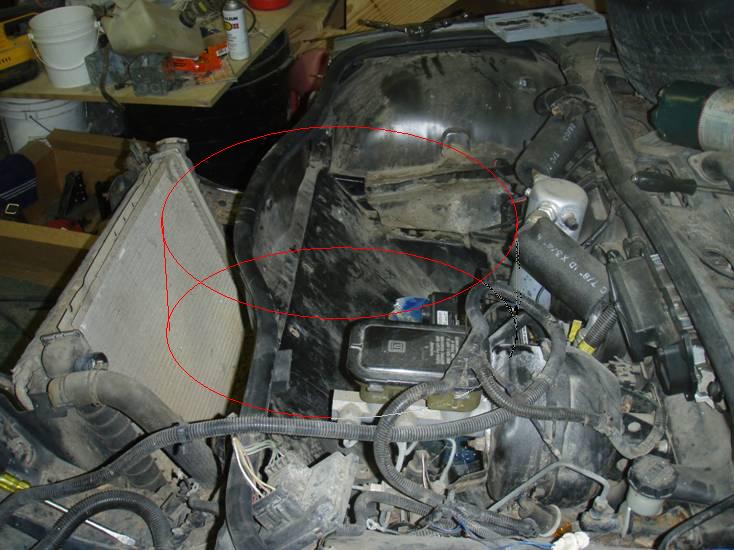
Let me start out with saying I've been watching this forum for a while and have gotten loads of information from all of you guys and gals on here and Thank you very much!
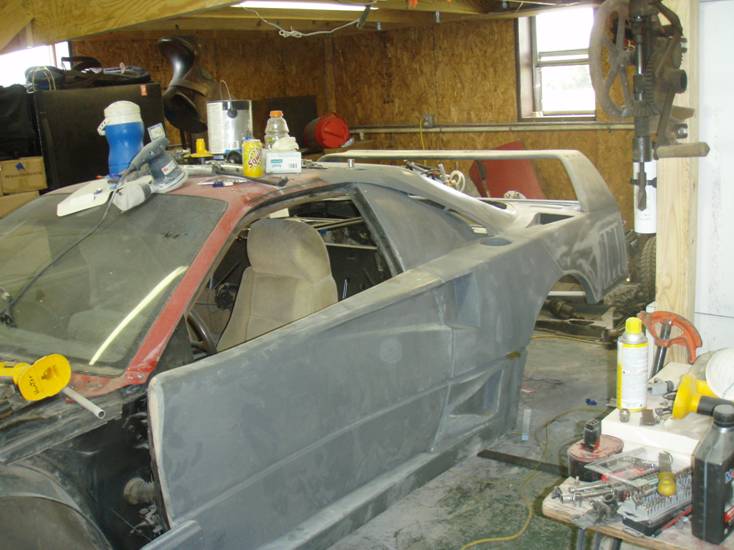
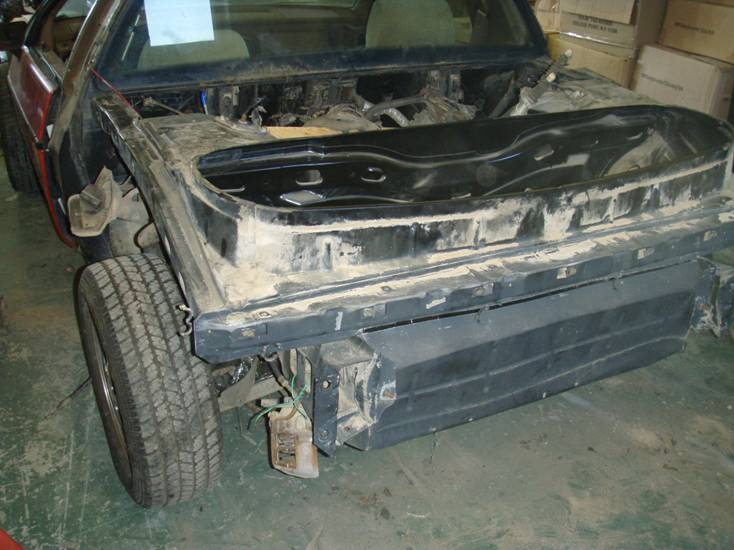
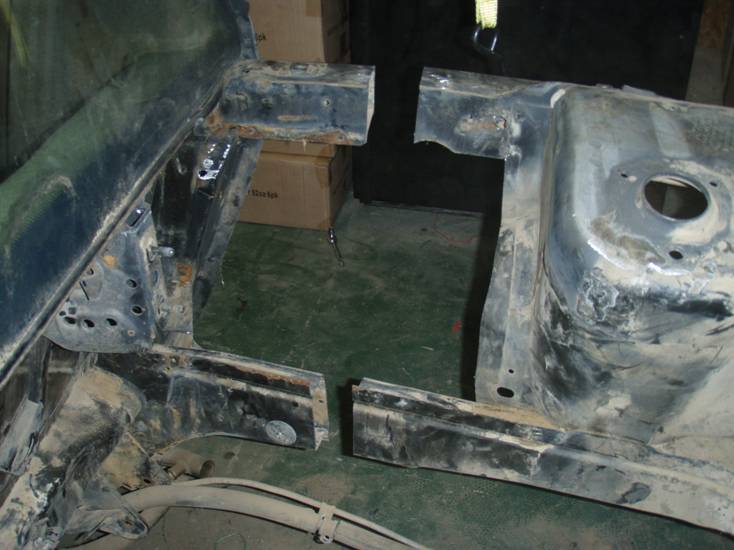
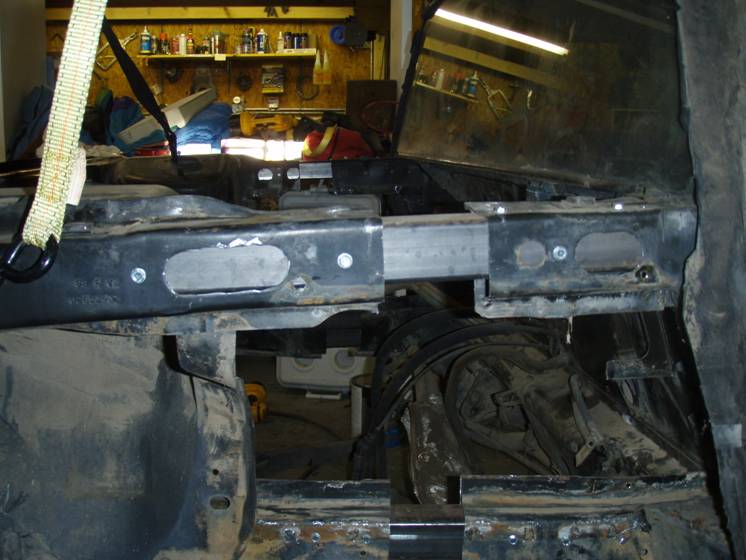
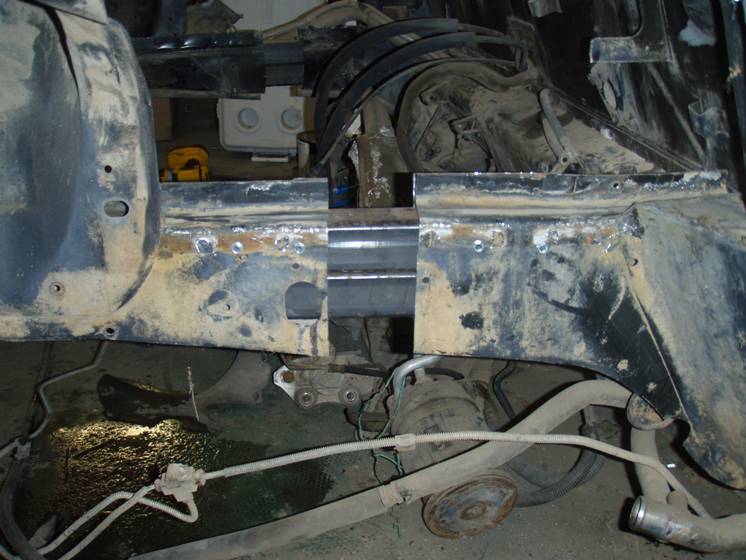
I bought my first Fiero when I was 19, I'm 25 now, but never got it on the road. It was an '85 GT, black with gray interior and an auto. It needed a new hood decklid and driverside rockers. Found an '88 coupe for $650 delivered to the house on a rollback, bought it for parts, this was until I found out the advantages of the '88. Both cars sat at my parents house till this summer when I brought the '88 back to my house in NW Arkansas. I started stripping the car down to clean it up and do the engine swap. Wanted to go with a manual, and picked up a G6 6 speed for $474 to the doorstep. This tranny will be going in with a TT 4.0 Aurora 32 valve DOHC. In building this car I decided to go with a 3 inch stretch, 96.5" rather then the 93.5" stocker, smooth out the lines a little better in my opinion. Besides there are other ulterior motives that needed the stretch. For the stretch I went with 1 3/4" x 1/8" wall Square tubing. Used a total of about 90" of tubing for a three inch stretch. In the upper rails I used an 18" piece and stacked two pieces a 15" piece on top of a 12" piece in each lower frame rail. After removing the engine and cradle, I gutted the engine compartment. First I removed the battery box and the thin metal between the firewall and strut tower on both sides. For the cuts I started by measuring 6 inches from the back glass on each upper rail and 6 inches from the kick in the lower frame rails, the lower frame rail comes straight out from the firewall about 6 inches and kicks in somewhere between 5 to 7 degrees. My goal on this car is to drive it to the 25th in July. There are a few things I have not documented, this is only because so many people on here have done something very similar. I am working on a NHRA spec roll bar with removable door bars that will have minimal intrusion into the interior, and still maintain a GLASS rear window. This is in the works, I will post more information on this as the bugs are worked out. Will post pictures later tonight, have to resize them all because they are all to big.
[This message has been edited by HTXtremes (edited 10-02-2007).]
IP: Logged
07:38 PM
PFF
System Bot
HTXtremes Member
Posts: 345 From: Mansfield, AR Registered: Sep 2007
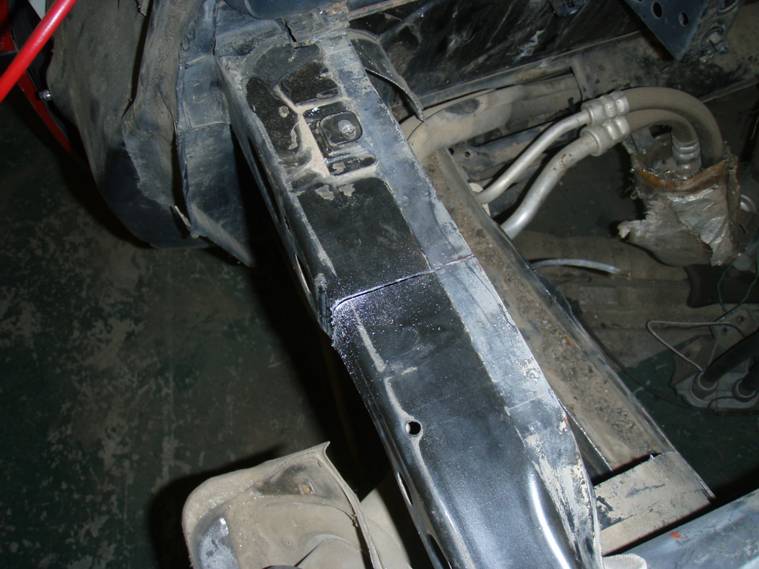
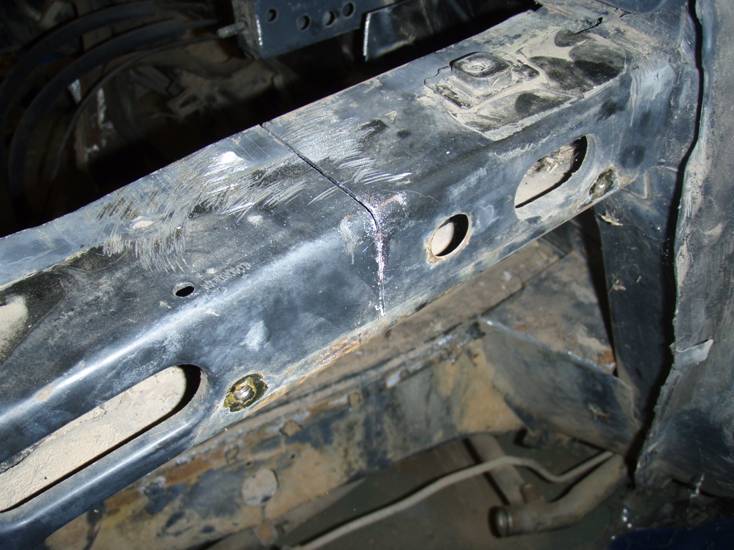
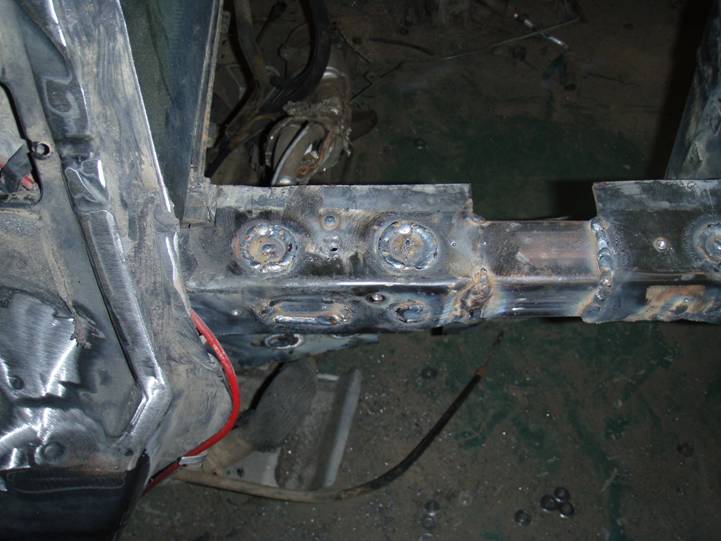
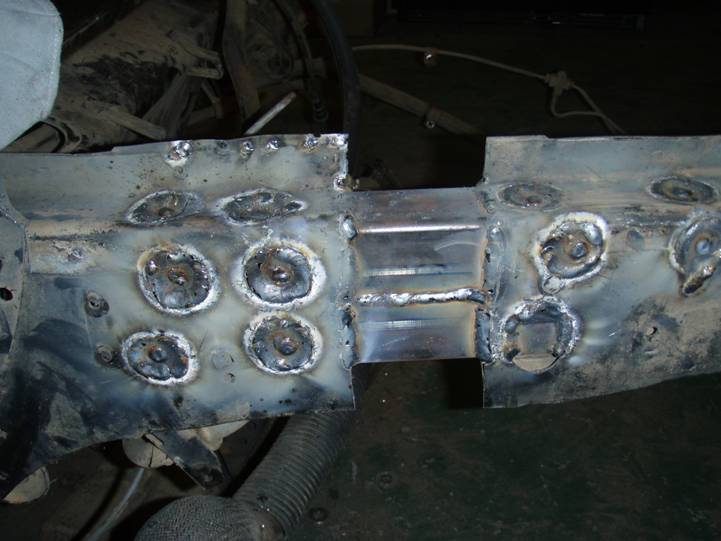
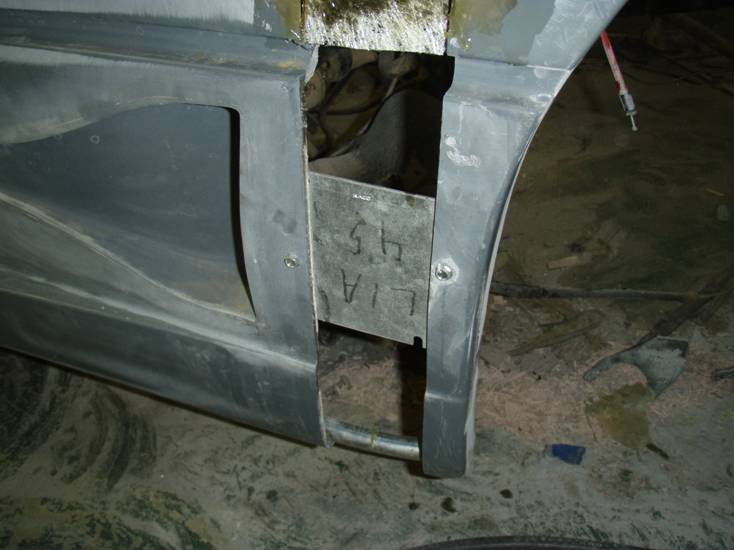
On the lower frame rails I split the inside panel off of the frame because of a groove on the top and bottom on the inside of the frame. I left these apart until the frame was welded pretty solid back together, then used the BFP to put it where it needed to go.
To get the tubing to fit in the frame rails I had to grind the lip off of the stamped holes in the frame. I used some self tapping sheet metal screws to hold it in place until final welding was done.
I used a 1 1/8" hole saw to make holes in the sheet metal frame rails so I could have VERY LARGE spot welds, there are over 38 of these welds.
[This message has been edited by HTXtremes (edited 09-26-2007).]
IP: Logged
09:09 PM
ALLTRBO Member
Posts: 2023 From: College Park, MD Registered: Mar 2006
I wanna say it was a Miller 200 mig, I'm not a welder so I had a guy come out and weld it up for me, he brought the welder. Forty bucks in gas, for that much welding was cheap in my book, so I threw in 100 ft of 8-4 S.O. cord.
[This message has been edited by HTXtremes (edited 02-21-2008).]
IP: Logged
08:34 PM
HTXtremes Member
Posts: 345 From: Mansfield, AR Registered: Sep 2007
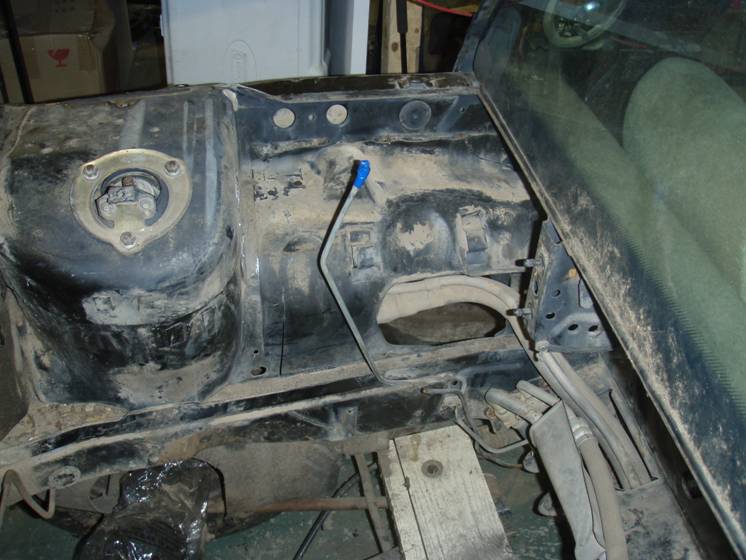
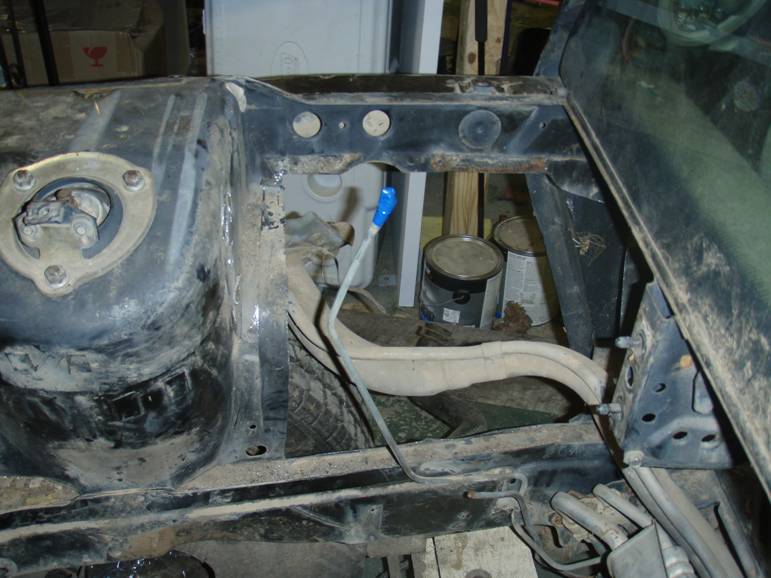
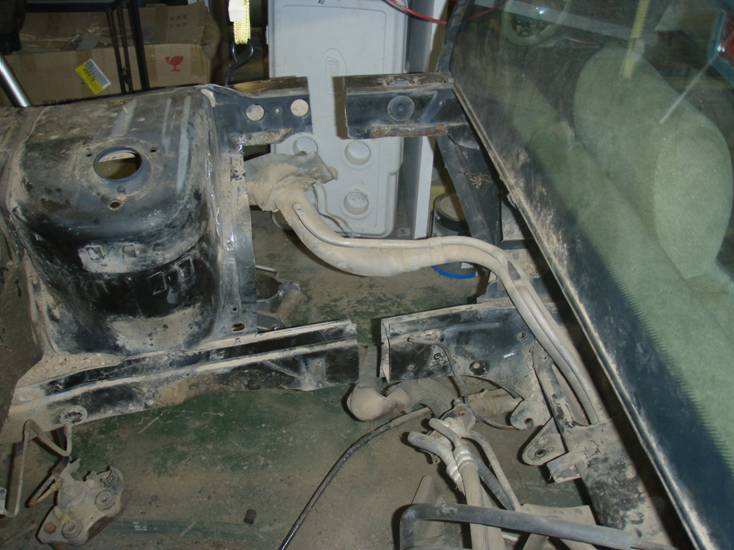
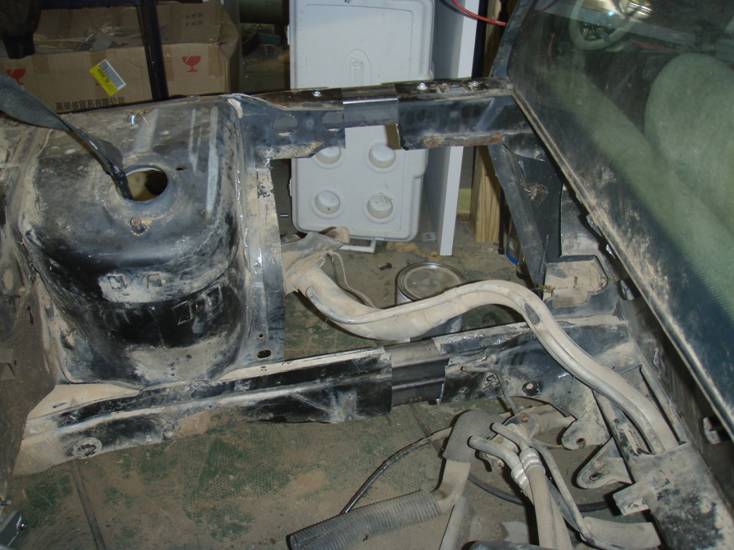
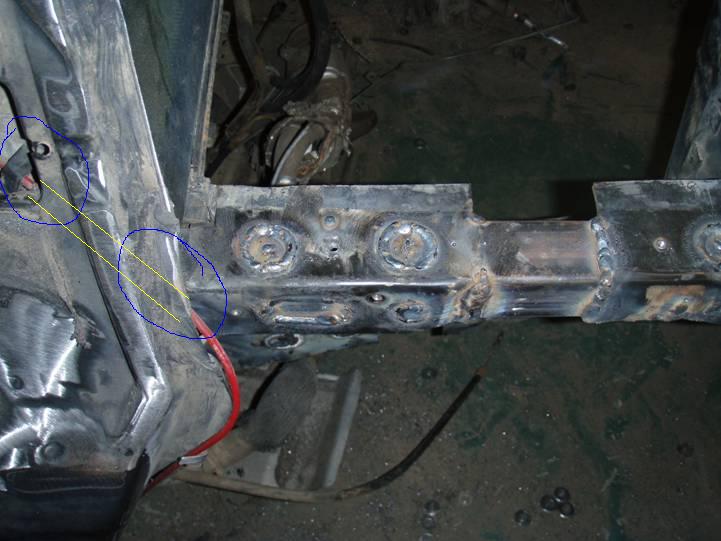
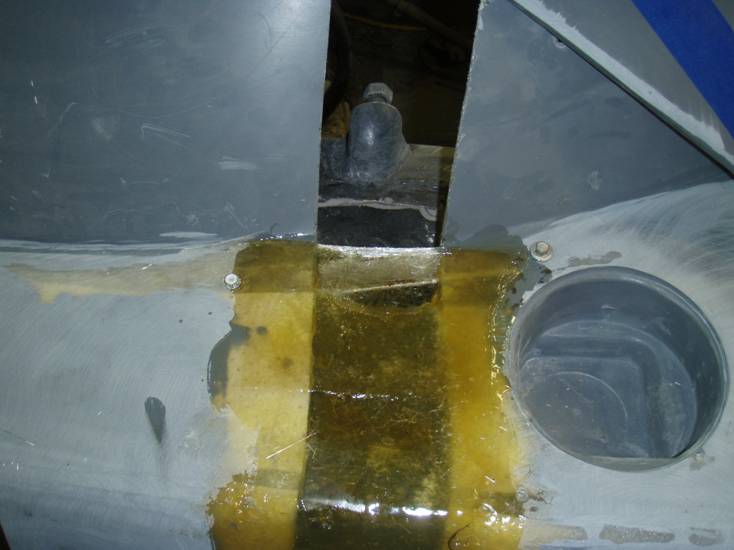
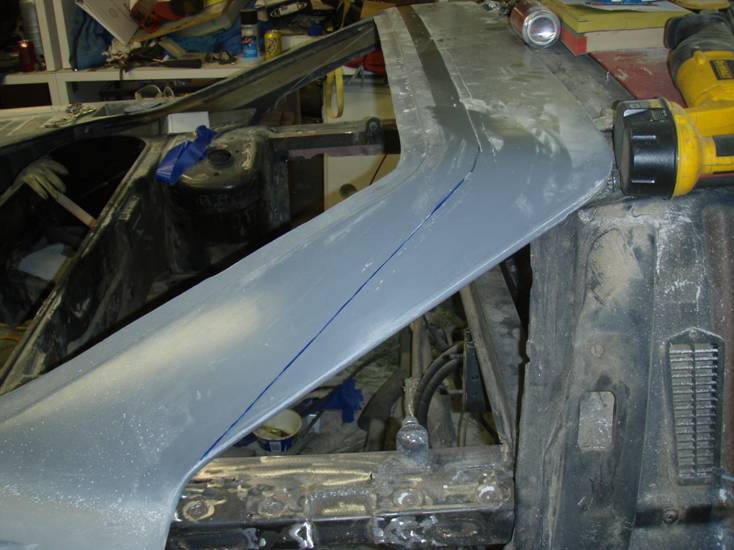
Oh yeah In this picture you can see where I relocated the fuel door cable. New route of cable is between yellow lines. A 3/8" drill bit and a small length of stainless tubing gave me a cleaner look. Besides if I ever have an issue with the cable it will be easier to replace now.
[This message has been edited by HTXtremes (edited 09-27-2007).]
IP: Logged
08:42 PM
HTXtremes Member
Posts: 345 From: Mansfield, AR Registered: Sep 2007
Okay. I'm just wondering what a minimum welder would be to accomplish a sturdy connection for this. It seems that it'd be a bit difficult to weld the thick tubes to the thin frame. I haven't welded yet but I'm about to buy a welder to learn on.
My concept is definitely different than your project, but it involves a stretched '88 with a TT V8. I'm considering making it my long term project, doing lots of research. It's here: https://www.fiero.nl/forum/Forum1/HTML/067262.html
Keep it up with the pics, much appreciated.
IP: Logged
09:16 PM
Sep 28th, 2007
HTXtremes Member
Posts: 345 From: Mansfield, AR Registered: Sep 2007
blue tape is where the 1 3/4" chrome moly tubing will connect for the NHRA spec roll bar. By the way it will have LEGAL REMOVABLE door bars!!
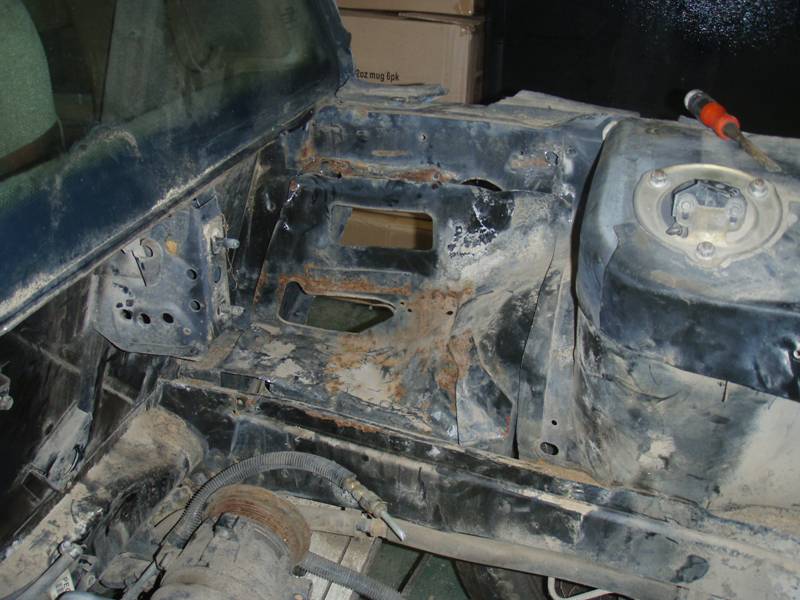
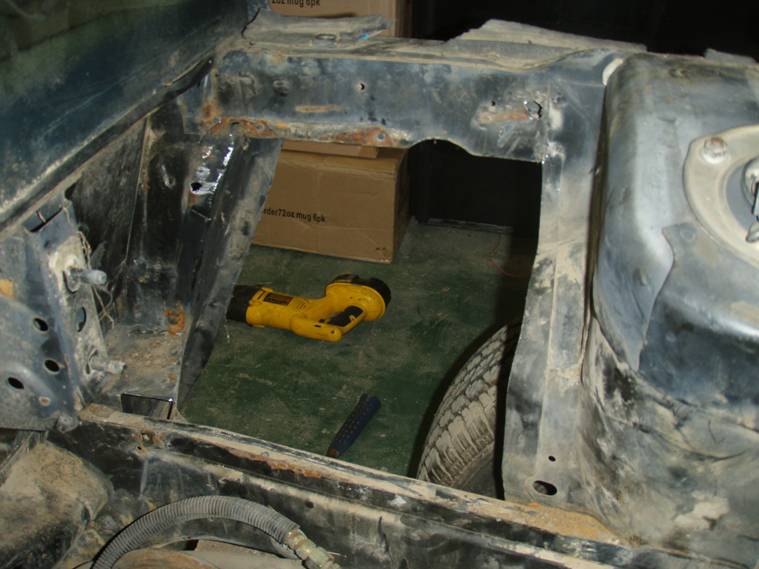
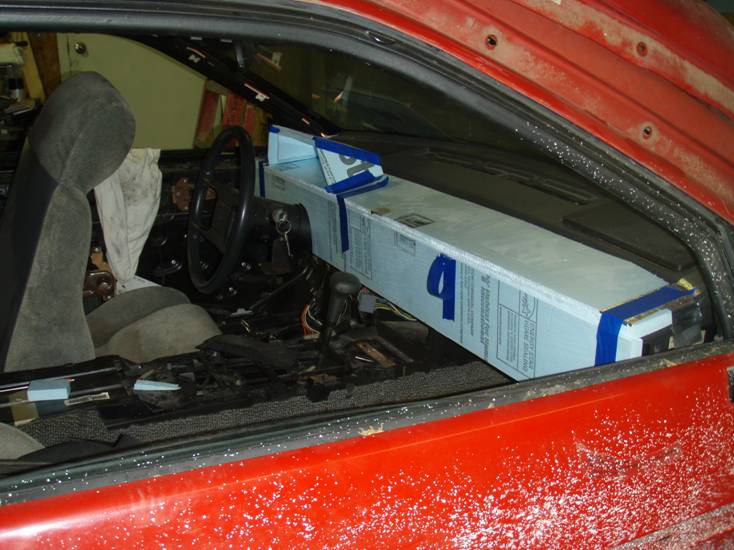
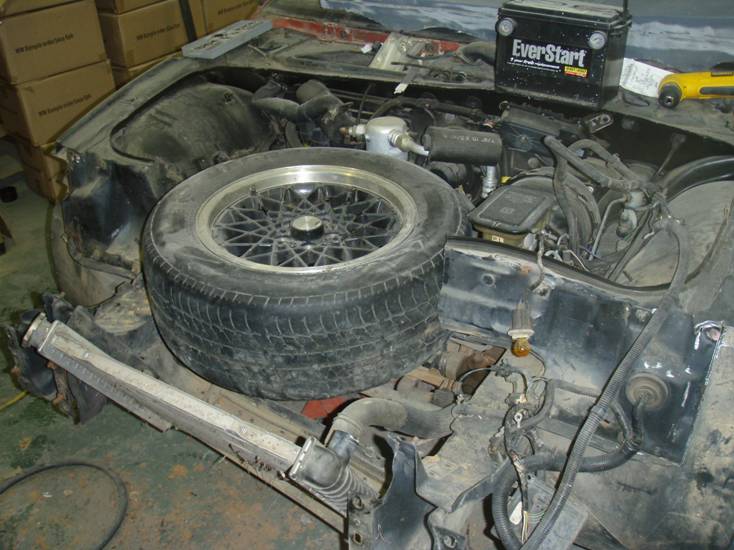
here's a pic of where I want to mount a full size spare. Will take some work but it can and will be done!
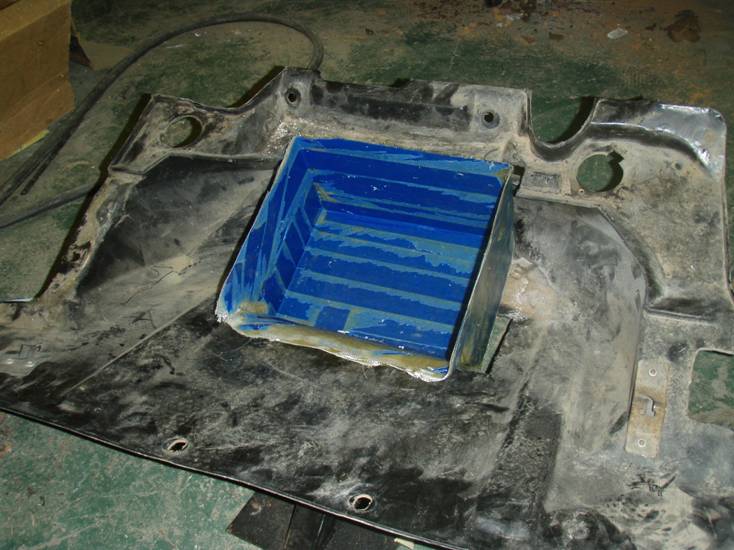
new battery box and old spare tire mount out of car
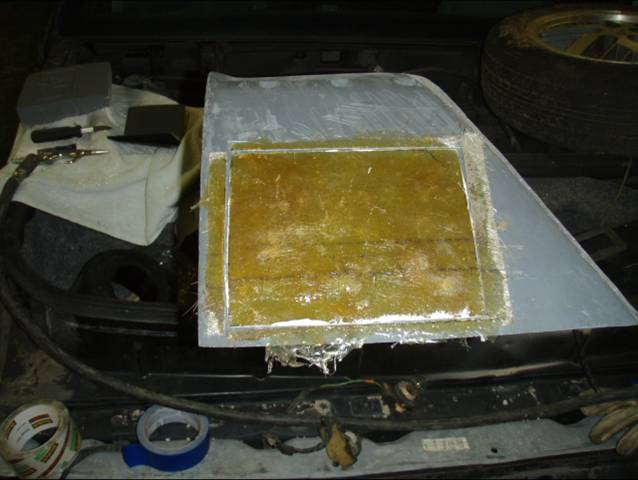
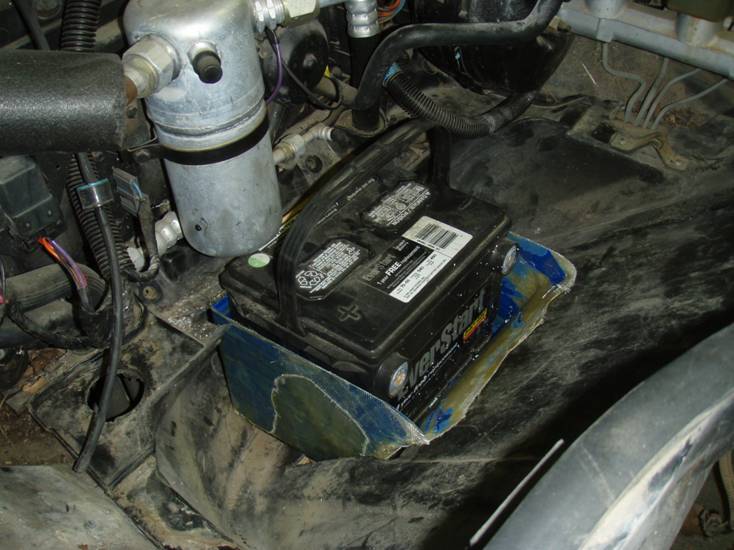
New battery box with battery test fit in car. Box still needs a few more layers of glass, this is the first fiberglass project I've taken on.
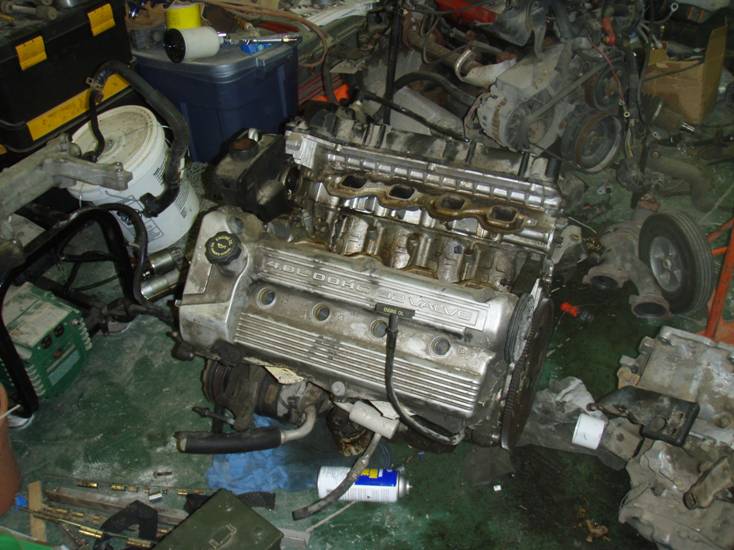
motor I will be rebuilding and installing with Twin Turbos and 5 to 7 lbs of boost
modified trans ( by specs in Zac88GT's post "northstar 6 speed")
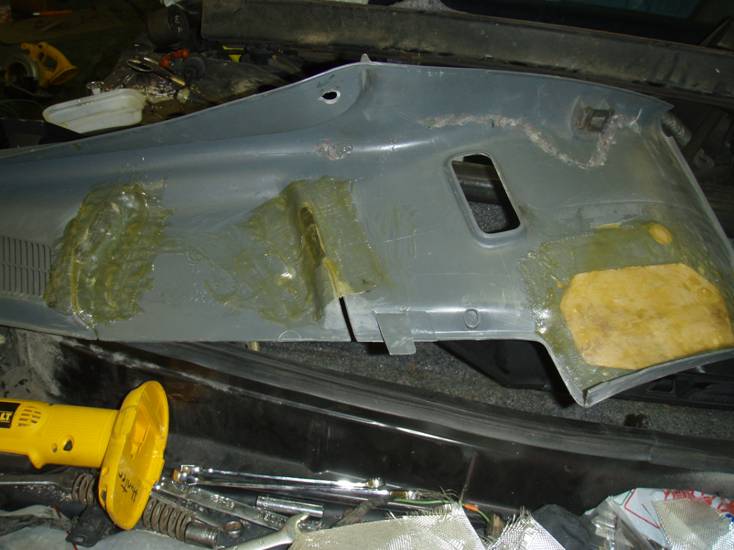
Some of the interior mods on the way include deleting the factory seat belts, new dash, and putting 5 1/4" speakers in the old seat belt reel location.
[This message has been edited by HTXtremes (edited 09-28-2007).]
IP: Logged
12:42 AM
HTXtremes Member
Posts: 345 From: Mansfield, AR Registered: Sep 2007
Because I am going with a set of Sabelt 6 point harnesses I will no longer need the factory seat belt locations so they are getting glassed and filled. I am going to relocate the speakers to the bulge where the seat belt assembly was because the roll bar will block the old speaker location. Here are a couple pics one of the b pillar trim and one of rough design of the dash. Let me know what you guys and gals think. I will try to keep everyone updated on the build, if anyone has questions I will do my best to answer if I can. Also if anyone has any ideas that you think might help out please post them, this post is help others as much as to get help myself. So please feel free to comment!
IP: Logged
04:34 PM
HTXtremes Member
Posts: 345 From: Mansfield, AR Registered: Sep 2007
Updates for today, Let me start out by saying I have no experience in fiberglass so bear with me I'm still learning. I will say before anyone takes on a battle with fiberglass be positive you get everything you need before you start, GLOVES are a must, resin is not easy to get off of your hands or anything you touch afterward. Spent half my time glassing the other half trying to get the resin off my hands. before work started
after work started
If you couldn't tell I'm an electrician by trade, note the 4 11/16" box cover and 1/2" EMT as temporary bracing. I'll leave the EMT in place and glass over it giving more strength.
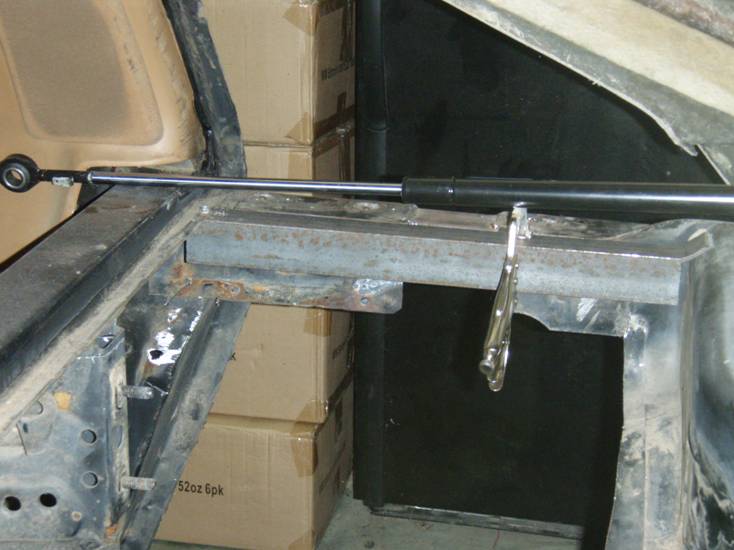
after rear hatch strut mount was installed
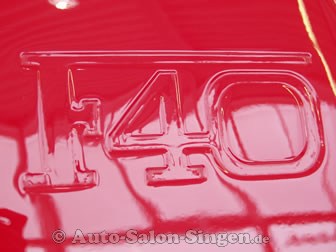
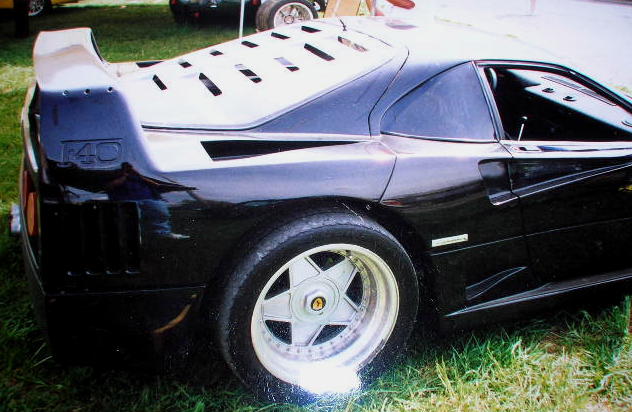
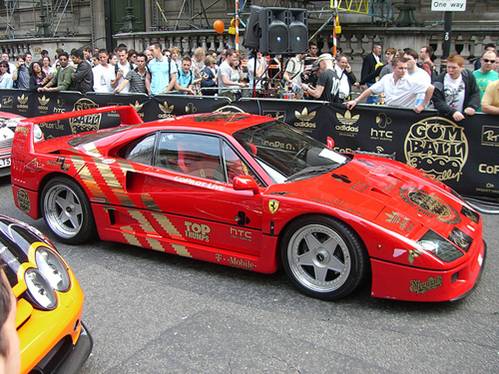
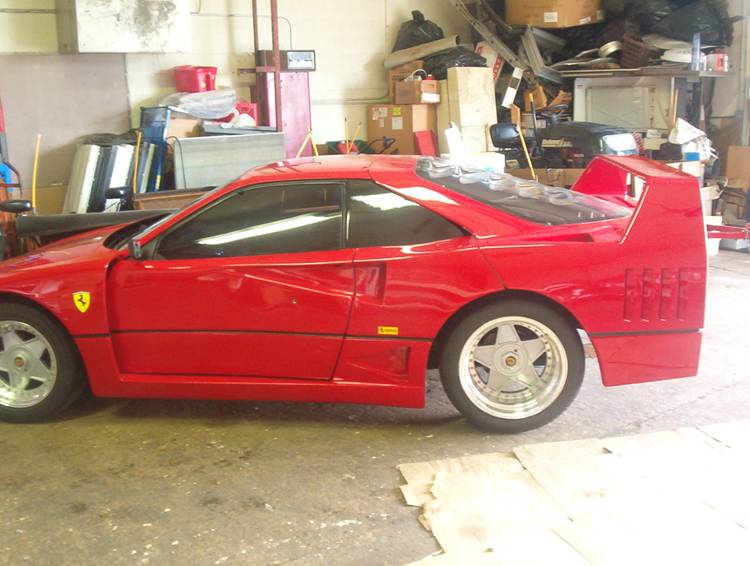
Here is a picture of a replica F-40 without a stretch
Here is a picture of a real F-40
Even though the non stretch replica looks very good, I think you need to have the correct wheelbase in order to get the lines to flow as Enzo Ferrari originally had on his dream car. I am going to make my Ferrari replica as close to the original as I can and still have the Fiero dependability and be driven daily.
[This message has been edited by HTXtremes (edited 10-02-2007).]
IP: Logged
01:46 AM
IMSA GT Member
Posts: 10734 From: California Registered: Aug 2007
Before you go too much farther......you may want to copy this post and move it to the General area. I know tons of people will want to see this build. I just came upon it by accident because I rarely go into the tech section......Just my opinion
IP: Logged
01:52 AM
HTXtremes Member
Posts: 345 From: Mansfield, AR Registered: Sep 2007
Heres a picture of a red non stretch f40, for better comparison, on an '87 coupe chassis, built with a ZZ4 350 and an Isuzu 5 speed, this one is in IL, lets just say I know the owner. This ones for you buddy!! LOL By the way this is the body kit that I started with. This one was done when he bought it I bought mine on ebay a couple months ago and we drove to Fort Wayne, IN together to get my new car.
[This message has been edited by HTXtremes (edited 10-01-2007).]
IP: Logged
01:58 AM
HTXtremes Member
Posts: 345 From: Mansfield, AR Registered: Sep 2007
Thank you for the complement! Got the bug! After I got home from teaching class tonight I had to go out and run my fingers over her smooth lines, and wish it was still the weekend so I could get more done. Seems that there is never enough time in the weekend to get done what you want to get done.
IP: Logged
12:31 AM
PFF
System Bot
Mr.PBody Member
Posts: 3172 From: Cincinnati, Ohio, USA Registered: Oct 2006
Forty hours a week as an electrician, and two nights a week as a college instructor, guess its more free time then last year of teaching three nights a week. LOL Oh well the pay is good and it helps me be that much closer to getting my car done.
IP: Logged
01:18 AM
Oct 3rd, 2007
ALLTRBO Member
Posts: 2023 From: College Park, MD Registered: Mar 2006
A twin turbo V8 with a proper wheelbase? Sweet! It's no real F40, but it's cool that you're using a proper number of cylinders and turbos while stretching it to create a more "realistic" replica. You are cheating on the displacement and number of gears though.
Keep the pics coming.
IP: Logged
08:30 PM
Oct 4th, 2007
HTXtremes Member
Posts: 345 From: Mansfield, AR Registered: Sep 2007
I know ALL TRBO, But it is my personal car so why not have it the way I want it! LOL
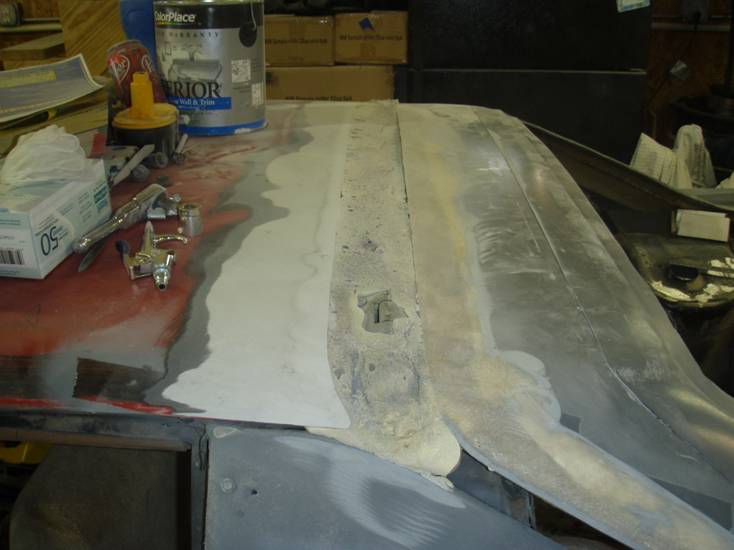
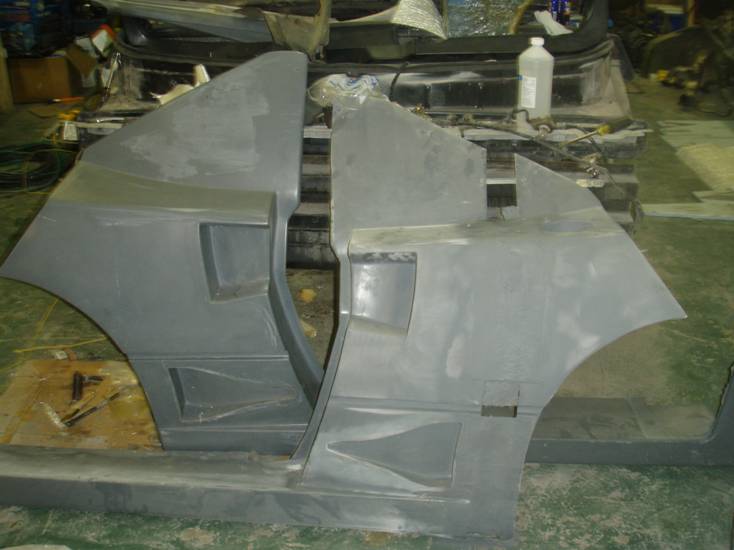
OK some more pics from tonight, First one is a comparison of a stretched panel to a non stretched one!
Update on new spare location! (still in the works no final location of other parts set yet)
Last is a picture of the top cut to make the rear hatch look right!
I don't get much done during the week, but I get a lot of drool time on here during the week, LOL! I ordered the tubing for the roll bar today, not going with Chrome Moly, no body can get it in locally. Going with 1 3/4" DOM .125" wall tubing. Might end up having a second rear hoop bent with the extra pipe I have to order.
IP: Logged
12:10 AM
Oct 5th, 2007
HTXtremes Member
Posts: 345 From: Mansfield, AR Registered: Sep 2007
Did some pricing and looking for the Chrome moly tubing to build the roll bar! Ebay was the only place I could really find, $45 + $19.02 for 8 ft of 1 3/4" x.083". So I thought it might not be worth going chrome moly if it was going to cost $245 for enough to build the roll bar! Then I looked into DOM (drawn over mandrel) tubing, which would have to be 1/8" wall. DOM tubing from a local guy was going to cost me $5.49 a foot but I would have to order 40 ft to have enough to build the roll bar, this totals about $220 before taxes almost $240 after taxes. So thus I went back to ebay, the seller for the moly I was looking at will combine shipping, bringing the total for the Chrome Moly to about $200 to the door. Chrome Moly bar is back in the works.
IP: Logged
07:22 PM
Oct 6th, 2007
niemann99 Member
Posts: 258 From: Seattle, WA USA Registered: Dec 2006
Nice! Pretty ambitious for a first build. Just to let you know, Jegs has everything from halos and hoops, to a complete chassis kit, check it out. A hoop is only $52, halo & hoop is only $92
IP: Logged
12:34 AM
Mr.PBody Member
Posts: 3172 From: Cincinnati, Ohio, USA Registered: Oct 2006
This is a sweet build. I had a thought though, shouldn't you design your front spare holder around the rims you end up using, or is the stock rim going to be the spare?
IP: Logged
12:55 AM
HTXtremes Member
Posts: 345 From: Mansfield, AR Registered: Sep 2007
niemann99 As for the Jegs roll bars, They will not fit the way I need them to fit, I.E. almost disappear into the cockpit, besides they are .135" wall tubing which will be pretty heavy when I'm trying to keep the weight as low as possible.
Mr.PBody The stock tire being used for the mock up is just for a rough fit. I will need to make room for a tire that is 25.9" x 9", for the new spare will be a 205/55r17, the front tires will be 235/45zr17 (25.4") and the rear will be 335/35zr17 (26"), thus the spare should be ok to run on either front or rear and not be a D@MN dough nut! Oh yeah I need to run a 17" spare for the future brake upgrade, 13" Wilwood!
[This message has been edited by HTXtremes (edited 10-06-2007).]
IP: Logged
03:02 AM
HTXtremes Member
Posts: 345 From: Mansfield, AR Registered: Sep 2007
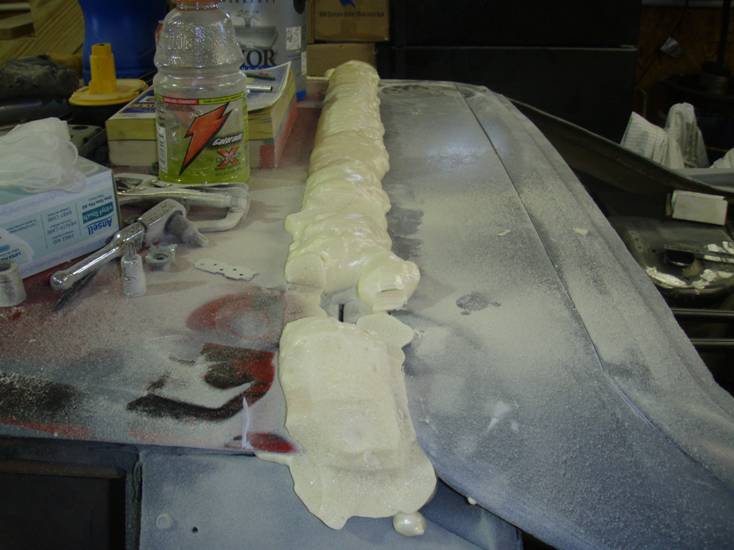
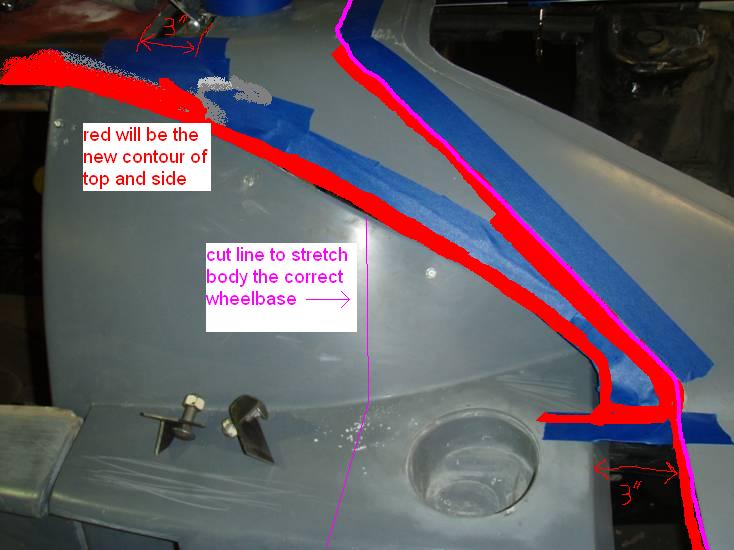
Updates from today's work, first picture is me trying to get the lines lined up, put some masking tape on it then put primer on the tape to get a feel of what the new lines were going to be. No glass work on the top yet.
Expandable foam to fill in the void between the top and rear hatch, will tape over and glass the two pieces together.
IP: Logged
11:24 PM
Oct 8th, 2007
AJxtcman Member
Posts: 1098 From: Rock Hill SC Registered: Nov 2006
I am sooooooooo glad GM is doing away with spare tires! I don't have one and I do not recommend anyone changing a tire on the side of the road. If you don't have one you will figure something out and I bet it will be safer.
IP: Logged
10:38 PM
PFF
System Bot
Mr.PBody Member
Posts: 3172 From: Cincinnati, Ohio, USA Registered: Oct 2006
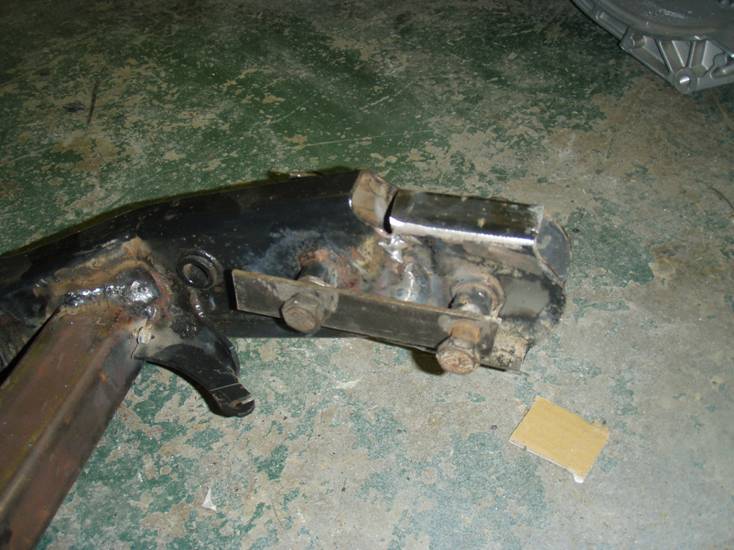
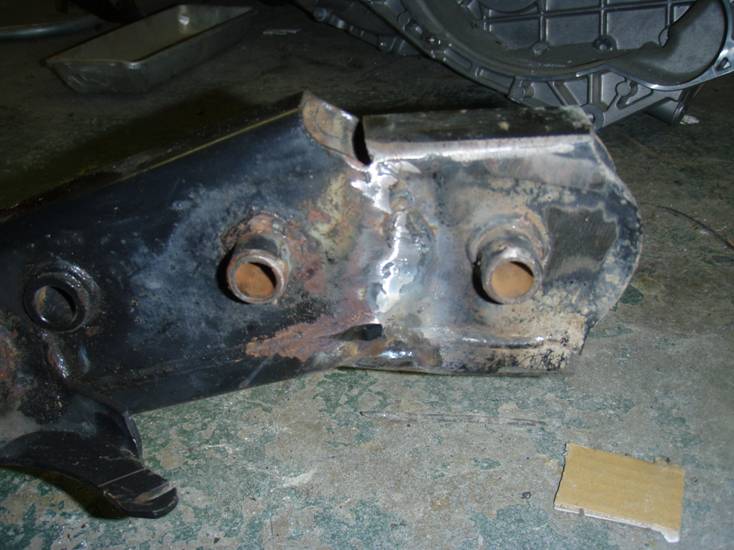
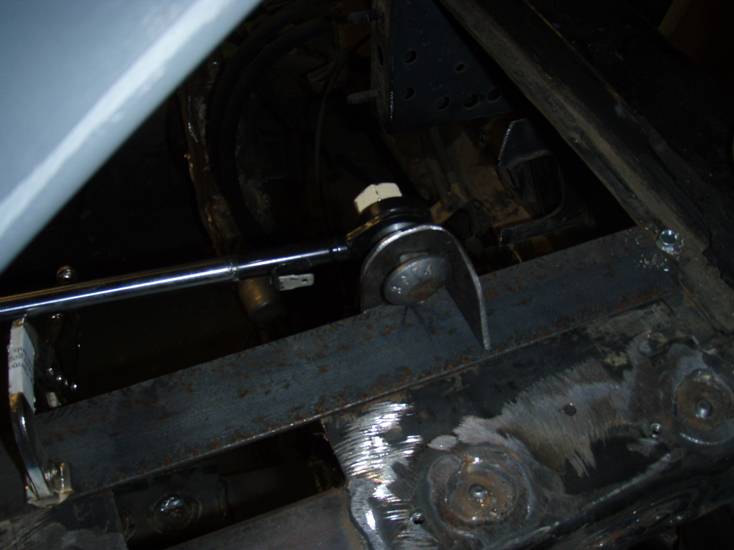
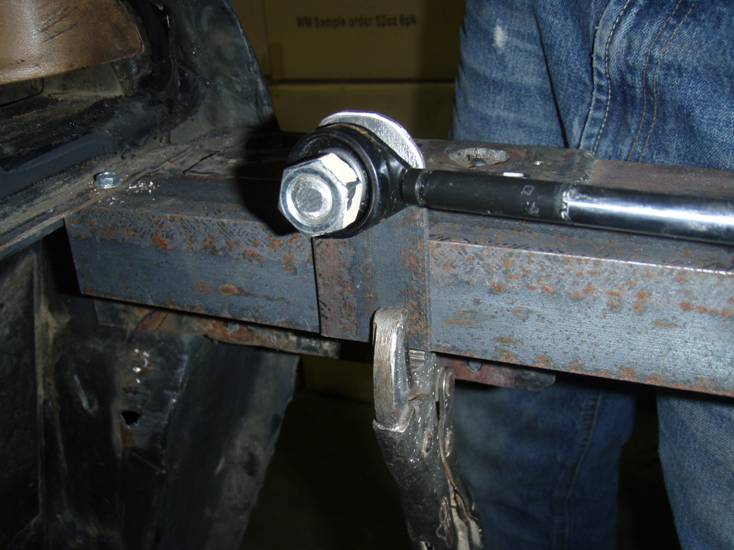
Ok, I haven't posted any progress in a while here are some pics of the E-brake relocation and some bracing on the new front cross member for the 4.0 Aurora swap.
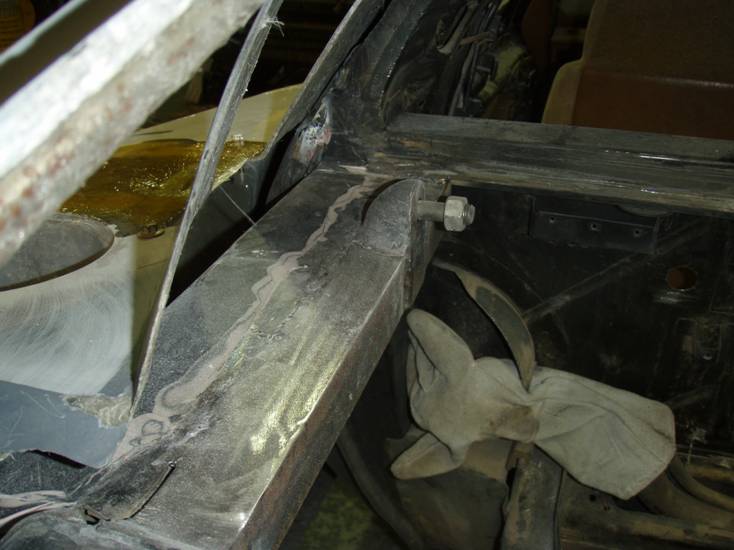
First off E-brake brackets, By the way I am not done with my bracing. The new front cross member is 1 3/4" square by 1/8" wall, original cross member was more like a hat channel of 16-14 gauge steel therefore mine should be stronger.
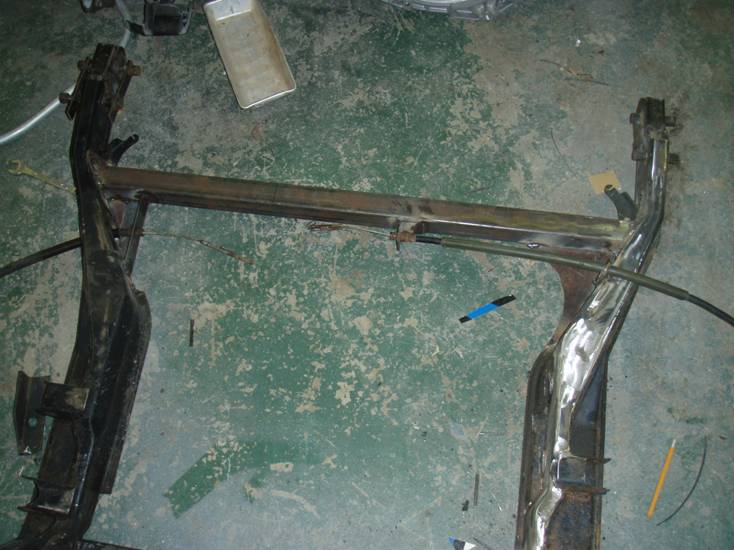
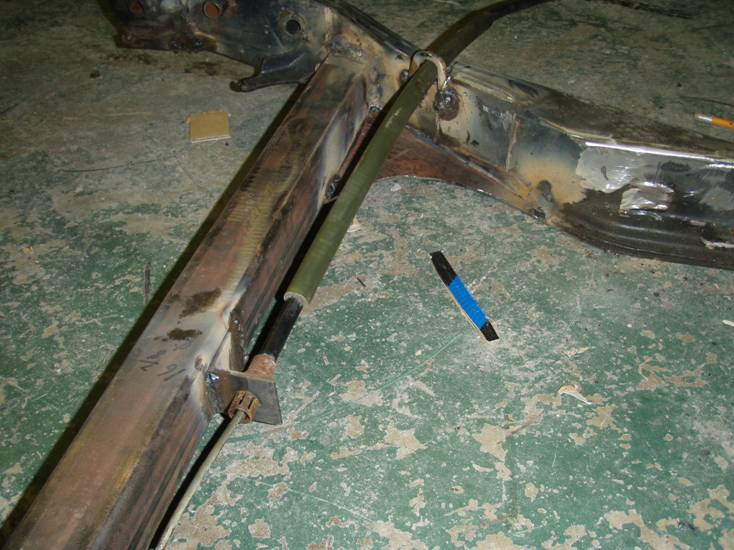
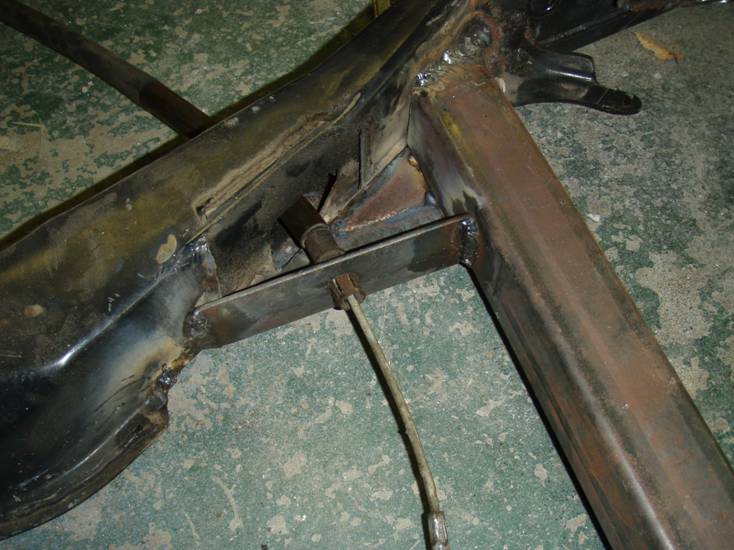
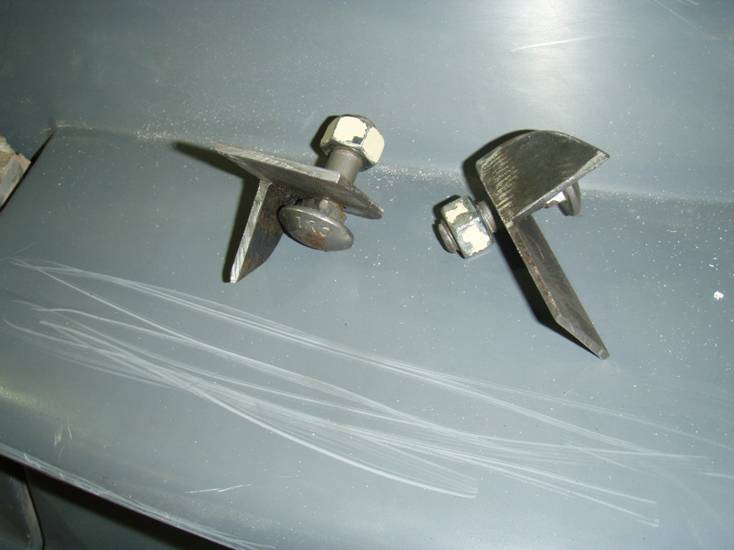
Next up How I stretched the cradle the three inches
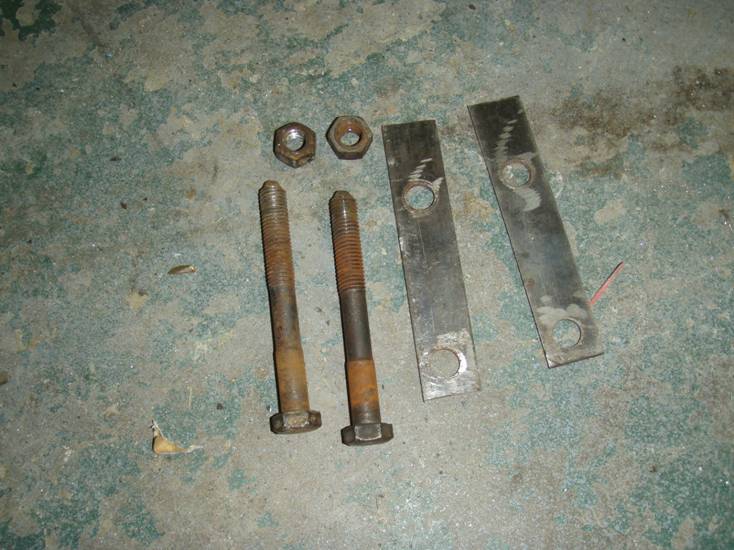
bolts and brackets
Brackets in place for the stretch
finished stretch, I will be plating both sides of the end of the cradle horns with 1/8" plate
And by the way this will be installed on the passenger side of the wing, molds are being made now!
Everyone let me know what you think, Am I wasting my time posting or is everyone enjoying the updates?
[This message has been edited by HTXtremes (edited 10-15-2007).]
IP: Logged
11:47 PM
Oct 16th, 2007
HTXtremes Member
Posts: 345 From: Mansfield, AR Registered: Sep 2007
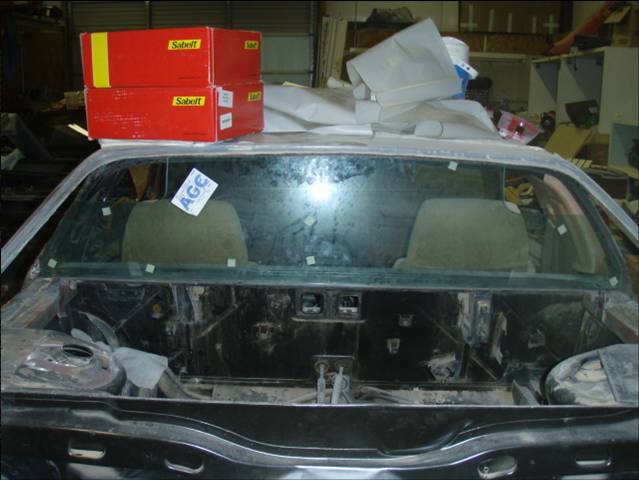
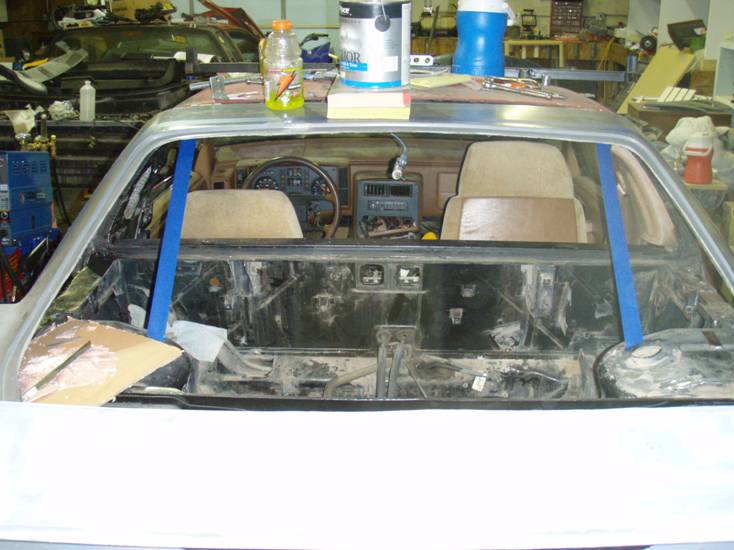
Oh yeah forgot to update on the rear window! The glass company here in Bentonville, AR are having the special piece of glass cut and tempered out of 1/4" glass, it will include notches to clear a NHRA Spec roll bar. The price for this window will be about $125 after taxes, not to bad in my book for the custom work. Will be getting this glass in, in the next week or two.
My roll bar is one step closer to being reality! I am having the company making this window retain the pattern, so they can reproduce it again if anyone would be interested. I will also make a pattern of the roll bar for anyone that would be interested.
IP: Logged
12:01 AM
Oct 18th, 2007
ALLTRBO Member
Posts: 2023 From: College Park, MD Registered: Mar 2006
Ok Its been a while since an update. Been working seven days a week and will continue doing so for a couple more weeks, so not much time to work on my car.
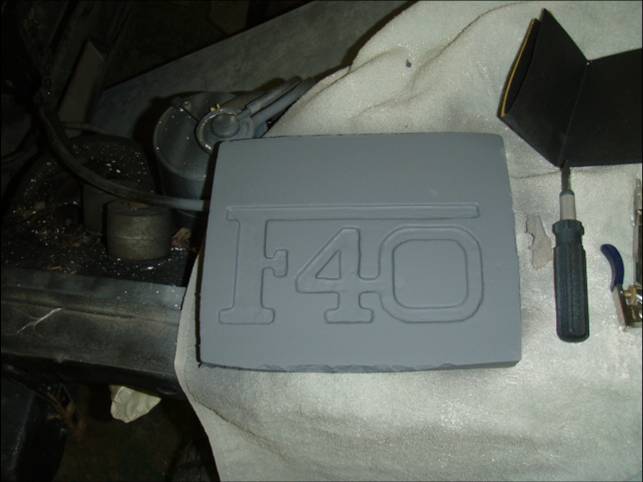
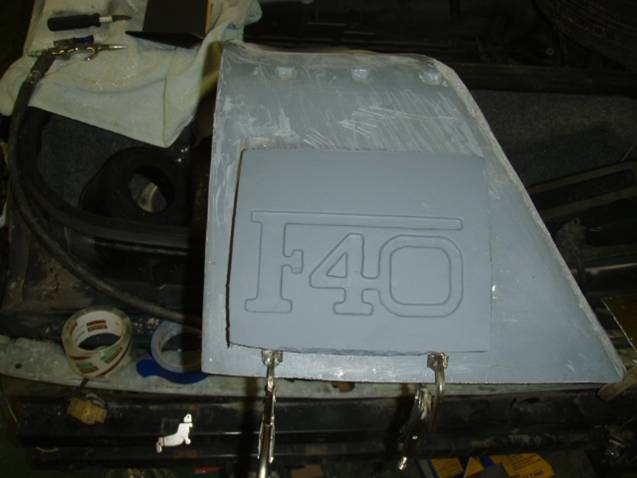
Made a plug for the add in logo on the rear wing as the real car has. First I made a fiberglass mold of the side of the wing, to have the same contour as the wing in my plug. Then I put a box around the trimmed up fiberglass panel and poured Plaster of paris in the box. After the plaster set up I made a pattern free hand from looking at a picture I have of the real wing. With a modified exacto knife I carved out the lettering and rounded the edges. Now I need to sand, paint and make a mold off of the plug.
Also got the rear window in for the roll bar install..... Glass is 1/4" thick tempered and cost $115.
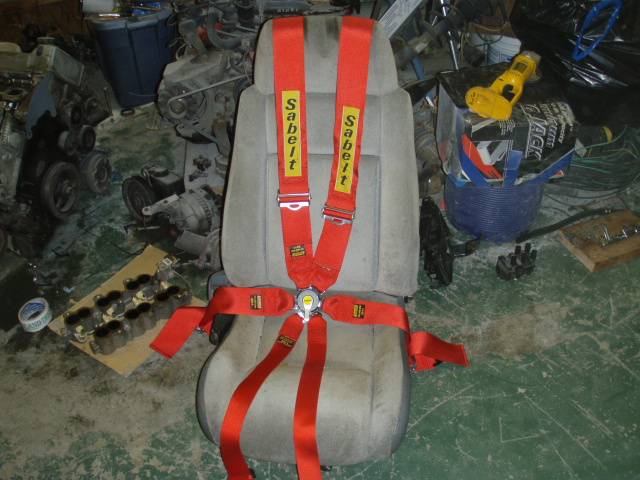
Pictures of the seat belts being used...
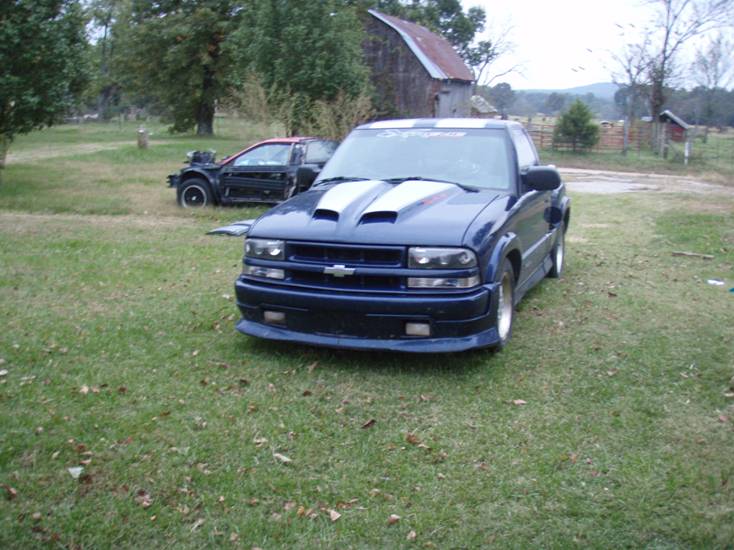
And here is a pic of one of my current rides.
Truck has a 4.3 auto and 182k miles by ME, also has a pair of Kicker L7 12's and a 2000w class D amp stuffed behind the seat!!
IP: Logged
11:01 PM
Mr.PBody Member
Posts: 3172 From: Cincinnati, Ohio, USA Registered: Oct 2006
Seats still in the air.... Haven't found one's I like, Mr Mike can make a pair of covers with slots for the shoulder belts to go through... Current seats just a mock up for now.... Yeah those L7's are only turned up about a 1/4 of the way and they will still shake the cars around me...LOL
IP: Logged
11:27 PM
Mr.PBody Member
Posts: 3172 From: Cincinnati, Ohio, USA Registered: Oct 2006
Forgot to say the saddle colored interior will not be put back in, if anyone needs it!
Nice project ++++++ Do you have the seat belt mechanism cover for sale ? mean the one on the seat side where the bench is articulated . my interior is saddle Thank you


 Going with 1 3/4" DOM .125" wall tubing. Might end up having a second rear hoop bent with the extra pipe I have to order.