
 
     |
| 3800sc Swap Complete Parts List (Page 1/13) |

|
AustinH
|
MAR 24, 12:01 PM
|
|
Welcome to the One-Stop-Shop for modifying/repairing/tuning a 3800 engine and/or swapping it into a Fiero! You will likely not come across a more thorough collection of 3800 information, parts, diagrams, instructions, or videos than here.
CLICK HERE TO DOWNLOAD A PRINTABLE/MOBILE FRIENDLIER VERSION
TO SEARCH THIS PAGE, PRESS ctrl F (PC), command F (mac), or tap ••• and "Find In Page" (mobile)
Why a 3800 supercharged swap? First, it's FUN and has mind boggling acceleration from a stop. Also it's simple, easy due to this guide (I will answer questions here too), off the shelf, easy to find engines, has aftermarket support, parts are sill produced, affordable (~$3000-3500 min), very reliable, small/fits better than the stock 2.8, has many transmission options with a strong stock 4spd auto, and takes you from 85/135chp to at least 235chp and easily 280+chp (~13 second 1/4 mile) with few easy DIY mods (up to ~400hp with the factory supercharger and ~600hp on stock internals).
CLICK HERE TO VIEW MY AMAZON STOREFRONT WITH LISTS OF MOST OF THESE PARTS
CLICK HERE TO VIEW MY EBAY STOREFRONT WITH LISTS OF MANY OF THESE PARTS
CLICK HERE TO VIEW NON-FIERO RELATED 3800 MODS ON AMAZON
CLICK HERE FOR A PRICING GUIDE AND A CUSTOMIZABLE BUILD SHEET (maintained infrequently)
FOR CONSULTING, TIPS, AND ADVICE, contact me on Facebook at https://www.facebook.com/FieroAustin/ or message me at fieroaustin.grader204@passinbox.com
Consider joining the 3800SC/3800 Fiero Swap Page Facebook group: https://www.facebook.com/gr...800.Fiero.Swap.Page/
Check out this information directory here for people who sell parts: https://www.facebook.com/gr...ink/2257683171084561
The below people charge do swaps for you.
James L Brown (Tennessee)
Brian Welch (Michigan)
Trent Ela (Florida)
Brian Sanburn (Lincoln, Nebraska)
Mitchell Davies (Ontario)
What this thread is: A suggestion of TWO COMPLETE GUIDES covering all years and variations of 3800s (not series 1), Fieros, and Transmissions for repair, modifying, tuning, and/or swapping into a Fiero:
BUILD 1: A COMPLETE BUDGET SERIES II 3800 SUPERCHARGED FIERO SWAP AND/OR 3800 REPAIR GUIDE
BUILD 2: A COMPLETE PARTS LIST FOR AN ALL-OUT SERIES III 3800 SUPERCHARGED BUILD (build 1 also needed if you are doing a Fiero swap)
What this thread is NOT:
-A Fiero Repair Guide
All videos available in this playlist here - https://www.youtube.com/pla...IM_4I2qJnkff2RlPWB_O
VIDEO: GUIDE TO THIS BUILD THREAD:
https://www.youtube.com/wat...nkff2RlPWB_O&index=1

CONTENTS:
1. How to pick out parts for your build: 3800 Performance and Specs of historical swaps
-Modification Selection Chart
---Camshafts
---Quarter Mile Times
---Dyno Wheel Horsepower
-Common Modifications
-Differences between 3800 Engines
-Transmission Options
-M90 Gen 3 and Gen 5 supercharger specs
-Motivational Previews
2. BUILD 1: A COMPLETE BUDGET SERIES II 3800 SUPERCHARGED FIERO SWAP AND/OR 3800 REPAIR GUIDE
-CLICK TO VIEW MOST OF BUILD 1 ON AMAZON
-PARTS YOU NEED TO TAKE OFF THE DONOR CAR
-Air
-Fuel
-Spark
-Exhaust
-Coolant and Hoses
-HARNESS/SENSORS/COMPUTER (ECU/PCM)
---NEEDED IF BUILDING YOUR OWN HARNESS
-TRANSMISSIONS
---Manuals
---4t65e-HD/4T65e/4T60e TRANSMISSION
-TRANSMISSION AXLES
---Buying axles
---Building 4t65e-HD/4T65e/4T60e Passenger's Axle
-ACCESSORIES/AC/OTHER/MISC
-Mounting and Brackets
---Rubber Cradle Side Motor/Transmission Mounts
---Engine/Transmission Side Brackets
-PARTS NEEDED IF YOU DO NOT BUY A 1998-2002 PONTIAC GRAND PRIX GTP OR REGAL DONOR CAR
-PARTS THAT WEAR OUT & MAINTENANCE PARTS FOR A 3800SC
3. BUILD 2: A COMPLETE PARTS LIST FOR AN ALL-OUT SERIES III 3800 SUPERCHARGED BUILD (build 1 also needed if you are doing a Fiero swap)
CLICK TO VIEW MOST OF BUILD 2 ON AMAZON
-GEN 3 to GEN 5 SUPERCHARGER SWAPPING AND NA TO SUPERCHARGER TOP SWAPPING
-Air
--Turbo
--Supercharger
---Intercooling
---Plugging throttle body/intake manifold heater/coolant holes/EVAP on a Gen V supercharger (Check local laws)
-Fuel & E85 (Ethanol) Conversion
---Fuel rails, hoses, regulator, and fittings
---Wiring Tools
---Pump and wiring
-Spark
-Exhaust
-Cylinder Heads/Valvetrain/Pushrods/Lifters
-Optional: Pistons, Rods, Bearings, etc. (Bottom End)
-Camshaft, timing chain, and balance shaft removal
-4t65e-HD/4T65e/4T60e Transmission
4. 3800sc Assembly Diagrams and Torque Specs
-Firing Order
-Coolant and Fuel Lines
-Throttle Cable/Cruise Mounting
-SUPERCHARGER, CONNECTIONS, AND ROUTINGS
-4t65e-HD/4T65e/4T60e Transmission
-Exhaust Setup for build 1
EVERYTHING BELOW THIS LINE IS FOR build 2
-TORQUES & TORQUE SEQUENCES
-ENGINE EXPLODED VIEW ASSEMBLY DIAGRAMS
-FUEL PRESSURE REGULATOR SETUP OPTIONS
-NORTHSTAR THROTTLE BODY
-EXHAUST SETUP FOR BUILD 2
5. WIRING HARNESS AND COMPUTER/ECU/PCM PROGRAMMING
-Buying a harness
-Building a harness
6. Disassembly, Reassembly and Final Fiero Installation Videos
-Below this line is required for both build 1 and build 2
-Below this line is only required for build 2
-Disassembly of the engine
-REMOVING AND PORTING CYLINDER HEADS
-INSPECTING THE BOTTOM END (crank/bearings/connecting rods/bearings/pistons/piston rings)
-RE-ASSEMBLY OF THE ENGINE
---MEASURING PUSHROD LENGTH WITH A PUSHROD LENGTH CHECKER
7. Other Helpful Fiero Parts While You're At It
-CLICK HERE TO VIEW MY FIERO MODS ON AMAZON
-A Fiero Repair Guide
-A 3800 Repair Guide
-PARTS THAT WEAR OUT ON A 3800SC
CLICK HERE TO VIEW NON-FIERO RELATED 3800 MODS ON AMAZON
-Good parts to change while the engine is out
8. EXTREMELY Useful Links
9. MY BUILD
CLICK HERE TO VIEW MY AMAZON STOREFRONT WITH LISTS OF MOST OF THESE PARTS
-Common Parts
CLICK HERE TO VIEW MY EBAY STOREFRONT WITH LISTS OF MANY OF THESE PARTS
-Fiero Drag Racing
-Parts from other how-to videos
10. MY TOOLBOX
-PART 1: CAR TOOLS
-PART 2: SHOP TOOLS
-PART 2.1: CONSUMMABLE CAR HARDWARE
-PART 2.2: CAR WASHING
-PART 2.3: ELECTRICAL TOOLS
-PART 3: HOUSE PROJECT & OUTDOOR TOOLS
Disclaimer: If you follow any instructions here, you assume 100% liability for your own build. NOTHING is guaranteed to work. If you blow up your engine, it is YOUR FAULT. Do not blindly follow this guide and buy parts until you feel you understand for yourself why and how everything about a 3800 engine works. This build thread is NOT BASED ON THE FACTORY INSTRUCTION MANUAL, but rather years of accumulated modification knowledge from across many companies, personal experience, and the internet. It might be helpful for you to buy a Buick 3800s factory service manual.
NOTE:If you would like to contribute your content to this page or report a broken link, please contact me at http://facebook.com/fieroaustin
Consulting, support, and donations
Amazon Recommendation Store for 3800s/Fieros/Tools https://amzn.to/3hNViaa
3800sc Instructions http://www.fiero.nl/forum/Forum2/HTML/139530.html
3800sc Instructions MOBILE https://drive.google.com/fi...JzC-2ZzbvLYMYE3QbmVq
eBay Recommendation Store http://ebay.us/hdJWbh
Donate to me https://paypal.me/FieroAustin
Join channel membership https://www.youtube.com/FieroAustin/join
Subscribe https://www.youtube.com/fie...n?sub_confirmation=1
Consulting https://www.facebook.com/FieroAustin/
Facebook Subscribers Group https://www.facebook.com/be...pporter/FieroAustin/
Video: How to support FieroAustin videos:
https://www.youtube.com/wat...nkff2RlPWB_O&index=2

When you click on links to various merchants on this site and make a purchase, this can result in this site earning a commission. Affiliate programs and affiliations include, but are not limited to, the eBay Partner Network and Amazon Associates.
-----
FieroAustin
1988 GT 3800sc Series III E85 Intercooled 2.56" Pulley
Amazon Recommendation Store for 3800s/Fieros/Tools https://amzn.to/3hNViaa
3800sc Instructions http://www.fiero.nl/forum/Forum2/HTML/139530.html
3800sc Instructions MOBILE https://drive.google.com/fi...JzC-2ZzbvLYMYE3QbmVq
eBay Recommendation Store http://ebay.us/hdJWbh
Donate to me https://paypal.me/FieroAustin
YouTube https://www.youtube.com/fie...n?sub_confirmation=1
Join YouTube membership https://www.youtube.com/FieroAustin/join
Join Facebook Group https://www.facebook.com/be...pporter/FieroAustin/
Consulting on Facebook https://www.facebook.com/FieroAustin/[This message has been edited by AustinH (edited 09-23-2025).]
|
|
|
|
fieroall
|
MAR 24, 12:46 PM
|
|
|
That's a great list of parts however I think it's a bit misleading. Their are many different ways to do the 3800 swap depending on your abilities and finances. Honestly looking over your list I don''t think I used a single part from it to do any of my swaps.
|
|
|
|
AustinH
|
MAR 24, 12:49 PM
|
|
How to pick out parts for your build: 3800 Performance and Specs of historical swaps
All options for your engine swap will come down to cost and effort. Use the charts and videos below to decide what power you want out and how much effort and money you are willing to invest into the project. 3800 engine modifications are labeled as "Optional" in build 1; and build 2 is completely optional (some needed if you start with a Series III engine).
-----Modification Selection Chart-----
The below chart shows most camshaft options for a 3800 available, the dyno wheel horsepower numbers for 3800 builds across the internet, and quarter mile track times for 3800 builds across the internet as of 2018. The chart shows the modifications for each person's setup (camshafts, superchargers, cylinder heads, fuel type, boost, compression, etc.). Generally, red colored cells indicate either bad performance or hard to achieve (expensive or lots of other supporting mods required),
If you want a spreadsheet file, Click Here
Data pulled from here
http://www.fiero.nl/forum/Forum1/HTML/070670.html
http://www.thechicagogarage...rchive%2A%2A%2A.html
http://www.3800pro.com/forum/fwdquarter.php
http://www.3800pro.com/forum/rwdquarter.php
http://www.3800pro.com/foru...-5-hp-cam-chart.html
http://www.clubgp.com/newfo...e=&smode=&s=#5178946
http://www.clubgp.com/newforum/tm.asp?m=1550443
http://www.clubgp.com/newfo...sp?m=5178946&mpage=1
-----Common Modifications-----
All videos available in this playlist here - https://www.youtube.com/pla...IM_4I2qJnkff2RlPWB_O
CHECK OUT THIS VIDEO SERIES FOR LOTS OF TESTING AND MODS!!!:
https://www.youtube.com/pla...BG8VcIqUr0BNWyaLt8Qu
Video: This video shows in-depth modifications to the 3800 engine from this build thread:
https://www.youtube.com/wat...nkff2RlPWB_O&index=3

Video: Here my video indicates most common modifications available for the 3800:
https://www.youtube.com/wat...nkff2RlPWB_O&index=4

Video: Here ZZP makes a short summary video of common modifications you can make to your 3800sc:
https://www.youtube.com/wat...nkff2RlPWB_O&index=5

-----Differences between 3800 Engines-----
There are many variations of 3800 engines. There are 3 different series, supercharged and non-supercharged (NA). Virtually every engine has a different wiring harness and different parts between years, makes, and models.
The ideal donor car or motor to buy is a 1998-2002 Pontiac Grand Prix GTP. If you do not get an engine from a GTP, there are many parts listed in build 1 that you will need in addition, just to make it fit in a Fiero.
Read up:
https://en.wikipedia.org/wiki/Buick_V6_engine
NOTE: DO NOT SWAP A SUPERCHARGER ONTO A 3800 NA (Naturally Aspirated) BLOCK UNLESS YOU KNOW EXACTLY WHAT YOU ARE DOING. THE COMPRESSION, PISTONS, AND RINGS ARE DIFFERENT. NA RODS CAN ONLY TAKE ABOUT 380WHP BEFORE BLOWING UP.
-----Transmission Options-----
NOTE: Many transmissions will work with this car. Here are a few common ones that can handle the 3800 power. See more in build 1 TRANSMISSIONS section.
http://www.fastfieros.com/t...06_transmissions.htm
4t60e 4 speed auto (comes with 3800s) - will only withstand ~200hp - https://en.wikipedia.org/wi..._transmission#4T60-E
4t65e 4 speed auto (comes with 3800s)- will only withstand ~250hp - https://en.wikipedia.org/wi..._transmission#4T65-E
4t65e-HD 4 speed auto (comes with 3800sc) - will withstand ~300hp, and up to ~350hp with modifications - already comes on 3800sc cars. EASIEST TO USE - https://en.wikipedia.org/wi...ransmission#4T65E-HD
Getrag 282 5 speed manual (stock Fiero) - will only withstand ~250hp - https://en.wikipedia.org/wi...rag_282_transmission
Other Fiero Manual Transmissions (stock Fiero) - will only withstand ~200hp - https://en.wikipedia.org//w...Pontiac_Fiero#Manual
4t80e 4 speed auto (not covered in this guide, see note below) - will withstand ~400hp but is big and heavy - https://en.wikipedia.org/wiki/GM_4T80_transmission
NOTE: See this video on installing a 4T80 into a GTP - https://www.youtube.com/wat...kff2RlPWB_O&index=71 and this video - https://www.youtube.com/wat...&index=9&pp=gAQBiAQB
F23 5 speed manual - will allegedly withstand ~500hp (not covered in this guide, see note below) - https://en.wikipedia.org/wi...rag_F23_transmission
F40 6 speed manual - will allegedly withstand ~600hp (not covered in this guide, see note below) - https://en.wikipedia.org/wiki/GM_F40_transmission
-----M90 Gen 3 and Gen 5 supercharger specs-----
Relevant M90 Supercharger Design and Performance Information:
http://www.mscperformance.com/specpg2.html
Alternatively I copied the data from the above link to this post: https://www.fiero.nl/forum/...HTML/139530.html#p14
Here is a quote from Eaton about the performance of an M90 Gen 5 supercharger compared with a Gen 3 supercharger:
The 90-cubic inch Gen V supercharger is very compact. Its housing includes the throttle-body adaptor, crankcase ventilation plumbing, coolant passages, the evaporative emissions purge valve and the rotor drive mechanism. The drive mechanism is sealed and permanently lubricated, obviating the need for oil connections and eliminating a potential source of leaks. Moreover, the Gen V features all-cast components and a larger, low-restriction outlet port. The tuned inlet port is also less restrictive, compared to previous-generation superchargers, allowing a larger (75 millimeter) throttle body. As a result, more air is pumped by the supercharger through the Series III’s induction system. The Gen V’s rotor is finished with Abraidbable Powder Coating (APC) rather than epoxy. APC is a patented material containing graphite that is electrostatically applied to the rotor and baked on. As a result, the rotor requires less clearance within the supercharger housing, resulting in less leakage around its edges, greater airflow at a given operating speed and lower operating temperature. The Gen V’s rotor bearings have been enlarged to increase durability and reduce operating noise and vibration. As a result, the Gen V operates at considerably higher efficiency than its predecessors. At wide open throttle, the Gen V turns at 700 fewer rpm (a 9 percent reduction), draws 13 percent less power from the crankshaft, decreases operating temperature 15 percent and increases volumetric efficiency 9 percent. For the customer, that means a 9 percent increase in horsepower (see product specifications), and best-in-class acceleration times for the Grand Prix.
-----Motivational Previews-----
All videos available in this playlist here - https://www.youtube.com/pla...IM_4I2qJnkff2RlPWB_O
Video: Engine bay and idling video:
https://www.youtube.com/wat...kff2RlPWB_O&index=53

Video: Supercharged Fiero Burnouts:
https://youtu.be/Nz0UldxPD2...qJnkff2RlPWB_O&t=260

-----
FieroAustin
1988 GT 3800sc Series III E85 Intercooled 2.56" Pulley
Amazon Recommendation Store for 3800s/Fieros/Tools https://amzn.to/3hNViaa
3800sc Instructions http://www.fiero.nl/forum/Forum2/HTML/139530.html
3800sc Instructions MOBILE https://drive.google.com/fi...JzC-2ZzbvLYMYE3QbmVq
eBay Recommendation Store http://ebay.us/hdJWbh
Donate to me https://paypal.me/FieroAustin
YouTube https://www.youtube.com/fie...n?sub_confirmation=1
Join YouTube membership https://www.youtube.com/FieroAustin/join
Join Facebook Group https://www.facebook.com/be...pporter/FieroAustin/
Consulting on Facebook https://www.facebook.com/FieroAustin/[This message has been edited by AustinH (edited 11-26-2025).]
|
|
|
|
BMTFIERO
|
MAR 25, 10:40 PM
|
|
|
Thanks for your time and contribution to the cause!!
|
|

|
Spadesluck
|
MAR 26, 01:04 AM
|
|
|
Everyone's build will vary for sure depending on wants and needs, however for you to go through the trouble and list what worked for you is greatly appreciated. Thank you. It will, at the very least, give people an idea on what to expect and look for. [This message has been edited by Spadesluck (edited 03-26-2017).]
|
|
|
|
AustinH
|
NOV 08, 07:15 PM
|
|
BUILD 1: A COMPLETE BUDGET SERIES II 3800 SUPERCHARGED FIERO SWAP AND/OR 3800 REPAIR GUIDE
CLICK TO VIEW MOST OF BUILD 1 ON AMAZON
CLICK HERE TO VIEW MY EBAY STOREFRONT WITH LISTS OF MANY OF THESE PARTS
CLICK HERE FOR A PRICING GUIDE AND A CUSTOMIZABLE BUILD SHEET (maintained infrequently)
NOTE: THIS BUILD 1 LIST IS COMPLETE AND INDEPENDENT OF BUILD 2, BUT BUILD 2 INCLUDES THIS BUILD 1 LIST UNLESS NOTED! BUILD 2 ALSO INCLUDES CONVERTING FROM A SERIES II TO A SERIES III
NOTE: The ideal donor car or motor to buy is a 1998-2002 Pontiac Grand Prix GTP or Regal. If you do not get an engine from a GTP or Regal, there are many parts listed below that you will need in addition to make it fit in a Fiero.
Preface: The output of this engine is expected 280 crank horsepower with optional easy, minor modifications. Those modifications are:
-3.4" supercharger pulley - for slightly increased air
-180 degree thermostat - for slightly cooler combustion
-Tune the computer (delete VATS security, increase shift speed, increase torque limiter, delete ABS, radiator fan setpoints, adjust fuel, MAF calibration, timing, check local laws before disabling EGR/Rear O2 Sensor etc.) (ECU/PCM)
-Autolite 104 Spark Plugs (2 heat range colder than stock spark plugs) - for slightly higher knock resistance
This build thread also assumes you optionally DELETE the following:
-Swap the valve covers so that the oil fill cap is on the other side so it is accessible from the Fiero engine bay.
-"Coffee can" vacuum accumulator canister for stock cruise control - stock Fiero cruise control allegedly works by hooking the vacuum line directly to the supercharger port, since the 3800 has more vacuum than the stock Fiero engine.
-Fiero vacuum lines except brake booster and cruise control (unless deleting cruise or switching to the 3800 cruise control module)
-Alternator bracket/coolant circuit (relocated and cooling circuit bypassed)
-Power Steering Pump
-Optional: Stock Fiero intake - requires new intake mounted.
-Optional (check local laws): EGR system - requires welding and sealing shut holes in exhaust and lower intake manifold, detailed in build 2. Requires reprogramming the computer to delete EGR codes and functionality.
-Optional (check local laws): Catalytic Converter and Rear O2 Sensor. Requires programming the computer and deleting rear O2 sensor codes and functionality.
-Optional (check local laws): EVAP System/vacuum lines - requires plugging supercharger hole with freeze plug and JB weld, reprogramming the computer, plug the extra EVAP hose on the fuel tank header, and venting the gas tank cap (You can easily do this by removing the valve in the gas tank filler cap.)
You can swap this build in less than 1 month and expect a 13-13.5 second quarter mile and a 1.9 60' time without modifying the tune.
THE LIST:
The numbers in (x) are the quantity of parts you need to order.
-----PARTS YOU NEED TO TAKE OFF THE DONOR CAR-----
-Engine
-Map Sensor Vacuum Lines
-Transmission (optional; bolted to engine anyways)
-Wiring Harness up to the Firewall + OBD II Connector from inside the car (cut the wires) + Fiero Wiring Harness
-Computer
-A/C Hose up to the firewall
-3" Exhaust flange (cut it off from the car side)
-Extra fuses and relays from the fuse box
-Power washer fluid pump, tank, and hoses if you want some cheap methanol injection (not covered in this guide)
-Electronic Cruise Control Module and Cruise Cable
-Both CV front axles (from a Pontiac grand prix GTP, others may or may not work)
Find a donor car here (search for an engine for a 1998-2002 Pontiac Grand Prix supercharged, enter in your zip code and select sort by distance): https://car-part.com/ OR Junkyard Search
-----AIR-----
NOTE: Throttle cable mounting to a 3800 Series II motor - see Assembly Diagrams section
Supercharger 3.7" pulley belt - 66.3", 6 ribs (1x):
Roadmax 6k663AP - https://www.amazon.com/dp/B..._US&ref_=as_li_ss_tl
NOTE: You may have to go up or down a size in 0.5" increments to ensure tight fitment; final fitment may vary. Search in RockAuto with a * for a wildcard (K0606** or 6k6** or 6pk6** or 6**k6 for 60"-69" belt lengths) - https://www.rockauto.com/en...h/?partnum=6k6%2A%2A
Optional: Supercharger 3.4" pulley belt - 66", 6 ribs (1x):
Gates K060660 - https://www.amazon.com/dp/B..._US&ref_=as_li_ss_tl
NOTE: You may have to go up or down a size in 0.5" increments to ensure tight fitment; final fitment may vary. Search in RockAuto with a * for a wildcard (K0606** or 6k6** or 6pk6** or 6**k6 for 60"-69" belt lengths) - https://www.rockauto.com/en...h/?partnum=6k6%2A%2A
Optional: 3.4" Supercharger Modular Pulley System (1x):
ZZPerformance 3.4 MPS - https://ebay.us/aTa3fF
Alternate - Smoothflow 3.4 Polished Finish Pulley System MPS (Modular Pulley System) - http://www.smoothflowpulleys.com/3800_MPS.html
NOTE: DON'T JUST ORDER A BARE PULLEY! ORDER THE PULLEY SYSTEM WITH THE HUB THAT IS PRESSED ON TO THE SUPERCHARGER SHAFT!
NOTE: It is not recommended going smaller than a 3.4" pulley on a stock setup without more modifications to the engine first. See BUILD 2.
Optional: Supercharger Pulley Puller (1x):
https://ebay.us/aQacLX
NOTE: Re-installing the pulley can be difficult. Put an ice bag on the shaft and the new pulley hub in the oven and used a hammer and a block of wood to pound it on. There may be better tools for this installation.
NOTE: You can rent something like this from autoparts stores but they usually do not fit right.
Optional: Flexible air duct flex 4" dia, 41inch long, to replace stock Fiero/3800 air intakes(1x):
Spectre SPE-9751 - https://www.amazon.com/dp/B..._US&ref_=as_li_ss_tl
Note: This is a very easy fitting universal intake hose. See alternatives below for more ideas.
REPLACED IN BUILD 2
Alternative: Walker 42423 4" dia INSIDE, 18" long (1x): https://www.amazon.com/dp/B..._US&ref_=as_li_ss_tl
Alternative: Walker 43381 4" dia INSIDE, 36" long (1x): https://www.amazon.com/dp/B..._US&ref_=as_li_ss_tl
Note: For the above 2, you would need some couplings with a larger than 4" inner diameter.
Alternative: UCREATIVE U-SH-45-102-T (1x): https://www.amazon.com/dp/B..._US&ref_=as_li_ss_tl
Alternative: GM GENUINE 25173861 / Dorman 696-426 (2x): https://www.amazon.com/dp/B..._US&ref_=as_li_ss_tl
Optional: Air filter (1x):
K&N RE-1040 - https://www.amazon.com/dp/B..._US&ref_=as_li_ss_tl
NOTE: This entirely replaces the stock air intake and water separator. Air filter is fastened under fender well behind drivers' seat and behind the stock intake vent. This is the BIGGEST filter that I can fit behind the side intake scoop.
Optional: Air Filter Cleaning Kit for filter above (1x):
K&N Kit-99-5050 - https://www.amazon.com/dp/B..._US&ref_=as_li_ss_tl
Optional: Air filter wrap for above filter (1x):
FILTERWEARS K298K - https://www.amazon.com/dp/B..._US&ref_=as_li_ss_tl
NOTE: Keeps water out and your filter clean. Your filter gets VERY DIRTY in wet weather without one. See filter wrap size chart: https://www.knfilters.com/search/wrap
Optional: 1.9 Rockers (1x):
https://ebay.us/kpeqbM
NOTE: NOT COMPATIBLE WITH ANY AFTERMARKET CAMSHAFT!!!! If you want some decent performance gains (5-7%) with minimal effort, these quite literally bolt on to the engine. Might be a good idea to replace valve springs if the engine is over 100,000 miles (see build 2).
Valve cover seals (1x):
Ultra-Power VS50465R - https://www.amazon.com/dp/B..._US&ref_=as_li_ss_tl
Note: These wear out, consider replacing them to avoid an oil leak.
-----FUEL-----
NOTE: Larry Curchoe will build and sell you a fuel system (may be more applicable to BUILD 2) - https://www.facebook.com/larry.curchoe/
NOTE: This setup below connects directly to the 3800 stock fuel rails and the stock Fiero lines.
NOTE: FOR COMPLETE E-85/Ethanol CONVERSION and custom fuel rail setup, SEE BUILD 2. This list replaces all Fiero hoses to allow for running ethanol, since most states have up to 15% ethanol in all fuel now.
NOTE: Check out how to modify Series III/Gen 5 rails for a Series II/Gen 3 - https://www.gmtuners.com/fiero/returnless.htm
Fuel pump (1x):
Walbro 255 LPH F20000169 - https://www.amazon.com/dp/B..._US&ref_=as_li_ss_tl
Alternate (quieter): Quantum 255 LPH HFP-343 - https://www.amazon.com/dp/B..._US&ref_=as_li_ss_tl
NOTE: BE CAREFUL WITH THE QUANTUM PUMPS. THE INLET CAN BE CLOSE TO THE BOTTOM OF THE FUEL TANK AND SUCKED AGAINST THE TANK, NOT ALLOWING FOR FUEL FLOW AT HIGH FUEL DEMANDS. TRIM THE BOTTOM LIP OFF OF THIS FUEL PUMP TO GIVE MORE CLEARANCE FOR DRAWING FUEL FROM THE BOTTOM OF THE TANK, WHILE STILL ALLOWING ROOM FOR THE SCREEN TO FIT - REMOVE SCREEN BEFORE TRIMMING.
NOTE: The 3800sc requires slightly more fuel than the stock Fiero pump can put out. You might be able to get by without changing this if you do not modify the 3800sc at all. It can always be changed later, as the tank can be pulled separately.
NOTE: SEE BUILD 2 FOR E85 CONVERSION. YOU WIILL NEED A 340+ LPH PUMP INSTEAD!
NOTE: Many fuel pumps out there are FAKES. Buy directly from the manufacturer's website or from this post.
REPLACED IN BUILD 2
Fuel tank lock ring and seal (1x):
Dorman 579-001 - https://www.amazon.com/dp/B..._US&ref_=as_li_ss_tl
Stock fuel rail hose release tools (1x):
Performance Tool W83148 - https://www.amazon.com/dp/B..._US&ref_=as_li_ss_tl
NOTE: These are a pain to use, see this video - https://www.youtube.com/wat...kff2RlPWB_O&index=13
SEE DIAGRAM BELOW FOR CORRESPONDING NUMBERS
0 - Optional (Check local laws): Block off / remove the EVAP circuit by cutting the EVAP fuel sender 1/4" hose and hose-clamping in a 1/4" bolt.
1 - Push-Lok Ethanol Fuel Hose 3/8" (1x):
Fragola 871006 (10ft) - https://www.amazon.com/dp/B..._US&ref_=as_li_ss_tl
2 - Fuel Filter (1x):
Wix 33481 - https://www.amazon.com/dp/B..._US&ref_=as_li_ss_tl
NOTE: With welded 16mm x 1.5 (M16-1.5) female inlet/outlet
3 - M16 x 1.5 Adapter to -6 AN (1x):
Edelbrock Russell 648060 - https://www.amazon.com/dp/B..._US&ref_=as_li_ss_tl
4 - 90° -6 AN Female swivel Push-Lok Barb Male (1x):
EVIL ENERGY CS00465D90 - https://www.amazon.com/dp/B..._US&ref_=as_li_ss_tl
5 - Stock 3800sc Fuel Rail 3/8" Supply Line To above -6AN Push-Lok adapters (1x):
Vibrant 16886 - https://www.amazon.com/dp/B..._US&ref_=as_li_ss_tl
6 - Stock 3800sc Fuel Rail 5/16" Return Line To above -6AN Push-Lok adapter (1x):
Vibrant 16885 - https://www.amazon.com/dp/B..._US&ref_=as_li_ss_tl
NOTE: Only required for Series II return style fuel rails, NOT Series III.
REPLACED IN BUILD 2
7 - 1/4" barb to 3/8" barb (1x):
Beduan 1yf-02920-srb - https://www.amazon.com/dp/B..._US&ref_=as_li_ss_tl
8 - 1/4" Fiero Ethanol fuel tank return hose (1x 5'):
UCREATIVE U-FH-30R7-5-14 - https://www.amazon.com/dp/B..._US&ref_=as_li_ss_tl
NOTE: For ethanol fuel
9 - 5/8 ID molded Ethanol hose with a right angle (1x):
Gates 28467 - https://www.amazon.com/dp/B..._US&ref_=as_li_ss_tl
NOTE: For ethanol fuel
10 - 1.5" Fiero Ethanol Fuel tank filler neck hose (1x):
Gates 21660 - https://www.amazon.com/dp/B..._US&ref_=as_li_ss_tl
NOTE: For ethanol fuel
11 - 180° bend -6AN to Pusk Lock 3/8" Barb (2x):
Dexepe OCH-AN6-180#1-BK-LC - https://www.amazon.com/dp/B..._US&ref_=as_li_ss_tl
NOTE: Only need 1 for a Series III Returnless style.
REPLACED IN BUILD 2
-----SPARK-----
Spark Plug Wire Kit for Custom Lengths (1x):
Taylor Cable 83253 (45 degree boots) - https://www.amazon.com/dp/B..._US&ref_=as_li_ss_tl
NOTE: You need a vise and a spark plug crimper below
Spark plug wire crimper to use with bench vise (1x):
MSD 3503 - https://www.amazon.com/dp/B..._US&ref_=as_li_ss_tl
Optional: Colder Spark Plugs - two ranges colder than stock Autolite 606 plugs, gap to 0.035"-0.040" (6x):
Autolite 104 - https://www.amazon.com/dp/B..._US&ref_=as_li_ss_tl
Note: Colder plugs decrease hot spots in the combustion chamber that could lead to KR reducing your timing and thus power.
REPLACED IN BUILD 2
Optional: Spark Plug Gap Tool (1x):
Performance Tool W80540 - https://www.amazon.com/dp/B..._US&ref_=as_li_ss_tl
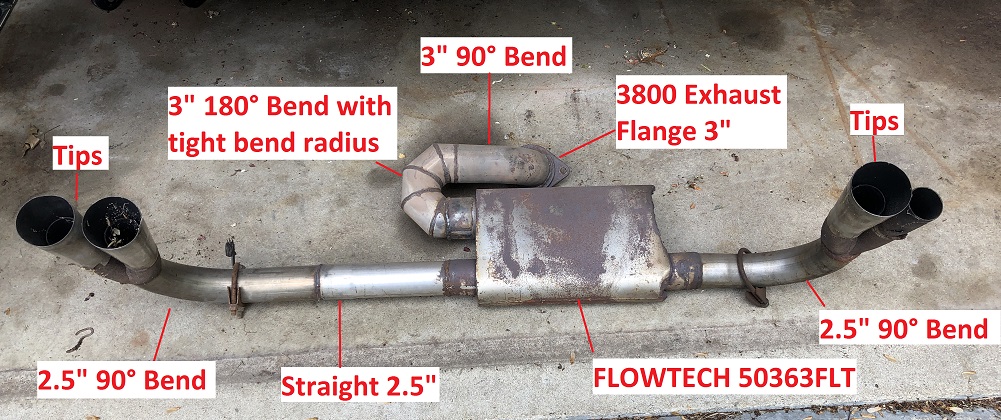
-----EXHAUST-----
NOTE: This exhaust system mates to the stock 3800 exhaust headers, which allegedly can support up to 300hp. You will have to custom-weld your exhaust. There is no bolt-on exhaust for an engine swap (does someone want to start making these?). Final fitment can vary between year models of Fieros, engine mounts, etc. Go to an exhaust shop and get one welded up after the engine is in the car.
NOTE: The best pipes are mandrel bent stainless steel.
Muffler - 3" right in, dual 2.5" right + left out, 13" body length (1x):
Spintec 343SC - https://ebay.us/MFESbZ
OR
Flowtech 50363FLT (may be discontinued) - https://ebay.us/XDcSTt
OR
Magnaflow 12158 (2.5" inlet, stainless, but is a good size) - https://www.amazon.com/dp/B..._US&ref_=as_li_ss_tl
NOTE: These below mufflers will not fit easily because they longer (especially with OE Fiero Routing, max dimensions 15x9.5x5"), but it may be possible to use them in an exhaust setup similar to what is pictured:
MagnaFlow 12265/12266/12267 (Stainless) - https://www.amazon.com/dp/B..._US&ref_=as_li_ss_tl
BORLA 40474 (Stainless) - https://www.amazon.com/dp/B..._US&ref_=as_li_ss_tl
OR
BORLA 400499 (Stainless) - https://www.amazon.com/dp/B..._US&ref_=as_li_ss_tl
OR
Walker 18375 (QUIET, 2.5" INLET, 2.25" OUTLET, CAN BE EASIER FOR A TIGHTER BEND RADIUS) - https://www.amazon.com/dp/B..._US&ref_=as_li_ss_tl
OR
Cherry Bomb SA2265-CE (2.5" INLET, 2.5" OUTLET, CAN BE EASIER FOR A TIGHTER BEND RADIUS) - https://ebay.us/hC2z1G
NOTE: You will have to weld a bend in your own exhaust. Pictured below.
REPLACED IN BUILD 2
Donor car exhaust flange (1x):
YOU MUST CUT OFF THE EXHAUST FLANGE FROM THE DONOR CAR TO USE IN THIS EXHAUST SETUP!
90° bend 3" diameter (1x):
X AUTOHAUX a22111700ux0403 - https://www.amazon.com/dp/B..._US&ref_=as_li_ss_tl
NOTE: Must be VERY TIGHT bend radius, likely needed custom weld job. You will have to cut and re-weld this at a sharper angle.
REPLACED IN BUILD 2
180° bend 3" diameter (1x):
X AUTOHAUX a22111700ux0413 - https://www.amazon.com/dp/B..._US&ref_=as_li_ss_tl
NOTE: Must be VERY TIGHT bend radius, likely needed custom weld job. You will have to cut and re-weld this at a sharper angle.
90° bend 2.5" diameter (1x 2-PACK):
X AUTOHAUX a22111700ux0402 - https://www.amazon.com/dp/B..._US&ref_=as_li_ss_tl
Straight 2.5" diameter, 1 ft (1x):
X AUTOHAUX a22111700ux0435 - https://www.amazon.com/dp/B..._US&ref_=as_li_ss_tl
2.5" diameter generic exhaust hanger U-bolts (1x 2-pack):
PALOZO EC-2.5 - https://www.amazon.com/dp/B..._US&ref_=as_li_ss_tl
NOTE: Could use the stock Fiero rubber exhaust hangers to hang these from
2.5" diameter Exhaust Tips (2x):
Re-used stock Fiero exhaust tips
Optional: 96-02 Camaro/Firebird Oil Pan for Stock Exhaust Routing NOT PICTURED (1x):
Spectra Premium GMP46A - https://www.amazon.com/dp/B..._US&ref_=as_li_ss_tl
NOTE: ONLY If you want to make exhaust like the stock Fiero routing, you need 1996-2002 Camaro or Firebird oil pan
Optional: 96-02 Camaro/Firebird Oil Pan Pickup Tube for Stock Exhaust Routing NOT PICTURED (1x):
Melling 292S - https://www.amazon.com/dp/B..._US&ref_=as_li_ss_tl
NOTE: ONLY If you want to make exhaust like the stock Fiero routing, you need 1996-2002 Camaro or Firebird oil pan
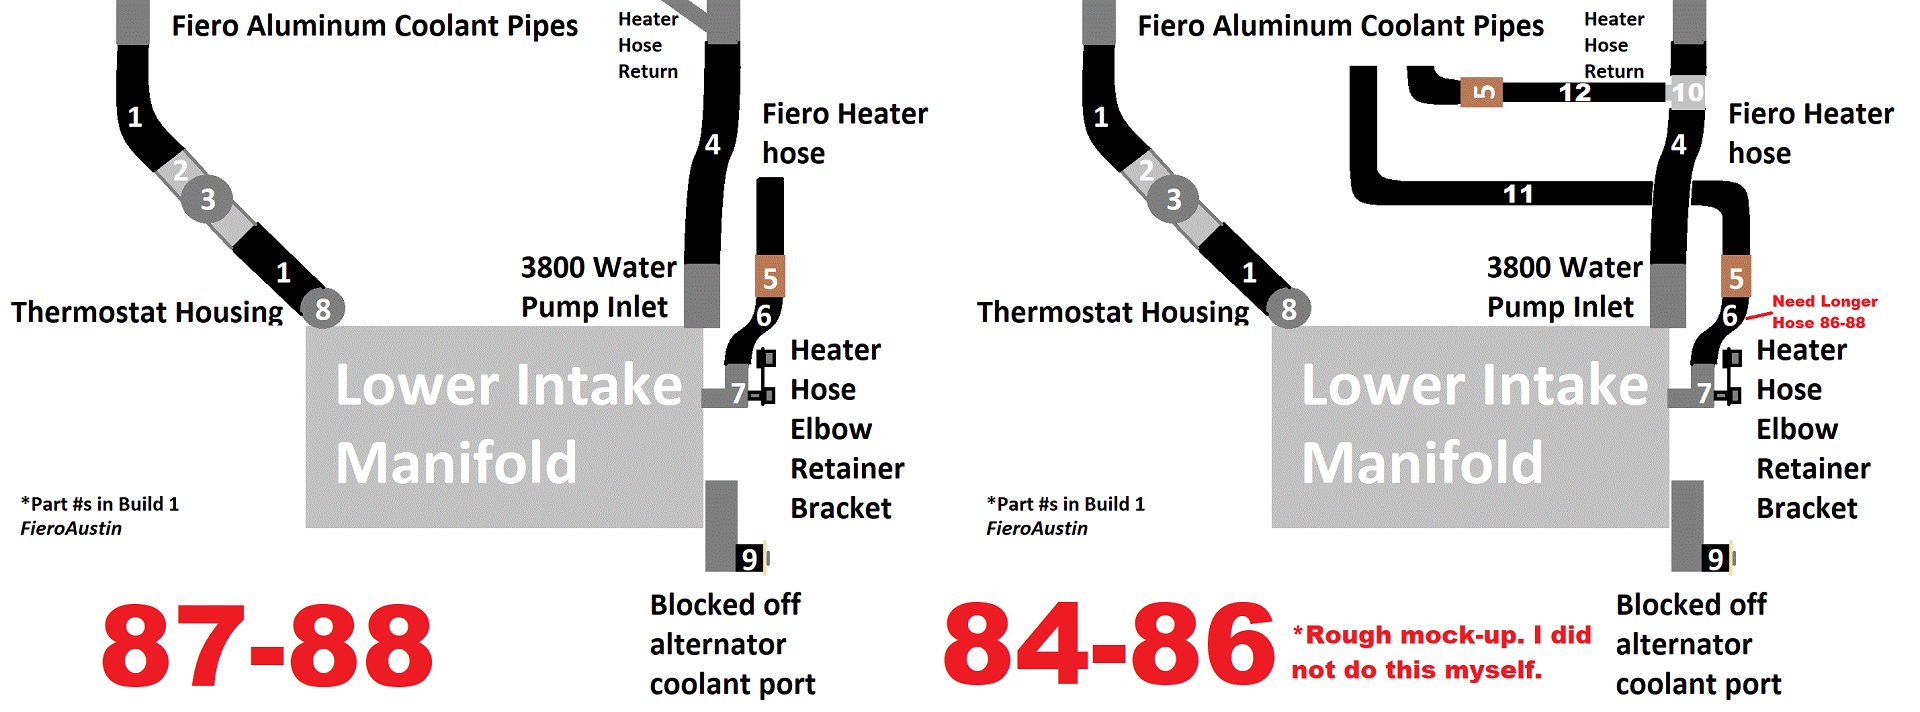
-----COOLANT AND HOSES-----
SEE DIAGRAM BELOW FOR PART #s
NOTE: THE BELOW DIAGRAM AND PART #s RELATED TO THE HEATER HOSE ONLY WORK FOR AN 87-88 FIERO. YOU WILL NEED A DIFFERENT HEATER HOSE FOR OTHER MODELS. TRY GETTING A T FITTING LIKE THE BUILT IN STYLE FOR 87-88 FIEROS.
NOTE: See this video on cooling system modifications. https://www.youtube.com/wat...kff2RlPWB_O&index=34
1 - 3800 Thermostat housing to drivers' side coolant hose 1.25" to 1.25" (1x):
Dayco 71082 - https://www.amazon.com/dp/B..._US&ref_=as_li_ss_tl
NOTE: Cut a few inches off the end(s). Duralast E71082 also works.
2 / 3 - Radiator filler neck 1.25" inlet and 1.25" outlet (1x):
HCHCSPEED JP2826-SL - https://www.amazon.com/dp/B..._US&ref_=as_li_ss_tl
NOTE: To fill coolant. Plug the overflow nipple. There are many other ways to do this.
NOTE: To Avoid buying a ridiculously expensive custom thermostat housing (https://westcoastfiero.com/...l-thermostat-housing) or to avoid making a new one. If you go the modified 3800/fiero thermostat housing route, it may work better for routing your heater core lines on an 84-86 Fiero instead of into the 3800 Lower Intake Manifold or instead of into the 3800 coolant inlet on the right side of the diagram below.
4 - 3800 Water pump 1.5" to Passengers' Fiero coolant hose 1.25" (1x):
Gates 21205 - https://www.amazon.com/dp/B..._US&ref_=as_li_ss_tl
NOTE: Cut a few inches off the small end. DAYCO 71126 also works.
5 - Barb coupling for below heater hose to stock Fiero heater hose 5/8-5/8" ID (1-2x):
ICT Billet AN627-10A - https://www.amazon.com/dp/B..._US&ref_=as_li_ss_tl
NOTE: Instead you could optionally use a barb ball valve shutoff for shutting off hot coolant circulation to the cabin of the car during the summer: Sharkbite 22462LFA - https://www.amazon.com/dp/B..._US&ref_=as_li_ss_tl
6 - Heater Hose (1x):
1987-1988 Continental 63113 - https://ebay.us/BtMRNa | https://www.amazon.com/dp/B..._US&ref_=as_li_ss_tl or DAYCO C87641 - https://www.autozone.com/co...641&redirectUrl=true
NOTE: This works well for 87-88 Fieros; earlier Fieros may need a longer heater hose to the firewall and a T in the return coolant pipe similar to an 87-88. Goes with the 5/8" barb above; you'll have to fabricate and mount a retaining bracket detailed in LostNotForgotton's Video
NOTE: The 7/8" 3800sc heater hose elbow can squeeze on to 5/8" stock 87-88 Fiero heater hose line
OR
1984-1986 TBD
NOTE: Instead of fabricating a retainer bracket in the video above, some choose to tap the coolant hole in the lower intake manifold with threads and put a pipe 3/4 MNPT to 3/4" OD barb fitting in, and a 5/8 ID molded hose with a right angle, and a 3/4" OD Barb fitting to join to the stock Fiero hose. I do not recommend as the hole is undersized for the proper sized tap and would ideally be honed out/drilled larger before a proper tap can fit with with a 59/64 drill bit, however this process is prone to cracking the aluminum intake to be potentially irreparable:
NPT tap set (1x): Drill America POUCSNPT5 - https://www.amazon.com/dp/B..._US&ref_=as_li_ss_tl
3/4 MNPT to 3/4" OD barb fitting (1x): Sharkbite UC134LFA - https://www.amazon.com/dp/B..._US&ref_=as_li_ss_tl
5/8 ID molded hose with a right angle (1x): Gates 28467 - https://www.amazon.com/dp/B..._US&ref_=as_li_ss_tl
59/64 drill bit (1x): Drill America DWDRSD59/64 - https://www.amazon.com/dp/B..._US&ref_=as_li_ss_tl
NOTE: You may want to buy other large drill bits in steps leading up to a 59/64" so you can drill out the heater hose coolant port in steps. Again, I do NOT recommend drilling for risk of cracking.
7 - Aluminum Heater Hose Elbow (1x):
Dorman 47065HP - https://www.amazon.com/dp/B..._US&ref_=as_li_ss_tl
NOTE: These CRACK if they are plastic! REPLACE with aluminum above!
8 - Optional: 180° Thermostat (1x):
Gates 33428S - https://www.amazon.com/dp/B..._US&ref_=as_li_ss_tl
OR
MotoRad 239-180 - https://www.amazon.com/dp/B..._US&ref_=as_li_ss_tl
OR
Motorad Failsafe 723-9180 - https://www.amazon.com/dp/B..._US&ref_=as_li_ss_tl
NOTE: Motorad thermostats with a small hole like the may be easier to burp the system but could cause longer warm up, P0128 code, & slight warm up power loss.
9 - 1" expansion frost plug for plugging water pump hole that used to go to the alternator coolant circuit (1x):
Dorman 02600 / 570-005 - https://www.amazon.com/dp/B..._US&ref_=as_li_ss_tl
or
Dorman 555-018 - https://www.amazon.com/dp/B..._US&ref_=as_li_ss_tl
10 - 1.5" to 5/8"(TBD) T Fitting (1x):
TBD
NOTE: For 84-86 ONLY
11 - 5/8 (TBD) Hose:
TBD
NOTE: For 84-86 ONLY
12 - 5/8" (TBD) Hose:
TBD
NOTE: For 84-86 ONLY
Coolant/Antifreeze (2x 1 gallon of concentrate; 14qt total diluted ~50/50 needed):
Peak PXA0B3 - https://www.amazon.com/dp/B..._US&ref_=as_li_ss_tl
NOTE: You can use whatever color you want, as long as you don't mix two colors and flush the system completely.
Optional: Bigger radiator (1x):
Champion 166-CC828 - https://www.amazon.com/dp/B..._US&ref_=as_li_ss_tl
NOTE: Radiator install video - https://www.youtube.com/wat...kff2RlPWB_O&index=28
NOTE: This or the bigger fan below (easier) is pretty much REQUIRED when running in hot weather for a long period of time (80° F +). Definitely need for build 2.
NOTE: Here are some cheaper ones. YOU GET WHAT YOU PAY FOR!
https://www.amazon.com/dp/B..._US&ref_=as_li_ss_tl
https://www.amazon.com/dp/B..._US&ref_=as_li_ss_tl
https://www.amazon.com/dp/B..._US&ref_=as_li_ss_tl
Optional: Better radiator fan (1x):
Proform 67016 - https://www.amazon.com/dp/B..._US&ref_=as_li_ss_tl or https://ebay.us/ILknzc
NOTE: 8 blade plastic.
OR
Permacool 19115 - https://www.amazon.com//dp/..._US&ref_=as_li_ss_tl
NOTE: 6 blade metal. See install instructions here (loads slowly): https://web.archive.org/web...1049c8ce4f2eed79da72
NOTE: See install video here - https://www.youtube.com/wat...index=28&pp=gAQBiAQB
Optional: Hood vents for increased radiator air flow (1x):
GM 10030564 & 10030565 - https://ebay.us/q4rHRe
Alternate: Paul Angel's (not making them much currently): https://angelonearth.net/customfiberglass/
NOTE: Contact Paul at imthadriver@gmail.com
Hose clamp kit (1x):
https://www.amazon.com/dp/B..._US&ref_=as_li_ss_tl
-----HARNESS/SENSORS/COMPUTER (ECU/PCM)-----
NOTE: See Harness section for building your harness with detailed instructions and diagrams here - https://www.fiero.nl/forum/...HTML/139530.html#p11
NOTE: See tuning video here - https://www.youtube.com/wat...kff2RlPWB_O&index=33
NOTE: Want to buy a harness and PCM tune? I highly recommend this. Contact one of the below guys:
James L. Brown - https://www.facebook.com/Fiero3800harnesses/
Dan McIlmoyle - https://www.facebook.com/danny.mcilmoyle
West Coast Fiero (expensive!) - https://westcoastfiero.com/...ess-for-conversions/
Joe Welch (olejoedad) - https://www.fiero.nl/cgi-bi...cgi?sendto=olejoedad
Harness from the donor car (1x):
https://car-part.com/
NOTE: Again best harnesses and engines are from a 1998-2002 Pontiac grand prix GTP
Harness from the Fiero (1x):
www.car-part.com
NOTE: If you do not have a Fiero harness, avoid buying a 1984 harness; it has some differences that make it more difficult.
3-pin Oil pressure sender (1x):
STANDARD MOTOR PRODUCTS PS245T - https://www.amazon.com/dp/B..._US&ref_=as_li_ss_tl
NOTE: Comes from a 1988 Fiero V6 already, so if you have this car you do not need this sensor.
1/4" NPT Male to Female Elbow for oil pressure sender (1x):
Legines 3420*BB - https://www.amazon.com/dp/B..._US&ref_=as_li_ss_tl
NOTE: May be difficult to install the oil pressure sensor above with the FieroRog alternator relocator bracket installed. This should help with relocating that. I am not sure this exact part will give enough clearance for the oil sensor (may be pinned against the oil filter housing)
-----NEEDED IF BUILDING YOUR OWN HARNESS-----
HPTuners + 2 credits (1x):
https://www.hptuners.com/mpvi3/
NOTE: Required for deleting VATS security, delete ABS/EGR/Rear O2 (check local laws), and tuning - see video: https://www.youtube.com/wat...kff2RlPWB_O&index=34
NOTE: If you are buying a harness, all the harness providers also include programming the computer, making this unnecessary. ZZP also does this at a much higher cost.
3-pin Oil pressure sender connector (1x):
Standard Motor Products HP4480 - https://www.amazon.com/dp/B..._US&ref_=as_li_ss_tl
NOTE: Comes from a 1988 Fiero V6 already, so if you have this car you do not need this sensor.
4t65e-HD/4T65e/4T60e Transmission Speed Sensor to Fiero Speedometer Buffer Circuit (1x):
https://reddevilriver.com/h...peedo-buffer-circuit
NOTE: See harness section for schematic; you can build this circuit yourself if you have the know-how.
NOTE: You may want a 125mph FIero speedometer. Search in junkyards - https://car-part.com/
In-line 20A fuse holders (2x):
Bussmann BP/HHG - https://www.amazon.com/dp/B..._US&ref_=as_li_ss_tl
NOTE: One for fuel pump.
Fuel pump relay (1x):
https://www.amazon.com/dp/B..._US&ref_=as_li_ss_tl
NOTE: Only required if building your own harness
NOTE: Can use stock Fiero relays instead.
-----TRANSMISSIONS-----
-----MANUALS-----
NOTE: Check out how to bypass the auto transmission controls in a 3800 engine - https://www.gmtuners.com/fiero/transbypass.htm
Spec 3+ Clutch (1x):
First, choose your clutch type and your transmission donor car here: https://specclutch.com/products/
Below are common ones for swaps.
1985-1988 2.8L Fiero 5spd - Spec SC883F - https://ebay.us/mBm1hd
1985-1988 2.5L Fiero - Spec SC783F - https://ebay.us/toj3Zh
1984 2.5L 4spd / 1985-1987 2.8L Fiero 4spd - Spec SC773F - https://ebay.us/H0Ov4p
NOTE: For manuals, (F23, F40, Getrag, etc.) everyone seems to use a Spec 3+ clutch, however sometimes Spec sends the wrong clutch. It must be MATCHED for your specific manual transmission (you need to know make, model, and year of car it came out of); not just any transmission will do and you can NOT order them online easily from what I understand. And sometimes even Spec puts the wrong clutch in the box. Best to call them up and verify your exact application first. Your clutch may rub the transmission if they get it wrong.
F23/F40 Shifter Bracket (1x):
fieroguruperformancellc@gmail.com https://fieroguruperformance.com/?page_id=906
OR
West Coast Fiero - https://westcoastfiero.com/...adapter-with-cables/
OR
https://fierospace.com/prod...-shift-cable-bracket
F23/F40 Shifter Cable (1x):
http://rodneydickman.com/pr....php?products_id=341
OR
https://westcoastfiero.com/...t/f23-shift-adapter/
Flywheel Bolts (1x):
SEE MOUNTING AND BRACKETS SECTION FOR FieroRog KIT
OR
https://westcoastfiero.com/...series-i-ii-and-iii/
F23 from a Cavalier mounts (1x):
Contact FieroRog
F23 from a Cobalt with a Cavalier bell housing mounts (1x):
https://fierospace.com/prod...cavalier-bellhousing
NOTE: Contact Brian Sanburn or at https://fierospace.com/
F40 Mount Kit (1x):
https://fierospace.com/prod...-3800-full-mount-kit
Other F23/F40 or transmission mount parts, and more
https://fierospace.com/
-----4t65e-HD/4T65e/4T60e TRANSMISSION-----
4t6x Transmission Cooler Line Fittings (different options are below):
2004.5+ GTP Transmission
3/8"-18 NPSM (1x): TBD
9/16"-18 UNF (1x): TBD
OR
2000(2000.5+ GTP)-2004.5 Transmission
1/4"-18 NPSM (1x): TBD
3/8"-18 NPSM (1x): TBD
OR
1990-1999 (2000.5- GTP) Transmission
1/4"-18 NPSM to -6 AN male (1x 2-pack): ICT Billet 551114 - https://www.amazon.com/dp/B..._US&ref_=as_li_ss_tl
NOTE: O-ring and straight thread 1/4" NPSM side go directly into transmission.
Transmission line elbow -6AN to 3/8" 90 deg barb (1x 2-pack):
EVIL ENERGY EV01111D90 - https://www.amazon.com/dp/B..._US&ref_=as_li_ss_tl
NOTE: to mate with the above fitting
Transmission Hose to Fiero Steel Hose (1x 5ft):
Derale 13016 - https://www.amazon.com/dp/B..._US&ref_=as_li_ss_tl
NOTE: Replaces stock 4t65e-HD/4T65e/4T60e steel transmission lines
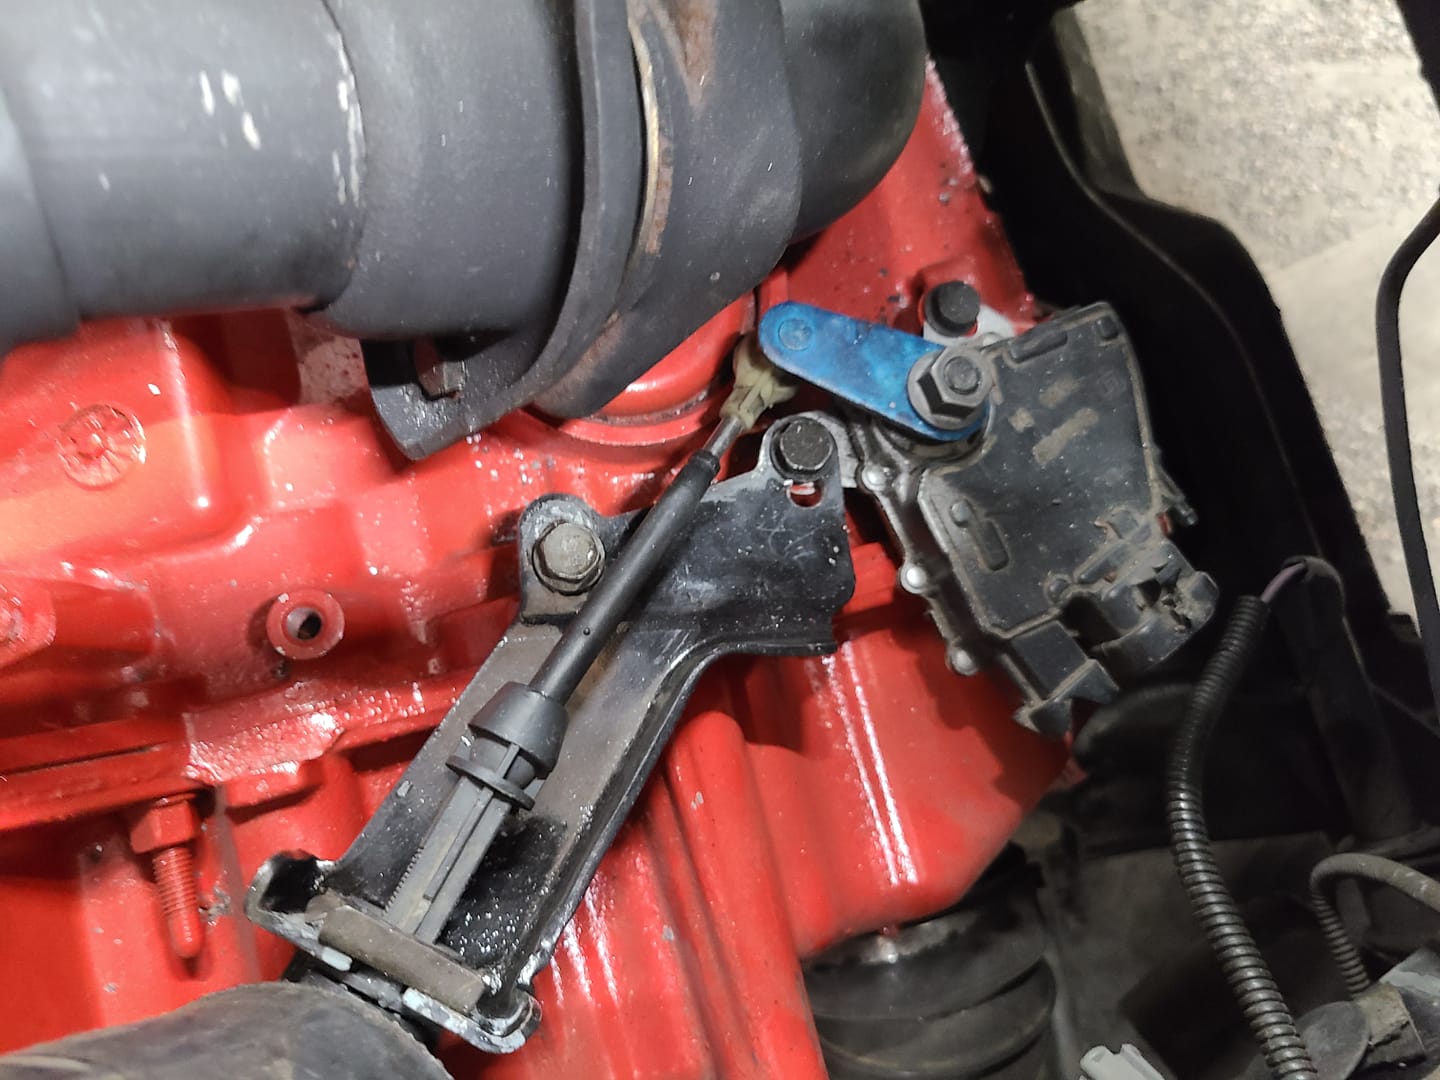
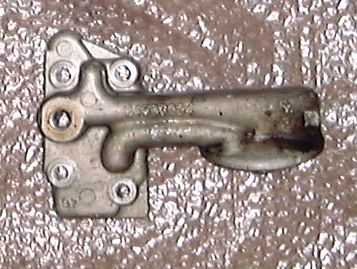
4t65e-HD/4T65e/4T60e Shifter bracket (1x):
Chuck Peterson makes these - https://www.facebook.com/chuck.peterson.566
OR
West coast Fiero: https://westcoastfiero.com/...ion-shifter-adapter/
NOTE: It is not possible to get into 1st gear with the West Coast Fiero bracket and the 3800 transmission shift arm. The shifter in the car was made for a 3-speed.
OR
Make your own out of a modified Fiero shift bracket and a chevy sonic shift arm, pictured below (1x):
GM 95160885 / 96888404 / 95147085 / 96639205 / 95198043 - https://ebay.us/J3BnMp | https://ebay.us/hTwZhq
NOTE: It is not difficult to construct your own. Unbolt the shifter arm and bolt it on in the reverse direction of the shifting action. Flip the sonic shift arm upside down and bend/press the Fiero shifter bracket flat.
NOTE: James L. Brown has designs for these and may start producing them - https://www.facebook.com/Fiero3800harnesses/
-----TRANSMISSION AXLES-----
-----Buying Axles-----
Fiero Manual Axles (2x):
Re-use stock axles!
OR
F23/F40 Manual Axles (2x):
fieroguruperformancellc@gmail.com https://fieroguruperformance.com/?page_id=906
or
West coast Fiero - https://westcoastfiero.com/...ct/f40-custom-axles/
OR
4t65e-HD/4T65e/4T60e Passenger's Axle (1x):
Stephen Poe: https://www.facebook.com/stephen.poe.5011
OR
West Coast Fiero - https://westcoastfiero.com/...to-4t60-e-and-4t65-e
NOTE: You must supply them the following information:
-Your Transmission Type
-Your Engine Type
-Your Fiero Type (make/model)
-Your engine mount/transmission mount type
-Measurements from both transmission output shaft surfaces to the inside surfaces of the Fiero hubs with no axles installed, with wheels on ground.
4t65e-HD/4T65e/4T60e Driver's Axle (1x):
Re-use Automatic Fiero driver's side axle
OR
GSP NCV10509 - https://www.amazon.com/dp/B..._US&ref_=as_li_ss_tl
-----Building 4t65e-HD/4T65e/4T60e Passenger's Axle-----
NOTE: Building axles yourself? See LostNotForgotton's axle building video: https://www.youtube.com/wat...kff2RlPWB_O&index=15
NOTE: Here is a great writeup, but I do not know if FieroRog mounts will work with these axles: https://www.gmtuners.com/swap/axles.htm
NOTE: THESE AXLES BELOW ARE FOR 4t65e-HD ONLY. THESE AXLES REQUIRE YOU USE THE FieroRog OR WEST COAST FIERO ENGINE AND TRANSMISSION MOUNTS LISTED IN THIS BUILD THREAD AND IN LostNotForgotton's VIDEO. FINAL FITMENT CAN VARY. LOOKUP WHICH TRANSMISSION YOUR DONOR CAR CAME WITH: https://en.wikipedia.org/wi...ransmission#4T65E-HD
Re-use Driver's side GTP Axle OEM (1x):
GM 26054707 / Cardone 60-1255 - https://www.amazon.com/dp/B..._US&ref_=as_li_ss_tl
or
https://car-part.com/
NOTE: It is a gamble whether some Cardone remanufactured axles used OEM parts; if you get one without OEM parts, it may not work for building your axles.
Re-use Passenger's side GTP axle OEM (1x):
GM 26073392 / Cardone 60-1256 - https://www.amazon.com/dp/B..._US&ref_=as_li_ss_tl
or
https://ebay.us/oLP27C
or
https://car-part.com/
NOTE: It is a gamble whether some Cardone remanufactured axles used OEM parts; if you get one without OEM parts, it may not work for building your axles.
Re-use any manual Fiero axle OEM (1x):
https://car-part.com/
NOTE: YOU MUST USE OEM PARTS FROM THE DONOR CAR. MIXING OTHER MANUFACTURERS PARTS WILL NOT FIT TOGETHER! THERE IS A CHANCE THE DONOR CAR HAD OEM AXLES SWAPPED OUT FOR NON-OEM!
Axle Boot Inner with grease (1x):
Dorman 614-004 - https://www.amazon.com/dp/B..._US&ref_=as_li_ss_tl
Axle CV Boot Clamps (1x):
MIKKUPPA QAT094 - https://www.amazon.com/dp/B..._US&ref_=as_li_ss_tl
Axle CV boot clamp tool (1x):
https://www.amazon.com/dp/B..._US&ref_=as_li_ss_tl
-----ACCESSORIES/AC/OTHER/MISC-----
Optional: Fiero Factory Service Manuals (1x):
https://www.rockauto.com/en...artnum=DPRGM2**8*FSM
Optional: OBD2 Bluetooth Scanner (1x):
OBDLink CX - https://www.amazon.com/dp/B..._US&ref_=as_li_ss_tl
NOTE: To be used with free phone app - REALLY helps with troubleshooting
Optional: Sound Deadening Material for Firewall (1x):
KILMAT KLM8018 - https://www.amazon.com/dp/B..._US&ref_=as_li_ss_tl
OR
Design Engineering 050502 https://www.amazon.com/dp/B..._US&ref_=as_li_ss_tl
NOTE: The Design Engineering is very difficult to form. Take a Dremel with gloves and safety glasses to notch out the Fiero firewall obstacles.
NOTE: This is ONLY necessary if your panels (firewall) are vibrating. You only need about 25% coverage. This sound mat is very heavy; it ONLY serves to DAMPEN a vibration by changing the weight of the object that is vibrating; it does not magically absorb sound waves. If you want to make the cabin quieter, you should first focus on SEALING the cabin entirely by plugging holes that could be exposed to the outside air.
1/2" Torque Angle Meter (1x):
Performance Tool M205 - https://www.amazon.com/dp/B..._US&ref_=as_li_ss_tl
NOTE: Required for torqueing OEM bolts on balance shaft sprocket, connecting rods, crankshaft mains, cylinder heads, flywheel, oil filter adapter, rocker arms, timing cover, timing chain sprocket, harmonic balancer, and water pump. See torque specs here - https://www.torkspec.com/to...3.8L-231ci-V6-3800II
Accessory Belt Tensioner Pulley (1x):
CONTINENTAL 49247 - https://www.amazon.com/dp/B..._US&ref_=as_li_ss_tl
NOTE: From a 1995 Ford Winstar 3.8, only needed if using FieroRog alternator relocation bracket
Accessory Belt - 81.5", 6 ribs (1x):
GATES 6K815AP - https://www.amazon.com/dp/B..._US&ref_=as_li_ss_tl
NOTE: You may have to go up or down a size in 0.5" increments to ensure tight fitment; final fitment may vary. Search in RockAuto with a * for a wildcard (K0608** or 6k8** or 6pk8** or 8**k6 for 60"-69" belt lengths) - https://www.rockauto.com/en...h/?partnum=6k6%2A%2A
Optional: Engine Blower Blockoff Kit (1x):
https://www.campsitecarbon....blower-block-off-kit
NOTE: Only for 85-87 Factory V6 Fieros with an engine blower removed (a small electric motor/fan in the trunk; if you don't have one you don't need it!)
Optional: Magnetic Oil Drain Plug (1x):
Dorman 090091 (65372) - https://www.amazon.com/dp/B..._US&ref_=as_li_ss_tl
NOTE: For extra safety to pick up metal shavings in the oil.
Optional: AC/DRYER (1x):
Four Seasons 33181 - https://www.amazon.com/dp/B..._US&ref_=as_li_ss_tl
Optional: Custom A/C hose made by a radiator shop (1x):
Larry Hubbert makes hoses - https://www.facebook.com/larry.hubbert.77/
Chuck Peterson makes hoses - https://www.facebook.com/chuck.peterson.566 or https://www.fiero.nl/forum/Forum4/HTML/069681.html
James L. Brown makes hoses - https://www.facebook.com/Fiero3800harnesses/
NOTE: To build your own, see LostNotForgotton's video - https://youtu.be/ZyPZkCPJzN...qJnkff2RlPWB_O&t=530
NOTE: Have a radiator shop make one. You need an R12 style port for the AC Pressure sensor. Cut one off of another 3800 AC hose and have it braised onto the Fiero side. Also use a GTP compressor side AC hose fitting for the compressor that came with the GTP. Beware, there were at least 2 types of compressors/AC hoses on 3800 engines.
NOTE: Joe Norton used to make A/C hoses but has stopped production.
Optional: R134a AC Seals (3800 side) (1x):
Four Seasons 26728 - https://www.amazon.com/dp/B..._US&ref_=as_li_ss_tl
Optional: R134a AC Seals (Fiero Side) (1x):
Four Seasons 26735 - https://www.amazon.com/dp/B..._US&ref_=as_li_ss_tl
NOTE: If you do want to utilize the AC system, you will need to charge it with R134a or newer refrigerant. The Fiero did not come equipped with this, so you will need to swap all your AC System O-Rings with Hydrogenated Nitrile (HNBR), and your orifice tube.
Optional: R134a AC Orifice Tube (1x):
ACDELCO 15-5754 - https://www.amazon.com/dp/B..._US&ref_=as_li_ss_tl
Longer 45" battery ground cable (1x):
Schumacher BAF-445S - https://www.amazon.com/dp/B..._US&ref_=as_li_ss_tl
Alternator (1x):
ACDELCO 335-1088 - https://www.amazon.com/dp/B..._US&ref_=as_li_ss_tl
NOTE: You need a year 2000+ alternator for any 3800 car to fit with FieroRog alternator bracket. This is the highest current (125A) model made; relocating the alternator without the cooling circuit can make a lower current alternator struggle to keep up. Your donor car may have this already; the bigger cars (park avenue, bonneville) have higher current alternators already. Do NOT get an off brand and/or remanufactured alternator; they tend to be junk.
Optional: Alternator voltage boost circuit (1x):
https://zzperformance.com/p...ator-voltage-booster
OR
https://easyperformance.com...ltage-booster-module
NOTE: The relocated alternator does not get cooled. It looses efficiency and does not charge as well. This boost circuit may help with that by increasing the alternator voltage by 0.6 Volts. You can do this for free here: https://zzperformance.com/b..._sid=0a5a8d6d2&_ss=r
Optional: A/C Compressor Bypass Pulley (1x):
Dorman 34195 - https://www.amazon.com/dp/B..._US&ref_=as_li_ss_tl
NOTE: Bypasses the AC Compressor if not using AC to save some horsepower and weight.
For engine removal and installation:
See Toolbox section https://www.fiero.nl/forum/...HTML/139530.html#p17
Jacks (2x): https://www.amazon.com/dp/B..._US&ref_=as_li_ss_tl
Jack stands (2x): https://www.amazon.com/dp/B..._US&ref_=as_li_ss_tl
-----MOUNTING AND BRACKETS-----
NOTE: This build uses FieroRog brackets. There are alternatives (like West Coast Fiero). You could build your own, but some parts in this build thread may not fit those if the transmission does not stay in the stock location.
NOTE: For Fiero manuals, you do not need cradle side transmission mounts, although you may want to replace the old rubber anyways.
NOTE: Rodney Dickman poly motor and transmission mounts are now discontinued, but they were located here. Poly motor mounts and a deleted balance shaft may make the car vibrate badly. V6 POLY ENGINE MOUNTS THESE ARE NOW BEING MADE HERE: https://fierospace.com/prod...6-front-engine-mount
NOTE: James L. Brown - https://www.facebook.com/Fiero3800harnesses/ is now producing poly mounts again.
NOTE: The 1988 Rodney Dickman engine cradle mount does not quite fit the FieroRog engine bracket right on some applications. May require drilling some ~1/2" offset holes. MAY IMPACT AXLE LENGTH REQUIREMENTS. Earlier year Fiero cradle/mount combinations may work better.
Optional: Adjustable Dogbone Mount - bolts to FieroRog alternator relocation bracket (1x):
http://rodneydickman.com/pr...o.php?products_id=72
OR
http://rodneydickman.com/pr....php?products_id=226
NOTE: I do NOT Recommend a solid mount for vibration.
Rear Frame Floating Cradle Nut Kit (1x):
http://rodneydickman.com/pr....php?products_id=276
NOTE: It is CERTAIN that the original nuts for the rear cradle will snap off the frame. You may have to cut a slot in the frame to get them out. Use 2 pairs of big vise grips to grab the nut through the cut hole in the frame in order to torque against it. The nut kit above sits inside the frame so in case the welds break loose next time, the mount is long enough that it can torque against the frame.
NOTE: This may be discontinued. It is not hard to weld a nut to a long drilled piece of steel yourself.
-----Rubber Cradle Side Motor/Transmission Mounts-----
Engine Cradle Mount for 84-85 4cyl, 86-87 4cyl manual transmission, 85-87 V-6 (1x):
Westar EM-2472 - https://www.amazon.com/dp/B..._US&ref_=as_li_ss_tl
OR
Engine Cradle Mount for 86-87 4cyl automatic, 1988 4cyl & 1988 V-6 (1x):
Westar EM-2548 - https://www.amazon.com/dp/B..._US&ref_=as_li_ss_tl
NOTE: These rubber mounts are on the engine cradle side and mount to steel FieroRog mounting brackets on the transmission/engine side. I would highly recommend NOT re-using the stock Fiero engine and transmission mounts as they are probably old and worn out.[/b]
OR
ALTERNATIVE POLY ENGINE CRADLE MOUNT (1x): https://fierospace.com/prod...6-front-engine-mount
NOTE: Alternative poly mount only works for original V6 cars. These could cause bad vibrations being transferred from the engine.
Front Transmission Mount (1x):
DEA A2466 - https://www.amazon.com/dp/B..._US&ref_=as_li_ss_tl
Rear Transmission Mount (1x):
Westar EM-2467 - https://www.amazon.com/dp/B..._US&ref_=as_li_ss_tl
-----Engine/Transmission side brackets-----
4t65e-HD/4T65e/4T60e Automatic FieroRog Bracket Kit (1x):
Order from FieroRog here http://www.fiero.nl/cgi-bin...orum=4&thread=068855 or here https://www.facebook.com/pr...p?id=100041431256035
NOTE: Comes with:
-front automatic 4t65e-HD/4T65e/4T60e transmission mount bracket (1x)
-rear automatic 4t65e-HD/4T65e/4T60e transmission mount bracket (1x)
-Engine mount bracket (same for manuals) (1x)
-Alternator relocation bracket (same for manuals) (1x)
-Dogbone engine mount bracket (same for manuals) (1x)
-bolts
OR
Manual Fiero Transmission FieroRog Bracket Kit (tell FieroRog what manual transmission type) (1x):
Order from FieroRog here http://www.fiero.nl/cgi-bin...orum=4&thread=068855 or here https://www.facebook.com/pr...p?id=100041431256035
NOTE: Comes with:
-Engine mount bracket (same for autos) (1x)
-Alternator relocation bracket (same for autos) (1x)
-Dogbone engine mount bracket (same for autos) (1x)
-bolts
-Custom machined down to 0.830-0.840" and balanced flywheel from a 3.8 manual Camaro (1x) (or make it yourself; GM 12576459 / 24503285 / AMS 167533 - https://www.amazon.com/s?k=..._US&ref_=as_li_ss_tl )
-Flywheel bolts - yield (8x): GM 24505092 - https://www.amazon.com/dp/B..._US&ref_=as_li_ss_tl
or
https://ebay.us/CE4PVb
or
ARP 134-1001 or 234-1001(stronger) (3x 3-pack) - https://www.amazon.com/dp/B..._US&ref_=as_li_ss_tl
NOTE: Rumor is some crankshafts may need to be drilled deeper to fit.
NOTE: FOR MANUALS ONLY! DIFFERENT THAN AUTOMATIC TRANSMISSION FLEXPLATE BOLTS!
-Clutch bolts: GM 24571667 - https://ebay.us/wMA4hS
or
ARP 150-2202: https://www.amazon.com/dp/B..._US&ref_=as_li_ss_tl
OR
F23/F40 Manuals Brackets:
fieroguruperformancellc@gmail.com https://fieroguruperformance.com/?page_id=906
OR
https://westcoastfiero.com/f23-f40-specific-parts/
-----PARTS NEEDED IF YOU DO NOT BUY A 1998-2002 PONTIAC GRAND PRIX GTP OR REGAL DONOR CAR-----
NOTE: Some of these parts can be found at junkyards. Find a donor car here: https://car-part.com/
NOTE: The transmission castings on a Regal may vary slightly and may need a spacer to work.
NOTE: SEE BUILD 2 AND 3800sc Assembly Diagrams and Torque Specs FOR HOW TO CONVERT A SERIES II TO A SERIES III (OR USE A SERIES III IN A FIERO), AND NA TO SUPERCHARGED (TOP SWAP)
GTP Axles (See "NEEDED IF BUILDING YOUR OWN HARNESS" section).
NOTE: Some axles from various cars may be interchangeable and compatible.
1998-2002 Computer (ECU/PCM) (1x):
GM 09357440 - https://www.amazon.com/dp/B..._US&ref_=as_li_ss_tl
or
https://ebay.us/YRzXat
or
Junkyard Search
NOTE: Only if you don't have one from the donor car, get at junkyard for $25 from ideally a 1998-2002 Grand Prix GTP.
2-Bar MAP sensor (1x):
Standard Motor Products AS4 - https://www.amazon.com/dp/B..._US&ref_=as_li_ss_tl
NOTE: ONLY if you bought a 3800 NA block/harness and you don't already have a 2-bar MAP sensor
GTP/Regal External Transmission Gear Selector Neutral Safety Switch / Range Sensor Switch (1x):
Standard Motor Products NS122 - https://www.amazon.com/dp/B..._US&ref_=as_li_ss_tl
Note: Some other cars already came with this switch. Look to see if it is sitting below your transmission gear selector lever on the top of the transmission.
GTP/Regal External Transmission Gear Selector Neutral Safety Switch / Range Sensor Switch Connectors for above (1x):
88862288 - https://www.amazon.com/dp/B..._US&ref_=as_li_ss_tl
Note: Only if building your own harness
GTP/Regal Steel Oil Pan (1x):
SPECTRA PREMIUM GMP11B - https://www.amazon.com/dp/B..._US&ref_=as_li_ss_tl
GTP/Regal Oil Pan Gasket (1x):
Apex AOP356 - https://www.amazon.com/dp/B..._US&ref_=as_li_ss_tl
NOTE: This needs trimming to fit over non-GTP oil pickup tube; depending on your car, you can get either get a GTP oil pickup tube or get a non-GTP oil pan gasket to avoid trimming this gasket)
GTP/Regal Oil Pan Pickup Tube/Gasket (1x):
Melling 256S - https://www.amazon.com/dp/B..._US&ref_=as_li_ss_tl
NOTE: Could instead trim down oil pan gasket to fit the other style pickup tube
GTP/Regal oil filter bracket (1x):
GM 12569219 ; 24508441 - https://www.amazon.com/dp/B..._US&ref_=as_li_ss_tl or https://ebay.us/Cv9T6f or https://ebay.us/cumdE1 or https://car-part.com/
NOTE: See what cars this came on here - https://www.gmpartsgiant.co...dapter-12569219.html
NOTE: You can not make any bracket BUT this GTP/Regal style work with the FieroRog brackets. More info at http://www.gmtuners.com/swap/3800.htm
NOTE: If you install a 5% overdrive balancer pulley, you will need this oil filter spacer to make it work - https://ebay.us/IMP58n
NOTE: You may want to install the ZZP Oil Volume Kit if you must install the GTP oil filter bracket: https://zzperformance.com/products/oil-volume-kit
Oil Filter Housing Gasket (1x):
MAHLE B31639 - https://www.amazon.com/dp/B..._US&ref_=as_li_ss_tl
NOTE: The ZZP Oil Volume kit comes with this.
GTP/Regal angled coil pack bracket (1x):
GM 24507211 ; 24504360 - https://ebay.us/GjwLdZ or https://ebay.us/8kbMmg or https://car-part.com/
NOTE: See what cars came with this here - https://www.gmoempartsoutle.../gm-bracket-24507211
NOTE: Cut engine mount dogbone off, shown here - https://youtu.be/mmfWbG37By...qJnkff2RlPWB_O&t=178.
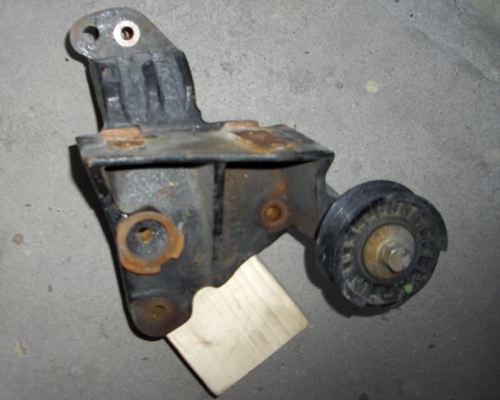
GTP/Regal Supercharger Tensioner Pulley (1x):
Dayco 89367 - https://www.amazon.com/dp/B..._US&ref_=as_li_ss_tl
NOTE: Should come on a GTP/Regal angled coil pack bracket above. You will have to buy this if it is missing from the coil pack bracket.
GTP/Regal Supercharger Idler Pulley (1x):
Gates 38009 - https://www.amazon.com/dp/B..._US&ref_=as_li_ss_tl
NOTE: Should come on a GTP/Regal angled coil pack bracket above. You will have to buy this if it is missing from the coil pack bracket.
Optional: Torque Converter (1x):
DACCO B21JXFM - https://www.amazon.com/dp/B..._US&ref_=as_li_ss_tl or https://ebay.us/lwhUad
NOTE: See here for stalls - https://atracom.blob.core.w...al/2013/2013-049.pdf
NOTE: A Bonneville SSEI or Park Avenue Ultra (JSFM) torque converter may be too low stall for a Fiero. Could idle at 20mph.
NOTE: A GTP/Regal torque converter (JTFM) might be OK, or a higher stall (JZFM or JXFM) Converter would be better. JXFM was highest stall. Works great in a 3800 Fiero (JXFM did NOT come on supercharged 3800s)
NOTE: YOU ALSO NEED TO FILL THE TORQUE CONVERTER BACK UP WITH TRANSMISSION FLUID BEFORE THE INSTALL!
GTP/Regal 3-pin Temperature sender (1x):
Standard Motor Products TX66 - https://www.amazon.com/dp/B..._US&ref_=as_li_ss_tl
NOTE: You may not need this; check to see if your car is already equipped with this 3-pin sensor (instead of a 2-pin)
GTP/Regal 3-pin Temperature sender connector (1x):
Standard Motor Products HP4440 - https://www.amazon.com/dp/B..._US&ref_=as_li_ss_tl
NOTE: Only needed if building your own harness.
NOTE: You may not need this; check to see if your car is already equipped with this 3-pin sensor (instead of a 2-pin)
Northstar Throttle Body, adapters, and throttle bracket:
-See BUILD 2 Air section
NOTE: Only needed for Series III/GenV motors.
-----PARTS THAT WEAR OUT & MAINTENANCE PARTS FOR A 3800SC-----
NOTE: These are highly recommended to change out because they wear out on a 3800. DO IT ONCE AND DO IT RIGHT!
CLICK HERE TO VIEW PARTS THAT WEAR OUT ON A 3800SC ON AMAZON
CLICK HERE TO VIEW ALL 3800 REPAIR PARTS ON AMAZON
* = especially susceptible on a 3800
-----BELOW WEAR PARTS NOT DUPLICATED IN ANY BUILD-----
*Supercharger Coupler (1x):
https://ebay.us/w2PVEf
or
Dorman 917-022 - https://www.amazon.com/dp/B..._US&ref_=as_li_ss_tl
*Supercharger snout bearing set (1x):
https://www.amazon.com/dp/B..._US&ref_=as_li_ss_tl
*4t65e-hd shift solenoids (3x):
GM 24219819 - https://www.amazon.com/dp/B..._US&ref_=as_li_ss_tl
NOTE: See Install Video here
*Valve covers:
Plastic Front (1x): Dorman 264-964 - https://www.amazon.com/dp/B..._US&ref_=as_li_ss_tl
Plastic Rear (1x): GM 12590364 - https://www.amazon.com/dp/B..._US&ref_=as_li_ss_tl
or
Aluminum Set (1x): https://ebay.us/zrsiqF or https://www.amazon.com/dp/B..._US&ref_=as_li_ss_tl
Note: The grey plastic valve covers are prone to cracking.
Knock Sensor (2x):
STANDARD MOTOR PRODUCTS KS45 - https://www.amazon.com/dp/B..._US&ref_=as_li_ss_tl
Transmission oil filter kit (1x):
ATP TF-161 - https://www.amazon.com/dp/B..._US&ref_=as_li_ss_tl
Transmission Oil Pan Gasket (1x):
8mm bolt holes/13mm bolt heads - ATP JG143 (1x): https://www.amazon.com/dp/B..._US&ref_=as_li_ss_tl
or
6mm bolt holes/10mm bolt heads - TBD - ABOVE CAN ALSO WORK
NOTE: There are two styles of transmission oil pans. You need to look at your pan and see what socket fits on your bolt.
NOTE: AVOID CORK OR PAPER GASKETS INCLUDED IN FITLER KITS!
Oil 10W30 (4.5 quarts):
Valvoline 881165 - https://www.amazon.com/dp/B..._US&ref_=as_li_ss_tl
NOTE: DO NOT USE HIGH MILEAGE OIL WITH NEW SEALS. HIGH MILEAGE OIL WILL DESTROY AND SWELL NEW SEALS. CAN CAUSE VALVE COVER OIL LEAKS.
Oil filter (1x):
ACDELCO PF47E - https://www.amazon.com/dp/B..._US&ref_=as_li_ss_tl
Supercharger oil (2x):
GM 12345982 - https://www.amazon.com/dp/B..._US&ref_=as_li_ss_tl
Optional: Ultraviolet dye and light for fluid leaks
UV Flashlight (1x): EOWCO E1 - https://www.amazon.com/dp/B..._US&ref_=as_li_ss_tl
UV Fuel/Oil/Power Steering/Transmission Fluid Dye (1x): ACDelco 1148963 - https://www.amazon.com/dp/B..._US&ref_=as_li_ss_tl
UV Coolant dye (1x): GM 12378563 - https://www.amazon.com/dp/B..._US&ref_=as_li_ss_tl
-----BELOW WEAR PARTS DUPLICATED IN BUILD 1 (ABOVE):-----
Colder Spark Plugs - two ranges colder than stock Autolite 606 plugs, gap to 0.035"-0.040" (6x):
Autolite 104 - https://www.amazon.com/dp/B..._US&ref_=as_li_ss_tl
180° Thermostat (1x):
MotoRad 239-180 - https://www.amazon.com/dp/B..._US&ref_=as_li_ss_tl
*Valve cover seals (1x):
Ultra-Power VS50465R - https://www.amazon.com/dp/B..._US&ref_=as_li_ss_tl
*Aluminum Heater Hose Elbow (1x):
Dorman 47065HP - https://www.amazon.com/dp/B..._US&ref_=as_li_ss_tl
NOTE: These CRACK if they are plastic! REPLACE with aluminum above!
Spark Plug Wire Kit for Custom Lengths (1x):
Taylor Cable 83253 (45 degree boots) - https://www.amazon.com/dp/B..._US&ref_=as_li_ss_tl
NOTE: You need a vise and a spark plug crimper below
Spark plug wire crimper to use with bench vise (1x):
MSD 3503 - https://www.amazon.com/dp/B..._US&ref_=as_li_ss_tl
-----BELOW WEAR PARTS DUPLICATED IN BUILD 2 (BELOW):-----
Automatic Transmission Service Overhaul Kit (1x):
GM Genuine Parts 19258573 - https://www.amazon.com/dp/B..._US&ref_=as_li_ss_tl
NOTE: Required for shift solenoids
NOTE: Required for hardened input shaft, 4th clutch shaft, and pump shaft
NOTE: Could get more expensive kits with clutch packs if you choose to change those. See overhaul video here - https://www.youtube.com/wat...kff2RlPWB_O&index=15
Transmission Fluid Dexron III - 7.4 quarts (maintenance) or 10 quarts (total drain including replacing the torque converter) (2x 6-pack):
Citgo 633131001 or 633131001182 Transgard High Viscosity Multi Vehicle ATF - https://ebay.us/36mRLv
NOTE: This difficult to find transmission fluid on the market - it is synthetic (long lasting), high viscosity (thick/sticky/lubricates well), and rated for Dexron III (not Dexron IV which is too thin to lubricate well).
NOTE: Sometimes the part numbers get mixed up at retailers; make sure it is the HIGH VISCOSITY.
*Intake Manifold Gasket Set (1x):
ACDelco 89017825 - https://www.amazon.com/dp/B..._US&ref_=as_li_ss_tl
Grey Gasket Maker (1x):
Permatex 85144 - https://www.amazon.com/dp/B..._US&ref_=as_li_ss_tl
NOTE: Use this on intake manifold gasket lifter valley seal corners AND on throttle body.
Series III/GENV Supercharger Upper Intake Manifold Plenum Gasket Set (reusable) (1x):
Apex AMS3735 - https://www.amazon.com/dp/B..._US&ref_=as_li_ss_tl
OR
Series II / Gen3 Upper Intake Manifold Plenum Gasket Set (1x):
FEL-PRO MS95744 - https://www.amazon.com/dp/B..._US&ref_=as_li_ss_tl
NOTE: Required for Intake Manifold Gaskets
NOTE: The ZZP Phenolic Spacer and interooler kits each come with 2 garlock gaskets included, so this is not necessary if you order that. Extra ZZP Garlocks available here: https://zzperformance.com/p..._sid=ecdfe73d9&_ss=r
*Flexplate Bolts (yields) (8x):
GM 24501365 - https://www.amazon.com/dp/B..._US&ref_=as_li_ss_tl or https://ebay.us/8zWGbd
NOTE: ONLY NECESSARY if you remove the automatic flexplate. These bolts YIELD and need to be replaced. These DO NOT WORK on a manual transmission, see FieroRog Flywheel bolts in the MOUNTING AND BRACKETS section of this build 1
Oil Pump Kit (1x):
Melling K195 - https://www.amazon.com/dp/B..._US&ref_=as_li_ss_tl
Head Gasket:
OEM style (messy, not reusable):
RHS (1x): FEL-PRO 9918 PT - https://www.amazon.com/dp/B..._US&ref_=as_li_ss_tl
LHS (1x): FEL-PRO 9917 PT - https://www.amazon.com/dp/B..._US&ref_=as_li_ss_tl
OR
MLS Head Gasket, reusable unless heat cycled (1x right/left side):
RHS stock height (1x): Cometic C5721-066 - https://www.amazon.com/dp/B..._US&ref_=as_li_ss_tl
LHS stock height (1x): Cometic C5720-066 - https://www.amazon.com/dp/B..._US&ref_=as_li_ss_tl
OR
RHS stock bore, .04 higher compression/.02" shorter than stock (1x): Cometic C5721-060 - https://www.amazon.com/dp/B..._US&ref_=as_li_ss_tl
LHS stock bore, .04 higher compression/.02" shorter than stock (1x): Cometic C5720-060 - https://www.amazon.com/dp/B..._US&ref_=as_li_ss_tl
OR
See the options available here for shorter, over bore, etc.: INTENSE HGP-0xx - http://www.intense-racing.com/PROD/HGP-0xx.html
NOTE: Pistons should measure out of cylinder hole ~0.025". You want .038"-.046" of quench according to INTENSE racing. For 0.035" quench + 0.025" out of hole = 0.060" thick gasket 0.04 extra compression and slightly more power.
NOTE: The arrow and the "L," or Left-Hand Side (LHS) gasket goes on the cylinder 1/3/5 side of the engine (towards the Fiero firewall, away from the donor car firewall). If you look at the rear cover from the rear of the engine, it goes on the left hand side.
NOTE: Your decks and heads must be perfectly flat and clean to install these MLS gaskets. Consider decking your surfaces, detailed in the Assembly videos section build 2. Otherwise they may leak.
NOTE: MLS should be reusable (unless heat cycled), and is not messy to clean off.
NOTE: Cometic indicated they have black Viton seal coating on the MLS gaskets and you should NOT use a copper spray on these. INTENSE racing says they do use copper spray. It is difficult sealing the coolant passages with these without a copper spray.
Head Bolts - yields (1x):
FEL-PRO ES 74033 - https://www.amazon.com/dp/B..._US&ref_=as_li_ss_tl
OR
Reusable head studs (1x):
ARP 193-4001 - https://www.amazon.com/dp/B..._US&ref_=as_li_ss_tl
NOTE: Instructions for installing ARP Head Studs - https://tech.arp-bolts.com/...uctions/193-4001.pdf
NOTE: DO NOT USE ARP THREAD SEALANT! INSTEAD USE A PERMATEX ULTRA BLACK GASKET MAKER AND CLEAN HEAD SURFACES WELL
NOTE: Required for head gasket
HEAD STUD SEALANT - DO NOT USE ARP THREAD SEALANT! (1x):
Permatex 82180 - https://www.amazon.com/dp/B..._US&ref_=as_li_ss_tl
NOTE: Be sure not to get ANY on the head deck surface. Clean it off with a rag sprayed with brake cleaner if you do.
NOTE: You can get a different form factor of this, such as one that fits in a caulk gun for ease.
NOTE: How-to video on sealing head studs - https://youtu.be/z4XB0vyGkz...2qJnkff2RlPWB_O&t=26
NOTE: Required for head studs
ARP 7/16"-14 Thread Chaser (1x):
ARP 911-0004 - https://www.amazon.com/dp/B..._US&ref_=as_li_ss_tl
NOTE: For cleaning the old sealant out of the head bolt threads.
NOTE: Do NOT use a tap to clean out your head bolt threads. You can damage/weaken the threads.
NOTE: Required for head bolts/head studs
*Camshaft Bolt - yields (1x):
GM 24501366 - https://www.amazon.com/dp/B..._US&ref_=as_li_ss_tl
OR
https://intense-racing.com/...H-BCM&Category_Code=
OR
https://ebay.us/IpZ2xP
OR
https://zzperformance.com/products/camshaft-bolt
NOTE: ONLY IF CHANGING CAMSHAFT
*Crankshaft / Harmonic balancer Bolt - yields (1x):
GM 24504736 - https://www.amazon.com/dp/B..._US&ref_=as_li_ss_tl
NOTE: This is very involved to swap out; see video here - https://www.youtube.com/wat...kff2RlPWB_O&index=51
NOTE: yields, required for removing the balancer/front cover/timing chain/camshaft/balance shaft
*Rocker Bolts - yields:
Non-reusable kit (3x 5-pack): GM 24503515 - https://ebay.us/T9ErY3
OR
Reusable kit (1x): S23BLTS-12 - https://ebay.us/gRhFwZ
NOTE: Comes with 1.9 Rockers
NOTE: Required if changing camshaft or head gasket or timing chain
High Strength Threadlocker for Rocker Bolts and plastic Lifter Retainers (1x):
Loctite 272 - https://www.amazon.com/dp/B..._US&ref_=as_li_ss_tl
NOTE: Also used for lifter retainer bolts.
NOTE: Required for reusable rocker bolts / 1.9 rockers
*Timing chain
Melling 381A - https://www.amazon.com/dp/B..._US&ref_=as_li_ss_tl
NOTE: Replaced with double roller and no tensioner in build 2, requires deleting balance shaft
*Timing chain tensioner damper - deleted in build 2) (1x):
GM 24503893 - https://www.amazon.com/dp/B..._US&ref_=as_li_ss_tl
NOTE: This is very involved to swap out; see video here - https://www.youtube.com/wat...kff2RlPWB_O&index=51
OR
ZZP 3800 Upgraded Tensioner https://zzperformance.com/p...0-upgraded-tensioner
Extra thick front cover gasket (1x):
ZZP ZZ-FCGG - https://ebay.us/yoYNHs
NOTE: needed for double roller timing chain
or
GM 12587003 - https://www.amazon.com/dp/B..._US&ref_=as_li_ss_tl
NOTE: The GM gasket is not extra thick, not compatible with double roller.
NOTE: Required if changing camshaft, timing chain, or balance shaft deletion
Crankshaft Seal REAR (1x):
National 320691 - https://www.amazon.com/dp/B..._US&ref_=as_li_ss_tl
Crankshaft Seal FRONT (1x):
GM 12582313 - https://www.amazon.com/dp/B..._US&ref_=as_li_ss_tl
NOTE: This is very involved to swap out; see video here - https://www.youtube.com/wat...kff2RlPWB_O&index=51
Fuel injector o-ring pack (1x):
Dorman 90100 - https://www.amazon.com/dp/B..._US&ref_=as_li_ss_tl
NOTE: These may not be required, but you always need a spare or two. The factory o-rings with these DEKA injectors seem slightly undersized for some applications. Use the thick brown o-rings from the pack.
Intake/Exhaust Valve Stem Seals (1x set of 12):
FEL-PRO SS 72144 - https://www.amazon.com/dp/B..._US&ref_=as_li_ss_tl
Water Pump (1x):
US MOTOR WORKS US5075 - https://www.amazon.com/dp/B..._US&ref_=as_li_ss_tl
or
Electric Water Pump (1x):
Meziere WP140 - https://ebay.us/qajFeQ
Aluminum Water Pump Gasket (1x):
Fel-Pro 35804 - https://www.amazon.com/dp/B..._US&ref_=as_li_ss_tl
NOTE: Required for Water Pump
Thread Sealant for bolts going in to water/oil jackets (1x):
Permatex 80632 - https://www.amazon.com/dp/B..._US&ref_=as_li_ss_tl
NOTE: Required for water pump, front cover gasket, timing chain, camshaft, timing chain tensioner, lower intake manifold, etc.
-----
FieroAustin
1988 GT 3800sc Series III E85 Intercooled 2.56" Pulley
Amazon Recommendation Store for 3800s/Fieros/Tools https://amzn.to/3hNViaa
3800sc Instructions http://www.fiero.nl/forum/Forum2/HTML/139530.html
3800sc Instructions MOBILE https://drive.google.com/fi...JzC-2ZzbvLYMYE3QbmVq
eBay Recommendation Store http://ebay.us/hdJWbh
Donate to me https://paypal.me/FieroAustin
YouTube https://www.youtube.com/fie...n?sub_confirmation=1
Join YouTube membership https://www.youtube.com/FieroAustin/join
Join Facebook Group https://www.facebook.com/be...pporter/FieroAustin/
Consulting on Facebook https://www.facebook.com/FieroAustin/[This message has been edited by AustinH (edited 12-14-2025).]
|
|
|
|
bulldog85043
|
NOV 12, 05:05 PM
|
|
|
I have my engine (3800 SC) out of a 2002 Grand Prix 40th Ann. so I'll be watching VERY close for those vids... [This message has been edited by bulldog85043 (edited 11-12-2017).]
|
|
|
|
AustinH
|
NOV 20, 01:20 PM
|
|
BUILD 2: A COMPLETE PARTS LIST FOR AN ALL-OUT SERIES III 3800 SUPERCHARGED BUILD (build 1 also needed if you are doing a Fiero swap)
THIS BUILD IS IN ADDITION TO BUILD 1, MEANING YOU MUST ORDER ALL OF BUILD 1 PARTS TOO, UNLESS SPECIFICALLY MARKED OTHERWISE
CLICK TO VIEW MOST OF BUILD 2 ON AMAZON
CLICK HERE TO VIEW MY EBAY STOREFRONT WITH LISTS OF MANY OF THESE PARTS
CLICK HERE FOR A PRICING GUIDE AND A CUSTOMIZABLE BUILD SHEET (maintained infrequently)
NOTE: THIS BUILD IS TO MAXIMIZE THE POWER OF YOUR M90 3800 AT A HIGH RPM WITH THE ZZP XPZ CAMSHAFT. CONSIDER DOING YOUR OWN RESEARCH INTO A LOWER RPM CAMSHAFT/VALVETRAIN AND AVOID A TIMING CHAIN/BALANCE SHAFT REMOVAL AND MACHINING CYLINDER HEAD VALVE GUIDES. MAYBE ONLY PUT 1.9 RATIO ROCKERS ON WITH A STOCK CAMSHAFT, OR TRY A ZZP VS OR XP CAMSHAFT FOR GOOD PERFORMANCE GAINS WITH MINIMAL EFFORT.
NOTE: IF YOU REMOVE YOUR CRANKSHAFT, TIMING CHAIN, CRANK POSITION SENSOR, AND/OR CAMSHAFT, YOU MAY NEED TO PERFORM A CRANKSHAFT POSITION LEARN IN THE TUNE. SEE THIS VIDEO: https://www.youtube.com/wat...kff2RlPWB_O&index=35
NOTE: THIS BUILD IS MATCHED FOR A ZZP XPZ CAMSHAFT. NOTES INDICATE WHAT PARTS ARE REQUIRED FOR THIS CAMSHAFT.
NOTE: IF YOU INSTALL A NEW CAMSHAFT, LIFTERS, ROCKERS, BEARINGS, RODS, RINGS, OR PISTONS, ETC., YOU MUST BREAK-IN YOUR ENGINE. USE BREAK-IN OIL ADDITIVE AND DO NOT REV YOUR CAR MORE THAN ~4,000 RPM FOR THE FIRST ~1,500 MILES!
NOTE: THIS BUILD ASSUMES YOU DELETE the balance shaft/tensioner spring/balance shaft gear (to fit the double roller timing chain), detailed here: https://www.youtube.com/wat...kff2RlPWB_O&index=51
This list assumes you buy a Series II engine and convert to a Series III supercharger. It would be easier to buy a Series III to begin with.
-----GEN 3 to GEN 5 SUPERCHARGER SWAPPING AND NA TO SUPERCHARGER TOP SWAPPING-----
NOTE: This build assumes you perform a gen 3 to gen 5 supercharger upgrade below. These are other independent guides for doing the same thing.
Excellent Gen 3 to Gen 5 Supercharger Upgrade Guide:
http://www.grandprixforums....en-five-gen-5-a.html or if that link is dead https://drive.google.com/fi...LTZ54du8bvbQeNHYjx0L
Another Gen 3 to Gen 5 Supercharger Upgrade Guide:
https://www.instructables.c...n-V-M90-Swap-on-L67/
ZZP's 3800 NA to Gen 3 supercharger installation instructions:
http://s3.amazonaws.com/zzp...rger+Kit+Install.pdf
NOTE: This is highly not recommended for higher power builds. This will blow up around 375whp instantly, and possibly with lower power over time due to the connecting rods not being as strong. The reason people do this is to raise compression from 8.5 (supercharged) to 9.4 (NA) which will get you more power, but unfortunately the connecting rods are weaker on a stock NA. Instead use reconditioned supercharged connecting rods and other higher compression pistons to achieve the same thing reliably.
THE LIST:
The numbers in (x) are the quantity of parts you need to order.
-----Air-----
For turbo guys, check these out:
Intake manifold from a 1995-1998 Camaro/Firebird (1x): GM 24505489(?) - https://ebay.us/247eyG or GM 24505487 - https://ebay.us/kmUCH3 or GM 24504806 - https://ebay.us/rBlksV
NOTE: It would be difficult to use a 99-02 Camaro/Firebird intake (GM 24505923 / GM 24505921) because it is drive by wire and the inlet is angled in a poor direction.
Intake Manifold Gasket (1x): Apex AMS3600 - https://www.amazon.com/dp/B..._US&ref_=as_li_ss_tl
Turbo Camshaft (1x): https://zzperformance.com/p..._sid=4b3e1dde6&_ss=r
Turbo kits - https://zzperformance.com/c...800-turbo-parts-kits
Everything else below this line is supercharged and much can work with a turbo setup.
Optional: Series III/GENV Supercharger from a 2004+ Pontiac Grand Prix GTP (upgrading from Series II / Gen 3) (1x):
GM 89017286 ; 89018119 ; 89017832 - https://ebay.us/iv2BaG or https://ebay.us/8KItxF or https://ebay.us/biozfL or https://ebay.us/ZXRG1n
or
Get at junkyard or buy a Series III engine -
https://www.car-part .com/cg...serIntSelect=1145748
NOTE: See thread with pictures of differences between gen 3 and gen 5 here - https://www.grandprixforums...en-five-gen-5-a.html or if that link is dead, here - https://drive.google.com/fi...LTZ54du8bvbQeNHYjx0L
Optional: Series III/GENV Intake Manifold (1x):
GM 12603871 ; 12594428 ; 12574837 ; 12574839 - https://www.amazon.com/dp/B..._US&ref_=as_li_ss_tl
or
https://ebay.us/gVKjhJ or https://ebay.us/GVnWCu or https://ebay.us/jwekO7 or https://ebay.us/PP5tzT
or
Junkyard - https://www.car-part .com/cg...serIntSelect=1145748
NOTE: Alternatively, it may be is possible to mill out and machine a Series II/Gen3 intake manifold: GM 24505729; 24503726 or DORMAN 615-281 - https://ebay.us/NTyn9O or https://ebay.us/BgbBrx or https://ebay.us/zEMB4a
NOTE: Only needed if upgrading from series II/Gen3 to series III/GenV
Series III/GENV Supercharger Upper Intake Manifold Plenum Gasket Set (reusable) (1x):
Apex AMS3735 - https://www.amazon.com/dp/B..._US&ref_=as_li_ss_tl
OR
Series II / Gen3 Upper Intake Manifold Plenum Gasket Set (1x):
FEL-PRO MS95744 - https://www.amazon.com/dp/B..._US&ref_=as_li_ss_tl
NOTE: Required for Intake Manifold Gaskets
NOTE: The ZZP Phenolic Spacer and interooler kits each come with 2 garlock gaskets included, so this is not necessary if you order that. Extra ZZP Garlocks available here: https://zzperformance.com/p..._sid=ecdfe73d9&_ss=r
DUPLICATES BUILD 1
Northstar throttle body from a Year 2000+ Cadillac DeVille/Seville (1x):
GM 12560099 - https://ebay.us/P7GwMw
or
Junkyard - https://www.car-part.com/cg...userIntSelect=679348
NOTE: Only needed if upgrading from series II/Gen 3 to series III/Gen 5 Supercharger
Northstar Throttle Body Adapter Plate (1x):
Gen 3 Supercharger - https://ebay.us/kHPJFk
Gen 5 Supercharger - https://ebay.us/Css3nf
NOTE: ZZP sells a whole kit including MAF and NorthStar throttle body.
Northstar Throttle Cable Bracket Adapter (1x):
ZZ-NSCB - https://zzperformance.com/p...rottle-cable-bracket
NOTE: I had to slot the holes on this adapter bracket to get it to fit.
Cable stop end for Northstar throttle/cruise cable (1x):
Dorman 03336 - https://www.amazon.com/dp/B..._US&ref_=as_li_ss_tl
LQ4 MAF from a 2000 6.0L Chevrolet Silverado 2500 (1x):
Delphi AF10043 - https://www.amazon.com/dp/B..._US&ref_=as_li_ss_tl
MAF/IAT Connector Adapter for LQ4 MAF (1x):
https://zzperformance.com/p...riant=12623053619311
NOTE: Optional depending on setup and harness. James L. Brown can probably put the correct connector on depending on your needs. Length needs to be extended on some applications, especially LQ4 MAF/IAT and Northstar Throttle Body
1998-2002 Computer (ECU/PCM) (1x):
GM 09357440 - https://www.amazon.com/dp/B..._US&ref_=as_li_ss_tl
or
https://ebay.us/YRzXat
or
Junkyard Search
NOTE: Only if you don't have one from the donor car, get at junkyard for $25 from ideally a 1998-2002 Grand Prix GTP.
DUPLICATES BUILD 1
*Intake Manifold Gasket Set (1x):
ACDelco 89017825 - https://www.amazon.com/dp/B..._US&ref_=as_li_ss_tl
DUPLICATES BUILD 1
Grey Gasket Maker (1x):
Permatex 85144 - https://www.amazon.com/dp/B..._US&ref_=as_li_ss_tl
NOTE: Use this on intake manifold gasket lifter valley seal corners AND on throttle body.
DUPLICATES BUILD 1
Optional: Longer Supercharger Bolts for upgrading from Series II / Gen 3 to a Series III / Gen 5 (1x of each):
Re-use all GEN 3 Supercharger bolts, but in addition:
M8x1.25x120mm bolt (1x): https://www.amazon.com/dp/B..._US&ref_=as_li_ss_tl
M8x1.25x140mm bolt (1x): uxcell A17110600ux0679 - https://www.amazon.com/dp/B..._US&ref_=as_li_ss_tl
OR
M8x1.25 Threaded Rod (1x 2-pack): https://www.amazon.com/dp/B..._US&ref_=as_li_ss_tl
M8x1.25 Nuts (1x 5-pack): Eastlo IN10050106-25 - https://www.amazon.com/dp/B..._US&ref_=as_li_ss_tl
NOTE: See supercharger upgrade instructions in Assembly Diagrams section - https://www.fiero.nl/forum/.../HTML/139530.html#p9
NOTE: Longer Bolts are included with intercooler and phenolic spacer kits, so you would not need these bolts.
Optional: 2.8" Supercharger Pulley (1x):
ZZPerformance 2.8 MPS - https://ebay.us/HxwDF4
NOTE: ZZP only guarantees a 2.8" pulley fits on all superchargers, but it is possible to go smaller in some cases (2.7, etc.) without machining.
NOTE: The smallest pulley ZZP offers is a 2.55" pulley after machining down the snout (see below): https://ebay.us/CXKc45
NOTE: If you go below 2.8", it is required to machine down the supercharger snout with a machining tool here: https://ebay.us/URtLzN. INTENSE Racing suggests this is pointless, as smaller pulleys beyond this point make exponentially increased temperature from compressed air.
NOTE: Instead of a smaller than a 2.8" supercharger pulley, consider a 5% overdrive balancer pulley detailed in later in this post. Dayco PBO81461SC5 (1x): https://www.amazon.com/dp/B..._US&ref_=as_li_ss_tl
REPLACES BUILD 1
Optional 1" ZZP Phenolic Spacer (1x):
Gen 5 Supercharger - https://zzperformance.com/p.../m90-phenolic-spacer
OR
Gen 3 Supercharger https://zzperformance.com/p...riant=12623054930031
NOTE: NOT COMPATIBLE WITH INTERCOOLER (unless you want to punch a big hole in your decklid), instead opt for a 1/4" phenolic spacers if you intercool
NOTE: You will need around a 1.5" longer supercharger belt to support https://www.rockauto.com/en...h/?partnum=6k6%2A%2A
-----Intercooling-----
Note: See install video here: https://www.youtube.com/wat...kff2RlPWB_O&index=75
NOTE: See other sections for redundant wire, wiring tools, hose clamps, fuel injector o-rings, custom fuel rails (required), NPT Tap set, gray gasket maker, antifreeze, spade connectors, tools, etc. OR see video description or amazon list:
CLICK HERE TO SEE INTERCOOLING LIST ON AMAZON
NOTE: IN ADDITION TO THIS SECTION, YOU NEED CUSTOM FUEL RAILS. SEE "Fuel rails, hoses, regulator, and fittings" SECTION OF build 2
Optional: Intercooler Kit (1x):
ZZP Stage 2.5:
Gen 5 supercharger - https://ebay.us/HWxShY
Gen 3 supercharger - https://ebay.us/KNkzse
OR
ZZP Short Stack:
Gen 5 supercharger - https://ebay.us/avvZgM
Gen 3 supercharger - https://ebay.us/dtriFM
NOTE: You will need around a 2.5" longer supercharger belt to support a full stack and a 1.5" longer belt to support a short stack https://www.rockauto.com/en...h/?partnum=6k6%2A%2A
NOTE: Full stack will need cutting into decklid to fit supercharger snout, pairs nicely with a 1/4" phenolic spacer
NOTE: Dual pass heat exchanger puts the hoses on the same side which worked for me. I do not know if it would cool any better.
NOTE: Allegedly the heater core from the stage 2.5 ZZP intercooler is from a 91-94 Ford Probe, if you need a replacement: OSC 98064 - https://www.amazon.com//dp/..._US&ref_=as_li_ss_tl
NOTE: The heat exchanger in these intercooler kits WORK WELL FOR GT AERO NOSE FIEROS ONLY IF YOU MOUNT IT UNDER THE FRONT BUMPER. See heat exchangers below that will fit the non-GT (coupe/SE/2m4) nose:
24" Single Pass non-GT front mount heat exchanger (1x): https://ebay.us/V05ar1 (single pass)
24" Dual Pass non-GT front mount heat exchanger (1x): https://ebay.us/qxlte1
Optional: 1/4" Phenolic Spacer under intercooler (1x):
Gen 5 - https://zzperformance.com/p...riant=12623054995567
Gen 3 - https://zzperformance.com/p...riant=12623054864495
NOTE: Comes with two Garlock laser cut gaskets. I do not like these. For Gen 5, Instead, consider optionally getting two more Upper Intake Manifold Plenum Gaskets (above) for a total of 3: Apex AMS3735 (2x): https://www.amazon.com/dp/B..._US&ref_=as_li_ss_tl
NOTE: In order to maintain enough thread engagement. you may need some ~1/4"+ longer bolts than what is included in the 2.5" supercharger kit. The longest 2 bolts included in the ZZP kit are absolutely too short for the 1/4" spacer. Instead, opt for a M8x1.25 threaded rod, and cut it to about 190-195mm and put a nut on the top. Install the nut before cutting so you can run the nut over the cut threads to re-shape them, or just re-tap or file down the threads after cutting:
M8x1.25 Threaded Rod (1x 2-pack): https://www.amazon.com/dp/B..._US&ref_=as_li_ss_tl
M8x1.25 Nuts (1x 5-pack): Eastlo IN10050106-25 - https://www.amazon.com/dp/B..._US&ref_=as_li_ss_tl
M8x1.25x110 Bolts (7x / 2x 5-pack): uxcell a18082900ux0928 - https://www.amazon.com/dp/B..._US&ref_=as_li_ss_tl
Intercooler Coolant Filler Neck 1" (3/4" ID) inlet/outlet (1x):
https://ebay.us/TTzHME
OR
https://zzperformance.com/c...intercooler-fill-kit (cheaper, plastic)
NOTE: You really need this for the pressure cap for pressure relief.
NOTE: Plug the overflow vent nipple.
1" (3/4" ID) Heater Hose for Intercooler (30 FT+):
Gates 28412 - https://www.amazon.com/dp/B..._US&ref_=as_li_ss_tl
NOTE: The intercooler KIT sold by ZZP above already comes with one 10' length, but that is not enough for a Fiero if you are mounting the intercooler radiator in front of the regular radiator. Cut the 30' hose into two 15' lengths.
1" (3/4" ID) molded rubber hose 90° elbow (2x):
DAYCO 80411 - https://www.amazon.com/dp/B..._US&ref_=as_li_ss_tl
1" (3/4" ID) barb fitting (1x):
Sharkbite UC020LFA - https://www.amazon.com/dp/B..._US&ref_=as_li_ss_tl
NOTE: For joining the molded rubber hose elbow above with the 30ft+ heater hose.
1/2" NPT to 1" (3/4" ID) Nipple 90° Elbows for intercooler radiator (2x):
Value Brands 6AFK0 https://www.amazon.com/dp/B..._US&ref_=as_li_ss_tl
NOTE: For neatly making a right angle into intercooler radiator
45° 4" Intake Hose (1x):
Ucreative U-SH-45-102-TZ - https://www.amazon.com/dp/B..._US&ref_=as_li_ss_tl
NOTE: For relocating LQ4 MAF so it doesn't contact the rear decklid with a Northstar throttle body setup.
DUPLICATES BUILD 1
Optional: Intake Air Temperature Sensor relocation post-supercharger (1x):
Standard Motor Products AX1 - https://www.amazon.com/dp/B..._US&ref_=as_li_ss_tl
Optional: 37/64 Drill bit for relocating Intake Air Temperature Sensor relocation post-supercharger (1x):
Drill America KFDRSD37/64 - https://www.amazon.com/dp/B..._US&ref_=as_li_ss_tl (or a 9/16 can work)
NOTE: You can drill and tap your intake manifold with a 3/8" NPT tap to stick this sensor inside after the supercharger for more accurate intake air temperature readings for tuning purposes. This sensor should plug right in to your existing harness. See build 1 or below for a NPT tap set.
Intake Air Temperature (IAT) Sensor extension cable (1x):
https://zzperformance.com/p...t-exten&_ss=e&_v=1.0
NOTE: For relocating intake air temperature sensor into the lower intake manifold after the supercharger. May not be necessary depending on where you relocate it to and how long your harness is.
Intercooler Pump Relay (1x):
https://www.amazon.com/dp/B..._US&ref_=as_li_ss_tl
NOTE: Redundant with fuel pump relays.
DUPLICATES BUILD 1
SPST Toggle Switch (1x):
mxuteuk B07QGDDTWJ - https://www.amazon.com/dp/B..._US&ref_=as_li_ss_tl
In-line 20A fuse holders (2x):
Bussmann BP/HHG - https://www.amazon.com/dp/B..._US&ref_=as_li_ss_tl
10A Fuses (1x Assortment):
https://www.amazon.com/dp/B..._US&ref_=as_li_ss_tl
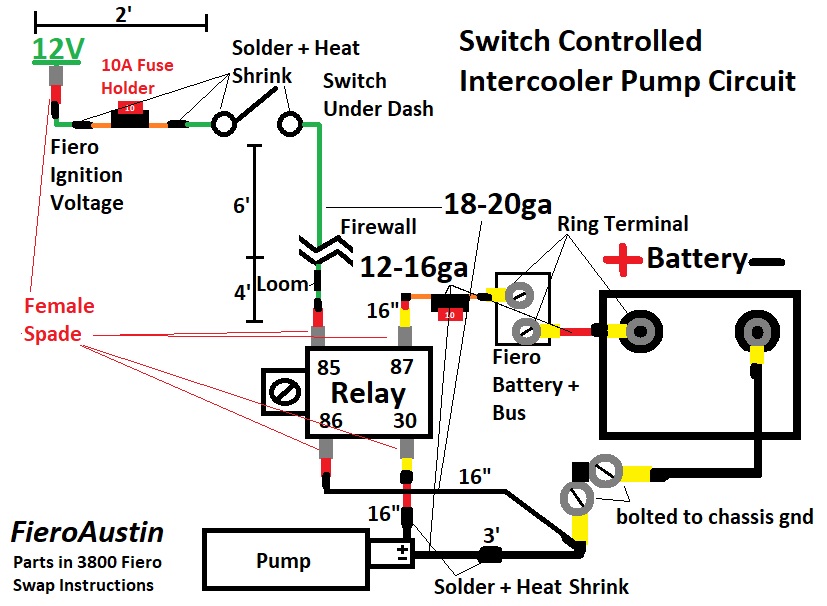
Note: See install video here: https://www.youtube.com/wat...kff2RlPWB_O&index=75
Wire, Crimps, etc.:
See "Wiring Tools" subsection in Fuel section below.
Optional: Decklid Strut Kit (Passenger's ONLY) (1x): http://rodneydickman.com/pr....php?products_id=113
NOTE: Decklid shock kits ONLY if you removed torsion bars
NOTE: The driver's side decklid strut kit would interfere with the supercharger with the extra intercooler height. Instead opt for the hinge mounted decklid strut kits and shorter shocks below
Optional: Hinge mounted decklid strut kit (2x):
http://rodneydickman.com/pr....php?products_id=439
NOTE: ONLY for removed torsion bars. Double up these kits on both sides and used the old torsion bar bolt hole (M6x1x10 bolt) with a shorter shock. You flip them mounts upside down for more clearance if needed. See video https://youtu.be/fONskBO6BZ...Jnkff2RlPWB_O&t=1162
Optional: Extra short, stiffer shock (6.42" compressed/10.0" extended, 83lbs force) for hinge mounted decklid strut (2x):
Sachs/Stabilus 5b-990659/SG459022/95610/753329/F95610/5GS0080LBS/4061/6916 - https://www.amazon.com/dp/B..._US&ref_=as_li_ss_tl
NOTE: Here are some more slightly longer and lighter force shocks if needed: 5B-3345XD (6.969" compressed/10.472" extended, 65lbs force); 5B-3658XP (7.008" compressed/11.22 extended, 67lbs force)
Alignment Roll/Tension Pin Set (1x):
Glarks B09WYDZNZD - https://www.amazon.com/dp/B..._US&ref_=as_li_ss_tl
-----Plugging throttle body/intake manifold heater/coolant holes/EVAP/EGR on a Gen V supercharger (Check local laws)-----
NOTE: CHECK LOCAL LAWS BEFORE REMOVING THESE SYSTEMS.
NOTE: See modification here - https://youtu.be/fONskBO6BZ...qJnkff2RlPWB_O
NOTE: For EGR, JBWeld a dime in the intake manifold hole, and welded the exhaust header hole shut (check local laws)
NOTE: If you run an intercooler, it is required to block off the coolant ports that go to the throttle body, since the intercooler does not have holes drilled.
Freeze plug kit (1x):
Dorman 557-001 - https://www.amazon.com/dp/B..._US&ref_=as_li_ss_tl
NOTE: 1/2" plug with JB Weld for EVAP Delete (check local laws)
NOTE: 2x 1/4" NPT used for plugging lower intake manifold throttle body coolant ports
NOTE: 1x 1/4" NPT could be used for plugging intercooler EGR port (check local laws) in the intercooler. Not large enough to seal in intake; consider 3/8 NPT instead.
NOTE: use NPT thread tape on these.
NOTE: Plugging throttle body coolant holes is REQUIRED for intercooling.
NPT tap set (1x):
Drill America POUCSNPT5 - https://www.amazon.com/dp/B..._US&ref_=as_li_ss_tl
DUPLICATES BUILD 1
NPT Thread Tape (1x):
https://www.amazon.com/dp/B..._US&ref_=as_li_ss_tl
7/16" Drill bit (1x):
DEWALT DW1128 - https://www.amazon.com/dp/B..._US&ref_=as_li_ss_tl
NOTE: For 1/4" NPT Plugs
Cooling Circuit Bypass Gasket (1x):
MAHLE Original C31274 - https://www.amazon.com/dp/B..._US&ref_=as_li_ss_tl
-----Fuel & E85 (Ethanol) Conversion-----
NOTE: See install video here: https://www.youtube.com/wat...IM_4I2qJnkff2RlPWB_O
NOTE: See most of this E85 conversion available on amazon: https://www.amazon.com/shop..._US&ref_=as_li_ss_tl
Injectors (6x or 1x 6-pack):
Series 2 - Siemens DEKA EV1 80# Injectors - 110324 / FI-114992 - https://ebay.us/l9m9cz
OR
Series 3 - Siemens DEKA EV6 80# Injectors - 109991 / FI114991 - https://ebay.us/VpmTj1
NOTE: DO NOT BUY CHEAP INJECTORS ON EBAY OR AMAZON, THEY'RE FAKES. You can tell by the DEKA words on the injection molding; fakes do not have DEKA on them. If it is not around $50 per injector, it is probably a fake.
NOTE: Series III harnesses came with EV6 connectors and Series II harnesses came with EV1 connectors. Your harness provider should be able to put whichever connector on. If you end up with the wrong connectors, it is possible to get an adapter, but it will look messy (6x): https://zzperformance.com/p...riant=12623051948143
NOTE: Even if you do not use E85, you still need bigger injectors. 60# injectors would work, but it is easy to max them out on these engines. Avoid 160# injectors - they will be difficult to get to idle properly. 80# is a perfect sweet spot for the ultimate 3800sc build.
Fuel injector o-ring pack (1x):
Dorman 90100 - https://www.amazon.com/dp/B..._US&ref_=as_li_ss_tl
NOTE: These may not be required, but you always need a spare or two. The factory o-rings with these DEKA injectors seem slightly undersized for some applications. Use the thick brown o-rings from the pack.
DUPLICATES BUILD 1
Stainless Steel Fuel Sender Unit (1x):
https://www.fierostore.com/.../Detail.aspx?s=60912
NOTE: The factory sender unit reacts with ethanol and turns black and creates a corrosion layer that can come off and clog injectors. It is probably Zinc coated which is not compatible with ethanol fuel.
Optional: Ethanol Test Kit (1x):
REV X ST0501 - https://www.amazon.com/dp/B..._US&ref_=as_li_ss_tl
NOTE: When tuning, be sure to only tune for E85 (83% ethanol) so that it runs rich when "E85" sold at gas stations can legally be as low as E53.
Optional: Gauge Pod for Air to Fuel Gauge (Wideband O2) (1x):
Autometer 20100 Dual - https://www.amazon.com/dp/B..._US&ref_=as_li_ss_tl
OR
Autometer 20102 Single - https://www.amazon.com/dp/B..._US&ref_=as_li_ss_tl
NOTE: See exhaust section in this post for AFR/Wideband O2 sensor.
NOTE: See install video https://www.youtube.com/wat...IM_4I2qJnkff2RlPWB_O
Optional: 3M Dual Lock 400 Velcro for Guage Pod (1x):
3M 688295157014 - https://www.amazon.com/dp/B..._US&ref_=as_li_ss_tl
-----Fuel rails, hoses, regulator, and fittings-----
NOTE: See build 1 fuel diagram and parts. The difference below is adding custom fuel rails and a fuel pressure regulator.
NOTE: The stock Fuel rails will have a hard time keeping up with high power fuel demand. This fuel rail system completely overhauls the stock 3800 fuel rail system.
NOTE: Check out how to modify Series III/Gen 5 rails for a Series II/Gen 3 - https://www.gmtuners.com/fiero/returnless.htm
Optional: You can get a custom fuel hose system made by Larry Curchoe instead of some of the below setup. https://www.facebook.com/larry.curchoe
Return Style Custom Fuel Rails (1x):
ZZPerformance Series II Return Style Fuel Rails - https://ebay.us/ykY2Ph
OR
Aeromotive 14131 - https://www.amazon.com/dp/B..._US&ref_=as_li_ss_tl
or
https://ebay.us/6WBzmP
NOTE: Consider converting back to a Return style fuel system if you have a Series III engine. Prevents cavitation and you can run lower pressure.
NOTE: These are REQUIRED for intercooling.
NOTE: The Aeromotive fuel rails require more fitting adapters and would be a lot more expensive as a result.
Adjustable Fuel Pressure Regulator, 400lph, 35-70psi (1x):
EVIL ENERGY KT01568BA-AMZ1 - https://www.amazon.com/dp/B..._US&ref_=as_li_ss_tl
NOTE: Stock supercharged injectors are 33# (some say 36#) and are regulated to ~55PSI. Refer to your injector's manufacturer manual for proper regulator pressure. Siemens Deka 80 are 80# at 43.5 PSI.
NOTE: See install video here: https://www.youtube.com/wat...IM_4I2qJnkff2RlPWB_O
-----Wiring Tools-----
Butt wire strippers/crimpers (1x):
IRWIN 2078309 - https://www.amazon.com/dp/B..._US&ref_=as_li_ss_tl
Wire stripper (1x):
Klein Tools 11063W - https://www.amazon.com/dp/B..._US&ref_=as_li_ss_tl
B type wire crimpers (1x):
Delphi Packard WHP T-11 - https://www.amazon.com/dp/B..._US&ref_=as_li_ss_tl
NOTE: This can NOT do 10ga wire insulation crimps. Instead of buying a $300 crimper, consider crimping with pliers or a vise instead.
Pin Removal Tool Kit (1x):
Kikerike TRTK - https://www.amazon.com/dp/B..._US&ref_=as_li_ss_tl
Soldering Station (1x):
YIHUA 8786D - https://www.amazon.com/dp/B..._US&ref_=as_li_ss_tl
-----Pump and wiring-----
NOTE: This wiring should be able to conduct 28 amps.
NOTE: SEE DIAGRAM BELOW FOR CORRESPONDING NUMBERS
0 - AEM 340LPH Ethanol fuel pump (1x):
AEM 340lph 50-1200 - https://www.amazon.com/dp/B..._US&ref_=as_li_ss_tl
NOTE: This fuel pump should draw no more than 16 amps worst case.
OR
Quantum QFS-343FT-1016 (quieter) - https://www.amazon.com/dp/B..._US&ref_=as_li_ss_tl
OR
Deatschwerks DW300 9-301-1000 - https://www.amazon.com/dp/B..._US&ref_=as_li_ss_tl
NOTE: Allegedly years ago Dark Horizon and Justin Bart went through a ton of pumps that were failing quickly. Deatschwerks are the only ones that held up. Unsure what all they tested.
REPLACES BUILD 1
1 - Fuel Pump Connector w/10ga Pins (1x):
Racetronix RCS-045 - https://www.racetronix.biz/...s-lg-12-10ga/rcs-045
or
DeatschWerks FPHWK - https://www.amazon.com/dp/B..._US&ref_=as_li_ss_tl
NOTE: This can NOT do 10ga wire insulation crimps. Instead of buying a $300 crimper, consider crimping with pliers or a vise instead.
2 - 14ga Red Teflon Wire (2x10ft):
Racetronix WR-FEP-14-2 - https://www.racetronix.biz/...600v-red/wr-fep-14-2
3 - 14ga Black Teflon Wire (1x10ft):
Racetronix WR-FEP-14-0 - https://www.racetronix.biz/...0v-black/wr-fep-14-0
4 - 14ga (or smaller) Blue Teflon Wire (1x10ft):
Racetronix WR-FEP-14-6 - https://www.racetronix.biz/...00v-blue/wr-fep-14-6
5 - Crimp connectors (heat shrink) (1x):
Kuject HST320CA - https://www.amazon.com/dp/B..._US&ref_=as_li_ss_tl
6 - Vapor-side Connector Set, MP150 4F, ITWH (1x):
Racetronix RCS-061 - https://www.racetronix.biz/...h-vapor-side/rcs-061
NOTE: You can re-use the Fiero connector but you would need an extra pin.
7 - FS Bulkhead Connector Assembly 4-way (1x):
Racetronix BCA-4W - https://www.racetronix.biz/...ssembly-4-way/bca-4w
or
ATL CFD-504 - https://www.amazon.com/dp/B..._US&ref_=as_li_ss_tl
NOTE: This alternative bulkhead connector here is not included in the wiring diagram. You can fit some two 12ga wires through it, eliminating the need to run two sets of two smaller wires.
8 - Connector Set, MP150.2 4F (TPS/BCWA) (1x):
Racetronix RCS-058 - https://www.racetronix.biz/...-4f-tps-bcwa/rcs-058
or
Michigan Motorsports 65400 - https://www.amazon.com/dp/B..._US&ref_=as_li_ss_tl
9 - Fuel tank lock ring and seal (1x):
Dorman 579-001 - https://www.amazon.com/dp/B..._US&ref_=as_li_ss_tl
DUPLICATES BUILD 1
10 - 12ga Teflon black wire (3x 5ft):
Racetronix WR-FEP-12-0 - https://www.racetronix.biz/...0v-black/wr-fep-12-0
or
GPW B008NC36HQ - https://www.amazon.com/dp/B..._US&ref_=as_li_ss_tl
11 -
Wire loom 3/8" (13ft): GS Power SL3-8L50 - https://www.amazon.com/dp/B..._US&ref_=as_li_ss_tl
Electrical Tape (1x): SoundOriginal SOGN-ET 19052601 - https://www.amazon.com/dp/B..._US&ref_=as_li_ss_tl
12/13 -
4-way Weatherpack connector set and pins (1x):
Fastronix 401-104 - https://www.amazon.com/dp/B..._US&ref_=as_li_ss_tl
OR
6-way Weatherpack connector set and pins (1x):
Fastronix 401-106 - https://www.amazon.com/dp/B..._US&ref_=as_li_ss_tl
14 - 15A Fuse (1x):
https://www.amazon.com/dp/B..._US&ref_=as_li_ss_tl
15 - Fuel Pump Relay and 10ga Pins (1x):
https://www.amazon.com/dp/B..._US&ref_=as_li_ss_tl
NOTE: THIS SHOULD ALREADY BE INCLUDED IN YOUR WIRING HARNESS IF YOU BOUGHT IT. IF IT IS, YOU WILL INSTEAD NEED NEW PINS BELOW
DUPLICATES BUILD 1
Optional: Extra 10ga relay pins (1x):
Delphi Packard 12033997 - https://www.amazon.com/dp/B..._US&ref_=as_li_ss_tl
NOTE: The insulation crimps on these pins are 10ga. The T-11 style crimpers will NOT crimp these. Consider crimping manually.
16 - In-line 20A fuse holders (1x):
Bussmann BP/HHG - https://www.amazon.com/dp/B..._US&ref_=as_li_ss_tl
DUPLICATES BUILD 1

NOTE: See install video here: https://www.youtube.com/wat...IM_4I2qJnkff2RlPWB_O
-----Spark-----
Optional: Spark Plugs (6x / 2x 4-pack):
Autolite AR103 - https://www.amazon.com/dp/B..._US&ref_=as_li_ss_tl
or
https://ebay.us/tdGQl5
Note: last longer and burn better (according to marketing) probably to further eliminate KR and hot spots in the ignition chamber. Have a back cut electrode. They are 3 ranges cooler than stock plugs (Autolite 606). Gap to .035” to .040”.
REPLACES BUILD 1
-----Exhaust (ENTIRELY REPLACES BUILD 1 EXHAUST)-----
NOTE: This exhaust is not equal length. It does not sound like a professional exhaust, but it is practically straight-piped. The muffler is VERY loud, extra bottle mufflers do help it.
SEE DIAGRAM BELOW FOR CORRESPONDING NUMBERS
#1 90° bend 2.5" diameter (1x 2-PACK):
X AUTOHAUX a22111700ux0402 - https://www.amazon.com/dp/B..._US&ref_=as_li_ss_tl
DUPLICATES BUILD 1
#2 Muffler (1x):
Flowmaster 72206 - https://www.amazon.com/dp/B..._US&ref_=as_li_ss_tl
OR
Vibrant 10632 - https://www.amazon.com/dp/B..._US&ref_=as_li_ss_tl
OR
Borla 60714
NOTE: REQUIRES CUTTING OUT BOTTOM SECTION OF TRUNK TO FIT WITH HEADERS! FLOWMASTER ALSO IS 2.5" INLET AND WILL NEED AN ADAPTER
#3 Optional: Mini bottle Mufflers (2x):
TOTALFLOW 6644 - https://www.amazon.com/dp/B..._US&ref_=as_li_ss_tl
NOTE: Get the 4" long muffler with 2.5" dia. 7" long would be very difficult to work with.
#4 Stainless Chinese exhaust headers for a Pontiac Grand Prix GTP (1x):
https://ebay.us/jebzk1
NOTE: REQUIRES CUTTING BOTTOM SECTION OF TRUNK TO FIT! Also, Since the Grand Prix GTP headers will likely not fit out of the box, the cross-over pipe will require cutting and re-welding, and the sensor hole may require welding shut (check local laws).
NOTE: It seems the Chinese have stopped making these headers. You may be able to find them occasionally used, or every expensive ones from ZZP instead. https://zzperformance.com/c...riant=18518733422654
#5 Optional: Exhaust wrap Titanium (1x): -
Design Engineering 010130 (2" by 100' roll) - https://www.amazon.com/dp/B..._US&ref_=as_li_ss_tl
NOTE: Exhaust wrapping the Chinese headers is painful but is a MUST, the exhaust headers get extremely hot, especially in the tight Fiero engine bay. Wear gloves when wrapping and watch the how-to video at https://www.youtube.com/wat...kff2RlPWB_O&index=49
#6 Optional: Stainless Tie bands for exhaust wrap (~30x):
Keadic K150 - https://www.amazon.com/dp/B..._US&ref_=as_li_ss_tl
#7 Exhaust Hanger (1x 2-pack):
Walker 36272 - https://www.amazon.com/dp/B..._US&ref_=as_li_ss_tl
#8 3" v-band flange and clamp (1x):
Blackhorse racing HM0923 / ER2602 - https://www.amazon.com/dp/B..._US&ref_=as_li_ss_tl
Exhaust Tips (2x):
Re-used stock Fiero exhaust tips.
2" exhaust clamp for exhaust headers crossover pipe (1x 2-piece):
EVIL ENERGY ES00424S2.5-2 - https://www.amazon.com/dp/B..._US&ref_=as_li_ss_tl
NOTE: Not shown in diagram; if you order the ZZP headers, then you only need one of these.
Optional: Air to Fuel Ratio Gauge / O2 Sensor (1x):
AEM 30-4110 - https://www.amazon.com/dp/B..._US&ref_=as_li_ss_tl
NOTE: HIGHLY RECOMMENDED FOR TUNING! (REQUIRES TUNING SOFTWARE OR HARDWARE AND CUSTOM WIRING)
NOTE: SEE INSTALL VIDEO https://www.youtube.com/wat...IM_4I2qJnkff2RlPWB_O
Optional: Vortex Cone Exhaust Sound Reducers
2.5" (2x): https://ebay.us/RfCwSa
3" (1x): https://ebay.us/swnJuP
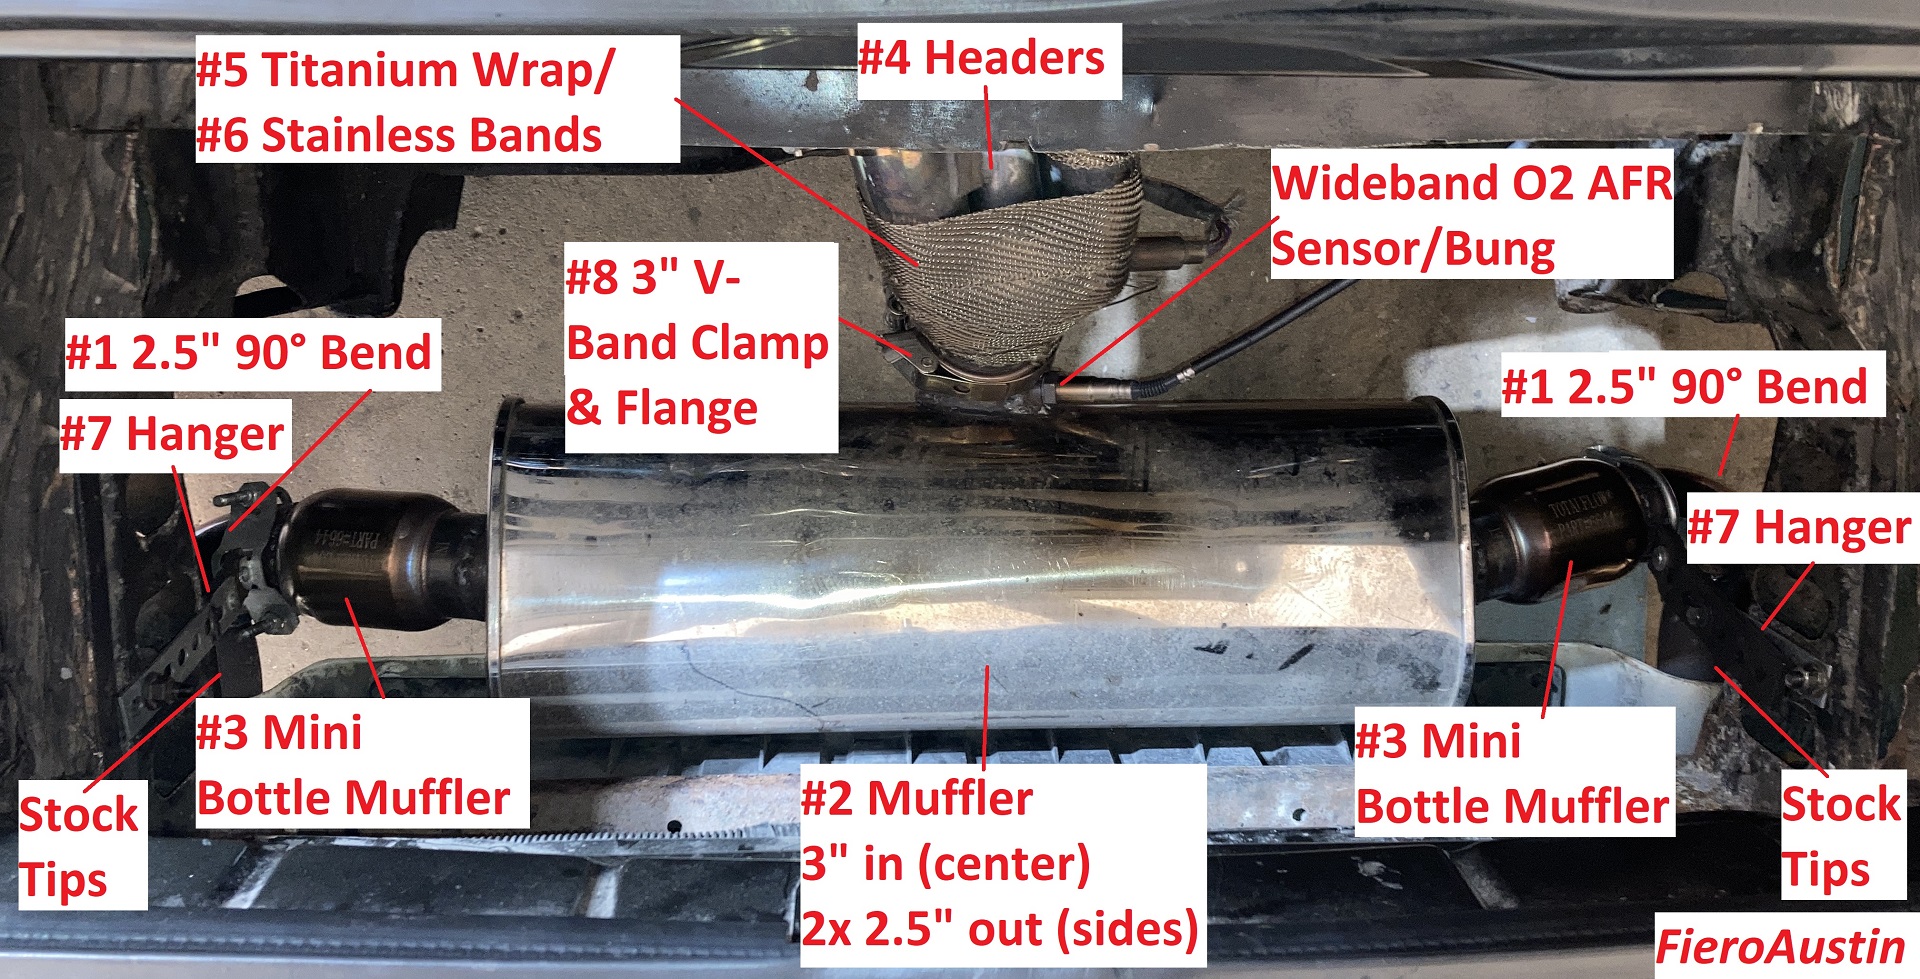
-----Cylinder Heads/Valvetrain/Pushrods/Lifters-----
NOTE: Using Series III heads. Stock Series III valves (1.83") are 0.030" larger in diameter than stock Series II valves (1.80").
NOTE: Cylinder Head Modification and porting: Machining off 0.060" off of intake valve guides and 0.030" off of exhaust valve guides (for 1.65 rockers; for stock 1.6 rockers you could machine off 0.050" intake and 0.010" exhaust valve guides) EXCLUSIVELY MATCHED FOR XPZ CAMSHAFT, valve job, gasket match intake runners, widened exhaust runners (maintain D shape). Head surface was decked. Performed at machine shop. See build 2 assembly video section for instructions on custom porting heads.
MLS Head Gasket, reusable unless heat cycled (1x right/left side):
RHS stock height (1x): Cometic C5721-066 - https://www.amazon.com/dp/B..._US&ref_=as_li_ss_tl
LHS stock height (1x): Cometic C5720-066 - https://www.amazon.com/dp/B..._US&ref_=as_li_ss_tl
OR
RHS stock bore, .04 higher compression/.02" shorter than stock (1x): Cometic C5721-060 - https://www.amazon.com/dp/B..._US&ref_=as_li_ss_tl
LHS stock bore, .04 higher compression/.02" shorter than stock (1x): Cometic C5720-060 - https://www.amazon.com/dp/B..._US&ref_=as_li_ss_tl
OR
See the options available here for shorter, over bore, etc.: INTENSE HGP-0xx - http://www.intense-racing.com/PROD/HGP-0xx.html
NOTE: Pistons should measure out of cylinder hole ~0.025". You want .038"-.046" of quench according to INTENSE racing. For 0.035" quench + 0.025" out of hole = 0.060" thick gasket 0.04 extra compression and slightly more power.
NOTE: The arrow and the "L," or Left-Hand Side (LHS) gasket goes on the cylinder 1/3/5 side of the engine (towards the Fiero firewall, away from the donor car firewall). If you look at the rear cover from the rear of the engine, it goes on the left hand side.
NOTE: Your decks and heads must be perfectly flat and clean to install these MLS gaskets. Consider decking your surfaces, detailed in the Assembly videos section build 2. Otherwise they may leak.
NOTE: MLS should be reusable (unless heat cycled), and is not messy to clean off.
NOTE: Cometic indicated they have black Viton seal coating on the MLS gaskets and you should NOT use a copper spray on these. INTENSE racing and ZZP says they do use copper spray. It is difficult sealing the coolant passages with these without a copper spray. This spray will also be VERY difficult to clean off. Be advised, https://www.amazon.com/dp/B..._US&ref_=as_li_ss_tl
DUPLICATES BUILD 1
NOTE: These may also be sealed with Hylomar, which is a lot easier to clean off with acetone. https://www.amazon.com/dp/B..._US&ref_=as_li_ss_tl
Optional: 1.65 Rockers Arms with reusable rocker bolts (yields) (12x):
ZZP ZZ-165RA - https://ebay.us/AodQ3m
NOTE: MATCHED FOR XPZ CAMSHAFT. ANY HIGHER RATIO ROCKERS ARE NOT EVER RECOMMENDED FOR NON-FACTORY CAMSHAFTS.
NOTE: Consider instead of a camshaft the 1.9 Rockers NOT COMPATIBLE WITH ANY CAMSHAFT!!!! - https://ebay.us/NWDUd8
NOTE: Use with red loctite
*Rocker Bolts - yields:
Non-reusable kit (3x 5-pack): GM 24503515 - https://ebay.us/T9ErY3
OR
Reusable kit (1x): S23BLTS-12 - https://ebay.us/gRhFwZ
NOTE: Comes with 1.9 Rockers
NOTE: Required if changing camshaft or head gasket or timing chain
DUPLICATES BUILD 1
High Strength Threadlocker for Rocker Bolts and plastic Lifter Retainers (1x):
Loctite 272 - https://www.amazon.com/dp/B..._US&ref_=as_li_ss_tl
NOTE: Also used for lifter retainer bolts.
NOTE: Required for reusable rocker bolts / 1.9 rockers
DUPLICATES BUILD 1
Valve Springs 130# @ 0.050” installed height valve springs, 0.600" lift max (12x):
PAC 1218 - comes with 16 - https://www.amazon.com/dp/B..._US&ref_=as_li_ss_tl
NOTE: MATCHED FOR XPZ CAMSHAFT, WOULD WORK ON OTHER CAMSHAFTS. COULD GO HIGHER SPRING WEIGHT BUT THIS WEARS OUT PARTS FASTER.
NOTE: Put some shims under the springs for a little extra spring weight.
NOTE: ZZP stopped recommending 135# valve springs for XPZ and only recommends 150# now. These 130# springs can still work.
NOTE: DO NOT BUY CHEAP SPRINGS, THEY ARE FAKE
LS1 Valve Spring Retainers (12x):
GM 10166344 - https://www.amazon.com/dp/B..._US&ref_=as_li_ss_tl
NOTE: MATCHED FOR XPZ CAMSHAFT, WOULD WORK ON OTHER CAMSHAFTS
NOTE: These LS1 retainers allow for ~0.005” more valve guide to retainer clearance! ZZP sells their own machined down valve retainers now, but they do not give the dimensions currently.
LS1 Valve Locks / Keepers (3x 5-pack):
GM 10166345 - https://www.amazon.com/dp/B..._US&ref_=as_li_ss_tl
Intake/Exhaust Valve Stem Seals (1x set of 12):
FEL-PRO SS 72144 - https://www.amazon.com/dp/B..._US&ref_=as_li_ss_tl
DUPLICATES BUILD 1
LS7 Hydraulic Roller Lifters (12x):
GM 12698945 / BTR X12499225-12 - https://www.amazon.com/dp/B..._US&ref_=as_li_ss_tl
NOTE: MATCHED FOR XPZ CAMSHAFT, WOULD WORK ON OTHER CAMSHAFTS
Head Bolts - yields (1x):
FEL-PRO ES 74033 - https://www.amazon.com/dp/B..._US&ref_=as_li_ss_tl
OR
Reusable head studs (1x):
ARP 193-4001 - https://www.amazon.com/dp/B..._US&ref_=as_li_ss_tl
NOTE: Instructions for installing ARP Head Studs - https://tech.arp-bolts.com/...uctions/193-4001.pdf
NOTE: DO NOT USE ARP THREAD SEALANT! INSTEAD USE A PERMATEX ULTRA BLACK GASKET MAKER AND CLEAN HEAD SURFACES WELL
NOTE: Required for head gasket
DUPLICATES BUILD 1
HEAD STUD SEALANT - DO NOT USE ARP THREAD SEALANT! (1x):
Permatex 82180 - https://www.amazon.com/dp/B..._US&ref_=as_li_ss_tl
NOTE: Be sure not to get ANY on the head deck surface. Clean it off with a rag sprayed with brake cleaner if you do.
NOTE: You can get a different form factor of this, such as one that fits in a caulk gun for ease.
NOTE: How-to video on sealing head studs - https://youtu.be/z4XB0vyGkz...2qJnkff2RlPWB_O&t=26
NOTE: Required for head studs
DUPLICATES BUILD 1
ARP 7/16"-14 Thread Chaser (1x):
ARP 911-0004 - https://www.amazon.com/dp/B..._US&ref_=as_li_ss_tl
NOTE: For cleaning the old sealant out of the head bolt threads.
NOTE: Do NOT use a tap to clean out your head bolt threads. You can damage/weaken the threads.
NOTE: Required for head bolts/head studs
DUPLICATES BUILD 1
ZZP Pushrod length Checker (1x):
ZZP ZZ-PRDLCKR-3800 - https://ebay.us/UXqjf3
Ignore this: Intake Pushrod (stock size 7.029") (6x):
GM 24504406 - https://www.amazon.com/dp/B..._US&ref_=as_li_ss_tl
NOTE: MEASURE YOUR REQUIRED PUSHROD LENGTH WITH THE PUSHROD LENGTH CHECKER! YOURS WILL BE DIFFERENT DEPENDING ON CAM, DECKING, VALVES, VALVE RETAINERS, LIFTERS, AND HEAD GASKET SETUP!
NOTE: See video here & description - https://youtu.be/dT3Hwe8S4X...qJnkff2RlPWB_O&t=288
Ignore this: Exhaust Pushrod - 7.00" (6x):
https://zzperformance.com/p...riant=12623547859055
NOTE: MEASURE YOURS WITH THE PUSHROD LENGTH CHECKER! YOURS WILL BE DIFFERENT DEPENDING ON CAM, DECKING, VALVES, VALVE RETAINERS, LIFTERS, AND HEAD GASKET SETUP!
NOTE: See video & description here - https://youtu.be/dT3Hwe8S4X...qJnkff2RlPWB_O&t=288
-----Camshaft, timing chain, and balance shaft removal-----
ZZP XPZ Camshaft (1x):
XPZ-1 - https://zzperformance.com/p...riant=12623418163311
NOTE: Consider the XP camshaft instead, which would not require cutting down the valve guides, or the VS camshaft to avoid chaining the timing chain, or just 1.9 rockers that is very simple and easy found in build 1.
Camshaft Installation/Assembly Lube (1x):
GM 12345501 / Comp Cams 153 - https://www.amazon.com/dp/B..._US&ref_=as_li_ss_tl
Double Roller Rollmaster Timing Chain Set (1x):
Rollmaster CS6150 - https://ebay.us/OwkBqD
NOTE: Needs 130#-150# valve springs
NOTE: MATCHED FOR XPZ CAMSHAFT, WOULD WORK ON OTHER CAMSHAFTS. IF NOT USING A DOUBLE ROLLER/DELETING BALANCE SHAFT/DELETING TENSIONER, THIS WOULD BE A GOOD IDEA TO REPLACE ANYWAYS (WITH A SINGLE ROLLER) ALONG WITH TIMING CHAIN SPRING TENSIONER AS THESE WEAR OUT. THIS DOUBLE ROLLER REQUIRES BALANCE SHAFT/TENSIONER/GEAR DELETION.
Double Roller Timing Chain Tensioner (1x):
ZZP 3800 Upgraded Tensioner https://zzperformance.com/p...0-upgraded-tensioner
Machined oil pump cover/oil pump replacement kit (1x):
ZZP # ZZ-OILPCVR - https://ebay.us/oQ167n
NOTE: required for rollmaster double timing chain clearance - Surface grind the non-oil pump side of the cover down by grinding off .023", or buy ZZP's.
Extra thick front cover gasket (1x):
ZZP ZZ-FCGG - https://ebay.us/yoYNHs
NOTE: needed for double roller timing chain
or
GM 12587003 - https://www.amazon.com/dp/B..._US&ref_=as_li_ss_tl
NOTE: The GM gasket is not extra thick, not compatible with double roller.
NOTE: Required if changing camshaft, timing chain, or balance shaft deletion
*Camshaft Bolt - yields (1x):
GM 24501366 - https://www.amazon.com/dp/B..._US&ref_=as_li_ss_tl
OR
https://intense-racing.com/...H-BCM&Category_Code=
OR
https://ebay.us/IpZ2xP
OR
https://zzperformance.com/products/camshaft-bolt
NOTE: ONLY IF CHANGING CAMSHAFT
DUPLICATES BUILD 1
*Crankshaft / Harmonic balancer Bolt - yields (1x):
GM 24504736 - https://www.amazon.com/dp/B..._US&ref_=as_li_ss_tl
NOTE: This is very involved to swap out; see video here - https://www.youtube.com/wat...kff2RlPWB_O&index=51
NOTE: yields, required for removing the balancer/front cover/timing chain/camshaft/balance shaft
DUPLICATES BUILD 1
Chrysler 440 camshaft bearing to seal oil hole in Balance shaft delete (1x):
ENGINETECH CC476 - https://www.amazon.com/dp/B..._US&ref_=as_li_ss_tl
NOTE: POUND THIS IN TO BLOCK OIL PASSAGE LEFT OPEN BY REMOVING BALANCE SHAFT, WITH OILING HOLES ON OPPOSITE SIDES SO ITS PLUGGED. DETAILED IN VIDEO - https://www.youtube.com/wat...WB_O&index=40&t=333s
Crankshaft Seal REAR (1x):
National 320691 - https://www.amazon.com/dp/B..._US&ref_=as_li_ss_tl
DUPLICATES BUILD 1
Crankshaft Seal FRONT (1x):
GM 12582313 - https://www.amazon.com/dp/B..._US&ref_=as_li_ss_tl
NOTE: This is very involved to swap out; see video here - https://www.youtube.com/wat...kff2RlPWB_O&index=51
DUPLICATES BUILD 1
Engine Break-In Additive Oil (2x):
Comp Cams 159 - https://www.amazon.com/dp/B..._US&ref_=as_li_ss_tl
Camshaft Bearings (1x):
MAHLE / CLEVITE SH1812S - https://www.amazon.com/dp/B..._US&ref_=as_li_ss_tl
NOTE: It is very difficult to replace camshaft bearings without completely disassembling the bottom-end (not detailed in this build). Some people choose not to change them.
Harmonic Balancer Puller (1x):
Lisle 45300 - https://www.amazon.com/dp/B..._US&ref_=as_li_ss_tl
NOTE: You can rent these from an auto parts store for free instead, but you may need to visit multiple stores to get the correct combination.
Optional: 5% overdrive harmonic balancer pulley (equal to taking a 2.8" pulley down to a 2.66" pulley to overdrive the supercharger even more). (1x):
DAYCO PBO81461SC5 - https://www.amazon.com/dp/B..._US&ref_=as_li_ss_tl
NOTE: This is highly recommended to install if you remove the balance shaft, to dampen vibrations.
NOTE: 5% overdrive balancer/AC pulley bypass install video - https://www.youtube.com/wat...kff2RlPWB_O&index=37
NOTE: These balancers are SFI rated.
NOTE: There is alternatively a 10% accessory belt underdrive balancer, but it decreases the performance of your water pump, AC compressor, and power steering: Dayco PBU81461SS10 - https://www.amazon.com/dp/B..._US&ref_=as_li_ss_tl
Oil Neck Spacer Bracket for 5% overdrive harmonic balancer pulley (1x):
https://ebay.us/Z6Lqs0
OR
Hayden Automotive 291 - https://www.amazon.com/dp/B..._US&ref_=as_li_ss_tl
NOTE: ONLY a GTP oil filter housing bracket to work with this, shown in BUILD 1
Oil Pump Kit (1x):
Melling K195 - https://www.amazon.com/dp/B..._US&ref_=as_li_ss_tl
DUPLICATES BUILD 1
ZZP Oil Volume Kit (1x):
https://zzperformance.com/products/oil-volume-kit
NOTE: HIGHLY RECOMMENDED If you install the overdrive balancer; it is easy to do while the balancer is off.
DUPLICATES BUILD 1
Optional: 8-rib 3" plastic smooth pulleys for the 8-rib 5% overdrive balancer (2x):
Gates 38023 - https://www.amazon.com/dp/B..._US&ref_=as_li_ss_tl
Optional: 8-rib 3" steel ribbed pulley for the 8-rib 5% overdrive balancer (1x):
Gates 38053 - https://www.amazon.com/dp/B..._US&ref_=as_li_ss_tl
NOTE: Plastic 8-rib with 1 bearing does not exist. You could instead buy a lighter weight aluminum pulley if you have the cash. Contact this website owner and ask for a single 8 rib 3" ribbed pulley (ZZP Style with one extra rib on either side): https://www.smoothflowpulle..._rib_L67_idlers.html
Water Pump (1x):
US MOTOR WORKS US5075 - https://www.amazon.com/dp/B..._US&ref_=as_li_ss_tl
or
Electric Water Pump (1x):
Meziere WP140 - https://ebay.us/qajFeQ
DUPLICATES BUILD 1
Aluminum Water Pump Gasket (1x):
Fel-Pro 35804 - https://www.amazon.com/dp/B..._US&ref_=as_li_ss_tl
NOTE: Required for Water Pump
DUPLICATES BUILD 1
Thread Sealant for bolts going in to water/oil jackets (1x):
Permatex 80632 - https://www.amazon.com/dp/B..._US&ref_=as_li_ss_tl
NOTE: Required for water pump, front cover gasket, timing chain, camshaft, timing chain tensioner, lower intake manifold, etc.
DUPLICATES BUILD 1
Optional: Underdrive Water Pump Pulley (1x):
http://www.smoothflowpulley...lley-Underdrive.html
OR
https://zzperformance.com/p...mp-underdrive-pulley
NOTE: Reduces cooling system capacity but also decreases parasitic horsepower loss. Instead consider the Electric Water Pump
-----Optional: Pistons, Rods, Bearings, etc. (Bottom End)-----
NOTE: IF YOU ARE PLANNING ON REBUILDING THE BOTTOM END WHICH IS OPTIONAL, YOU MUST KEEP EVERYTHING PAIRED, GET PROPERLY OVERSIZED BEARINGS, ETC. SEE GUIDE FOR DROPPING OFF AT A MACHINE SHOP IN Assembly videos section build 2
NOTE: See general 3800 repair parts here - https://www.amazon.com/shop..._US&ref_=as_li_ss_tl
Optional (discontinued?): 4.2L Stroker Kit
Mace Engineering - https://www.maceengineering...TS-TO-SUIT-V6-ECOTEC
Optional: ARP Main Stud Kit (1x):
ARP 193-5401 - https://www.amazon.com/dp/B..._US&ref_=as_li_ss_tl
Optional: Crankshaft bearings (1x):
https://www.rockauto.com/en...ft+main+bearing,5220
NOTE: Have a shop tell you what oversize bearings you need. You NEED to measure it and have your crankshaft/rods reconditioned by a machine shop and ground round.
Optional: Connecting Rods (6x):
ZZP H Beam - https://zzperformance.com/p..._sid=91a9a3e18&_ss=r
or Factory connecting rods (6x): GM 12593375 - https://www.amazon.com/dp/B..._US&ref_=as_li_ss_tl
Optional: Connecting Rod Bolts (1x):
https://zzperformance.com/p..._sid=760b69eb3&_ss=r
Optional: Pistons (6x):
Higher compression FORGED - https://zzperformance.com/c...riant=12623094710383
Higher compression HYPEREUTECTIC - https://zzperformance.com/c...riant=12623524954223
Factory - https://www.rockauto.com/en...3,engine,piston,5620
NOTE: Have a machine shop measure and determine for you.
Optional: Piston Ring Kit (1x):
https://www.rockauto.com/en...ine,piston+ring,5640
NOTE: Have a machine shop measure and determine for you.
-----4t65e-HD/4T65e/4T60e Transmission-----
NOTE: Have a professional disassemble your transmission and install the below parts. This is a very complicated process and can be very easy to mess up. Modification of this transmission is not highly detailed in this build, but there is a video covering it in the video section.
NOTE: Check out https://tripleedgeperformance.com/online-store - they will build a transmission for you.
Optional: Hardened Input Shaft (1x):
ZZP 300M "1000hp" - https://ebay.us/YEjz2d
NOTE: These need a GM J-tool and complicated disassembly to be installed properly, must take off valve body to access and replace gaskets. This shaft is to support over 350 whp. I do not believe the ZZP marketing for these horsepower numbers. If you plan to go over 350hp, opt for the 300M shaft.
Optional: Chrome Moly Pump Shaft (1x):
ZZP ZZ-CMPS-4T65E - https://zzperformance.com/p...rome-moly-pump-shaft
NOTE: These need a GM J-tool and complicated disassembly to be installed properly, must take off valve body to access and replace gaskets. This shaft is to support over 350 whp
Hardened 4th Clutch Shaft (1x):
84570G / 24205603 / A84570G / 84860C / 24207289 - GO TO DEALER. DO NOT BUY ON EBAY.
NOTE: These need a GM J-tool and complicated disassembly to be installed properly, must take off valve body to access and replace gaskets. This shaft is to support over 350 whp
Automatic Transmission Service Overhaul Kit (1x):
GM Genuine Parts 19258573 - https://www.amazon.com/dp/B..._US&ref_=as_li_ss_tl
NOTE: Required for shift solenoids
NOTE: Required for hardened input shaft, 4th clutch shaft, and pump shaft
NOTE: Could get more expensive kits with clutch packs if you choose to change those. See overhaul video here - https://www.youtube.com/wat...kff2RlPWB_O&index=15
DUPLICATES BUILD 1
*Flexplate Bolts (yields) (8x):
GM 24501365 - https://www.amazon.com/dp/B..._US&ref_=as_li_ss_tl or https://ebay.us/8zWGbd
NOTE: ONLY NECESSARY if you remove the automatic flexplate. These bolts YIELD and need to be replaced. These DO NOT WORK on a manual transmission, see FieroRog's Flywheel bolts in the MOUNTING AND BRACKETS section of this build 1
DUPLICATES BUILD 1
Torque Converter (1x):
DACCO B21JXFM - https://www.amazon.com/dp/B..._US&ref_=as_li_ss_tl or https://ebay.us/lwhUad
NOTE: See here for stalls - https://atracom.blob.core.w...al/2013/2013-049.pdf
NOTE: A Bonneville SSEI (JSFM) or Park Avenue Ultra torque converter may be too low stall for a Fiero. Mine idled around 20mph.
NOTE: A GTP/Regal torque converter (JTFM) might be OK, or a higher stall (JZFM or JXFM) Converter would be better. JXFM was highest stall. Works great in a 3800 Fiero (JXFM did NOT come on supercharged 3800s)
NOTE: YOU ALSO NEED TO FILL THE TORQUE CONVERTER BACK UP WITH TRANSMISSION FLUID BEFORE THE INSTALL!
DUPLICATES BUILD 1
Transmission Fluid Dexron III - 7.4 quarts (maintenance) or 10 quarts (total drain including replacing the torque converter) (2x 6-pack):
Citgo 633131001 or 633131001182 Transgard High Viscosity Multi Vehicle ATF - https://ebay.us/36mRLv
NOTE: This difficult to find transmission fluid on the market - it is synthetic (long lasting), high viscosity (thick/sticky/lubricates well), and rated for Dexron III (not Dexron IV which is too thin to lubricate well).
NOTE: Sometimes the part numbers get mixed up at retailers; make sure it is the HIGH VISCOSITY.
DUPLICATES BUILD 1
Optional: 4t65e-HD/4T65e/4T60e Transmission Shift Kit (1x):
https://ebay.us/Zw4LgI
Optional: Positraction Differential (1x):
ZZPerformance/Quaife "Torsen" style Differential - https://zzperformance.com/p...65e-lsd-differential
OR
Phantom Grips PGXBACUS1 - https://ebay.us/e7RDRL
OR
Engineered Performance - http://www.engineered.net/eplsd.htm
NOTE: This Engineered Performance LSD works great but his website does not always work. Contact Jeff Ianitello directly: https://www.facebook.com/jeff.ianitello
NOTE: See this Engineered Performance LSD wearing after light driving - may want to replace thrust washers with bronze!: https://youtu.be/LOgrVRZ1mu...qJnkff2RlPWB_O&t=449
Optional: 3.29 Gear Set, 7/8" chain and sprockets (1x):
ZZ-GRCK-3.29 - https://zzperformance.com/p...ratio-conversion-kit
NOTE: This will increase your engine RPM to maintain the same speed as before, so cruising on the highway might be unpleasant. These are probably long gone!
Optional: Transmission Oil Cooler Pan (1x):
ZZP - https://ebay.us/BS2bUj or https://www.amazon.com/dp/B..._US&ref_=as_li_ss_tl
NOTE: There are two options depending on your car's bolt sizes. Read the product description.
NOTE: If you are very hard on your car (autocross), you can buy this to avoid mounting a secondary oil cooler on your car.
-----
FieroAustin
1988 GT 3800sc Series III E85 Intercooled 2.56" Pulley
Amazon Recommendation Store for 3800s/Fieros/Tools https://amzn.to/3hNViaa
3800sc Instructions http://www.fiero.nl/forum/Forum2/HTML/139530.html
3800sc Instructions MOBILE https://drive.google.com/fi...JzC-2ZzbvLYMYE3QbmVq
eBay Recommendation Store http://ebay.us/hdJWbh
Donate to me https://paypal.me/FieroAustin
YouTube https://www.youtube.com/fie...n?sub_confirmation=1
Join YouTube membership https://www.youtube.com/FieroAustin/join
Join Facebook Group https://www.facebook.com/be...pporter/FieroAustin/
Consulting on Facebook https://www.facebook.com/FieroAustin/[This message has been edited by AustinH (edited 11-26-2025).]
|
|
|
|
VanGTP5000
|
NOV 20, 01:53 PM
|
|
| quote | Originally posted by AustinH:
Well I am tearing down my 2nd 3800sc engine for a rebuild now and doing a how-to about it.
I decided to launch a Facebook page, as Facebook seems to have replaced some Forums as a modern source of information in many ways. You can find it here:
https://www.facebook.com/pg/FieroAustinH/
|
|
Great job on the video Austin...I enjoyed watching it. I am sure it will be very helpful to many!!!
-Van
|
|
|
|
AustinH
|
DEC 24, 12:03 PM
|
|
3800sc Assembly Diagrams and Torque Specs
-----FIRING ORDER-----
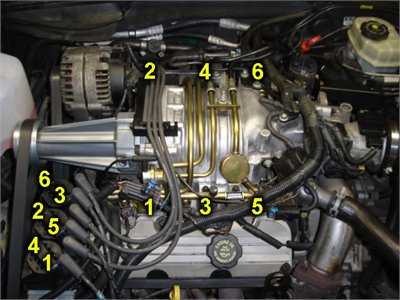
-----COOLANT AND FUEL LINES-----
Coolant Lines - see build 1
Fuel Lines & Wiring - See build 2
NOTE: Fuel lines are straightforward for build 1; the fittings provided in build 1 connect directly to the old Fiero lines and the 3800 lines.
-----Throttle Cable/Cruise Mounting-----
Courtesy of GMTuners - https://www.gmtuners.com/swap/3800.htm
NOTE: This only works for a Series II throttle body. Throttle cable bracket for Northstar throttle body availble in build 2 - ZZ-NSCB - https://zzperformance.com/p...rthstar&_ss=e&_v=1.0
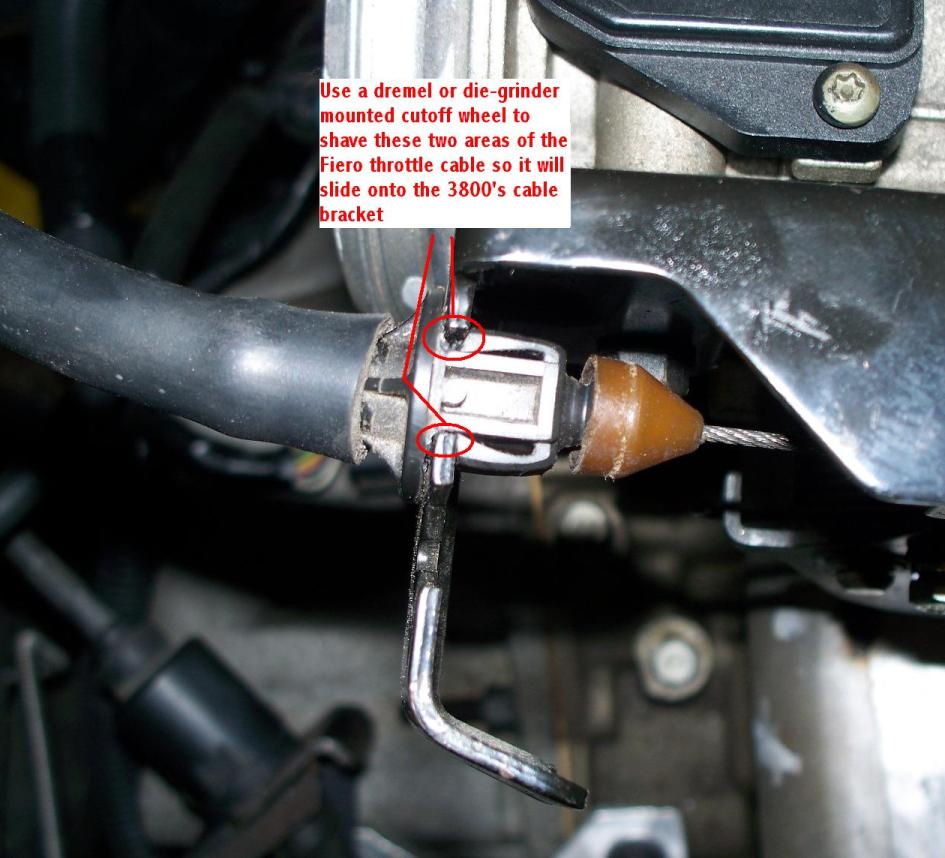

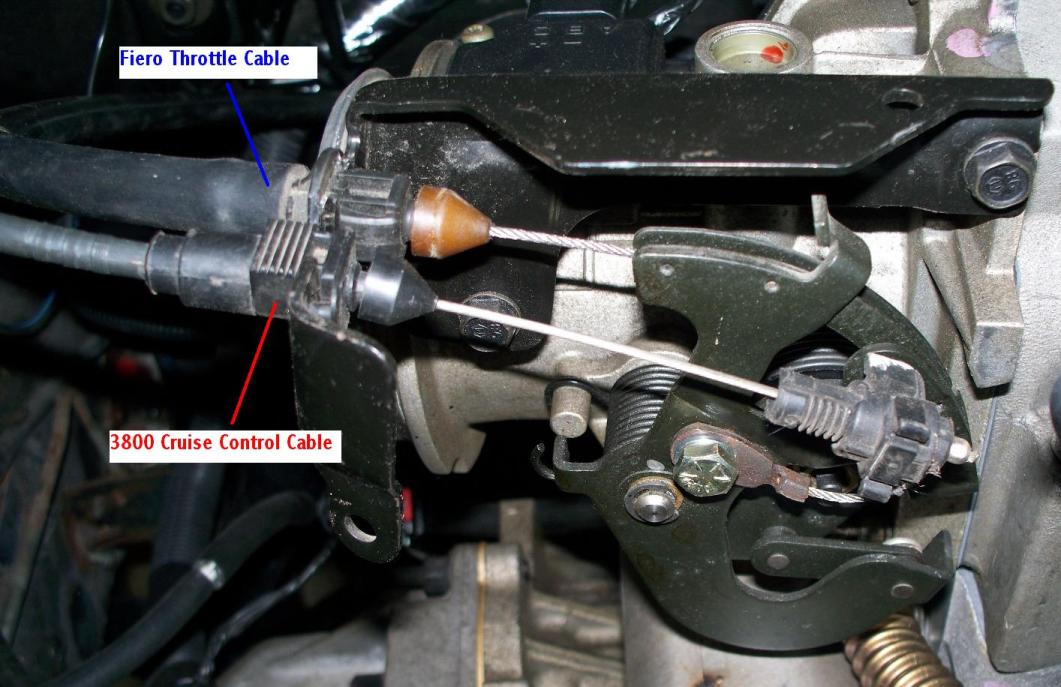
-----NORTHSTAR THROTTLE BODY-----
Northstar throttle cable (see build 2 air section for parts):
NOTE: I did not hook up cruise control here. You are on your own. You can use stock cruise control if you remove vacuum accumulator canister (coffee can), plug that port from the stock vacuum accumulator canister, and plug the other port into the vacuum port on the top of the supercharger. Or, see harness section for wiring the electronic 3800 cruise module into the fiero.
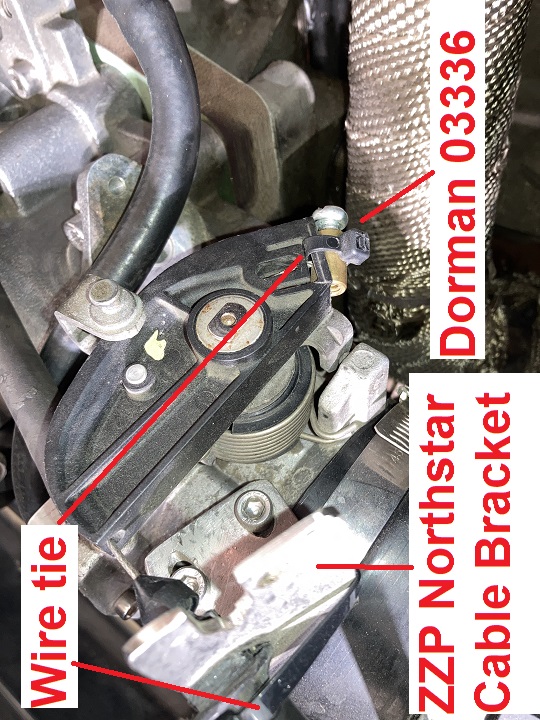
-----SUPERCHARGER, CONNECTIONS, AND ROUTINGS-----
Diagram of Gen 3 Supercharger and hose routings:
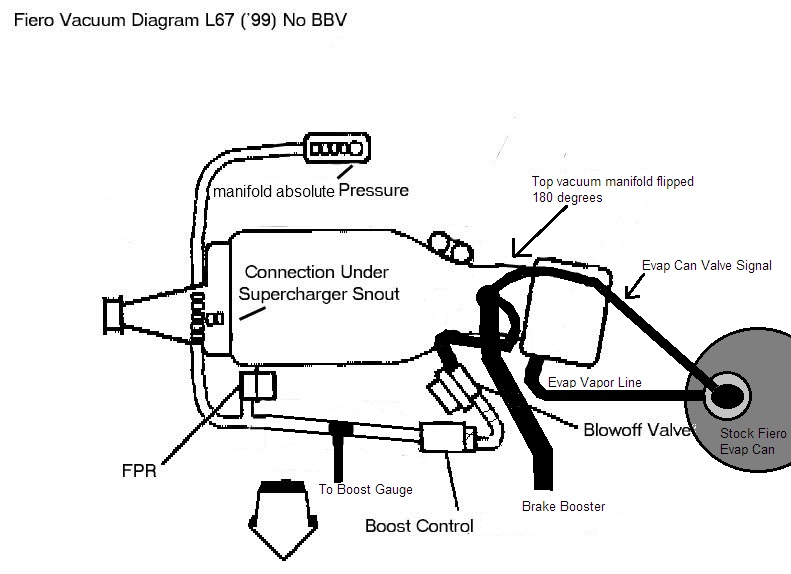
Diagram of Gen 5 Supercharger and hose routings:
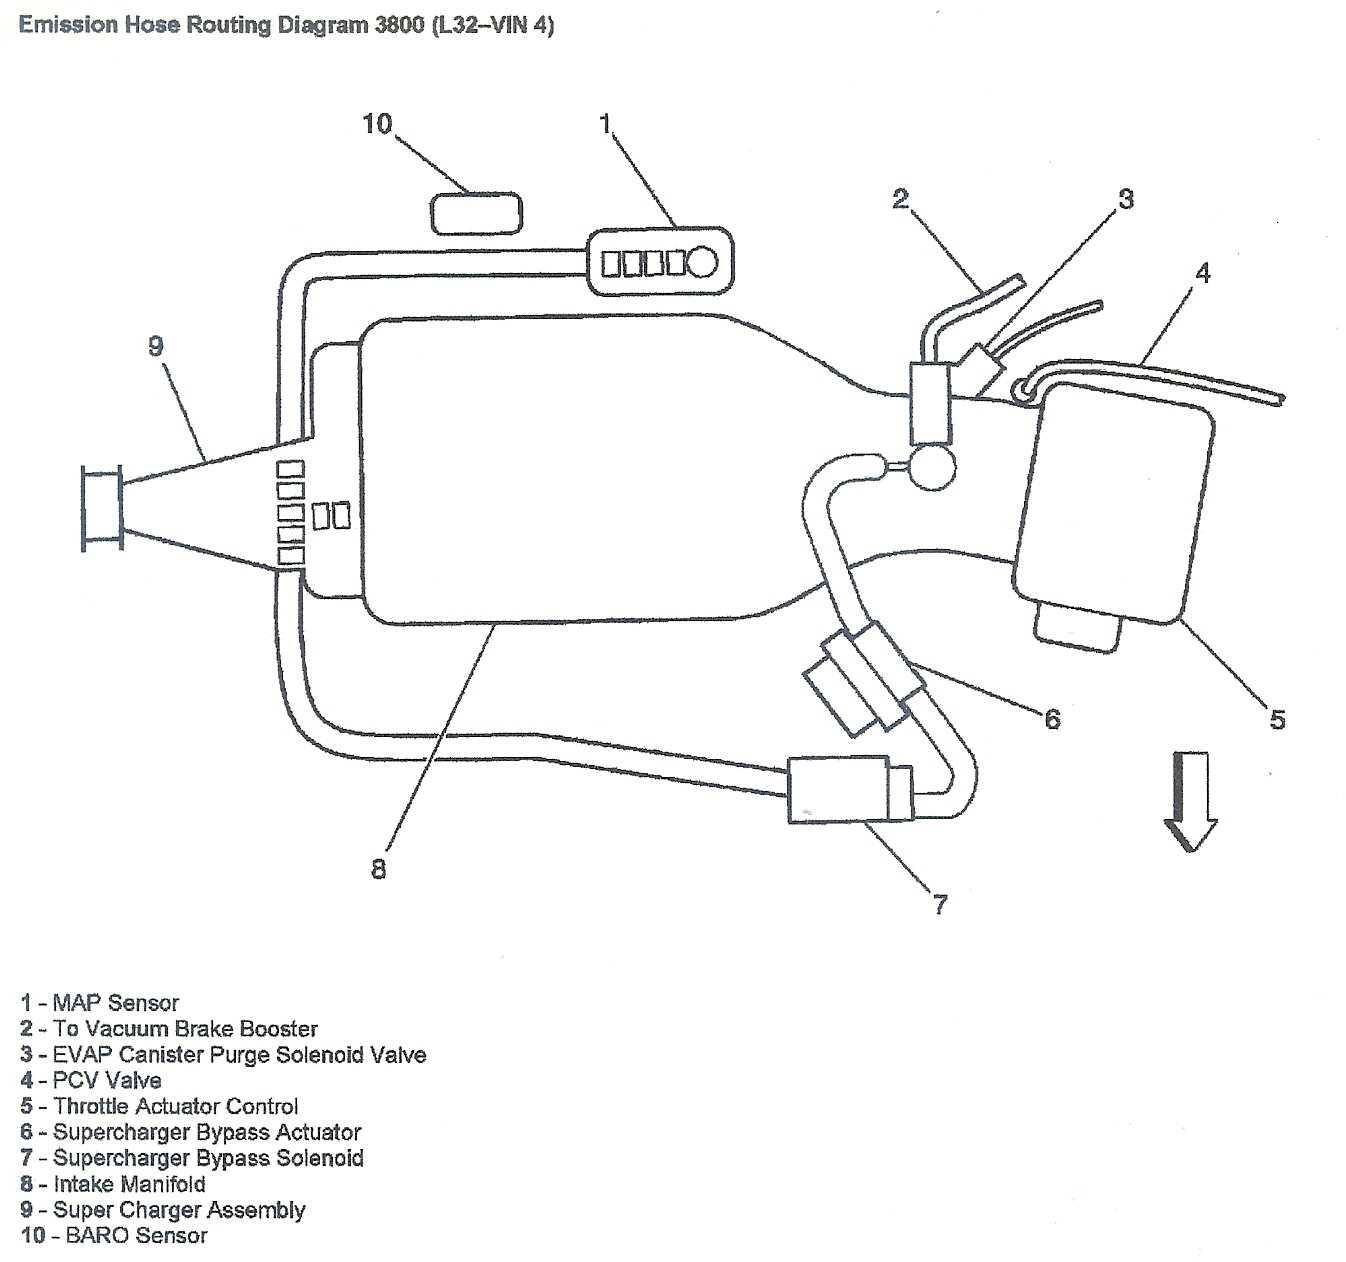
-----4t65e-HD/4T65e/4T60e Transmission-----
Check out 4t65e-HD upgrades. These guys will also rebuild your 4t65e-HD/4T65e/4T60e Transmission for you:
https://tripleedgeperformance.com/online-store
4T65 Repair guide: https://www.instructables.c...50e-HD-transmission/
4t65 transmission diagram, parts available here:
https://www.transpartsonlin...TransPartsType=4T65E
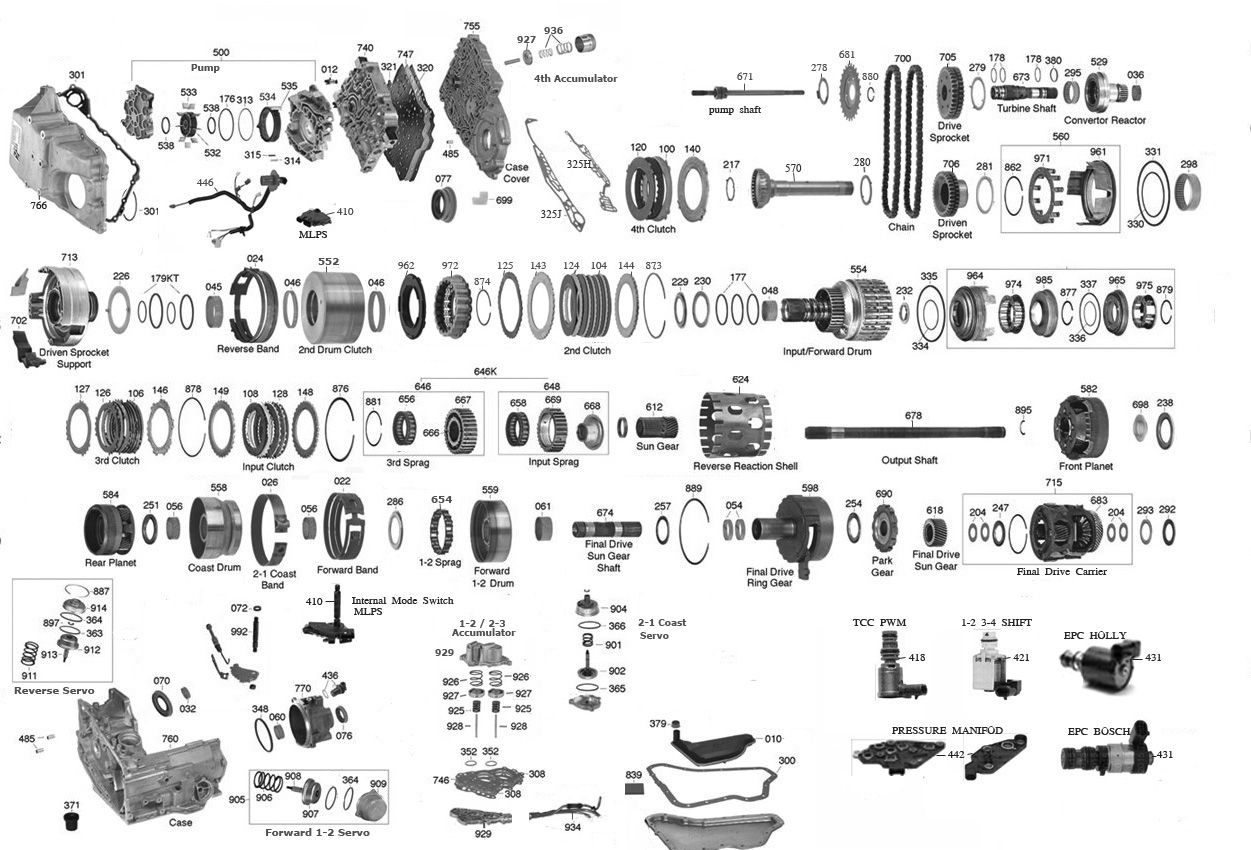
How to connect 4t65 transmission lines to Fiero:
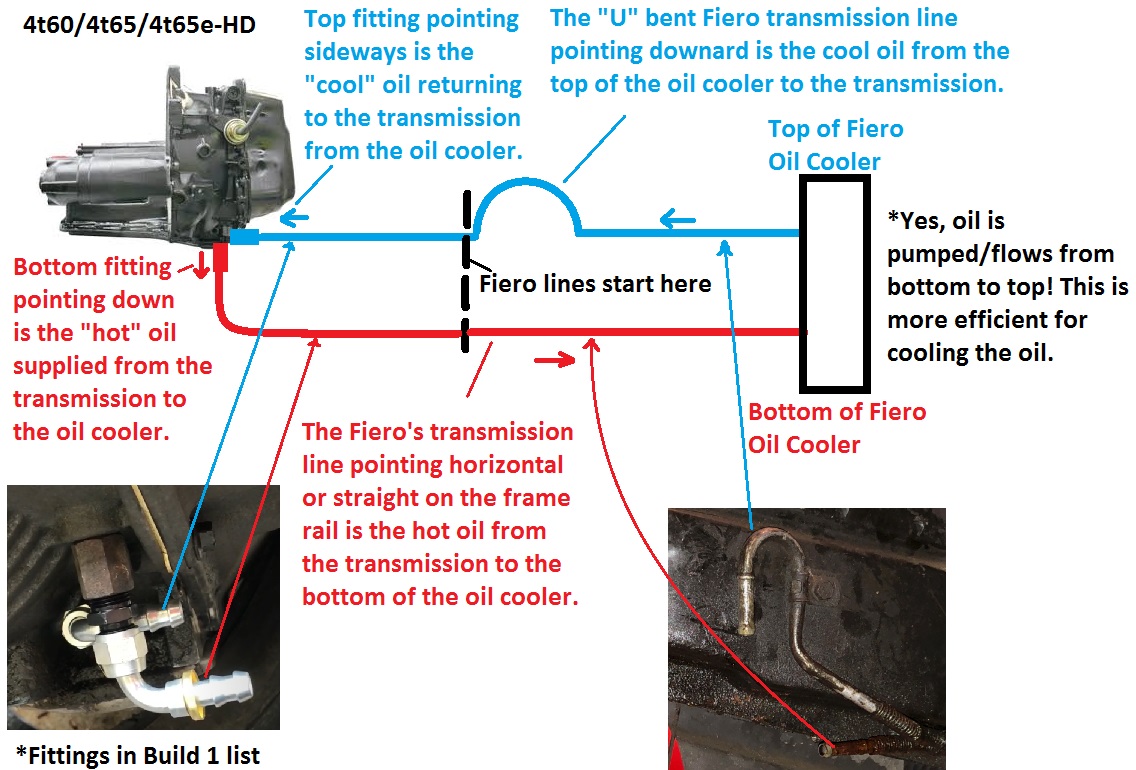
-----EXHAUST SETUP FOR BUILD 1-----
See build 1 parts list. This setup is for mating with the stock exhaust headers, which can support up to 300hp.
EVERYTHING BELOW THIS LINE IS FOR BUILD 2.
-----TORQUES & TORQUE SEQUENCES-----
NOTE: The Torque Sequence refers to the order in which you torque bolts. Head bolt torque sequencing can require multiple steps. Please refer to the torque guide website below for these steps, or to the guide from your manufacturer.
3800 Engine Torque Specs (helpful to print this off):
NOTE: THE TORQUE SPEC CALLING OUT 74 ft-lbs FOR A/C COMPRESSOR BRACKET/STAY IS INCORRECT. SUGGEST TO USE 30 ft-lbs INSTEAD.
https://www.torkspec.com/to...3.8L-231ci-V6-3800II
3800 Cylinder Head Torque Sequence for both sides. Follow torque values in the torque spec website for stock or follow the head stud manufacturer's torque specs.
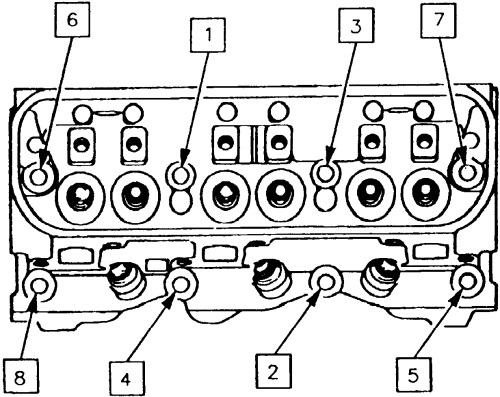
NOTE: ARP Head stud torque specs found here
NOTE: DO NOT USE ARP THREAD SEALANT! USE PERMATEX ULTRA BLACK AND CLEAN IT OFF THE HEAD SURFACE WELL. https://tech.arp-bolts.com/...uctions/193-4001.pdf Courtesy of ARP

Series II Supercharged Lower Intake Manifold Torque Sequence:
NOTE: #5 is not shown, but it is directly below #11.
Gen V/Series III Supercharger Torque Sequence:
Courtesy of ZZP
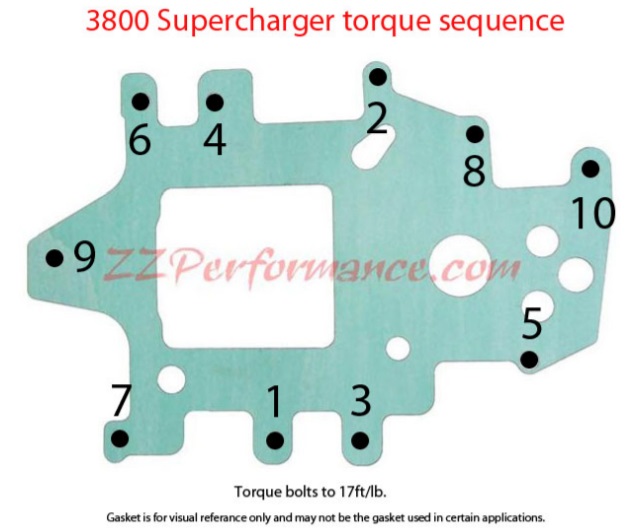
-----ENGINE EXPLODED VIEW ASSEMBLY DIAGRAMS-----
You can find most of these diagrams and the part #s of the parts labeled at many GM parts websites. These diagrams were taken from here:
https://www.gmoempartsoutle...ix--gtp--3-8l-v6-gas OR https://nemigaparts.com/cat...c/2w1-w/00/gm00-032/ or https://g.oempartsonline.co...6-gas/engine--engine
Fuel Rail, Supercharger, Lower Intake Manifold, Exhaust, Throttle, EGR diagram:
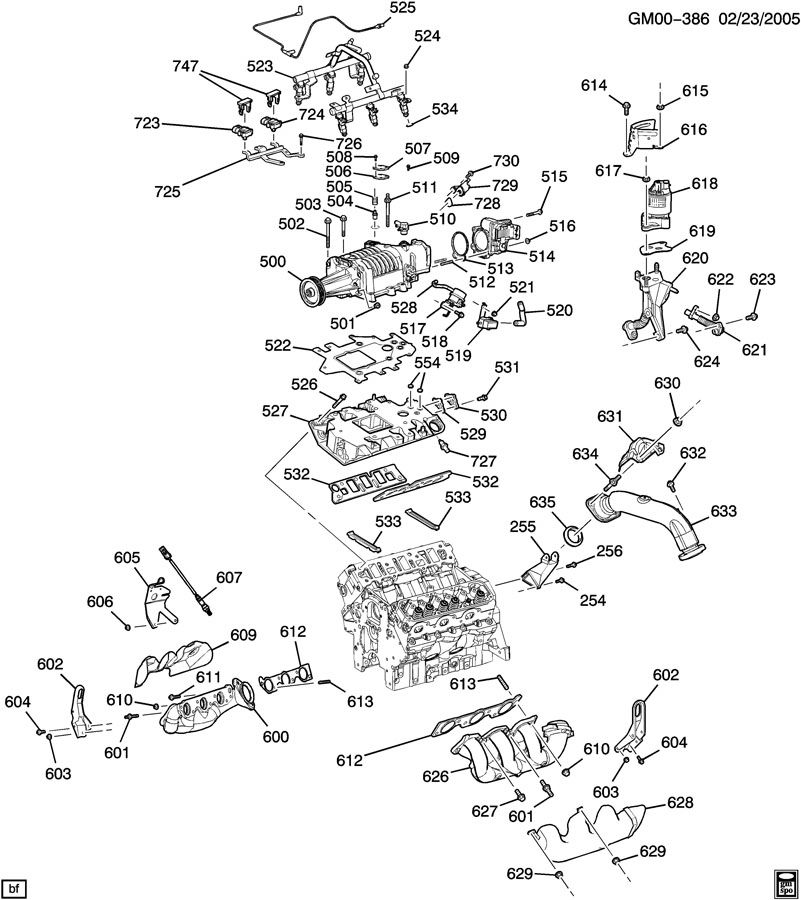
Cylinder Head, Valve Train, Coil Pack, Lifter, Pushrod, Rocker, and Valve Cover Assembly.
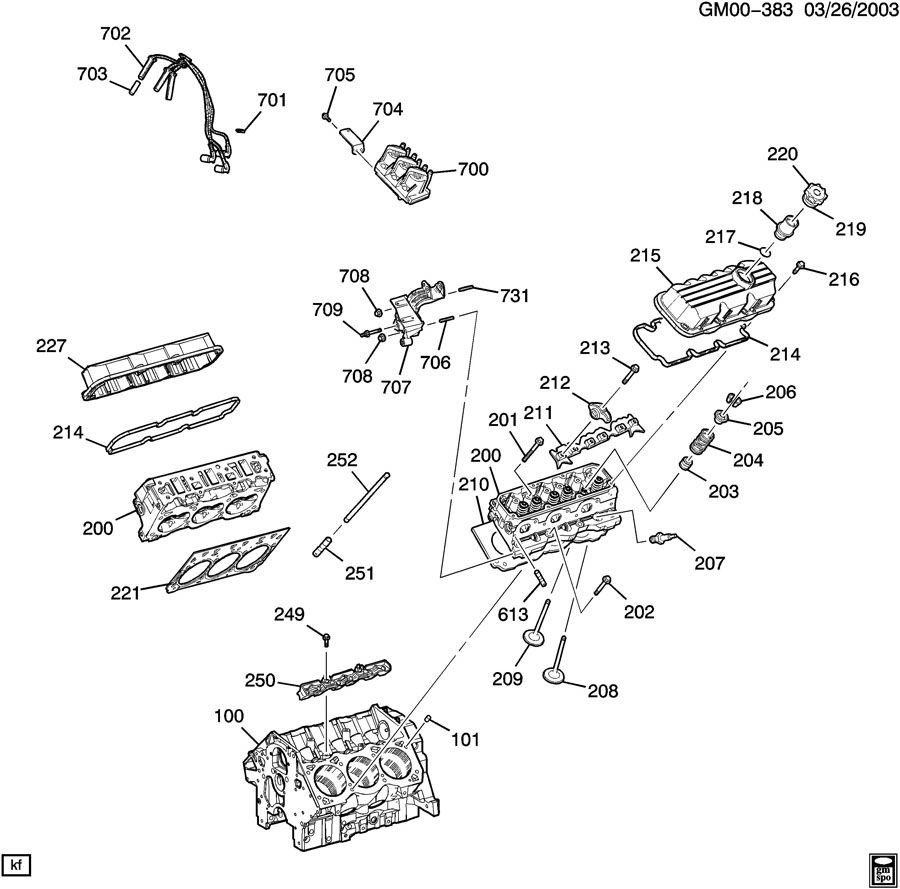
Water Pump, Front Cover, Alternator Bracket, Thermostat, Balancer diagram:
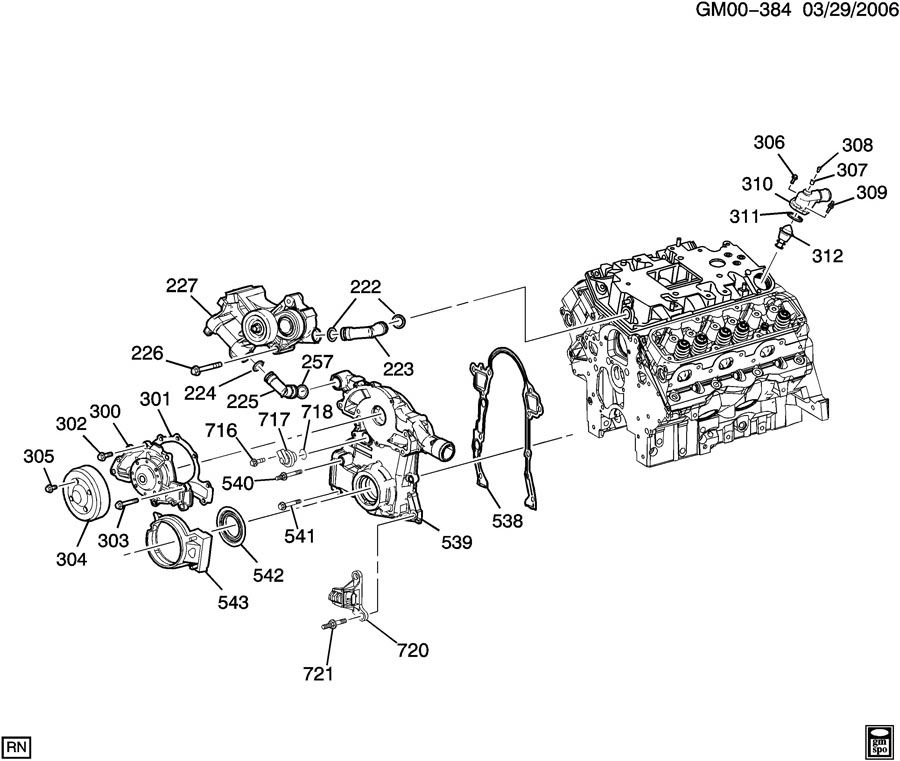
Front Cover, Oil Pump, Oil Pan, Dipstick diagram
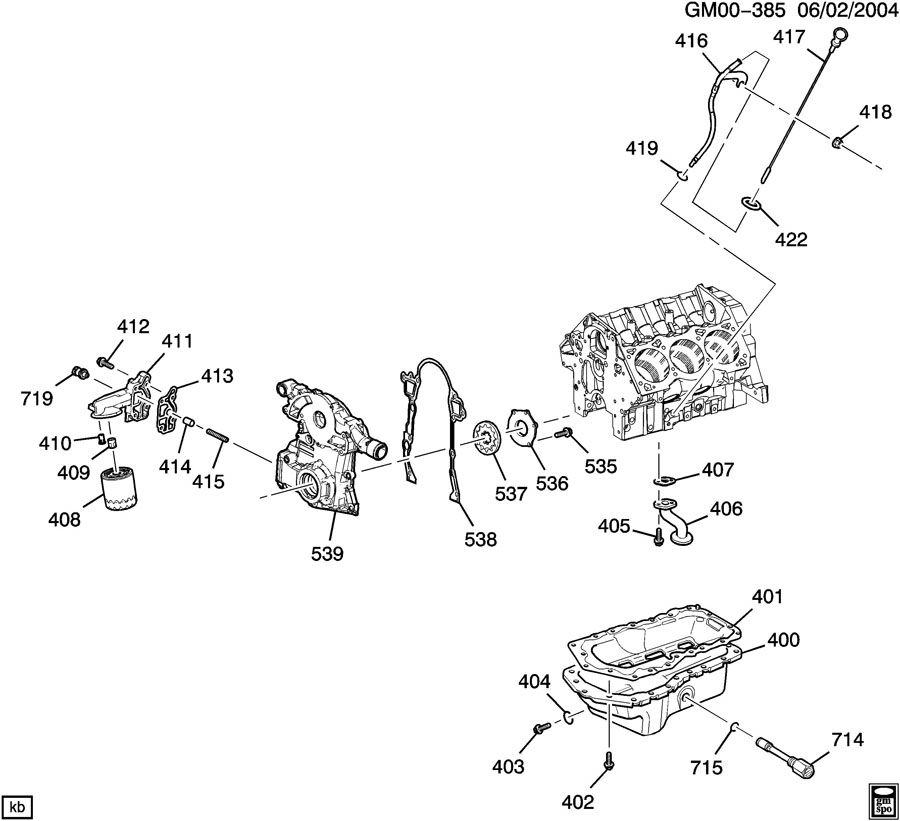
Camshaft, Rear Cover, Flywheel, Crankshaft, Timing Chain, Balance Shaft, Piston, Connecting Rod diagram:

Transmission to Engine Mating Diagram:
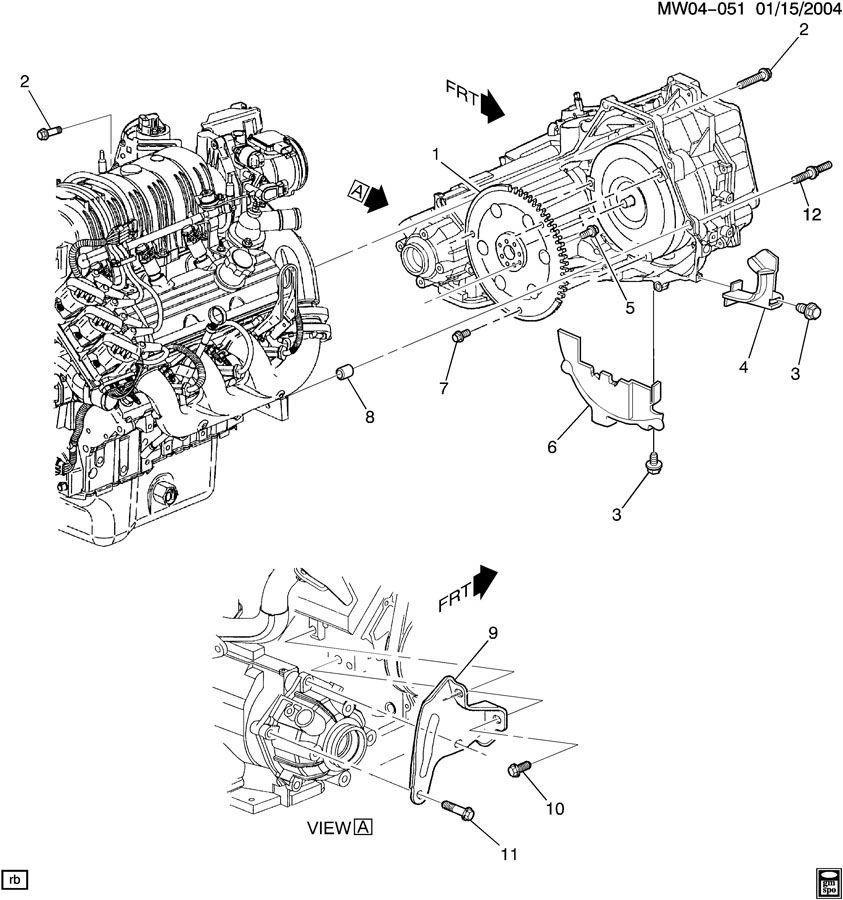
Crankshaft and Camshaft Timing Gear TDC Alignment:
-----FUEL PRESSURE REGULATOR SETUP OPTIONS-----
SEE BUILD 2 FUEL SECTION FOR PARTS AND DIAGRAM OF MY SETUP
NOTE: This assumes you get rid of stock fuel rails.
NOTE: My setup (bottom) is a very simply routed return-style, however it may not be the most effective. I do not recommend returnless, or #1 or #3 that dead-head one rail.
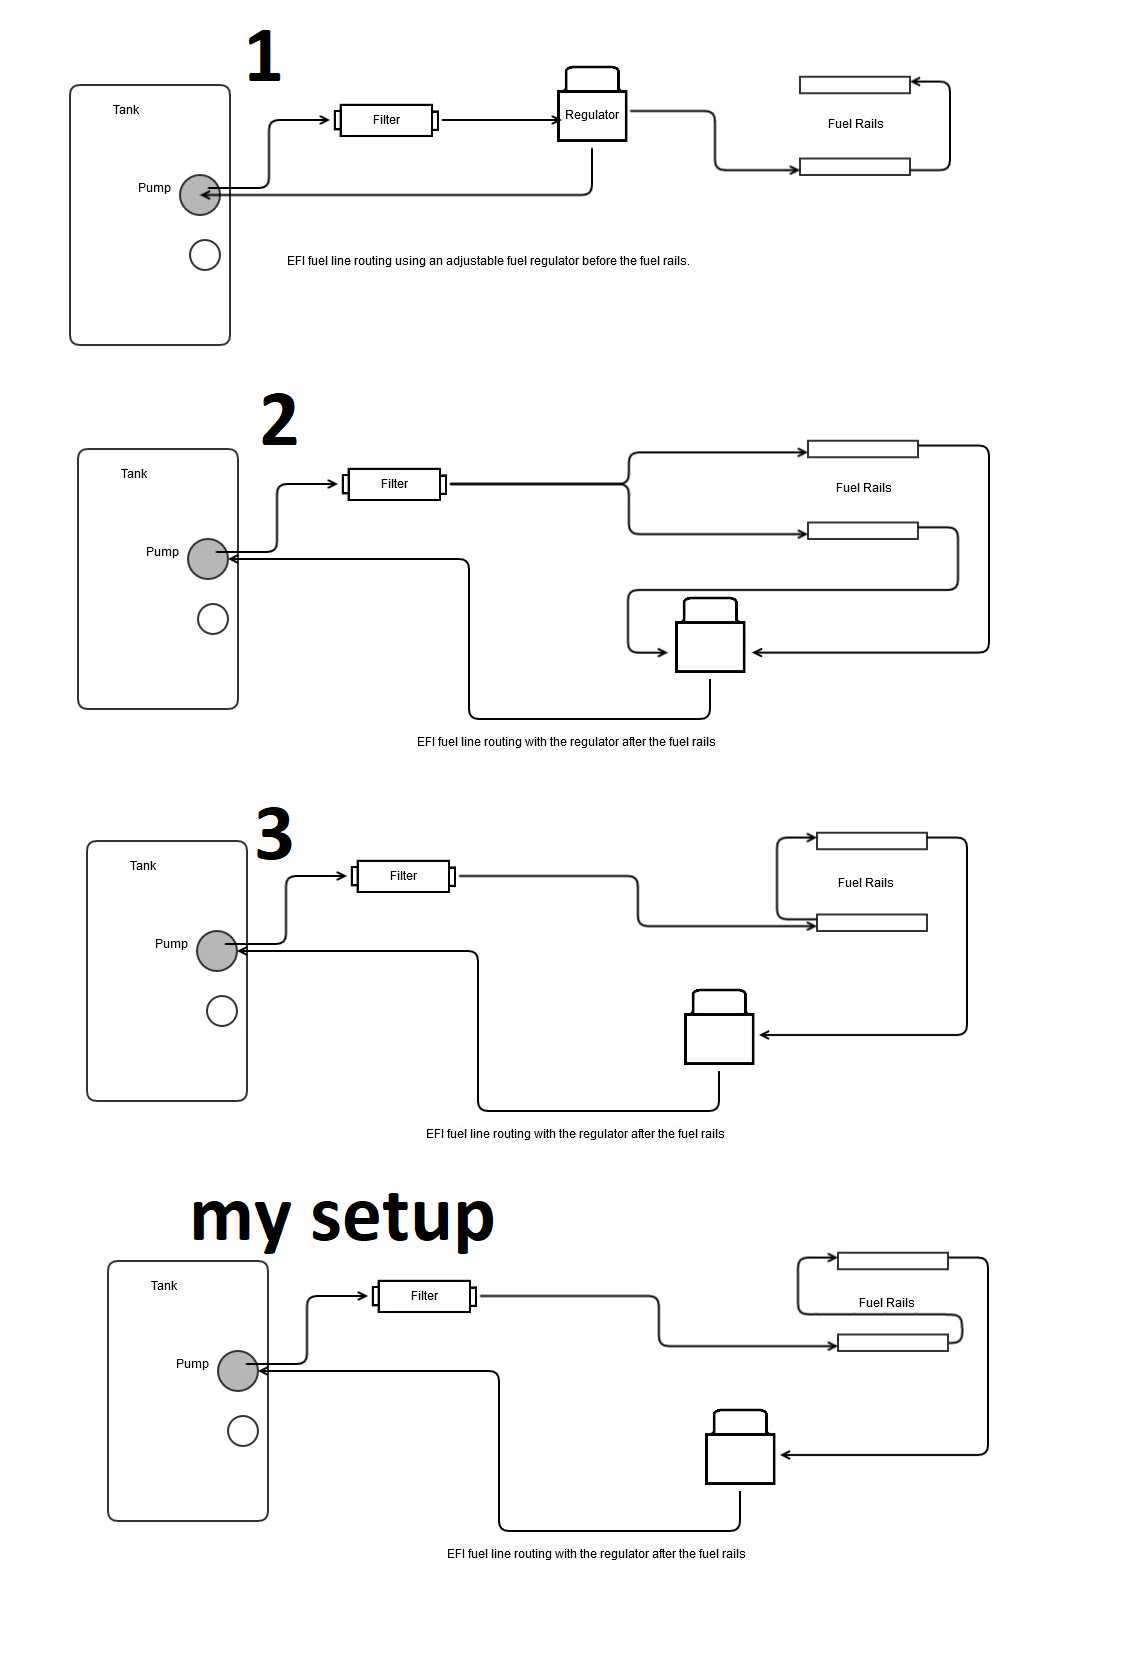
-----HOW TO HOOK UP PCV-----
For Gen 5 supercharger with a northstar throttle body, all you do is attach a hose from the Northstar TB nipple (before butterfly valve but after MAF) to the nipple on the supercharger by the PCV. You may need to change the direction of the nipple on the northstar throttle.The air goes from the throttle body, through the supercharger nipple, through the intake manifold, through the heads to the crank case, back up through the heads, back through the intake manifold, through the PCV valve, and back into the supercharger intake. There is no way to run a catch can without bypassing the actual PCV in some way, since it sits directly in the Gen 5 Supercharger intake.
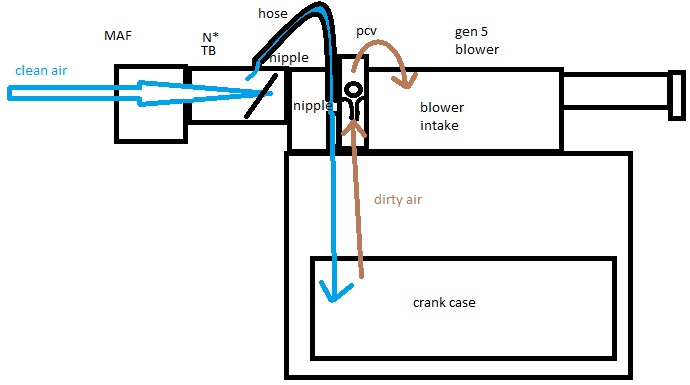
-----EXHAUST SETUP FOR BUILD 2-----
NOTE:See build 2 Exhaust section parts list.
-----
FieroAustin
1988 GT 3800sc Series III E85 Intercooled 2.56" Pulley
Amazon Recommendation Store for 3800s/Fieros/Tools https://amzn.to/3hNViaa
3800sc Instructions http://www.fiero.nl/forum/Forum2/HTML/139530.html
3800sc Instructions MOBILE https://drive.google.com/fi...JzC-2ZzbvLYMYE3QbmVq
eBay Recommendation Store http://ebay.us/hdJWbh
Donate to me https://paypal.me/FieroAustin
YouTube https://www.youtube.com/fie...n?sub_confirmation=1
Join YouTube membership https://www.youtube.com/FieroAustin/join
Join Facebook Group https://www.facebook.com/be...pporter/FieroAustin/
Consulting on Facebook https://www.facebook.com/FieroAustin/[This message has been edited by AustinH (edited 09-23-2025).]
|
|
|
|