Pennock's Fiero Forum
  The Construction Zone
  Project "off the Rickst'er Scale" begins (Page 27)

Post New Topic  Post A Reply
Email This Page to Someone! | Printable Version

This topic is 30 pages long:  1   2   3   4   5   6   7   8   9   10   11   12   13   14   15   16   17   18   19   20   21   22   23   24   25   26   27   28   29   30 
Previous Page | Next Page
next newest topic | next oldest topic
Project "off the Rickst'er Scale" begins by Bozzie
Started on: 01-26-2012 05:45 PM
Replies: 1166 (48413 views)
Last post by: Bozzie on 02-21-2023 06:27 PM
Bozzie
Member
Posts: 1188
From: Plainville,Ct. U.S.A
Registered: Oct 2007


Feedback score: (1)
Leave feedback

Rate this member

Report this Post05-28-2017 10:31 PM Click Here to See the Profile for BozzieSend a Private Message to BozzieEdit/Delete MessageReply w/QuoteDirect Link to This Post
Here you can see how I glassed under the wing and how it flows to the rear.


Pontiacbuildersnortheast.com
IP: Logged
Bozzie
Member
Posts: 1188
From: Plainville,Ct. U.S.A
Registered: Oct 2007


Feedback score: (1)
Leave feedback

Rate this member

Report this Post05-28-2017 10:33 PM Click Here to See the Profile for BozzieSend a Private Message to BozzieEdit/Delete MessageReply w/QuoteDirect Link to This Post

Bozzie

1188 posts
Member since Oct 2007
With the hatch back down, checking clearances and trimming and sanding time.


Pontiacbuildersnortheast.com
IP: Logged
RCR
Member
Posts: 4397
From: Shelby Twp Mi
Registered: Sep 2002


Feedback score:    (7)
Leave feedback


Total ratings: 102
Rate this member

Report this Post05-29-2017 08:28 AM Click Here to See the Profile for RCRSend a Private Message to RCREdit/Delete MessageReply w/QuoteDirect Link to This Post
The quality of work, and the speed by which you achieve it is truely amazing. Awesome stuff.

Bob
IP: Logged
Bozzie
Member
Posts: 1188
From: Plainville,Ct. U.S.A
Registered: Oct 2007


Feedback score: (1)
Leave feedback

Rate this member

Report this Post06-10-2017 08:41 PM Click Here to See the Profile for BozzieSend a Private Message to BozzieEdit/Delete MessageReply w/QuoteDirect Link to This Post
As always .. thank YOU Bob. It gets CRAZY when you get on a roll and Hrs just pass on by like nothing ! One reason I don't have a clock in the shop.....I guess why in a casino there is no windows to the outside....so you never can tell how long your there. I truly appreciate your input

Boz

[This message has been edited by Bozzie (edited 06-10-2017).]

IP: Logged
Bozzie
Member
Posts: 1188
From: Plainville,Ct. U.S.A
Registered: Oct 2007


Feedback score: (1)
Leave feedback

Rate this member

Report this Post06-10-2017 08:45 PM Click Here to See the Profile for BozzieSend a Private Message to BozzieEdit/Delete MessageReply w/QuoteDirect Link to This Post

Bozzie

1188 posts
Member since Oct 2007
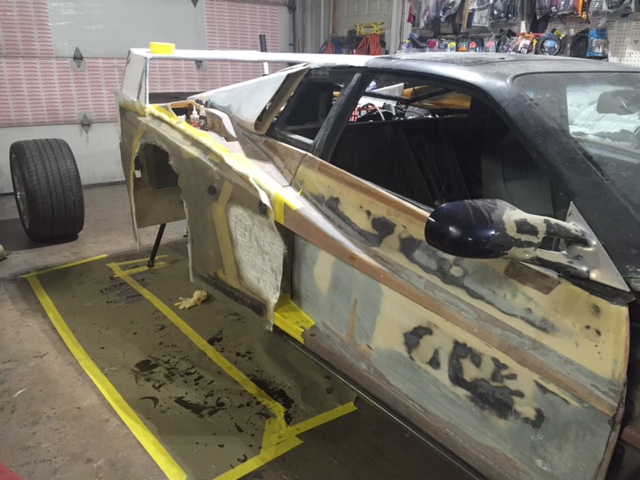
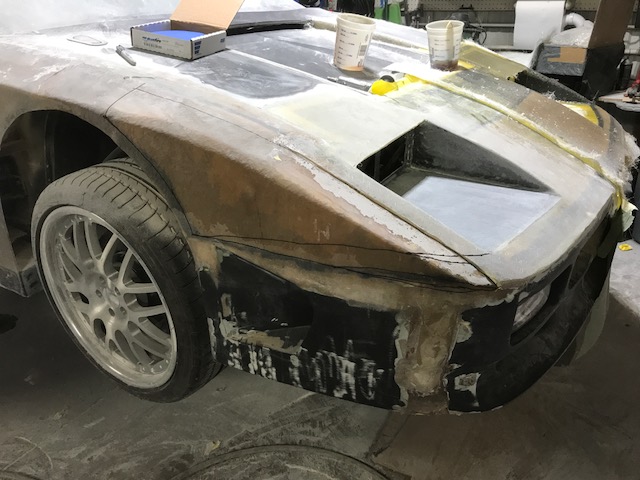
Back to the grind here. ALOT of sanding here. just sanding and sanding and well.....filling and sanding ! Just going from the left to the right side and checking for symmetry. This is where time stands still as hrs of work doesn't look like much. I'll be happy when this part is done and I can finally get to smoothing it out....which goes MUCH faster


Pontiacbuildersnortheast.com
IP: Logged
Bozzie
Member
Posts: 1188
From: Plainville,Ct. U.S.A
Registered: Oct 2007


Feedback score: (1)
Leave feedback

Rate this member

Report this Post06-10-2017 08:47 PM Click Here to See the Profile for BozzieSend a Private Message to BozzieEdit/Delete MessageReply w/QuoteDirect Link to This Post

Bozzie

1188 posts
Member since Oct 2007
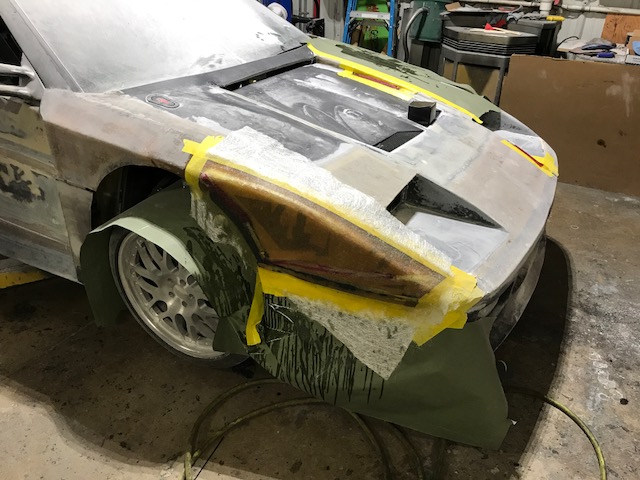
Here the side scoop was about a 3/8 " higher on the passenger side, so I cut it and moved it down. I'll have to fix the underside of this scoop as well later....as I wanted it curved under and I was alittle off on this side.


Pontiacbuildersnortheast.com
IP: Logged
Bozzie
Member
Posts: 1188
From: Plainville,Ct. U.S.A
Registered: Oct 2007


Feedback score: (1)
Leave feedback

Rate this member

Report this Post06-10-2017 08:53 PM Click Here to See the Profile for BozzieSend a Private Message to BozzieEdit/Delete MessageReply w/QuoteDirect Link to This Post

Bozzie

1188 posts
Member since Oct 2007
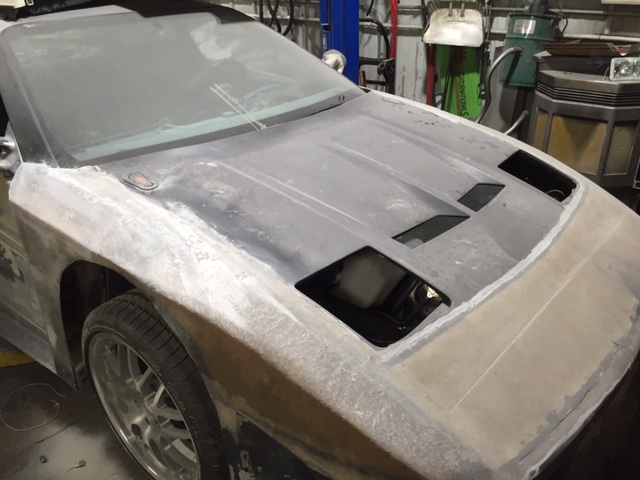
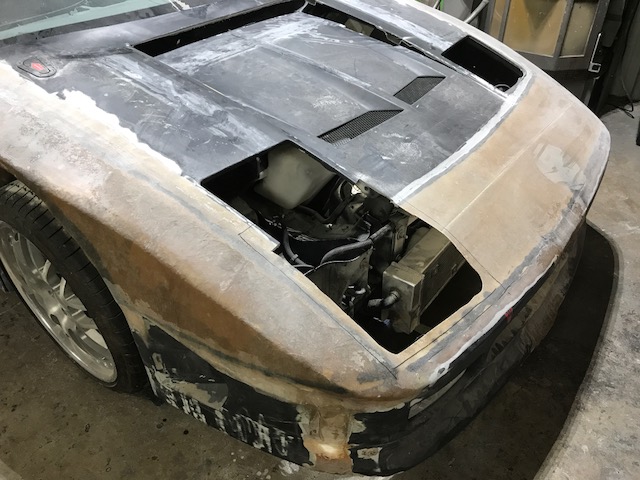
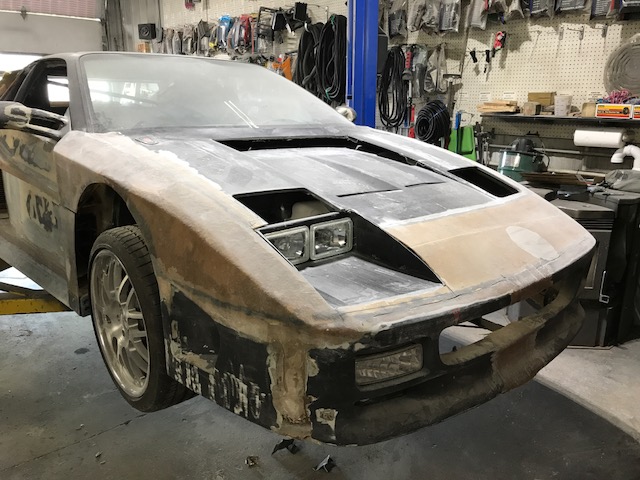
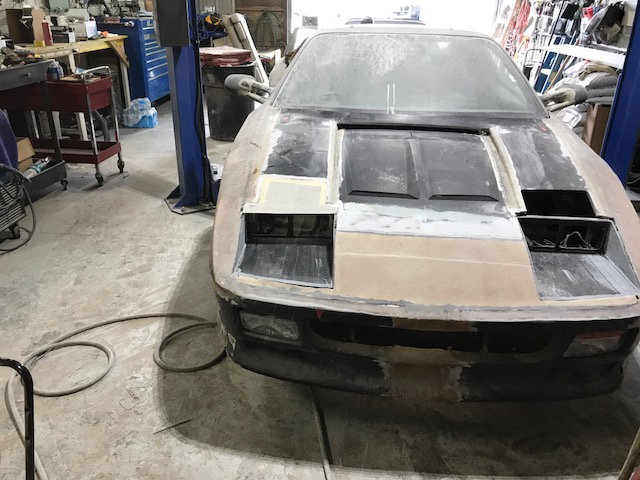
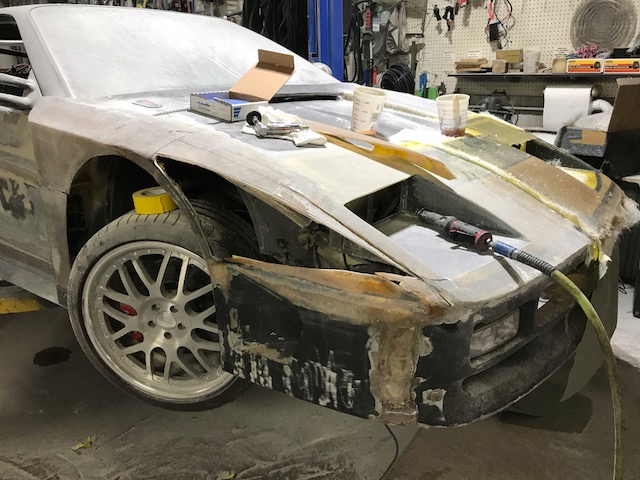
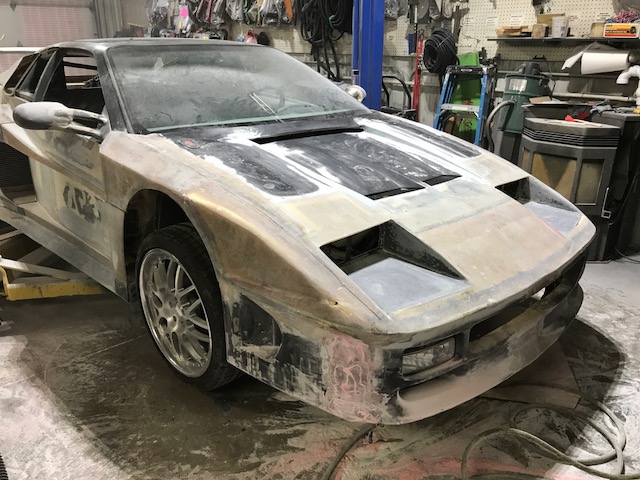
The hood is up for some major changes. I've been concentrating on the rear so much lately that while things dry there im moving onto the front. This way I can go back and forth between resin timing and filler timing i'll always be moving forward Here it is as she stands. The first mod is dropping the center of the hood about a 1" and a Half.


Pontiacbuildersnortheast.com
IP: Logged
Bozzie
Member
Posts: 1188
From: Plainville,Ct. U.S.A
Registered: Oct 2007


Feedback score: (1)
Leave feedback

Rate this member

Report this Post06-10-2017 08:55 PM Click Here to See the Profile for BozzieSend a Private Message to BozzieEdit/Delete MessageReply w/QuoteDirect Link to This Post

Bozzie

1188 posts
Member since Oct 2007
So....as with any mod, its measure a buncha times and make your lines. Look at it 100 X's move things around and then done.

Boz


Pontiacbuildersnortheast.com
IP: Logged
Bozzie
Member
Posts: 1188
From: Plainville,Ct. U.S.A
Registered: Oct 2007


Feedback score: (1)
Leave feedback

Rate this member

Report this Post06-10-2017 08:59 PM Click Here to See the Profile for BozzieSend a Private Message to BozzieEdit/Delete MessageReply w/QuoteDirect Link to This Post

Bozzie

1188 posts
Member since Oct 2007
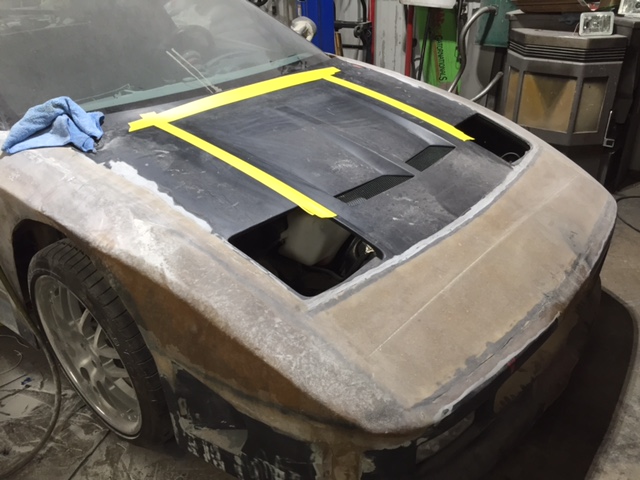
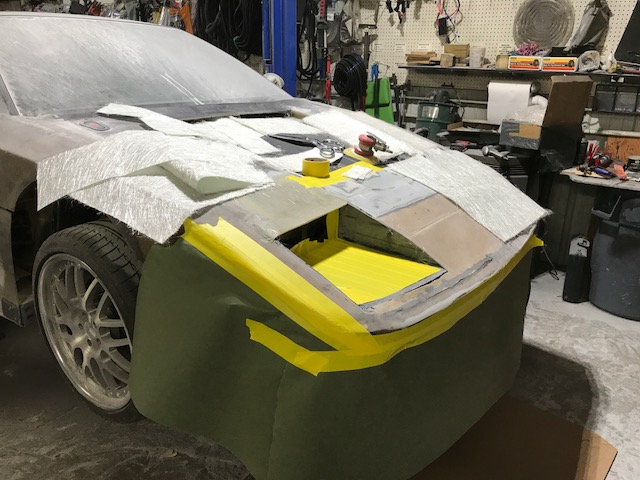
Here its cut. BUT.... I had to trim the metal up by the cowl area a bit to get it to drop that much. THEN...... the front firewall where the headlights mount was sitting about a 1" to high and bulging the hood there. SO..... as with all the mods one things leads to another and a bunch trimming was made to make this work. And trimming the front area...well....the brake vacuum canister was there so I had to move that !! Freakin never ends !!!
Boz


Pontiacbuildersnortheast.com
IP: Logged
Bozzie
Member
Posts: 1188
From: Plainville,Ct. U.S.A
Registered: Oct 2007


Feedback score: (1)
Leave feedback

Rate this member

Report this Post06-10-2017 09:01 PM Click Here to See the Profile for BozzieSend a Private Message to BozzieEdit/Delete MessageReply w/QuoteDirect Link to This Post

Bozzie

1188 posts
Member since Oct 2007
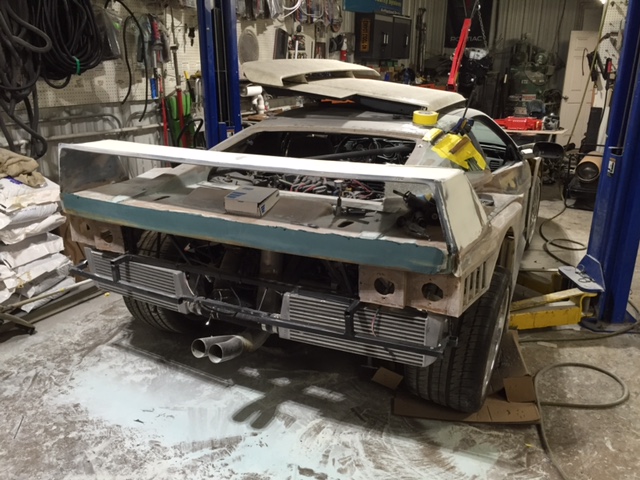
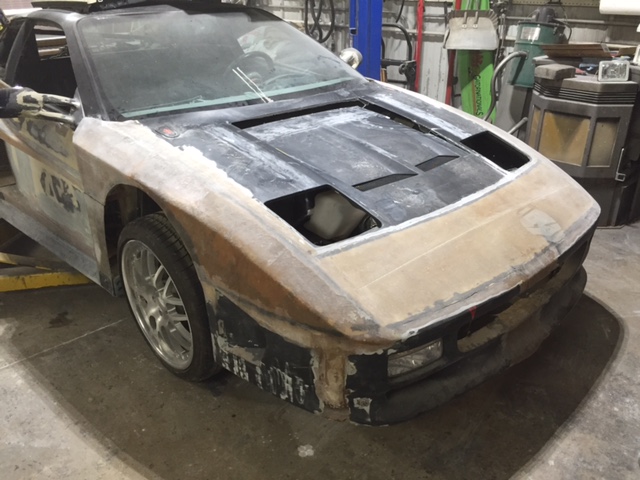
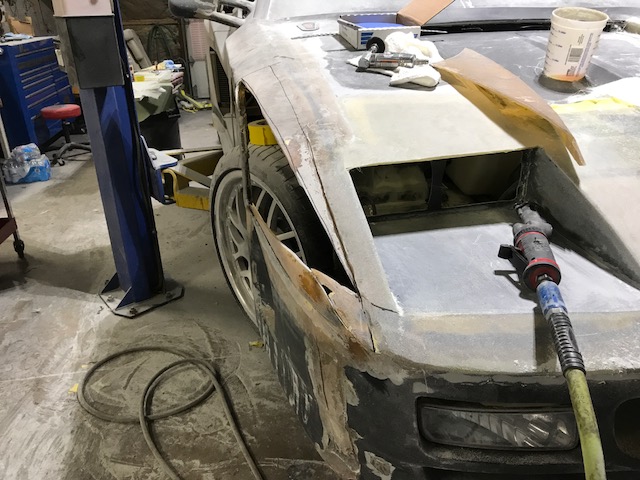
I'll get to glassing the hood later.....just kinda beat myself up on it so im moving back to the rear. Sanding again and mounted the bumper back on for some filling.


Boz


Pontiacbuildersnortheast.com
IP: Logged
Bozzie
Member
Posts: 1188
From: Plainville,Ct. U.S.A
Registered: Oct 2007


Feedback score: (1)
Leave feedback

Rate this member

Report this Post06-10-2017 09:05 PM Click Here to See the Profile for BozzieSend a Private Message to BozzieEdit/Delete MessageReply w/QuoteDirect Link to This Post

Bozzie

1188 posts
Member since Oct 2007
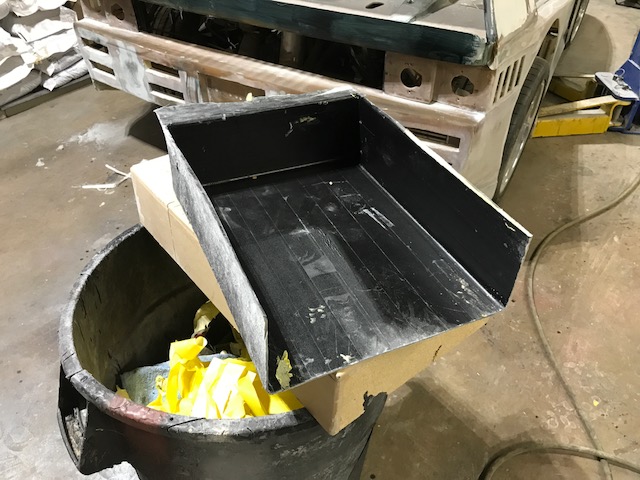
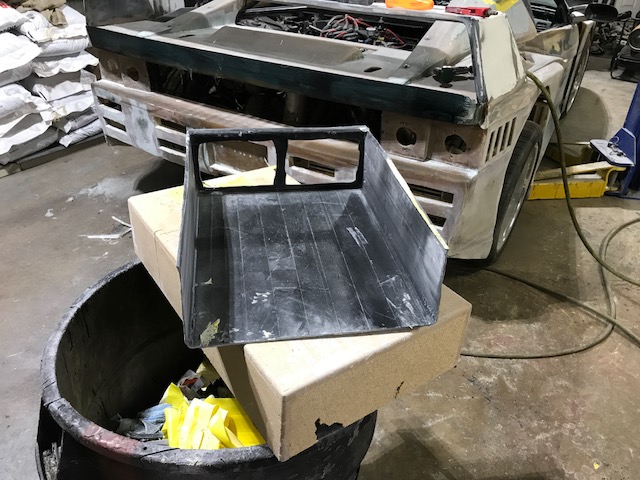
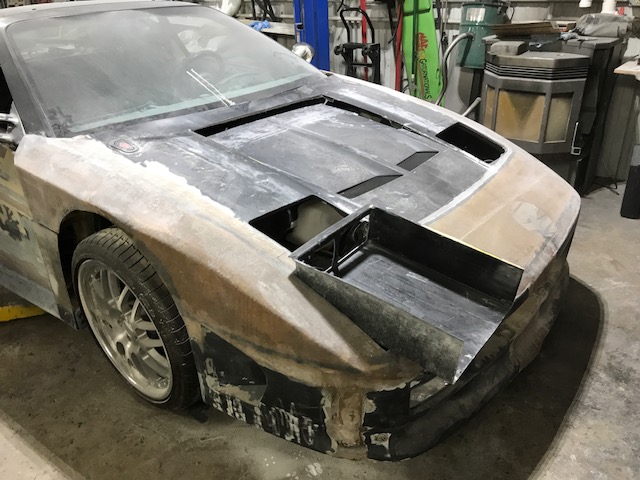
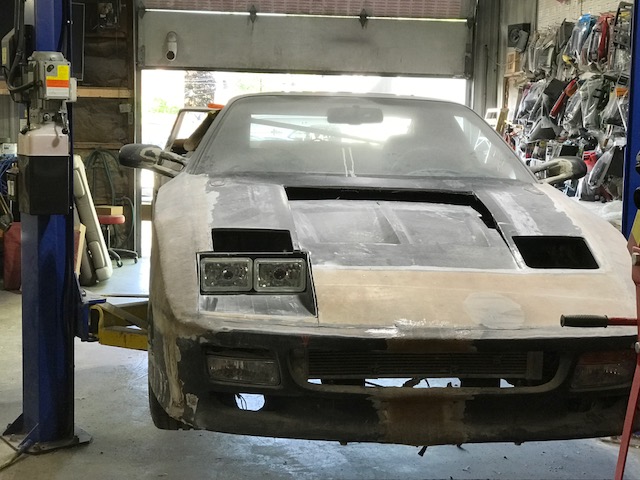
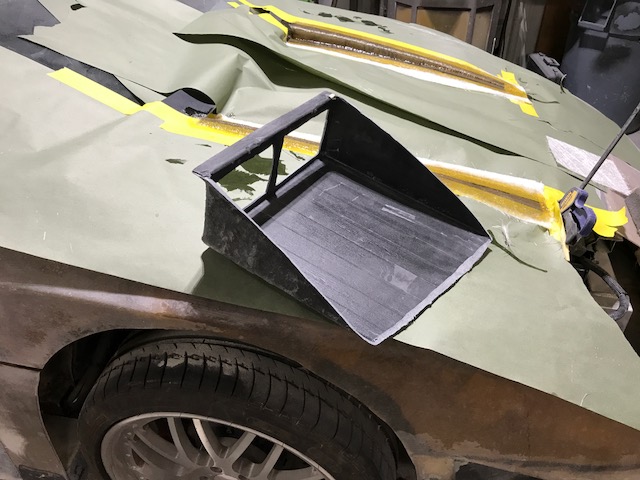
Inbetween I made some box's here out of MDF for the NEXT Mod I glassed these over and let it sit overnight.....popped it out and Here you can see my version of a Koenig version headlight bucket. I'll make another and find a way to make it fit the car.....gonna be tight. I made these buckets about as small height and width wise as I could. Going to be a lot of cutting later for sure. More to come !

Boz


Pontiacbuildersnortheast.com

[This message has been edited by Bozzie (edited 06-10-2017).]

IP: Logged
PFF
System Bot
RCR
Member
Posts: 4397
From: Shelby Twp Mi
Registered: Sep 2002


Feedback score:    (7)
Leave feedback


Total ratings: 102
Rate this member

Report this Post06-11-2017 09:50 AM Click Here to See the Profile for RCRSend a Private Message to RCREdit/Delete MessageReply w/QuoteDirect Link to This Post
 
quote
Originally posted by Bozzie:

Pontiacbuildersnortheast.com


Moving around is the only way to keep the progress going. I'm just stuck because I need the front to tie everything together.

Now, I can't imagine you're out of room, so how are you going to integrate the GT decklid into the roof?

Bob
IP: Logged
Neils88
Member
Posts: 4045
From: Jeddore,Nova Scotia
Registered: Aug 2013


Feedback score: N/A
Leave feedback


Total ratings: 56
Rate this member

Report this Post06-11-2017 08:42 PM Click Here to See the Profile for Neils88Send a Private Message to Neils88Edit/Delete MessageReply w/QuoteDirect Link to This Post
 
quote
Originally posted by RCR:

... so how are you going to integrate the GT decklid into the roof?


Clearly Bozzie is trying out his new roof spoiler. May need to straighten that up a bit though....

Looking awesome Bozzie!
IP: Logged
DeLorean00
Member
Posts: 4251
From: Sacramento, CA / Reno, NV
Registered: Aug 2005


Feedback score: (2)
Leave feedback


Total ratings: 100
Rate this member

Report this Post06-11-2017 10:29 PM Click Here to See the Profile for DeLorean00Send a Private Message to DeLorean00Edit/Delete MessageReply w/QuoteDirect Link to This Post
Bozzie you are one of the most talented people I have ever seen. You are able to design and create your dreams and that is unbelievable. I am humbled by your talent. Thanks for keeping us updated on your progress.
IP: Logged
Bozzie
Member
Posts: 1188
From: Plainville,Ct. U.S.A
Registered: Oct 2007


Feedback score: (1)
Leave feedback

Rate this member

Report this Post06-24-2017 08:38 PM Click Here to See the Profile for BozzieSend a Private Message to BozzieEdit/Delete MessageReply w/QuoteDirect Link to This Post
Bob.......ya know I KNEW I was gonna get some slack on that decklid ! I took the pic and thought to myself....YUUUUPPPP I did think about what Neil said and making it a sprint car with a monster upper spoiler but that only lasted a second. Delorean, its my pleaser keeping this up to date, any input is always appreciated. Neil, your modern marvel with all your ingenuities is downright off the chart ! I sometimes look at what your doing like WHAT ?!!?! I must be slackin !


Boz
IP: Logged
Bozzie
Member
Posts: 1188
From: Plainville,Ct. U.S.A
Registered: Oct 2007


Feedback score: (1)
Leave feedback

Rate this member

Report this Post06-24-2017 08:40 PM Click Here to See the Profile for BozzieSend a Private Message to BozzieEdit/Delete MessageReply w/QuoteDirect Link to This Post

Bozzie

1188 posts
Member since Oct 2007
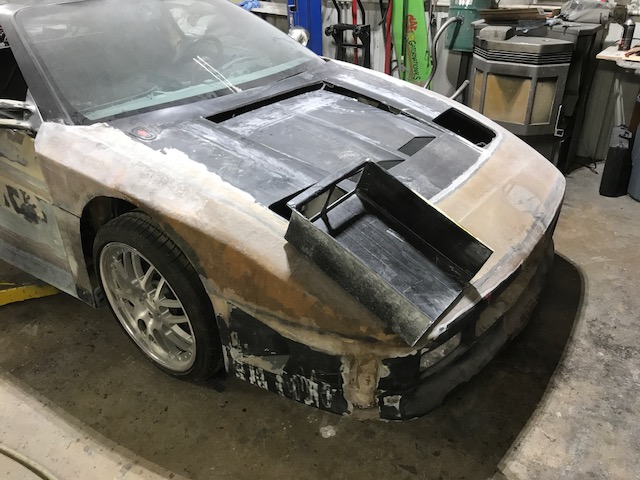
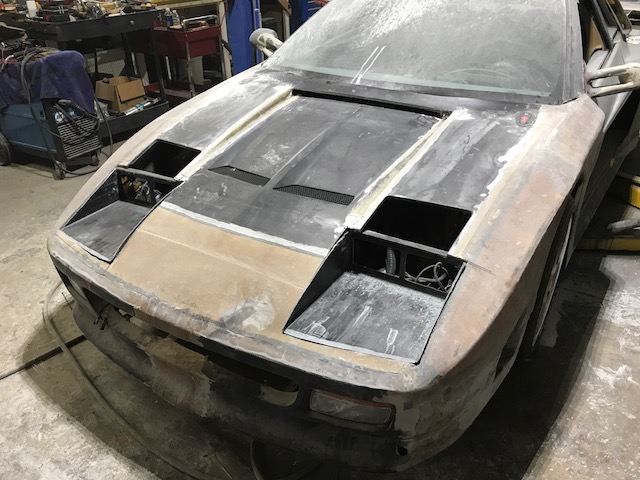
SO ....back to the buckets Im doing dual Square lights like the Koenig edition so I cut the opening for the lights. This is a flat panel they will mount to but i'll trim the lights later to give it a stagger ....more on this later.

Buckets ........


Boz


Pontiacbuildersnortheast.com
IP: Logged
Bozzie
Member
Posts: 1188
From: Plainville,Ct. U.S.A
Registered: Oct 2007


Feedback score: (1)
Leave feedback

Rate this member

Report this Post06-24-2017 08:42 PM Click Here to See the Profile for BozzieSend a Private Message to BozzieEdit/Delete MessageReply w/QuoteDirect Link to This Post

Bozzie

1188 posts
Member since Oct 2007
Popped the lights for effect. These have a halo ring around them that lights up white. Not sure if it will look cheesy so i'll have to try and see.

Boz


Pontiacbuildersnortheast.com
IP: Logged
Bozzie
Member
Posts: 1188
From: Plainville,Ct. U.S.A
Registered: Oct 2007


Feedback score: (1)
Leave feedback

Rate this member

Report this Post06-24-2017 08:44 PM Click Here to See the Profile for BozzieSend a Private Message to BozzieEdit/Delete MessageReply w/QuoteDirect Link to This Post

Bozzie

1188 posts
Member since Oct 2007
Here comes the FUN part. By all calculations this is gonna be TIGHT. Going to measure and trim alittle at a time and see how it goes.

Boz


Pontiacbuildersnortheast.com
IP: Logged
Bozzie
Member
Posts: 1188
From: Plainville,Ct. U.S.A
Registered: Oct 2007


Feedback score: (1)
Leave feedback

Rate this member

Report this Post06-24-2017 08:50 PM Click Here to See the Profile for BozzieSend a Private Message to BozzieEdit/Delete MessageReply w/QuoteDirect Link to This Post

Bozzie

1188 posts
Member since Oct 2007
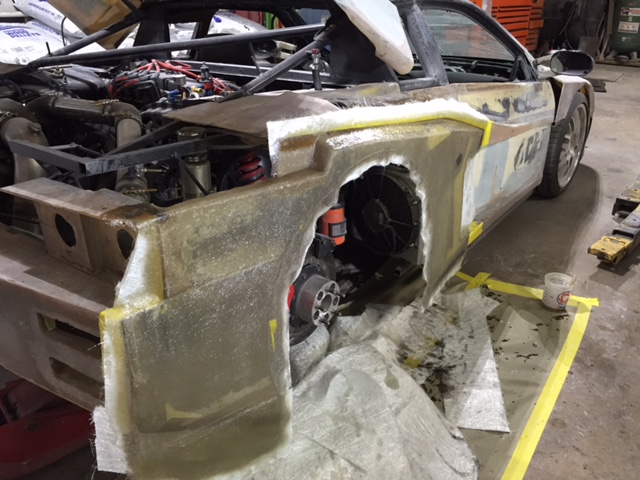
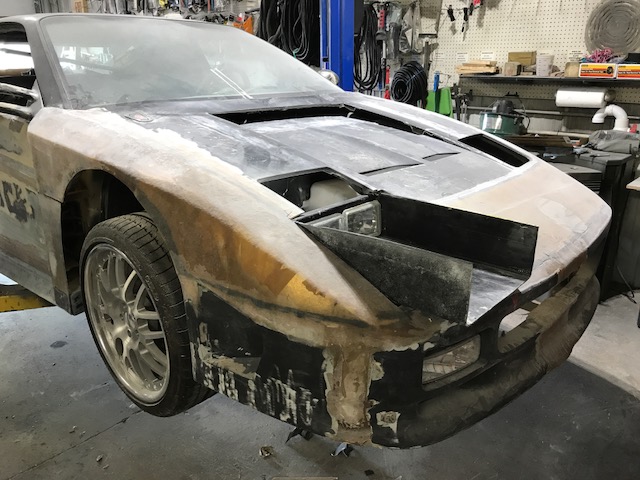
Here is the trimmed area. Theres a lot in the way. Wiring, metal, etc. Have to cut this all out slowly as to make sure I keep as much as I can. The buckets need to be level so I need to move them back and down until so.


Boz


Pontiacbuildersnortheast.com
IP: Logged
Bozzie
Member
Posts: 1188
From: Plainville,Ct. U.S.A
Registered: Oct 2007


Feedback score: (1)
Leave feedback

Rate this member

Report this Post06-24-2017 08:52 PM Click Here to See the Profile for BozzieSend a Private Message to BozzieEdit/Delete MessageReply w/QuoteDirect Link to This Post

Bozzie

1188 posts
Member since Oct 2007
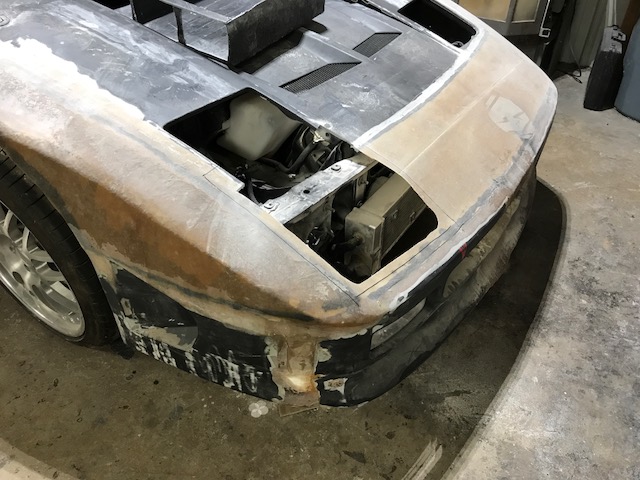
Sometimes things just work out for some reason, more often not thou.. LOL. But here I cut the forward radiator support right up to the frame rail. It seams like these buckets are going to fit with no room to spare width wise. Some wire rerouting to come. Im very happy these are going to fit, thou I wasn't taking no for a answer !!

Boz


Pontiacbuildersnortheast.com
IP: Logged
Bozzie
Member
Posts: 1188
From: Plainville,Ct. U.S.A
Registered: Oct 2007


Feedback score: (1)
Leave feedback

Rate this member

Report this Post06-24-2017 08:54 PM Click Here to See the Profile for BozzieSend a Private Message to BozzieEdit/Delete MessageReply w/QuoteDirect Link to This Post

Bozzie

1188 posts
Member since Oct 2007
Cutting down alittle at a time and moving the bucket to fit. Going to have to go deeper than I thought !


Boz


Pontiacbuildersnortheast.com
IP: Logged
PFF
System Bot
Bozzie
Member
Posts: 1188
From: Plainville,Ct. U.S.A
Registered: Oct 2007


Feedback score: (1)
Leave feedback

Rate this member

Report this Post06-24-2017 08:56 PM Click Here to See the Profile for BozzieSend a Private Message to BozzieEdit/Delete MessageReply w/QuoteDirect Link to This Post
Here it is pretty much where I want it. Alittle more trimming for some extra space and done. Time to shape it !

Boz


Pontiacbuildersnortheast.com
IP: Logged
Bozzie
Member
Posts: 1188
From: Plainville,Ct. U.S.A
Registered: Oct 2007


Feedback score: (1)
Leave feedback

Rate this member

Report this Post06-24-2017 08:57 PM Click Here to See the Profile for BozzieSend a Private Message to BozzieEdit/Delete MessageReply w/QuoteDirect Link to This Post

Bozzie

1188 posts
Member since Oct 2007
Another look before trimming.. Definatly a different look to it !


Boz


Pontiacbuildersnortheast.com
IP: Logged
Bozzie
Member
Posts: 1188
From: Plainville,Ct. U.S.A
Registered: Oct 2007


Feedback score: (1)
Leave feedback

Rate this member

Report this Post06-24-2017 08:59 PM Click Here to See the Profile for BozzieSend a Private Message to BozzieEdit/Delete MessageReply w/QuoteDirect Link to This Post

Bozzie

1188 posts
Member since Oct 2007
Trimmed and just sitting in there for a visual.


Boz


Pontiacbuildersnortheast.com
IP: Logged
engine man
Member
Posts: 5298
From: Lebanon NH
Registered: Mar 2006


Feedback score: (5)
Leave feedback

Rate this member

Report this Post06-24-2017 09:01 PM Click Here to See the Profile for engine manSend a Private Message to engine manEdit/Delete MessageReply w/QuoteDirect Link to This Post
just amazing
IP: Logged
Neils88
Member
Posts: 4045
From: Jeddore,Nova Scotia
Registered: Aug 2013


Feedback score: N/A
Leave feedback


Total ratings: 56
Rate this member

Report this Post06-25-2017 08:30 PM Click Here to See the Profile for Neils88Send a Private Message to Neils88Edit/Delete MessageReply w/QuoteDirect Link to This Post
I love the new lights! That is going to look so much better than the stock positioning. Are you going to build in an adjustment system to allow you to easily align the lights?
IP: Logged
Bozzie
Member
Posts: 1188
From: Plainville,Ct. U.S.A
Registered: Oct 2007


Feedback score: (1)
Leave feedback

Rate this member

Report this Post07-14-2017 06:51 PM Click Here to See the Profile for BozzieSend a Private Message to BozzieEdit/Delete MessageReply w/QuoteDirect Link to This Post
Some UPDATES Thanks Mark, as I hope your still keeping going on your car....seams SO close !!!! Neils......I was thinking ALOT about the headlights. And thou it might sound cheesy , as I have built the housing at a 90degree to the ground as the stance the car sits at , Im just thinking of just glueing the housings in. I'll light them up and set them in the housing where I want them. I really don't think i'll ever care to adjust them again. Thinking that once there set, like any new car, that's pretty much it Plus, it saves quite a bit of work more concentrated elsewhere.


Boz

Pontiacbuildersnortheast.com
IP: Logged
Bozzie
Member
Posts: 1188
From: Plainville,Ct. U.S.A
Registered: Oct 2007


Feedback score: (1)
Leave feedback

Rate this member

Report this Post07-14-2017 06:55 PM Click Here to See the Profile for BozzieSend a Private Message to BozzieEdit/Delete MessageReply w/QuoteDirect Link to This Post

Bozzie

1188 posts
Member since Oct 2007
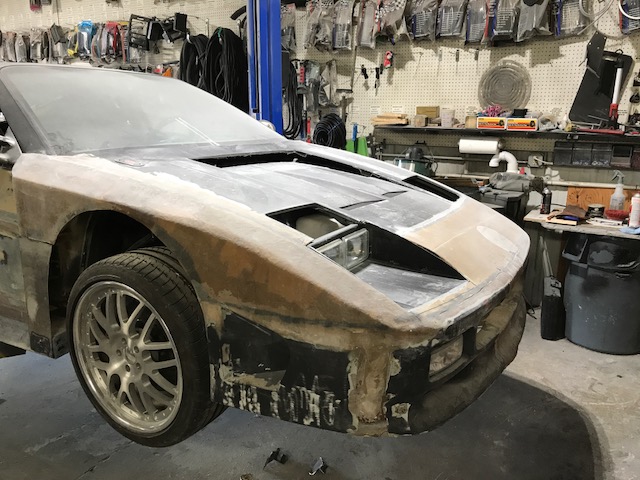
Glassing the sides of the hood here. I had to place a brick on the forward edge because it was bulging out with the lack of support. Trying to keep it as non warped as possible as it comes back together, might've cut alittle to much without putting things back together !

Boz


Pontiacbuildersnortheast.com
IP: Logged
Bozzie
Member
Posts: 1188
From: Plainville,Ct. U.S.A
Registered: Oct 2007


Feedback score: (1)
Leave feedback

Rate this member

Report this Post07-14-2017 06:57 PM Click Here to See the Profile for BozzieSend a Private Message to BozzieEdit/Delete MessageReply w/QuoteDirect Link to This Post

Bozzie

1188 posts
Member since Oct 2007
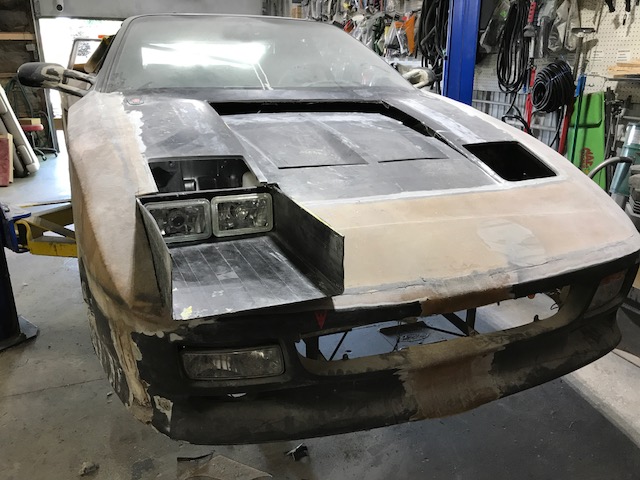
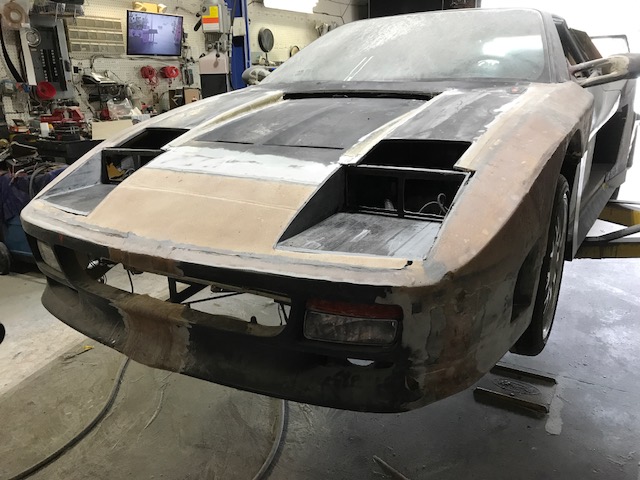
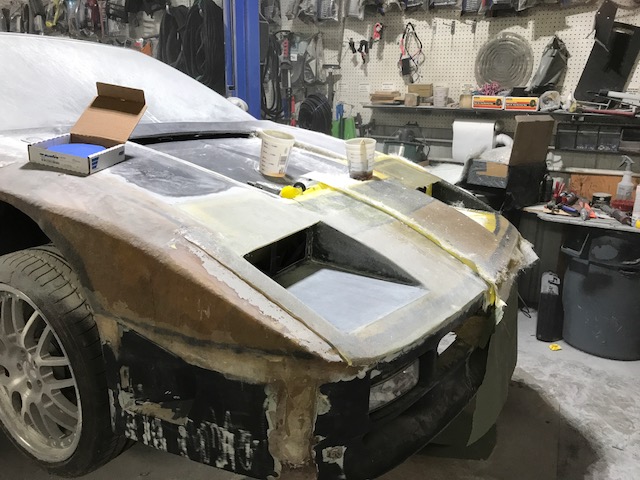
Pulled the Headlight pocket out here, checking again for fitment and clearance. Time for the drivers side as the hoods alittle more solid. Hoping to get these too sides to match so alittle cutting at a time

Boz


IP: Logged
Bozzie
Member
Posts: 1188
From: Plainville,Ct. U.S.A
Registered: Oct 2007


Feedback score: (1)
Leave feedback

Rate this member

Report this Post07-14-2017 07:00 PM Click Here to See the Profile for BozzieSend a Private Message to BozzieEdit/Delete MessageReply w/QuoteDirect Link to This Post

Bozzie

1188 posts
Member since Oct 2007
Got the Drivers side matched up pretty good. The cuts into the radiator support areas and front factory headlight buckets line up. There just sitting here for a look


Boz


IP: Logged
Bozzie
Member
Posts: 1188
From: Plainville,Ct. U.S.A
Registered: Oct 2007


Feedback score: (1)
Leave feedback

Rate this member

Report this Post07-14-2017 07:03 PM Click Here to See the Profile for BozzieSend a Private Message to BozzieEdit/Delete MessageReply w/QuoteDirect Link to This Post

Bozzie

1188 posts
Member since Oct 2007
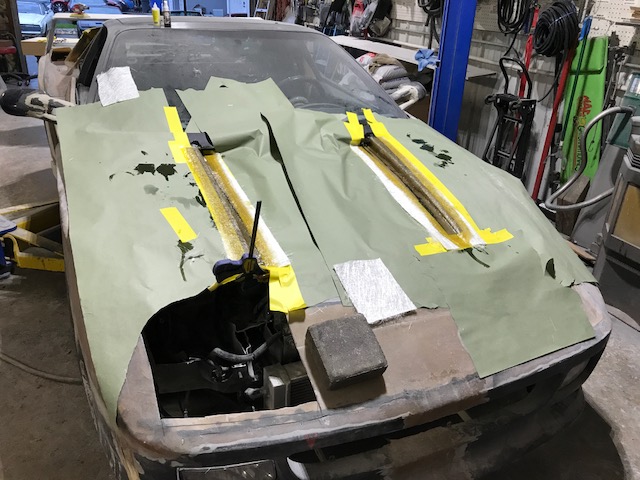
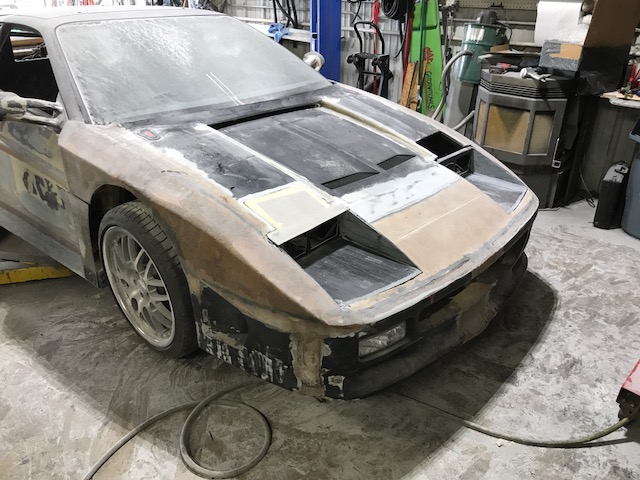
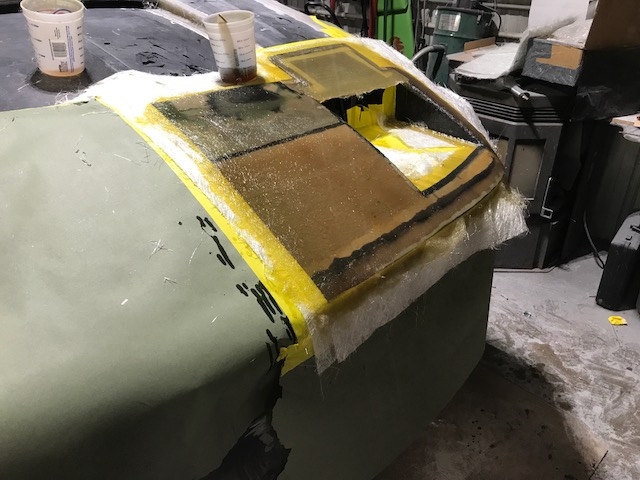
Made a small panel out of 2 layers of glass to fill in the opening on the hood. I'll glass these in with another 2 layers. They overlap the headlight bucket by about a inch therefore hiding the top of the headlight housings. Koenig edition cars came with plexi covers over this area and not. Im not doing covers as these will be black in contrast to the car


Boz


[This message has been edited by Bozzie (edited 07-14-2017).]

IP: Logged
PFF
System Bot
Bozzie
Member
Posts: 1188
From: Plainville,Ct. U.S.A
Registered: Oct 2007


Feedback score: (1)
Leave feedback

Rate this member

Report this Post07-14-2017 07:08 PM Click Here to See the Profile for BozzieSend a Private Message to BozzieEdit/Delete MessageReply w/QuoteDirect Link to This Post

Bozzie

1188 posts
Member since Oct 2007
And glassed solid. Not shown is the glassing of the bucket to the car with 2 layers as well. I did this to the hoods center line.


Boz


IP: Logged
Bozzie
Member
Posts: 1188
From: Plainville,Ct. U.S.A
Registered: Oct 2007


Feedback score: (1)
Leave feedback

Rate this member

Report this Post07-14-2017 07:10 PM Click Here to See the Profile for BozzieSend a Private Message to BozzieEdit/Delete MessageReply w/QuoteDirect Link to This Post

Bozzie

1188 posts
Member since Oct 2007
Ruff sanding here. I don't have pics somehow of the glasswork to the centerline on this side but youll see by the drivers side what I did coming up
Boz


IP: Logged
Bozzie
Member
Posts: 1188
From: Plainville,Ct. U.S.A
Registered: Oct 2007


Feedback score: (1)
Leave feedback

Rate this member

Report this Post07-14-2017 07:11 PM Click Here to See the Profile for BozzieSend a Private Message to BozzieEdit/Delete MessageReply w/QuoteDirect Link to This Post

Bozzie

1188 posts
Member since Oct 2007
Drivers side glassed in. This is how I did the passenger side as well. Some sanding to go !


Boz


IP: Logged
Bozzie
Member
Posts: 1188
From: Plainville,Ct. U.S.A
Registered: Oct 2007


Feedback score: (1)
Leave feedback

Rate this member

Report this Post07-14-2017 07:14 PM Click Here to See the Profile for BozzieSend a Private Message to BozzieEdit/Delete MessageReply w/QuoteDirect Link to This Post

Bozzie

1188 posts
Member since Oct 2007
Cleaning up the passenger side area here. You can see about a 3/4" flat area on the outside of the bucket before the fender. I will taper this down and around the front fender section. Since I made the fenders ive never really been happy with the front corners. Ive done these over a few times already and well.......hopefully one more time will do it as I refine it further.


Boz
IP: Logged
Bozzie
Member
Posts: 1188
From: Plainville,Ct. U.S.A
Registered: Oct 2007


Feedback score: (1)
Leave feedback

Rate this member

Report this Post07-14-2017 07:15 PM Click Here to See the Profile for BozzieSend a Private Message to BozzieEdit/Delete MessageReply w/QuoteDirect Link to This Post

Bozzie

1188 posts
Member since Oct 2007
Front fender corners here. Ive marked a line as to where the body flows that i'll cut and bring it all in somehow.


Boz


IP: Logged
Bozzie
Member
Posts: 1188
From: Plainville,Ct. U.S.A
Registered: Oct 2007


Feedback score: (1)
Leave feedback

Rate this member

Report this Post07-14-2017 07:17 PM Click Here to See the Profile for BozzieSend a Private Message to BozzieEdit/Delete MessageReply w/QuoteDirect Link to This Post

Bozzie

1188 posts
Member since Oct 2007
and it begins..................... cut up and pieced together like Frankenstein !!


Boz


IP: Logged
Bozzie
Member
Posts: 1188
From: Plainville,Ct. U.S.A
Registered: Oct 2007


Feedback score: (1)
Leave feedback

Rate this member

Report this Post07-14-2017 07:19 PM Click Here to See the Profile for BozzieSend a Private Message to BozzieEdit/Delete MessageReply w/QuoteDirect Link to This Post

Bozzie

1188 posts
Member since Oct 2007
oh BOY ....look what the ups guy brought in Had Alex redue a Beachwood wheel for me which will go into my black CJB Amazing job !!!


Boz


[This message has been edited by Bozzie (edited 07-14-2017).]

IP: Logged
Bozzie
Member
Posts: 1188
From: Plainville,Ct. U.S.A
Registered: Oct 2007


Feedback score: (1)
Leave feedback

Rate this member

Report this Post07-14-2017 07:22 PM Click Here to See the Profile for BozzieSend a Private Message to BozzieEdit/Delete MessageReply w/QuoteDirect Link to This Post

Bozzie

1188 posts
Member since Oct 2007
Glassed the front corner in and did some ruff sanding. I think I can work with this now.


Boz


IP: Logged
Bozzie
Member
Posts: 1188
From: Plainville,Ct. U.S.A
Registered: Oct 2007


Feedback score: (1)
Leave feedback

Rate this member

Report this Post07-14-2017 07:25 PM Click Here to See the Profile for BozzieSend a Private Message to BozzieEdit/Delete MessageReply w/QuoteDirect Link to This Post

Bozzie

1188 posts
Member since Oct 2007
A few more things to do on the list are to get rid of those lower vents in the bumper sides, clean up the door jambs and finally get down to smoothing and filling. More to come !!!


Boz


Pontiacbuildersnortheast.com
IP: Logged
Previous Page | Next Page

This topic is 30 pages long:  1   2   3   4   5   6   7   8   9   10   11   12   13   14   15   16   17   18   19   20   21   22   23   24   25   26   27   28   29   30 
next newest topic | next oldest topic

All times are ET (US)

Post New Topic  Post A Reply
Hop to:

Contact Us | Back To Main Page

Advertizing on PFF | Fiero Parts Vendors
PFF Merchandise | Fiero Gallery | Ogre's Cave
Real-Time Chat | Fiero Related Auctions on eBay


Copyright (c) 1999, C. Pennock