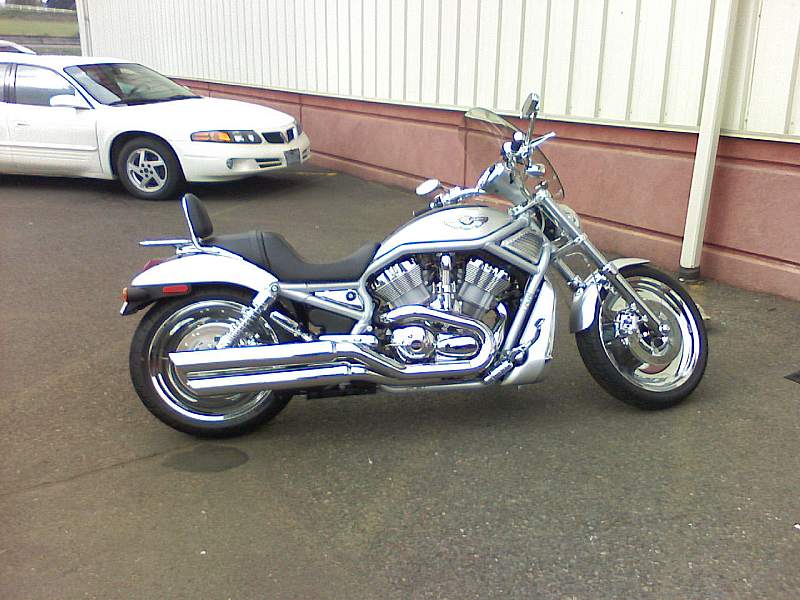
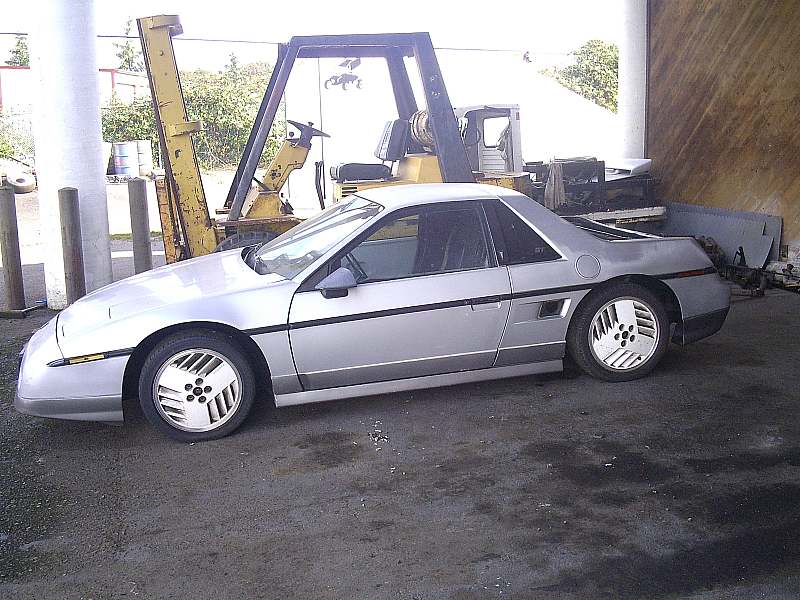
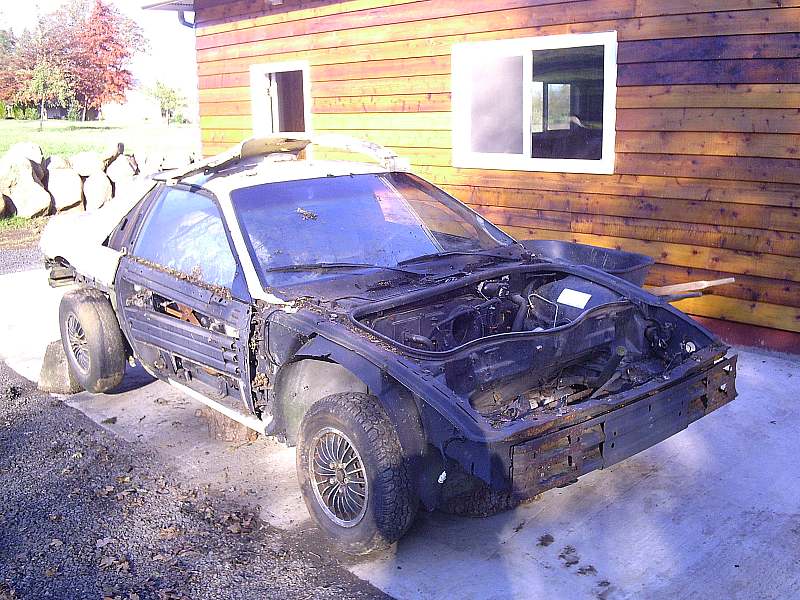
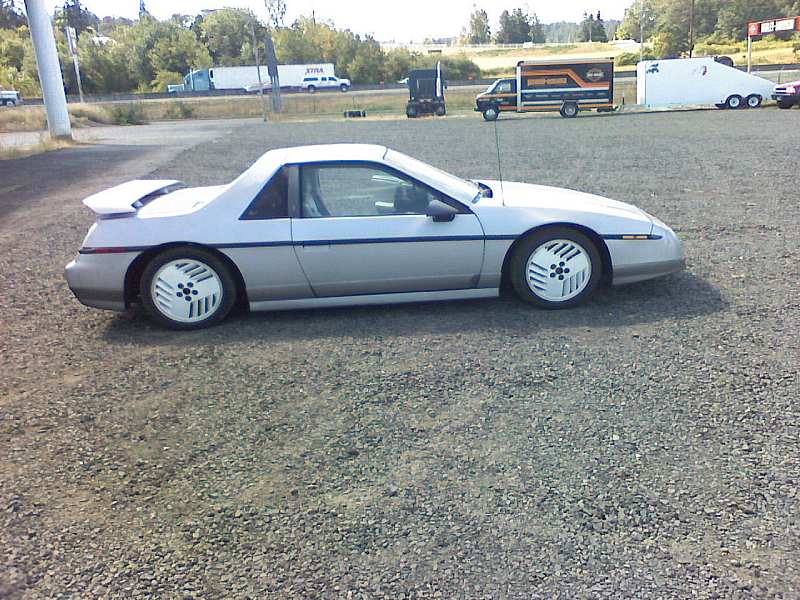
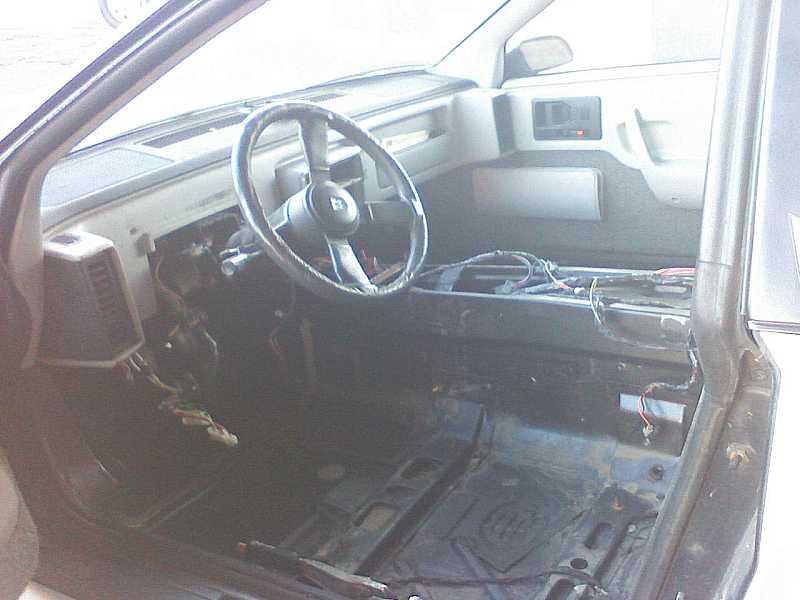
It is an 85GT 2.8 4 speed with approx 150,000 miles on her. She came with a rebuildable 88 motor with a spun rod bearing. Its never been hit that we can tell. Silver with grey ground effects, headlight conversion (110w H4), alpine deck with infinity rear speakers in the firewall, cut springs (and clamped ) and the ugliest 1990 grand am wheels you've ever seen. Everything else is stock. It only has power windows, tilt steering, and decklid release. No AC, cruise or any other features. It is a pretty light fiero to begin with. Here is a pic of how she looked when I first got her. It will be a good "before" picture. Cost - $200 dollars
List of the mods being done to this car as the build continues. (updated occasionally) We will do all the work ourselves using available fiero parts when possible.
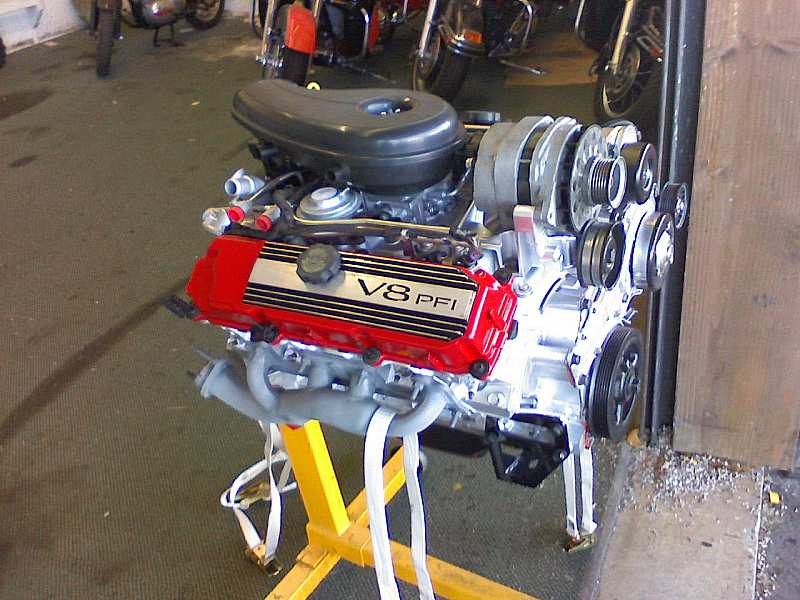
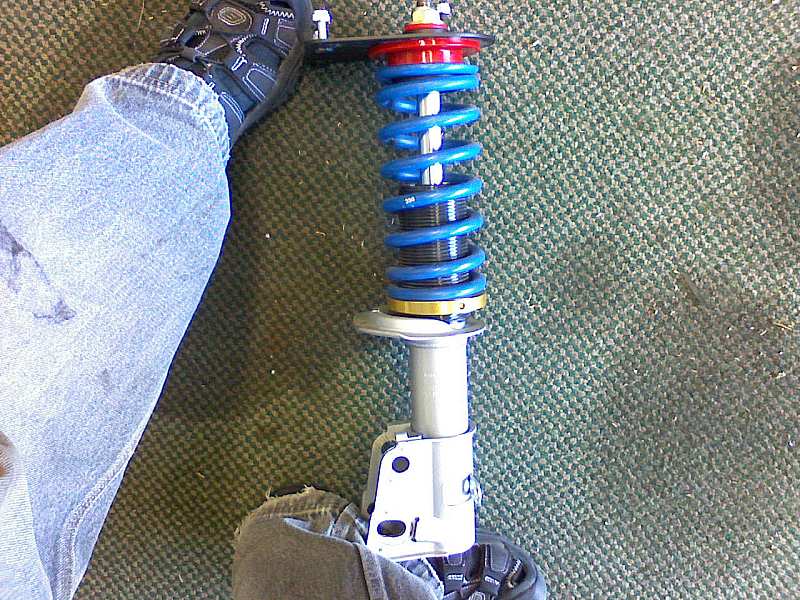
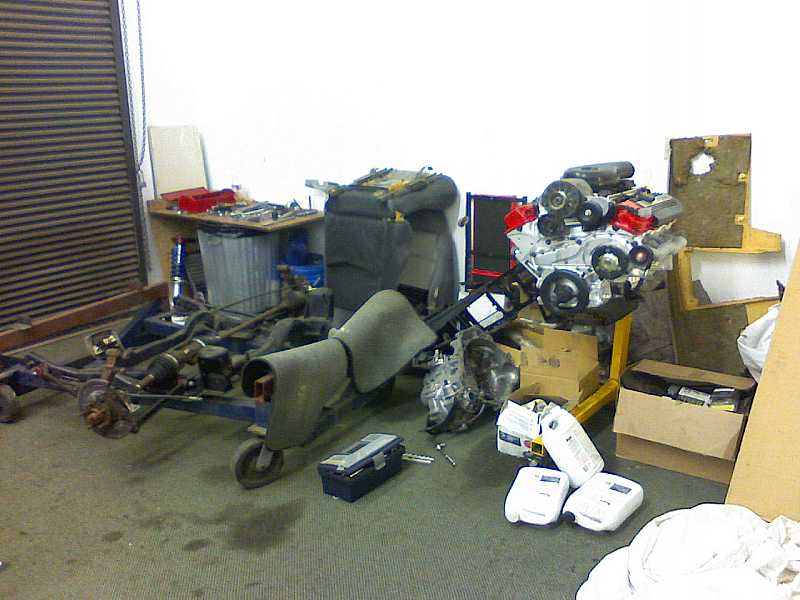
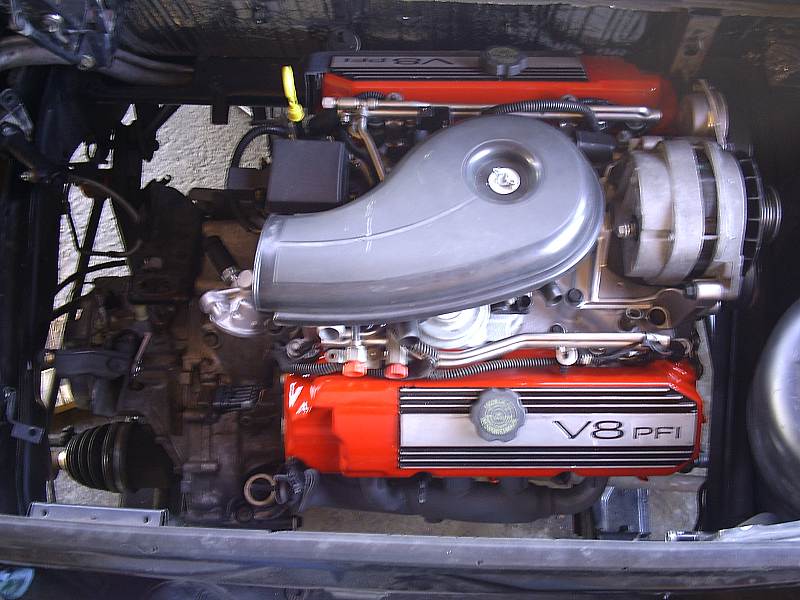
-Rebuilt 4.9 cadillac engine, ported with Delta 480 lift cam - Cost ~$800 (done)4.9 Rebuild thread -SPEC 3 clutch ~$225 (done) EDIT: SPEC never held. Installed new Clutchnet clutch 7-09 ~$450. Installed with LSC performanced flywheel 7-09. ~$260 -Homebrew exhaust ~$305 (done) -Homebrew decklid intake ~$12 (done) -Wired as a 91 deville with single O2 sensor and fastchip programing. Homebrew harness, $0 part of engine price. $65 for chip, (done) $50 for delco sensor. (done) -Poly motor mounts with fieroaddiction front mount bracket, homebrew side mount. (done) $100 -New engine bay insulation (done) $110 -88 isuzu trans with Rodney competiton short throw shifter, isuzu select arm rebuild kit. (done) $50 for tranny, ~$80 shifter, $15 select arm kit. EDIT: Isuzu broke. Re-installed original muncie 4 speed 7-09 $0 dollars. Found getrag ($140 pullout). Installed 11-09. Currently pulling back out to open and fix. -88 cradle swap with poly suspenison bushings using Held adapters (done) $50 cradle, $60 poly, $100 held adapters -85 front suspension with poly bushings and new Rodney front ball joints, upper adjustable and lower. (done) $50 for poly $100 for ball joints (done) -New KYB all around, gas adjust front, GR2 rear. (done) ~$250 -WCF lowering springs front 400lb, coilovers rear 350 lb. (done) ~$125 -Rodney Dickman poly trans mounts (done) $130 -12" corvette rotors, 88 fiero calipers (X4 rebuilt by us), and Russell stainless braded lines all around + fieroaddiction adapters/rings , front hubs (new bearings/seals), and rotors ~$650 total (done) -87-88 gas tank conversion. $35 (done) -Fastback conversion ~$150 amazing junk yard deal including tailights but no quarter windows and one broken vent (done) EDIT: Vents replaced. Another junk yard deal $13 (done) Quarter windows purchased ~$120 with Arrowheads. -Hood vent $?? (pending) -Front mount battery tray and goodies (done) $100 total -86-87 GT cluster with aux gauges $75 (done) -Dynamat sound deadened interior (done) $130 for 36 sq ft. -16x7 ASA AR1 wheels ~$552 delivered -General Altimax HP tires. 215/55-16 front, 225/55-16 rear. ~$450 delivered -Mr Mikes seats. $525
EDIT: I give up. Way too many to list now. -------------------------------------------------------------------------------------------- Running Total: Oops! Lost track and afraid to look at the receipts ..... 7k+
****************************************** The beginning ~ 9/1/08-9/3/08 ****************************
I got the car stripped this weekend and, hopefully, will be installing the motor, cradle and tranny next weekend.
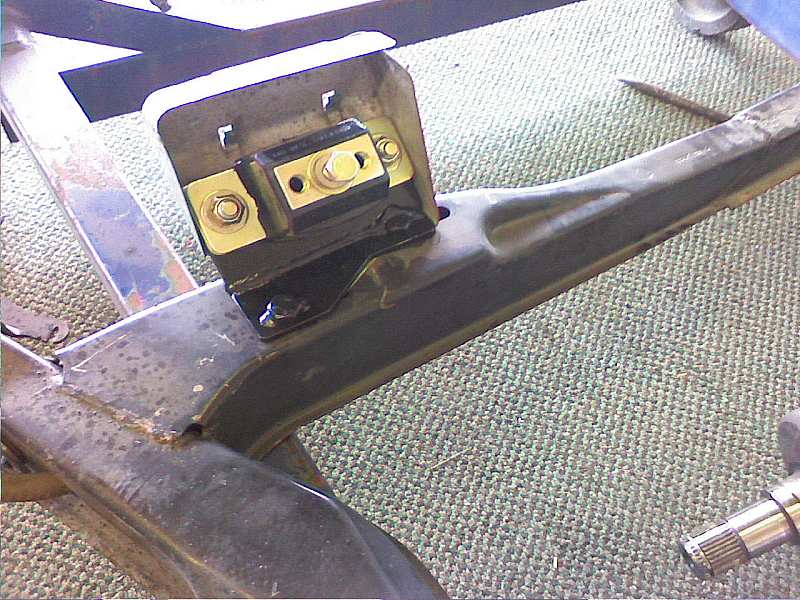
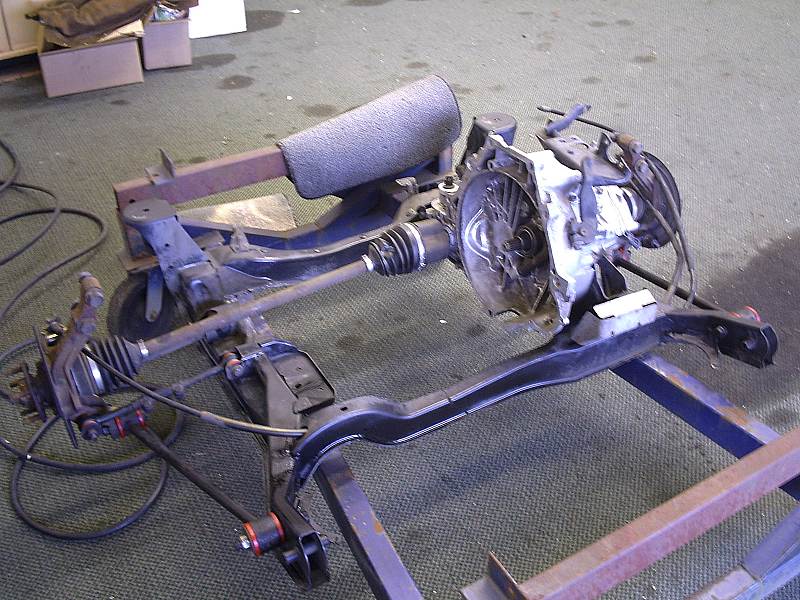
First thing I started on was the new cradle. The old suspension busings were removed and new poly bushings were installed along with the poly tranny mounts.
With the cradle ready to go I got started on the teardown of the car.
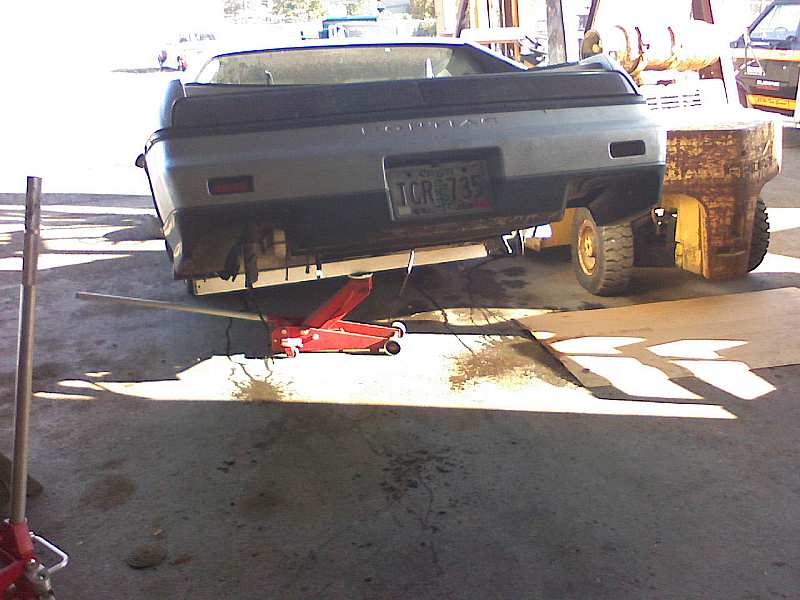
First we had to drag it out of the blackberry bushes that had started to overtake it. We drug it out using a fork lift since it was handy. You have to laugh at the wheels. They are the wrong offset (16x6+47mm) and sit way too far in. Also they are all exactly the same. This means that the drivers side actually helps keep the brakes cool by forcing air in while the passenger side vents out creating a cross draft inder the car. We were laughing about it for a while. One side sucks while the other side blows.
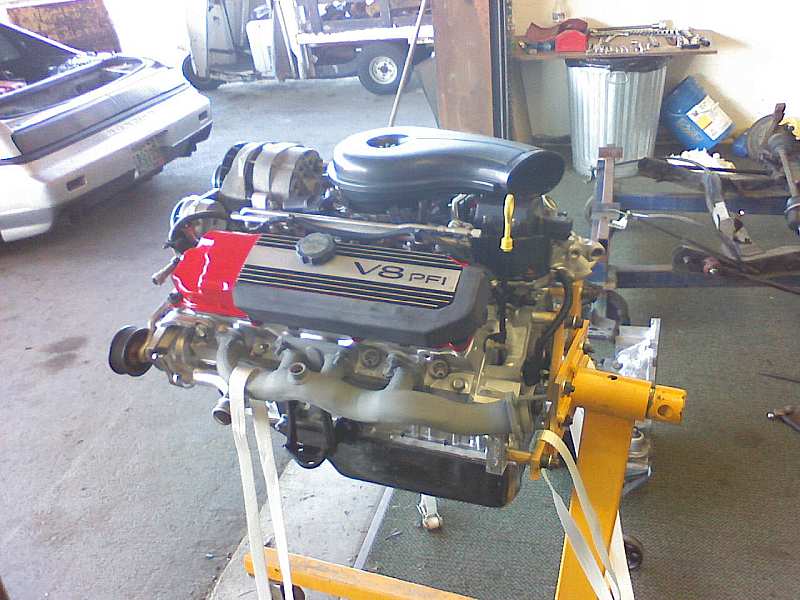
I immediately started disconecting the motor and anything else attaching to the car. Meanwhile, Dad went to get the 4.9 and rest of the parts we have so far from next door.
Dad showed up a few minutes later with the engine complete with stand and pretty much ready to go in.
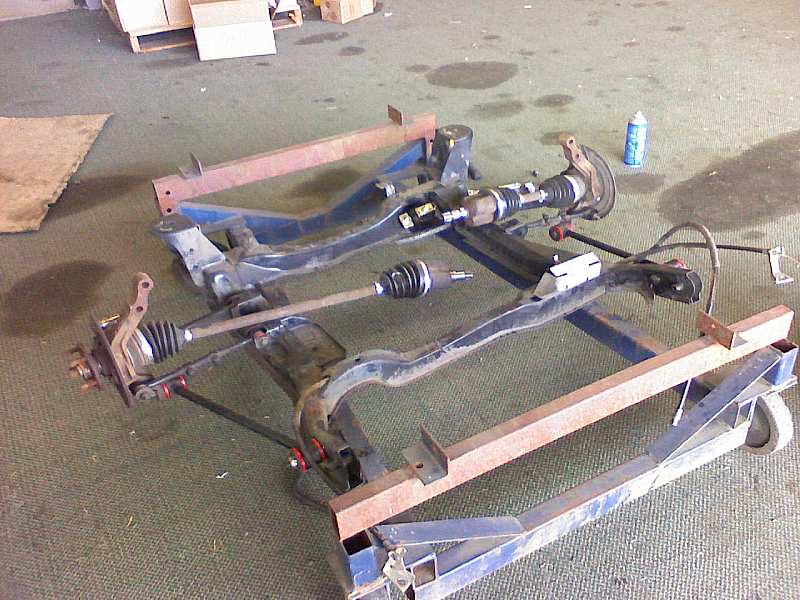
Time to pull the old cradle and motor out. This is our prefered method and if you want details PM me.
We measured up the stock 84-87 cradle, the 88 cradle and the car to see if there was a difference in mounting except for the strut towers. It looks to fit perfectly but we'll find out for sure later. I measure center to center and got the same measurment on all three.
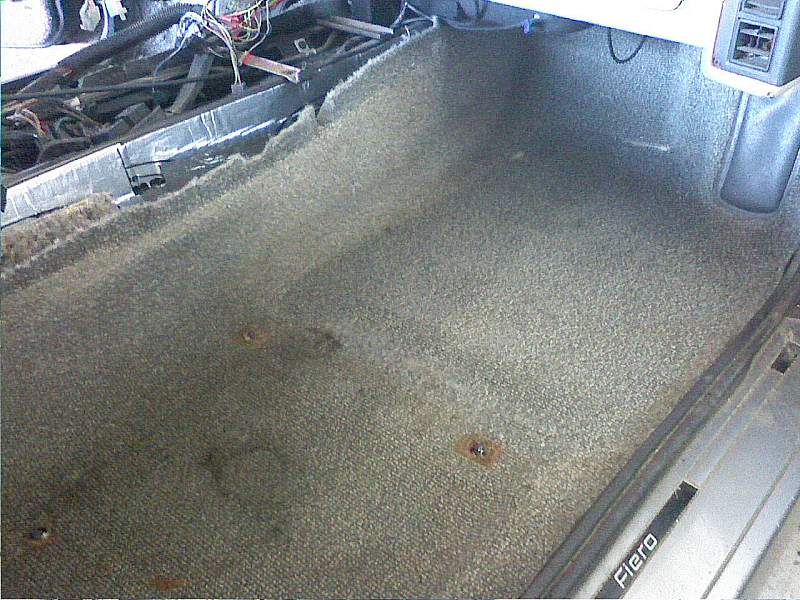
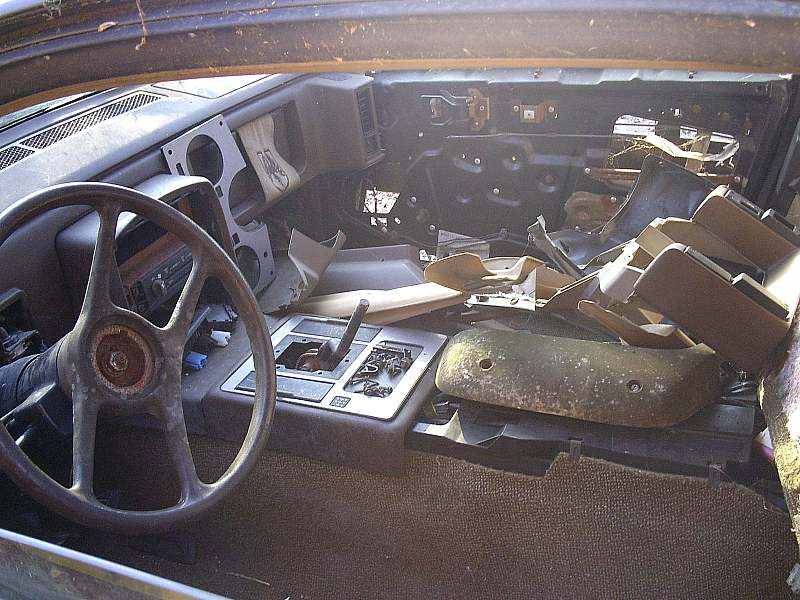
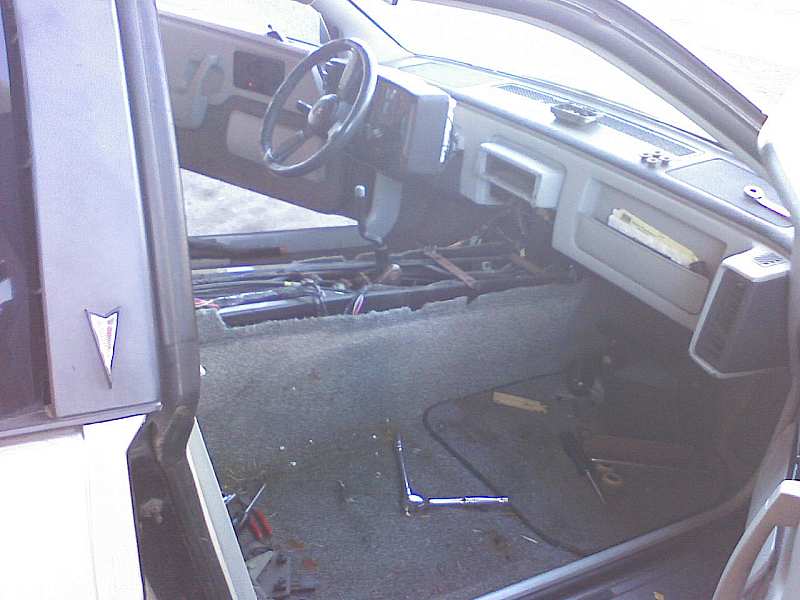
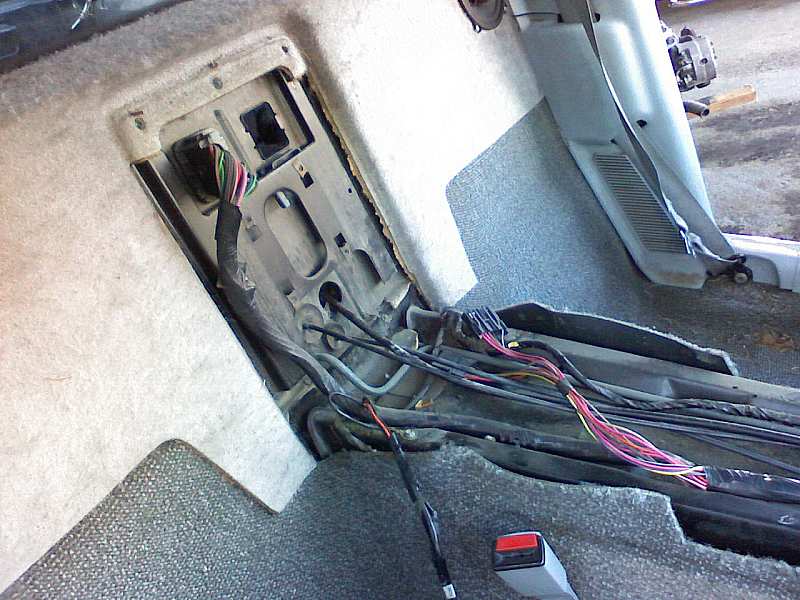
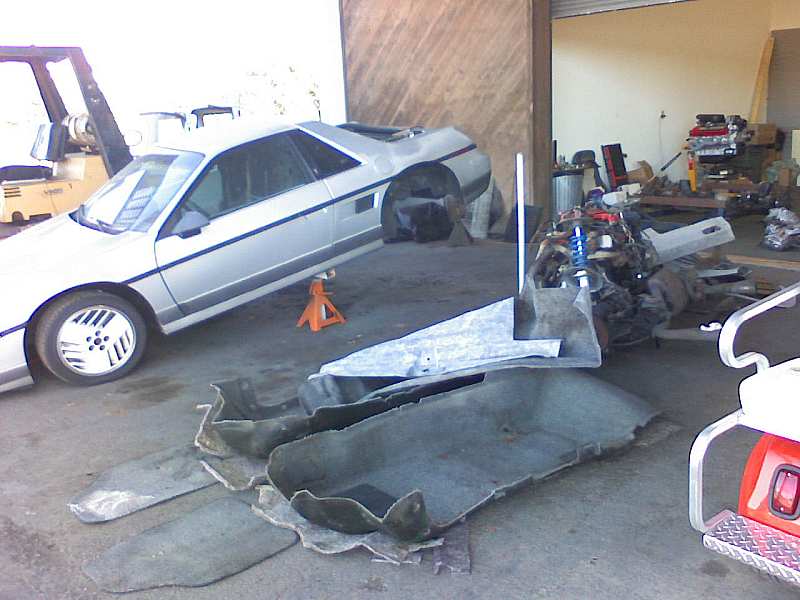
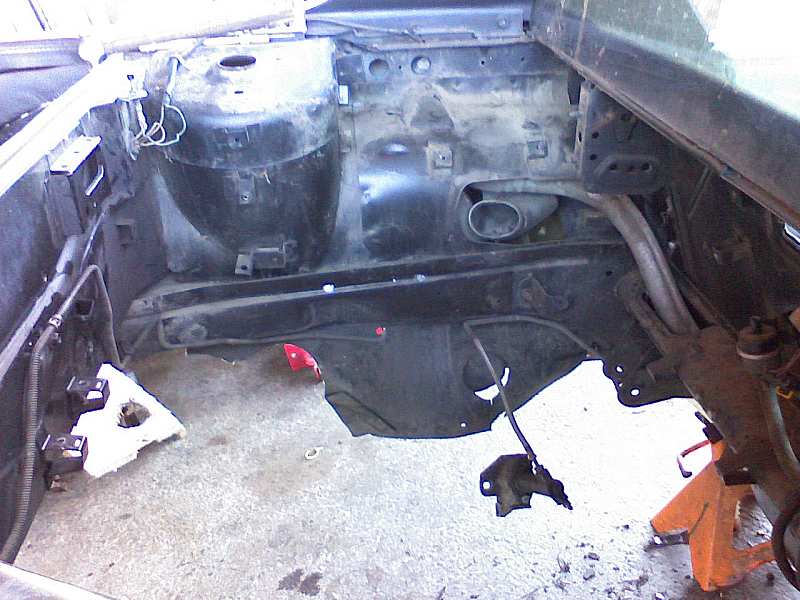
Next up I started tearing apart the interior. Almost everything had to go. There is no headliner so I will eventually need one. Nice, this car is pretty much rust free!
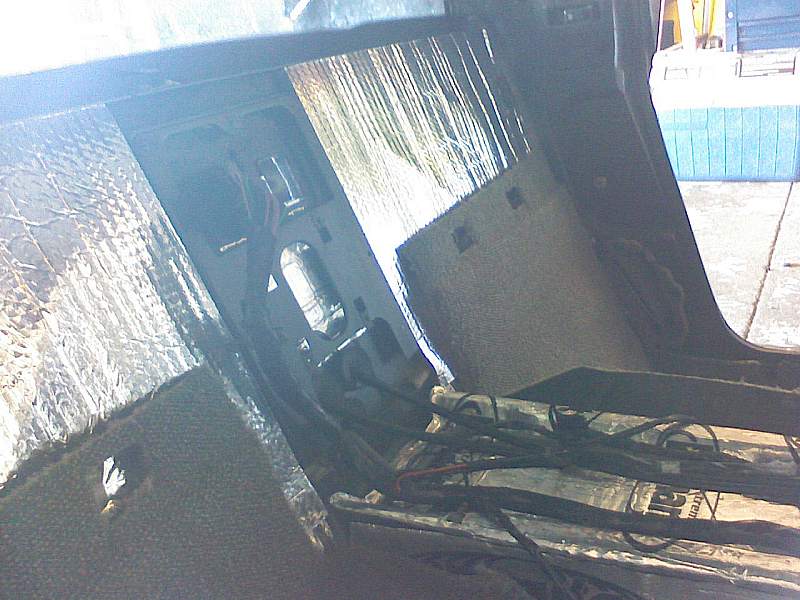
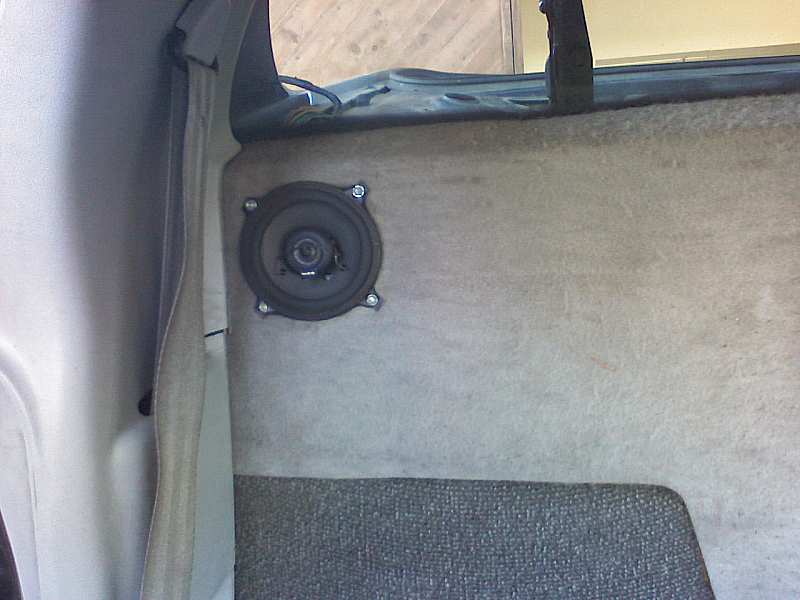
I thought the speakers in the firewall looked OK at first glance... but they did a horrible job installing the stereo equipment. Wiring under dash and at seat speaker plug all hacked up along with the firewall. They even cut out the mount for the relays in the engine bay. This is what you call a complete "Hack Job". I think they used a chisel. I will fix the holes and replace the factory connectors and use an adapter for the stereo plug.
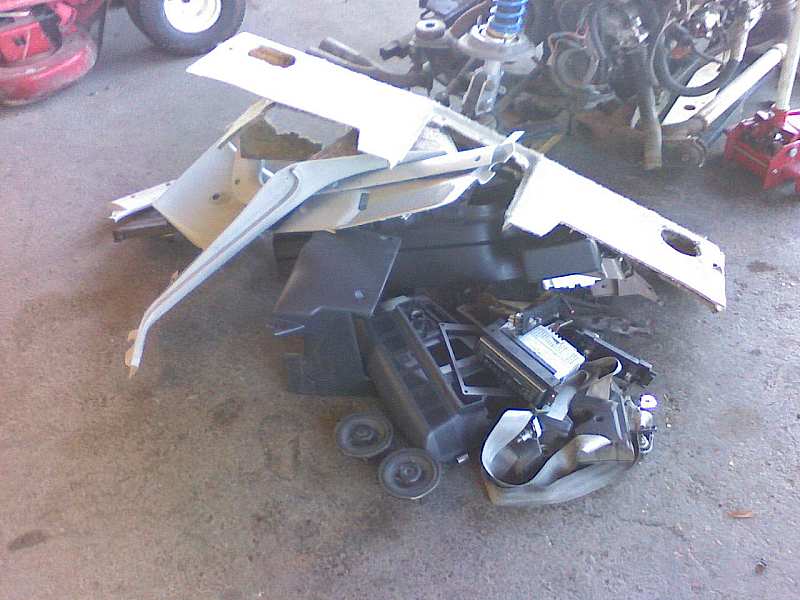
Everything was piled up for sorting later. Some pieces will have to be replaced but not many.
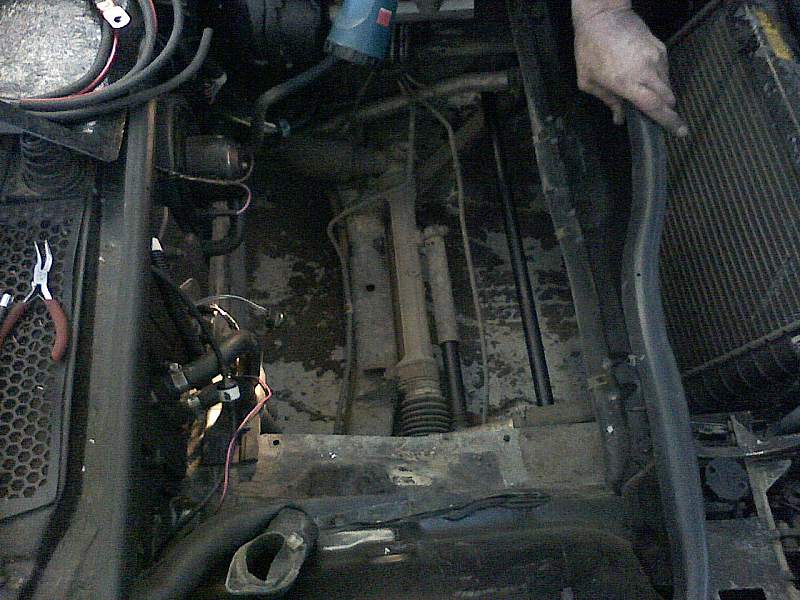
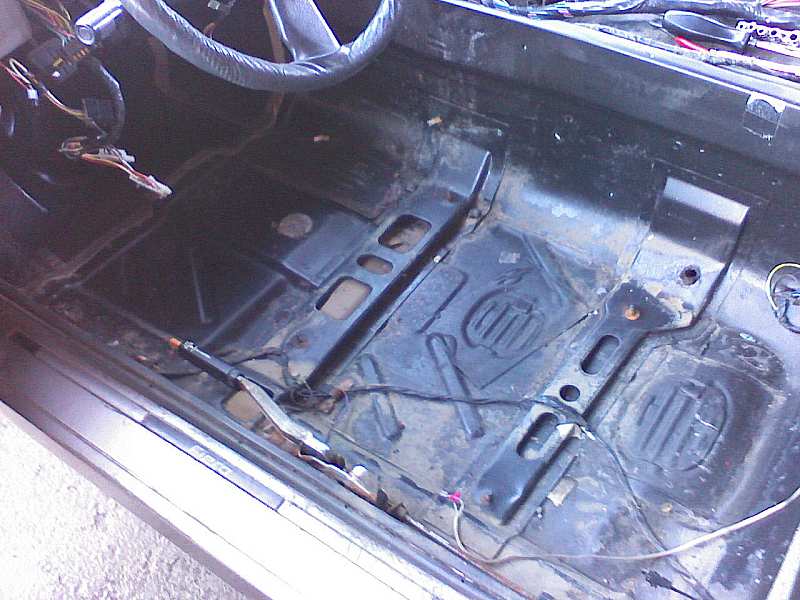
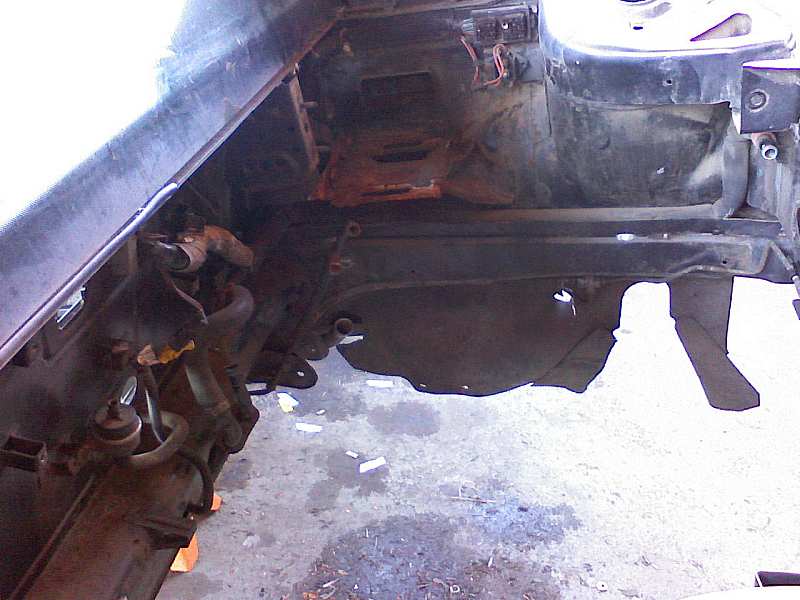
I finished removing everything from the engine bay and trunk. I am going to replace the truck carpet with some out of an early coupe. I removed the blower and tubing from the trunk, insulation, and pretty much everything except the slave cylinder and coolant tubes. Not much rust here either except for the battery tray and thats coming out anyway.
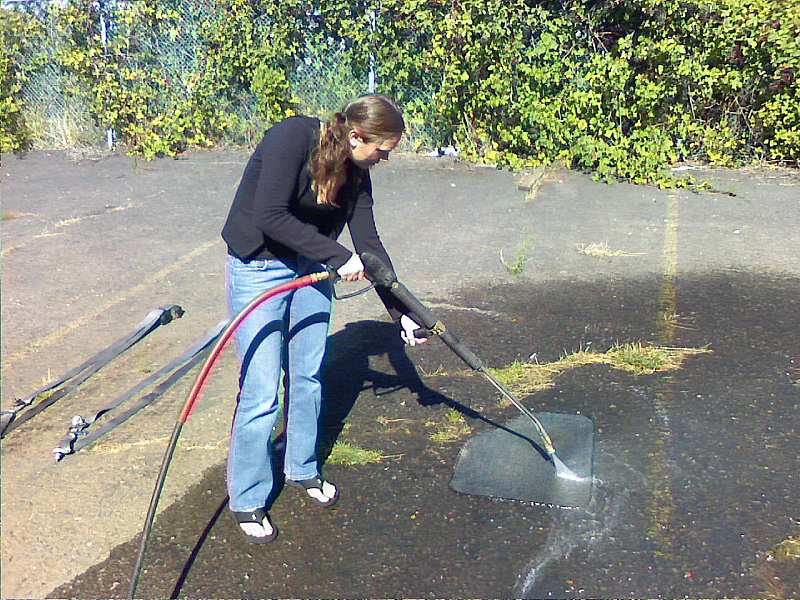
Dad pressure washed the engine bay and seatbelts to make them look good again. I re-did it later to actually get it clean. Marla took care of the mats for us. The passenger side mat looks to be bleached so I'll be on the lookout for a new one eventually. Her car is coming up next.
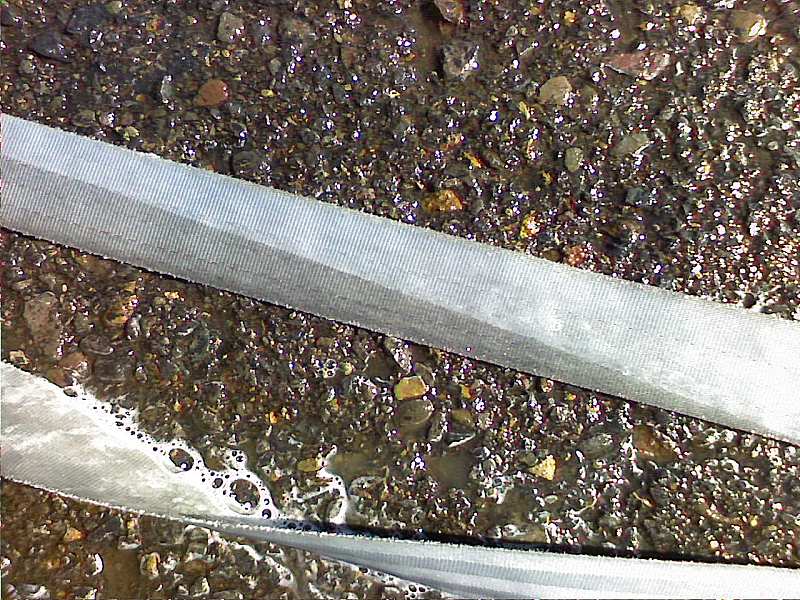
Here is a good before and after shot of the seatbelts. A little scrubbing bubbles and a pressure washer or wand style carwash can do wonders.
We sorted the piles and organized everyting for make it easier for next weekend.
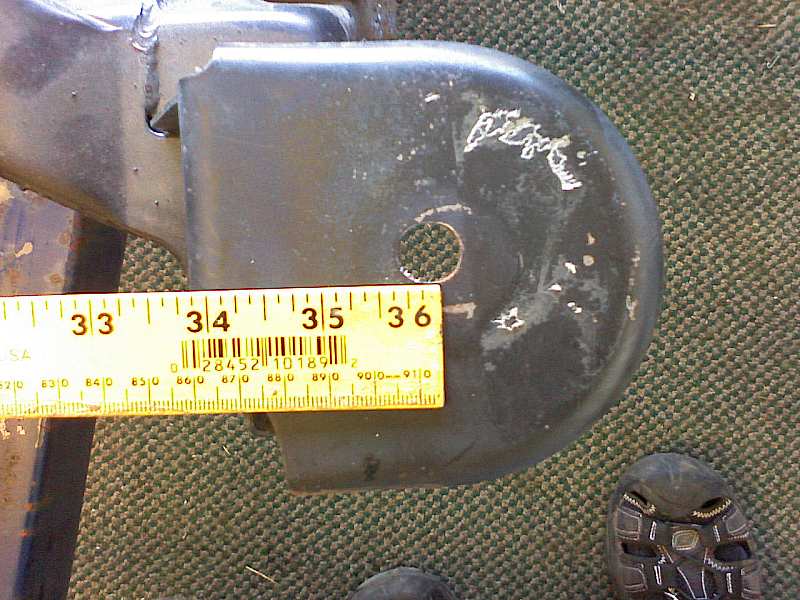
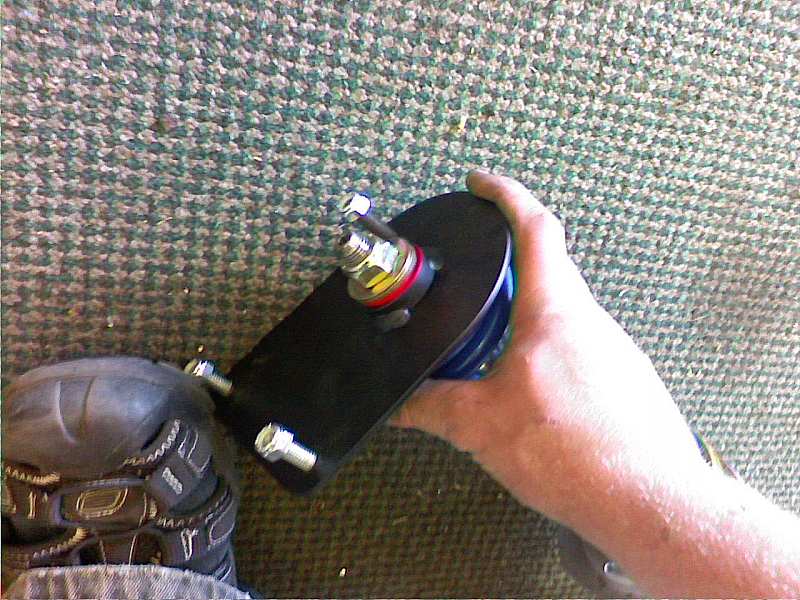
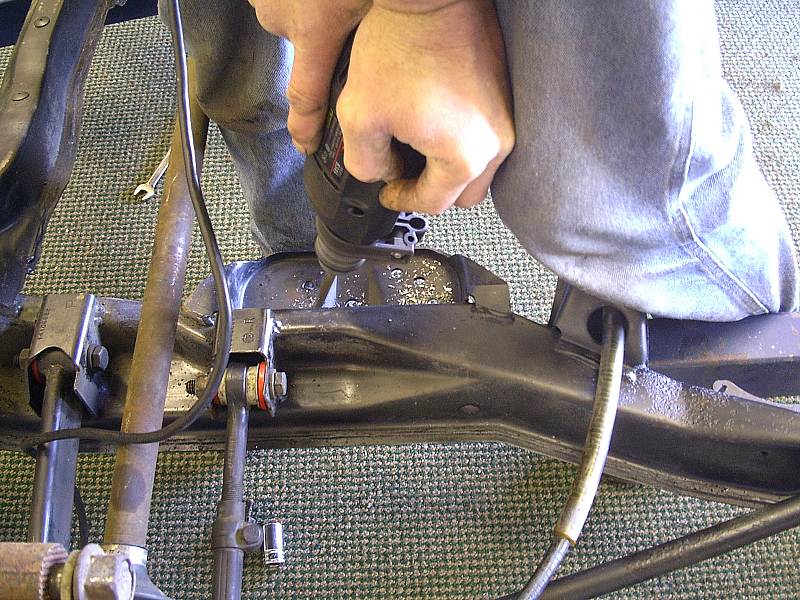
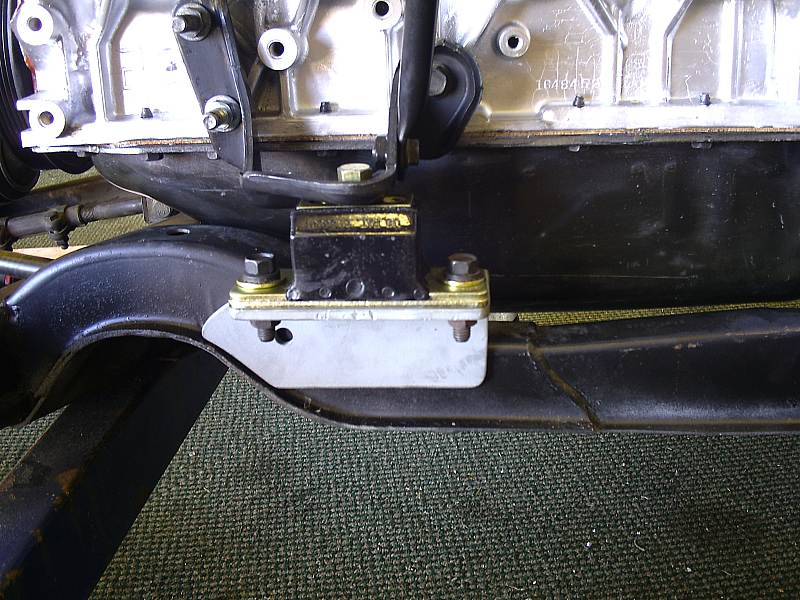
Next we started getting the struts and strut towers ready for the 88 cradle. I am using the Held adapters for this.
The drivers side was pretty easy. The two adapter bolts nearest the fender were put in to give us a center for the hole The passenger side required more work to get it started. We used a die grinder with a milling bit to remove the spot welds from the dogbone mounting bracket so we could remove enough to drill the hole. We will probably take it all out later since it is not needed for this install. We did not have time to complete either hole but dad will finish this over this next week so the car is ready for the install next weekend.
That was all we had time for this weekend. I will be playing with many different ideas so if you have something you think I should try let me know. Questions or comments are always welcome. More to come. This project has been a long time coming for me and I am happy to be able to share it with so many good people.
[This message has been edited by Fieroseverywhere (edited 04-02-2010).]
I'd recommend leaving the dog bone bracket installed because it actually adds structural strength to the trunk panel there. I have an SBC and was going to remove it, but now that I look at it, I wish the drivers side had the same mount. Also, on the adapters for the struts, just a perfect circle hole isn't sufficient. You'll notice that the welding was done on the outside of the center portion. I recommend using a die grinder to expand the hole where those welds are in your 3rd to last picture. The idea is to get that plate to sit completely flush with the strut tower's underside, and it won't if the adapters center section only fits in the hole. I can take a picture of mine tomorrow night if you'd like. Looks like a sweeeet install!!!
------------------ Christian Thomas 87 Pontiac Fiero GT Burgandy/Silver 5.7L ZZ4 5spd 301rwhp/345rwtq Next Mod: 88 suspension, C6 polished wheels, C5 Z06 brakes, Konis, poly'd ...AKA NEW CAR! 06 Cobalt SS/SC w/ LSD
I'd recommend leaving the dog bone bracket installed because it actually adds structural strength to the trunk panel there. I have an SBC and was going to remove it, but now that I look at it, I wish the drivers side had the same mount. Also, on the adapters for the struts, just a perfect circle hole isn't sufficient. You'll notice that the welding was done on the outside of the center portion. I recommend using a die grinder to expand the hole where those welds are in your 3rd to last picture. The idea is to get that plate to sit completely flush with the strut tower's underside, and it won't if the adapters center section only fits in the hole. I can take a picture of mine tomorrow night if you'd like. Looks like a sweeeet install!!!
I have a dogbone setup out of a 4.5 caddy complete that I will be trying to use for this istall. I think I can buy enough room for the caddy dogbone bracket if I remove the fiero one. Fingers crossed. I will strengthen as needed to keep it all tight back there.
Those are only the preliminary holes for the struts. That is exactly what we were going to do to make the adapters sit flush. At first I didn't understand why they only welded in three places around it. Now that the holes are cut it all makes perfect sense. I'd love to see some pics if you got time to post them. Thanks for the heads up.
I love constuctive criticism. I dont want to miss a thing! Thank you!
No problem, glad you saw what I did. I modified the stock oblong washer-type things so they'd sit in the normal pattern. I'll plan on some pics for tomorrow.
I figured on doing the same thing. Right now the bolt aren't even tight. I knew I should have said something about that earlier. Cant wait to see those pics. Thanks again.
Thanks Cliff. Thats where I was trying to put it all along.
Bobadoo - This car is not going away anytime soon. Keep your eyes open, its going to go fast now that work has gone into the slow season.
A little update. The firewall insulation showed up over the weekend when I was out of town. I have to order a few more parts this weekend but the install will still go as planed. Engine in this weekend!!! Then the fun really starts. Exhaust will be next followed by plumbing and finally wiring. It feels so good to have my time back.
The belt I was sent was too short and I had to re-order it today. Their 63 1/8" was crap and it was actually 62 1/2". New one is on the way.
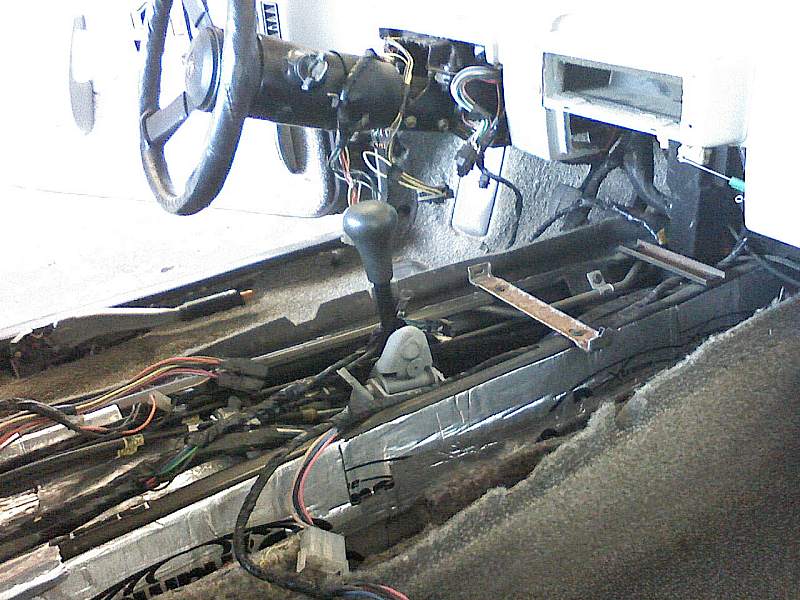
I am going to order the rest of the engine bay isulation and interior sound deadener this weekend and should be able to do all that in a couple weeks. I also need the new Rodney shifter rebuild kit so I can put the interior back together. I ordered the wrong one last time and ended up giving it to my Dad for his 88 GT getrag. More to come ASAP!
i bought a roll of sound damping material, foil on one side and adhesive tar based stuff on the other, just liek dynamat, for like $100 for 100 sq. feet off ebay, you can get it on there all the time..the stuff was awesome, dropped the outside roadnoise by 40 dB. i used about 85 sq ft total to do the entire car..
quote
Originally posted by Fieroseverywhere:
Thanks Cliff. Thats where I was trying to put it all along.
Bobadoo - This car is not going away anytime soon. Keep your eyes open, its going to go fast now that work has gone into the slow season.
A little update. The firewall insulation showed up over the weekend when I was out of town. I have to order a few more parts this weekend but the install will still go as planed. Engine in this weekend!!! Then the fun really starts. Exhaust will be next followed by plumbing and finally wiring. It feels so good to have my time back.
The belt I was sent was too short and I had to re-order it today. Their 63 1/8" was crap and it was actually 62 1/2". New one is on the way.
I am going to order the rest of the engine bay isulation and interior sound deadener this weekend and should be able to do all that in a couple weeks. I also need the new Rodney shifter rebuild kit so I can put the interior back together. I ordered the wrong one last time and ended up giving it to my Dad for his 88 GT getrag. More to come ASAP!
i bought a roll of sound damping material, foil on one side and adhesive tar based stuff on the other, just liek dynamat, for like $100 for 100 sq. feet off ebay, you can get it on there all the time..the stuff was awesome, dropped the outside roadnoise by 40 dB. i used about 85 sq ft total to do the entire car..
Sound like a good deal to me. I do have one concern though. I have heard the the tar or petrolium based deadeners leave a smell behind. How did yours turn out? Does it smell like oil in the car? I would also like to do it without adding too much weight and I've heard the tar based stuff can be heavy. I'm willing to spend a little more but not quite Dynamat level.
I bought some firewall insulation last week. Only enough for the firewall. It is an insulating foam with a layer of sound deadener built in. I want to do the floor, ceiling, and door panels. I will also need something for the rest of the engine bay. Any suggestions would be great. I am taking a vacation from work later this month and should be able to get the interior done during that week. 2 1/2 weeks from now so I need to order it soon. Here is the company I have been planing to go through. They have some really good stuff and the prices are too bad also they are local to me. http://www.cascadeaudio.com/
[This message has been edited by Fieroseverywhere (edited 09-05-2007).]
Can someone near VA gimme a ride in a 4.9 fiero? I wanna know what the big deal is with these tractor motors.
Not a high performance motor but a good all around driver that gets decent gas mileage in a light weight and compact V8 package. It fits in a fiero like it was made to be there. Even the coolant pipes are in the right place for the most part. And it can be done for about the cost of a good 2.8 rebuild. From my experiance anyways. Very quick stoplight to stoplight but starts to run out of steam around where the speed limit is on the hwy. They make great daily drivers.
[This message has been edited by Fieroseverywhere (edited 09-05-2007).]
Got some work done on the car this past weekend but unfortunately did not have time to get the motor in. That will be done in a couple weeks when i can get back to it. I am taking a week off of work and should be able to spend at least three hole days (36hrs) working on this car. The new belt showed up over the weekend when I was out of town. Only thing I still need for the motor is the O2 sensors, oil cooler, and Allante starter.
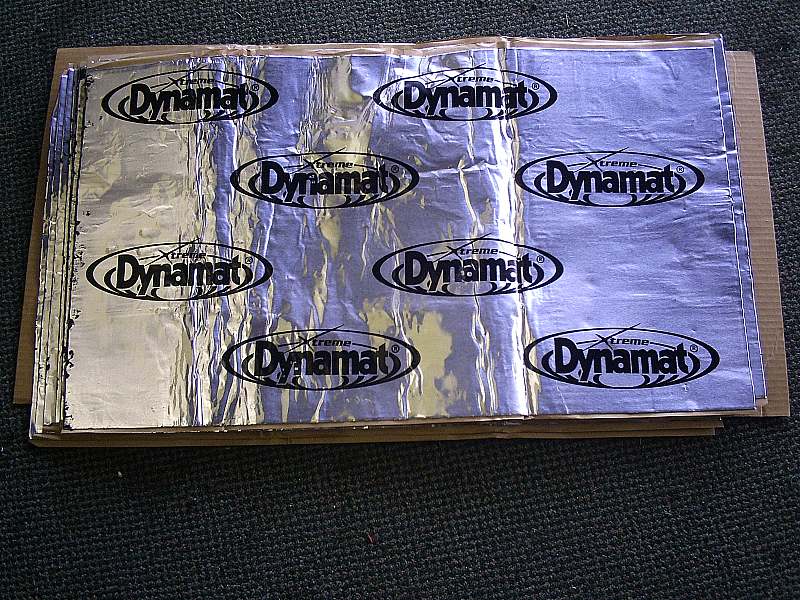
I ordered my sound deadener for the interior yesterday. I got a great deal!! I ended up ordering the Dynomat extreme pack which comes with nine 18"x32" pieces. I was going to go with something cheaper but ended up finding a ~65% off deal on it through Amazon.com. While it was 300 everywhere else I got it for only 116. At that price I just couldn't say no.
I also ordered myself a small point and shoot camcorder to make the rest of the pics better. It was time. The camera phone just couldn't do what I wanted it to do anymore. Both should be here before the end of the week.
First off this last weekend I had to do some work on my truck to keep it up and running while this car is built. That took a couple hours away from build time. With that out of the way I finished up the strut towers and made everything fit right and sit flush. I appears that I didn't get any pics of them though. I will get them later to make up for it.
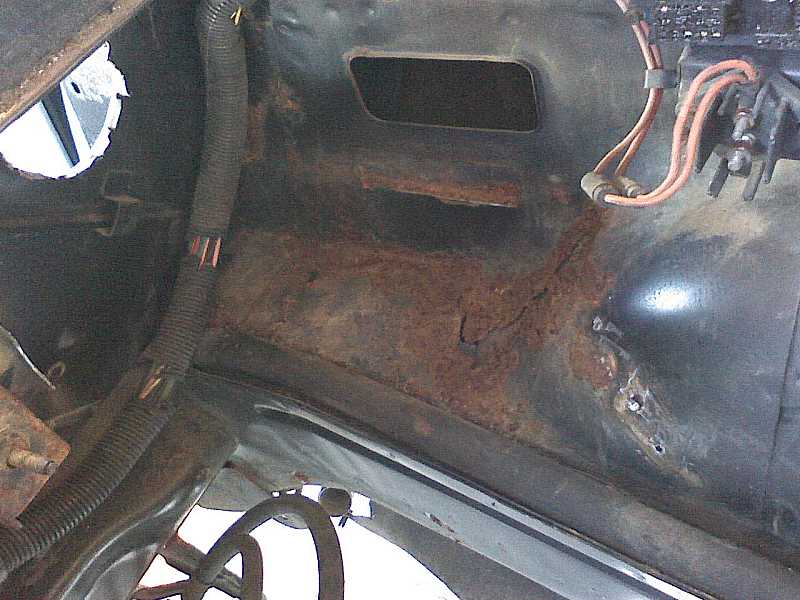
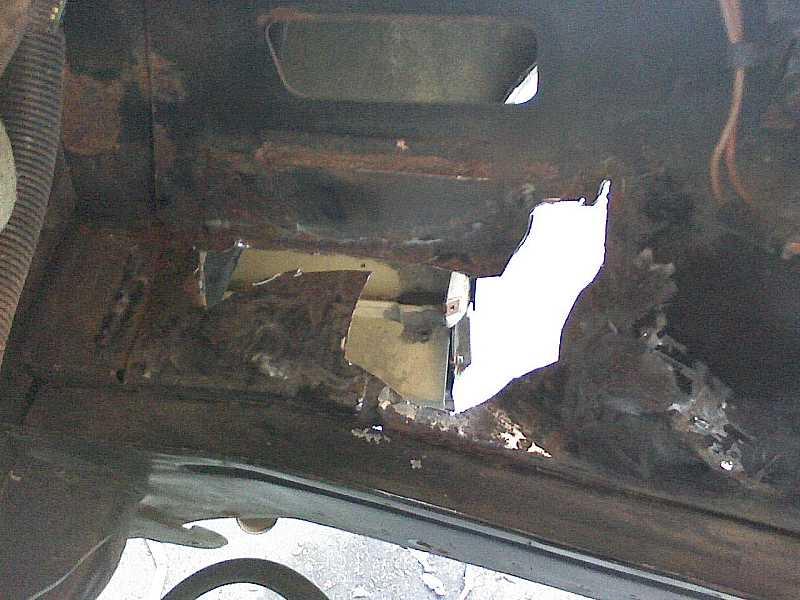
With the strut towers done I started on the rest of the engine bay. I finished up removing the dogbone bracket and removed the old battery tray. That is when I noticed it. A big F%^&*ng hole right through. Well, that sucks. Good thing I can fix it. This is the reason I couldn't get the motor in. It just took too much time. I removed the inner fender wells on both sides. No rust there. Cleaned everything up and took out the water seperator.
Next I started by cutting away all of the rusty parts. The die grinder and angle grinder were my best friend that day. There was a good portion of the panel gone by the time I was done.
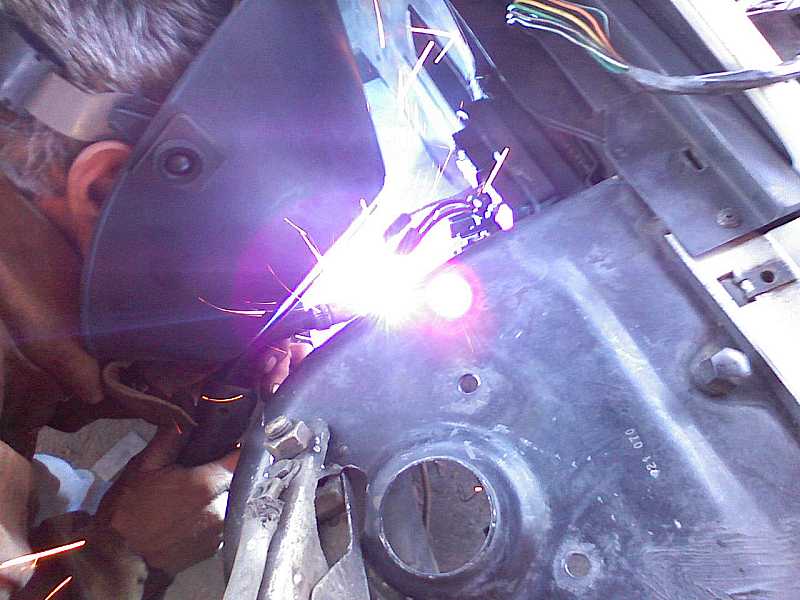
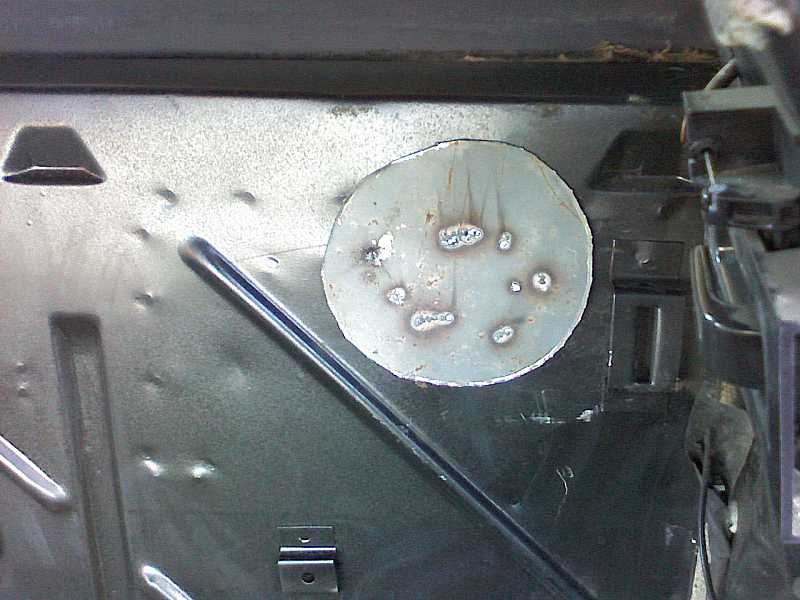
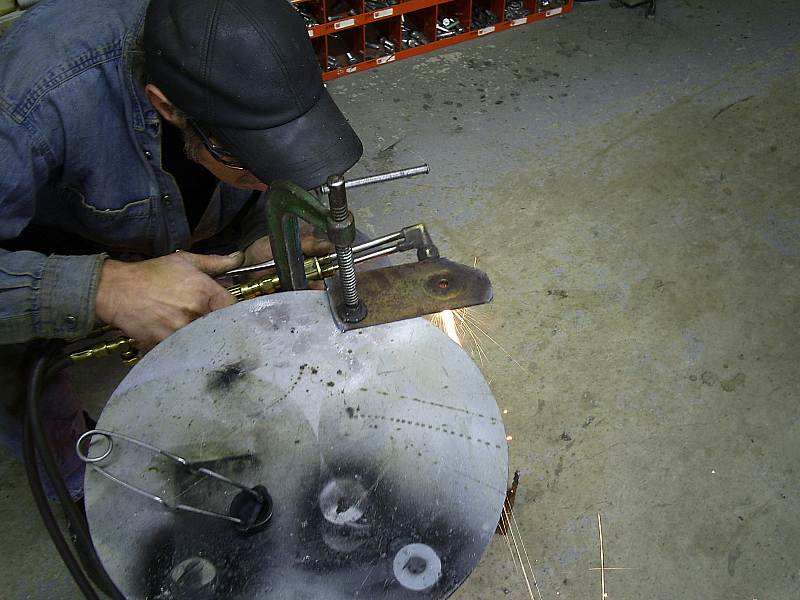
We had some scrap zinc coated sheet metal lying around so I made up a piece to fit in place. Dad took a break from work for a while to do some welding for me. I'm not even close to as good as he is so I just stepped back and let the pro have a go at it. While he was working on that I cut out a couple circles to plug the speaker holes. We straightened the holes back out and he tacked the circles into place also. I will seal everything up later to make sure there aren't any air leaks. I will also primer and paint the inside parts aswell.
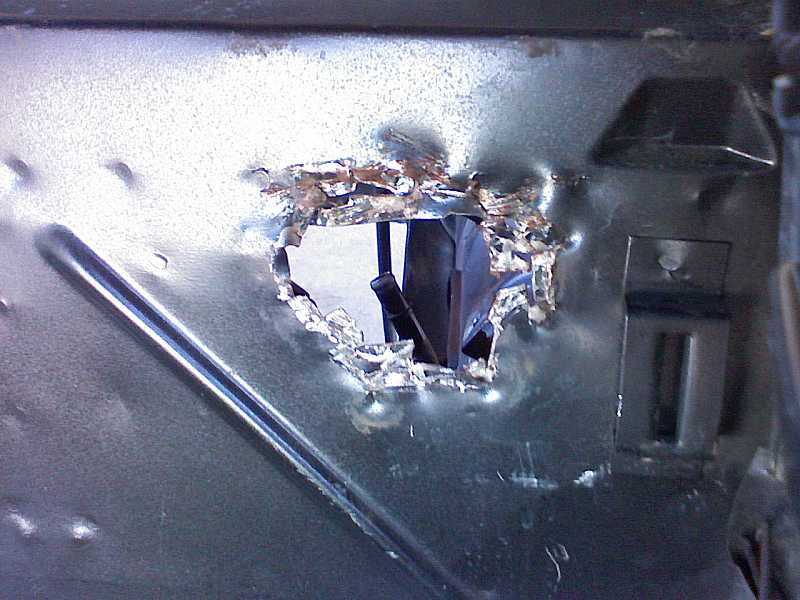
After he was done he headed back to work. I went back to work grinding down welds and smoothig everythign out. Then I broke out the zinc primer and semi-gloss black paint and went to work making it look good again. I think it turned out pretty good considering what it looked like before.
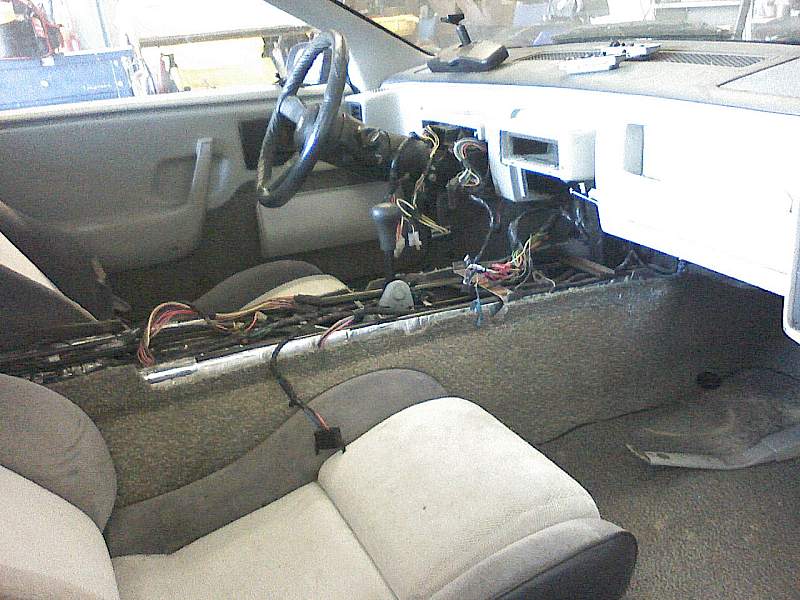
The end of the day was coming fast so I did a few other things in the interior to get it ready to go. I installed the 87-88 2.5 throttle cable to the pedal along with cleaning up some of the interior panels. Its got to be clean for the Dynomat.
I organized the parts as best as I could so I can really move during my vacation End result, one pile of fiero.
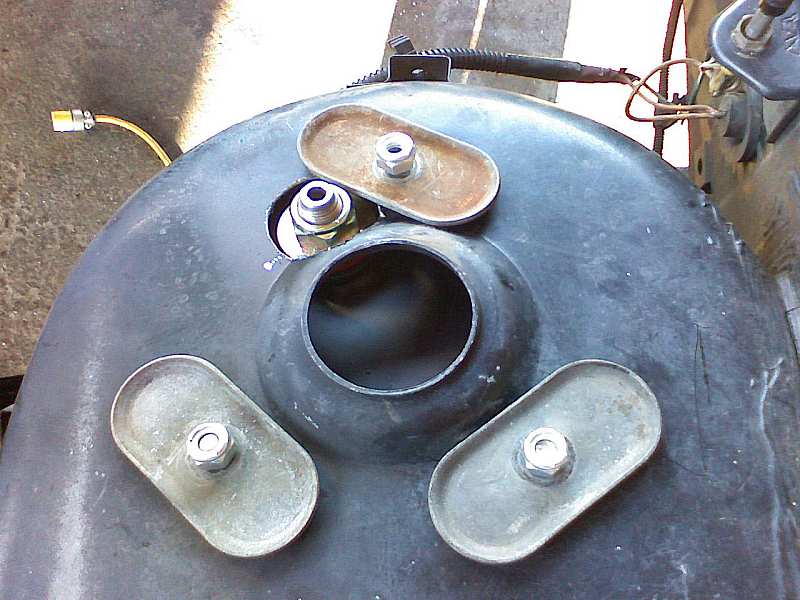
I shorlty realized that the 88 cradle would take different real bolts. Since we didn't have anything that would work handy I headed down to the discount auto parts store and picked up a couple. We now have enerything needed to install the cradle.
I was a little disappointed (a lot!) that the motor could not go in but it will be OK. Two weeks and it will be in and then some. More to come somewhere between 9/22-9/30.
Alright, I have the actual dates set. I will be spend three days at the shop next week. 9/24-9/26. Expect an update with lots of pics with the new camera on or around 9/26. I've added a couple things to the list of mods being done an the beginning of this thread. I think you will find them interesting.
Engine will go in and probably come back out to do the exhaust on 9-24. 9-25 will be working on plumbing, ect. 9-26 will be puting the dynamat in and puting the interior back together. Cant wait to get started! More to come.
[This message has been edited by Fieroseverywhere (edited 09-20-2007).]
Got a bit done this week. I have a few pics but I dont have time right now to go into the details. I will post the pics and come back later to edit this post and add the details. More to come later.
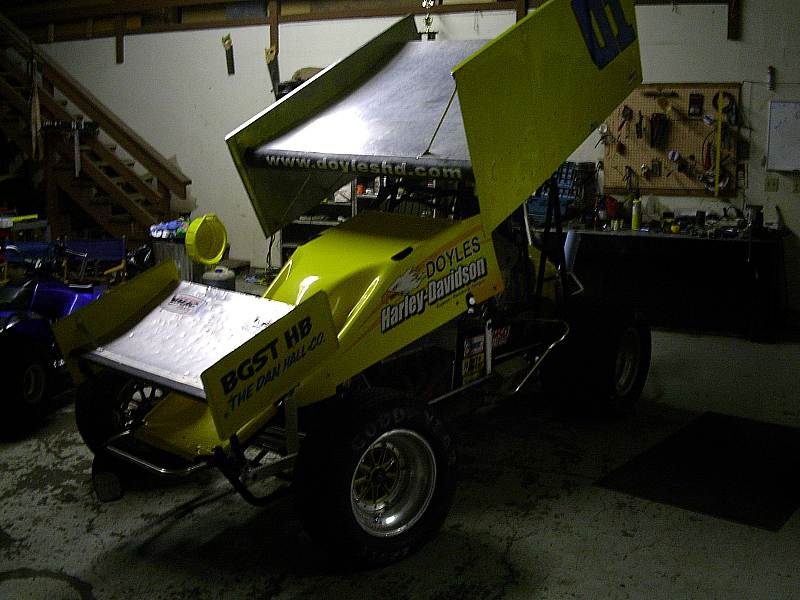
Ok first off I walked into the shop ready to get started and found the sprint car all packed up. Seems the end of the season has come and gone. I just thought this picture turned out really good. That car just looks mean!
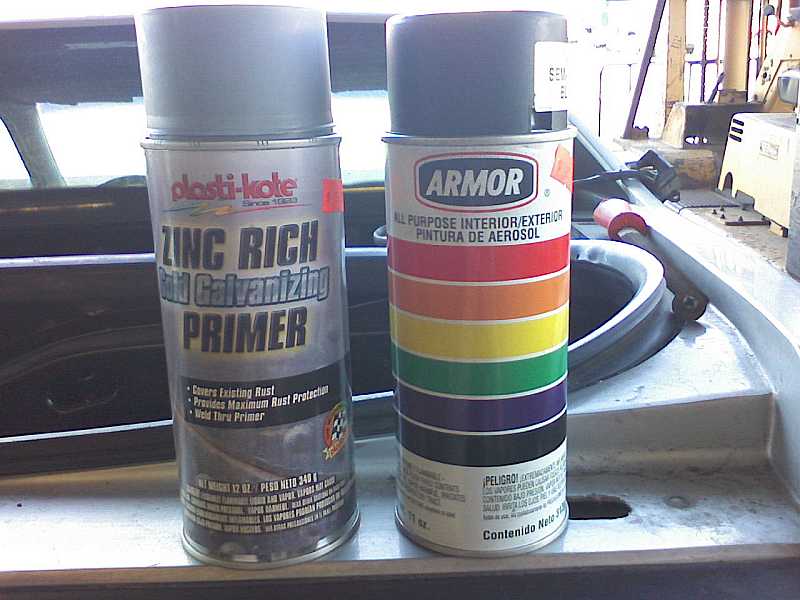
First off I finished preping the cradle for the install. I had some small rust spots under where the battery used to be. I used a wire brush to clean off the rust. Then I followed it up with some zinc primer. I use this stuff everywhere. Works great. For those interested it works extremely well on exhaust maniflods. Once heated it turns white and looks similar to a ceramic coating. At 8 dollars a can though it will much more affordable. I use Plasticoat Zinc loaded cold galvanizing primer in grey. I followed this up with a semi gloss black acrylic enamel. It matches the fiero black paint pretty well and is affordable and durable. Picture of both products are a couple posts up.
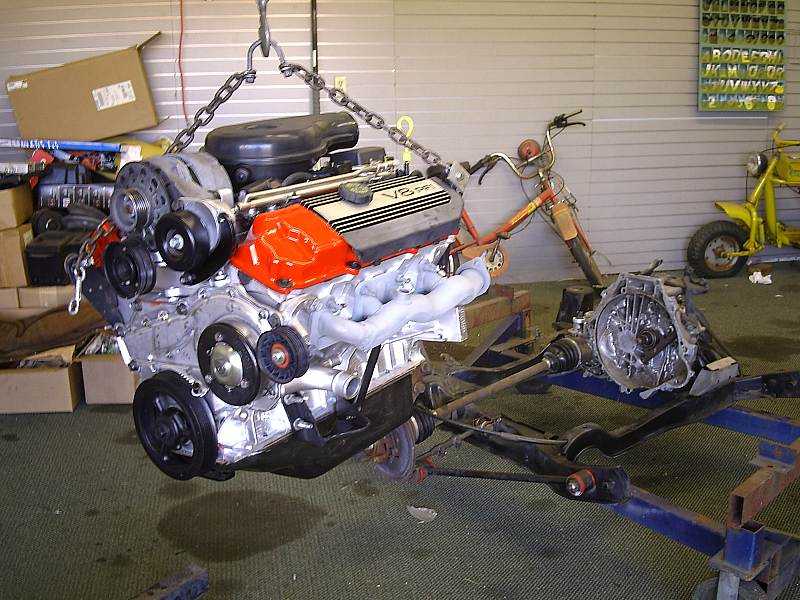
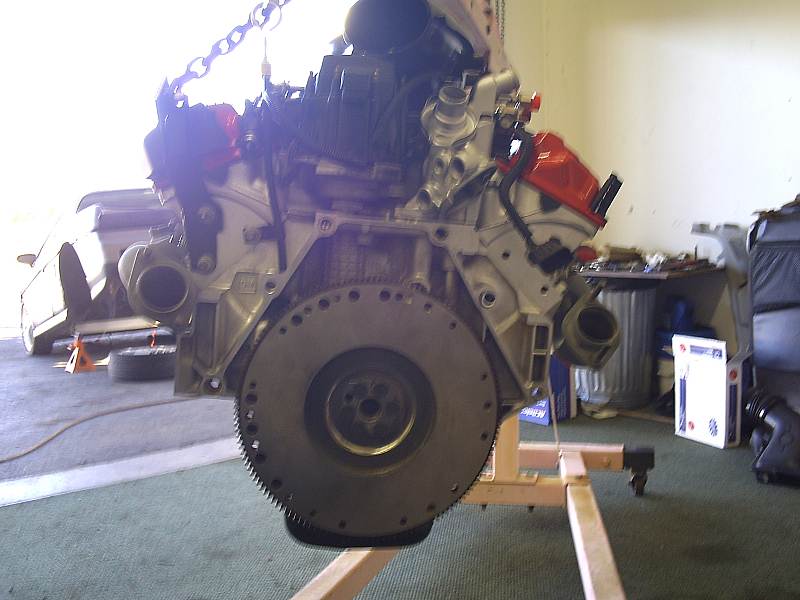
Next up we pulled the 4.9 off of the engine stand and started to get it ready to go. I added some lifting eyes (stock 4.9) which I removed once it was on the cradle.
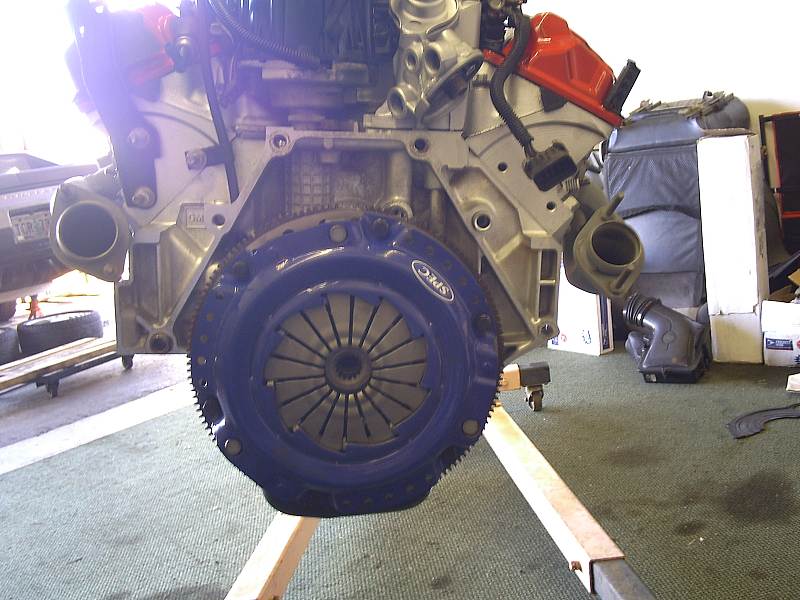
I mounted the flywheel with the new flywheel bolts. I would recommend using new flywheel bolts for any type of flywheel change. It's just cheap insurance. They are torqued to 70 ft/lbs according to the caddy flexplate specs.
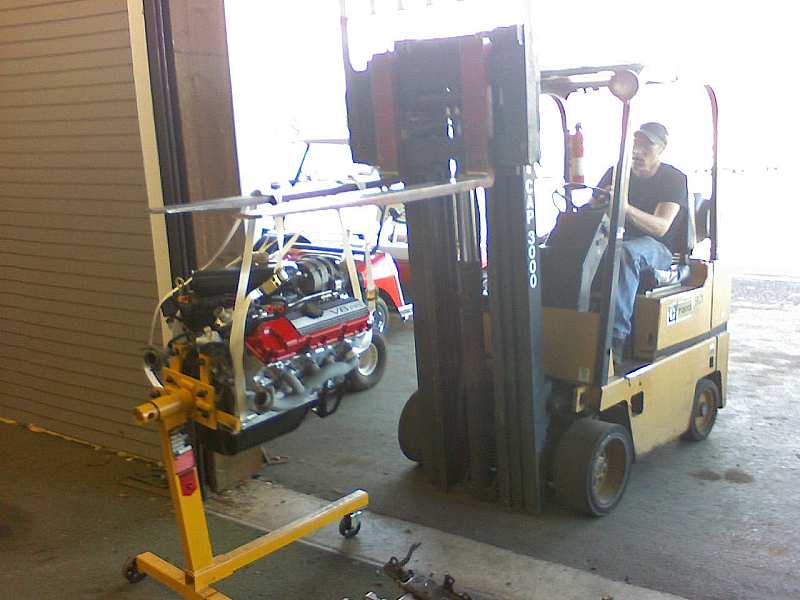
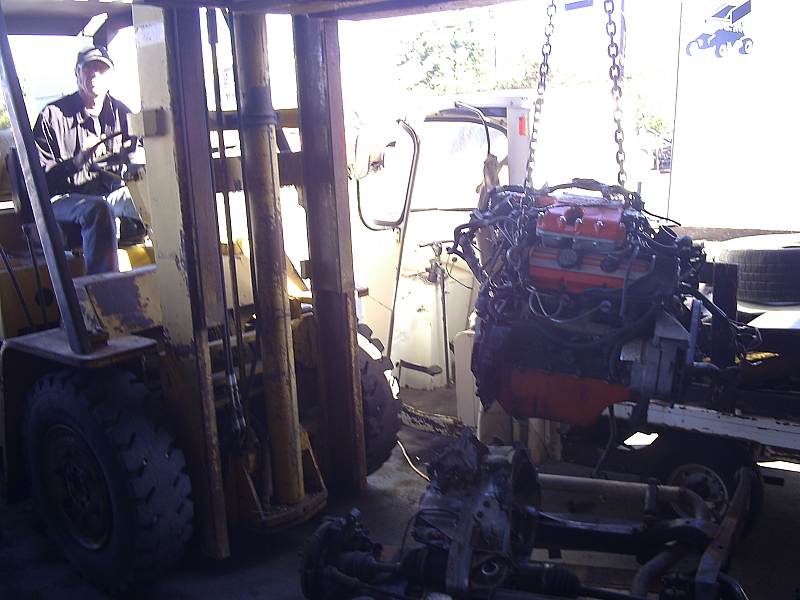
It was at this point that I realized that I had no bolts to mount the pressure plate. I called a couple places to see what I could findn locally. No luck. Well crap. I guess I have to remove the old motor from the cradle and harvest some parts. I was hoping to not have to do this since I am using a different cradle and tranny. We decided not to waist any time and started unbolting everything. We pulled the 250 dollar forklift over and made quick work of that job.
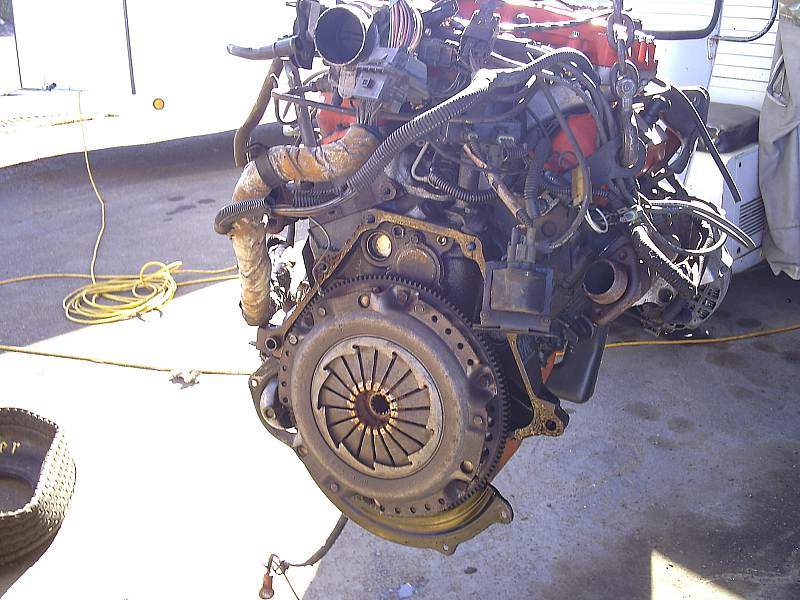
With the newly harvested pressure plate bolts we were able to mount the new SPEC stage 3 clutch. I have been paying attention the the recent threads about SPEC clutches and I am hopeing to avoid any problems. Everything alligned well and there looks to be plenty of clearance between the spring and pressure plate fingers. We'll see.
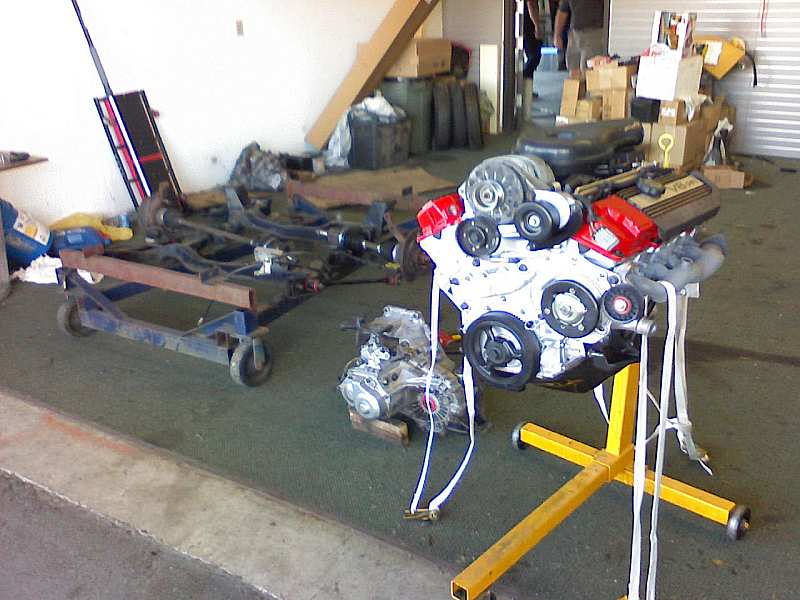
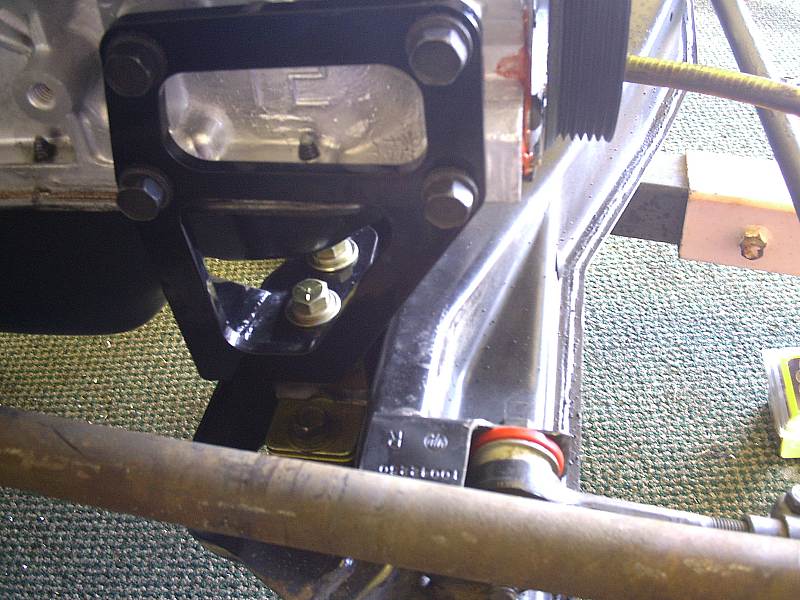
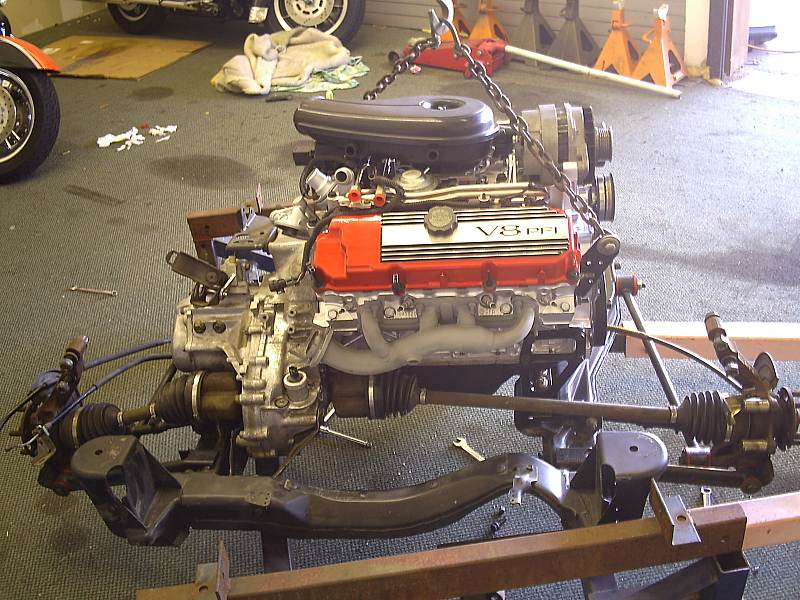
With the clutch out of the way we started working on the mounts. The 4.9 engine mount bracket was bolted on and the poly engine mount was bolted to it. We then bolted the 4.9 to the tranny to line everything up. We scribed the mounting holes and removed the engine again to drill the them out. Wasn't tough at all and the motor fits like a glove.
We then started work on the side mount. This is just a piece of 3/8 thick angle iron that will be welded to the cradle. The mount that bolts to the block is stock 4.9. I even used all of the support pieces that went with it. The bracket we made went to the glass beader followed by a coating of zinc primer (love this stuff). I have not painted it yet as I may still need to slot the mounting holes for adjustments. We bolted it to the rest of the mount and it actually sits there perfectly without being welded.
With the mounts done it was time to mount it to the cradle for good. It turned out pretty good but is still not fully allligned.
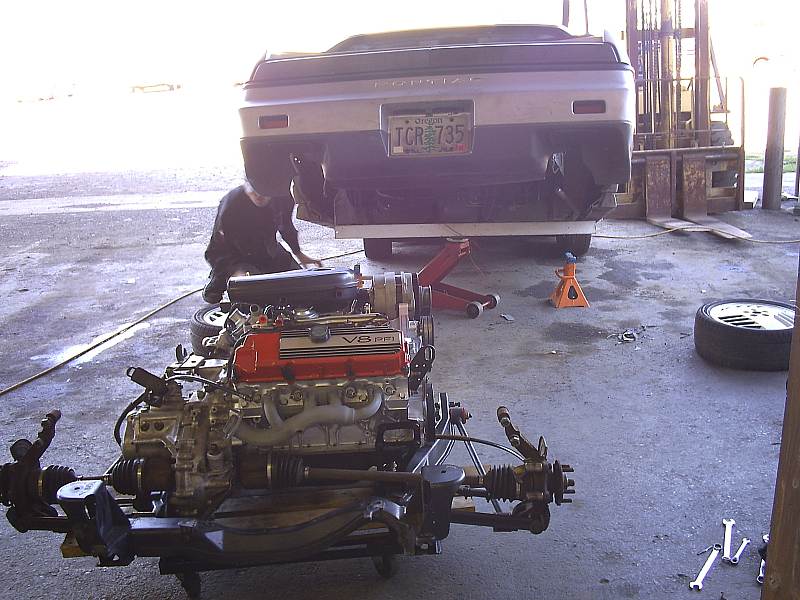
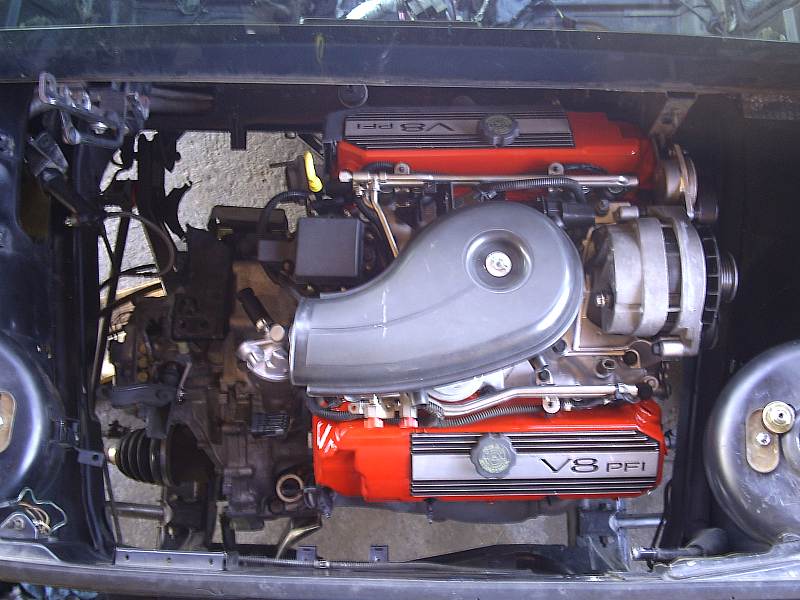
Next up was the first test fit into the car. Everything went pretty smooth here also.
We thought there would be some clearance issues here and trimed the decklid mount a little to compensate. We just basically cut off the rusty part you see here. It just ended up being the engine out of allignment. Once corrected there were zero fitment issues. It fit like it was made to be there. I am very pleased with how this motor fits.
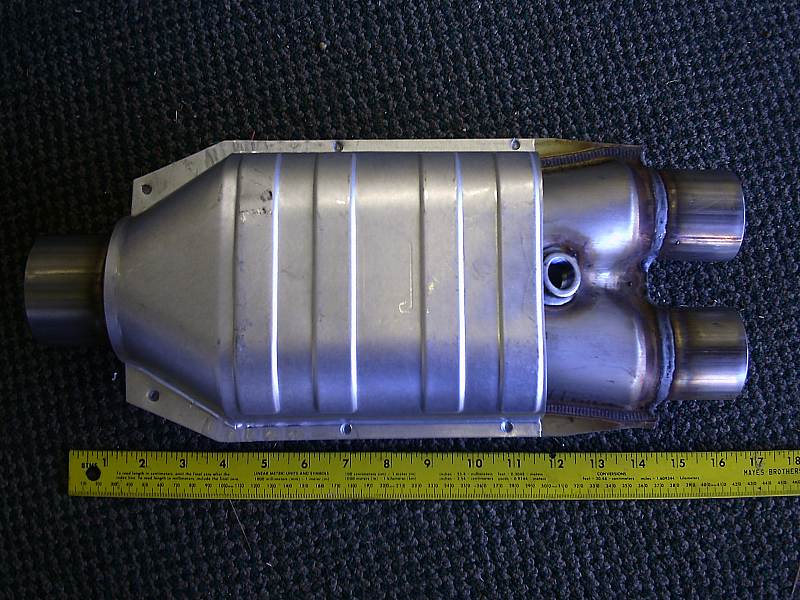
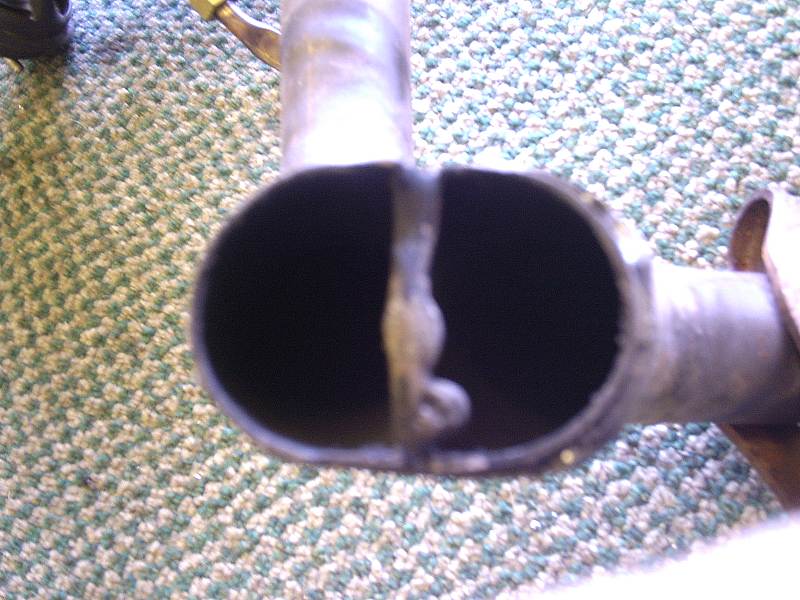
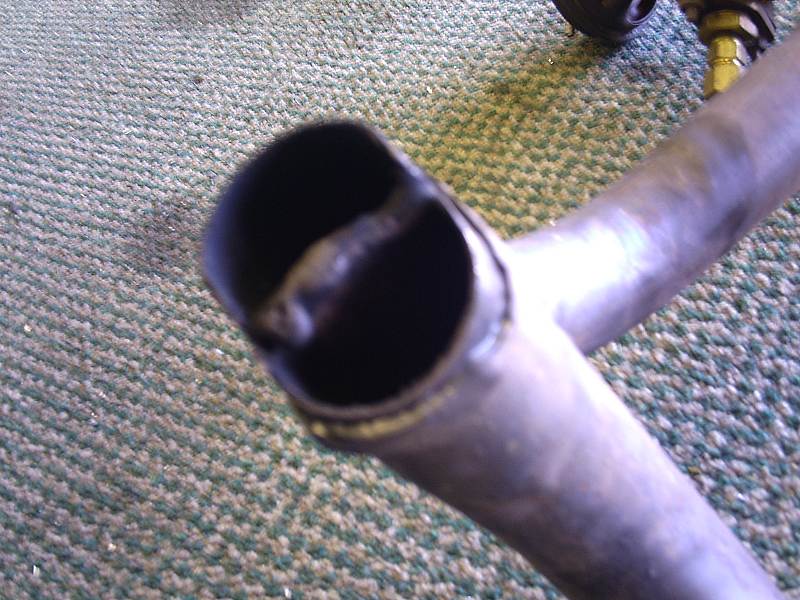
I picked up the cat I am going to use from a local muffler shop. The guy at the counter said they are mainly used on Dodge and Ford pickups. It has two 2" inputs and one 2.5" output. Using this cat will eliminate the need for a "Y" pipe. It is 16" long though you cant really tell from the pics here. Very smooth flow and very low restriction. It is a little more expensive then a regular cat but the cost is made up for by not having to buy a "Y" pipe.
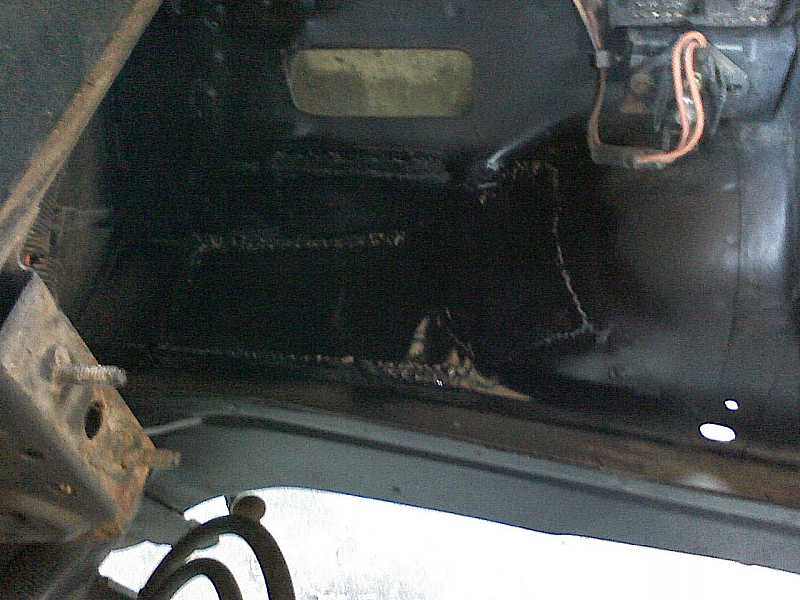
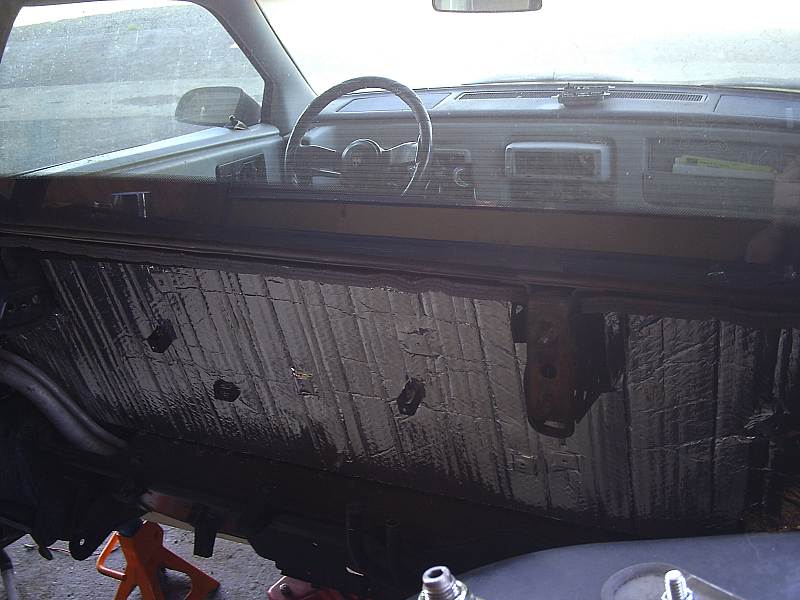
We pulled engine back out so we could take some measurments for the exhaust. I also took this chance to get the new engine bay insulation put in. I was very happy with the results on this also. I still need to cut out the holes for the wiring but I will do that later sinced it is the only thing sealing the interior from the outside air. I want to keep the mice and birds out as best a possible while the car is in pieces. All the seams were taped and I even taped the shorter brackets. You can hardly see them anymore.
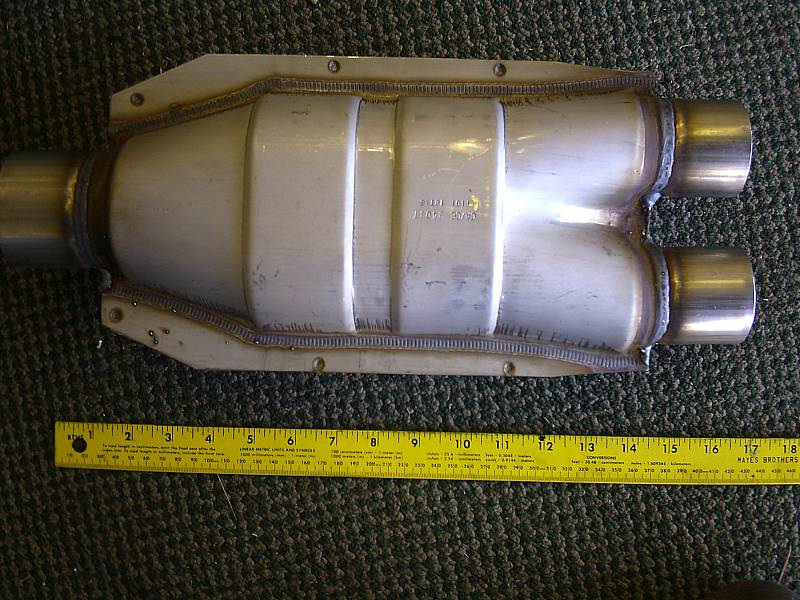
While I was looking at the exhaust parts and trying to figure out a plan I came accross the original "Y" pipe that was on the car. The weld had broken and I think it might have been leaking a little. I took these to show how restrictive the stock "Y" pipe truely is. Not only is the "D" shape not the best for flow but that huge piece of weld in the middle cant be good for anything. We will fix this one and see how much better it will be will all restrictions removed. It will go onto either the 3.1 (fiero 2.8 block) or 3.4 (firebird/camaro 2.8 block) built up cars. These need it the most.
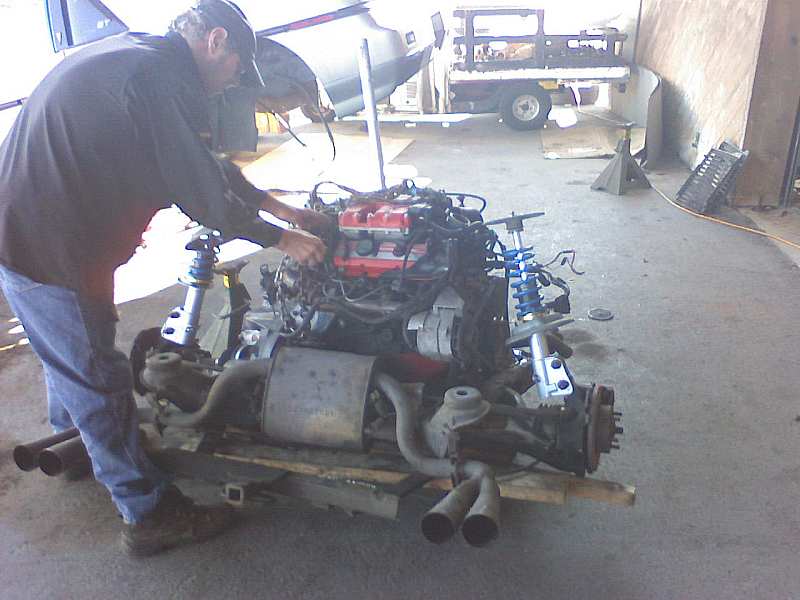
I mostly played around the rest of the time doing the stupid little things that this car needs. I removed the front swaybar and cleaned up the rusty parts which was everything between the center bushings. I found that someone had put in a non fiero cooling fan. Must have been the same person that did the firewall speakers. It has one bolt and 7 zip strips holding it in. Bastards. I'll need a new fan also now. I also found that one of the headlight relays is missing. Got another lyign around somewhere I'm sure. I pounded out the dents in the floor pan and removed the center brace that goes under the gas tank. I got all of the rocks (~1 lb) out of the brace and re-installed it. Guess my woman got a hold of the camera at some point and got this pic of me filthy and under the fiero. There was not one part of my clothing that wasn't completely covered in grease, dirt, oil, brake fluid, or what ever else I could find to cover myself in. We put the motor back in for safe keeping til next time. Looks pretty good in there. Cant wait to hear it run.
As always, questions, comments, and constructive critisism are welcome. I also have bigger pics of any you see in most of my threads. Need a bigger pic? Just ask. More to come as soon as time and money allow.
[This message has been edited by Fieroseverywhere (edited 09-27-2007).]
Hey man, good to see the progress. I am still having to work on my house, so mine is at a stand still right now, but I did get it under the car, and the cradle bolted up for the first time. I will still need to pull it out and put it back in a few more times, but that's no big deal. In a few weeks I should be able to get back on it for a little while. I have big brake brackets on the way, and my computer chip is back and better than it was. Special thanks to Aaronrus for that.
I can't believe the hack job they did to get those speakers in there. That is sick, and I can't imagine how bad the exhaust fumes were in that car. Glad you are plugging them up. Just wanted to say hey, and glad to se your moving on it again, I will join you on the V8 path as soon as I can. Talk at you later, it's looking really good, Darren
The engine rebuild looks awesome. Who did that for you? I was also told that rebuilding the 4.9 is super problematic and not worth the time?
I did it myself with some help from my dad. There is a link to the rebuild thread in the first post of this thread. I don't think it is any harder then a 2.8 rebuild. You just have to be a little more careful during the teardown part. You want to do whatever needs to be done to not strip any of the threads out of the block. Use lots of WD40 or equivelent and heat. Take your time and make sure you check the block out very well. Dont want any cracks and all it takes with this motor is a small hit in the front. When buying a junk yard motor make sure the hood is on the car and has not been left open. If water gets into the cylinders you can have a mess on your hands. I was laughing with my dad about that. As we pressure washed the sleeves they would start to rust before we got the rest of them clean.
It cost me 200 for the motor, 400 for the gaskets, bearings and rings, and about 400 for the install parts. It may cost a little more for others, I got a pretty good discount with some of my engine building friends but, you get the idea.
Hey man, good to see the progress. I am still having to work on my house, so mine is at a stand still right now, but I did get it under the car, and the cradle bolted up for the first time. I will still need to pull it out and put it back in a few more times, but that's no big deal. In a few weeks I should be able to get back on it for a little while. I have big brake brackets on the way, and my computer chip is back and better than it was. Special thanks to Aaronrus for that.
I can't believe the hack job they did to get those speakers in there. That is sick, and I can't imagine how bad the exhaust fumes were in that car. Glad you are plugging them up. Just wanted to say hey, and glad to se your moving on it again, I will join you on the V8 path as soon as I can. Talk at you later, it's looking really good, Darren
Hey Darren, glad to hear from you. So the house is coming along good? Are you ready for the new addition to the fam? BIG BRAKES, woo hoo!!!
He he. I had this motor in three times and back out twice in those three days I worked on it. It know it will still come out at least one more time when we put the exhaust in also. By the time I'm done I will be a master at puting in and taking out a 4.9.
The holes in the firewall are plugged now but I am considering using the holes, since they are already there, to add some subs. Because my battery will be up front and I am doing a custom air intake that will pull through the decklid there will be nothing behind that area. I was thinking I might install a set of 8" subs I got lying around in there and make a couple custom boxes that go into the engine bay. Since the holes are already cut I see no reason why I shouldn't figure something out.
Glad to hear thing are coming along for you. Keep up the good work and keep me posted. I can't wait to hear that baby purrrrr.
Here is that pic I was supposed to put up a loooong time ago!
Thanks for the pic. Looks great to me. Seems I forgot to post a pic of my completed ones. You can see one of them in the last pic I posted today. I still need to figure out a mount for the engine grates. Since I will be converting to a fastback I will have to come up with something custom. The fastback grates mount a little differently and use a ring that goes around the strut top. I cant use it cause of the new placement of the strut. I'll try to get that figured out next time I'm down working on the car.
Just use the 86-87 fastback mounts. The triangular bolt pattern that we use didn't change, so where the pre-88 engine grille mount goes is still the same location. Just modify the pre-88 grille bracket like I did. The 88 ones don't fit, either.
I have a better picture that will show what I'm talking about, I can post it sometime tomorrow.
[This message has been edited by CTFieroGT87 (edited 09-28-2007).]
Just use the 86-87 fastback mounts. The triangular bolt pattern that we use didn't change, so where the pre-88 engine grille mount goes is still the same location. Just modify the pre-88 grille bracket like I did. The 88 ones don't fit, either.
I have a better picture that will show what I'm talking about, I can post it sometime tomorrow.
You know, I didn't check out an 86-87 fastback mount. I just took a look at the 88GT. Now that you mention it of course they are different. They cradle and strut mounting position didn't change til 88. The 88 one mounts in the opposite direction from the notchies so I just figured the 86-87 were the same. Good call. I'll look into that. It wont be tough to make a small "L" bracket to hold the grill anyway so I have another option if this doesn't work out. I appreciate the info. Thanks again.
Just a little update. I will be heading down to do some more work on 10/11-10/13. I will be puting in the Dynomat aswell as puting the interior back together and finishing up the engine bay. I will be doing the exhaust in 3 weeks on the next trip down as some stuff has come up and money is a little tight for the few couple weeks.
[This message has been edited by Fieroseverywhere (edited 10-07-2007).]
Glad to see you posting some stuff. Saw the relocation kit in the other thread, so I know what you did. I still haven't gotten my Box ordered from Norm yet. I have been able to get a few things done this past weekend. I will work on it a little tonight, then maybe this weekend, I will actually have enough done to post some pics.
If you think it looks good now just wait til the intake is done. It should really clean up the engine bay dramatically.
And thanks again for those GT gauges. They are going to make a very nice addition to this car.
quote
Originally posted by 3.8 SC:
That swap looks great! As for what is going on up front - I believe you are getting ready to put the battery up front. Am I right?
Right you are. I know, it wasn't much of a teaser but I dont have much for pics til the camera shows up. Since the cat is out of the bag...
quote
Originally posted by Darren's 87 coupe:
Glad to see you posting some stuff. Saw the relocation kit in the other thread, so I know what you did. I still haven't gotten my Box ordered from Norm yet. I have been able to get a few things done this past weekend. I will work on it a little tonight, then maybe this weekend, I will actually have enough done to post some pics.
Are you working on yours again this weekend?
Darren
Darren, good to hear from you again. Glad to hear its coming along for you. Cant wait to see some more of those pics!!
Not this weekend. Unfortunately I don't have the time or money to drive the 125 miles every weekend though I would in a heartbeat if I did. I will be going beck down the following weekend (10/26-10/28). Without giving away the rest of what I did this last weekend I can tell you that I will be puting together the mock-up exhaust. I am doing this using some pieces that are lying around. I will then take it down to the local muffler shop (Goofy's) to have them either copy one for me or bend the pipes I need so Dad can weld it all together (he is a much better welder then I am). I know they do excellant work. They do all of the exhaust work on the sprint cars and have done quite a few other custom jobs for the guys at the Harley Shop. 454 SS chevy dualies ect (this truck is crazy!!). The only reason it wasn't done this weekend is because we found out we didn't have a set of isuzu shift cable brackets. Luckily we found a set on the 85 parts car that I can use. So with the throttle cable and shift cables in place I can actually see what kind of space we have for exhaust. I will be using 2" for the majority of it with the exception of the pipe going from the cat to the muffler which will be 2.5". I will be using a stock style muffler with the 2 into 1 cat inplace of a "Y" pipe. It will be unique for now but if it works as well as I think it will it'll probably catch on pretty quickly. Even most the best "Y" pipes have more restriction then this cat does. And since they are available with a 3" outlet also they can be used for just about any engine swap with most of the pipe being run in the stock position or with the use on any cat-back system. I have a few other things planed but I can't go into it til I get these pics from last weekend posted or I will give it all away.
So where are you at right now in your build?
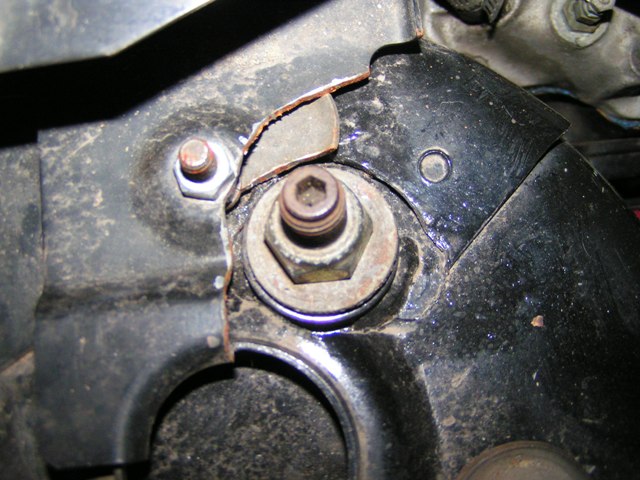
On a side note. Dad got the old 88 2.8 out of this car torn apart and found something odd. The crank is bad, but thats not the odd part. Its the way is went out. It looks like the whole crank shifted forward and carved a nice groove in the side next to the bearing seats. We have had many 2.8's apart for rebuilds and have never seen anything like this. I will grab a pic to illustrate what I am talking about next time I am down there. Everything else is good so that alone was worth the cost of the car.
[This message has been edited by Fieroseverywhere (edited 10-16-2007).]
Ok. Camera is here and I can finally post my update.
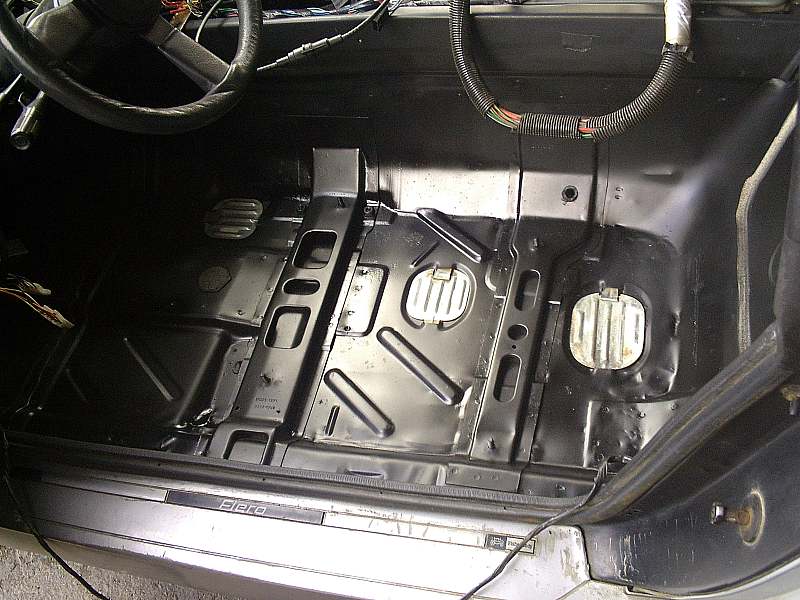
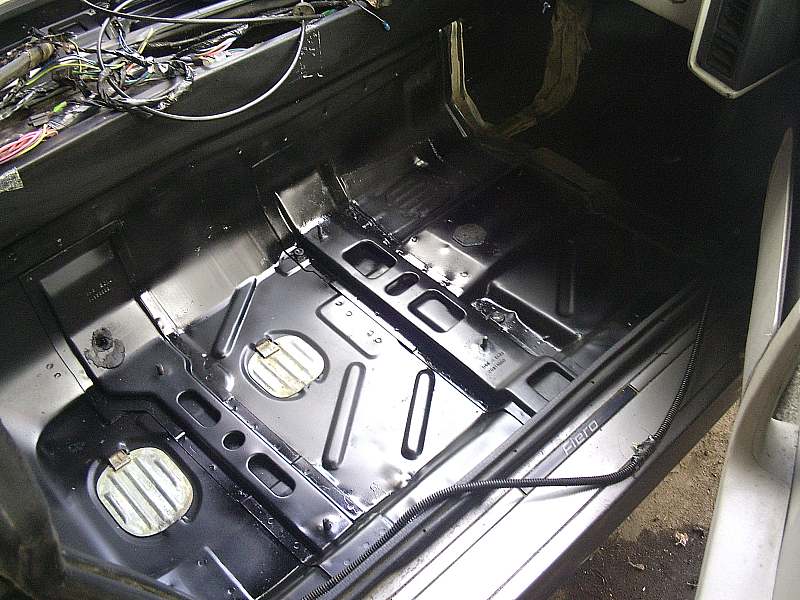
First thing I did was tear into the interior. I'm sure you guys remember what it looked like under the carpet. Filthy. I spend some time with a roll of paper towels and a can of brake clean. Brake clean is the stuff. Leaves no residue and comes in a spray can. Once I got everything clean I pulled out the trusty old (25years at least) steel wire brush and went at the loose paint and couple small spots of surface rust. Back to the brake clean to get rid of the dust I just created and then on to....... you guesed it. My trusty can of Zinc primer. I followed this up with some semi gloss black paint. I was very pleased with the results. I think you will be too.
With both sides clean, primered, painted and ready to go I got out the... I measured it up. hehe Its a pretty good fit without any cutting at all.
Before I got too far into it I we decided it was time to move the car. Sprint car racing is over for the year so there is apace once again in the shop. Yay, no more working outside. This is the first time it has been moved, or even on it own wheels since the beginning of the install. I had to grab a pic of course. Those wheels HAVE to go!
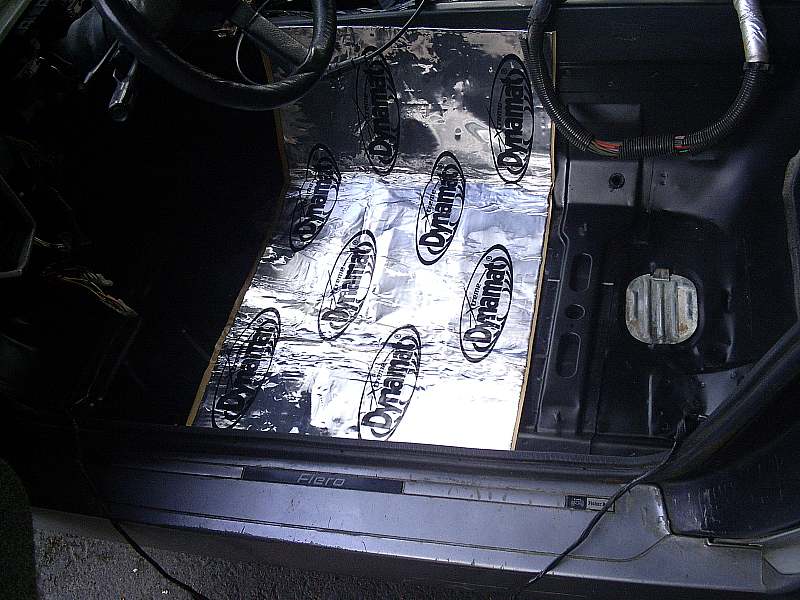
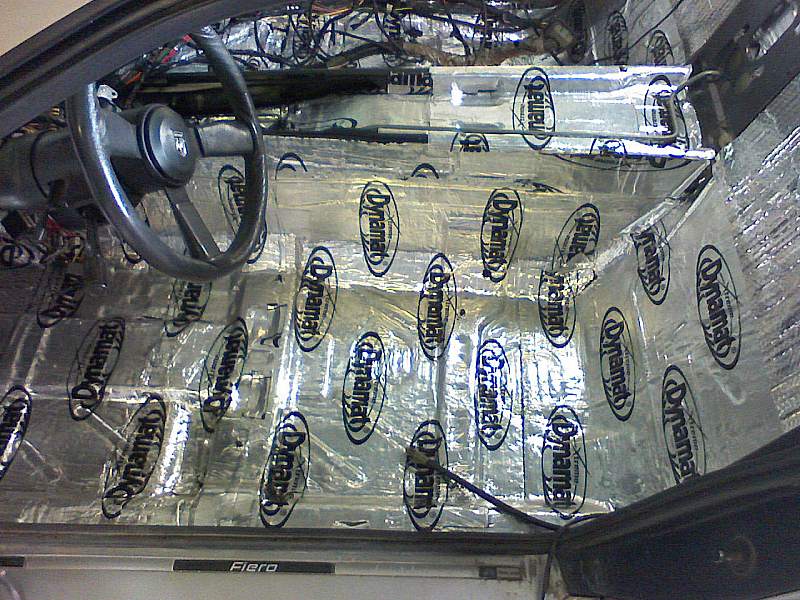
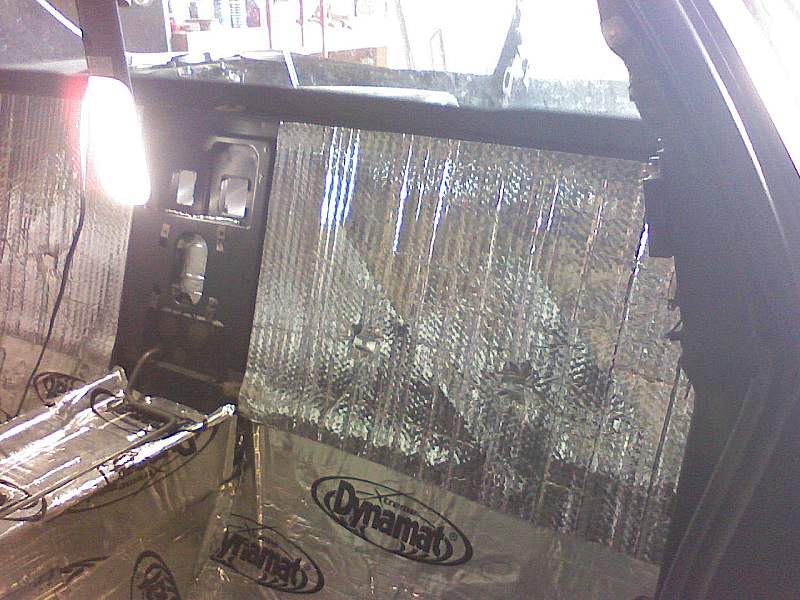
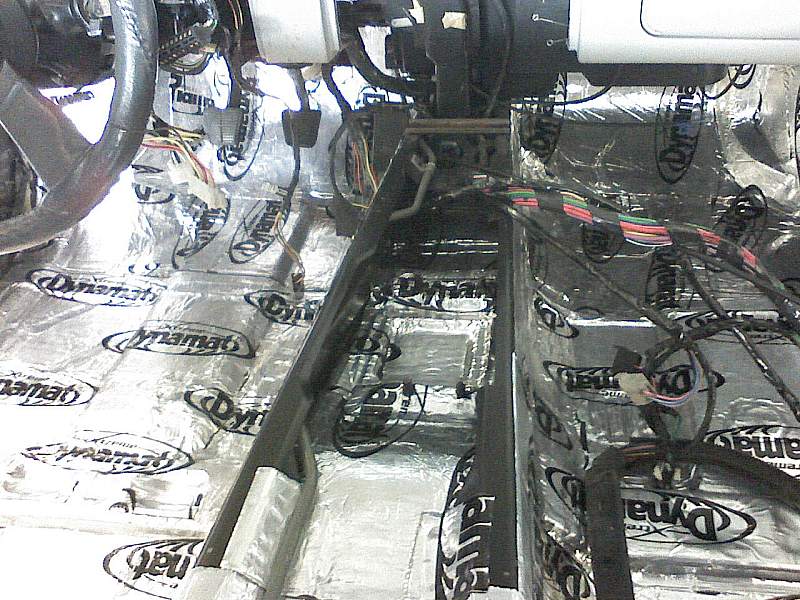
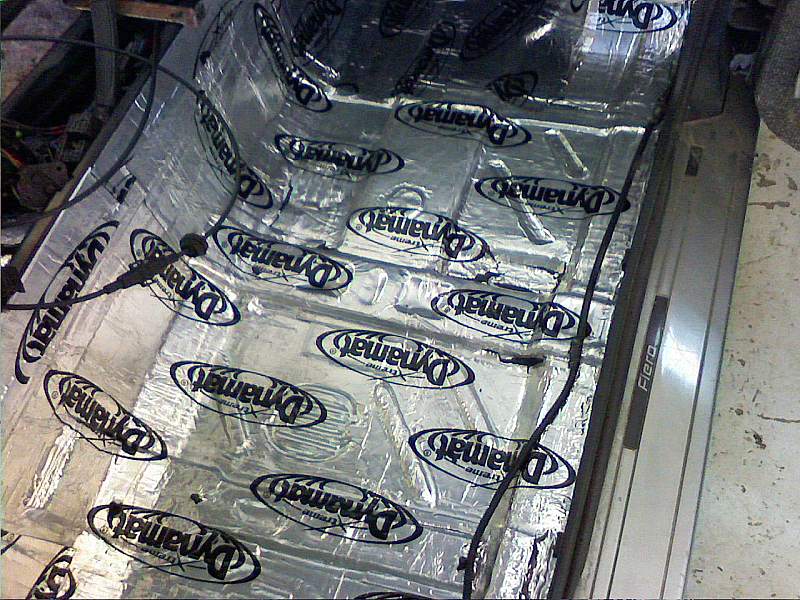
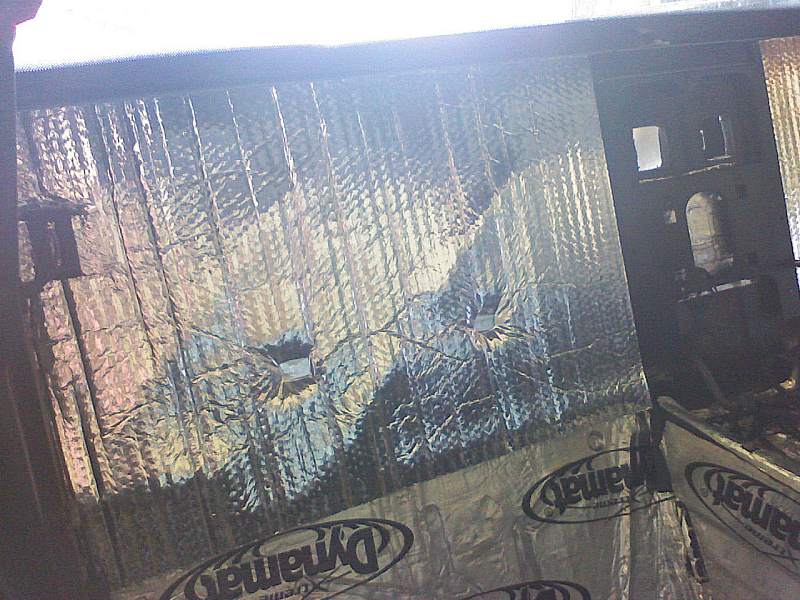
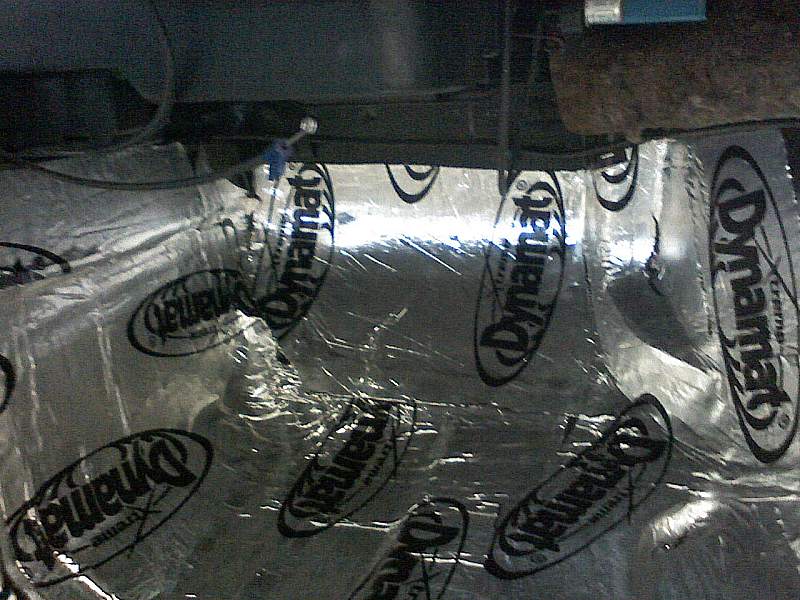
With the sprint car out of the way and the fiero finally, officially, in the shop I jumped into the Dynomat project. And let me tell you it IS a project. It took the rest of the day and part of the next morning to complete it. Every nook and cranny covered, rolled, and patched to cover everything I could. For future reference removing this bolt can allow enough room to get the solid line out of the way to lay this stuff under it.
Now I started on gettin the carpet and padding back in. Boy was that fun.
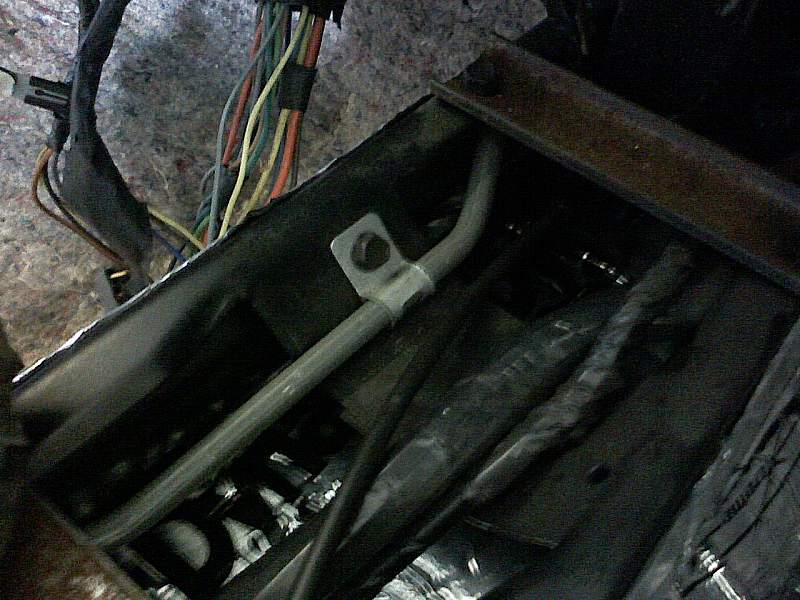
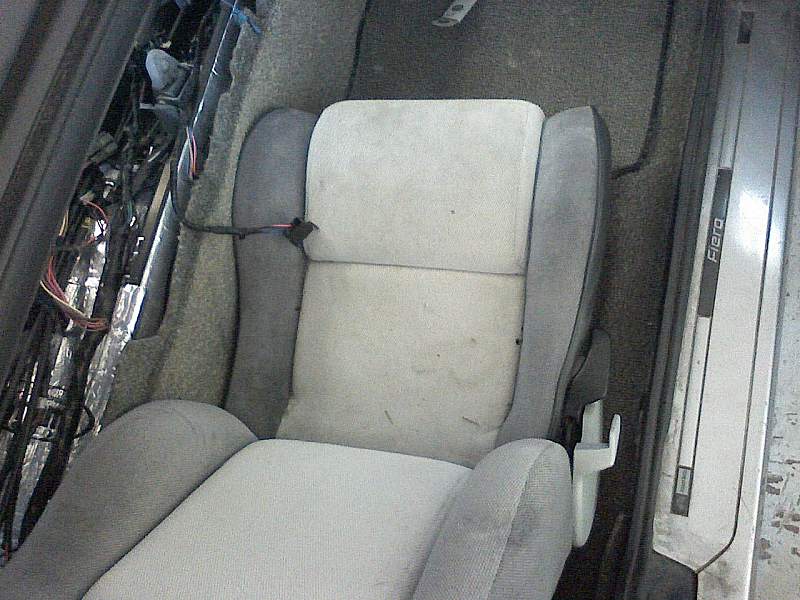
I also put in the new shifter. Re attached all of the wiring and got the seats put back in. The interior is now almost ready for the engine wiring to begin. Just need to put in the gauge cluster and add a (5 wires) harness for the rally gauges. There are more interior pieces that need to go back in but that will have to wait til the engine is running. Except for the couple small cigarette burns in the passenger side and the usual damage in the driver side the seats are not in horrible of shape considering their age. They will need recovering eventually along with speaker replacement.
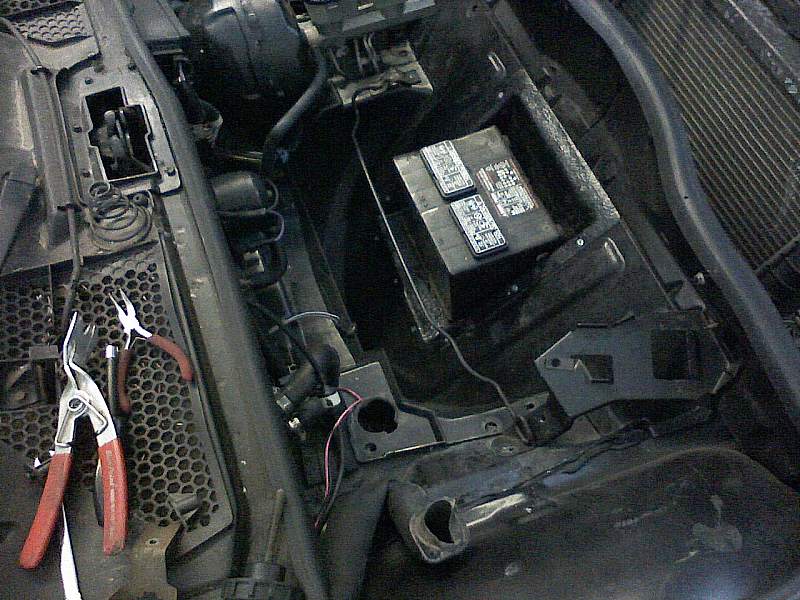
The rest of the time we were planing out the swap. We also put the battery tray in as shown above. I pulled the plastic tray competely and cut the hole at the work bench instead of in the car.
We noticed we didn't have any shift cable brackets so we couldn't do the exhaust mock-up (did I already say that?). Sorry, mind slips me sometimes. The next morning we found a set of shift cable brackets on the 85 parts car so we are all set for that. Throttle cable is ready to go also. We are set for the exhaust next weekend. The engine will get its final allignment also at that time. I will also install the gauges. For those interested in how to do this in an 85 I will provide pics and a good write up for those also.
Its becoming a reality......... finally. More to come at time allows. Later
[This message has been edited by Fieroseverywhere (edited 10-17-2007).]
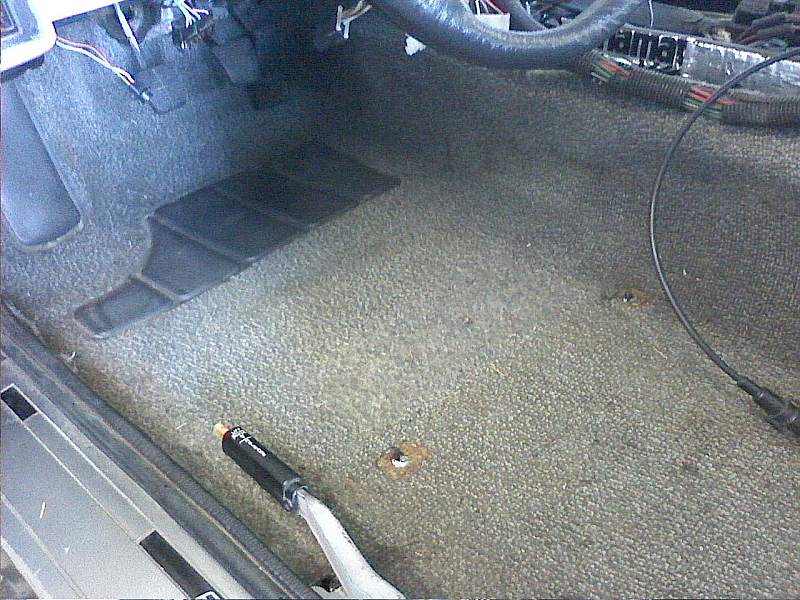
Dad pressure washed the engine bay and seatbelts to make them look good again. Marla took care of the mats for us. The passenger side mat looks to be bleached so I'll be on the lookout for a new one eventually. Her car is coming up next.
It only shows a floormat, but does this picture qualify for the "Girls With Fieros" thread?
I have decided on a couple things. First instead of running an oil cooler I have decided to run an automatic radiator and use the built in tranny cooler as an oil cooler. I have spoken to a few people about this and everyone seems to think it is a good idea and can't find a reason why it wont work. It should increase the oil capasity a good amount also which will be nice. If you got any info that could help let me know. I picked up a few thing from my parts guy earlier today to help with this. I got..
- auto radiator and cooling fan. He will pull the cooler lines from another car later for me along with 86 2.5 fuel lines which I will use to make the 4.9 fuel lines - jack and lug wrench (car did not come with them) - 86+ washer fluid tank (larger capasity then 84-85?) - 86+ third brake light and connector to wire it - one set of the ball bolts that hold the shift cables - some assorted coolant hoses and misc small parts
Best of all it only cost 20 dollars for everything.
I now have everything I need to mount the shift cables and start work on the exhaust. I am still on schedule for next weekend for this. I will also be dissasembling the 85 parts car (2.5 isuzu coupe). I need to rob quite a few parts so we are just going to drag it out with the loader and tear it apart. I will be robbing the under car coolant lines, shift cable brackets, and clutch lines amongst other items that I can't think of at the moment.
When I pulled the motor I also grabbed the stock 93 deville strut tower brace which I have dedided to use with this install. It is basically a 1" square stock bar (steel) that is almost exactly the perfect size to fit between the fiero strut towers. The nice thing about this brace is the way it mounts to the caddy. It has two brackets on either end that bolt to the strut tower. These brackets also bolt to the bar itself. I am going to make new brakets for the ends. These new brackets will also have provisions for holding the engine grates as well as a cover for the old strut hole that is no longer used. I think it will make it look right, maybe factory, while making the extra holes in the strut towers from the 88 cradle swap look better. I will post some pics when I get near the parts. I am using a 4 point mounting system and will only use a dogbone is I absolutely have to later if the engine is not held well enough with this set-up.
More to come.
EDIT: One more thing. I'm playing around with some custom shift nobs also. Got some alluminum stock and a lathe so I might be able to come up with something. Got a special one in the works right now but I cont give away the secret yet.
[This message has been edited by Fieroseverywhere (edited 10-22-2007).]
I was going to wait til I was able to get some more work done but...
Here are those shots of the completed strut towers. EDIT: nevermind, they didn't turn out
Shift cable bracket installed
The rest of my time was taken up with getting the motor alligned on the cradle and dismanteling the parts car to get the parts I need to complete the rest of the install. One good thing though, I finall got the belt on it. Gates part # K6063 63" 6 groove belt.
I had to rob most of the lines out of the parts car since most of the ones in the this car were trashed. It was very frusterating. It's ok though, I know all of the lines are good now and should NOT cause me a problem later. Always better to start fresh anyway.
Parts robbed include...
Under car coolant lines - (both were crushed on top side where we couldn't see them. ) Clutch lines - again bent, almost broken 84-86 2.5 fuel lines - I think they will work better with this install Lower rubber strip for rear window Plugs for trunk holes HVAC controls - originals were painted to change dash color same as gauges and courtesy lights. several other misc. parts that elude me at the moment
Now that this is done I can actually get back to work on it build again. I will be heading over to a buddies house tomorrow to pull a few other parts that I need. I will be grabbing the automatic radiator to tranny lines to go with my auto radiator to be used as an oil cooler. With any luck I will not have to replace the brake lines as they are the only ones left. Time will tell on that.
On wednesday I will be going to the wrecking yard to pull some other parts off of a caddy. Once this stuff is installed this weekend I should be able to do the exhaust. Its holding up everything. Later
EDIT: Parts ordered...
1 - 91-92 Cadillac Allante starter (reman.), partsamerica.com $97 shipped 10 pk - 200k multi turn trimmer pot for tach modification (9 extras, $3 shipped )
[This message has been edited by Fieroseverywhere (edited 11-05-2007).]
I have decided on a couple things. First instead of running an oil cooler I have decided to run an automatic radiator and use the built in tranny cooler as an oil cooler. I have spoken to a few people about this and everyone seems to think it is a good idea and can't find a reason why it wont work.
I think engine oil pressure is going to be much higher than transmission oil pressure. I'm not 100% sure about this but if I recall correctly, the transmission oil is pumped through the cooler at low pressure.
I think engine oil pressure is going to be much higher than transmission oil pressure. I'm not 100% sure about this but if I recall correctly, the transmission oil is pumped through the cooler at low pressure.
The only way I think it would work
DUH! Dreaded truncated post.
What I meant was the only way I see around that is a dry sump system where the scavenge side could be plumbed for the tranny oil cooler because it is pumped with very little pressure except that necessary to return the oil to the reservoir.
What I meant was the only way I see around that is a dry sump system where the scavenge side could be plumbed for the tranny oil cooler because it is pumped with very little pressure except that necessary to return the oil to the reservoir.
1
I was a little worried about the pressure difference at first til I got a look at the way the caddies are set-up yesteday. The lines from the oil filter housing are plumbed directly into the radiator just like a fiero auto cooler lines are. Now that I've seen that the only worry I have is making 3 lines fit under car as opposed to 1 or 2 (1 clutch line (3/16?), 2 auto cooler lines(5/8)). They all run in the exact same way on stock fieros. I think it will work great and by this weekend I will know for sure. Thanks for the heads up I will deffinately keep that in mind as something to look out for on first start up. One nice bonus would be an increased oil capasity, maybe 1-2 quarts?? I figure the cooler itself and the lines would have to hold close to that much.
While I'm at it a little update.
The company I ordered the starter from, I'm guessing, didn't have one in stock. They refunded the money and did not even bother to let me know why. I wont be dealing with them again anyway. I was just hoping to save 50 bucks buying it online. There is a local place right up the street that I just found out about today that I am going to go check out. With a little luck they may have what I need for a decent price. Later
After getting the refund for the one I purchased last week i started looking around again. I came accross a deal at Rockauto.com. They had 1 (and only 1) of a manufacturer closeout Beck/Arnley reman starter. Your not going to believe this but I got it for..... 54.59 total shipped including discount code. Should be here sometime next week. I had the guy call the factory and double check that it is indeed the correct one and it is. So freakin excited right now. Heres to saving 100+ dollars on starters.
Congrats on the savings. That's always fun. I'll take one of the extra parts for the Tach mod if thats ok. Are you doing a speedometer modification as well? I have left over capacitors and resistors to make you a module for that if you need it.
My wiring is coming together really well. It's a pain, but it's finally getting done. Should have the whole harness done this next weekend. If the sun would stop going down so early, I could have had the harness finished this weekend.


 ) and the ugliest 1990 grand am wheels you've ever seen. Everything else is stock. It only has power windows, tilt steering, and decklid release. No AC, cruise or any other features. It is a pretty light fiero to begin with. Here is a pic of how she looked when I first got her. It will be a good "before" picture. Cost - $200 dollars


 ..... 7k+
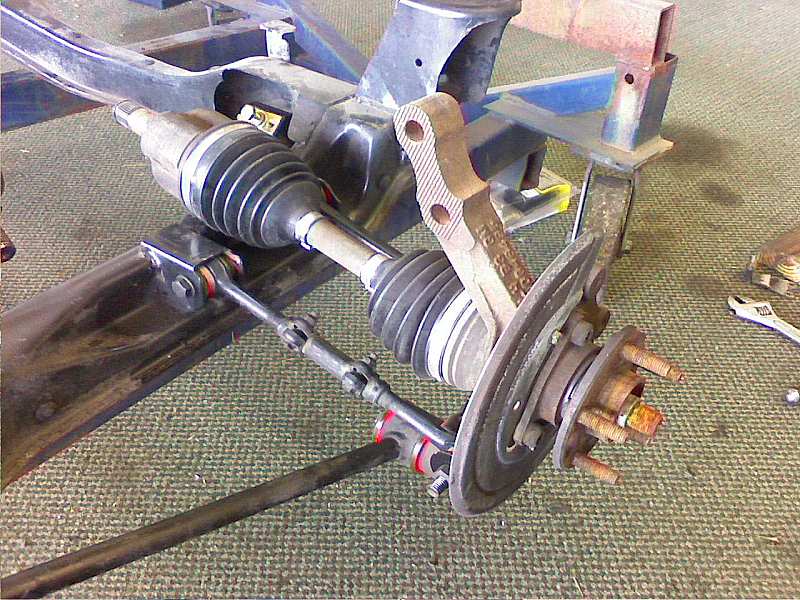


 I'll need a new fan also now. I also found that one of the headlight relays is missing. Got another lyign around somewhere I'm sure. I pounded out the dents in the floor pan and removed the center brace that goes under the gas tank. I got all of the rocks (~1 lb) out of the brace and re-installed it. Guess my woman got a hold of the camera at some point and got this pic of me filthy and under the fiero. There was not one part of my clothing that wasn't completely covered in grease, dirt, oil, brake fluid, or what ever else I could find to cover myself in. We put the motor back in for safe keeping til next time. Looks pretty good in there. Cant wait to hear it run.
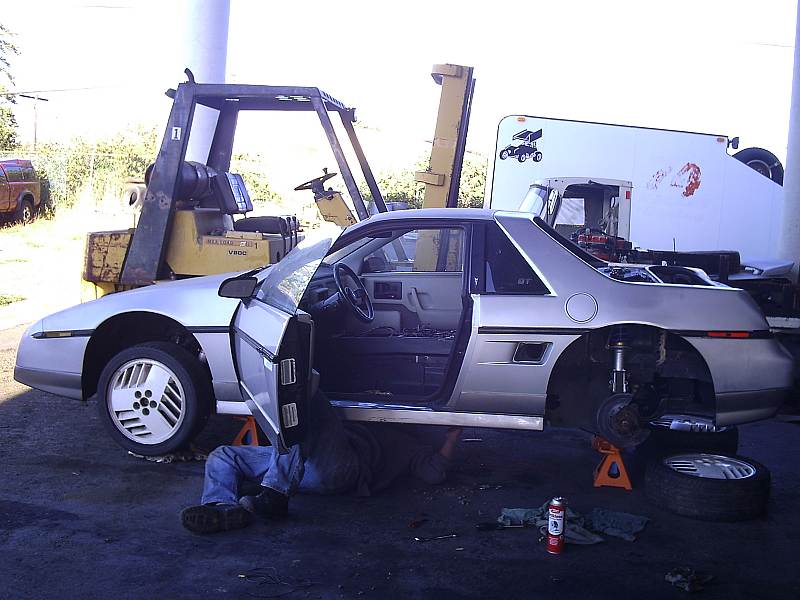

 v-rods rule