Sorry that I haven't posted lately - I haven't been here much myself. Been terribly busy with work plus slowly working on this:
This is the first car I've ever drained the oil out of (though I've done some basic stuff on my Fiero) so it's pretty slow going - learning as I go. The engine and tranny are going to have a home in my Fiero eventually. Lot of time and $$$ between here and there though, like most projects.
Anyway, I can't wait to see your car in paint. I think it's going to look amazing! Those fender flares have got me thinking...
Some progress this weekend, slow but in the right direction. The front flares are the right shape as it's looking more like a widebody kit. They are ready for scratch removal and finer sandpaper:
The front antenna hole was glassed in last year and hasn't cracked which is good news, so it got a coat of bondo today:
I was very happy with the blending of the side skirts to the door. The rear of the door was a little too thick, so I sanded in down flush with the panel behind it. You have to be careful while using the long block on the doors that you don't press too hard. Since the panels are flexible it can cause waves (high and low spots):
Here is a shot of the redesigned b-pillar covers and a few tools of the trade:
The rear spoiler fiberglass was sanded with coarse paper to shape and is ready for a coat of filler:
I am trying to stay patient - the paint is the first thing everyone will notice... Since I've put hundreds of hours into the car already, mostly in the engine bay - I don't want to rush the bodywork. My plan is to get it as close as possible to ready for paint and then bring it to the bodyshop where they will probably point out more work that needs finishing. At that time I can negotiate whether I finish it under their supervision or pay the experts for the final prep.
Cheers, Ryan
BTW nice 4.9 you got there Andrew - you'll learn quick by getting your hands dirty. If you haven't already I would suggest a Haynes Manual or similar book for that car so you can read and learn as you go.
Good news today - I've now got an important piece to finishing my project.
First I went to look at a Fiero for sale in Niagara Falls for $300. It was a red 1984 2.5L 4spd. Since I really don't have anywhere to store it for parts, I decided to pass on it. Then I went to see the Father/Son that were building there own car from a Fiero chassis. It is coming along nicely and has an all metal removeable body. The roof line and doors are from a TR7 while the seats, floor pan, firewall, engine/transaxle are Fiero. Tailights are round Ford Fairlane - the overall design reminds me of a Lotus Extige. Sorry I didn't have my camera, but the orginal design of the widebody fenders with air intakes were very cool (77" wide!). The wraparound dash is also all original and should look great when done.
Front suspension was Fiero and brakes were Cadillac He still had his 1985 GT parts car that I bought the decklid off of last year. With their help, I was able to remove and purchase the windshield surround for $50 (actually I gave $60 because they helped me remove it in one piece undamaged)
I couldn't help but notice the aero style font and rear bumper covers - hmmmmm! I do like the appearance of my front end, but I might be going back to get the rear cover - haven't decided yet. The dual exhaust outlets, lower valance to hide my cat's and no bumperettes might look sweet. However, I would have to redo the rear fender flares with fiberglass to make them fit. I'm also a little concerned it won't match the side skirts or the front bumper in appearance.
Better decide soon, I guess. Any input would be appreciated. Here are the pics of the two rear bumper cover styles for comparison.
My current bumperette cover:
The style I found today on the black 1985 GT (This is Steve's car from page 6, thanks again):
This afternoon I was able to do some work that didn't involve sanding for a change
First I changed over my starter - the Powermaster 9000 was upgraded to the 9004 model. I just reused the starter block I had previously modified to fit. The spec sheet for the 9004 is on page 5 of this build thread. It was a direct swap, just a little longer. I still badly need a new flexplate, but I can't see how I can replace it without dropping the cradle, so it's still postponed till after paint.
Alright, I went back yesterday and picked up the rear bumper cover off the 85 GT. I also got an ashtray cover cause one of mine was broken.
Here is the new one, it was in good shape but had been repainted:
This is the bodywork I needed for the windshield frame - tomorrow's project:
Chapter 11, section 15 in the Haynes Manual has a good description of how to remove the bumper cover. Six phillips screws hold the tailights in, with these out you get access to the top clips:
I found the easiest way to remove the retaining clips was by prying the center pin up with some dull side cutters and then pulling them out. These clips are also on the underside. The 7mm screws from the wheelwell liner also need removal along with the marker lights using T-15 Torx to get access to the 7mm screws. Don't forget to unhook the license plate lights before pulling the cover completely off:
Here are a couple shots with the cover removed:
The fiberglass fender flare was cut with a knife prior to removal:
I did need to transfer the license plate lens to the aero bumper:
And the reflectors - I thought about filling these in but the urethane is very flexible so I passed, but I might relocate them to be flush. If I do that, I'll want to do the front indicator lamps too - stay tuned on that:
Here you can see a comparison of the two styles of covers - hopefully the cutouts for the tips will be right:
Test fitting the new cover - of course it's gonna require some custom fitting due to the fender flares:
Unfortunately the flares are also going to have to be shortened to end at the skirt like the front ones do:
On the other hand the exhaust tips are both in the perfect location Drivers side:
Passenger side:
I was very happy with the results - it's an improved look and matches the rest of the skirts nicely. It also achieved my goal of covering the exhaust. Now was the last chance to do this mod before paint, and it was well worth the time involved in my opinion. Best of all, it still clears the car ramps so I will have no issues getting under the car easily (something I was concerned about):
Hi Winkie - thanks for looking. I used red engine enamel spray paint - pictures near bottom of page 1. The transmission was degreased and primed by Mister Transmission. Here's a shot of it in primer:
Cheers, Fiero2m8
[This message has been edited by Fiero2m8 (edited 07-11-2007).]
Yesterday, I got the windshield trim modded and reinstalled. You have to remove the fender bolts to slide the bottom corners in. two screws in the bottom held it in position so I could mark the top edge for cutting:
The studs in the top section had to be grinded off to sit flush:
I used my grinder with a cutoff wheel to cut the curve - it did a nice job with no splitters or paint cracking:
Then I spent some time regapping the front fenders and I reinstalled the front shroud:
All the Sunbird convertible parts were reinstalled including the modified interior lamps. The header still needs to be recovered with cloth or vinyl. I am going to try and match the tan, if I can't it will be black. I haven't used butyl rope on the pillars yet - gonna let Standard Auto glass do it during the windshield install:
I'm gonna make a windshield appointment soon, so I reward myself with a cruise between sandings
So here's my solution to redo the rear fender flares to accept the new rear bumper valance. After looking at the front flares, they stopped at the front apron and side skirts, so I decided to cut my rear flares to match. I also tapered them in to meet the top of the rear skirt and mechanically fastened them hold them in place so I could glass them:
I also made a decision to keep the rear side markers basically to match the front ones. This time I built up the flare so that the marker lens with appear to blend and disappear into the flare. The first step was to roughen up the surface with 40 Grit sandpaper. Then I layed a few layers of fiberglass cloth. I decided to use bondo-hair long strand fiberglass to create the desired shape and add more strength. Here is the cured look prior to any sanding:
Next step was to add a layer of bondo-glass short strand fiberglass to finalize the shape so it is ready for body fller:
Now that I can easily visualize how the finished body will look, I didn't mind having to redo the rear flares. The lines and overall shape are flowing nicely from front to back - not bad for a budget junkyard body kit.
I think I've got something fairly unique for around here. Judging by the dozen passerbys that stop daily to check out the project, I'm feeling confident that's my vision is coming to life...
Originally posted by Fiero2m8: What do you Fierofanatics think?
As you've noted earlier, you can't rush bodywork, but I really want to say "Hurry up and finish it already!"
I think it looks great. I love the flares, I love the fact you went with a GT bumper. I also love how you handled the transition from the doors to the decklid. One of my pet peeves with cutting the top off the Fiero notchback is the up and down and up from fender to door to decklid - particularly from door to decklid. You've handled that really well!
When I'm back to Ontario I have to make a trip to Niagara - see the falls and Fiero2M8
I think it looks great. I love the flares, I love the fact you went with a GT bumper. I also love how you handled the transition from the doors to the decklid. One of my pet peeves with cutting the top off the Fiero notchback is the up and down and up from fender to door to decklid - particularly from door to decklid. You've handled that really well!
quote
Originally posted by Fiero2m8:
The goal is to blend the height transition from the door to the rear deck. Fastbacks don't have this problem, but most guys wouldn't cut a fastback roof off anyways
Yes Andrew, I tried to make the transition as gradual as possible after seeing a few other solutions that bothered me. I'd like to see someone make the whole door higher on a notchie roadster to flow the lines from front to rear fenders. But the Fiero certainly has character and I'm not trying to disguise it as something else.
Be sure to let me know when you make the trip.
Latest progress was just another sanded coat of filler on everything behind the doors.
I have an appointment Monday for the new windshield to go in (weather permitting) In the meantime, if there's any photoshoppers out there, please post a black version so I can see how the marker lights will look. Feel free to edit 18" 5 spoke rims in there too...
New windshield was installed by Speedy Glass. Everything around the windshield was removed and they glued the surround down for me. I was impressed with the install and molding they used. They installed a newer than 1986 style mirror for me too so I didn't have to find a replacement for mine that I dropped and broke. Here is a view from back:
The top of the windshield is tinted as well similar to the original. Here is the outside view:
Bad news from last week was finding out the Pontiac dealership that I made a deal with to paint the Fiero was sold last Thursday However the owner bought the Saturn dealership in Niagara, so I am meeting the painter they use to paint flexible panels. Hopefully I will be able to make a similar deal - I will keep everyone posted.
I brought Fiero2m8 over to the new painter to agree on pricing and what point he will take over the paint job. Good news is the pricing will be as good or better than the dealer was. He is also willing to finish any prep work vs. the dealer that would only mask and spray. I saw samples of his work, the most recent was a Black flexible panel Saturn Ion that was of the quality I am looking for. He is recommending using a black PPG urethane paint vs. the base/clear to save cost, and make future repairs easier.
For the front fenders that were currently at 120 Grit, he suggested using 240 then 3 coats of high build primer. That should expose defects that I can use spot putty on and sand to 400 grit.
So it looks like I've got alot more sanding to do next week before he can block the rest of the car. I was considering sanding all the skirts and giving them a coat of flexible primer as well. Whatever I can do will save me money in prep labour, but I don't want to spend the rest of my summer sanding. I am going to bring the car back in a few weeks for another inspection to see if it's ready for paint.
Other than that, all I've done this week is put the wiper arms back on
I love how your car is turning out. I plan to also use bolt on flares. Do you think the flares you have are from a firebird or aftermarket. I will probably buy some after market ones soon i just hope they will go around the wheel well. I havent seen sunfire turbos with flare kits. How wide a wheel can you fit on the car now? Do you have coil overs will you use them? What year is car?
I love how your car is turning out. I plan to also use bolt on flares. Do you think the flares you have are from a firebird or aftermarket. I will probably buy some after market ones soon i just hope they will go around the wheel well. I havent seen sunfire turbos with flare kits. How wide a wheel can you fit on the car now? Do you have coil overs will you use them? What year is car?
G'Day Mate (or Sheila),
"Throw another shrimp on the manifold"
1. My flares are from a U.S. spec stock 1988-1991 Pontiac Sunbird Turbo - see earlier in the thread. If you go aftermarket, just measure your wheelwell opening first and make a template.
2. 245mm wide without rear coilovers.
3. Currently McPherson strut still in place - Yes, rear coilovers are a winter project (just let the cat out of the bag) With the proper offset, I am planning for 275mm rubber on an 18" or 19" rim.
4. 1986 Pontiac Fiero Sport Coupe - LT1 from 1994 Chev Caprice 9C1 (police package), 4T60 Transmission from 1990 Cadillac Seville STS
Good on ya Bruce
Thanks for all the info i am thinking i will do rear only for the staggered effect. I am not sure what i will need template for i guess to get holes in right spots. I dont fancy my chances of buying factory parts here in Australia i got no junkyards here with pontiacs in them. I will look at 18-19s also i just wish i put coil overs on back when i did my suspension last year. I was all for factory look then but now i have started modifying my car. My car only has 22,000 miles so was regretful of modding but after discussions of RHD devaluing anyway i decided not to hold back. For 22,000 miles was is in poor condition all round and had accident damage. I have started replacing everything new suspension drive train cvs clutch, engine mounts, new rubber everything new windows all the parts i have replaced or repaired all broken panels and like you slowly customising a body. I will keep my eyes on your car i cant wait to see it painted with coil overs and rims. I will be keen to see what your wheel choice will be. Yes those wheels look like juicers they are so 80s but then again so is the car but after what your doing you will have changed the whole look of the car well done excellent work.
I like the concept of the car and the innovation is superb but Im not too keen on all the amounts fiberglass and filler . What happens if you get in a fender bender?
I like the concept of the car and the innovation is superb but Im not too keen on all the amounts fiberglass and filler . What happens if you get in a fender bender?
I never understood this particular "what if". What difference does it make? Custom is custom. By this logic, we should never do anything to modify the appearance of our car because of the off chance we might get into a fender bender and wouldn't be able to bolt on a regular replacement part. It makes no difference whether it's 'glass or pounded sheet metal; plain and simple: Custom Don't Come In A Box! Look at it this way, he basically built the thing from the ground up (nice job btw) so I would suppose if he gets into a wreck he'll collect the insurance money and FIX IT, What else?
Im not saying anything bad about the job being done. What ever a person wants is their own buisness. Personally, I just dont like alot of filler in a car. It causes cracks to develop around seams and joins. The only way to stop filler from cracking is if it is applied over a welded seam. I dont know of any ways to weld a fiero's panels unless you fuse them with a plastic weld machine or weld kit. I much rather see someone do a good job once, rather than have to repair it multiple times. Just my .02
A lot of misconception about the use of filler here. He has glassed it then sanded the filler is just to get a smooth surface. I dont see problems with this cracking the fibreglass will hold it in place nicely.
I have a question. The flared guards you have used did they fit the wheelarches perfectly? I am finding the gap between the universal flares is 28 inches but gap of wheel arch of fiero is about 30 inches. Have you covered up any of the wheel arch with the flares overlapping. Is the donor pontiac as big around the wheel arch as a fiero?
Thanks for all the feedback! I hope stuff doesn't crack on me, but it's not the end of the world if it does given the budget on paint. Either way, It will be a good learning experience for all of us backyard mechanics. As far as the rims, they will be replaced when I burn off all the tread and/or when I have more $$$ for the project. For now the wheelwells are full and will have to do even though 3 spoke rims are a pet peeve of mine.
Ryan
quote
Originally posted by Australian:
I have a question. The flared guards you have used did they fit the wheelarches perfectly? I am finding the gap between the universal flares is 28 inches but gap of wheel arch of fiero is about 30 inches. Have you covered up any of the wheel arch with the flares overlapping. Is the donor pontiac as big around the wheel arch as a fiero?
Here's a picture of the flare removed - you can see it is larger than the stock opening by approx 2" either side. The stock bodyside molding had to be trimmed so the flare sits flush.
I haven't had time to work on the project lately, but I have been researching how to fix the minor front oil leak I have developed. This link gives an excellent step by step description with pictures explaining what I am planning to do:
So far, I've bought all the seals, o-rings and gaskets to perform the fix. The waterpump has to come off, so I might replace the optispark while I'm in there since the GM unit has been getting oily. I found the MSD Optispark on the Summit Racing site:
O.K. here it the update on the front engine oil leak repairs. Good info here for LT1 owners:
First I removed the water pump, as I need to replace the seal behind it. This F-body pump has been modified to fix the Fiero and has one hole plugged because I'm using iron heads:
Next, I removed Archie's harmonic dampener which I believe is neutral balanced - correct me if I'm wrong... I had to remove it in order to get the Optispark distributor off, which is also blocking the seal!
Here you can see the distributor shaft with O-rings and the cam pin dowel guide that inserts into the slot in the Optispark. I replaced this seal while I'm there as it's cheap insurance on a future oil leak there that could damage the Opti:
The cam driven waterpump seal is notorious for being installed incorrectly. Mine leaked when I got the motor and the engine builder installed a new one wrong (even after taking time to polish the shaft) making things worse. It is so easy for the inner seal to flip and point away from the motor instead of inward as you slide it on the shaft. After wrecking a new seal myself I experimented and after a few tries, found the perfect guide tool anyone can easily find. It's a Super Sharpie cap with the clip snapped off
As you can see here, it slides on real slick with no issues
After tapping the seal home, I installed the new MSD Optispark being sure to align the cam pin and then installed the O-ring on the splined water pump drive:
The water pump has the same spline and the same part number O-ring goes on here too. They don't seal oil or coolant, just provide a cushion for the splined collar that joins the assembly together:
This is a shot of the new MSD and a new collar installed on the spline (end with groove in it goes towards engine):
After hooking up the coil wire, fresh air and vacuum lines to the Opti and plug wires, I was ready to remount the almost new water pump with new gaskets and RTV:
Carefully refilled the cooling system. I don't use the bleeder I installed on the water pump to avoid getting my Opti wet. Instead I burp the cooling system by making the rad the highest point, run the heater and use my pressure cap to release trapped air into the overflow bottle. After 10 minutes of warm up all the air is bleed and the overflow is topped up as it cools: BTW-the X-frame makes finding jack stand points a piece of cake
After a 30 minute test drive and cool down no oil or coolant leak anywhere - PHEW!
I brought Fiero2m8 over to the new painter to agree on pricing and what point he will take over the paint job. Good news is the pricing will be as good or better than the dealer was. He is also willing to finish any prep work vs. the dealer that would only mask and spray. I saw samples of his work, the most recent was a Black flexible panel Saturn Ion that was of the quality I am looking for. He is recommending using a black PPG urethane paint vs. the base/clear to save cost, and make future repairs easier.
For the front fenders that were currently at 120 Grit, he suggested using 240 then 3 coats of high build primer. That should expose defects that I can use spot putty on and sand to 400 grit.
So it looks like I've got alot more sanding to do next week before he can block the rest of the car. I was considering sanding all the skirts and giving them a coat of flexible primer as well. Whatever I can do will save me money in prep labour, but I don't want to spend the rest of my summer sanding. I am going to bring the car back in a few weeks for another inspection to see if it's ready for paint.
Other than that, all I've done this week is put the wiper arms back on
Ryan
1) Prime everything with EPOXY before the high-build primer. The high-build will not stick as well if you don't. 2) No need to sand with anything finer than 180 when you use high-build primer. 3) After blocking using 180 wet, final sand with 320 wet, shoot another coat of epoxy for a sealer, & shoot the paint. OR: Final sand the high-build with 180 wet, shoot the epoxy & let dry, final sand *it* with 400 wet & shoot the paint. Always use a giude coat (mist) of flat black for evey sanding. 4) Base/clear will last longer & is no problem to spot in if it gets damaged. I've been building custom cars for nearly 40 years... HTH, ~ Paul aka "Tha Driver"
Thanks Paul, + 4 u. Nice to get tips from those experienced painting a Fiero.
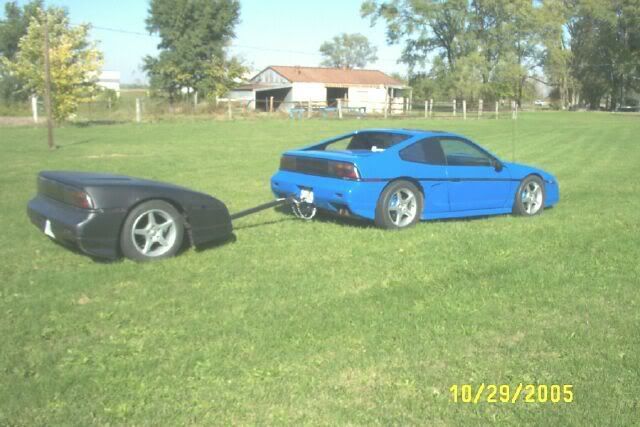
I stopped by the Last Chance Car Show yesterday with my son Andrew and he really liked this Fiero trailer. Owner wasn't around - anyone know who's it is so I can give them a thumbs up and get my ?'s answered?
Here was my favourite pic of an LT1 used in an engine swap - nice top plate, painted fuel rail covers and hidden wiring!
I do not know who has the red trailer, but the one below is the one I built. PM me any questions you have and feel free to read my build thread (pics no longer work but I zipped them and can email them if you would like).
I was having a hard time starting the car when it was hot and I hadn't done anything different to the car to cause that problem. After some research on www.CamaroZ28.com and concluded that my ICM (Ignition control module) was acting up when it got hot. However, I did a few check first before buying the part. Since Fiero engine bays are warm, I had previously relocated it to a cooler spot. Some posts recommend heating the old one with a hair dryer to see if it causes a no or hard start. The Fuel pressure was good cranking hot. I didn't think it was flooded because it wouldn't start with the pedal to the floor. I ruled out vapour lock because the fuel lines and fuel filter hadn't move moved in 2 years. Also, I was hoping the new Distributor might have solved it but it did it with both Optispark distributors so I could rule that out. So I broke down and ordered a new one from GM, bolted it to my MSD coil and remounted it. Presto, problem solved. Nice when the first part you buy solves the problem!
On the topic of starting, I decided to try a new Optima battery in the engine bay with short thick 1 Guage cables to make life easier on my Powermaster 9004 starter. I had previously went through two starter solenoids, so I thought moving the battery from the front might help. Here are some pictures of it installed as a trial to see if I prefer it. So far, it seems to work better.
Optima Red Top:
I mounted and bagged it on the left side of the engine compartment - these batteries are spill proof and can mount at any angle:
I will update everyone after some more mileage with my review of this mod:
Time to go for a cruise and enjoy the amazing weather this long weekend. Fiero2m8
I picked up some new header collector gaskets and installed them:
When using aluminum "permanent" gaskets, make sure you use metal locknuts or double nut them like I did here:
Also picked up some new NGK TR6 spark plugs:
Next items to fix:
* shorter Nitrous line from bottle to solenoid * re-jet to a 100HP shot and leaner setting once colder spark plugs installed * ordered new flexplate that will need balancing and installation * need to replace cracked axle boot on passenger side of trans * speedo stopped working on the weekend
Always seems to be a WIP - good thing it's a hobby
Fiero2m8
[This message has been edited by Fiero2m8 (edited 10-09-2007).]
I picked up some new header collector gaskets and installed them:
I hope you have better luck with those aluminum ones than I did. Melted 2 sets with each lasting about 1000 miles. I now run Copper... But mine were on Stainless steel manifolds and hold in more heat than a traditional header, so that could have been my issue
I hope you have better luck with those aluminum ones than I did. Melted 2 sets with each lasting about 1000 miles. I now run Copper... But mine were on Stainless steel manifolds and hold in more heat than a traditional header, so that could have been my issue
Can you give me more details on the copper? Manufacturer, pics, where to buy etc. Good reference for if/when mine melt.
My new Flexplate came in yesterday for an 86 2.5L auto Fiero. Parts Source said they were no longer available (only the V6 one was) but Canadian Tire got me a 4cyl one for $40CDN. I brought it and the orginal LT1 Flexplate to Northtown Machine. The plan is to have the new flexplate balanced to match the stock LT1 flexplate. Here is the LT1 flexplate (notice the weight is in line with the guide pin hole:
The new Fiero 4cyl flexplate has no weight on it and has 6 symmetrical holes:
So the question from the machine shop was, where is my reference point on the new one (since I didn't bring Archie's adapter in)
I called Archie and he answered the phone and was very helpful - especially since I confused him by accidentally agreeing that I had a V6 plate and they are DIFFERENT.
Anyways after walking over and looking at an adapter, he confirmed that my reference point would be on the center line of any of the six holes on the new Fiero 4 cylinder flexplate.
I should have it back and balanced next week - now I'm looking for tips on the easiest way to complete the flexplate swap....
Not much to report as it's busy at work this time of year. I picked up the balanced flexplate last week, here it is...
Also the speedo stopped working, so I have to investigate the wiring from the VSS.
Doing some research for winter projects in addition to the flexplate install. I have added rear coilovers, front poly bushings, and lowering front springs to the list. (Not to mention finishing the bodywork )
This past weekend I was visiting my brother's new place in Troy, Michigan as he transferred to GM's headquarters in Detroit. Any Pennock's people in the area?
Ryan
[This message has been edited by Fiero2m8 (edited 11-05-2007).]
Starting to collect my parts for the winter Fiero2m8 projects. Today I picked up the Prothane complete kit for the 84-87 Fiero. It contains everything I need except the engine cradle (K-frame) mounts that I already installed last year.
Well here's the latest on the bodywork... I just picked up a GT aero nose to match the rear bumper cover I installed in the summer. Good thing I hadn't finished the bodywork yet Actually, I will have to redo the front flares, but no sense finishing the bodywork before I'm totally happy with the looks. Here's a couple shots of the new piece:
I will show shots of it installed soon:
If only I could find a better spot for the front license plate...
Well, today I got the bumper pad nose exchanged for the aero nose. I am pleased with the results - it matches the rear now. It's not hard to swap a nose cone, just took my time and enjoyed the process.
Here are the pictures - if anyone has questions, let me know.
First all the top, side and bottom fasteners were removed and the driving lights were disconnected:
I removed the emblem (not sure if it's going on the new one yet) and I had to separate the flares from the bumper before it came off: Yeah, there's surface rust cause this car wasn't garaged and was winter driven despite only 35K miles on it. (still not bad for over 20 years old in Canada...)
Here's the old one removed with the Daytona Turbo Z skirt still attached:
The 5mph waffle plastic was transferred into the new front end - it fit the same as the other one and I held it in place temporarily with masking tape:
Here you can see I'm gonna have to cut and reshape the flares like I did with the rear ones:
I spent the most time realigning the hood to bumper gap using the adjustment nuts on the hood hinges:
You'd probably noticed the front license plate holder is gone too - still brainstorming what to do about it:
I didn't have to touch the indicator lights, although I've been thinking I might install flush mount ones front and rear in the future:
I don't plan on reinstalling the front or rear side marker lights either, should make finishing the flares easier and better looking...although I'll probably install flush mounted aftermarket ones if the police notice they're gone:
The original owner isn't gonna recognize this car by the spring
Yeah, that's snow, our first of the season - that's why the seats covers went back on