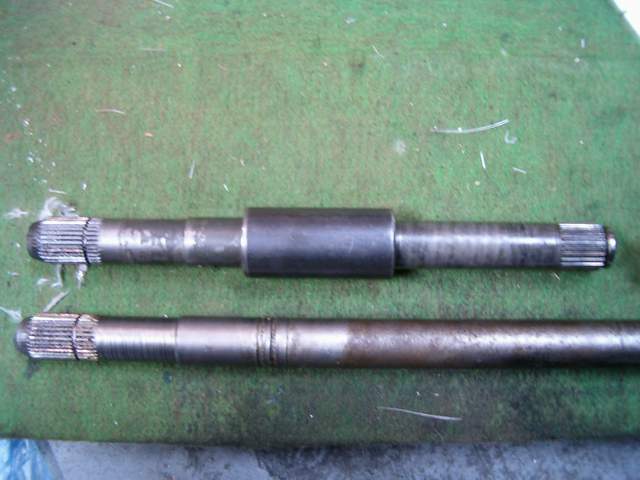
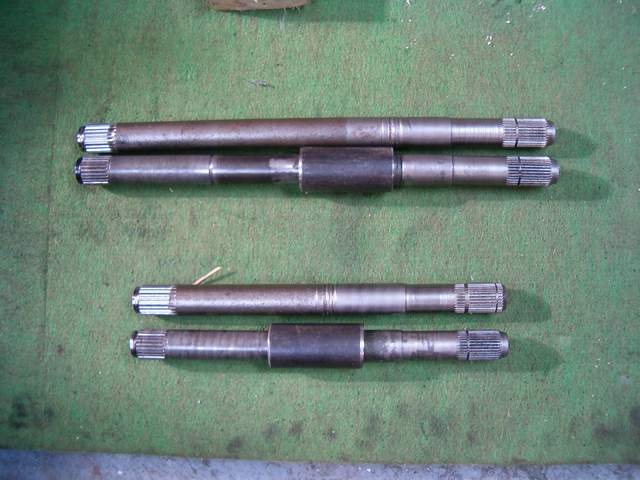
As far as axles go i have decided to try the press fit sleeve method first. After some calculations in another thread i found out that interference fits can actually transmit a substatial amount of torque. Press fits are designated on a scale of FN1-FN5 where 1 is a light press fit and 5 is heavy. I had machined the axle ends to give a .005" interference with the sleeve. After looking at the specifications for an FN5 fit, a maximum interference of .0035" for that shaft diameter, i decided to reduce the interference to match that. The calculations said that it would take ~40 tons to press the axles together but it only took about 12 . Since it only took 12 tons to press together i'm a little worried about the amount of torque that it will be able to transmit. With 40 tons of force to put together it would be able to transmit about 3700 ft lbs of torque. If the press fit doesn't hold the worst that will happen is the axles will spin inside the sleeve, this might spin weld them internally or it might not. If they dont weld themselves after spinning then i will . The original getrag passenger side axle is long enough that both new shafts can be made out of this one piece and the diameter is sufficient enough to re-machine splines on for the cobalt inner cv tripot. I found a place locally that can machine the splines for a reasonable price. I will be cutting the passenger. side getrag axle into two pieces and haveing them machine the new splines on to the ends so i will have a spare set of axles that are solid. The solid one piece axles will only be used if the pressed sleeve and welded pressed sleeve method fails. I want to try the sleeve methods so that other people can put axles together cheaply and because i really just want to see if it works. On to some specs now.
The passenger side axle will be the longer of the two with a total length of 16 5/16" The distance from the outer edge of the c clip groove (fiero side) to the start of the splines or face of the tripot bearing (cobalt side) is 13 7/8"
The driver side axle is 12 7/16 total length The distance from the outer edge of the c clip groove (fiero side) to the start of the splines or face of the tripot bearing (cobalt side) is 10"
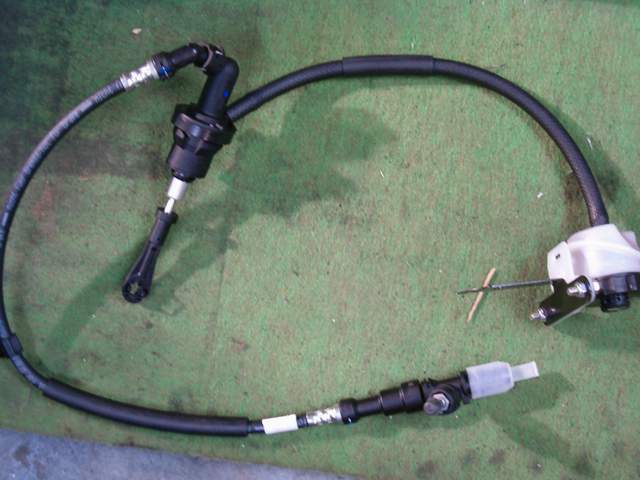
I have also ordered the clutch line and bleader piece for the hydraulic TOB. The clutch line and bleader are not available seperately and must be purchased as an entire master cylinder assembly which makes it rather pricey. The assembly comes with the master cylinder, clutch line, bleader, resevoir and cap and costs ~$180 cdn. Hopefully i'll be able to make some more progress soon. I have to re-do the 3d model for my flywheel adapter in solid works because master cam isn't reading the inventor file for some reason
edit: I own page 2
[This message has been edited by Zac88GT (edited 10-18-2007).]
Bump just to keep near the top. I'll have more updates soon. My solid one piece shafts are at the machine shop now getting resplined. On a side note a couple of my friends and I are starting to take on an interesting northstar project. Paul has an 89 Lotus Esprit turbo that we're going to put a northstar into and a corvette power steering rack. We're not sure what tranny we're going to use, we have the UN1 tranny from the lotus that we just rebuilt and we also have a G64 porche tranny that we modded for 2wd. The G64 trans has a pretty sexy controllable limited slip diff.
[This message has been edited by Zac88GT (edited 10-24-2007).]
Originally posted by gascarracer: Great information, great thread. This is very interesting. Please take the next comment in the light I am giving it. Just information to be considered. I do not think welding a clutch up is a good idea. Welding bulds up stresses that need to be relieved. Balancing. I think you are asking for trouble. I have seen pictures of the aftermath of clutch explosions. Think about where the clutch is located. This is the last you whill hear on this from me. I feel I would be amiss if I didn't at least mention it.
Today i got my axles back from the machine shop and picked up the clutch master cylinder assembly that i ordered in. The axles turned out beautifully and it only cost $190 to get them both resplined. I wanted to buy just the bleader and hydraulic clutch hose for the G6 transmission but they only sell the entire assembly so i had to pay $200 for that. It's a very interesting assembly though, lots of snap together connections and the surprising thing is they ship the assembly already full of fluid!
Next step will be to assemble the axles with the sleeved shafts and hurry up and get this flywheel adapter underway. We're trying to use some cool new features with mastercamX so it's taking a little longer to set it up.
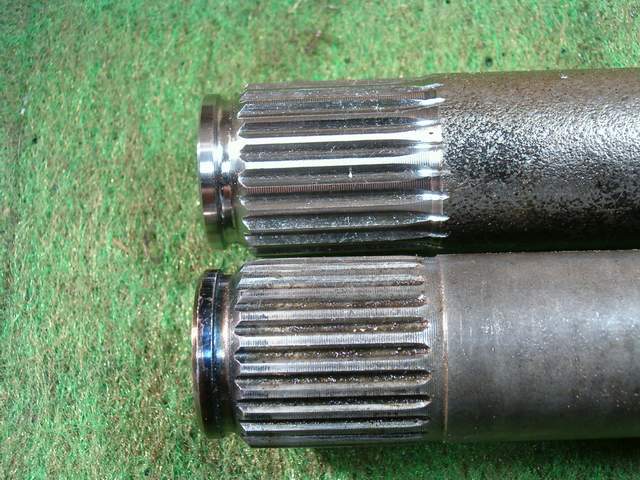
Nice work, Moser does resplining at $110 a pair for future reference. When having axles modified or made similar to the original axles by a machine shop, be sure to give instructions and measurements as if the individuals doing the work are complete and total idiots short of needing connect the dots instructions; Case in point, rather than match the snap ring groove dimensions to the original for the outboard joint, they made the groove wider and deeper, on the surface it didn't seem like a big deal. Unfortunately I didn't give it enough thought, it turns out aside from the snap ring groove being moved inward further than what I intended shortening the axle an additional 1/4", the increased depth of the groove allowed the snap ring to move from its centric position to eccentric after the joint was installed, in other words, the joint is now permanently snapped onto the axle. So be aware of this and make sure the copied groove is as close to exactly like the original as you can get it.
I still managed to get it to work but it's not perfect.
Also what precautions are you planning to take with the hydraulics? I'm not sure how much volume is necessary to disengage the 6spd clutch so I loosened the mastercylinder retaining nuts to allow it to sit nearly a 1/4" away from the firewall to reduce the amount of pushrod travel into the cylinder at full pedal travel, amazingly the amount of travel left was still enough to disengage the clutch so now I'm concerned that applying the full volume of the stock clutch mastercylinder might cause a problem. I'm using the OE 6 spd assembly, the disc hub is not as thick as the aftermarket/earlier sprung hubs being used so my fear is of the possibility of over extending the roller end of the throwout bearing in the event there is no locking mechanism preventing that from happening instead of hub interference.
Also what precautions are you planning to take with the hydraulics? I'm not sure how much volume is necessary to disengage the 6spd clutch so I loosened the mastercylinder retaining nuts to allow it to sit nearly a 1/4" away from the firewall to reduce the amount of pushrod travel into the cylinder at full pedal travel, amazingly the amount of travel left was still enough to disengage the clutch so now I'm concerned that applying the full volume of the stock clutch mastercylinder might cause a problem. I'm using the OE 6 spd assembly, the disc hub is not as thick as the aftermarket/earlier sprung hubs being used so my fear is of the possibility of over extending the roller end of the throwout bearing in the event there is no locking mechanism preventing that from happening instead of hub interference.
My setup has no provision for this but the clutch releases very high. I have an adjustable banjo so I need to cut some slack there as I prefer a lower release. I guess maybe I'm used to the almost close to the floor of a worn normal getrag/clutch setup
After shipping both ways plus duty and any other crap it would have been more expensive to have them machined by moser. The place i took them to was really nice cause it was local and they have a great rep. They do all the narrowed ford 9" rear ends around here and know what they're doing. They didn't need any drawings or details, only an example spline and the bearing that it fits into. I haven't thought to much about the volume of clutch fluid being moved because i haven't had a chance to get the tranny plugged into the car and see what happens. Once i get the hydraulic hose adapted then i'll do that, but i'm thinking to limit the pedal travel i'll either take out the master and make the banjo adjustable or just weld a block under the clutch pedal. Although really crude i like the block idea best because it allows the pedal to have positive stops on both sides and it keeps the pedal at the upper end of it's travel region. I think if you used the banjo bolt, depending on how much adjustment is required, there would be the possibility of bottoming out the master cylinder.
Is it possible to take two 3800 m/trans flywheel (one with ring gear and mount holes removed) welded together and machined to the thickness of the 3900 flywheel and balanced to the 3800sc spec. Do you think this would work or would it be too heavy?
Originally posted by koolgtz: Is it possible to take two 3800 m/trans flywheel (one with ring gear and mount holes removed) welded together and machined to the thickness of the 3900 flywheel and balanced to the 3800sc spec. Do you think this would work or would it be too heavy?
Anything is possible but i don't know if it would work all that well. It would be really heavy but if the machined surfaces were true, it was well ballanced, and you got some good penetration when welding it i dont see why it wouldn't work. Another thing you could try is to use the auto flex plate and a flywheel without the ring gear, then make a stand off to bolt betwen the flywheel and the flexplate and extend the flywheel deeper into the tranny.
Just a bump. The flywheel adapter progress is very slow. Master Cam seems to be having issues with dealing with my solid works model aswell so i'm just going to have to plot the profiles in 2d myself and choose all of the tool paths manually. Also i've been pretty busy with school, midterms and such, but I hope to make some progress soon. The northstar lotus project is slow going too but hopefully by tomorrow we'll have the engine mounts finished in it. The hardest part is going to be making the adapter plate to go from the N* to the UN1 lotus trans.
[This message has been edited by Zac88GT (edited 11-15-2007).]
I got the flywheel adapter done today. It turned out pretty good, theres only one design change from the model i created and that was to not pocket the bottom around the pressure plate threaded holes. About halfway through the 1/2" endmill got a burr right on the tip so it made a couple un asthetically pleaseing lines but thats no big deal.
Here is the spec aluminum flywheel i'm using as a base.
And here is my sexy adapter plate.
Adapter with friction surface.
And the whole package.
Now i just have to bolt it all together and get the assembly ballanced this weekend and i can install it on the motor.
After a little searching i came accross some threads that have the stock 88 V6 flywheel weight at 16.25 lbs. Even with the extra inch of thickness my aluminum flywheel weighs in at 12.5 lbs which i am very pleased with.
Why not just use a flex plate for the starter gear, a small diameter spacer and then a thinner adapter for the clutch?
You've increased your flywheel weight by 50% with most of that at almost full diameter. That's a very big increase in MOI. You'll see a significant decrease in your engine's willingness to rev quickly.
I could do that, and i thought about it. I feel more confident with this route because you're not sandwitching so many pieces to the crank through the same bolts. The MOI will be very close to if not less than a regular thickness steel flywheel which is what i was after.
I would be more confident in the sandwiched components, because longer stretchier bolts could be used which would be much harder to overtorque than the factory style bolts. Just make the spacer out of steel so that it won't creep and unload the bolts when it gets hot.
Flywheel is ballanced and installed on the engine with clutch and transmission. The depth of the adapter apears to be perfect so far but i will let you know if i have any issues later. The adapter thickness is currently 1.040". Right now i'm working on building a new set of headers. I have the front header completely done and i will be starting the rear tomorrow. I'll post pics of them when they're done.
"Anyone can make a copy of something, it may look good but it never is the real car. Make something from your imagination, something unique, something nobody has, anything is possible and, ideas can become a reality; Archie and the Crew and make your Dreams into a reality."
The headers are almost complete. I just need to complete the welds around the collectors and a few other spots, install the O2 bungs and paint them and they'll be finished. I'll have a few more pictures to post in a few days when i get some more time to work on them but here are a couple of previews. The old headers that i made last year were using 1.5" OD tubing and the tubes were quite short and definatly not equal length. The new headers are 1.75" OD and substantially longer. They're not equal length by any means but they're a heck of a lot closer than the old ones. The new set are about 36" +/- 4". I'm going to try filling them with water and comparing volumes to see what the lengths actually are just for curiosity's sake.
Wow! Two other Victoria people in one post. Represent!
BTW really nice work, your welds are AMAZING. If you saw some of my battery + cables + sacrificial screwdriver "GIT R DONE" welds that we use for quick fixes offroad you'd most definitely burst out laughing.
I got the flywheel adapter done today. It turned out pretty good, theres only one design change from the model i created and that was to not pocket the bottom around the pressure plate threaded holes. About halfway through the 1/2" endmill got a burr right on the tip so it made a couple un asthetically pleaseing lines but thats no big deal.
Here is the spec aluminum flywheel i'm using as a base.
Now i just have to bolt it all together and get the assembly ballanced this weekend and i can install it on the motor.
holy crap that thick!! hehe
I just weigh'd the aluminum flywheel that I have thats already balanced for a 3800 seriesII and it came in at 11 lbs 9 oz., your's is not bad at all...
The trunk side headers will need a huge amount of heat shielding of some type to work to there full potential. The surface area of pipe is so great and the pipes are spread so far apart that a lot of heat will be lost from the exhaust gas and dispersed into the engine bay. The loss of exhaust gas heat is significant because the gas will slow down before to gets to the collector because the cooling of the gases will cause it to condense to a lesser volume. That will have a negative affect on the efficiency in that header compared to the other side. The other side will not lose as much heat because the pipes are so close together. Hot gasses expand and cool gasses contract. That is important in headers because expanded hot gasses travel much faster in the pipes than cool contracted gasses. The collector will have much better scavenging efficiency with faster moving gasses.
You may already know this but others reading the thread may not.
Yeah i'm aware that there will be a significant amount of heat loss but with the radius of the bends and diameter of the pipes i was using there really is no way around it. It may not be at it's maximum efficiency but i'm certain it will be loads better than before.
Just in case you haven't thought of it, I want to recommend Jet-Hot or some other coating for the exhaust. I've used it on the last three swaps I've done, the stuff is really amazing. On my turbo Northstar I had everything done from the headers to the tips including the turbo housing, and it was under $500. Besides the performance gains, it looks great and it should make the parts last a lot longer. It also lowers the underhood temps drasticly, so hoses and stuff will last longer too. I swore I'll never do another swap without Jet-Hot, but I'll probably get cheap.
This thread is very interesting. loving the headers, custom flywheel work, and the work done to the tranny to get it mounted. top notch. looking forward to seeing this car someday
I got the headers painted and installed and the engine is just about ready to go back into the car. I just finished my wide band air fuel ratio display for my LC1 controller. The place i got my LC1 from wanted an extra $150 for the gauge so i made this one for like $5. It just accepts an analogue input from 0-5 volts and displays the afr from 10.0 to 19.9.
I got the engine installed in the car today and it went in without a hitch. The closest clearance was on one of the webs for the transmission but it's not an issue at all. There turned out to be loads of room between the rear header and the trunk heat shield. I hooked the shifter cables up quickly to see how it was going to be and it seems pretty good. I need to adjust the cables and reverse detent to get everything aligning properly but after it's adjusted it should be awesome. A little bit more wiring, connect the hoses and connectors, install the suspension axles and brakes, fill the fluids and cross the fingers and it should be ready to fire up.
Looks like it all coming together Zac....Very interested to hear how that 6 speed works out for you. Do you have a close up pic of how your dogbone is mounted ?
This is the dogbone mount on the head. The dogbone attaches to the subframe right where the verticle cradle bolts go. This is an old pic showing the dogbone and roughly where it attaches to the cradle. I welded a 3/8" piece on the other side of the support to dissipate the load over a larger area. Since this pic i've replaced the spherical joint at the head with a poly bushing.
I got a little bit done after work tonight. I almost finished the wiring on the WB02. I adjusted the shifter cables and it shifts great now. I also soldered up my clutch hose adapter. I just got a union to connect to the fiero braded steel hose and then soldered a 90 elbow into that. Then i cut the end off of the G6 clutch line, removed the rubber hose bits from inside it and then soldered that to the elbow. Bled the clutch and it works perfect. The clutch pressure and release point feel identical to the getrag so i'm very happy.


 . The original getrag passenger side axle is long enough that both new shafts can be made out of this one piece and the diameter is sufficient enough to re-machine splines on for the cobalt inner cv tripot. I found a place locally that can machine the splines for a reasonable price. I will be cutting the passenger. side getrag axle into two pieces and haveing them machine the new splines on to the ends so i will have a spare set of axles that are solid. The solid one piece axles will only be used if the pressed sleeve and welded pressed sleeve method fails. I want to try the sleeve methods so that other people can put axles together cheaply and because i really just want to see if it works. On to some specs now.