Pennock's Fiero Forum
  General Fiero Chat
  New nose Fi512 by Amida's FieroVation...any interest? (Page 10)

Post New Topic  Post A Reply
Email This Page to Someone! | Printable Version

This topic is 19 pages long:  1   2   3   4   5   6   7   8   9   10   11   12   13   14   15   16   17   18   19 
Previous Page | Next Page
next newest topic | next oldest topic
New nose Fi512 by Amida's FieroVation...any interest? by Amida
Started on: 02-23-2010 01:22 PM
Replies: 746 (64341 views)
Last post by: MrMWS on 12-03-2022 10:38 AM
Amida
Member
Posts: 2349
From: Seattle, WA. USA
Registered: Jul 2003


Feedback score: (4)
Leave feedback


Total ratings: 63
Rate this member

Report this Post05-13-2011 01:53 AM Click Here to See the Profile for AmidaSend a Private Message to AmidaEdit/Delete MessageReply w/QuoteDirect Link to This Post
Wet sanding & buffing to clean the finish & remove the orange peel texture.


IP: Logged
CoastalStuart
Junior Member
Posts: 5
From: Ogden, Utah, USA
Registered: May 2010


Feedback score: N/A
Leave feedback

Rate this member

Report this Post05-15-2011 01:46 PM Click Here to See the Profile for CoastalStuartSend a Private Message to CoastalStuartEdit/Delete MessageReply w/QuoteDirect Link to This Post
Fabulous, do you have a websight of your own with all your different items ??

I think I might be getting in line for one of these.
IP: Logged
1988holleyformula
Member
Posts: 4109
From: SE MN
Registered: Jul 2009


Feedback score: (3)
Leave feedback


Total ratings: 68
Rate this member

Report this Post05-15-2011 03:02 PM Click Here to See the Profile for 1988holleyformulaSend a Private Message to 1988holleyformulaEdit/Delete MessageReply w/QuoteDirect Link to This Post
 
quote
Originally posted by CoastalStuart:
Fabulous, do you have a websight of your own with all your different items ??

I think I might be getting in line for one of these.


quote
Originally posted by Amida:


I do not have a website. Pennocks is the only place.


Welcome to the forum btw! Great work Amida!
IP: Logged
PAPA_SMURF
Member
Posts: 70
From: Virgina
Registered: Oct 2010


Feedback score: N/A
Leave feedback

Rate this member

Report this Post05-21-2011 02:02 AM Click Here to See the Profile for PAPA_SMURFSend a Private Message to PAPA_SMURFEdit/Delete MessageReply w/QuoteDirect Link to This Post
Do you by chance have a pic of the newly sprayed bumper with the lights installed?
IP: Logged
doublec4
Member
Posts: 8289
From: Oakville, Ontario, Canada
Registered: Jun 2003


Feedback score:    (20)
Leave feedback


Total ratings: 150
Rate this member

Report this Post05-21-2011 11:56 AM Click Here to See the Profile for doublec4Send a Private Message to doublec4Edit/Delete MessageReply w/QuoteDirect Link to This Post
Looks great!!
IP: Logged
iluvsd619
Member
Posts: 1036
From: san diego, ca
Registered: May 2005


Feedback score:    (25)
Leave feedback

Rate this member

Report this Post05-22-2011 05:54 PM Click Here to See the Profile for iluvsd619Send a Private Message to iluvsd619Edit/Delete MessageReply w/QuoteDirect Link to This Post
Wow! I think I found my front bumper! Let me know when it is completed. I will buy this summer. It looks wonderful.
IP: Logged
Amida
Member
Posts: 2349
From: Seattle, WA. USA
Registered: Jul 2003


Feedback score: (4)
Leave feedback


Total ratings: 63
Rate this member

Report this Post06-05-2011 11:13 PM Click Here to See the Profile for AmidaSend a Private Message to AmidaEdit/Delete MessageReply w/QuoteDirect Link to This Post
In addition to designing & building the plug, spinning a vinylester cocoon is a lengthy process in itself. All together 6 sections will comprise the completed tool.

[This message has been edited by Amida (edited 06-30-2011).]

IP: Logged
Synthesis
Member
Posts: 12207
From: Jordan, MN
Registered: Feb 2002


Feedback score:    (19)
Leave feedback


Total ratings: 295
Rate this member

Report this Post06-06-2011 08:28 AM Click Here to See the Profile for SynthesisSend a Private Message to SynthesisEdit/Delete MessageReply w/QuoteDirect Link to This Post
 
quote
Originally posted by Amida:

In addition to designing & building the plug, spinning a vinylester cocoon is a lengthy process in itself. All together 5 sections will comprise the completed tool.


Amida, I can't believe your ratings bar has not appeared...

While you may not care about it, and it doesn't really matter in the overall scheme of things, I wanted to remedy that if at all possible.

I looked and realized I had not already rated you a +. Something I chose to resolve at this moment.
Your thread is informative and shows a level of production detail usually unparalleled on most forums, even this one.

A BIG + from me, and that is not even remotely enough to express my awe and admiration at your skill and the product you are making.
IP: Logged
Carcenomy
Member
Posts: 1109
From: Invercargill, New Zealand
Registered: Jan 2009


Feedback score: N/A
Leave feedback

Rate this member

Report this Post06-07-2011 01:10 AM Click Here to See the Profile for CarcenomyClick Here to visit Carcenomy's HomePageSend a Private Message to CarcenomyEdit/Delete MessageReply w/QuoteDirect Link to This Post
 
quote
Originally posted by Synthesis:


Amida, I can't believe your ratings bar has not appeared...

While you may not care about it, and it doesn't really matter in the overall scheme of things, I wanted to remedy that if at all possible.

I looked and realized I had not already rated you a +. Something I chose to resolve at this moment.
Your thread is informative and shows a level of production detail usually unparalleled on most forums, even this one.

A BIG + from me, and that is not even remotely enough to express my awe and admiration at your skill and the product you are making.


I frequently forget that PFF uses a rating system, most forums I visit don't. A + for you also Amida, I'm highly envious of your skills. Between your top notch Fi355 products, your custom parts and the new Fi512 nose, you've got the highest quality replica parts I've seen so far that fit without modifications. Good work and keen to see how the Fi512 turns out when it's a final production part.

------------------

IP: Logged
Axdrenalin
Member
Posts: 478
From: Mountain City, Tennessee
Registered: Mar 2011


Feedback score:    (18)
Leave feedback

Rate this member

Report this Post06-15-2011 08:53 PM Click Here to See the Profile for AxdrenalinClick Here to visit Axdrenalin's HomePageSend a Private Message to AxdrenalinEdit/Delete MessageReply w/QuoteDirect Link to This Post
Amida, any new updates and / or pictures? I'm interested in some pricing schedules on this front end when you go into production, as well as any tips and info on what will be required for installation (mods, adjustments, etc)

Robert
IP: Logged
WMac
Member
Posts: 320
From: Pacific NW.....USA.
Registered: Feb 2002


Feedback score: N/A
Leave feedback

Rate this member

Report this Post06-15-2011 09:19 PM Click Here to See the Profile for WMacSend a Private Message to WMacEdit/Delete MessageReply w/QuoteDirect Link to This Post
 
quote
Originally posted by Amida:


I do not have a website. Pennocks is the only place. I always liked the look of this one:


I cant wait to get my hands on one. and a rear like one above would be great.

IP: Logged
PFF
System Bot
Amida
Member
Posts: 2349
From: Seattle, WA. USA
Registered: Jul 2003


Feedback score: (4)
Leave feedback


Total ratings: 63
Rate this member

Report this Post06-20-2011 03:09 PM Click Here to See the Profile for AmidaSend a Private Message to AmidaEdit/Delete MessageReply w/QuoteDirect Link to This Post
 
quote
Originally posted by Axdrenalin:

Amida, any new updates and / or pictures? I'm interested in some pricing schedules on this front end when you go into production, as well as any tips and info on what will be required for installation (mods, adjustments, etc)

Robert


Still working on the tooling which is almost ready to hatch...stay tuned.
IP: Logged
Amida
Member
Posts: 2349
From: Seattle, WA. USA
Registered: Jul 2003


Feedback score: (4)
Leave feedback


Total ratings: 63
Rate this member

Report this Post06-20-2011 03:12 PM Click Here to See the Profile for AmidaSend a Private Message to AmidaEdit/Delete MessageReply w/QuoteDirect Link to This Post

Amida

2349 posts
Member since Jul 2003
 
quote
Originally posted by WMac:


I cant wait to get my hands on one. and a rear like one above would be great.


I may look into seeing if an attachment can be designed for the Formula rear, instead of a full replacement.
IP: Logged
Amida
Member
Posts: 2349
From: Seattle, WA. USA
Registered: Jul 2003


Feedback score: (4)
Leave feedback


Total ratings: 63
Rate this member

Report this Post06-25-2011 09:07 PM Click Here to See the Profile for AmidaSend a Private Message to AmidaEdit/Delete MessageReply w/QuoteDirect Link to This Post


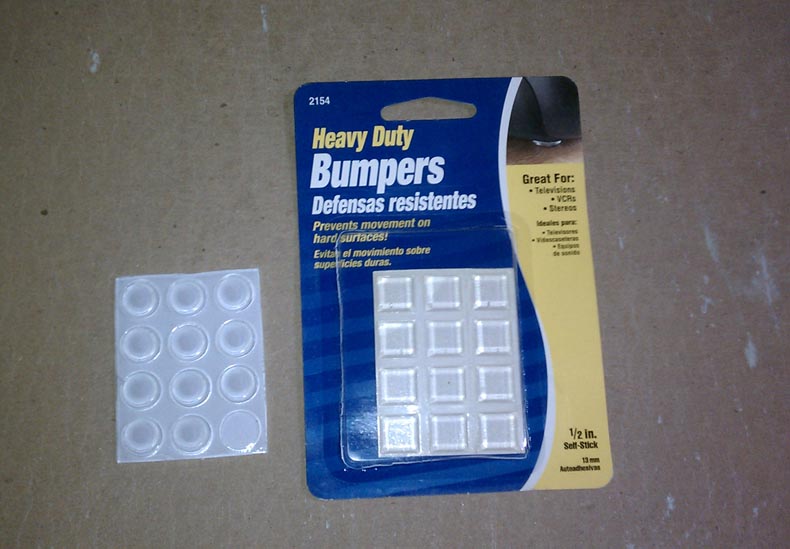
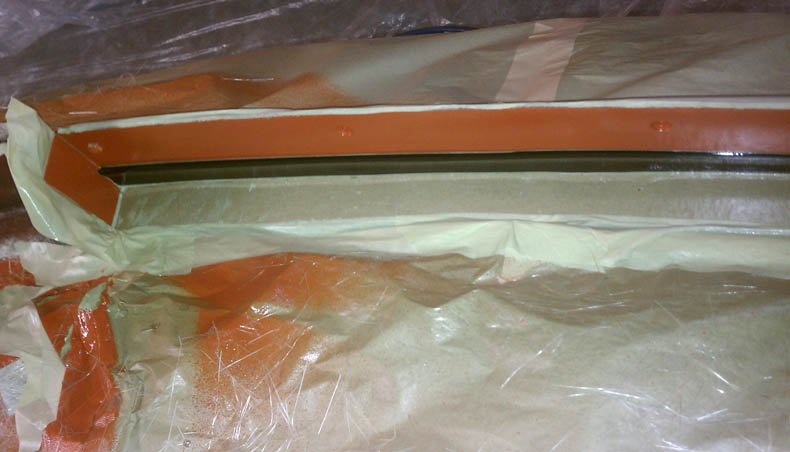
Rubber bumper pads, self adhesive, are used as alignment pins along the flange surfaces to keep everything in the correct position.


Waxing several times with green paste wax on the plug and on the mold flanges is very important to make sure that the sections can be separated after the molding process is completed. This type of wax is thick and cannot be left on too long or else it will be too hard to buff away.

PVA is a water soluble film that is sprayed on after waxing to provide a chemical barrier against the styrene solvent in the gelcoat. This will ensure separation & prevent the gelcoat from attacking/desolving the lacquer paint surface on the plug...like paint remover.

[This message has been edited by Amida (edited 06-25-2011).]

IP: Logged
Amida
Member
Posts: 2349
From: Seattle, WA. USA
Registered: Jul 2003


Feedback score: (4)
Leave feedback


Total ratings: 63
Rate this member

Report this Post06-25-2011 09:15 PM Click Here to See the Profile for AmidaSend a Private Message to AmidaEdit/Delete MessageReply w/QuoteDirect Link to This Post

Amida

2349 posts
Member since Jul 2003


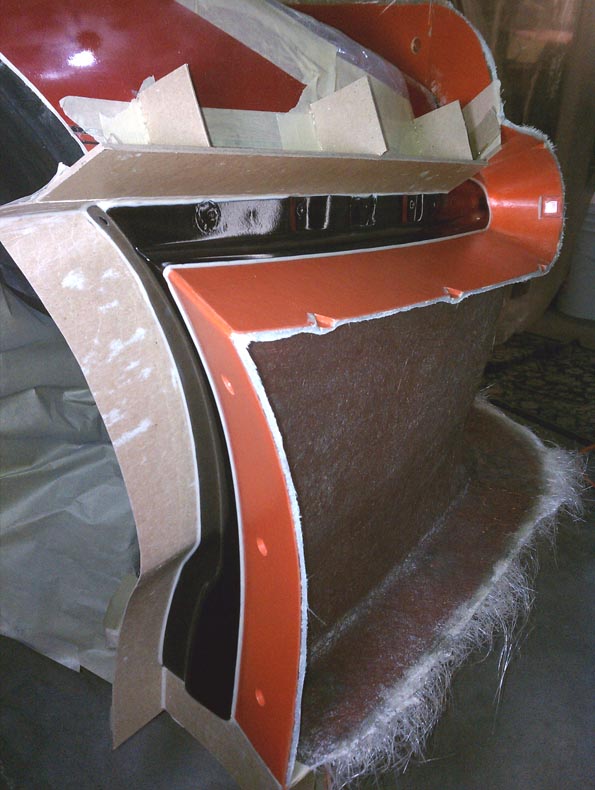
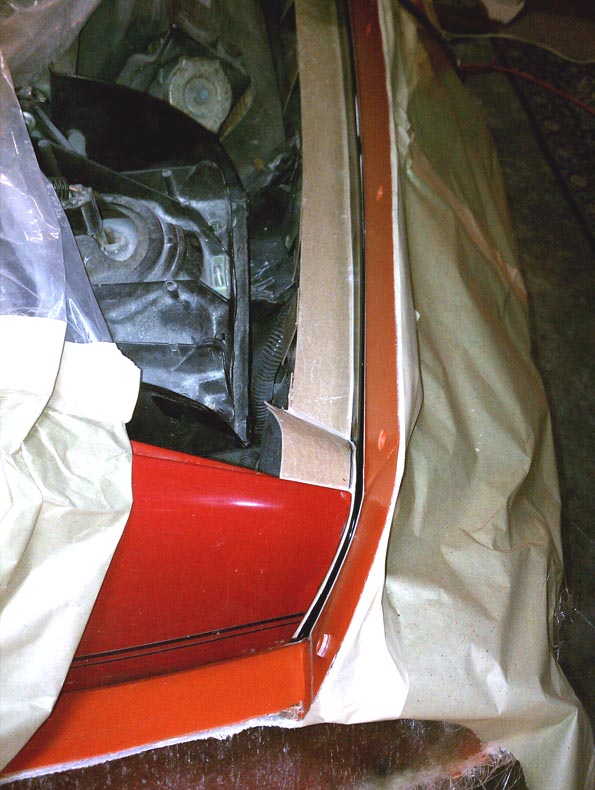
Flanges are created with chip board & panel board which I get from the upholstery supplier. Hot glue & masking tape is used to hold it in place. Chip board is a thin cardboard that is flexible & easy to cut. Panel board is thicker & provides a smoother/flatter surface. Surfaces are waxed thoroughly prior to cutting fitting.

[This message has been edited by Amida (edited 06-25-2011).]

IP: Logged
Amida
Member
Posts: 2349
From: Seattle, WA. USA
Registered: Jul 2003


Feedback score: (4)
Leave feedback


Total ratings: 63
Rate this member

Report this Post06-25-2011 09:26 PM Click Here to See the Profile for AmidaSend a Private Message to AmidaEdit/Delete MessageReply w/QuoteDirect Link to This Post

Amida

2349 posts
Member since Jul 2003


Plasticene clay is used in the seams & joints to prevent gelcoat seepage and to smooth out the edges & corners, and fill in gaps.

[This message has been edited by Amida (edited 06-25-2011).]

IP: Logged
Amida
Member
Posts: 2349
From: Seattle, WA. USA
Registered: Jul 2003


Feedback score: (4)
Leave feedback


Total ratings: 63
Rate this member

Report this Post06-25-2011 09:36 PM Click Here to See the Profile for AmidaSend a Private Message to AmidaEdit/Delete MessageReply w/QuoteDirect Link to This Post

Amida

2349 posts
Member since Jul 2003


Upper mounting flange, sections 4 & 5, is made in two sections in order to ease removal once moulding is completed. The Fiero fenders have undercuts in the side belt moulding areas which will lock this section in place, preventing removal, if this section were made in one piece. RULE #1 in mold design/building...make sure you can remove the mold from the plug !
IP: Logged
Sage
Member
Posts: 2901
From: USA
Registered: Nov 1999


Feedback score:    (14)
Leave feedback


Total ratings: 69
Rate this member

Report this Post06-25-2011 10:42 PM Click Here to See the Profile for SageSend a Private Message to SageEdit/Delete MessageReply w/QuoteDirect Link to This Post
That is a beautiful mold. IMHO, a good mold is a very big part of getting good parts, this one looks like it will produce many.

Like musical instruments, a good one in the hands of someone that doesn't know how to use it, will sound horrible, but even a bad one in the hands of someone who does, will sound decent. Put an exceptional instrument in the hands of an artist, and you get great music.

You should have people standing in line to get these noses, a perfect plug, a beautiful mold and an artist producing the parts.......................great work!

Again, just my opinion, but felt compelled to comment on your talent and diligence.


HAGO!
IP: Logged
RCR
Member
Posts: 4397
From: Shelby Twp Mi
Registered: Sep 2002


Feedback score:    (7)
Leave feedback


Total ratings: 102
Rate this member

Report this Post06-26-2011 08:41 AM Click Here to See the Profile for RCRSend a Private Message to RCREdit/Delete MessageReply w/QuoteDirect Link to This Post
Thanks for the shots, Rob. They will definitely help if/when I do mine.

I find it amazing you could do the whole front mold in one piece....Amazing

Bob

[This message has been edited by RCR (edited 06-26-2011).]

IP: Logged
Amida
Member
Posts: 2349
From: Seattle, WA. USA
Registered: Jul 2003


Feedback score: (4)
Leave feedback


Total ratings: 63
Rate this member

Report this Post06-27-2011 07:16 PM Click Here to See the Profile for AmidaSend a Private Message to AmidaEdit/Delete MessageReply w/QuoteDirect Link to This Post
After masking off other areas a light mist of PVA is sprayed on & let dry. A medium wet coat follows & allowed to dry which is repeated four times. If PVA is applied to heavily it will take too long to dry & run, droop & sag which will show up in the mould. Wipe/ blot off sag/droop emmediately with a wet towel & start over. Or let dry & peel off if too much is already applied.


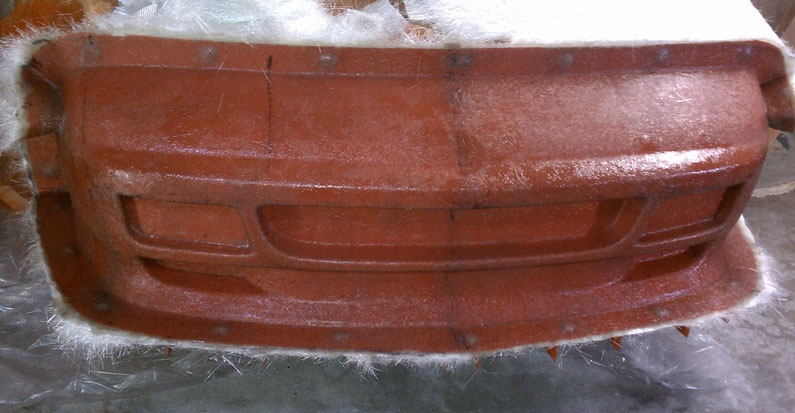
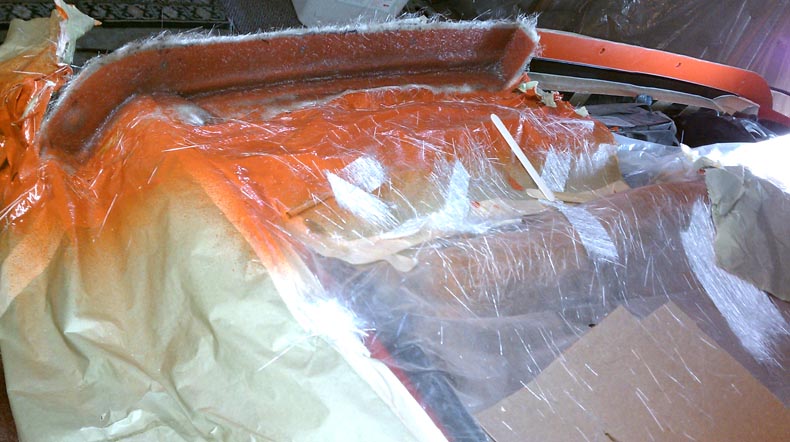
Vinylester gelcoat is sprayed on waiting 5 minutes between passes. Applying too much too fast on vertical surfaces will cause it to sag & run. Waiting a few minutes between passes will give it time to set. Apply to 20 MIL thickness.

IP: Logged
Amida
Member
Posts: 2349
From: Seattle, WA. USA
Registered: Jul 2003


Feedback score: (4)
Leave feedback


Total ratings: 63
Rate this member

Report this Post06-27-2011 08:17 PM Click Here to See the Profile for AmidaSend a Private Message to AmidaEdit/Delete MessageReply w/QuoteDirect Link to This Post

Amida

2349 posts
Member since Jul 2003
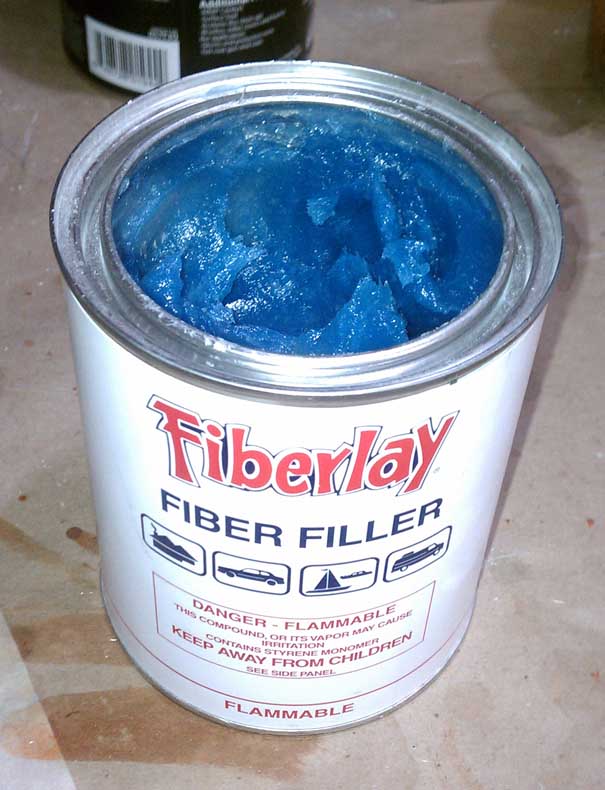
Fiberfiller is used to fill in the alignment pins, and to also fill in & smooth the transition between un-even edges to prevent air pockets. Be easy on the MEKP catalyst, you want a slow mixture to give you plenty of time to lay on the glass before the filler solidifies. Fiberglass has a tendency to bridge over inside corners & uneven edges which will create air gaps/pockets under the gelcoat. Eventually the gelcoat will crack & chip away in these un-supported areas. The filler helps to eliminate air gaps in corners.


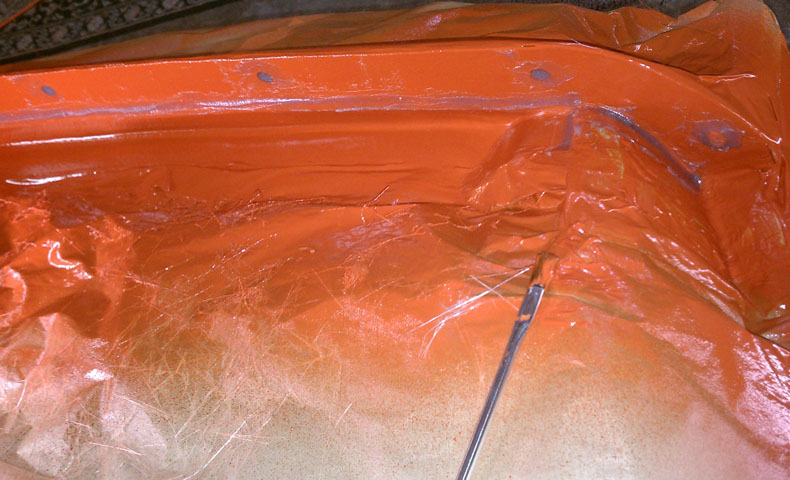
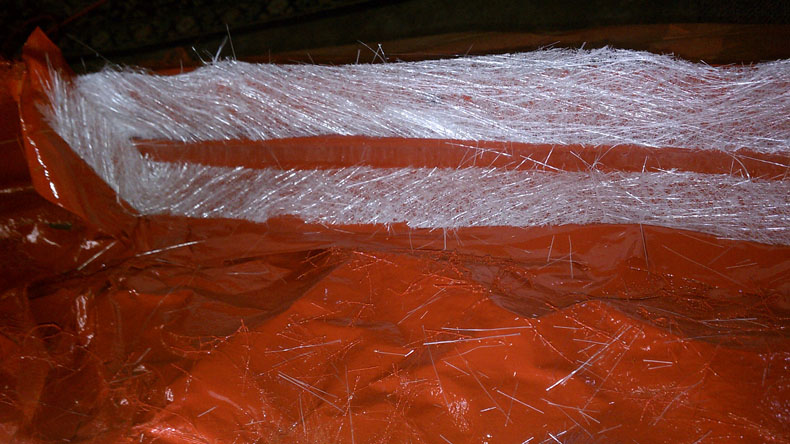
For the first layer of fiberglass the goal is to have an air bubble free zone next to the gelcoat. Any air bubbles left next to the gelcoat will eventually become blisters in the mould surface and chip away. A thin 3/4 oz mat is applied which is ideal to allow all air bubbles to easily pass through. It will also lock the gelcoat in place without creating too much heat. Too much heat buildup in the first layers can cause rapid shrinkage/warping and premature mould separation. The mould will end up with distortions & waves.

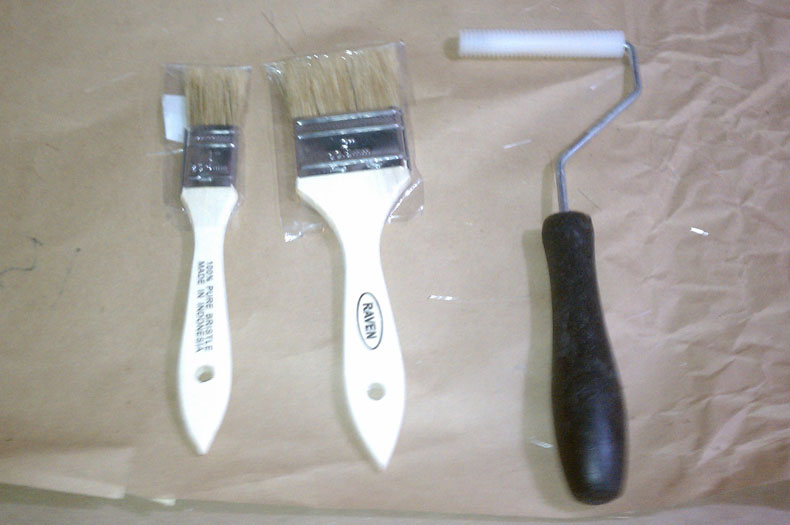
First, butt edges of 3/4oz. mat together in the corners, this will prevent air gaps. Apply a liberal amount of resin with a brush, let soak, then use a ribbled roller & brush to consolidate the mat while pushing all the air bubbles out to the edges. Push the mat around with the brush to adust positioning if needed. Using plenty of resin will help displace the air bubbles. Once all the bubbles are gone, apply another strip of 3/4 oz mat overlapping the butt joint. Let the excess resin already applied soak into the overlapping strip. Roll out any remaining bubbles and soak up any excess puddles of resin with the brush. Let this first layer set overnight.


[This message has been edited by Amida (edited 07-04-2011).]

IP: Logged
PFF
System Bot
Amida
Member
Posts: 2349
From: Seattle, WA. USA
Registered: Jul 2003


Feedback score: (4)
Leave feedback


Total ratings: 63
Rate this member

Report this Post06-27-2011 08:53 PM Click Here to See the Profile for AmidaSend a Private Message to AmidaEdit/Delete MessageReply w/QuoteDirect Link to This Post
The next morning sand paper is used to remove any glass spikes, bumps, debris from the surface before starting on the next layers. This will prevent anything from causing more air pockets. For the main laminate a heavier 1.5oz mat is used. Four layers are applied in two sessions. Layers 2 & 3 are applied in the morning, one layer at a time, rolling out the bubbles each time. Any pools/puddles of resin are soaked up with the brush. The mould is left to set & cool down for half a day. In the afternoon/evening sanding the surface again to remove any spikes & debris, then layers 3 & 4 are applied the same way. The goal of spreading out the lamination time is to prevent overheating which can cause premature mould separation/warping.

[This message has been edited by Amida (edited 06-27-2011).]

IP: Logged
Amida
Member
Posts: 2349
From: Seattle, WA. USA
Registered: Jul 2003


Feedback score: (4)
Leave feedback


Total ratings: 63
Rate this member

Report this Post07-02-2011 11:35 PM Click Here to See the Profile for AmidaSend a Private Message to AmidaEdit/Delete MessageReply w/QuoteDirect Link to This Post
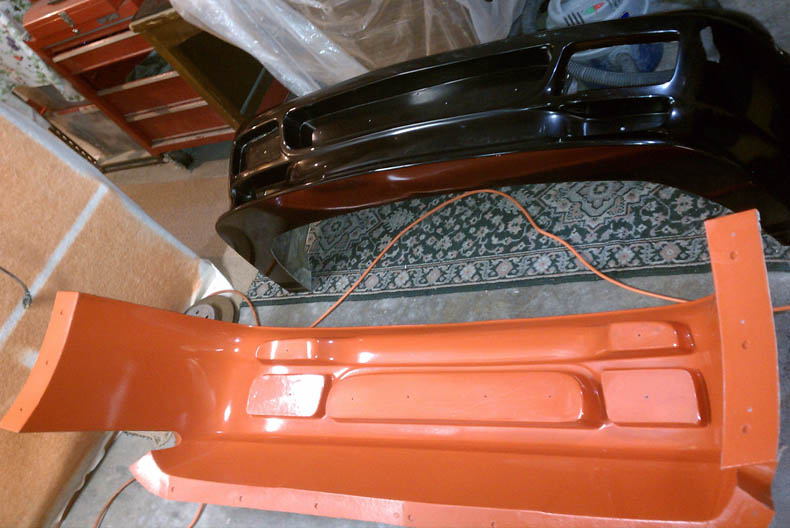
In order to finish the final, lower section of the mold the whole plug with mold was first removed from the car and turned upside down on the floor. This will make it much easier to work on rather than laying on your back on the floor and having messy chemicals dripping down your hands and onto your face!


[This message has been edited by Amida (edited 07-02-2011).]

IP: Logged
Amida
Member
Posts: 2349
From: Seattle, WA. USA
Registered: Jul 2003


Feedback score: (4)
Leave feedback


Total ratings: 63
Rate this member

Report this Post07-02-2011 11:41 PM Click Here to See the Profile for AmidaSend a Private Message to AmidaEdit/Delete MessageReply w/QuoteDirect Link to This Post

Amida

2349 posts
Member since Jul 2003
 
quote
Originally posted by Sage:

great work!


HAGO!


Thanks!
IP: Logged
Amida
Member
Posts: 2349
From: Seattle, WA. USA
Registered: Jul 2003


Feedback score: (4)
Leave feedback


Total ratings: 63
Rate this member

Report this Post07-02-2011 11:48 PM Click Here to See the Profile for AmidaSend a Private Message to AmidaEdit/Delete MessageReply w/QuoteDirect Link to This Post

Amida

2349 posts
Member since Jul 2003
 
quote
Originally posted by RCR:

I find it amazing you could do the whole front mold in one piece....Amazing

Bob


It depends on the design of the panel...if there are design features that create locking undercuts then you'll have no choice but to design the main section in two or more pieces. That may be the only way to remove the mold off the plug. In this case it's a simple design, so a full main section was possible to do.
IP: Logged
exoticse
Member
Posts: 8649
From: Orlando, Fl
Registered: Jun 2003


Feedback score: N/A
Leave feedback


Total ratings: 108
Rate this member

Report this Post07-03-2011 12:20 AM Click Here to See the Profile for exoticseSend a Private Message to exoticseEdit/Delete MessageReply w/QuoteDirect Link to This Post


Amida you are freaking amazing.
IP: Logged
Amida
Member
Posts: 2349
From: Seattle, WA. USA
Registered: Jul 2003


Feedback score: (4)
Leave feedback


Total ratings: 63
Rate this member

Report this Post07-03-2011 01:53 PM Click Here to See the Profile for AmidaSend a Private Message to AmidaEdit/Delete MessageReply w/QuoteDirect Link to This Post
 
quote
Originally posted by exoticse:
Amida you are freaking amazing.


No matter how hard you try you always think you could've done it better....Thanks.
IP: Logged
Amida
Member
Posts: 2349
From: Seattle, WA. USA
Registered: Jul 2003


Feedback score: (4)
Leave feedback


Total ratings: 63
Rate this member

Report this Post07-03-2011 02:32 PM Click Here to See the Profile for AmidaSend a Private Message to AmidaEdit/Delete MessageReply w/QuoteDirect Link to This Post

Amida

2349 posts
Member since Jul 2003
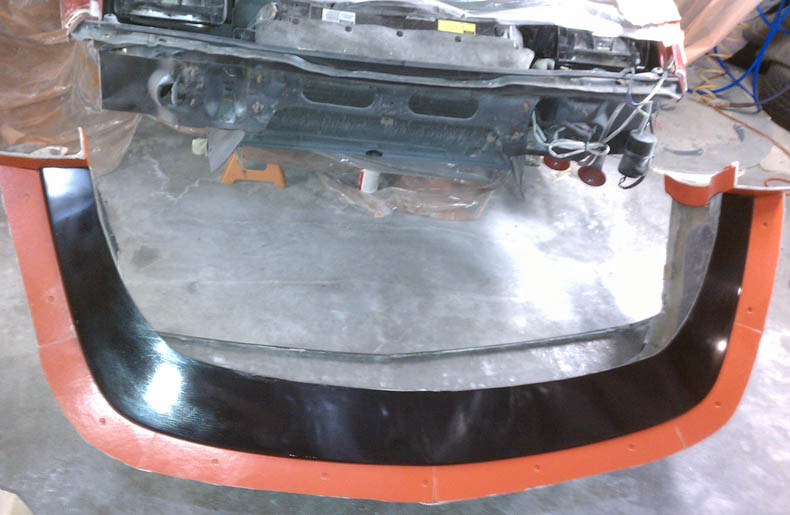
Hatching the mold is the scary part. You don't know if anything went wrong inside the mold, i.e. alligatoring, paint wrinkling, premature separation/warping, until you actually hatch the mold.

Because everything is stuck together & air tight from the molding process you need to finagle the plug to get it out of the mold. I first I start by gently flexing the edges of the plug away from the mold surface, rocking back & forth. You'll see the plug start to separate from the PVA film. Suction & negative air pressure will prevent you from pulling the plug straight out so I then drill 1/4" holes in the mold... in the bottom of the grill & light pockets , but making sure that I stop just as I get to the plug surface. Then I use a small punch and tap into the holes to initiate separation. Then I take the air pressure nozzle with a rubber tip and blast air into the holes. If done successfully what you'll hear is a loud CRACK or POP which is the sound of the plug separating from the mold inside. I do the same in every pocket.

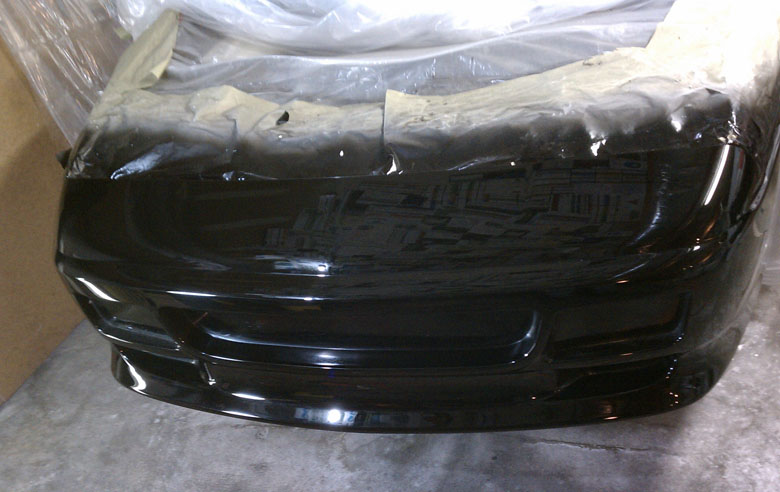
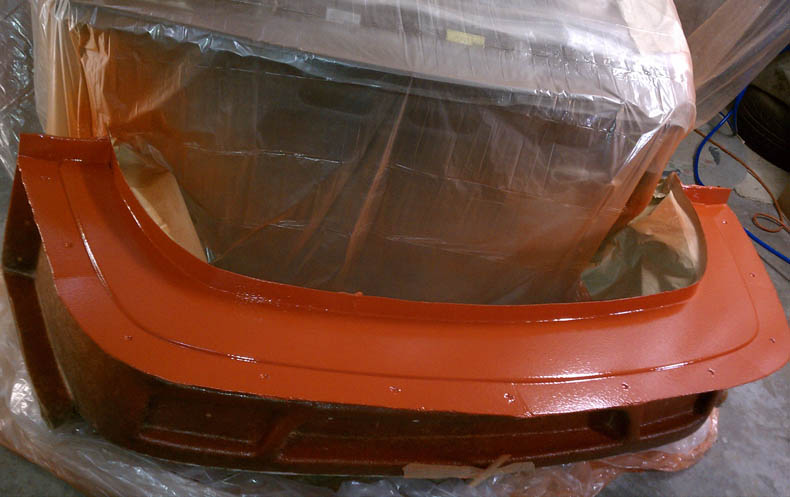
Once the seal is broken what should happen next is that the plug will just slide right out of the mold which is exactly what happened. I noticed some paint sticking, but other than that the plug just slid right out. Next, I will check for flaws & problem spots.

[This message has been edited by Amida (edited 07-04-2011).]

IP: Logged
RCR
Member
Posts: 4397
From: Shelby Twp Mi
Registered: Sep 2002


Feedback score:    (7)
Leave feedback


Total ratings: 102
Rate this member

Report this Post07-04-2011 07:54 AM Click Here to See the Profile for RCRSend a Private Message to RCREdit/Delete MessageReply w/QuoteDirect Link to This Post
Looking great, Rob.

I have a fiberglass question for you... When I make a batch of resin, usually it flashes over pretty quickly, not giving me a lot of time to lay a large section. Obviously I'm using too much hardener, but I'm afraid to cut back and have something that doesn't kick over. What combination do you use to allow yourself time to do a large section, or do you just layout in multiple small sections at a time?

Bob
IP: Logged
Amida
Member
Posts: 2349
From: Seattle, WA. USA
Registered: Jul 2003


Feedback score: (4)
Leave feedback


Total ratings: 63
Rate this member

Report this Post07-04-2011 11:35 AM Click Here to See the Profile for AmidaSend a Private Message to AmidaEdit/Delete MessageReply w/QuoteDirect Link to This Post
Bob,

Unless your weather is hot you're probably using too much MEKP catalyst. I typically get 45-60 minutes per batch at 2% ratio. That's about 5cc MEKP per 16oz cup. Cut it back to a minimum of 1% ( 2.5cc/16oz cup ) on a test laminate & see how long it takes to gel. If it takes more than an hour then increase the ratio another 1/2% on another batch. Keep increasing until you get at least 45minutes of working time.

To help get consistent mix ratios I use graduated cups ( 16oz, 32oz, 64oz & medicine cups ) from the fiberglass supplier, and I also use a graduated MEKP dispenser squeeze bottle with CC markings. Also try refrigerating, or putting on ice, your resin to start with a cool batch to give you more time. Keep your work area to a managable size per batch as well.
 
quote
Originally posted by RCR:

Looking great, Rob.

I have a fiberglass question for you... When I make a batch of resin, usually it flashes over pretty quickly, not giving me a lot of time to lay a large section. Obviously I'm using too much hardener, but I'm afraid to cut back and have something that doesn't kick over. What combination do you use to allow yourself time to do a large section, or do you just layout in multiple small sections at a time?

Bob


IP: Logged
Pete Matos
Member
Posts: 2291
From: Port St. Lucie, Florida
Registered: Jan 2010


Feedback score: (2)
Leave feedback

Rate this member

Report this Post07-04-2011 11:45 AM Click Here to See the Profile for Pete MatosSend a Private Message to Pete MatosEdit/Delete MessageReply w/QuoteDirect Link to This Post
 
quote
Originally posted by Amida:

Bob,

Unless your weather is hot you're probably using too much MEKP catalyst. I typically get 45-60 minutes per batch at 2% ratio. That's about 5cc MEKP per 16oz cup. Cut it back to a minimum of 1% ( 2.5cc/16oz cup ) on a test laminate & see how long it takes to gel. If it takes more than an hour then increase the ratio another 1/2% on another batch. Keep increasing until you get at least 45minutes of working time.

To help get consistent mix ratios I use graduated cups ( 16oz, 32oz, 64oz & medicine cups ) from the fiberglass supplier, and I also use a graduated MEKP dispenser squeeze bottle with CC markings. Also try refrigerating, or putting on ice, your resin to start with a cool batch to give you more time. Keep your work area to a managable size per batch as well.


Yeah well....... that pretty much sounds to me like you REALLY know what the hell you are doing with fiberglass man.... Excellent work on that bumper!! Looks amazing!! Keep up the good work...peace

Pete

IP: Logged
PFF
System Bot
RCR
Member
Posts: 4397
From: Shelby Twp Mi
Registered: Sep 2002


Feedback score:    (7)
Leave feedback


Total ratings: 102
Rate this member

Report this Post07-04-2011 02:17 PM Click Here to See the Profile for RCRSend a Private Message to RCREdit/Delete MessageReply w/QuoteDirect Link to This Post
Thanx Rob...I'll try it soon.

Bob
IP: Logged
GT86FASTBACK
Member
Posts: 757
From: Monroeville, PA
Registered: Jul 2009


Feedback score: (1)
Leave feedback

Rate this member

Report this Post07-05-2011 07:24 AM Click Here to See the Profile for GT86FASTBACKSend a Private Message to GT86FASTBACKEdit/Delete MessageReply w/QuoteDirect Link to This Post
I cant wait to get the money together and grab one of these amazing bumpers!!! Great work man!!! +1
IP: Logged
ALLTRBO
Member
Posts: 2023
From: College Park, MD
Registered: Mar 2006


Feedback score: (4)
Leave feedback

Rate this member

Report this Post07-05-2011 02:27 PM Click Here to See the Profile for ALLTRBOSend a Private Message to ALLTRBOEdit/Delete MessageReply w/QuoteDirect Link to This Post
If anybody is seriously interested in getting into the #4 spot for one of these, PM me (don't inquire about it in this thread, please).

I've decided to go in a wholly different direction for my Fiero's body, though I am very bummed that I won't be using this bumper afterall, especially with it being so close to production. It is still, by far, my favorite bolt-on front bumper, and it obviously has the quality to match. It just won't work with the rest of what I've decided for the car, and I'm absolutely not willing to hack it up.

Keep it up Rob, you do absolutely amazing work.
IP: Logged
KissMySSFiero
Member
Posts: 5541
From: Tarpon Springs, FL USA
Registered: Nov 2000


Feedback score:    (18)
Leave feedback


Total ratings: 111
Rate this member

Report this Post07-05-2011 03:17 PM Click Here to See the Profile for KissMySSFieroSend a Private Message to KissMySSFieroEdit/Delete MessageReply w/QuoteDirect Link to This Post
How would you ship this? Can it be shipped UPS or USPS?

------------------
SSFiero@Aol.com 87 Gt-5spd-62k miles.

IP: Logged
iluvsd619
Member
Posts: 1036
From: san diego, ca
Registered: May 2005


Feedback score:    (25)
Leave feedback

Rate this member

Report this Post07-05-2011 10:17 PM Click Here to See the Profile for iluvsd619Send a Private Message to iluvsd619Edit/Delete MessageReply w/QuoteDirect Link to This Post
Looking good!
IP: Logged
Amida
Member
Posts: 2349
From: Seattle, WA. USA
Registered: Jul 2003


Feedback score: (4)
Leave feedback


Total ratings: 63
Rate this member

Report this Post07-06-2011 04:51 PM Click Here to See the Profile for AmidaSend a Private Message to AmidaEdit/Delete MessageReply w/QuoteDirect Link to This Post
 
quote
Originally posted by KissMySSFiero:

How would you ship this? Can it be shipped UPS or USPS?


The cheapest way is on Greyhound bus to the nearest station. Package must be picked up at the station. Fedex & UPS may be possible but at a much higher cost.
IP: Logged
Dirty Harry
Member
Posts: 347
From: Orlando, FL, USA
Registered: Jun 2003


Feedback score: N/A
Leave feedback

Rate this member

Report this Post07-06-2011 10:52 PM Click Here to See the Profile for Dirty HarrySend a Private Message to Dirty HarryEdit/Delete MessageReply w/QuoteDirect Link to This Post
Bumper #9 is about to wet himself with anticipation. Great work Rob. It just keeps looking better & better. Harry

------------------
87 GT Maroon 3800SC & White Formula

IP: Logged
Amida
Member
Posts: 2349
From: Seattle, WA. USA
Registered: Jul 2003


Feedback score: (4)
Leave feedback


Total ratings: 63
Rate this member

Report this Post07-09-2011 01:14 PM Click Here to See the Profile for AmidaSend a Private Message to AmidaEdit/Delete MessageReply w/QuoteDirect Link to This Post
 
quote
Originally posted by Dirty Harry:

Bumper #9 is about to wet himself with anticipation. Great work Rob. It just keeps looking better & better. Harry


Ya, it's looking real good. I still have to work on the mounts in the light pockets for for the fog & turn signal lights.
IP: Logged
Amida
Member
Posts: 2349
From: Seattle, WA. USA
Registered: Jul 2003


Feedback score: (4)
Leave feedback


Total ratings: 63
Rate this member

Report this Post07-09-2011 01:55 PM Click Here to See the Profile for AmidaSend a Private Message to AmidaEdit/Delete MessageReply w/QuoteDirect Link to This Post

Amida

2349 posts
Member since Jul 2003
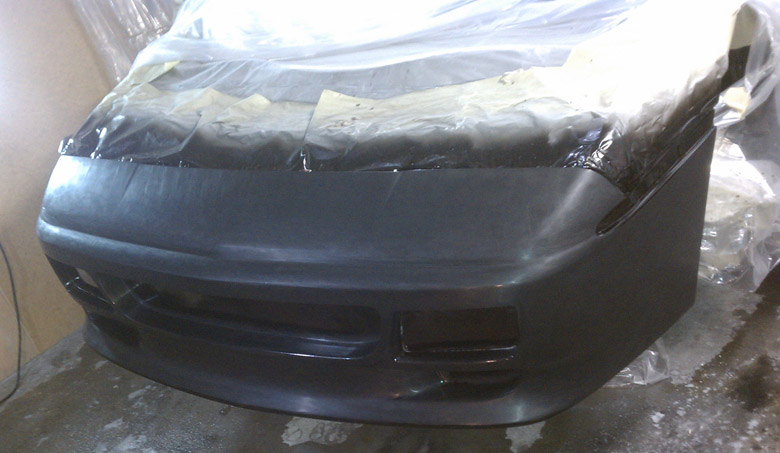
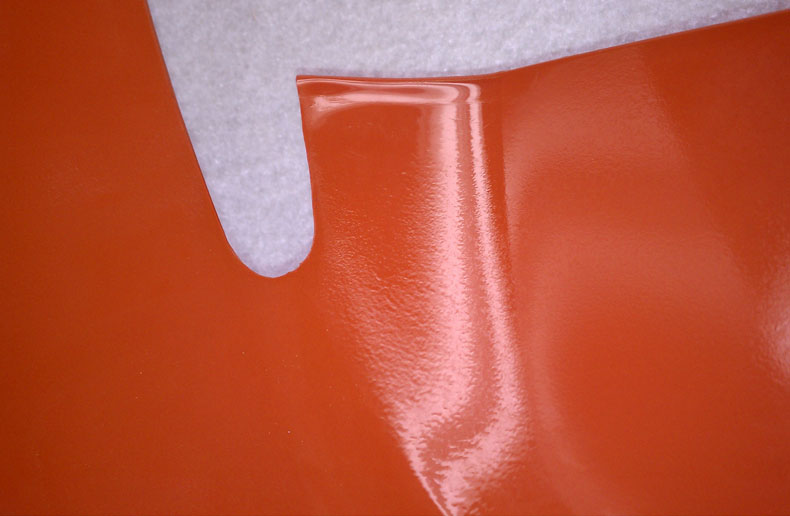
Doing some spot touch ups. Found a high spot on the right side which was easily sanded down & polished.


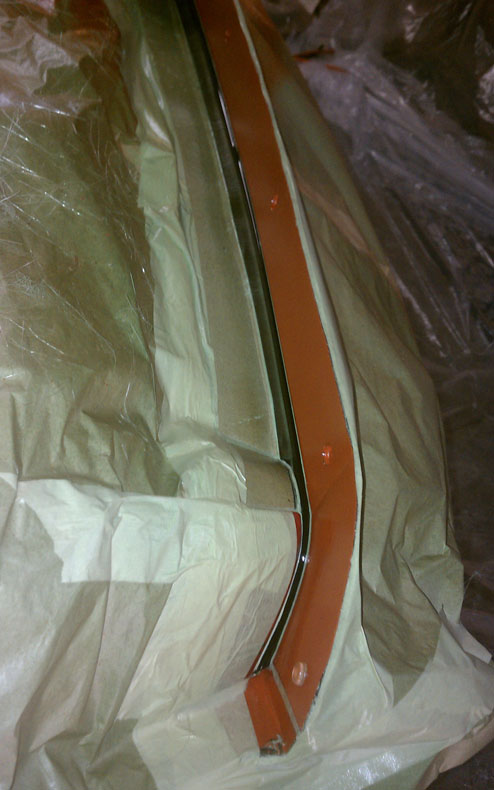
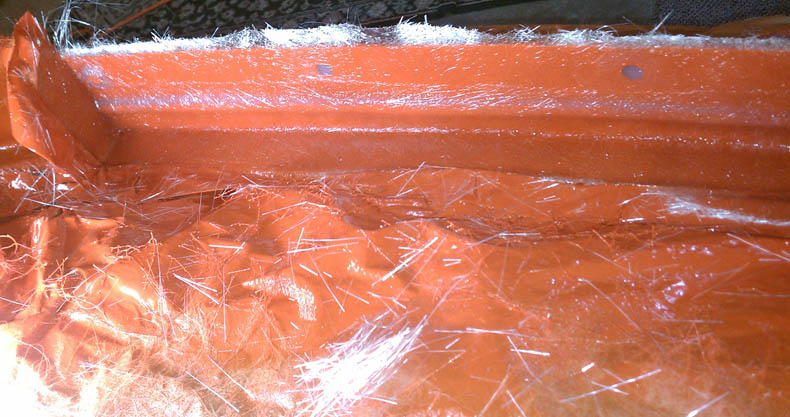
One word of caution when spraying gelcoat. Make sure you don't spray to heavily in the corners. What happens is it gets too heavy and starts to sag & pool up & deposit into the corners of the flanges. The gelcoat gets too thick from the pooling which creates too much heat and rapid curing. This causes the gelcoat to separate from the plug surface prematurely. The result is a depression/low spot in the mold surface which will show up as hight spots in the final part. On small spots it's not a problem since it can be sanded down to level during normal paint prep.

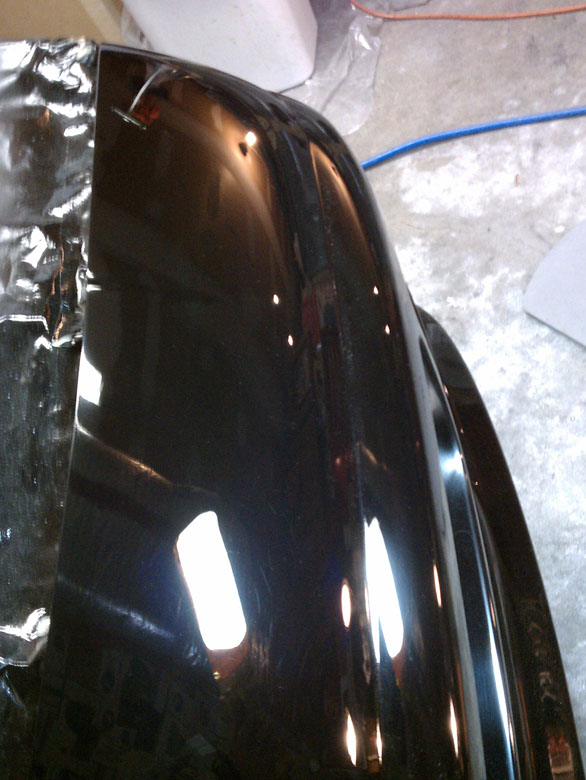
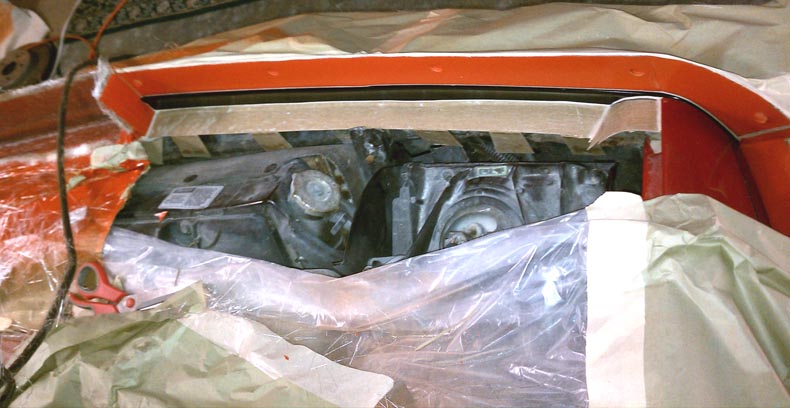
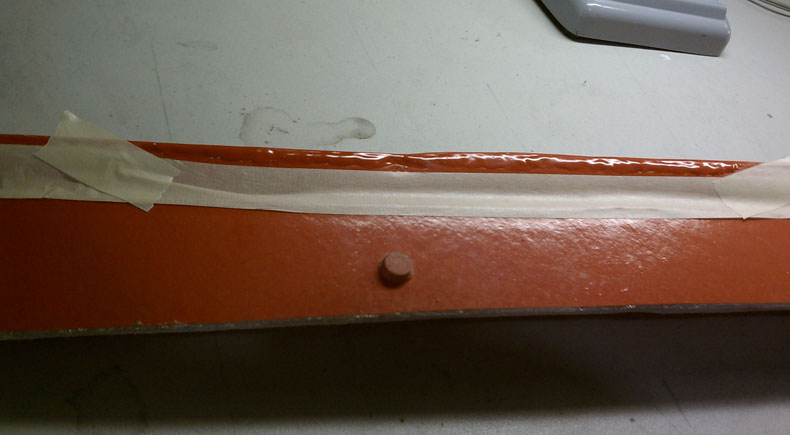
The gelcoat was too thick here in the corner above the arrowhead. the depression can be seen near the edge. But, again, not a problem since it'll show up as a slight high ridge in the part which can easily be sanded down during paint prep.


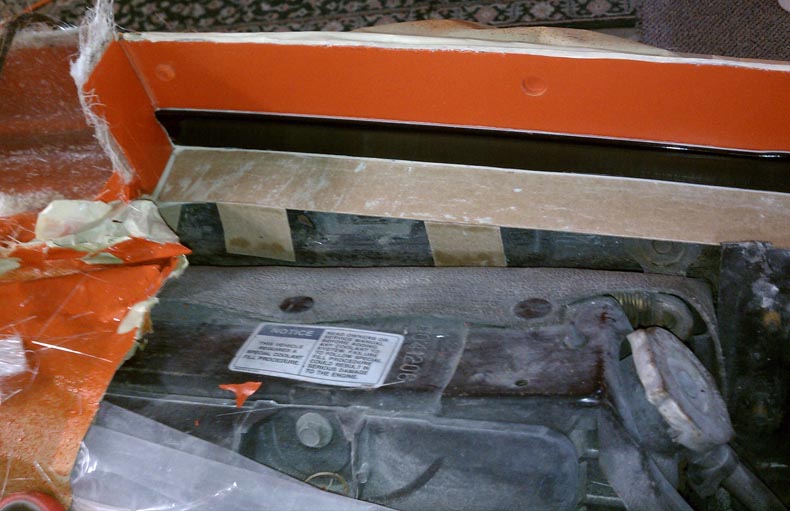
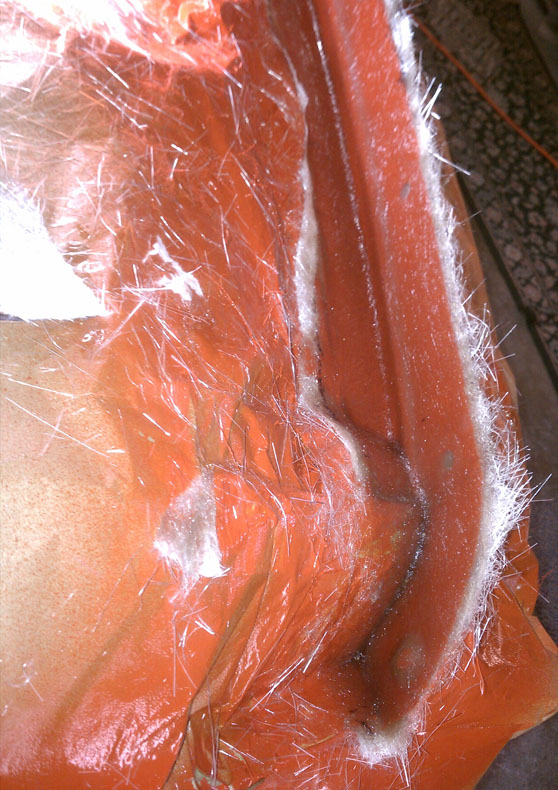
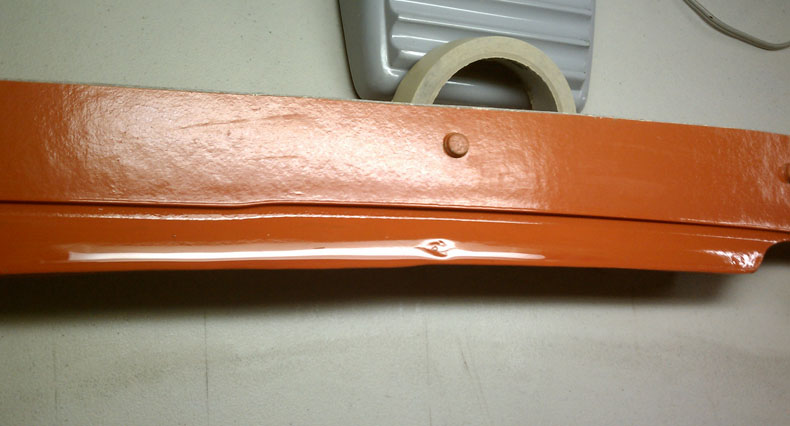
Gelcoat was too heavy in this area of the top flange as well. The low spot was a little too much for my liking so I needed to repair it. To fix it the area is masked off, sanded then filled with additional gelcoat. After curing it is sanded down using successive paper grits 180, 400, 1200, 2000. Machine polished to finish the repair.


[This message has been edited by Amida (edited 07-09-2011).]

IP: Logged
Previous Page | Next Page

This topic is 19 pages long:  1   2   3   4   5   6   7   8   9   10   11   12   13   14   15   16   17   18   19 
next newest topic | next oldest topic

All times are ET (US)

Post New Topic  Post A Reply
Hop to:

Contact Us | Back To Main Page

Advertizing on PFF | Fiero Parts Vendors
PFF Merchandise | Fiero Gallery | Ogre's Cave
Real-Time Chat | Fiero Related Auctions on eBay


Copyright (c) 1999, C. Pennock