I called Joe and Jeff on Friday after work to see how things were coming along. Didn't hear anything. Woke up to find an email and some cellphone-pictures that were sent around 3 a.m. Sunday morning (so about 9 hours ago from this post).
It was from Joe, being honest about not starting on the exhaust till yesterday. He has the rear bank done, and started on the front bank. From the pics he sent, it looks like he came up with something different than what he told me, or ran into a hiccup.
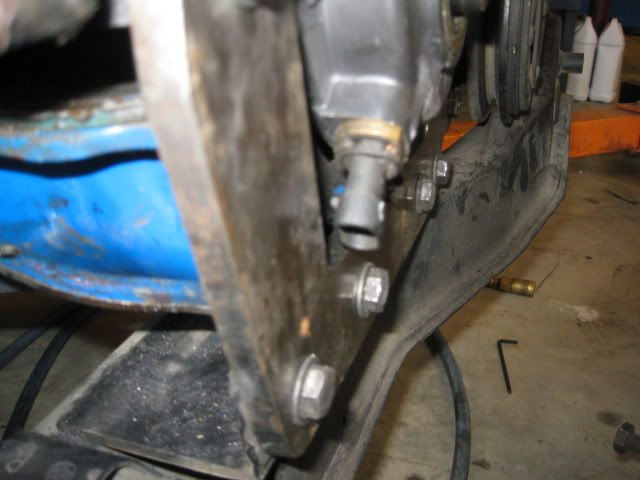
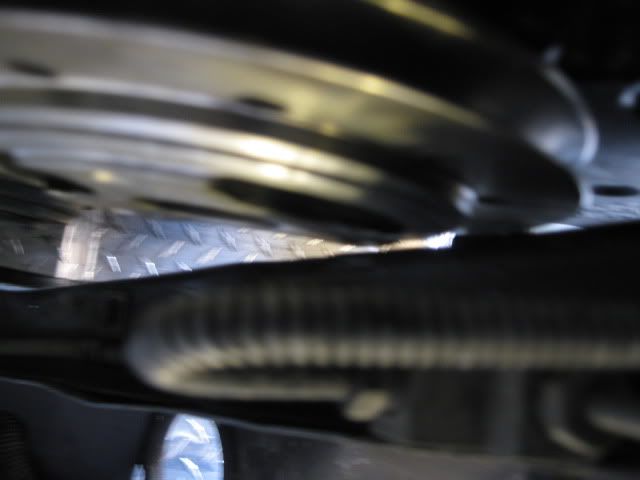
Shot from the back, you can see where the pipe for the completed rear bank ends.
A shot through the yet-floorless modified trunk. This is still looking like how he had originally planned/showed me. Check out my spiffy Borla Pro XS muffler!
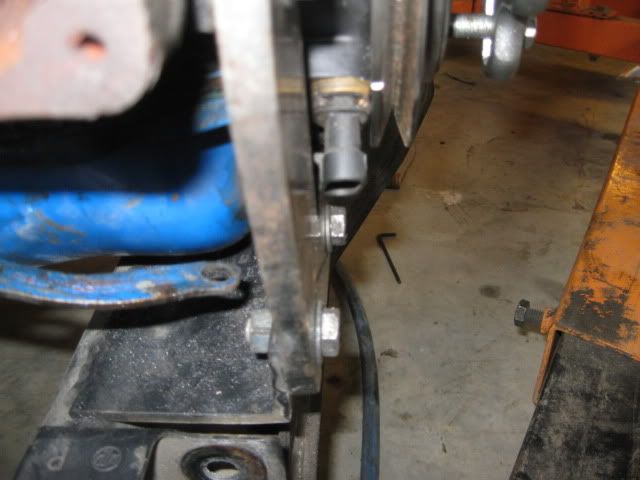
Here's where it starts to get different. In the way he had originally showed me, the front bank muffler was going to have the same orientation as the rear, only sitting above and off to the side with some overlap. This would let Joe create a cross-over pipe by connecting the two mufflers together directly instead of the pipe. Apparently he's run into an issue with that, or came up with a better idea.
I emailed him back and let him know I was upset at the news, but appreciated the honesty. It's better than him just dodging me. I also asked him if Jeff had been out to get any of the stuff he needs to do done. I'll update when I hear something back... but right now Jeffs statement of "We'll do everything we can to get it back to you by the 27th." is losing it's credibility - though after all the other missed deadlines, I suppose I shouldn't have gotten my hopes up.
Got another email from Joe this morning and another pic. He did run into a hiccup, something with the firewall-side header. He didn't go into details, just that he finally got Jeff out there to take the cradle/engine back out of the car so he could work on it easier. He also sent along this pic.
You can see that the axles are attached now - probably to help make sure everything is going to fit/run right, and you can see a pipe peeking out under the oil pan, so Jncomutt may havebeen right, and before that other muffler wasn't hooked up, just in a test fit position. Either that or when Joe went to put the axles on himself, before the engine came out, he discovered an issue.
Regardless, the engine is out and Joe is going to modify the other header now to resolve the issues. At least progress is being made!
He said that he thinks Joe will be done with the exhaust today and have it out to be ceramic coated, and he was still hoping to have everything done by/on the 27th. He did say it'd be cutting it close.
I'm on the fence about getting my hopes up. Part of me is excited, the other part is trying to keep me grounded.
More updates! Yay! I haven't gotten this sort of update/feedback since the first month of them having my car. It's reassuring!
The issue Joe had with the firewall side was that the collector dumped just above the subframe, no room to run the pipe - if I understood his email correctly. But he finished modifying the headers and running the exhaust.
He then ran into an issue with doing the crossover at the mufflers - apparently Borla doesn't joke around with the stainless steel they use, his drill bits barely scratched them! Which I guess is a good testament to Borla's quality. He has some concerns in general with it, since the link from one side of the exhaust will be after a few feet of pipe, the other will be just a few inches after the header. He's going to give Scott a call and see what he thinks.
He also talked to the guys who handle the ceramic coating for him, said that it could take a week to get them done - he said he'd call them back and try to get them to bump it up.
And lastly they got the scoop modified a bit to make it an easier (and cleaner) attachment to the decklid. I do have some more pics, but don't have the time to get them up right now. I'll do so tonight!
The exhaust pic I mentioned in my earlier post. Again Joe isn't sure how/if he's going to be able to do the crossover. Haven't heard back from him if he was able to pull strings with the people that do their coatings. I found out that Jet-hot (used to) do express jobs, I shot them an email but might just give their dealer in Charlotte a call tomorrow, since even at 24 hours that means they won't get it back till Thursday.
Latest email from Joe says that he's got to get one more bend piece, which he'll have today, then just 30 minutes more of work and the exhaust will be done.
His coaters said it'd be a few days no matter what. Which sucks. So if they get everything else done to get the car running and check everything by tomorrow night I'm still going to just pick it up and then drive it around for a week or two before bringing it back to them to pull the exhaust and send it out. I think since I need to do that, I'll probably go with Jet-Hot coating. Though it won't look as nice, I'm thinking about getting their S2000 stuff, since it has the highest heat retention out of all their coatings. There's only one Jet-Hot dealer that's within 25 miles of Vixen, so I'll probably give them a call since that's likely where they'll need to take it.
So as of right now, I'm still keeping my fingers crossed to pickup the car tomorrow night.
On a funny aside, when Joe was telling me about the exhaust, he says "So when you bring back next week from blowing up your transmission, we'll get it coated then." to which I responded with "Thanks for the vote of confidence there!" and he emails me back and says he tried to get a pool started on when I'd blow up the transmission... but said everyone wanted to pick "one week". lol
Joe has found a few issues, including one where he couldn't rotate the engine... now here's what he said he found:
"its the ****ing crank pulley. Scott has a diff timing gear cover on there that is all sorts of in the way. The rubber in the pulley was barely bumping against the plastic cover and jamming everything up. "
Now what worries me is - to my knowledge - that crank pulley and timing cover is the same one that was on there when Scott had this engine on his dyno stand for the break-in. So I let Joe know that this morning by email and asked him if it's possible that the pulley got smacked and messed up anything inside the engine. Joe's been really good about checking with Scott on things when he had a question about the engine, so I'm hoping he will for that.
I was hoping to pick it up this weekend... but now with this latest happening, I'm not sure. I guess it depends on what he finds about this timing gear cover/pulley situation.
The plastic timing pulley... is this the standard L31 vortec timing cover? If it is, Archies SBC balancer/pulley will hit the crankshaft sensor boss on that cover well before the balancer bottoms out on the timing gear. I did a bunch of clearancing to the sensor boss and both side of the Archie balancer/pulley so it could be as tight as possible to the cover and still clear the passenger side frame rail. Even with all this work, I still needed to install a 1/4" spacer to bottom out the pulley. If you need more info just PM me.
This is a different cover from the one that was on my original SBC. Joe sent me some pictures, showing how my new timing cover protrudes a little further than the old one. I'll get them up on webshots and then link them here, and you'll see where the new cover protrudes out some. I'll let Joe know that there's someone who's run into issues like this and see if he needs more info, if he does, do you mind if I PM you his email address/TN# so you can get ahold of him directly?
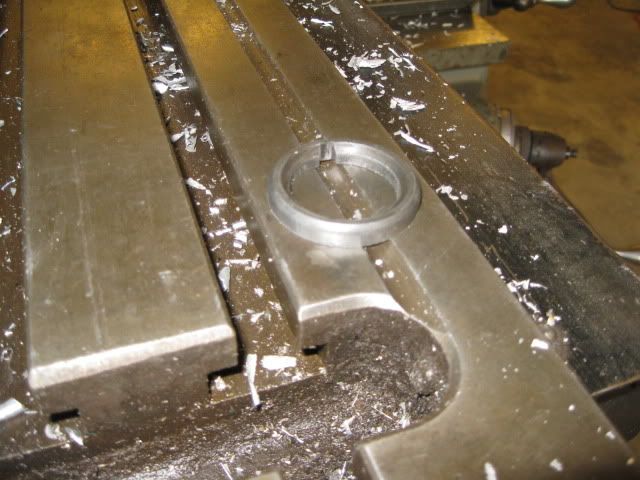
Here are some of the pics. Notice the boss and the crank position sensor have been clearanced slightly. If you are using one of the crate motor covers, there isn't a crank sensor, but the boss is still there. You could fill up the sensor hole with epoxy and then clearance it alot more:
Here is the 1/4" spacer:
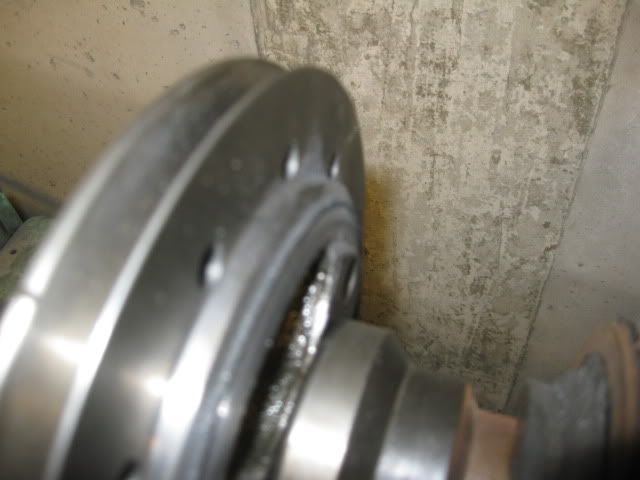
To clear the frame rail, I tapered the machined step between the hub and outer ring and even then it was tight.. :
WOW! You aren't kidding about it being a tight fit!!
I sent that post along to him. Hopefully it'll do it. I'm not sure what else he could do besides see if he can put my old timing cover on the new engine - which to my knowledge had no place to put a sensor... which obviously would be an issue when I went to EFI. lol
My concern with having a shop inexperienced with SBC/Fiero swaps do the work is they might have moved the entire engine/tranny too far to the driver side and created the opportunity to bottom out the driver side tripod.
When I setup my SBC fiero originally, to set the side to side engine/tranny position I ran the driver side suspension from full droop to full compression to find the placement that caused the axle to bind... then backed it off about 3/16" to account for some suspension bushing flexing. Ran that setup for many years and lots of miles issue free with the convetional timing cover. All the work above was needed to retrofit the plastic cover to this setup and engine placement while keeping the balancer within the frame rails... so if the passenger frame rail hasn't been notched, and your unmodified balancer sticks out further than mine... then your tranny is probably further to the driver side and closer to or at the point of axle binding. Have them pull the driver side spring and cycle the suspension while rotating the wheel by hand and see if you feel it binding.
If it binds, there are a couple options. 96 Corsica 4T60 Passenger axle is about 1 1/4" shorter than the fiero DS axle (your tranny is probably about 1" over) and is a plug n' play setup once the ABS ring is knocked off. Or you could take the fiero axle and reposition the snap rings (and cut the excess off). On the passenger side you could run a 1/4" spacer between the axle and the wheel bearing (some of the Held stuff does this)... or run an intermediate shaft combo.
The swap was originally done by Archie, that was with the previous owner though, and I never looked to see if anything had been notched out. So I'm not sure how much can actually change when just swapping out one 350 for another (hell, could be worlds of things, I will admit I simply don't know). I did send Joe a link to your last post, see what he comes up with. I'm planning on going out there tonight, see if there's anything I can do to help.
At least now I know there are more options for creating more room if needed!! Thank you!
Alright, Joe decided to just swap the timing covers, it was easier to do for now since I'm not going to be getting to my EFI for at least six months.
He pointed out something interesting to me though, the car had a mechanical water temp sensor that ran off the top of the block, the gauge was in the trunk. The temp sensor in the car worked as well, but it was always significantly lower - 50 or so degrees difference. I always thought that the one in the car was reading the temp from the radiator - Joe corrected me and showed me where the other sensor was plugged into the side of my old SBC, and couldn't explain the temp reading difference.
He isn't sure if it was just a bad sensor, or if it's just not the right sensor. To get the proper water temp inside the car, which water jacket should the sensor be plugged into, and what does the sensor look like / make-model number?
Thanks guys!
Edit - the sensor that was in the side (the one feeding the gauge in the car) says "HS 125 CM 12v 1969" on it, if that's any help.
[This message has been edited by Trinten (edited 09-04-2010).]
Just need to know which one I should get. I want to try to get this tomorrow (Saturday, so today?) instead of waiting for it from the Fiero store. Thanks!
I'm pretty sure I have a used V6 throttle cable, if that's what is used on the V8 swaps. I have to double check its condition, but if its decent I can bring it by Joe's shop. Does $30 sound fair?
And yes, as far as I can tell the original throttle cable was used. I found a really great .doc file in google on how to get the bastard out, and it was just like it said (well, on the interior side anyway, as it was already disconnected from the engine).
Unfortunately, the little damn black push-tab things were a ***** to get off and I cracked my until-then-mint console "skeleton".
I'm planning on being back up there today. What time did you want to drop it off? Or I can just paypal you the money, whatever works for you. The dead one is next to the car still if you want to make sure it's the same thing.
Alright, Joe decided to just swap the timing covers, it was easier to do for now since I'm not going to be getting to my EFI for at least six months.
He pointed out something interesting to me though, the car had a mechanical water temp sensor that ran off the top of the block, the gauge was in the trunk. The temp sensor in the car worked as well, but it was always significantly lower - 50 or so degrees difference. I always thought that the one in the car was reading the temp from the radiator - Joe corrected me and showed me where the other sensor was plugged into the side of my old SBC, and couldn't explain the temp reading difference.
He isn't sure if it was just a bad sensor, or if it's just not the right sensor. To get the proper water temp inside the car, which water jacket should the sensor be plugged into, and what does the sensor look like / make-model number?
Thanks guys!
Edit - the sensor that was in the side (the one feeding the gauge in the car) says "HS 125 CM 12v 1969" on it, if that's any help.
You only need the plastic timing cover with the crankshaft sensor if you want to run OBDII efi (like the 411 ecm). You can run EFI in OBDI format w/o any need for that timing cover.
Fiero temp guages are far from accurate. Unless you have fixed it, the temp guage pegs during bulb test. All this pegging over the years can allow the needle to walk backwards (read lower) over time or even come off completely. If this is the cause of the low reading, then you could gently pull the needle, let the engine get up to a known accurate temp that is easy to see on the fiero guage (like 220 degrees) and then put the needle back on so it reads right at that temp. A simple rewire will fix the bulb test issue so it will not go off again.
It is possible you have a temp sensor with the wrong range, they are fairly cheap to pickup at any parts store for the year of the fiero and original engine.
The sensors can be in either head or up close to the thermostat housing... it isn't that critical, but I normally avoid puting a sensor on the rear facing bank (cylinders 2,4,6,8) because I do not want to see it or the wire that connects to it. Just part of my finicky nature I guess.
Jncomutt - thank you for the cable! I haven't heard from Joe today, I asked him to call me when he knew he'd be at the shop. Looks like I'll be getting out there tomorrow to get that cable in. PM me with your email that you have paypal on (if you have it?) if not we'll meet up sometime and I'll get the cash to you.
FieroGuru-
Thank you for the info! That is the valve cover I had: A plastic one with a 4x sensor in there. The 411 ECM is the one I intend to use! The small harmonic balancer/pulley was rubbing against the plastic. I showed Joe your info on the spacer. He said it was possible to do, but then we'd need to space out the alternator and everything else by the 1/4 inch so the pulleys would line up. I don't think he looked at the pictures, so he might have misunderstood the placement/purpose of the spacer. I'm not sure. All that stuff is out of my depth, so I was just relaying info between you guys.
Maybe when I got to do the EFI conversion, I can make a trip out to your place if you'd be interested. I'd be happy to compensate you for the time/trouble. What do you say?
So next time I'm at the shop, my personal checklist is: Get the new throttle cable in. Be annoyed with my cracked skeleton and those damn plastic tabs. flush out my A/C lines with some compressed air Help Joe with whatever he's working on after I'm done with all that crap.
Joes list (to my knowledge): Make sure the A/C lines can get around the headers Finish getting the old valve cover on if not done (we didn't have any gasket sealant) Put the damn thing in the car. Hook it up and put the suspension back together. See if I can get him to help me swap in the S10 master cylinder (please tell me it is the thing that is the brake fluid resevoir with that weird metal pipe under it?) Get the brakes back on, filled up, bleed them Get the rest of the fluids in there.
Then we take it for a test drive down an empty, low traffic side street in case anything goes Horribly Wrong (tm).
[This message has been edited by Trinten (edited 09-05-2010).]
It doesn't have to go on there now, but if I recall correctly, it was one of the recommended upgrades for doing any sort of brake upgrade. Eventually I'll be doing the Lebaron brake upgrade (unless something better comes along before then), already got the master cylinder and the ten-degree brackets.
Will It hurt anything to have that master cylinder on there with the rest of the brake system stock?
You're confusing the master for the brake booster. Switching to the S10 master without the aided assist of the more powerful booster is going to make braking a choir, if not impossible; given how terrible brake leverage/clamp already is.
-Paul
[This message has been edited by L67 (edited 09-05-2010).]
Thank you for the info! That is the valve cover I had: A plastic one with a 4x sensor in there. The 411 ECM is the one I intend to use! The small harmonic balancer/pulley was rubbing against the plastic. I showed Joe your info on the spacer. He said it was possible to do, but then we'd need to space out the alternator and everything else by the 1/4 inch so the pulleys would line up. I don't think he looked at the pictures, so he might have misunderstood the placement/purpose of the spacer. I'm not sure. All that stuff is out of my depth, so I was just relaying info between you guys.
Maybe when I got to do the EFI conversion, I can make a trip out to your place if you'd be interested. I'd be happy to compensate you for the time/trouble. What do you say?
Joe is correct in that putting the pulley where it needs to be to clear the plastic timing cover will force all of the other accessories to move, but that really isn't that bad compared to modifying the balancer pulley. When the time comes to convert to EFI, just send me a PM and we can see if we can work something out.
L67 - thank you for the catch/correction! That could have been very, very bad. So I need to get an S10 brake BOOSTER and put it on there. Does that require changing the master cylinder as well, or can I leave the Fiero one in place? In the meantime, off to reread that brake thread...
FieroGuru - Sounds like a good plan to me, thank you for being open to discussing it!
I've done the S10 booster in my sisters car, you dont need to upgrade the master cylinder at the same time. The typical upgrade mc,however, is from a full size blazer. It's a quick take up, 1.125" bore.
------------------ | 1984 3800 Turbo / 5speed | 518hp on a Dyno-dynamics | 11.8 @ 129mph |
Understand, that using a larger vacuum assist isn't going to make your braking situation any better; the brakes will lock and fade faster. You should be considering larger, *vented*, rotors, because therein lies the problem. The S10 booster will be a metaphorical band aid, if you will.
The difference between the Grand Am upgrade + S10 booster and the stock system, is through the windshield verse standing on the brakes to stop. I drove a stock system home last night, after a few drinks, and still can't believe how unacceptable they are.
Though I don't want to sidetrack this into a brake thread, Paul is right. The larger MC will give you harder pedal feel, with less travel, using the stock calipers. The S10 booster will increase the assist and therefore make the pedal feel more like stock, but you are still pushing more fluid to the calipers using less pedal travel. The result is that the calipers squeeze a lot harder, a lot quicker. They feel like they 'bite' much quicker and lock up during 'panic stop' becomes very easy. Of course, the better the tires you have, the better you can stop, as well.
Putting those 11.25" rotors on there, with the S10 and the larger MC is asking for some serious braking power.
[This message has been edited by Jncomutt (edited 09-05-2010).]
L67 - yup! That's why I'm going to the Lebaron brakes. Since they're larger and vented. It's crazy how the thread (if I understand right) said that the back rotors are different from the front ones... and how few parts supplies actually differentiate. Makes making sure you get the right parts a little tricky!
Now unless I missed something, both threads hve called for the master cylinder upgrade, but one doesn't mention the brake booster (yet). The other thread lists the brake booster (along with a link to another thread) as an OPTIONAL upgarde.
Now it was mentioned that puttingon the bigger MC with the stock system is going to make the brakes LESS responsive? Did I understand that right?
Yet it was just mentioned that doing the MC and Booster is asking for trouble. So the MC change makes MODIFIED brakes more responsive, just not stock ones. So I shouldn't worry about the booster - just hold off putting on the MC until I do the Lebaron upgrade... right?
The master cylinder is a larger bore, so it will move more fluid. Why you would need this: 1. You're using a larger caliper that requires more fluid to operate. 2. Your brake upgrade is twitchy, too "on/off". The blazer MC will move more fluid but reduce mechanical advantage. So the brakes would come in gradually with more effort.
In your case, neither is what you need. The booster is the upgrade, not the MC. If and when you get the Lebaron brakes on, you decide that they're twitchy or engage faster than you'd like, "you want more control or less pedal travel", then I would recommend looking into the larger bore MC. You do NOT want a harder pedal with the solid rotors you have on your car now. Which is why John was curious why you were talking about using an S10 MC.
[This message has been edited by L67 (edited 09-05-2010).]
Hey L67! Thanks for the breakdown! So when I do the upgrade, just see how it goes with the stock MC and booster, and if it breaks too hard, pop in the bigger MC to ease it up a smidge?
Thanks again guys.
I have not heard from Joe yesterday (After I got home) or today. Called the shop and his cell phone. :/
The good news is that the engine was actually running in the car!
The coolant system is filled and was burped once, the wheels are on, the engine is in.
The bad news is, stuff is yet to be done!
The "mysterious red wire" is still in play. I'm positive it was what was supplying power to the electric water pump, and that the connection it had running to the C500 was to close the circuit when the key was on the accessory or run position. Right now Joe has it hooked up to draw juice through that block. I don't think that's a good idea.
Jeff is positive the wire was feeding the pump too. He'll be there on Sunday to check that part out as well as help put the rear clip back together.
The rear clip is still apart, transmission has no fluid yet. Joe said he still had some odds and ends to secure into place, but everything was hooked up. Minus the LEDs for the PONTIAC symbol.
The headers have (According to Joe) been at the coaters since last Wednesday. He tried getting ahold of them Thursday to get an ETA on when they would be done, because he said that if he got them back Friday he could (likely) get my car back to me this weekend. Unfortunately he couldn't get through to anyone, no answer the first time, on hold for a while before hanging up the second time.
Not to be too much of an ass, but at least he has some idea of how I feel when I leave him multiple messages and don't hear anything for a week. He said he was going to drive up to their place on Friday to see what was going on and call me, but haven't heard from him. I'll call him tomorrow.
So right now the plan is for me to go out there Sunday early afternoon, meet up with Joe and Jeff.
If we do get the car up and running and ready to roll and for me to leave with it on Sunday... I'm going to see if I can convince Jeff to follow me home in my Town Car and Joe to follow behind in his truck, and then Jeff carpool with Joe back to Charlotte. No sense in my car sitting there done for a week, and no sense in dragging my roommate down to Charlotte if there's no promise the car will be ready to drive away.
We'll see what happens. Story of my life right now. lol
It was August 23rd 2009 when Jeff put blame on me that your car wasn't getting worked on, because I parked the station wagon in front of the shop door the previous night. Me thinks I wasn't the problem.
[This message has been edited by L67 (edited 10-16-2010).]
lol, well, here's the update from yesterday (and strangely, I didn't get a notification of your reply...)
So I worked on the cooling system yesterday, discovered that at one of the couplings the pipe is crimped a hair. Looking around the coupling it appears it's been that way for a while. At some point I'll likely replace all of the piping anyway (stainless if possible) so not going to worry about it too much for right now - since if it was leaking before, it wasn't noticable.
Joe went to Calico... my exhaust was still not coated, so he just picked it up to put it on the car. I did find this nifty stuff that you can put on yourself with an airbrush gun or touch up paint gun (after you blast your parts), the stuff air dries and cures from exhaust temperatures. Kento is familiar with the stuff so he said he would help me out getting all that done. And it'll be alot cheaper. (this stuff: http://www.caswellplating.c...e/index.html#exhaust )
Joe is fabricating a bracket that will attach to those extra holes in the bottom part of the hinge bracket, that will hold my oil pressure sensor thing and two relays that currently won't reach to where they were before, instead of them just hanging there. There's also a fitting he's waiting on (or can fabricate) to hook up to the water pump to get my heater core put into the loop.
Brake lines are hooked back up, sway bar is partially in place (connected to the cradle).
Fuel line needs to be redone, but the rest of the fuel system is done and in place, the engine compartment's new temp gauge is nicer than my old one, and mounted in a nifty way. The new trunk floor is in place.
We found an electrical gremlin. I was right about the red wire running the water pump, and it seems that it's lead from the battery is worn/touching the chassis someplace, causing 12v-to-chassis issue. Jeff just needs to hunt down exactly where this is taking place and get it fixed. I think almost all of the other wires that were dangling under the car are now hooked up. Among them were the A/C power, and one other wire clip, and then one loansome wire hanging by itself with some weird cap/scoop on it.
And lastly... the new intake I have is laid out differently, so we need to figure out how to mount the return spring(s) for the throttle on my carb since the bracket won't hook up the same way.
Things left to do (at Vixen): Eletrical gremlin (and then reassemble the interior - again) Fabricate relay-n-oil sensor bracket Heater core hookup to water pump Brake bleed Refill cooling system and reburp it Transmission fluid filled A nice fuel line setup from pressure regulator to Carb Reconnect A/C lines to compressor Throttle return springs Decklid/scoop (but thankfully it's almost done)
Then off to get it inspected, then to an A/C shop to vacuum the lines and recharge the system.
Damn... it doesn't seem like anything got done... but I know stuff did, I was there! lol
First up, my new fuel line fitting to the carb with the new fuel pressure gauge:
Next, my finished decklid! (well, finished painting and such, still need to move the lock and electric release over to it next).
Jeff had been out there some last week (not sure if he's been out there this week or not) and found the short - the wire coming off the battery to power the water pump had worn through coming through the firewall, and was touching the metal there.
So - to my knowlege, here's what's left to get done:
Things left to do (at Vixen): Reassemble the interior - again Fabricate relay-n-oil sensor bracket (Joe says it's done, but I haven't seen it) Heater core hookup to water pump Brake bleed Refill cooling system and reburp it Transmission fluid filled Reconnect A/C lines to compressor Throttle return springs Move lock and electric release to finished decklid.
Then off to get it inspected, then to an A/C shop to vacuum the lines and recharge the system. -- well, at least the list shrunk a tiny bit.
WOW just caught up on your post. Hopefully you get your car back soon. Give me a heads up next time you are down this way. Hopefully if I am around I can stop over at the shop.
I was out there yesterday for about 9 hours. Didn't feel like we got much done, but I guess that's bound to happen.
I had an (initially very confusing) conversation with Joe on the wiring. By the time we got on the same page, I understand that all the electrical is working the way it should, but from my emails with Jeff, he still had to finish making sure the short wouldn't reoccur.
Jeff had said he would be out there around "lunchtime", however later on he told me (via email) and John (another guy there, working on a Monster Miata), via text that he was out there in the morning and no one was there, and Joe didn't leave him the key (Which confirmed as true, Joe blamed his mom, said she might have taken it to get in at some point). John (with the Miata) then explained he had a key and lived five minutes away, so we made sure to let Jeff know that if he ever gets there and can't get in... to just call him and he'd come out to let him in - then he can finish the wiring issue and put the interior back together (and work on the Miata's wiring).
Swaybar issues (ultimately fixed). Joe realized it was on upside down. There's a... "bent notch" in the swaybar for where the exhaust pipe passes. I hadn't noticed it when I got it it bolted to the chassis the first time.. and of course we discover it as we're bolding it to the arms. So we undo that, flip it around, bolt the bastard back up.. and then dick with the arms again. Definitely a learning experience as things we did to make it easier to line stuff up ultimately worked against us. Joe got it fixed in the end though, which I'm grateful for, I was really frustrated with it! That damn thing ate up at least two hours.
With Joes help I got the A/C lines in place, which is great. There's still one more wire that needs to be hooked up to the compressor, Jeff is going to need to come up with a different way to fit/crimp/connect it, though. Damn I hope this compressor is good. Getting this thing replaced would be a ***** . It should be good, it's the same one that came out of my car originally, but it's been sitting for a few years.
Brakes are bled, transmission fluid is in.
We tried to bleed the clutch... I was getting ZERO pedal resistance! It was light as air. We tried bleeding it the traditional way for about an hour with no results, and the travel of the slave cylinder wasn't even an inch (from what Joe was saying - I was pumping/holding the pedal). This is confusing to me, since at no point would anything of the clutch system have been "open". So not sure how it got this soft to begin with.
I called CowsPatoot (Greg), and he said that he's never had luck doing it that way, and uses a vaccuum line. So we went to a few auto-parts places till we found one that had one, and hooked it up, and followed Gregs recommendations. The crap in my clutch system is BLACK. Very icky looking. Not sure how normal that is. Joe said the system used brake fluid, so as we vaccuumed garbage out, I was watching the Master Cylinder and topping it off as it slowly lowered. No leaks anywhere that we can see.
Joe climbed under the dash and saw that the rod that comes through the firewall from the master cylinder is bent. He thinks that's the issue... but I don't think so. There was no pressure in moving the rod AT ALL so this did not happen yesterday - my guess is that it's been that way for a while, the pedal did used to travel a bit before the clutch engaged, I just thought it was normal. Apparently not.
Greg also agreed to come out there with me next weekend and help me with odds and ends and stuff like the clutch and the electrical/interior if Jeff doesn't get out there during the week to get it done. Very grateful for that.
Joe was unusually bent towards getting the clutch issue fixed so he could crank the engine (again bringing up doubt that he ever had it running before... and not something I confronted him with, just not worth it). He kept falsely insisting it was "practically the last thing to do." So I set my foot down and rattled off the remaining things to do, after each item he'd say "Yeah." so when I was done, I said "So there you go, alot of stuff for you to get finished first, then we can worry about the clutch!" his reply? "My work week is going to be boring, then." .... I didn't make a comment besides saying "It's all stuff that needs to get done anyway, and that I can't do."
Joe also said that he didn't like the way the bracket for the oil sender and relays looked. He redid some wiring so the relays went back to their stock location. He showed me a few things he wanted to do with the oil sender and I told him, definitively, what I wanted it to be like. He agreed.
Also Joe started getting the modified carpet into the modified trunk. I worked on that for a bit, trying to finish the fit. It's still a long way from looking good, but I got it all "laying" now, which is great.
But a few more things off my list! Things left to currently do (assuming no more hangups or setbacks):
Touch up the hood (Joe spotted some places that he needed to spray a little more clear and rebuff, found that out yesterday) Finish paintjob on the decklid ( I thought it was painted already by the pics, but it wasn't). Reassemble the interior Fabricate bracket/mount oil sending unit Heater core hookup to water pump Refill cooling system and reburp it Throttle return springs (figured out how to do this, just need to get it done, car was up in the air too much to set it up) Move lock and electric release to finished decklid.
Then off to get it inspected, then to an A/C shop to vacuum the lines and recharge the system -- and pray the compressor works.
In light of this weekend, and the possibility of replacing my slave and master clutch cylinders, I have ordered replacements for both, plus gotten the MR2 piston to upgrade the slave. If you have no idea what I'm talking about, check out this thread:
Greg (CowsPatoot) is still going to try to bleed things, but given that I got a bent arm from the master, and slave is pretty much just surface rust... might be time for a change. lol
A thank you to Greg for helping me out with the clutch stuff, and both TopNotch (for the thread and answering my questions about his upgrade) and Capt Fiero for answering my clutch questions.
Oh! Some places have the updated master clutch cylinder for over a hundred bucks, found it at napa for 30-odd dollars.
Part numbers from Napa for the slave and master for the 4 speed: NNC 39719 NNC 37795
Capt Fiero had made some recomendations on what to cross reference for the parts, which I tried to find without much success (I could have been doing it wrong and/or the places I talked to were doing it wrong), in one instance where I lucked out, it was around 110 bucks. So for right now, given how quickly I needed the part, I'm hoping that the 30 dollar part holds up. If time was not so much an issue, I would have taken his recommendations!


 Topic Closed