Many of you already know about my project or have seen my video on youtube, but now its time to really get into my project. I spent the first part of 09 wrapping up some design details and I finally have most of them worked out. (Notice: I said mostof them) The reason for the tittle of this thread is because its time for me to start laying fiberglass on my project. I have been inspired by some of the great project I have found on this site-forum. So to thank all of you for your willingness to share the trials and tribulations of your projects I have decided to share my build with you guys. Mainly for 2 reasons. 1. I will need all of your help and advice. 2. I'll need you guys watching me to make sure I finishe what i start, because you guys get pisssed when a project starts and doesn't finish.
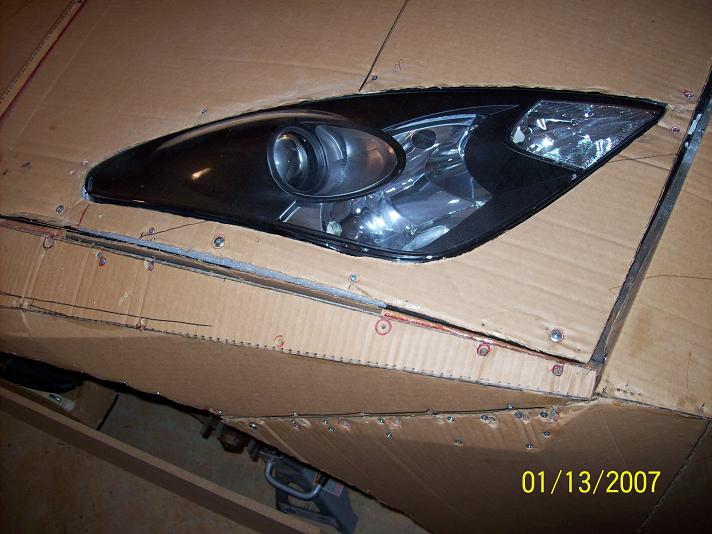
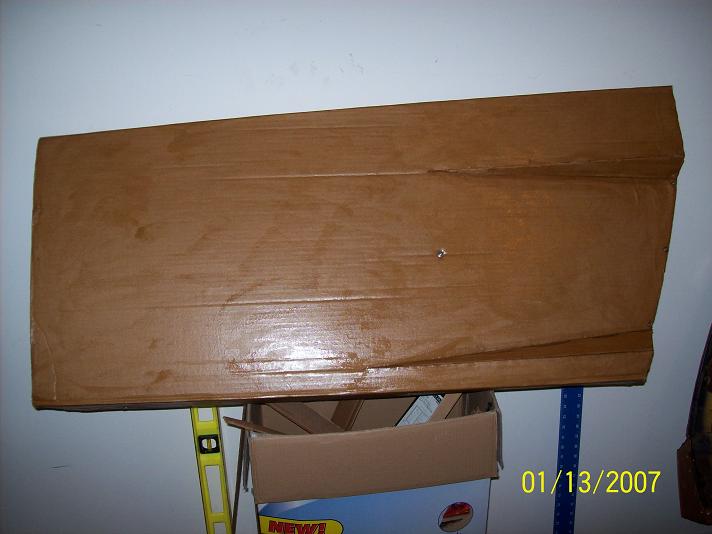
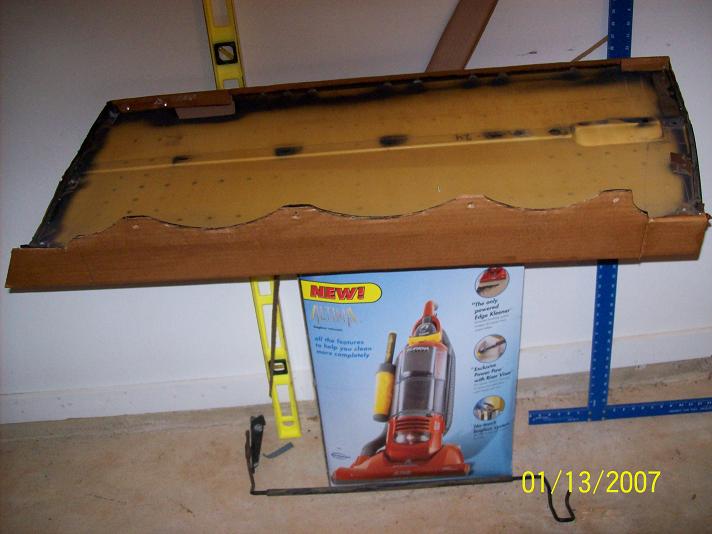
Things you need to know so your advice/suggestion will help me instead of hindering me. As you may already know but can certainly see me project is built almost entirely of cardboard, which I plan to fiberglass over. This is where I get the most ,WTF, comments. The cardboard will become a part of the finished parts. I am not making making molds, I'm making one off body panels. Sooo... the final part will be made up of cardboard sandwich between layers of fiberglass. In some cases, such as the door panels,hood and rear quarters, the original Fiero part is underneathe the cardboard. the rear bumper and engine cover are made from an MDF frame and a cardboard skin. All of which I will be posting pictures of. I am hopefully including pictures in this post but I don't know if it will work yet. Anyway my point is as much as i would love to make molds and offer my body panels to you guy i don't have the money or experience for that type of project so please confine your advice to ideas i can use to finishe the project i have begun. Eventually I plan on doing the motor, brakes and interior using ideas I have gotten off this site but before i can do any of that I have to complete the body. Without the body theres no need to do any of the other stuff. yes my project is based on the Gallardo thats why my name is Galliero, but this is not a replica. I did not try to make the fiero body match the gallardo i took design cues from it and made them fit the fram of the fiero and modified where necessary to make the design look cohesive and flow. the head light is from a Toyota celica. i plan making the front bumper and fenders one piece the gaps between the hood, bumper and fenders still need to be tweaked i removed the door panels so you could see the connections to the body and to the side skirts. the rear fenders are connected to the side skirts using u-bolts. that tear is where my dog suddenly decided she likes to eat card board, now she sleeps locked in her crate. im playing with the idea flairing the wheel wells a little, not sure yet how hard it will be to blend it in correctly. the opening is where the taillight goes. i used a ford expedition taillight turned sideways. one problem is i still haven't found a hinge to to open the trunk without it rubbing against the bumper. the humps were my solution once i decided not to go convertible. i think it actually worked out great and looks really cool. the engine cover opens like the hood this picture shows the notch that the engine cover slides in, helps keep things lined up when cover is down its needs to be trimmed because its a little long. this picture is to show that although the front looks flat and boxy it does have a slight angle to it. here's the door panel from all sides this is where i will be starting the fiberglassing because all the other body panels align off of the doors and hood becase their positions are fixed. so i need your ideas suggestions on how to begin glassing these door panels because they have tight inside corners and sharp angles all the screws you see will be recessed below the surface so the won't get in the way of the glass. So give it to me guys. i'll put your ideas into effect this weekend and post the pictures Sunday whether good or bad. After all its just fiberglass, if i mess up i can sand it down and try again
IP: Logged
02:03 AM
PFF
System Bot
Erik Member
Posts: 5628 From: Des Moines, Iowa Registered: Jul 2002
Glad to see you moving along with your project. I remember seeing you on Hotrodders as well so don't leave those guys hanging. I think once you have enough glass on the panel you should flip it over and remove as much of the cardboard as you can then lay up some more glass on the inside. If you lay all of the glass up on the outside your body panels will get bigger an may not flow as well. Looking forward to your build and hope we all can get some insperation from your car.
IP: Logged
09:56 AM
Fierology Member
Posts: 1195 From: Eastern Tennessee Registered: Dec 2006
Amazing! When I first saw it I thought you were just laying out a template, because it's a lot easier and cheaper to make a cardboard car than a fiberglass one. But then I read that you're actually using the cardboard in the car. And I'm impressed if it works. It seems a great thing about using cardboard is you can change and modify it w/o much if any cost to yourself until you see that you like it, and you can actually see what the car will be like. It's so much better than a cad system which requires someone that knows cad and only gives you a limited perspective. And even when you get cad right, you still can't see it as it would be in person. So, I Iook forward to seeing how this comes out. it's outside the box, and that's really cool. People probably say: "What the heck? cardboard?" but, then, why not? It's a good material that's abundant, relatively strong and cheap. good luck and keep up a good thread.
-Michael
------------------ "A guy know's he's in love when he loses interest in his car for a few days." -Tim Allen
You should roll it outside and take some photos of it from different angles.
I think the headlights need to move out and forward.
it raining now but when it stops i'll let the garage door up and take some more pictures. I didn't really show you guys the back and its my favorite part it really looks nice.
IP: Logged
02:58 PM
PFF
System Bot
Galliero Member
Posts: 83 From: Calera, Alabama, USA Registered: Jan 2009
Added to my Favorites! Cant wait to see this move forward!
you and me both, i'll take special care to post as much as possible i would love to have the fiber glass work done in no more than 6 months but im learning so it may take longer but im a quick learner and very meticulous like madcurl, archie and others guys on here. So what starts as a tweak could turn into a completely new design.
IP: Logged
03:03 PM
Galliero Member
Posts: 83 From: Calera, Alabama, USA Registered: Jan 2009
Glad to see you moving along with your project. I remember seeing you on Hotrodders as well so don't leave those guys hanging. I think once you have enough glass on the panel you should flip it over and remove as much of the cardboard as you can then lay up some more glass on the inside. If you lay all of the glass up on the outside your body panels will get bigger an may not flow as well. Looking forward to your build and hope we all can get some insperation from your car.
Thanks alot Jake, I'll be sure to update my hotrodder post and thanks for the suggestion about glassing the back side your right on the money and I was already planning to do that where ever possible, the only way this works with the cardboard is if im able to sandwich it between the layers of fiberglass. Where i cant get to the backside i'll be using a stitchmat which is a layer of cloth with a layer of may stitch on top for a combined 24oz of mat. Hope that's strong enough.
IP: Logged
03:11 PM
Galliero Member
Posts: 83 From: Calera, Alabama, USA Registered: Jan 2009
Amazing! When I first saw it I thought you were just laying out a template, because it's a lot easier and cheaper to make a cardboard car than a fiberglass one. But then I read that you're actually using the cardboard in the car. And I'm impressed if it works. It seems a great thing about using cardboard is you can change and modify it w/o much if any cost to yourself until you see that you like it, and you can actually see what the car will be like. It's so much better than a cad system which requires someone that knows cad and only gives you a limited perspective. And even when you get cad right, you still can't see it as it would be in person. So, I Iook forward to seeing how this comes out. it's outside the box, and that's really cool. People probably say: "What the heck? cardboard?" but, then, why not? It's a good material that's abundant, relatively strong and cheap. good luck and keep up a good thread.
-Michael
Thanks alot micheal for the great words of inspiration. Actually you are right on about the cardboard being cheap and easy to work with. The entire car was made from eight sheets of 8x4 corrugated cardboard at about $12 to $15 per sheet and I still have have a sheet and several peices of scraps. To cut down on waste and since I have degrees in CAD and Computer Animation I did make my templates for all body panels in AutoCad and printed them out full size on the plotter at my job. Then I tranferred those to the cardboard and im proud to say in most case I was no more than a 1/4inch off on any of the panels but one I got them onto the car then you have to adjust for unknown variable and what the car tells you it wants ( i swear it talks to me sometimes) and then try to make the body lines line up and get all your gaps right. I'll try to post images of the CAD files on here so you can see what I'm talking about. This what I used to get parts gor my Fiero. I paid $200 for the fiero and I spent about $100 bucks on cardboard and I'm going for the look of a $250k car so I would say I'm not doing so bad....
IP: Logged
03:36 PM
May 3rd, 2009
RCR Member
Posts: 4432 From: Shelby Twp Mi Registered: Sep 2002
You've certainly put a lot of work into it so far. Looks pretty good. I think we all need to get some views from a distance to piece it all together.
I used cardboard as a base for my subwoofer project, so now some advice...
1) Card board soaks up a lot of resin, but not completely. There will be portions of the cardboard that remain soft (and flexible).
2) It's very hard to keep it flat and symetrical. You may find yourself loading up on filler or sanding into the cardboard to level things off or make them match.
3) Consider that the fiberglass is a skin over the cardboard and take into account that it will ancrease your panel sizes/gaps/etc by 1/8" or so.
4) because the glass is a skin, and the cardboard does not soak the resin completely, consider that there will be portions of cardboard still susceptible to water.
5) You used a lot of corrugated cardboard, did you think to use the single layer stuff used on packing pallets? I've been using it for patterns and I did see a scratchbuild using it for the body.
That's it for now...Good luck. Look forward to see how you solve some of the technical issues.
Bob
IP: Logged
08:10 AM
opm2000 Member
Posts: 1347 From: Versailles, Ky USA Heart of the Bluegrass Registered: Dec 2000
If you plan on cardboard removal, try waxing or spraying PVA on each piece before fiberglassing.
In most cases though, I'd consider leaving the cardboard. If you properly glass both sides, you create a composite sandwich structure, which can be very strong.
There is more to creating such a sandwich structure than just glassing both sides. The second side should have @ a 2" edge taken off the core (cardboard) so that the 2nd layer of glass also bonds with the backside of the first layer. Then it assumes tremendous strength.
The bulkheads and most structural panels of the Rutan designs I'v e built were made using this technique, we just used clark-foam as the core.
Molt Taylor actually built an airplane using cardboard as the core, similar to what your doing.
David Breeze
------------------ Pantera Rebody Kits
IP: Logged
08:28 AM
americasfuture2k Member
Posts: 7131 From: Edmond, Oklahoma Registered: Jan 2006
You've certainly put a lot of work into it so far. Looks pretty good. I think we all need to get some views from a distance to piece it all together.
I used cardboard as a base for my subwoofer project, so now some advice...
1) Card board soaks up a lot of resin, but not completely. There will be portions of the cardboard that remain soft (and flexible).
2) It's very hard to keep it flat and symetrical. You may find yourself loading up on filler or sanding into the cardboard to level things off or make them match.
3) Consider that the fiberglass is a skin over the cardboard and take into account that it will ancrease your panel sizes/gaps/etc by 1/8" or so.
4) because the glass is a skin, and the cardboard does not soak the resin completely, consider that there will be portions of cardboard still susceptible to water.
5) You used a lot of corrugated cardboard, did you think to use the single layer stuff used on packing pallets? I've been using it for patterns and I did see a scratchbuild using it for the body.
That's it for now...Good luck. Look forward to see how you solve some of the technical issues.
Bob
Thanks alot for the incredible advice, its just the kind of stuff I need to hear from people who have experience doing what i'm trying to do. Could you take a closer look at the door panel and tell me how you would glass them, paying special attention to the ends of the doors. Any insight would be greatly appreciated. Any help from anyone else would be helpfull also. I plan on glassing the door panel this weekend if the weather is good. My main question is how is the glass going to act if I try to fold it over the thin edge of the door or should i just lay it flat and trim off the extra. i don't want to wrap it over the edge and have it spring back while curing. I was planning on using mat in the tight corners and sharp edges.
IP: Logged
11:03 PM
May 5th, 2009
RCR Member
Posts: 4432 From: Shelby Twp Mi Registered: Sep 2002
Thanx for listening to little ol' me, but david (opm2000) is the fiberglassing expert. Any edges that are flat and run to the edge of the existing door, I would consider cutting back so the fiberglass lays on the Fiero door skin. This will seal the edge of the card board. As for wraping around the edges, honestly, I have the worst luck doing that. I've been known to wrap the piece in aluminum foil so the glass will hold it's shape. Then just peal the aluminum off once the glass is hard. You will leave pieces, but those can be sanded off later. I'm sure David or Rob Amida has better advise than that.
Bob
IP: Logged
06:15 AM
opm2000 Member
Posts: 1347 From: Versailles, Ky USA Heart of the Bluegrass Registered: Dec 2000
Bob (RCR) has it right. Your best to treat your tight corners & edges by laying the fabric flat. If you do try to layup over a corner and it puckers up, full of air, just sand it away or cut it open and fill it after it has cured.
You can turn tight corners sometimes by using very thin (lightweight) bid cloth with the weave laid at 45deg to the edge. Try it dry first. If you can radius a curve first, you can get glass to lay across it better. Outside radius by sanding away...inside radius by adding filler & shaping a fillet.
But usually you will get best results by laying multiple layers flat. Work some woven cloth into yur layup schedule for additional strength.
David Breeze
------------------ Pantera Rebody Kits
IP: Logged
06:37 AM
PFF
System Bot
exoticse Member
Posts: 8655 From: Orlando, Fl Registered: Jun 2003
Great job so far BTW !! That looks awesome ! But before you ruin it i would definatly consult some of the more experienced fiberglass guys on the forum to make sure you know what you are doing and how the cardboard is going to hold up.
I can also recommend a good site for you too ! It is a fiberglass forum where guys have done and are doing special car projects. You have to sign up (free) in order the see the pictures and threads. I will post a few of your pictures and see if i can get some input.
Just a quick update guys, the weather here is bad this weekend thunderstorms and tornado watches so No glassing this weekend and I'll be spending Mother's Day with my mom, so I'll try to get some glass laid next week.
Side note: I coated the door skins in shellac to keep them from soaking up so much resin and also to keep them from sagging under the weight of the resin and glass. The peices become stiff but not rigid so i don't have to worry about them cracking or breaking. This is an idea I got off this website. Let me know what you guys think about this technique. Whether you think its a good idea or bad one before I apply shellac to other peices. The reall test will be to see how the resin and shellac react to each other and form a tight bond?
IP: Logged
01:39 PM
May 19th, 2009
Galliero Member
Posts: 83 From: Calera, Alabama, USA Registered: Jan 2009
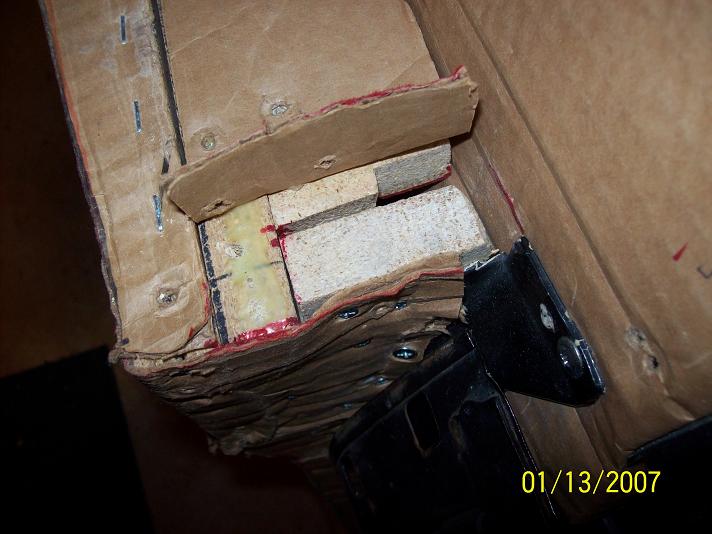
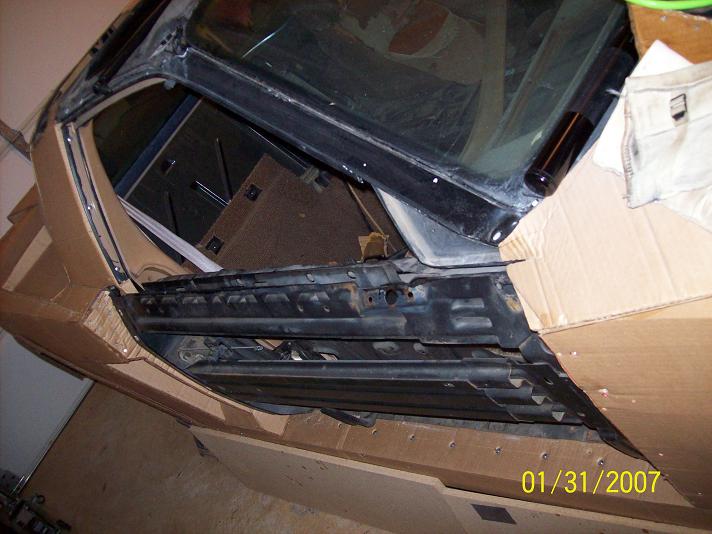
Another quick update: It just won't stop raining here! My garage is about the size of a small bedroom so I can not lay the fiberglass in such a small space or may not get to post againand it is also connected directll to my house and the little lady doesn't like resin fumes all over the house and it looks like rain again this weekend. I did however solve my trunk problem. I had been trying to use the hunges that came off the old trunk with no luck. I kept trying to mount the pivot point high to avoid the back bumper and trunk from bumping into each other and totally destroying my trunk. I finally mounted the hinge down inside the rear bumper (and yes i had to tear the hood up oder to get this to work) I will end up having to large holes in the bumper that the hinge rotates out of but it works. (PICTURES TO FOLLOW TONIGHT) Now I have to hook up some shocks to open and close the trunk. Thanks for all the advice so far and the project is ongoing so keep the advice coming.
Per some very good advice i will be trying to remove some (not all) of the carboard in some places to help it bond better and to keep it from getting to thick in some areas.
IP: Logged
04:21 PM
Galliero Member
Posts: 83 From: Calera, Alabama, USA Registered: Jan 2009
Great job so far BTW !! That looks awesome ! But before you ruin it i would definatly consult some of the more experienced fiberglass guys on the forum to make sure you know what you are doing and how the cardboard is going to hold up.
I can also recommend a good site for you too ! It is a fiberglass forum where guys have done and are doing special car projects. You have to sign up (free) in order the see the pictures and threads. I will post a few of your pictures and see if i can get some input.
after much debate i have decided to keep the moon roof. now i have to make the new roof cove match up
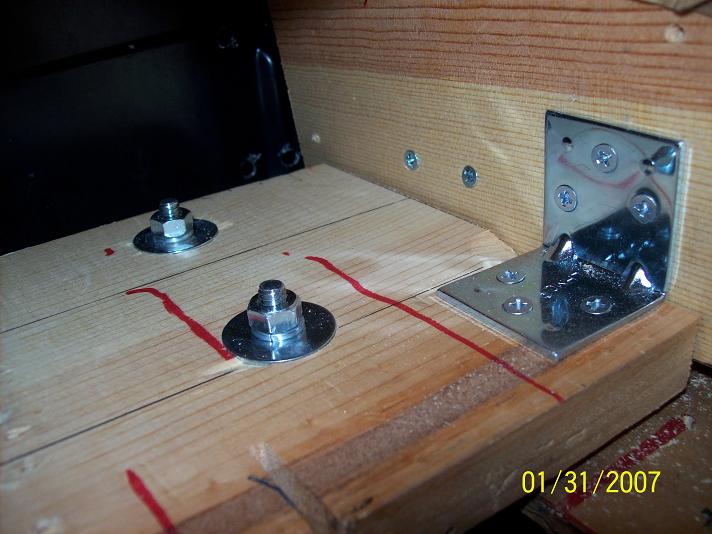
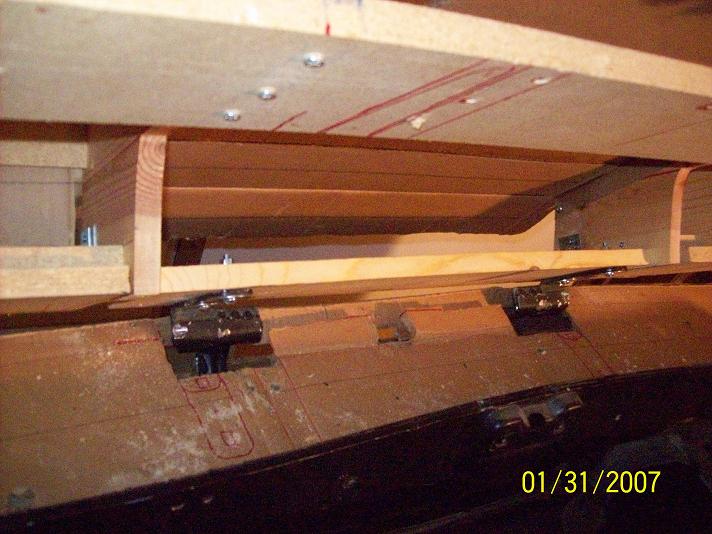
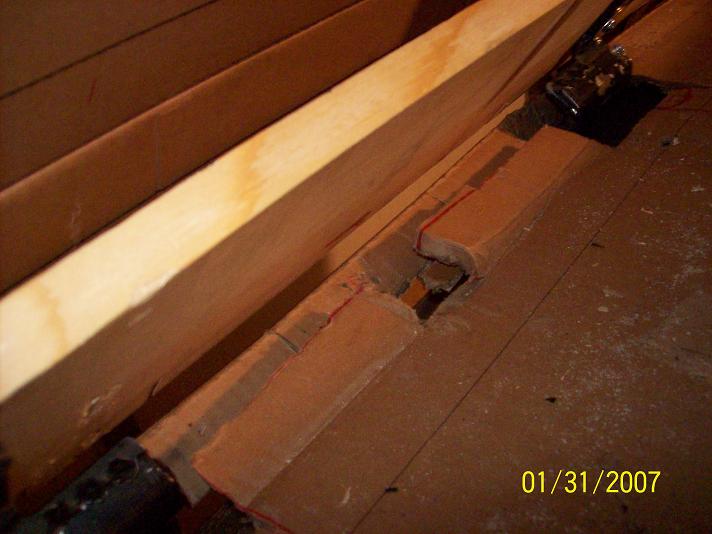
here is a shot of the hinge attached to trunk.
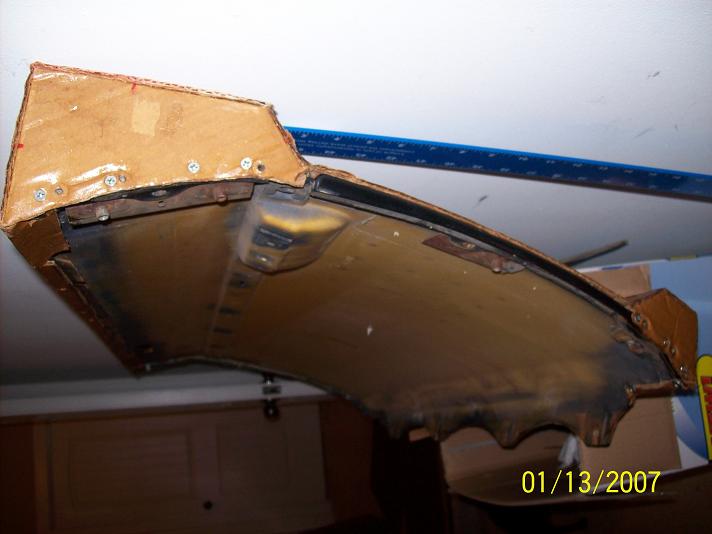
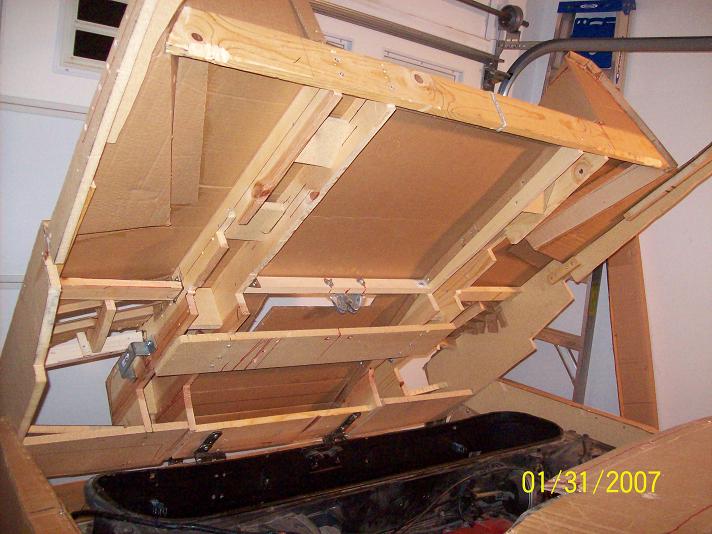
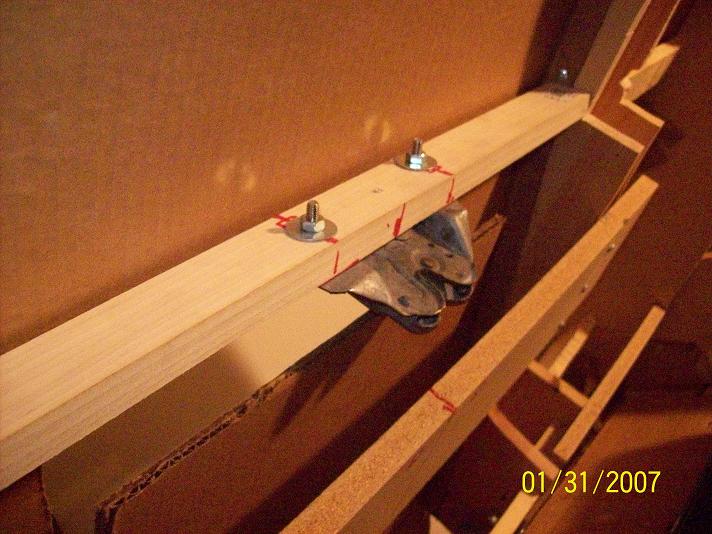
here is a good shot of the substructure of the trunk if you look back at some of the previous pics you can see how it looks on top. I will probably put glass on top side then try to peel off some of the cardboard before I apply glass to this side in the hope that this will create a stronger bond.
close-up of hinges you can see i had to hack up the bumper to make this work but this will be hidden when trunk is closed and i will fix this before glassing
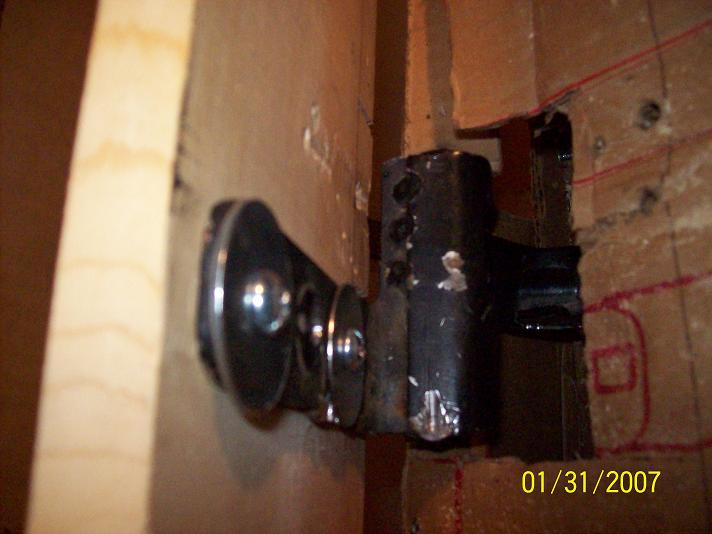
here you can see where i relocated the lock and it works but i need a new lock mechanism. the hole you see above is where i had to cut a hole in the trunk after i accidently lock it with no way of unlocking it. (Yes, I kick my own azz)
last, heres a shot of how i keep the trunk open until i figure out how to attack the shock to hold it open and open it when i pop the trunk.
ok, thats it for now, so give me any advice or suggestions you have. thanks
IP: Logged
11:38 PM
May 20th, 2009
BabyVet Member
Posts: 1173 From: Kansas City, Kansas Registered: May 2008
All i can say is " WOW" that if freaking awesome!!!! well i think you could have saved $100 buck and got your cardboard at the local grocey store there always giving it away cuase they dont use it you know??? I can't wait to see how things turn out for you and to see how it goes please please have someone take pic's while your glass good luck
IP: Logged
02:13 AM
whodeanie Member
Posts: 3819 From: woodstock,Ga.,USA Registered: Jan 2008
If you can build a car that nice with cardboard I can't wait to see what you do with Fiberglass. are you going to make molds for it or is this going to be a one off? D.
IP: Logged
08:44 AM
86fieroEarl Member
Posts: 2203 From: Orlando, FL Registered: Jun 2002
if the fiberglass goes on good and the cardboard holds up you should start making body kits, I think it would be one of the best looking body kits for the fiero.
its good to see someone getting off there glass and doing it hehe
IP: Logged
01:44 PM
Galliero Member
Posts: 83 From: Calera, Alabama, USA Registered: Jan 2009
Dean, as you may know i'm a big fan of you and your work, so to have you chime in with words of encouragement is an honor. I hope you dont mind if I ask your advice from time to time and hopefully I will be able to plan a trip to meet you and person and get some glass tutoring. ( I think if I send the ole lady and kid to six flags I can break away for some training)
Right now the plan is for it to be a one off but the more I look at the more I think making a mold would not be as difficult as I first thought. But my main concern is finishing this one, I'll worry about the other stuff later if anybody shows some interest in any of my body panels.
quote
Originally posted by whodeanie:
If you can build a car that nice with cardboard I can't wait to see what you do with Fiberglass. are you going to make molds for it or is this going to be a one off? D.
IP: Logged
03:06 PM
PFF
System Bot
Galliero Member
Posts: 83 From: Calera, Alabama, USA Registered: Jan 2009
Well, thats always the dream to be able to make kits, thats one reason i tried to use the fiero mounting holes and body panels whenever i could. Only time will tell!
Im glad somebody got the pun of my thread title, I was begining to wonder...
I feel pretty confident about the cardboard holding up its my glassing skills that I'm worried about. If not for my lack of knowledge i would prpbably be almost done.
quote
Originally posted by 86fieroEarl:
if the fiberglass goes on good and the cardboard holds up you should start making body kits, I think it would be one of the best looking body kits for the fiero.
its good to see someone getting off there glass and doing it hehe
IP: Logged
03:22 PM
Fierology Member
Posts: 1195 From: Eastern Tennessee Registered: Dec 2006
-Wood and (even) cardboard have good strength:weight ratios. Their weakness is rotting. Be sure you seal them well. I think the cardboard should be easy, as the fiberglass will envelope it. How do you plan on sealing the wood?
-I'm also curious: how heavy is that deck lid? Are any of those pieces braces to hold it in place until the rigidity of the fiberglass is in place?
Cool. I look forward to seeing your progress.
Ciao, Michael
IP: Logged
03:44 PM
Galliero Member
Posts: 83 From: Calera, Alabama, USA Registered: Jan 2009
Thanks thats was also my understanding that these two items had good strength to weight ratios, but always nice to get confirmation. I bought a wood sealer but from some of my test glassing peices once the wood was seal the resin wood not bond to it, once the resin cured I was able to peel it right off, which is not bad thing if I was making a mold. I was going to try a shellac next. I was told that the resin would bond with the shellac. Let me know if this is not the case so I don't mess something up. I think a light sanding on the shellac would open the surface up enough to allow the resin to bond? If it did not bond directly to the shellac.
If i had to guess i would say the trunk weights between 40 to 50lbs. Right now I can lift it on and off the car by myself without ant problem.
They are braced pretty good, but i plan to do the first layer of glass with peices in place on the car so they cure in the proper shape and to minimize warping
quote
Originally posted by Fierology:
L@@king good.
Couple things you should be sure to mind:
-Wood and (even) cardboard have good strength:weight ratios. Their weakness is rotting. Be sure you seal them well. I think the cardboard should be easy, as the fiberglass will envelope it. How do you plan on sealing the wood?
-I'm also curious: how heavy is that deck lid? Are any of those pieces braces to hold it in place until the rigidity of the fiberglass is in place?
Cool. I look forward to seeing your progress.
Ciao, Michael
IP: Logged
05:28 PM
May 21st, 2009
LAMBO Member
Posts: 1677 From: Lucas, Iowa, USA Registered: May 2000
You may want to pick up a book on canoe buiding or wooden boat building. The epoxy resins they use to seal the wood in those applications would be very similar what you're wanting to accomplish. I'd stay away from shellac. It isn't very durable.
IP: Logged
09:34 AM
Fierology Member
Posts: 1195 From: Eastern Tennessee Registered: Dec 2006
Oh yeah, it'll also be exposed to a lot of heat. Keep that in mind for sealing purposes
quote
Originally posted by LAMBO:
You may want to pick up a book on canoe buiding or wooden boat building. The epoxy resins they use to seal the wood in those applications would be very similar what you're wanting to accomplish. I'd stay away from shellac. It isn't very durable.
IP: Logged
12:32 PM
Galliero Member
Posts: 83 From: Calera, Alabama, USA Registered: Jan 2009
Thanks alot guys, I'll keep that in mind. I guess its a good thing I was planning to use epoxy resin anyway. I just got a shipment of epoxy resin and 60min hardener from Fibreglast.
I ordered the 60 minute harder because my lack of experience I thought it would be good to give myself a little more working time.
I guess I'll plan on sealing all the wood in the trunk area with epoxy resin since it will be exposed to the most heat!
quote
Originally posted by Fierology:
Oh yeah, it'll also be exposed to a lot of heat. Keep that in mind for sealing purposes
IP: Logged
12:55 PM
whodeanie Member
Posts: 3819 From: woodstock,Ga.,USA Registered: Jan 2008
Thanks for the complement. you can come over anytime you have the hard part of your build mostly done now the glass work is not that bad once you get used to it. a few simple tricks go a long way.
I will be going to Archie's then the Dells next week then maybe Pigon Forge? so for the next few weeks I will be bussy but after that I may see about going to your place to see your car. Epoxy is the best way to go the only thing with the 60 min. hardener you will not be able to bond parts together unless you have a way to hold them while they setup. the better you get at it the faster you will want the part to setup. that is the only thing about fiberglass that is a pain is the wait Pm me sometime we will try to hook up. D.
IP: Logged
01:43 PM
Austrian Import Member
Posts: 3919 From: Monterey, CA Registered: Feb 2007
CAD - "Cardboard Aided Design" I ran across that term once on a Toyota MR-2 board. (I think it was a powersteering thread linked from PFF)
Looks really good. Can you take more pictures though. Don't be shy. So far the car looks better than the Lizardo. Much nicer proportions.
How are you going to solve cooling for the radiator? Are you going to make ducts, or are you switching to Porsche Boxter/Cayman/911 - style twin small radiators?
IP: Logged
02:00 PM
Galliero Member
Posts: 83 From: Calera, Alabama, USA Registered: Jan 2009
Thanks for the compliment! I think I could probably give the lizardo a run for its money. The proportions of the car were very important to me because there always seems to be something just a little off about kit cars and I wanted to try to avoid that as much as possible. When I first heard about the Lizardo I was surprised but once I saw it I saw that we had to totally different design, but based on the same Lambo.
I promise I'll get more pics I had to make sure the picture posting link worked and that was able to give at least a little description of what was going on in each pic. Now I take my camera to the garage every time I work on the car.
Its not in the pictures I currently have posted but I have a billet grill from a Cadillac Escalade that I cut to fit in the trapazoid (I waited my entire life for a chance to use trapazoid in a sentence. Math sure does come in handy later in life) shaped opening on the front bumper. Also the bottom half of that opening will be cut out to allow /chanel air directly into the radiator. I'll snap a few pictures and post them tonight.
But...now that you mention it may need to look into the twin small radiators.
quote
Originally posted by Austrian Import:
CAD - "Cardboard Aided Design" I ran across that term once on a Toyota MR-2 board. (I think it was a powersteering thread linked from PFF)
Looks really good. Can you take more pictures though. Don't be shy. So far the car looks better than the Lizardo. Much nicer proportions.
How are you going to solve cooling for the radiator? Are you going to make ducts, or are you switching to Porsche Boxter/Cayman/911 - style twin small radiators?