Exhaust manifold gaskets, lengthy, detailed with pictures at the end.
It was exhaust manifold gasket replacement time on my 86 V-6, manual 4-speed, non air Fiero. Oh yeah, everybody’s favorite task but this time I tried to think ahead (read prepared) and be smart about this. I’ll go through and describe how I went about this and include as many specifics as I possibly can for you. I performed the project in stages over several days, breaking down the job into several smaller, more manageable tasks.
Started to spray down the “PB blaster” well ahead of the job including the Y-pipe bolts. I changed gaskets many years ago, remembering that I reused several studs and bolts, not a good thing as I have learned after the fact. I have a temporary straight pipe in place of the catalytic converter, so I knew that there was room to work. If you have a cat, consider removing it for the job. My back up plan included a drill, EZ-outs and etc for snapped studs.
Just to see what I was going up against before I actually do the job, I took my 13MM 6-point, swivel head socket wrench and tightened up all of the bolts, yes, I tightened all of them. I had heard that this works to break them loose, figuring that the old gasket could still be compressed. I did have a couple of stubborn ones so I kept working them with a tap hammer back and forth, trying to use the vibration / shock value of the hammer to break them loose. I figured that this was the hardest part of the job so I took my time with this, at my leisure, a couple at a time, when I was afforded the time.
I was able to loosen all of the manifold bolts so I went ahead and ordered Rodney Dickman’s stud kit, Rodney’s phone is (262) 835-9575 and the Felpro gaskets. Felpro part number MS 93045, 173 (2.8) engine exhaust manifold set. I already had some car ramps, safety glasses, trouble light and an assortment of 13MM wrenches, sockets in 6-point, light bulbs for trouble light, shop towels, rubber disposable gloves. I worked over a big piece of carpet for comfort but I bet that cardboard would work just fine. Permatex brand hand cleaner, item number 01013, is my best friend for cleaning up my mitts afterwards!
My favorite tools used are the Ľ-inch drive socket wrench, great for tight spots and studs, long 13MM box wrenches, long 3/8-inch swivel head socket wrench, deep well 13MM sockets in 6-point. I wished that I had purchased a “stubby” short 3/8-inch swivel head socket wrench for those tight spots. You may wish to make that investment, sure would have been nice to have on hand. Another tool for your consideration is an “S-bend” 13MM wrench, it was great for the manifold bolt behind the air conditioning bracket on my other car.
Disconnect the battery, be safe, use wheel chocks, jack stands or ramps and please wear those safety glasses especially under the car.
Started with the trunk side manifold, removing the Y-pipe heat shields and manifold was straightforward. Used a Dremel high speed tool and ported the manifold, there really is allot of restriction due to GM’s manufacturing process.
From past experience, while porting, always wear safety glasses, junk clothes, work outside if possible and most importantly wear gloves. Those metal slivers will get everywhere if you’re not careful. You will cut your porting job time down by purchasing a new bit, $10 bucks well spent. Dremel part number 9903 tungsten carbide cutter. Heed my warning about those metal slivers, take all precautions, they’re nasty, toss your clothes and gloves in the trash afterwards.
I prepped the manifold and mating surface with a sanding block, lightly, just enough to have a clean surface and gave it a coat of Permatex copper spray a gasket, item number 80697. I used just a slight touch of Permatex lock-tight, thread locker, item number 24206, on the studs only and replaced the truck side manifold. I’ll be honest, I’m not sure if the lock-tight is the best choice, you decide for yourself. I didn’t want the studs backing out while I still wanted the option of removal in the future if needed.
The alternator heat shield cover was in the way of the new stud so I used a bolt instead, with Permatex anti-seize, item number 81343. I’m lazy, could have removed the cover, maybe I’ll do that this weekend. I needed new bolts at the Y-pipe and I used anti-seize on those two. Y-pipe hex head cap screw size is Grade-8, M8 x 1.25 pitch and 50 MM long. “Needa” part number 005260 hex head cap screw, Qty: 2, available at the auto parts store. That took care of the truck side manifold.
The next day, I backed up on the ramps, removed the bolts, working from both the bottom and top on the firewall side manifold. The Dremmel earned its keep in a big way, I did have to cut one of the Y-pipe bolts off, man alive, what a handy little tool. I had forgot that I did have to use a bolt and a nut on the Y-pipe to manifold connection years ago. The size is grade-8, M8 x 1.25 pitch nuts, “Needa” part number 001220 hex nut, Qty: 10, matching washers and the 50MM long grade-8, M8 hex head cap screw, again using anti-seize.
After my porting and inspection of the manifold, I installed the upper studs, got the manifold up there first and then installed the lower studs. There may be a tight clearance issue with a cooling tube that is in the lower passenger side area of the manifold, you may opt for a grade-8 bolt there, however, I thought that I had enough room for future manifold removal with the stud. After the manifold was installed, I reinstalled the curved heat shield with three more nuts, anti-seize also. I have not used the big recall shield between my manifold and block in many years, only using the Felpro gaskets.
For grins and giggles, I picked up a can of Dupli-Color high heat 1200F spray-paint. The Dupli-Color item number is DH1602, black. I used that on my heat shields. I know that this is just a daily driver, just wanted to make it look cared for. Hey nothing fancy here, just degreasing prep and I sprayed away. Sprayed the deflector shields, air cleaner and cooling tubes also to make it all match in black.
The gaskets have been manufactured as one piece (per side) with three ports of which has extra material running between the ports. I chose to install the gaskets with this extra material towards the bottom half of the manifold as to not interfere with the spark plugs. I mention this because I overlooked this little aspect on my other Fiero, changing plugs is a bit more challenging.
The most important aspect of this job, in my mind, was not to try to tackle it all in one afternoon and plan ahead. Several parts of this task were done on different days and evenings. I was still able to use the car between the different stages of work. If I had snapped a bolt, I would have stopped, drilled it out, then moved forward again. Same thing if I had a cracked manifold, I had shops lined up to do the welding work in a pinch if needed.
I cannot say that this is a complete description of everything that you may encounter when you tackle this job. You may need more or less, your job may go smooth or it may not. I have done this job three times now, suffered through two nightmares, this time things went fairly well. I have carefully documented the specifics as well as I could, hopefully with this information, your gasket job will go well.
I have a couple of after thoughts for you. Perhaps I could have taken the manifolds to a machine shop to have them sanded down true and flat. I really should have painted the manifolds also while I was at it, just didn’t think of it at the time.
I wrote this procedure up not for the green in my ratings bar, although it would be very much appreciated, but mostly for all of my PFF friends throughout the world. This is a most dreaded job, perhaps I have helped make it go better for you, if so, please email me sometime and let me know, ok?
Ok now for some pictures! I saved these for the end of the post just in case someone wanted to print the top half out with all the part numbers and information.
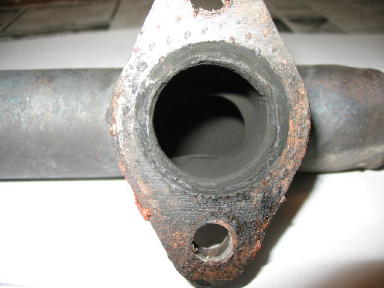
Exhaust manifold porting, before
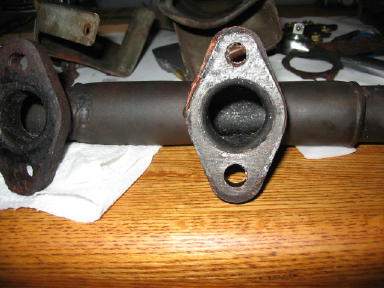
and after the porting.
Exhaust manifold gaskets blown out on all four corners. Those bolts were easiest to remove, matter of fact, I believe that some had started to back out resulting in the blown gaskets.
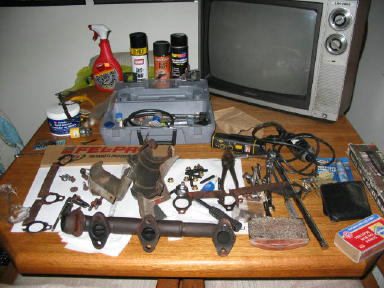
The kitchen table at the last stage, gee no wonder why I’m still single.
Firewall side manifold. You are on your back on the ground under the car with your feet out the rear of the Fiero. You are looking up the cylinder head that I have sprayed with the copper spray a gasket to prepare the surface.
The same orientation as above, this last photo shows the manifold in place. The curved heat shield was put over this.
Whew, took almost as long to write this up as it did to do the job! It's all worth it if it helps someone out someday.
jet
------------------ jetman Silver 86 SE 2M6 4-speed, with "check wallet light"
Cool write-up. I always hoped I'd never have to do it, but my 87 sounds like a sewing machine.. I"ll be doing the same soon also. Good to have this writeup!
I recieved a bunch of questions through PM and email so I'd post some answers for everyone.
The first answer is for the wise guy! Ok, I'm a bit portly but I was able to slide under the car on standard car ramps, the oil pan didn't get wiped clean on my shirt, thanks.
I neglected to mention that I used an "el-cheepo" 5MM 6-point socket to install Rodney Dickman's studs. The studs have a 6-point "star" pattern. If, heaven forbid, I ever have to remove the studs then I will find a "star" pattern socket.
I tightened the studs down to where a shoulder is on the stud, about 5/8ths of an inch. I tightened down to where there was resistance, then backed the stud out by a half a turn and let the thread locker set up.
The starter was not in the way of the installation, the wire harness was persuaded out of the way temporarily. The temporary straight pipe was a minor pain to reach around but not impossible. Remove your cat, you'll have allot more room.
This was a good question. "How does the car run now?" Quiet, no ticky, ticky, tick! The idle is bit lower now and the ECM drops the idle down to 950 rpm at stop lights much faster than it did before.
Another question. Horsepower improvement from the porting job? I'm not sure but it sure sounds healthy. I will judge it and get post my thoughts.
Thanks for the emails everyone, and especially for the kind words about my write up. Tm,,,edit for spelling
------------------ jetman Silver 86 SE 2M6 4-speed, with "check wallet light"
[This message has been edited by jetman (edited 07-27-2005).]
good write up, ill probly refer to it when i do my gaskets in a week or so, even thought ive done them before, extra ideas dont hurt.
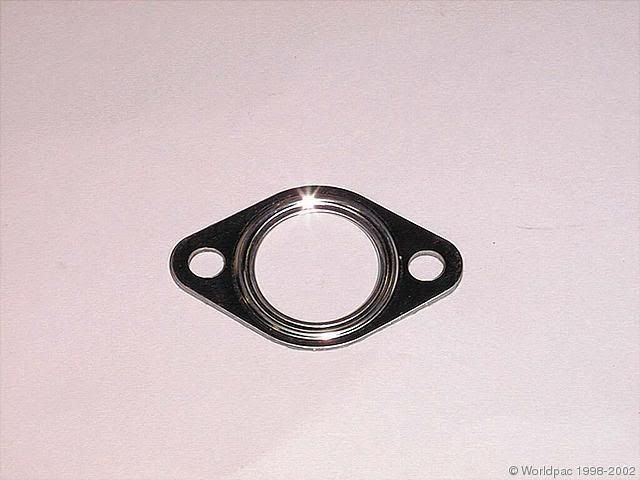
i did notice that the new gaskets, the metal ring on the inside of the port, one side is flat, the other has a rounded edge. im not sure which edge should be facing the head and which should be facing the manifold... i think the rounded side should face the head, giving it a smoother transition into the manifold, but i might be wrong...
I need to replace mine, but I'm still trying to work up the courage to do it. If this were a straight forward replacement like something I'd face in my '77 Camaro which would allow me to practically get into the engine bay while working on it I'd have no reservations. It's 10:47 am and I need to make a choice- do I try to do this today or do I wait until I have two days off in a row...
I need to replace mine, but I'm still trying to work up the courage to do it. If this were a straight forward replacement like something I'd face in my '77 Camaro which would allow me to practically get into the engine bay while working on it I'd have no reservations. It's 10:47 am and I need to make a choice- do I try to do this today or do I wait until I have two days off in a row...
Wait til you have 2 days off in a row. Nothing ever goes straight forward for me.
Originally posted by wanobi: Wait til you have 2 days off in a row. Nothing ever goes straight forward for me.
Yes, this is sensible. Start preparing the area by cleaning the engine, spraying PB blaster, gathering up the tools such as 13MM wrenches, car ramps, safety glasses and etc. Try to have your back up plan in place, drill and bits just in case od the worst or someone who can weld a nut to the shaft of a snapped bolt. Some of the heat shields need to be removed, Y-pipe bolts, start spraying those down. The idea is to have much of the pleminary (sp?) work done in advance so when the "big" day comes you'll have a smoother time of it. Good luck.
edit,,,, still trying to spell
[This message has been edited by jetman (edited 07-16-2006).]
Just FYI was have got the studs at the dealers also. They are used on the 96 Grand Prix's 3100 and porbably a lot others. They are not stainless but are good steel and last a long time.
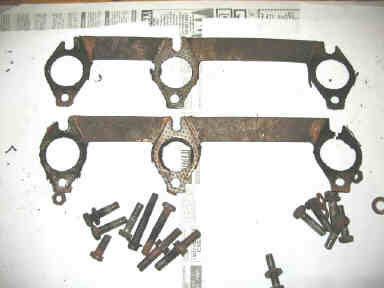
I wanted to take some time out to help my fellow PFfers on this subject. While I'm not certain of which side of the gasket gets put where, the orientation of the runner, the material that runs lengthwise does makes a difference. I took and posted pictures to show how.
Here is a picture of the old gaskets, you can see the extra material that runs lengthwise between the ports. Notice that the runner is not as wide as the ports rather it is much narrower and it is placed along one side of the ports.
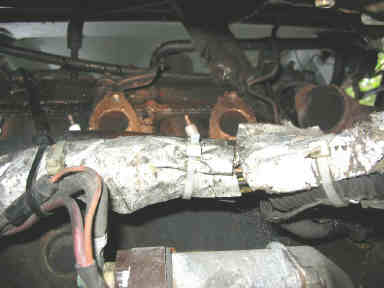
Now here are two pictures of the exact location on two different Fieros showing the orientation of the runner. In the first picture the gasket has been placed on so that the runner sits on the lowest part of the manifold. This is the significant aspect of the point that I am trying to make here, in this case there is plenty of room to install and remove the spark plugs.
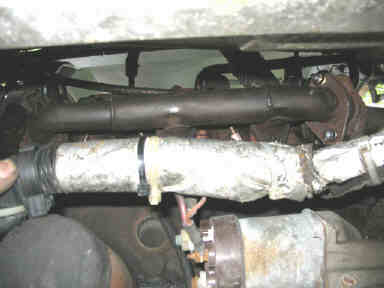
In this next picture, the gasket was placed so the runner sits along the highest part of the manifold. You can see that this makes it difficult to install and remove the spark plugs.
You wonder why I did this to my Fiero? Well I wasn't aware of this until I had brought back lunch for the professional mechanics who had stopped by to help me finish up on my upper end rebuild. It wassn't until I was installing the plugs that I realized what had happened.
Anyways, I just wanted to pass this little tibit along, maybe I can save someone some aggravation sometime in the future.
------------------ jetman Silver 86 SE 2M6 4-speed, with "check wallet light"
Is there a reason as to why you cant simply cut the runner off on the gaskets? a good pair of tin snips and the runner would be gone and out of the way. Or is there a mechanical part of the runner that increases life of the gasket?
Having done a few hundred exhausts in my lifetime, I would add some things to also consider at re-assembly time. I beleive Jetman did an admirable job explaining the prep for removal, tho he may have left out earplugs for people who are sensitive to some of the better sequences of 4 letter words that are itricately tied to exhaust work and the sharp edges of heat shields!
if possible, get stainless steel bolts/studs. for the end connections to the y pipe, drill out both sides to 3/8", go to your local home center, and buy a length of 3/8"ss threaded rod, 18" is fine, and buy 8 ss nuts and split type lock washers. cut them to the proper length, about 4" IIRC from mine. regular threaded ss rod is more than strong enough for this. For the head bolts, check out a marine supply shop if you have any in your area, they do have ss metric bolts. I made the studs for mine from 4 longer ones. (metric SS threaded rod is obscenely expensive, for no good reason)
get a tube of permatex ultra copper high temp exhaust gasket silicon. put a paper thin layer on each side of the gasket before re-assembly. Do NOT blob it on, a little goes a long way, and will insure a 100% seal. I've used it without gaskets with no leaks on some motors.
now some may not like this, but never use locktite thread locker on exhaust bolts. use never-seize. always. even on the Stainless bolts. don;t skimp on it, you;ll thank me when you have to remove it all in a couple of years. properly torqued, I have never had a neversiezed bolt/stub back out on it's own on any exhaust system. besides, you'll like your silver fingers more than the normal black greasy ones.
p.s. you get plus from me for your efforts here, it will help alot of people!
[This message has been edited by tjm4fun (edited 08-06-2006).]
Originally posted by timgray: Is there a reason as to why you cant simply cut the runner off on the gaskets? a good pair of tin snips and the runner would be gone and out of the way. Or is there a mechanical part of the runner that increases life of the gasket?
Great write up jetman!!!, Tim I cut mine out of the way, never had any problems, if I remember correctly I cut them --right where its says *don`t cut* ...
Just wanted to update my write up with a link to an archived thread on the subject of helicoil inserts. I had this one bookmarked as a "just in case" option and thought it would be a good idea to post the link.
Just a quick post to mention that I went out and inspected the nuts on the manifold studs and found that I was able to give each nut a 1/4 turn tighter. Might be good information to pass along to inspect the nuts after a couple thousand miles or a couple of months.
I can report a similar experience, although not with a Fiero. I replaced the manifold gaskets on a 66 Mustang 289, checked the manifold nuts after driving it for a week, and they needed tightening.
WOW!!! For a Fiero newbie like me, this is one of the best and most useful posts! Thanks Jetman for your time and effort in passing along this most useful info.
Thank you very much for the kind words. It's nice being appreciated for making a meaningful contribution to the forum. Believe me, it's actual knuckle busting, back twisting, arm scraping experience doing the talking here, not to mention a bit of grease and oil on the keyboard.
I can't stress enough, be prepared with tools, back up plan, taking it in smaller and more manageable tasks over the course of several evenings or weeks, what ever suits you. I kept my daily driver on the road uninterupted by doing a little work at a time, it was alot less frustrating for me too. Good luck on the repairs.
I feel better about trying to tackle this myself now. I also now how to prepare for this job and a plan of action. I just got my exhaust system fixed as I had a 4" gap between the down pipe end and the cat. Now that it is not as loud, I hear a loud popping - the " oh crap is that a cracked manifold or did I just blow out the gasket" sound. I just had it fixed yesterday and it is rapidly becoming worse. I fear I need to fix this as soon as I can because of the fear that It may be more serious. Could the manifold bolt have snapped? Can I hurt anything with a severe leak?
You can inspect with a small trouble mirror to look for snapped bolts and cracks. You can pick up an inexpensive articulating mirror at most auto parts stores. I use a "MIT" Michigan Industrial Tools, 2-Pc. inspection & pick-up tool set, $3.99 at Murrays Auto Parts Stores. Both the mirror and the magnetic pick up tool are telescoping.
The bad thing about an exhaust leak is that you have red hot exhaust gas exiting the manifolds in an uncontrolled fashion. You are at risk for fire so you do need to take care of this soon. Remember that you have plug wires, main wire harness, sound insulation, vacuum lines and even your fuel lines in that general area that can burn up fast. I'm sure that you already knew that, I was in denial about facing the manifold job myself.
I'm going to re-post this paragraph because it bears repeating.
The most important aspect of this job, in my mind, was not to try to tackle it all in one afternoon and plan ahead. Several parts of this task were done on different days and evenings. I was still able to use the car between the different stages of work. If I had snapped a bolt, I would have stopped, drilled it out, then moved forward again. Same thing if I had a cracked manifold, I had shops lined up to do the welding work in a pinch if needed.
Exhaust manifold gaskets are a PITA job especially on a 20-year old car, just take it in stages. If you run into difficulties, start a thread, lots of here can post suggestions to help you out. Thank you for the accolades.
When I bought mine it had a bad leak. The rear window would get so hot you couldn't hold your hand on it. Some of the engine wiring harness was damaged too. After awhile (180 miles on the interstate) the ignition module died. Yes, it can damage something although it depends on the severity and the location.
If you have time and really want to use good gaskets, try these:
When I bought mine it had a bad leak. The rear window would get so hot you couldn't hold your hand on it. Some of the engine wiring harness was damaged too. After awhile (180 miles on the interstate) the ignition module died. Yes, it can damage something although it depends on the severity and the location.
Lately there has been a sound that I thought was an exhaust pipe vibrating, or loose or something, and the local shop looked at it and told me its the manifold gasket. So its now at the shop having the manifold gasket replaced (now I wonder if they are doing one or both). I have recently been told that my car was pretty warm or gives off a lot of heat (from someone standing next to it). I just recently had to replace the ignition module too. Hmmm this all seems to match what you said above.
------------------ ------------------ "what you've just said is one of the most insanely idiotic things I have ever heard. At no point in your rambling, incoherent response were you even close to anything that could be considered a rational thought. Everyone in this room is now dumber for having listened to it. I award you no points, and may God have mercy on your soul"
What about the header to y-pipe connection? I can't seem to find the gaskets for that.
No gasket required as the connection is supposed to be able to articulate. Tighten down the bolts snugly but do not overtighten, the joint has to be able to flex somewhat. This helps keep the manifold from cracking, or so I've been told here on the forum.
Very good write up. I have to replace mine in a couple of weeks...again. It has been a couple of years. I now have another crack in the front manifold.
I have one bolt holding mine altogether. The previous owner was good at taking shortcuts when he replaced the gasket(s). So with at least 5 bolts to drill out, I'm thinking that not only do I have to drop the engine, but I'll just replace the head they "bolt" into using Rodney Dickman's bolts. (Maybe I don't have to drop it if I'm doing this- just work at it from the top?) Until then, JB Weld is my new best friend (apparently it was his as well). I found this stuff, wonder if it works any better than the JB Weld stick stuff I just used yesterday...
Description:
INDUSTRO WELD is J-B WELD in an economical shop-size package containing two 5-oz. tubes. Professionals in many industries use it to fix, bond, or fill -- in the shop, factory, or field. INDUSTRO WELD makes strong, permanent repairs when hot welding isn't possible or practical. How does it work?
INDUSTRO WELD includes two tubes. One contains liquid steel/epoxy resin, and the other contains hardener. When mixed together in equal portions, a chemical reaction occurs that turns the mixture into a compound as hard and tough as steel -- and with similar properties. Properties (psi) Tensile Strength: 3960 Adhesion: 1800 Flex Strength: 7320 Tensile Lap Shear: 1040 Shrinkage: 0.0% Resistant to: 500° F How to use it:
Use INDUSTRO WELD as an adhesive, laminate, plug, filler, sealant, and electrical insulator. Squeeze out equal portions from the black and red tubes. Mix thoroughly. Clean surface to be bonded. Apply INDUSTRO WELD, and let it cure. That's all there is to it!
Like metal, INDUSTRO WELD can be formed, drilled, ground, tapped, machined, filled, sanded, and painted. It stays pliable for about 30 minutes after mixing, sets in 4-6 hours, and cures fully in 15-24 hours. It's water-proof; petroleum-, chemical-, and acid-resistent; resists shock, vibration, and extreme temperature fluctuations, and withstands temperatures up to 500° F. INDUSTRO WELD is super strong, non-toxic, and safe to use. Before it sets, you can clean up with soap and water.
For reference, the exhaust assembly from cat back excluding trumpet horns is a Walker Exhaust part number 40094. The Fiero Store has them, ask for your 10% PFF discount, with shipping it is very close to the best price that I could find locally. It's always good to support the vendors that help keep our little cars running.
I mention this because I was quoted $494.00 for the exact part from a local muffler shop , tax and installation extra, that's 2-1/2 times the actual cost. Man alive, no profit magin there?!!
------------------ jetman Silver 86 SE 2M6 4-speed, with "check wallet light"
Thanks alot jetman, it was a really nice write up. i was wondering if at all possible, with patience, i could remove the bolts without breaking them? or is it just an inevitable doom? i plan on haveing the entire engine pulled when i do it, so i think it would be easier to deal with.
Thanks alot jetman, it was a really nice write up. i was wondering if at all possible, with patience, i could remove the bolts without breaking them? or is it just an inevitable doom? i plan on haveing the entire engine pulled when i do it, so i think it would be easier to deal with.
Your chances of success are much greater if the engine is out of the car, you'll have all the room that you need. Beg, borrow or rent an impact wrench, that'll really help break the bolts loose without snapping them. I just did an engine swap on my 88 Duke and none of my manifold bolts snapped, man alive, I'm a firm believer in an impact wrench. Maybe a phisics expert can chime in but I think it has something to do with the shock value of that tool.
Always easier to work outside of the car, thanks for the compliment, good luck and let us know how it goes, ok?
Thanks for this great thread, I've gotten all the bolts off except one thanks to pb blasting for a week ahead of time. The one i cant get is the pipe thats conected to the manifold, I took off all the 6 bolts that connect it to the engne block but now it has only the two bolts stopping it from coming out, everytime i try undo the bolt it seems like it twisting the manifold around, like now it isnt lined up anymore, twisted facing more of the trunk now, is it welded?
Thanks for this great thread, I've gotten all the bolts off except one thanks to pb blasting for a week ahead of time. The one i cant get is the pipe thats conected to the manifold, I took off all the 6 bolts that connect it to the engne block but now it has only the two bolts stopping it from coming out, everytime i try undo the bolt it seems like it twisting the manifold around, like now it isnt lined up anymore, twisted facing more of the trunk now, is it welded?
The nut is welded to the exhaust manifold. I had to cut the bolt off to remove the manifold and extract the bolt/stud later on the work bench. If you don't want to cut it off, try using some heat like a torch and quench it with PB Blaster, do this in repeated sequences. Be careful with the torch, don't set anything on fire, ok? Thank you again for the nice compliment.