Your chances of success are much greater if the engine is out of the car, you'll have all the room that you need. Beg, borrow or rent an impact wrench, that'll really help break the bolts loose without snapping them. I just did an engine swap on my 88 Duke and none of my manifold bolts snapped, man alive, I'm a firm believer in an impact wrench. Maybe a phisics expert can chime in but I think it has something to do with the shock value of that tool.
Always easier to work outside of the car, thanks for the compliment, good luck and let us know how it goes, ok?
An impact wrench? That one just scared me. It would have been the last thing to think about for the risk of the bolts snapping off. I assume that you will use it with a very low torque?
I've swapped gaskets on two 87 and no bolts snapped. I used an angled impact wrench, they are usually not as powerful as a straight impact wrench and apply an even load on the bolts. I set it on low and just let it work for a few minutes and the bolts slowly backed out.
Oh... I also soaked the bolts in PB blaster a few days before and just before I used the wrench I tapped (knocked) on the bolts with a hammer. Then threw salt over my shoulder, said a prayer... .... ... and everything else that could help.
Just thought I would update this thread, if you do decide to pull the head to remove exhaust mainfold bolts, you really need to get this tool, it'll save you from having to reset the valve lash, a real time saver and headache saver as countless posts about re-setting valve lash will attest to. The idea is that you can remove the pushrods without disturbing the rocker arm / valve lash settings at all.
Be sure to thank Partick for this excellent contribution. This is definitely the way to go when you need to drill out those snapped manifold bolts.
quote
Originally posted by Patrick:
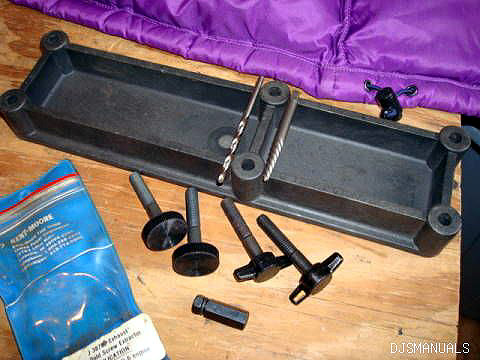
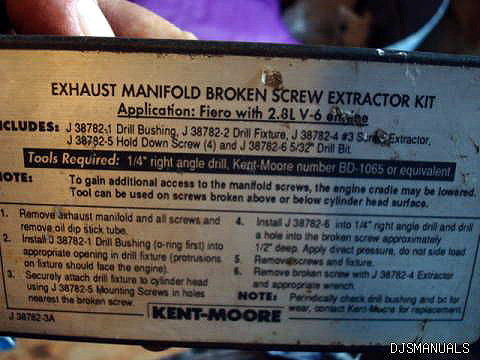
KENT MOORE J-38782 FIERO 2.8L EXHAUST EXTRACTOR KIT. It bolts to the head and guides the drill bits so that the broken studs can be drilled out straight. I snagged one on eBay a few months ago because I knew I'd need it. Here's a couple of images I picked up from the 'net.
WOW !! this is an excellent thread. Im getting ready to do mine manifolds and gaskets in the next month or so. This is definately added to my favorites.
I wanted to update this thread with more information provided by our fellow members concerning drilling out broken bolts. The technique is to drill at low speeds, use plenty of oil, let everything cool down and use a good drill bit.
quote
Originally posted by cvillechopper:
VICTORY IS MINE!!! I called up the local specialty fastener and tool shop and told them about my situation. They said the bit I need is called a GRT bit and if it doesn't get through it, nothing will so I stopped by after work and picked one up for under $5. That thing was BAD ASS! I went slow and used plenty of cutting fluid and that bit acted like I was working on mild steel. I even went back to the cobalt bits about 1/2 through just to see if it was something else. Nope. The other bits couldn't make a dent and this new on ate right through it (in about 1/2 hour with plenty of breaks for cooling and oiling).
I'll never waste time with anything else. These GRT bits (it's the style, not the company) are amazing.
Thanks for the help guys.
and this quote....
quote
Originally posted by topcat:
Another bit that cuts metal like a hot knife in butter is a CMD bit. We use them to cut thru titanium at work. Some of the titanium that we drill is up to 1/2 inch thick, and the CMD will cut like no other.
Thanks to cvillechopper and topcat, excellent stuff.
When I bought mine it had a bad leak. The rear window would get so hot you couldn't hold your hand on it. Some of the engine wiring harness was damaged too. After awhile (180 miles on the interstate) the ignition module died. Yes, it can damage something although it depends on the severity and the location.
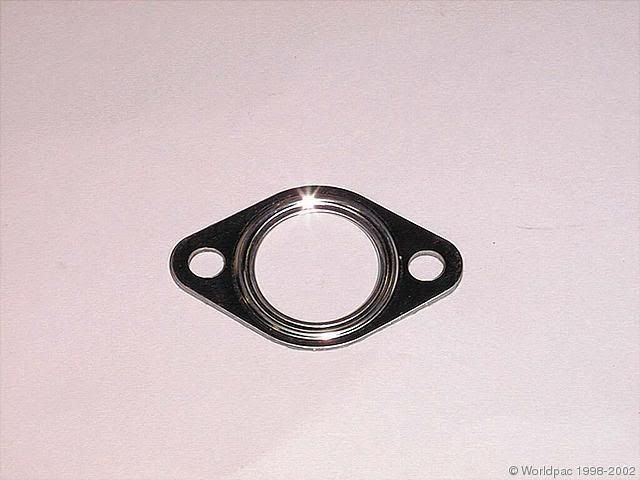
If you have time and really want to use good gaskets, try these:
Fits a 1966 Type 1 Volkswagen. About $1.50 each.
I have has those in my 85&87 for ten years now, no leaks.
Tip: To prevent future manifold cracks. Coat the gaskets with powdered graphite before installation. This will allow some necessary expansion movement (due to heat cycling) without the manifold developing cracks. Always torque exhaust manifold bolts to their proper torque specs. Too loose and you'll have leaks, too tight and you'll have cracks.
------------------ " THE BLACK PARALYZER" -87GT 3800SC Series III engine, custom ZZP /Frozen Boost Intercooler setup, 3.4" Pulley, Powerlog manifold, Northstar TB, LS1 MAF, 3" Flotech Afterburner Exhaust, Autolite 104's, MSD wires, Custom CAI, 4T65eHD w. custom axles, HP Tuners VCM Suite. "THE COLUSSUS" 87GT - ALL OUT 3.4L Turbocharged engine, Garrett Hybrid Turbo, MSD ign., modified TH125H " ON THE LOOSE WITHOUT THE JUICE "
I don't think anyone mentioned the use of a left hand drill bit. (not a joke) A bubble pak is available at H-Frt. Whether you can first center punch a snapped bolt in place is a little hazy to me, but I think I did this many years ago to my 85GT , manifold in place. The out come was that the punch vibration was enough to loosen the broken bolt which I managed to them uncrew....
But what I was leading up to with the center punch is that the reverse (loosening) cut of the drill has a tendency to loosen such a bolt as the drill bit (cutting ) lip digs in. Use a reversible 3/8 hand drill on the REVERSE setting. If the bolt does not loosen, stop and think before drilling for an easy out as you are likely to take out the female threads in the head.
Jetman's good vibrations from an air hammer (gently) probably accomplish what that center punching did for me. If there is "good rust" then dry rust is more crystal -like than the nasty water fed rust which welds metals to one another. The heated exhaust port area can keep some moisture at bay. So jarring the intact or snapped bolts may help. Street physics 101.
Edit: Further thought on heat vs rust... For oxidation (rust) electrolyte is required. In this case water. Another reason (besides oil sludge) to thoroughly warm up car when possible. Street physics 102.
[This message has been edited by hobbywrench (edited 03-28-2013).]
Whether you can first center punch a snapped bolt in place is a little hazy to me, but I think I did this many years ago to my 85GT , manifold in place.
You could probably use a "transfer punch" to mark an accurate center. It would be even better, if possible, to level (i.e. grind or spotface) the fractured surface of the broken screw and then use a transfer punch. If you have the Kent-Moore jig like Patrick's, 5/32 would be the appropriate size for the spotface, transfer punch, and left-handed drill bit.
[This message has been edited by Marvin McInnis (edited 03-18-2013).]
Marvin's idea is good about squaring off before center punching, however my broken stud (murphys law) was broken below the surface of the exhaust flange . Also , it's been a long time , but an offset (90 deg) drill head or attachment would probably help. I did not have one, but seems like the most compact 90 deg. unit might be an air die grinder or purpose - built electric drill. Poblem with air is low torque and hair trigger input. Good electrics were available but somewhat expensive.
This the best write up I have ever found for this. Thank you thank you ! Now I'm ready to tackle it and get myself into trouble, but an outstanding job. I could never repay you for all the work that went into this write up. True asset to the forum. Thanks again !
This the best write up I have ever found for this. Thank you thank you ! Now I'm ready to tackle it and get myself into trouble, but an outstanding job. I could never repay you for all the work that went into this write up. True asset to the forum. Thanks again !
Thanks!! You can pay it forward some day by helping our fellow members with knowledge that you have gained.
Just did this repair for the first time. I can't stress enough that it is so much easier tackling the front manifold from the bottom. The upper A/C bracket is done topside. Remove the metal firewall shield...it surprisingly makes a big difference...it's 4 x 8m bolts...literally took 2 min to remove. Then the front manifold to head bolts should all be accessed from below. The front manifold to crossover bolts (1 above and 1 below). That's it. No need to tilt the engine cradle or remove the decklid. It's really not too bad from below the car. It seems like a lot of people do not want to work on the car from the ground though so...they'll make it 10x harder just to work from above.