Thanks ! yours looks nice as well. What's the history on yours? did you build it and if so how long ago? what kind of powertrain? The "true" widebodys do seem to be a pretty scarce package. I'm sure there are more out there, but yours would only make 3 street IMSAs, besides mine, that I've seen.
Russ
Thanks for the compliment Russ.
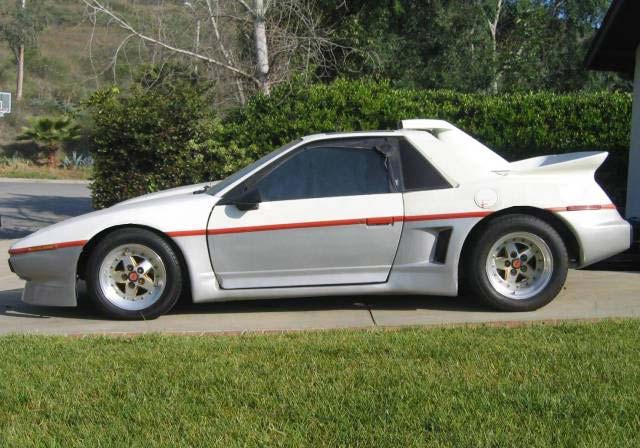
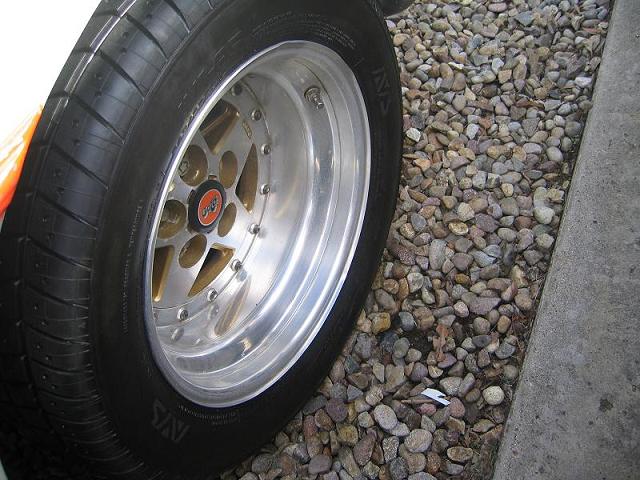
Mine was built this way and sold new at a Pontiac dealership in CO in 84 as a "Banshee Turbo Fiero" (still have to paint it before i can re-apply the decals. only 3 were built, and as far as i know, mine (#1 of the 3) is the only one left. It came with a Turbo charged 3.0 4cyl with Superduty head, intake, crank, rods, and custom cam/pistons, etc. I have not dyno'ed it yet, but i am guessing the hp is around the 290+ mark based on g-tech data (ill have to dyno it to be sure). Came standard with rear swaybar, bigger front sway bar and 3 piece Gotti wheels. Indy scoop was also standard. The odo is just over 6k miles, so the interier is pristine. paint needs to be redone on the body though. Gotta love the wide bodys! they really make the Fiero look like a heavy caliber.
Mine was built this way and sold new at a Pontiac dealership in CO in 84 as a "Banshee Turbo Fiero" (still have to paint it before i can re-apply the decals. only 3 were built, and as far as i know, mine (#1 of the 3) is the only one left.
Wow. that's a trip. hopefully you have some documentation with the car, as it could make that a pretty valuable car in the not so distant future. I'd love to see yours in person sometime. I'm facinated to see that the wheel openings are larger than the "normal" IRM street bodies. I wonder if they cut them out and built up a new lip similar to the way I did mine, or just how the whole thing developed. We'll have to have a WB cruise some time
Russ PS Where is Poway? near Sac? I don't get down that way very often, but you never know.
I have some documentation on the car from when it was new, but not nearly the pages i would like. Like the window sticker. Mr.Fiero on the forum almost bought the car back in the early 90's from the original owner. says he still has the news paper article advertising it, but he hasn't gotten me a copy yet, would be neat to have.
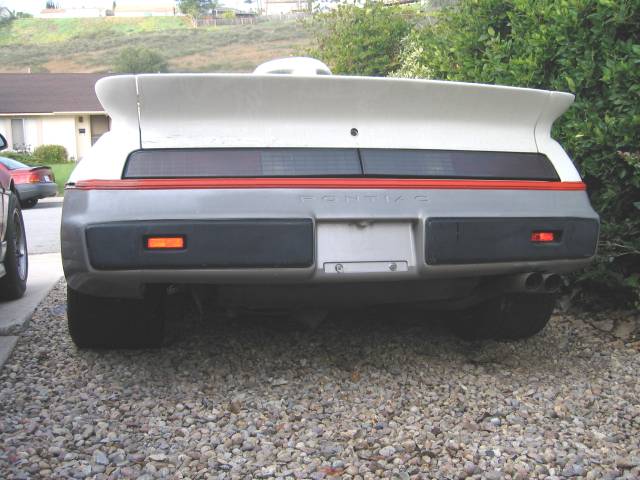
The previous owner told me that Pontiac used a full race IMSA body and integrated it like you did into the top and inner portion of the notchback clip. As far as i can see, there has never been any alteration to the fiberglass of the wheel openings. it may be that the race bodies where different at the wheel openings, im not sure (i should probably look into it more) The only bummer thing is there are no wheel liners. i had the same idea you did for the wheel well liners, but never did anything with it. seeing your extremely great job inspires me to start on a set. luckly the car has low miles and did not suffer any ill effects from no wheel liners.
Sadly Poway is in southern CA in San Diego county, might have to meet at some big Fiero shin-dig somewhere in the middle sometime
P.S. you should really take some more pics of your car. ide love some big screen backround sized ones
Yes the race bodies did have the larger wheel openings, but that must have been quite a challenge to adapt the tube frame body to the stock Fiero chassis.......... you know... it seems like Tedd (Sage) told me that the street bodies came a year or two later than the race bodies, so, now that I think of it, they most likely hadn't even developed the "street" IMSA body when yours was built. The inner liners are a big improvement on a glass body car, but I'd still hate to see them installed on such a rare example as yours. better to keep it as built IMHO.
Most years (not this one due to heavy rains) a couple of us go to So Cal between X-mas and new years on a flying trip (hang gliders). We go to Torrey Pines, Lake Elsinore, Crestline, Silmar, etc. wile it's freezing cold here in Oregon. Maybe next year I'll drop by if your around then .
Cheerio, Russ
PS: I will get some larger pics up before too long. winter has returned here for the second time this year, but when it leaves again I'll get some more photos.
[This message has been edited by Russ544 (edited 04-04-2005).]
FOCOA bodies? Did they make their own widebody setup or is that a modded IRM type.. The lips around the wheel house openings look different... and it's been smoothed
I did the smoothing and fender openings. Could be IRM. The top of the original rear fender opening was below the molding. If it is, it's probably the last one. Quality was really poor. Phil oiginally sent me a mix of GT and notch-back parts. Sent the GT parts back and he was supposed to send me the correct parts, which is when he disappeared. I ended up with a front spoiler for a regular width nose that didn't fit, two right side rocker panels, and no door pieces.
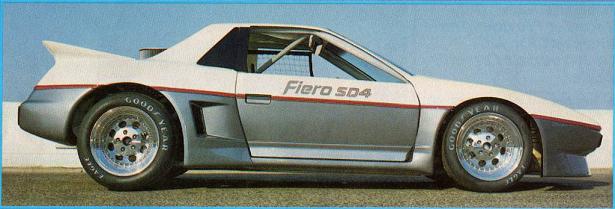
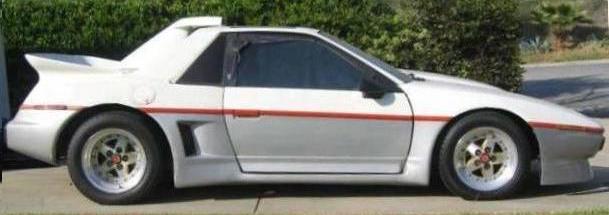
I dug up this pic of the SD4 Fiero. It's suppsosed to be the same body used on my car. i think the wheel openings are exactly the same, but i could be wrong
i flipped mine around and shrunk it for comparison, i know the angle is a little lower in the SD4 pic, but its close.
I dug up this pic of the SD4 Fiero. It's suppsosed to be the same body used on my car. i think the wheel openings are exactly the same, but i could be wrong
Yes, I'm pretty sure that's correct. the entire body should be the same with the exception of the modifications made to adapt it to the Fiero space frame.
Just read this thread again. has to be one of the coolest build threads on the forum!
one question for you on the wheel liners. the can you used for the extra material seemed to work well and look good. what brand was it? and where did you find it?
Just read this thread again. has to be one of the coolest build threads on the forum!
one question for you on the wheel liners. the can you used for the extra material seemed to work well and look good. what brand was it? and where did you find it?
There's lots of very cool build threads here, but glad you enjoyed mine. thanks. It might be a wile before I really get rolling on it, but don't forget to check in again when the Northstar chapter begins. now that's gona be cool
The can I used for the wheel liners were Rubbermaid Roughneck 33 gal from Fred Meyers. They have a lifetime warranty against cracking or denting, but I'm not sure if that covers roadkill or not . The only drawback is that they're a dark brown color, so you'll need to shoot some Sem black on the finished product if you decide to go this way.
The "low mileage peach" VIN 9 Northstar turned out to be an 88,000+ mile, 6 owner, 1 repo,... VIN 9 Northstar. It went back to Texas from wince it came. another engine is in route from the East coast that is claimed to be in the 22,000 mile range and does in fact show as a one owner car on Carfax. We'll see. Wile I had the motor from Texas, I was able to get the shift linkage and clutch slave bracket pretty much fabbed together. I think it should work out just fine. The Texas motor went back to my local yard yesterday, so I'll have to wait for the new motor to arrive before I can do the front engine mounts however. When things get rolling again I'll be back on board with some progress reports.
Russ
[This message has been edited by Russ544 (edited 07-09-2009).]
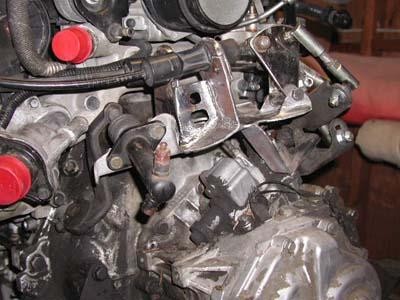
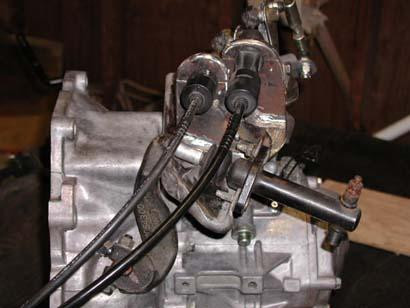
It's amazing how much cleaner a project becomes when you're waiting for parts to arrive . I got the spare trans cleaned up today, and set the shift linkage and slave cyl up on it along with cables and a shifter assy from a parts car. I'm very happy with the shift feel when using this setup. I was afraid the extra linkage would make the shifter feel like a wet noodle, but I honetly can't tell the difference with or without the belcrank mechanism installed. cool . Here is a better shot of the way the throwout fork arm was "clocked" around in order to gain clearance from the Northstars water manifold.
It's a simple matter to remove 3 or 4 splines from the throwout fork arm and grind a bit out of the relief where the pinch bolt goes through in order to turn it on the shaft to the needed orientation.
Russ
[This message has been edited by Russ544 (edited 07-09-2009).]
that looks like it will work fine Russ. since you have to take the slave off anyway to bleed it that should take any guess work out of getting the air out. now where is that N*???
I really like that setup you have for the shift cables -- looks awesome! Did you use a bearing or what for what the crank rotates around?
No actual bearing. just a hub welded to the bellcrank and pivoting on a grade 8 3/8" bolt. I set it up so only the shank of the bolt bears on the bellcrank hub, and not the threaded portion. I'll be adding zerk fittings to each hub also.
Russ
[This message has been edited by Russ544 (edited 07-09-2009).]
I picked it up on Friday. This one looks much better than the first one they got me. This one (a 98' VIN 9 Deville) arrived in a well made crate and has been drained of all fluids and had the cylinders oiled for storage. everything checks out well mechanically but it does have some corrosion from the salted roads in it's former home in Ohio. Not too bad, but it will take some spit and polish. I got the alt bracket, belt tensioner and idler pretty well set up today so now I can see what room is left to fab the front motor mounts. I expect to start on the mounts tomorrow.
Russ
[This message has been edited by Russ544 (edited 07-09-2009).]
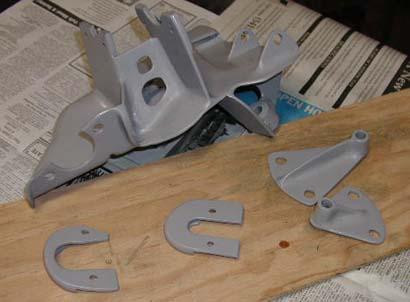
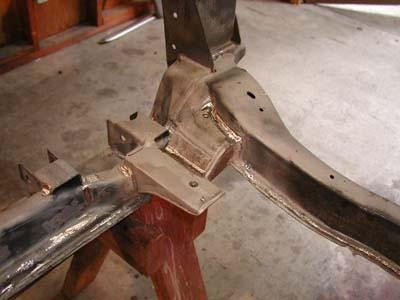
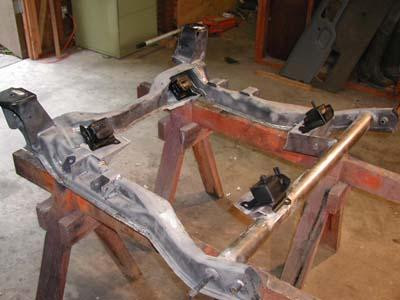
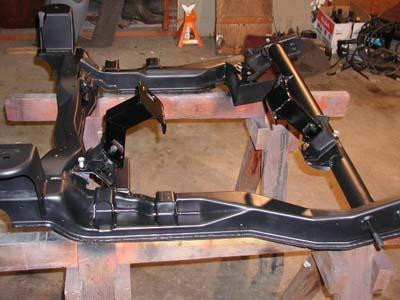
For the mounts on this Northstar swap I wanted something soft to complement the smooth Caddy style. Even though this project will definetly be higher up the "show" side of the scale than my others, I still concider this a "driver" first and a show car second, so comfort is important to me. With that in mind, and because I had a few spares laying around I decided to utilise Fiero trans mounts all the way around. There will be at least one dogbone installed also, to stabilize things. The Fiero trans mounts actually fit into my plan quite well, just requireing a shelf to be fabricated for one in the rear right corner: and a fairly simple plate and a couple of gussets, attached to the new crossmember, for the other side of the engine.
Engine mounting plates carved from some 3/16" steel and 2" square tubing was used to span the gap between the engine and the new mounts, being carefull to allow clearance for incedentals like Axles, exhaust manifolds, alternators, etc..
[This message has been edited by Russ544 (edited 07-09-2009).]
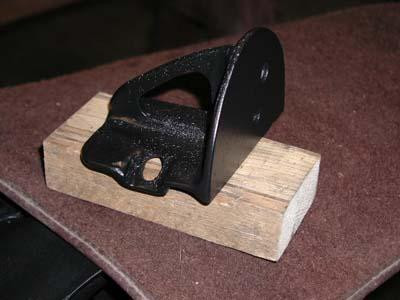
here's a pic of the bracket I made for the idler. this mounts in the location of the old power stearing bracket, as shown earlier, and allows the use of the stock N* spring loaded idler arm with a groved pulley installed on it.
[This message has been edited by Russ544 (edited 07-09-2009).]
Originally posted by Russ544: For the mounts on this Northstar swap I wanted something soft to complement the smooth Caddy style. Even though this project will definetly be higher up the "show" side of the scale than my others, I still concider this a "driver" first and a show car second, so comfort is important to me. With that in mind, and because I had a few spares laying around I decided to utilise Fiero trans mounts all the way around. There will be at least one dogbone installed also, to stabilize things.
Umm... You're not going to use stock rubber or stock replacement rubber mounts are you? I can tell you that those will get destroyed quickly. I'd recommend Rodney or WCF's poly trans mount replacements. Gonna need Rodney's rear trans mount bracket as well.... My Northstar broke my stock one into three pieces.
Umm... You're not going to use stock rubber or stock replacement rubber mounts are you? I can tell you that those will get destroyed quickly. I'd recommend Rodney or WCF's poly trans mount replacements. Gonna need Rodney's rear trans mount bracket as well.... My Northstar broke my stock one into three pieces.
Yup. I'm using 4 stock replacement Fiero trans mounts. I understand your skepticism, but I feel that with the engine mounts spread as far apart as they are, the loads on each one will be minimal for the type of driving this car will see. at least one dogbone mount (more likely two mounts) will also be in use. When the stock trans mounts are used on the trans only, along with the single centrally located front mount, they're subject to conciderably more stress than in my arrangement, and in the three mount configuration are much more subject to failure when power is added to the mix. Does Rodney make trans brackets for the Isuzu? I thought he just did the Getrag parts.
Russ
[This message has been edited by Russ544 (edited 05-16-2005).]
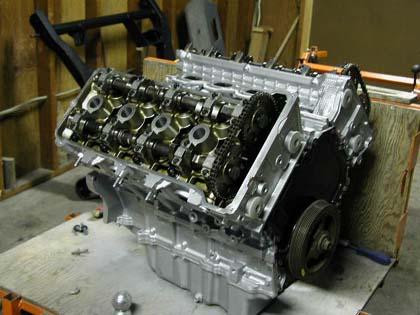
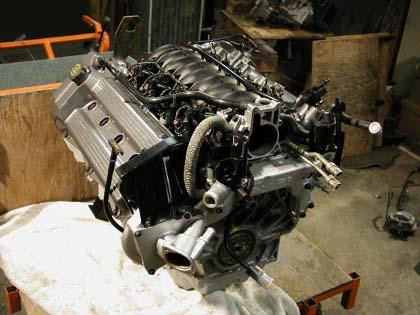
Progress has been slow on this portion of the project as I've been working 10 - 12 hour days for a wile now, and will continue for another month or more. work sucks ;( No fabrication this weekend as I'm dedicating my days off this week to clean up and paint projects. The N* I got only has 22000 miles on it, but had a heavy layer of corosion all over it from the salted roads in Iowa from wince it came. I tried every trick in the book to get the aluminum spiffed up again, including sandblasting the entire engine. I still didn't like what I saw, so I went shopping for a paint to refinish it with. Generally I hate aluminum paint as it tends to look like a mexican chrome job (aka rattle can chrome) but I found a product that actually looks pretty good IMO. it's a Duplicolor product made to refinish wheels, so it's resistant to acids, oils, moderate heat etc. and seems quite tough to boot. As nasty as the outside was I was very happy to see that the inside is vertually spotless. everything looks like new in there. Tomorrow I'll work on refinishing the bits and pieces and putting it all back together again.
Cheers, Russ
[This message has been edited by Russ544 (edited 07-09-2009).]
If you are using silver (rattle can) paint in the future and want it to look good just get some clear and apply it right after spraying on the silver it mellows it out and the end result looks great .
geeeeeeeez that project is looking great.. Im sorry to see that you gave up on the 4.3... Im still pushing this combo for obvious reasons I have had several rides in N* cars and other than not quite having the off the line pull, the northstar is an awsum set up
------------------ 84 Fiero Turbo Vortec 4300 Phantom GT L35 block, Syclone Intake and ECM with Moates adapter 50lb injectors, 3 bar map sens, T04B H3 Turbo www.cardomain.com/id/vortecfiero Murphy's Constant Matter will be damaged in direct proportion to its value Murphy's Law of Thermodynamics Things get worse under pressure. Arthur C. Clarke "Any significantly advanced technology is indistinguishable from magic"
Originally posted by Russ544: ain't that puuuuurdy
I've been a die-hard sbc builder for many years but I may have been converted. the Northstar is a very impressive design.
Master Tuner, Good tip, but the Duplicolor wheel refinishing stuff has the clear in the same can .
Yeah, the Northstar has some really nice stuff inside. How far down did you take it? My 100K mile crank was +/- 0.0002 from spec on main and rod journals. It requires only four dabs of RTV, whereas a Chevy requires about half a tube to get the intake manifold to seal.
geeeeeeeez that project is looking great.. Im sorry to see that you gave up on the 4.3... Im still pushing this combo for obvious reasons I have had several rides in N* cars and other than not quite having the off the line pull, the northstar is an awsum set up
I wish I could convey in a better way that in no way did I "give up" on the 4.3L . I still love the performance, overall drivability and ease of installation in the Fiero with this motor. It's really only my ego that has me setting up a Northstar for this car as I really don't expect a huge increase in performance between the stock Northstar and the current modified 4.3L . The reasons I'm swaping has very little to do with performance and everything to do with exhaust note and "wow" factor when the decklid is popped. Perhaps I should show my old sig more often
Russ
"doesn't matter where you've been....... doesn't matter where you're going...... just how cool you look gettin' there." Fonzy
[This message has been edited by Russ544 (edited 05-23-2005).]
Yeah, the Northstar has some really nice stuff inside. How far down did you take it? My 100K mile crank was +/- 0.0002 from spec on main and rod journals. It requires only four dabs of RTV, whereas a Chevy requires about half a tube to get the intake manifold to seal.
Will, Huuumm. I answered you once but the post vanished.... o-well
I only stripped the engine down to the long block to do the blasting on it and the exterior bits and pieces but I'm totally impressed with the use of o-rings and silicone seal rings on every part. very nice. Where did you dab silicone on the intake manifold? With a dry setup like this I saw no need and just installed everything as supplied.
I'm trying to decide on a couple things that I could use some input on: Steel flywheel from CHRF or aluminum Spec unit? ( I'll likely use a 2 or 3+ Spec disc.) Air cleaner and housing? how about the cad unit from a Deville or?
Russ
[This message has been edited by Russ544 (edited 05-23-2005).]
Things may have changed but if you use chrfab's steel flywheel i am pretty sure you will have to have it turned down because it is made for a rwd tranny. the spec flywheel is made for the fiero style fwd trannys. the price was about the same or slightly less for the spec flywheel early last year... that could also be different now.


 .
.