The small world thing seems to happen a lot. Remember my first dealing with you was someone back East saw a part I had for sale and told you about it. I sent it to you and days later my dad walks into your shop and notices you have a Fiero and tells you about his son having one. With the size of the country, what's the chance.
HA HA. yup that's true isn't it. Sure glad it worked out that way to, as there have been lots of parts since then that came from "the house of Aaron" that made several of my projects happen. It's always a pleasure to do business with you.
"Thanks" my friend, Russ
[This message has been edited by Russ544 (edited 11-01-2004).]
I'm not sure how much interest remains, but I figure I'll update the IMSA progress, see how many hits I get, and go from there.
The past two weekends have been mostly filled with fairly boring (by my standards) and routine tasks. I cut one full coil from the front springs which dropped the front about 1 1/2". I may do another 1/2 coil before I'm done. The rear struts haven't arrived yet, but I plan to start by cutting 1/2 coil from the rear springs when they do.
The less obvious progress included building a switch panel to fill the radio hole (real hotrods don't have radios ) The new panel has 6 toggle switches, just cause that's what looked right, but the functional ones initially include a radiator fan override, a fuel pump interrupter, electric choke control, and ignition. I think I'll mark one switch "ejection seat" just to give passengers something to think about . I plan to have a local graphics shop make an overlay for the lettering, so I'll have a photo of that in a week or two. Other tasks included installing the 120 speedo setup with gauge pod, and then tracing and rewiring a problem with my engine swap wireing that prevented the tach from operating. Wile I was in a wireing mood I went ahead and installed an electric rear decklid release hijacked from my parts car. I got some GT seat skins from Aaron a week or so ago and spent a few hours installing them on my seats and repairing the hinge covers and recline levers. After starting to reinstall the headliner I decided to put new cloth on it first. it looked ok but I'm glad I decided to recover it as the foam backing was pretty rotten under the old cloth. The backing is cleaned up now, but I ran out of steam at about this point in my weekend. I should have photos of the compleated interior by next weekend if the creek don't rise.
Cheers, Russ
[This message has been edited by Russ544 (edited 07-09-2009).]
What does this word.......... "finished" mean?? My definition of "finished" is actually another phrase:.... "for sale".
Thanks guys for the votes showing interest in seeing more of my progress. I started this thread to show the IMSA bodywork being done, but if you'all want to see the rest I'm certainly willing to share. Progress always seems slower as a project nears compleation, so pull up a chair and I'll dust off my camera and go back to work on it beginning next weekend.
Later, Russ
------------------ "doesn't matter where you've been....... doesn't matter where you're going...... just how cool you look gettin' there." Fonzy
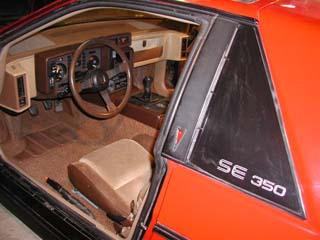
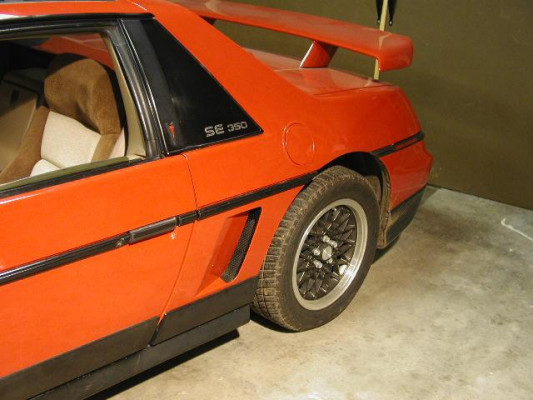
That looks sweet. I would love to do one too but with the Shark nose, I just don't like that HOOVER GT/SE nose! well keep us updated. BTW is that a stock 2.8 in there or a swap?
------------------ 4.9 Caddy in Garage! Car in Driveway! ACK! **************************************** http://home.cfl.rr.com/fierose Central Florida Fieros http://www.centralfloridafieros.org Proud Member and founder of the DOWN SOUTH SUNNY WINTER PICK ON SNOW PEOPLE COALITION!
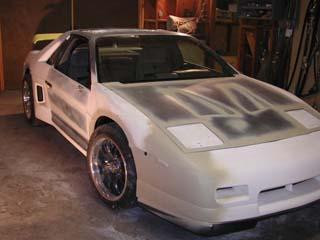
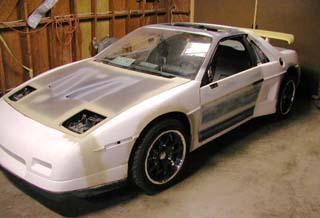
So without further ado........... First we gota get nekid.
This has been covered numerous times so I won't go into how the old cloths come off, but it's a fairly simple matter and should only take about a half day for a first timer.
but but but I really want to know how the old clothes come off! Any suggested reading cuz I am a first timer
That looks sweet. I would love to do one too but with the Shark nose, I just don't like that HOOVER GT/SE nose! well keep us updated. BTW is that a stock 2.8 in there or a swap?
So without further ado........... First we gota get nekid.
This has been covered numerous times so I won't go into how the old cloths come off, but it's a fairly simple matter and should only take about a half day for a first timer.
but but but I really want to know how the old clothes come off! Any suggested reading cuz I am a first timer
DeB
pull the snaps and twist the buttons. If you're doing it wrong she'll .......................... OHhhh. you meant................
There really aren't many surprises in removing the "skin" from a Fiero except for the rear clip/roof panels. and the only thing there is to loosen and raise the rear edge of the front 1/2 to alow the rear half to clear some pegs. The headliner has to come out to access the bolts that hold the roof on which adds a bit of a challenge to the process, but other than those items it's pretty much just a matter of removing enough bolts until parts start falling off
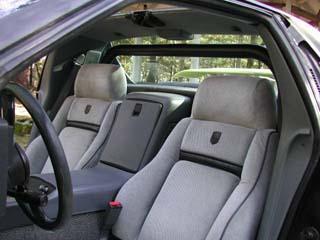
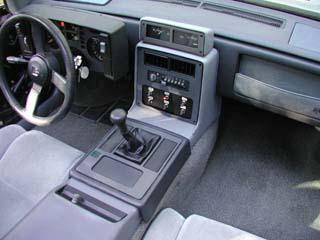
Much of this weekend was spent on interior projects. Recovering the headliner, installing the GT wheel, reassembling interior trim, housecleaning, etc.. I've always liked the GT style seats, so I picked up two nice seat backs and one base from Aaron (Electrathon). I had a couple flawed GT bases, but fortune prevailed and I was able to have two of them combined into one nearly perfect one for $50.oo, which then gave me a compleat set. A good Woolite wash job and a couple hours R&R paid off IMO:
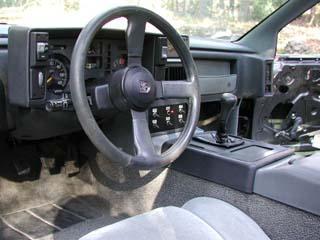
As I mentioned last week, I fabricated a switch plate and mounted it in the radio opening. I haven't gotten around to visiting the local graphics shop to get the tags made yet, but masking tape tags work for the moment . switches include: RAD (fan); IGN; FUEL (pump); EJECT (passengers); and FIRE (a Fiero exclusive). #6 is blank at this time.
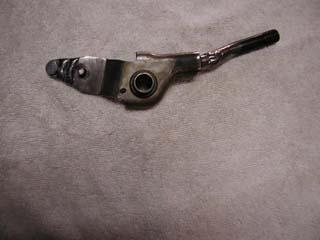
The more observant among you will notice the shifter has been shortened by 1 1/4" as well. I really like the feel of a short shifter in the Fiero, and it's very easy to modify. I prefer to cut the upper part in the middle in order to retain the angle of the finished product, but several variations can be done on this end to suit your tastes. The bottom of the shift arm can be lengthened about 3/8", before it hits anything, and that shortens the throw between gears quite noticeably.
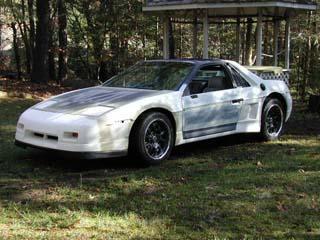
It was a gorgeous day in Oregon today, so I got the car out for a photo shoot................................
and just couldn't resist going for a "test drive" up the rural road I live on. This cars not currently insured, no plates installed, no lights, no mirrors, expired registration....... I just love living in the country ... I only ventured out a few miles, and didn't push the car too much, but nontheless.... It seems to meet my performance expectations .
After returning to reality, I decided to install some power mirrors on the car. The high wing and rollbar combine to block a large chunk of the rear view (as noted wile checking for red flashing lights during my "test drive"), so accurate outside mirrors may be a plus to me someday. Have you ever removed a set of PM from a parts car?? what a PITA. I see now why people get so much $ for a used pm setup. it's not the hardware itself, but rather the labor to remove the wire harness. You pull out the entire dash (and all that that entails), part of the heater ducting, the console and it's skeleton...... etc etc. needless to say, the wire harness now takes the "low route" under the dash of it's new home.
[This message has been edited by Russ544 (edited 07-09-2009).]
For those who PM requested more info on the dash switch panel.
The plate is made from a sheet of light guage steel. A step is bent into each end to raise the plate about 1/4", which brings it up tight against the back of the installed face plate. The same 4 screw holes are used to secure it that once held the radio.
Cheers, Russ
[This message has been edited by Russ544 (edited 07-09-2009).]
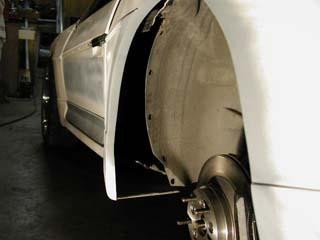
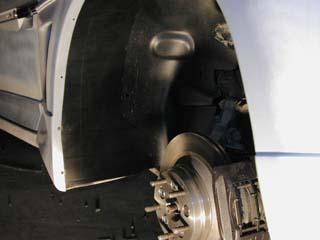
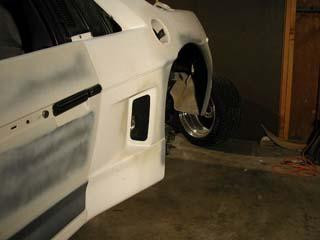
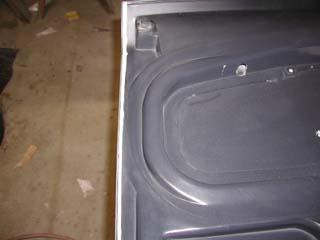
I had intended to leave the wheelwells tub-less, however after experiencing the sound of gravel hammering against the inside of the fiberglass bodywork, wile traversing my driveway, I began to reconsider , Then during yesterdays "test drive" I noticed that the section of fender in front of the rear wheel would pick up a bigtime harmonic from the engine at around 3000 RPMs. That is a fairly large chunk of fiberglass hanging out there unsupported, so when it gets vibrating you really notice it. Sooooo. Tubs it is........ At first I had planned to use two spare wheel tubs grafted together to make one wide one but the shapes of each piece prevented that from working out so I braved the mall in search of a suitable material to fabricate extensions. After several false starts with other items I finally settled on a HD plastic garbage can. tough; flexible; reasonably cheep; and even has the approximate curve of the wheel opening. It still took several sets of cardboard templates before I was satisfied with this method, but it all worked out in the end.
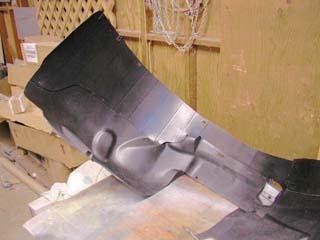
By cutting a 4"-5" slice off the outer edge of the front half of the stock rear tub the correct angle is located to add a piece on, and have it meet the wheel opening correctly. After the new piece is trimmed and correctly positioned it gets tacked to the stock wheel tub with an air gun shooting small brads. once secure the tub is removed and the pieces permanently assembled with large staples with the backside hammered over to lock them into position. The rear 1/2 of the tub is much easier, as no cutting of the stock tub is required to make the extension line up with the wheel opening.
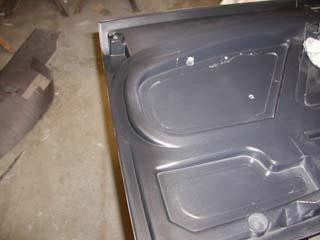
Sheetmetal nuts are used at the outer edge to secure the tubs to the wheel opening flange. I didn't feel that extra support was needed for the lower edge of the rear 1/2 but on the lower edge of the front half I pop riveted a 6" section of fiberglass L onto the fenders base and screwed the lower edge of the tub to it. this makes that whole area of the fender quite ridged now.
After shooting the whole thing with SEM black I took at least 15 pics trying to show the extension mounted in place. unfortunatly it all blends together so much that it's very hard to see where the old ends and the new begins.............. but I guess that was the whole idea actually
[This message has been edited by Russ544 (edited 07-09-2009).]
Nice job, very imaginative way to use a trash can! I've been watching this thread for awhile and finally decided to post my kudos to you. Keep up the good work.
------------------ A coward dies a thousand deaths..................A soldier dies but once. Red 86 SE Yellow 87 GT Gold 86 SE (wrecked) Red 84 2.5 Coupe
Bonus round: I'm still working on the parts that will provide material for the next "chapter" so I thought I'd throw this in for those brave souls who are sticking around for the finish of this project.
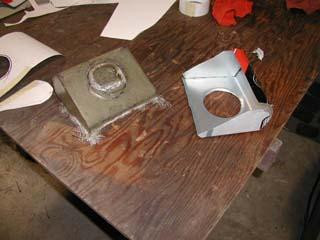
It seems like I'm always needing a fiberglass part for one of my projects, but I seldom drum up the energy to make a plug, pull a mold off of it, sand and buff the mold, wax it 8-10 times, da da da. It's just too much work to go through for most items, and the "one off" method usually doesn't provide a very attractive part without a ton of finish work. Wile I was enlarging the wheelwells on this project I happened on the method of using thin aluminum sheet to easily create a "mold" of sorts. The really neat part of using aluminum is that it has a nice finish already, and the resin doesn't stick to it so no waxing is required. No waxing, no sanding, no polishing. It's easy to form into a multitude of shapes, and can be hammered to form compound curves if desired. ......... YA.... I like it
Make a cardboard template to work out the bugs Transfer that to aluminum sheet. Bend into shape and tape the joints together with duct tape. lay up the fiberglass part and allow to cure overnight. Remove the duct tape an pop the part out of the mold. Repeat as needed.
As you can see, the parts come out almost ready to use, or paint if desired, after trimming off the edges and some minor sanding of the corners. The black marks on this particular part are from the felt tip marker used to mark the cloth for cutting, but you can use gel coat, or paint the part, or not use the felt tip and then just leave the part natural, depending on your intended use. Enjoy!
[This message has been edited by Russ544 (edited 07-09-2009).]
Looking great, Russ. Hey, you're giving away all the glass tips for free! I use the sheet aluminum deal quite often, and a few other materials as well. Basically, anything that will hold the shape you want, that resin won't stick to works.
Saw an article in Kit Car Mag. a couple years ago about a guy that built an entire body from molds he made out of plywood and sheet ureathane screwed to it. Worked great, and really not that much more finishing work than he would've had doing it with conventional molds, but I really can't speak to repeated use of and consistant quality from that type mold, but it worked great for his purpose, and it was cheaper for a one off.
Your project is getting better everytime you post a new picture. I'm sure I'm not the only one that looks forward to seeing your progress and innovative ideas coming together.
Keep up the good work. Love the garbage can mod! That looks like it works better than even the Pontiac fiberglass inner fenders would have, after all, they would've been too "small".LOL
Hey. great to hear from you Tedd. I had been wondering lately if you were still kicking. Hows that back holding up? probly a little worse now that it has to support that turkey dinner also hu?
quote
Originally posted by Sage:
Looking great, Russ. Hey, you're giving away all the glass tips for free! I use the sheet aluminum deal quite often, and a few other materials as well. Basically, anything that will hold the shape you want, that resin won't stick to works.
Free?? heck no..... didn't I mention that everyone is supose to send me 5.oo for the info? I've played with fiberglass off and on for 25 years and never heard of using aluminum this way, so I guess you guys kept your secret pretty well....... untill now But now that we all know how easy it is,you'll most likely just go right out of business. LOL
quote
Your project is getting better everytime you post a new picture. I'm sure I'm not the only one that looks forward to seeing your progress and innovative ideas coming together.
Coming from you Tedd, I take that as a very great compliment. Every day that I work on the fiberglass pieces that you made for this project I'm just blown away at the degree of quality in your layups. Sometimes I almost feel guilty puting the glass parts that I make on the ones you made. You use jel coat to creat a smooth finish, wile I use it just to hide all my air bubbles LOL.
quote
Keep up the good work. Love the garbage can mod! That looks like it works better than even the Pontiac fiberglass inner fenders would have, after all, they would've been too "small".LOL
HAGO!
Ya. one mans trash is another mans treasure I guess. ha ha. I have the next chapter written up, but the server that I use to store my pics had a major meltdown the other day so I'll wait till they get that worked out before I try to post Chapter 19. Just a hint...... I opened up the side vents and set up ductwork for a future cold air intake system. It came out great IMHO. I should have pics again in a day or so.
Cheers, Russ
[This message has been edited by Russ544 (edited 11-29-2004).]
Huuumm. the server with my pics on it seems to still be in a coma as far as the older pics go, but new ones seem to be working so I'll give this a try ..........
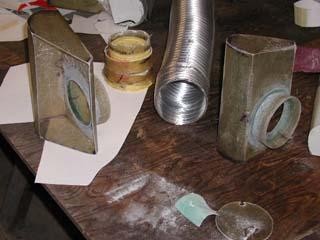
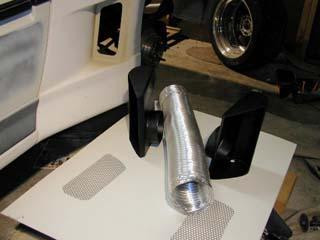
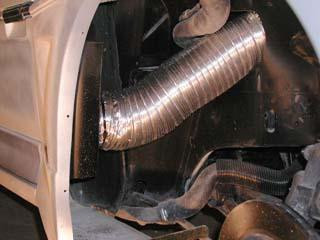
CHAPTER 19 Before the wheel tubs go in for the last time, it seemed like a good time to compleat the side vent plumbing as that area will be buried behind the tubs. The aluminum molds I showed a couple days ago were intended to form the collector boxes, but I wasn't satisfied with them and ended up making new ones. The new molds are a little taller, fit the shape of the openings better, and will allow for 4" hoses. I intend to eventually fabricate a fiberglass open-top box to contain the entire carb/filter assy and seal against the rear (vented) decklid with a foam seal. the hoses from the side vents will then connect to the box for a supply of cold air. That part of the project hasn't worked it's way up the priority ladder yet however. The new collector box shape required making a right and a left mold, as the top is slanted to more closely follow the shape of the vent opening, and yes, I did use the margarine containers as molds to make the neck of the collectors . The aluminum tube is dryer vent hose. it's not my ideal material, but it will function for the moment until something else comes along. It dents easily and looks pretty tacky when it gets "crinkled". kind of like a wad of tinfoil that can never be flattened out again. after a little TLC and paint, plus drilling a 1/2" hole in the lower corner for a water drain, the collectors are done. A piece of honeycomb screen, scavenged from a parts cars upper vent is cut to perform its new duty as side vent screens. the screens get buried in a bead of kitty hair bondo behind the finished vent opening, and after that dries a bit, the collector itself gets bonded on the inside of the fender with 3M bonding adhesive. The left vent hose required only a 1/2" slice of sheet metal to be removed from the side of the frame rail. On the right side, I cut a hole in the area that was once under the battery box, as the battery resides up front now anyway. Cool!
[This message has been edited by Russ544 (edited 07-09-2009).]
The back is about as well as can be expected, none of us are getting any "younger".
There's good days and there's bad days. I try to get allot done on the good ones, but doesn't always work out that way.
The vents look great, as does the rest of your project. Hope your server gets healed soon, cause I don't want to miss any new pictures you're sharing with us!
Glad to hear the body is satisfacory. Gel coat is sometimes decieving. Often it's hard to tell what you've really got until you start sanding on it, then the bubbles start showing up. I always figure it's better to find them at that point, than to watch them show up under your new paint job!
It's very rewarding to watch this come together, even though my part was small and short lived, I always enjoy watching a true craftsman, and you're that, without a doubt!
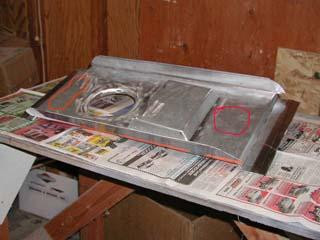
Well.... I wasn't planning to make the cold air box yet, but I started playing with ideas and before I knew it I was making an aluminum mold. It looks like a simple item but this took me the better part of a day to design and fabricate. ..........maybe I just thought about it too much . The obvious temptation is to just use the aluminum tray as the cold air box, but I think fiberglass will be worth the extra effort for it's insulating ability. no sense in having a cold air box if it doesn't keep the air cold.
The raised portion in the middle is to clear the distributor. The vertical flanges front and rear fit up into the decklid when it's closed, and the kicked down portion of each side fits under the ribs in the decklid that the hinges attach to. all sides will close on a foam seal. The areas marked in red will be the approximate locations of the openings where each side vent attaches There will be a vent of some form in the deck lid also, in order to encourage a constant flow of air and to keep from building pressure in the carb.
I got the main layup done today, but several other small pieces still need to be fabricated and bonded to the main tray.
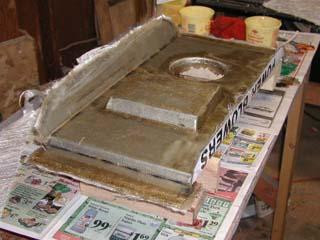
I'll be using a Holly triangular filter and top plate, with the fiberglass tray serving as the filters base. One of the time consuming parts of the mold fabrication was making a wooden buck and then hammering out the aluminum into it to form the neck of the carb opening. it's amazing how much 22 gauge aluminum will stretch. very nice stuff to work with.
to be continued:
[This message has been edited by Russ544 (edited 07-09-2009).]
The tray was cured enough today to pop it out of the mold, so I was able to continue with the final trimming of the edges to mate up with the decklid, and building the hose connections. The left hose fitting was no biggie, but the right side posed quite a challenge to avoid various sensors, thermostat housing, water and fuel lines etc. I had determined where to route it, and how it should be shaped, but had no idea how I was going to make a form to lay up the fiberglass. I considered a multitude of options, but for one reason or another discarded them all in favor of using a piece of the drier hose I had purchased for the connecting flex hoses. the stuf is made of very thin aluminum, pleated accordion style so it can flex. It's thin enough that I was able to form it into the necessary configuration after considerable trial and error. The pleats needed to be covered over with some foil tape I had laying around to help smooth things out in preparation for resin/cloth, and it ended up looking like some kind of prop for a cheap si-fi movie, but it actually worked even better than I expected. After the resin dried I was able to remove the foil form from inside the new part without too much effort.
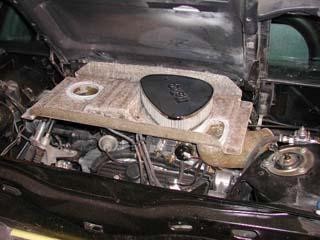
With only a very small notch in the inner portion of the decklid, it actually closes over the filter now to . Still needs some finish work and foam seals around the edges, but the hard part is done. Looks cool to me.
[This message has been edited by Russ544 (edited 07-09-2009).]
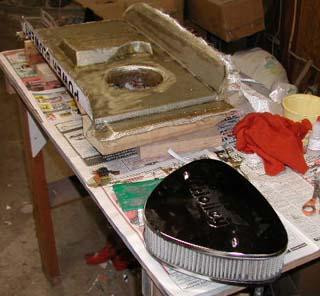
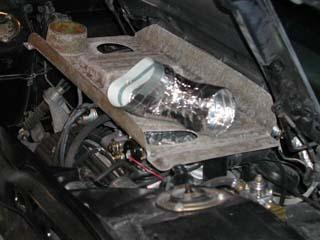
I've been a little under the weather the past couple days, so not much progress to report. I was able to finish up the cold air system this afternoon however, with the exception of installing the foam seals around the edges. I'll wait until after exterior painting is done to install those. I drilled a 1" hole in the tray above the HEI coil to provide a bit of cool air to it, and painted the underside silver and the top side black.
I wanted the tray to be easily removable to facilitate access to the thermostat housing and other service needs, so a couple of solutions were invented. It's hard to see in the photos, but I had already fabricated a stand to support the left end of the tray, so it wasn't too difficult to add a bracket (circled in red below) on the side of it to hold the left hose in the proper location for a 1" tall fiberglass ring, attached to the bottom of the tray, to insert into the hose. A similar system is used on the pcv air intake tube, which needed to enter the tray under the air cleaner. I welded a bracket on the side of some 1/2" tubing and bolted it to a carb mounting stud . A large washer is welded on the upper portion of the pipe (yellow arrow), where a foam seal will set to seal against the tray when it's installed over it. The tray can now be removed by loosening the hose clamp on the R side hose and removing 4 wingnuts.
Cheers, Russ
[This message has been edited by Russ544 (edited 07-09-2009).]
Russ: just in case the garbage can plastic doesn't work out, there is a store in Eugene that sells 1/8 in. black ABS plastic that is a perfect match to the inner liners. Comes in 4x8 sheets for pretty cheap. Worked well on mine.
Russ: just in case the garbage can plastic doesn't work out, there is a store in Eugene that sells 1/8 in. black ABS plastic that is a perfect match to the inner liners. Comes in 4x8 sheets for pretty cheap. Worked well on mine.
Thanks for the tip Guss. One of my criteria for the material was that you be able to shoot a staple through it without it breaking the plastic. several things I tried prior to the trash can seemed extreamly tough and flexable, but when I shot a staple in it it would split. Did you try anything similar on the ABS? The material I found seemed to work very well for me, but for future reference what store has the ABS sheets?
Multi-craft Plastics, Inc. 541-485-1727. I used pop rivets with back up washers. Staples would work as well. This is the same material as the inner liners.
CHAPTER 21: Friday was spent re-installing the wheel tubs, now that the cold air system is finished. After that, I hooked up the E-brake and trimmed off a piece of fiberglass that was rattling against the frame and tidied up a few other details. Yesterday I drove the car to town to meet with the guy who will shoot the paint for me. He's the new painter at a body shop next to my business, and is anxious to trade for some equipment I have, so I'm jumping on the opportunity. He's an excellent painter, so I was really happy when he said I'd done a great job on the bodywork. I consider myself a lot better mechanic that a body man, so that was nice to hear. He did point out a couple areas that still needed some attention however, so I've been spreading bondo and sanding for much of the morning today, plus filling a few little nicks and pinholes on various edges. The gaps on the sides of the rear decklid had been bothering me for quite a wile, and the painter pointed them out also, but said "ya, but there really isn't much you can do on these plastic bodies to correct that". So naturally I had to prove him wrong . When I look at a show car, one of the first things I look at is the evenness of the gaps around the doors and decklids. when the' re even all the way around you know the builder spent some time on the car to do it right. when the gaps are uneven it just looks tossed together. The gaps on the sides of the rear deck on this car were ok towards the front, but tapered down, and in fact were touching the fenders, on both sides, above the taillights. The fact that the rear decklid is made up of two pieces bonded together actually helped the process of narrowing, as I first took a pie cut off the edge of the inner layer, being careful not to damage the lip on the edge of the top skin. After that piece was carefully separated from the top skin and removed, a pie cut was taken from the top skin, beginning near the front edge and ending about an inch in at the rear of the decklid. (sorry I forgot to take a pic of that one). this left a ledge of lower skin to support the top skin after it's pulled over to meet the new edge. I just used kitty hair bondo to reattach it. Very little sanding was needed on the bottom to return it to a virtually original looking edge. A light skin coat of glazing putty and a bit of sanding was all that was required on the top side, and now the gaps on both sides are as perfect as one could hope for, and that's one more thing that won't bug me after the car is painted LOL.
The painter and I decided to wait until after the holidays to begin final prep and paint, so I may have to actually work on my SBC car next weekend. I've had some interior parts to compleat the gray to brown conversion for several months now, along with some rear 1/4 panel air inlet scoops that I made and painted for it 6-8 months ago. I just have too many toys and too little time LOL.
Happy holidays to all, Russ
[This message has been edited by Russ544 (edited 07-09-2009).]
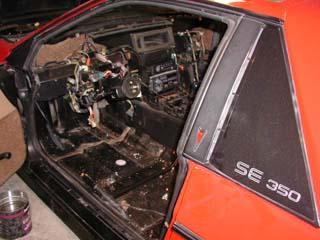
As I mentioned the other day, the painter won't be able to start on the IMSA until after the first of the year, and I kind of needed a break from it anyway, so I decided to take care of a couple items on my "hot rod" (86SE - 377 sbc 4 speed). The interior has been 1/2 gray and 1/2 brown for about a year now, so it was way past due to be redone properly. I hadn't wanted to tear it apart and not be able to drive the car during the summer, but I rarely drive it in the winter anyway so the time was right. Well..., you know how sometimes a project kind of..... ahhhhh....... gets a little out of control This was after "disassembly day".
It was one of those: ............as long as I have the console out I may as well put in those new shift cables.............. and I could get rid of those fuzzy carpets in there.......... and I may as well put in the 120 speedo wile the dash is out.......... and fix the heater vent seal and broken control cable.... and the headliner is gettting kind of grungy....... do-da do-da. Well it took two long days of my vacation, but I think it was worth it. It's really nice to have everything color matching now and to have all the pieces actually bolted down again instead of just setting there waiting for me to finish it.
I gota tell ya..... the IMSA will need to be a pretty cool ride to top my emotional attachment to this car. There aren't too many things that give me goosebumps like twisting the key on 400+hp and blipping the throttle a couple times. The IMSA has it in the looks dept, for sure, but ohhh that sbc thunder is hard to beat. Maybe a warmed over Northstar in the IMSA would push it up a notch in that department?? we'll see.......................................
[This message has been edited by Russ544 (edited 07-09-2009).]
Russ454, Outstanding thread. I appreciate the time you�ve taken to document and write up your progress . I knew someone had bought the old IRM molds but didn�t know parts were beginning to be offered. I�ve printed this thread out because I�ve thought of putting a IMSA widebody on my choptop coupe for several years now. BTW, is there a web page for these parts and prices available yet? Thanks (and good luck) again for taking the time to document and share your work!
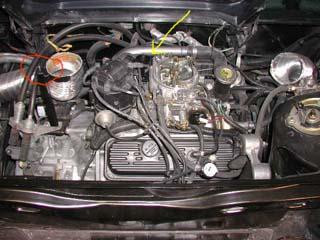
Today I finished up the projects I had planned for the sbc car. the front valve cover had been leaking slightly. It's kind of a pita to pull the front valve cover, so I picked up some trick gaskets this time. This motor has roller rockers so tall valve covers were necessary, and the only way to remove the front cover is to drop the rear of the cradel so the engine rotates down enough to give clearance below the right decklid hinge. fun..... lots of fun. I also installed the side vents that I made a year ago and had been gathering dust ever since. the one on the right is especially welcome as it feeds a 10" fan that had been installed in the battery box area. The additional air circulation was good for a 15-20 degree reduction in the engine bay, even without the side vents, so this should even improve on that.
Like I said, this was the last project I had planned for the sbc car, so I'll be pulling the IMSA back in the garage tomorrow. The change of pace was welcome..... but now it's time to get back to the regularly scheduled program
[This message has been edited by Russ544 (edited 07-09-2009).]
Russ454, Outstanding thread. I appreciate the time you�ve taken to document and write up your progress . I knew someone had bought the old IRM molds but didn�t know parts were beginning to be offered. I�ve printed this thread out because I�ve thought of putting a IMSA widebody on my choptop coupe for several years now. BTW, is there a web page for these parts and prices available yet? Thanks (and good luck) again for taking the time to document and share your work!
Thanks Choptop. It was my original intent to help others to assemble ths kit, so I'm glad to hear that you've gotten some good out of it. Yes, Fiero Warehouse purchased the IRM molds a couple years ago. apparantly they had been badly abused, so a lot of work (time) was needed to get them back in usable condition again. My kit was the first one out of those molds in many years. Tedd, from Sage Glassworks, is doing the actual layup of the parts, so the quality (hand layup) is extreamly good. Give Doug at Fiero Warehouse a call and I'm sure he'd be happy to have one built for you also . five grand may seem like a lot of money, but as body kits go I would say you'd be hard pressed to find a better value anywhere. photos don't do the car justice as it honestly does look much better in person. This ain't you're momas Fiero anymore .
Lookin great so far!!! So good you have inspired me to do an Imsa of sorts...hehehe...Custom of course, but not like yours...One ? though, where did you get your kit from??? Webpage would be awesome, thanx..........
Lookin great so far!!! So good you have inspired me to do an Imsa of sorts...hehehe...Custom of course, but not like yours...One ? though, where did you get your kit from??? Webpage would be awesome, thanx..........
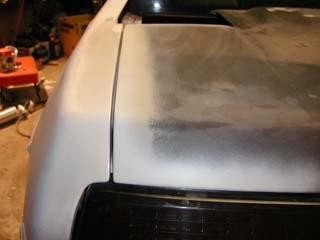
If you decide you want to do a body kit...... become very familar with the materials on this fender
The various shapes and designs/material of sanding blocks on the fender are just the ones I used on the area shown. I have a shobox full of wooden blocks which have been cut and sanded into specific shapes for working down the really tricky areas. even so, It seems like every project has one area that just refuses to cooperate, and in the case of this car, it's this corner. I've had this area in primer about a 1/2 dozen times during the past month, thinking it was "good enough", but somehow it just never was. The area where the facia and fender join together were high, but you can only grind away just so much glass before it weakens it, so I'd end up cheating by filling a little extra on either side and blending. Today I drilled a small hole next to the joint to check the remaining thickness and was surprised to find it still ~ 1/4" thick there, so I guess the somewhat heavy layup that Sage uses does have it's benifits . With DA in hand the high area vanished in short order, so maybe this time it will really be good enough.
[This message has been edited by Russ544 (edited 07-09-2009).]


 ) The new panel has 6 toggle switches, just cause that's what looked right, but the functional ones initially include a radiator fan override, a fuel pump interrupter, electric choke control, and ignition. I think I'll mark one switch "ejection seat" just to give passengers something to think about
  . I plan to have a local graphics shop make an overlay for the lettering, so I'll have a photo of that in a week or two.


2.jpg) Free Forum, everyone do their part.
Free Forum, everyone do their part.