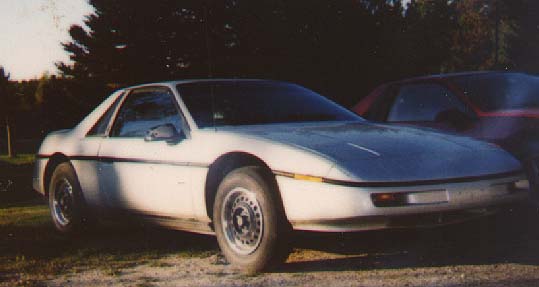
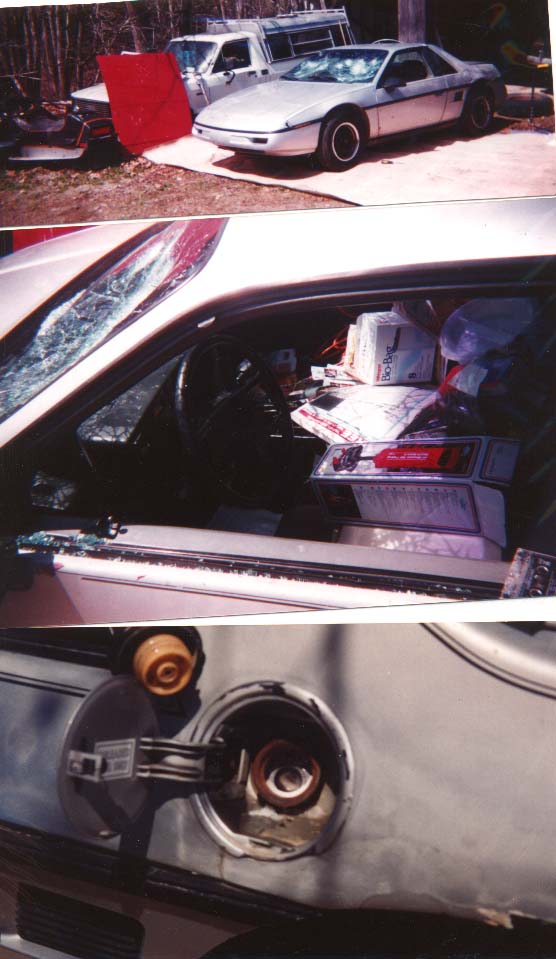
As you may know....Im building an 88GT from a couple different Fieros. After finding severe frame rust on my 87GT last fall...and my 88 coupe sitting outside needing an overhaul....I decided i would strip the 88 coupe down to bare bones and rebuild the 87GT on it. So, I spent the winter stripping the 88 down( in an unheated garage in Maine BRRRRRRRRR) and got my garage redone to a workable condition. So, now that this is done and the rebuild is starting, Ill give you a little history on the 88 (my future GT) . I bought the 88 in August of 2000..... .... from a fellow worker that had no clue on how to be respectful to our beloved Fiero. He just couldnt get it running right...he sold it to me for $300. I looked at the simple things....four plug wires are better than three...one was burnt off, I would have guessed he would know that mouse houses didnt belong IN the air filter housing! removed it ....seemed to run better now, but was still running weird. The cause for that ..a smashed air box that is on the drivers side...the box that connects to the vent on the drivers side. That fixed it. Ran good now. In April of 2001, I moved out of the place where I was living and found out that my ex roommate didnt like it and smashed the windows out of it including the windsheild. Poured sugar in the gastank and then proceeded to ripe the interior apart and threw it all over the front lawn. She did this to both my Fieros. (lesson learned....Move the FIeros FIRST) then come back for everything else. the little story here: https://www.fiero.nl/forum/Archives/Archive-000002/HTML/20030819-1-026723.html Sept 2001, I move into my new house...brought the Fieros with me of course. Started removing the damaged stuff from the 88...and prepared to rebuild her with spare parts I had , for my son....spent the summer of 2002 redoing it with my son and then he changed his mind, it wasnt cool enough for him.He Wanted a GT...then a Lambo .... kids loves to dream ...then....then ........then... those that have kinds ,know what Im talking about...so the 88 ended up sitting again. The summer of 2003 , a fellow member ClearDark was going to buy it off me if I finished putting back together.... I did and the weekend that he was supppose to come down to take a look at it....he was involved in a horrific wreck ( head on with a loaded dumptruck in his VW Golf) The dumptruck won and Caleb survived a long hospital stay. We both thought it would be best if I kept the 88.
Last fall is when I discovered the horrible rust on my rear frame rails on the 87GT I was restoring. Thats when I decided I would need this forum to help me decide what to do... https://www.fiero.nl/forum/Archives/Archive-000001/HTML/20040710-2-046460.html Thanks to this thread and a few fellow members , it was clear to see that the 88 would be a great canidate. prestripping in the middle of the winter...
[This message has been edited by fiero67 (edited 08-31-2004).]
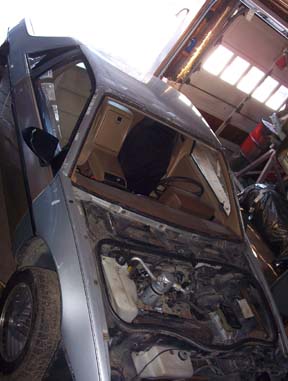
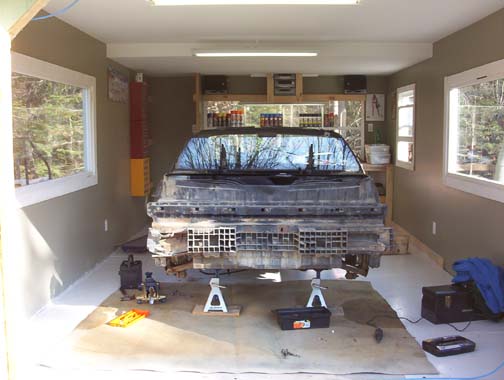
So spring is here. I brought the 88 home to put it in my new garage and finish the strip..
Its never hard to strip a car.....Hope I can reassemble it.....
Now tonight, Im almost done with the front end prep and my order of POR15 and POR15 chassis (sp?) paint should be here tomarrow. The front compartment has been painted charcoal grey metallic..and I must say,,it was a good choice..it will compliment my interior well.
Im looking forward to starting the rebuild and joining some of these shows WITH a Fiero !!!
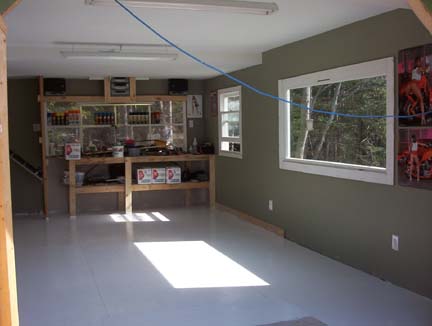
Thanks Linenoise.....my garage used to be a rental trailer that my parents owned. After the last renters trashed it....we cut it in half with a sawzall and towed it to my house. I put another floor over the exsisting floor giving it 1 3/4 inches thick. I ripped out the old panel walls, insulation, and wiring. reinsulated and re wired the entire thing...then sheetrocked it. Did it all myself. I wanted a place to display all my Fiero stuff besides the living room
I had to make sure it had lots of outlets.....including the ones in the ceiling......and loads of light....that way i can work all night in it. Not to mention...the West Coast chopper posters on the wall.....lol
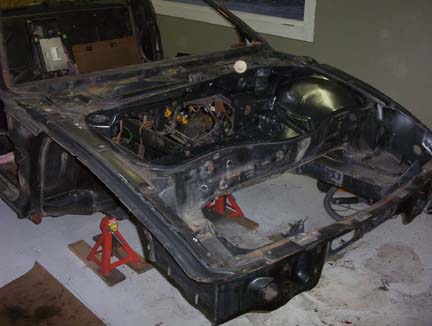
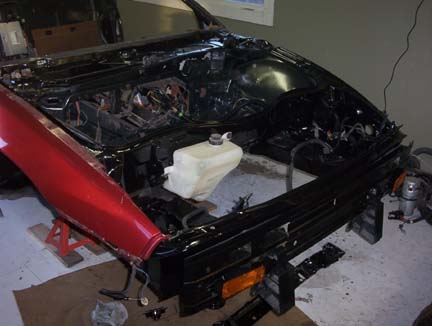
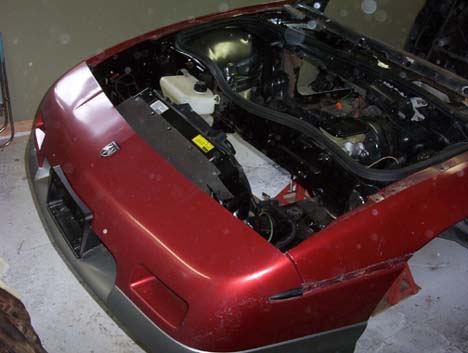
Today was a good day. After finishing the countless hours of grinding ...I was able to POR15 the entire front end. I grinded smooth all the spot welds and minor rust. Cleaned all the screw /bolt holes with a mini wire wheel. Its hard to get a good picture of it painted since everything is black now....
The contrast between the Charcol grey metallic and the black is apparent now...
There will be many mods done to this GT before I am done...one thing I have learned here is that Im NOT going to sand my body panels in my garage....lol ....I cant forget to mention how much I love the 88 suspension....8 bolts and it comes out in one peice.
That looks like a very pleasant place to work on your Fiero. Especially compared to mine Keep up the good work. I love body off restorations, especially on 88s.
- Jonathan
------------------ If you find my advice useful, then please give me a positive rating, thanks... 1988 GT (Firebird Interior),1988 Coupe (Daily Driver), 1985 SE (Project Car), 1985 Coupe (parts car), Firebird Interior Installation Website
Thanks Jscott1.....it is nice to work in the garage....especially when the only things that are really allowed in there are Fiero parts. The red and yellow containers on the wall are the ones you buy at Wal*Mart and have many clear slide out compartments. I put all my extra small Fiero parts in them from stripping down the other two Fieros. I had to make the garage livable just because I spend alot of time in there...and if I am ever in need of a dawghouse....lol Im glad I took the time today to armor-all the entire front wiring harness before I installed it....I had to start reinstalling parts back onto this car....just to keep my spirit up..and not get overwhelmed...I even set a fender on just to show me what Im aiming at...
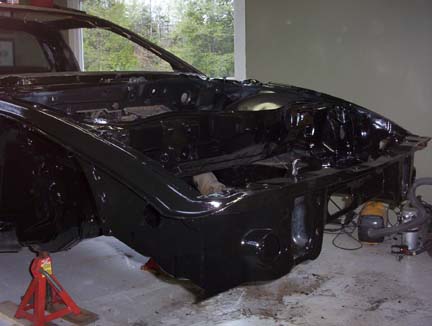
I am happy with the progress so far. You can really see a difference between the old and new in the next photo....
Hey John, I was talking about you on our way down through Maine. Where do you live there, and maybe send me you telephone number, I'll try and look you up on the way home, which will likely be mid-late week.
Looks like you have a good start on your project!
[This message has been edited by jelly2m8 (edited 05-23-2004).]
I had to go out and buy one of those "dry erase boards", so that I can remember what I wanted to do to the Fiero....but,no, nothing that big....thats for the next rebuild....most of the mods will be exterior....front hood scoop to disapate the heat from the radiator....functional trans am vents in the front fenders.....rear hood vent.....lots of lighting....but Ill keep that to myself...for now. The interior....will.... look stock. Soon I'll be learning the fine art of the airbrush.....Ill be ghosting alot onto my 88. Hopefully....no one will reveal the ideas before me......
Great Job your doing! Im also going thru the exact same steps, and I know exactly what you mean about the front end! The Por15 looks so good now Ill have to go spends some bucks to keep up with the neighbors" "THANKS ! "
Midshipman Easy...its well worth the expense. I picked up a six pack that came with 3 cans of POR15 and 3 cans of chassis paint. All the areas that are visable will be second coated with the chassis paint...because the POR15 will dull out to direct sunlight. You should post some pics....we love pics!!!
thanks for the advice.. I have my hands full updating my site. But if you want to see some pixs Ive got plenty on my site below. Ill be watching this thread though and following your excellent start!
BtotheB my investment so far has to around $1000...for both cars and the garage.. I kinda lucked out ....but I spend an anormous amount of time working on it. If I had to pay myself for the labor....Id be broke!
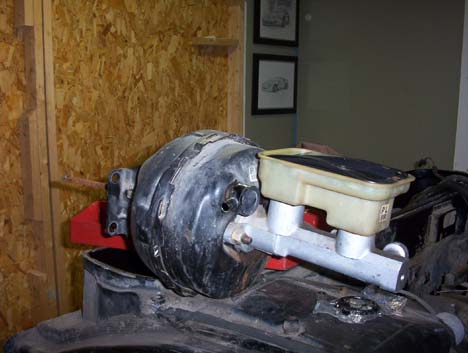
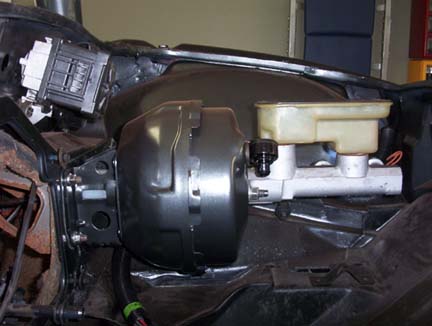
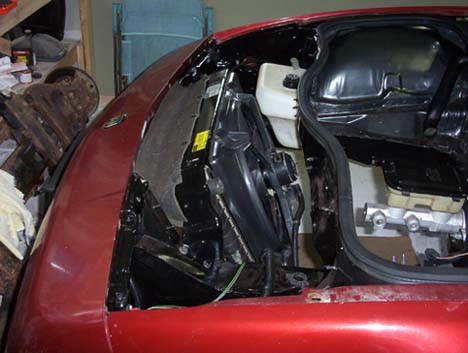
Well, tonight i took the fan assembly apart....wasnt hard...cleaned that up with a washing and prepped the motor for paint. I concentrated on the brake booster mostly tonight. Mine didnt look too pleasing....
Linenoise.....Ive got your Fiero in my garage!
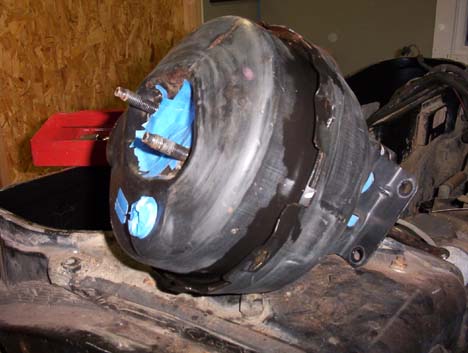
so I took it apart, like everything else....lol....I like to take lots of pictures before I take anything apart just for the idea of how to put it back together after its painted. sanded and grinded and wire wheeled it until I thought it was ready for primer. cleaned it all with thinner, just to make sure there wasnt anything left on it....taped everything I didnt want painted...including the decals...Its nice to see original decals on the parts.
then primed it....have to let it dry overnight....so I cant paint it till tomarrow... after i wet sand it. I also found a resourceful way to paint things now...when I bought my overhead lights..they came with chains and hooks on them...since I didnt want them as long as they were..I cut them off. I screwed the ramaining to my ceiling and now I have painting hooks.
well....I have 3 days to plug away at the fiero. The brake booster is finished and reinstalled.. I think it looks great.
The nuts that hold it on came out real clean..almost brand new looking. I took a soft wire wheel on the Dremil and cleaned off minor rust and tarnish...then I buffed them out with a polishing wheel.
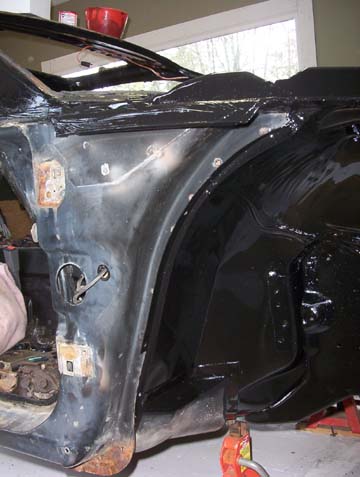
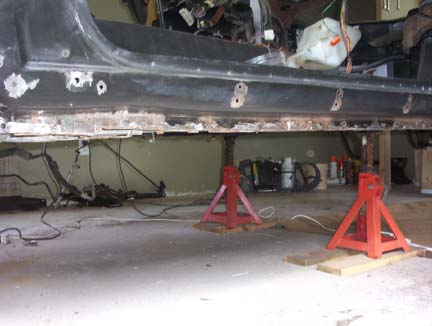
So far this weekend I have finished the prep of the front end. Took a long time to grind off the rust that was on the lower parts under the doors...then I took a pair of vise grips to staighten that track out to where it was suppose to be.
The last thing I needed to do before I paint the rest of the front....was to clean off the rail that holds the windsheild in. Since I found small amounts of rust under the old rubber, I thought it would be good to strip it all off. It wasnt hard after I broke out the BIG grinder and softly buff off the rubber coating.
I cant stress how important it is to clean everything with laquer thinner before painting. To clean off all the dirt in the hard areas..where a rag wont clean..I used a toothbrush with paint thinner on it first.
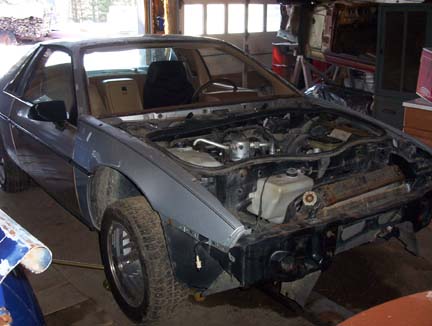
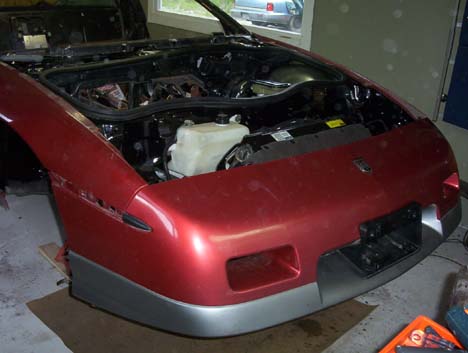
I have the radiator back together after repainting it and cleaning everything. installed. To give me more ambition on this project...I put on the front bumper and both fenders....the sunroof panel and one rocker panel....just set them in place because I want to make sure everything is done in the area that they are going. Not to mention, Ill be painting this car with the panels off and there is no need to waste rivets....
its really starting to look like a Fiero now!
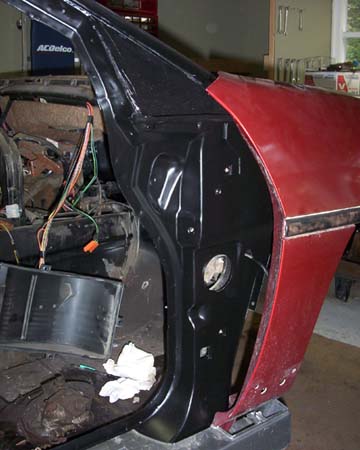
Im really pleased as to the way the door jambs came out... I coated them first with the POR15 and then with the chassis paint.
Tomarrow is the annual mystery trip (where we have no clue as to where we are going) It will be for 3 days. Everyone have a great weekend....BTW, this is what we will be going in....car restoration runs in our family...this is a 1955 Ford crestliner conver. Took my dad 5 years to complete...its completely stock including the color.
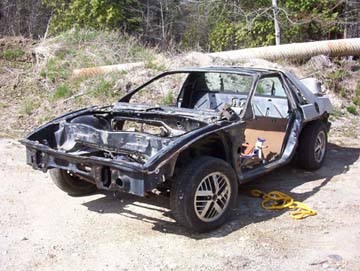
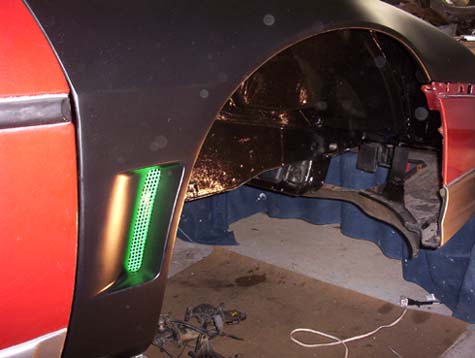
More restoration has been happening on project 88. Most of it is fixing problems and paint work on the body. I thought it was about time that I tried to mold in "skitimes" project fender vents. It wasnt as bad as I thought it would be, but there sure is a lot of fine tuning to get them just right and smooth. I thought since I had all the material, Id also shave this fender. After looking at the fender on the car...I love the vent (thanks for the idea skitime!!!) but the shaved trim...I dont like. So this set will go on my sons project Fiero and I'll do a set with the moldings left on. Let me know what you think of it....its hard to get a better pics since it is in the garage . My sons Fiero colors are going to matte black with green highlights.
------------------ -Chris - Custom Gun Metal 86 GT 3.4 5spd 3.4 SOLD & 4.9 being installed "It's too low, too rough, too loud, drinks gas, it's totally impractical, but damn good lookin. In other words, It's almost perfect!" Build up tread or MODS w/ Pics
Nice work, fiero67! Threads like this are what the forum is all about. I'm looking forward to seeing your progress...and you've earned a "+" from me! Who knows...maybe one day, I'll get a chance to see it in person...I have a friend who lives in Bradford, ME...not TOO far from you...
well...if you ever get up this way, definately stop in! I apreciate the comments ! Then I could let you in on some custom stuff Im doing that I havent seen done yet. ...lol. John
Awesome work! I was wondering if I was the only fool thinking about tearing down an '88 chassis and POR15'ing the thing from top to bottom. Now I know I am not alone! LOL
I'm gonna peek in here every so often and steal your ideas though. First I need to clean the chassis up - there's pine needles EVERYWHERE! Not to mention the twin swimming pools inside. At least I know the floors are solid!!
More restoration has been happening on project 88. Most of it is fixing problems and paint work on the body. I thought it was about time that I tried to mold in "skitimes" project fender vents. It wasnt as bad as I thought it would be, but there sure is a lot of fine tuning to get them just right and smooth. I thought since I had all the material, Id also shave this fender. After looking at the fender on the car...I love the vent (thanks for the idea skitime!!!) but the shaved trim...I dont like. So this set will go on my sons project Fiero and I'll do a set with the moldings left on. Let me know what you think of it....its hard to get a better pics since it is in the garage . My sons Fiero colors are going to matte black with green highlights.
Hey you are welcome. The vents are sure getting popular. Great job you are doing. Can't wait to see the final result.
------------------ Red 88 GT T-Top 3800 INTERCOOLED SUPERCHARGED White 88 GT Stock Please give me a rating if you appreciate my contribution. History of Skitimes Car
Thank you skitime, if you hadnt done it and posted it... Id still be looking for something to put there.
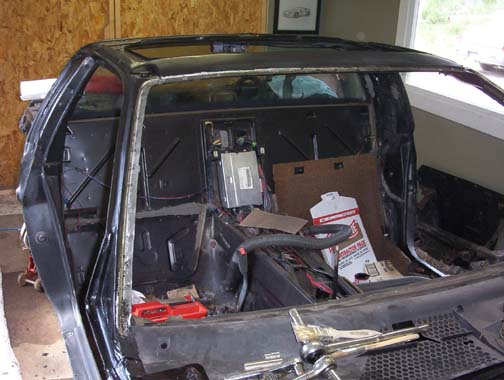
The REwiring of the interior has begun. Since alot of my mods are interior, I decided that I would remove the entire original 88 wiring harness and install the 87GT's harness. Not to mention Im switching from a 4-banger coupe, auto w/ AC to a 6 ,5-speed without AC. This is the most important part of this rebuild. The wiring has to be done right. So if anyone has something I should know besides the basic, please inform me here. Im adding the aux fuse box connector thing that is white and goes above the original fuse panel . that will allow me to wire in a few more accessories. After stripping the interior of everything, removing and reinstalling a new wiring harness was a breeze. Took about an hour. While doing this... behind the insulation above the steering support, I found an access panel... if you remove the four bolts, it opens up to an area where the hood cable roots into...could be useful to someone that cant get into their front hood.
Some of the mods that Im wiring in are: 1) front hood popper 2) gas door popper 2) lightning sphere in the sunroof 3) lighted door handles 4) power mirrors from... another car 5) neon under the dash, recessed in some hidden areas through out the interior 6) auto dimming mirror 7)lighted sunvisors from another car 8) remote car starter with pass key 9) speed window 10) valet parking (trunk disablizer) and some other things that are still up in the air. I'll post a" how I did it"and pics when Im done.
John
[This message has been edited by fiero67 (edited 09-18-2004).]
Awesome work! I was wondering if I was the only fool thinking about tearing down an '88 chassis and POR15'ing the thing from top to bottom. Now I know I am not alone! LOL
I'm gonna peek in here every so often and steal your ideas though. First I need to clean the chassis up - there's pine needles EVERYWHERE! Not to mention the twin swimming pools inside. At least I know the floors are solid!!
So I see you are trying the home made pine tree air freshners and I never thought of the ole swimming pool mod....darn you beat me to it...LOL
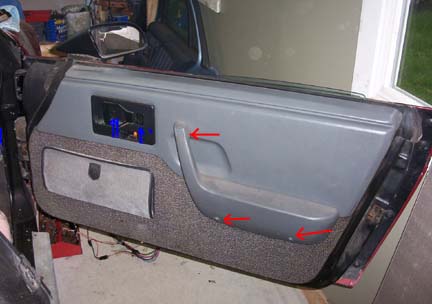
You ever get the feeling like you are way too far over your head on something? Me either... The wiring for all the accesories is very time consuming. Im on hold due to waiting for a relay for the passkey/ remote starter. This 88 didnt have any accesories in it , except AC. So I have to wire everything myself with some help from the electrical gurus here on the forum. So I fixed my sights on the power mirrors... Heres the step by step process of removing mirrors from a Fiero. 1) (red arrows) pop the tabs off the arm rest and remove the three phillip head screws, remove arm rest. 2) (blue arrows) carefully pry off the fiero emblem on the door handle and also the round cap behind the door handle exposing the two philip screw. Remove them. pull the door handle bezel out towards you. Reach behind the bezel and pull the lock slide towards you. This should disconnect it so you can now slide it out of the bezel. With a little effort, you can now slide the bezel towards the front of the car and off the door handle.
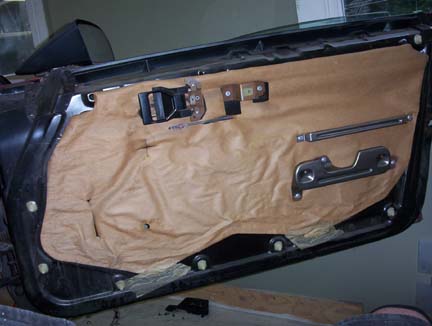
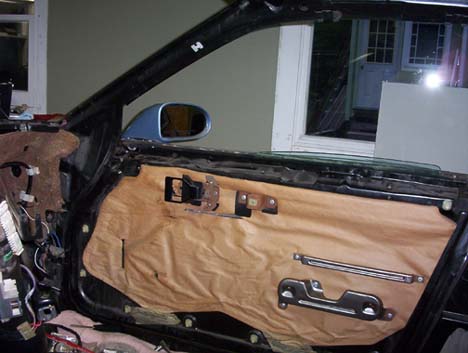
to remove the door panel you should have a special tool designed to pop the plastic holders that hold it in place. There are 8 of them. the plastic holders are the white things on this door frame. I did notice that there was one missing from mine on the top left hand corner. Now that you have the door panel off, you can see the threw screws that hold on a rubber like cover on the opposing side of the mirror. remove them and you will see the two 10mm nuts that hold the mirror on. To get better access to the nuts I marked the position of the inner dew wipe(not sure of the real name of this) plate before removing it. Its the metal strip that follows the top of the window. After you remove this metal plate... the dew wipe just lifts up and off.
Now with a 10mm socket on a 3/8" drive rachet..you can remove the mirror. ....then let yourself go crazy and start modding...or put it back on, your choice.
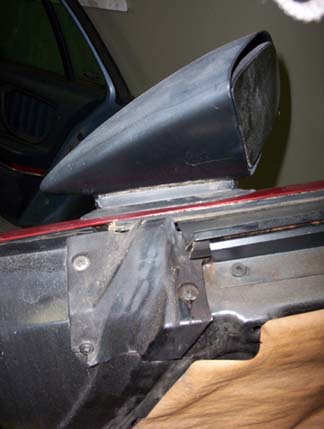
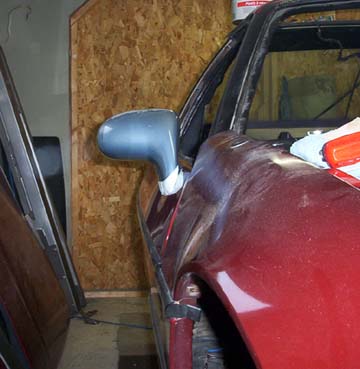
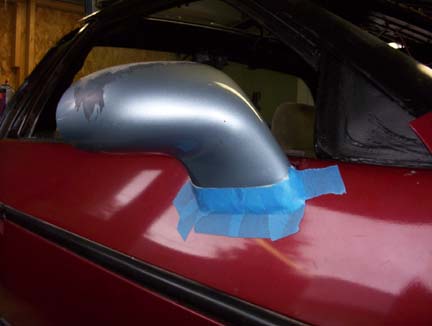
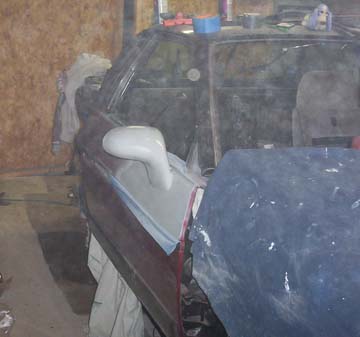
I got the following power mirrors from a olds98 Regency. I like the style of them. After removing the original mirror, and placing the new one on, for fitting, I realized that an easy swap wasnt going to happen... I propped it up with cardboard to find the angle I needed. with it in place, I can now measure the opening in the bottom . I will have to make a prop for this mirror using balsa wood (its so easy to shape) and the either resin it or bondo it to make it paintable. I did make sure to measure from the door edge to the mirror, so that it would sit close to where the old one was. So that when I was in the drivers seat, I could see where Im suppose to.
I know my mods arent dramatic or competitive, but alot of the time, people leave out the little stuff. I try not to. I hope my posts can be helpful to someone. John
[This message has been edited by fiero67 (edited 10-16-2004).]
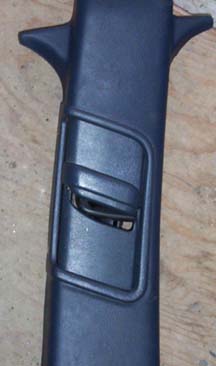
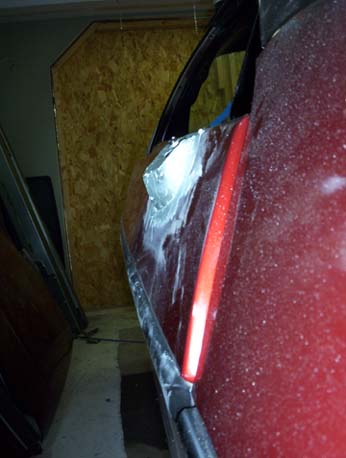
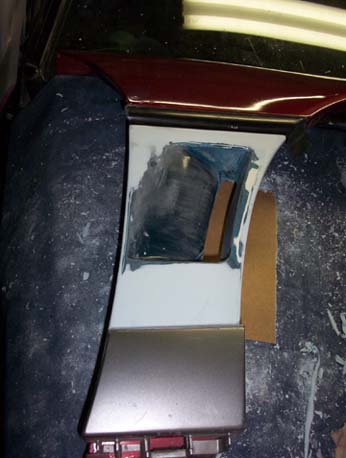
before I get going on posting more on the mirror mounts... Ill throw in a picture on the next mod Im making to my interior...does anyone want to guess what it is?
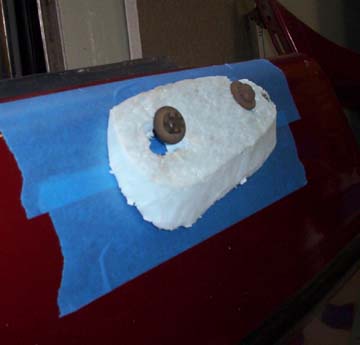
now back to the mirror mounts... progress has been good. after doing an emense amount of measuring an positioning of this mirror, I found the best location for it, figured out the angles so it looked good where it sits and that it was going to be fully functional. Instead of using balsa wood to make the form for the mirror to sit on, I went with the blue foam. with a razor blade in hand and a new can of patience, I started to cut this peice of foam down until it filled the gap between the mirror and the door panel and also continued the lines of the base onto the door panel.
I put blue tape on the door so when I attached the foam peice to the mirror and place it back onto the door, I could outline it onto the door to know where it would sit (without having to hold the mirror on it). I am molding this peice onto the door panel . The mirror bolts and wiring will pass through this form. The mirror and gasket will attach to it.
One more test fit to make sure this is where I want it, before I permamently bond it onto the door. I then proceeded to put tape on entire peice of foam. Im not sure what fiberglass resin would do to foam. I was too impatient to find out. test fitted the mirror again. trimmed off the excess of the tape ( Im not worried about the tape giving way, because it will be trapped inside of the fiberglass when this project is done) Then I coated it onto the door with a thin layer of boat bondo to form it, before I put on a layer of fiberglass. of course thats after I add a crap load of hours sanding this peice smooth and highlight the lines in the mirror onto the door panel. Tomarrow, it should be ready for primer.
before I get going on posting more on the mirror mounts... Ill throw in a picture on the next mod Im making to my interior...does anyone want to guess what it is? ...
It looks like you are adding an adjustible seat belt anchor. Cool! It's the attention to little details that separate the really nice Fieros from the hacked up looking ones. I think yours will be one of the really nice ones when you are done. It will be in the Skitime class...
you are right, It is an adjustable seat belt anchor. Good eye. I will post a step by step on that as well. I could only dream of being in the same class as skitime or you jscott1 and many others here on the forum. My dream is to make my first car restoration a memorable one. Im honored to hear you say that though. Thanks. John
Regency Mirrors! I drive a regency in the winter and I've been looking at the mirrors for a long time now, and always thought about how they'd look on a fiero. I knew they wouldn't conveniently bolt up, and I knew they'd need to be installed on a certain angle as you have done, so I never took the chance and tried to install them.
Thanks a bunch for doing this and actually letting me see what it looks like! + for you.
you are welcome ......If you need any angle shots or anything else ,let me know. If you want to do this yourself, I can always spray a crap load of foam on the door and make a mold from it ...Im sure these mirrors will look great once they and the mounts are painted the same color as the car. I also can give you the wiring diagram on how to wire them to the factory mirror harness. The regency that I had was fully loaded, so alot of my interior mods are from that car. so stay tuned and see what else may look good to you, like the speed window on the drivers side. John
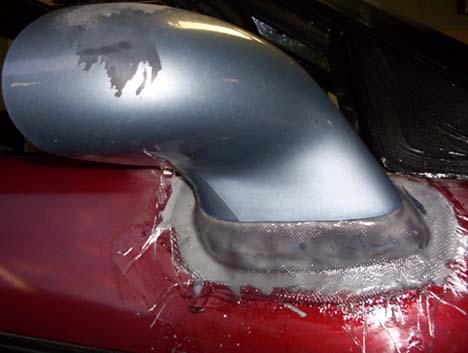
All I can say, is sanding and fine tuning bondo isnt that much fun. Someone lied to me After I sanded the shape to this mount, I layed two layers of fiberglass onto it. I did this for strength. We all know how mirrors get hit all the time as people pass by them. I wanted a solid mount. I dont think the foam and the bondo would have held. I also tested the fiberglass resin on the blue foam, and it doesnt eat it or damage it at all. so , on the drivers door, I can skip the pre bondo step.
After the fiberglass was cured, ( I mounted the mirror on the base. This way I can make sure all my edges match.I looked for all the low spots, filled them with bondo. ) I then proceeded to lay more boat bondo on top of the fiberglass, to finish the shaping of the lines. this was hard, but worth it in the end. The finishing step was to mount the mirror onto the base and smooth it all out with spot filler. Its sands easy and can fill anything that I missed. most of what you see in the picture will be wet sanded off. All that is left to do is prime the door panel.
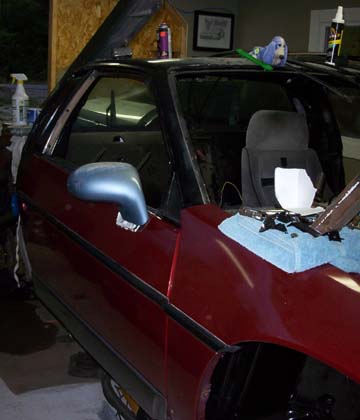
The only concern I have is with the mirror installed. The whole thing looks long now, but I think its because of the two contrasting colors and sheen...making it stand out. Once it is painted, I think it will blend right in.
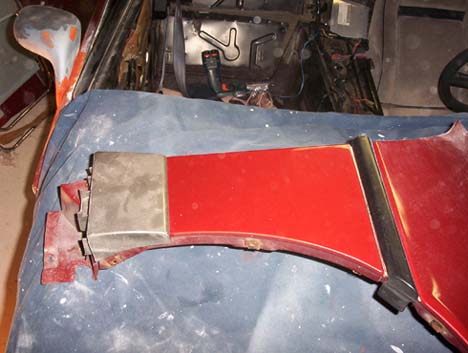
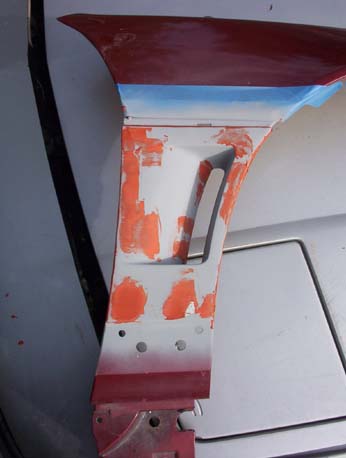
I know I said I was going to work on the seat belt adjuster, but heck, I just got my TA vents in..and sense Im already in fiberglass. I might as well do these too. Above is a pic of the first ones I did, but I dont like the shaved look. So Im going to leave the molding and GX on.
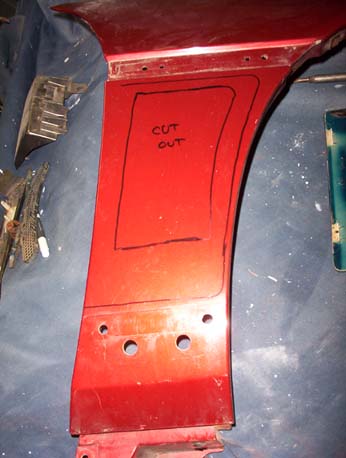
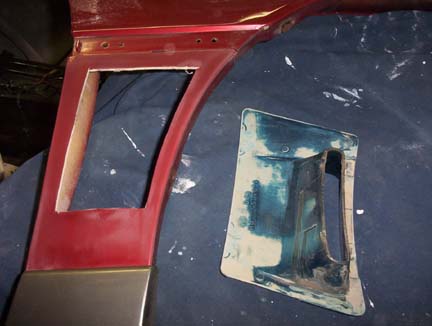
Im installing these from the outside of the fender. The first step to installing TA vents is to place the driverside one on the passenger side upside down. that will be what the finish shape will be when the right one is installed. position it to where you want it and trace that onto the fender. I use the marker for my dry erase board, because you can just wipe it off. I left the fender mouldings on so I could see where everything will sit. you dont need to cut all of the trace out...this is the guide to show you where it will sit. All you will need to cut out is the area of the curve on the vent. I marked the cutout on the fender , and cut it out. On the back of the vent, you must remove the plastic clips that hold it onto the fender of a TA. I used my dremil for this. The only tabs you leave are the ones that the vent screens clip onto.
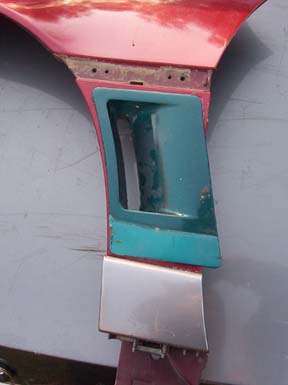
like this: After I fit it and it sits flat on the fender, I used two part epoxy and clamps and glued it on . let dry overnight. You will notice that the lower part of the vent will stick out over the fender. I used the edge of the fender as a guide and trimmed this off, at an angle . From there, I used coarse grit sandpaper and sanded off all the edges of the vent (tapering them towards the edges of the fender. ) Now that all this is done, I got out the boat bondo and filled the areas to smooth out the vent. Putting the trim peice and the GX back on, they gave me a guide to fill by. I wanted to make this look as stock as possible immediately after the first coat of bondo was put on, I removed both those peices. Making sure to clean them off. I didnt want to mold these on. I tapered the edges of the bondo at these areas to look like the shape that would have been there from the factory (or so I thought)
Lots more sanding and layering the bondo until I got the exact contor and profile I wanted. Wet sanded the fender down and primed it. Anything else that would need fixing will be done with spot filler. All that is left to this is finishing up with the spot filler and reprimming to get it ready for paint.
[This message has been edited by fiero67 (edited 10-12-2004).]
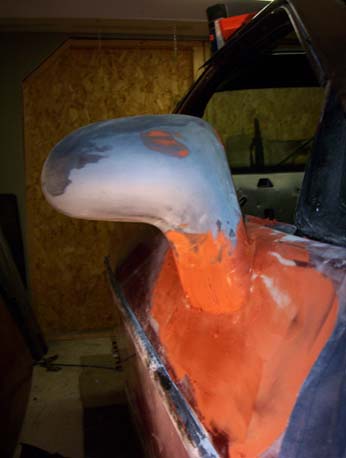
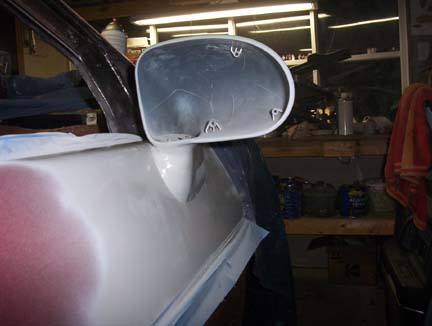
I wish I could get better pictures but my garage isnt big enough to move back enough away from what Im working on. heres the mirror in primer.... Im very happy with it.
I had to take this picture quick because I filled the garage with primer mist....need air!
Thanks for looking.. John
[This message has been edited by fiero67 (edited 09-25-2004).]