Been a while folks. I haven't touched my Fiero for several years, been in hibernation in the garage. It needs a new water pump and at the end of Sept I finally kicked myself hard enough to start the work. I've been spending an hour here and there on this, and today finally got all the screws/bolts out of the pump. I've been a bit shocked at how much R&R is required to remove the pump with the engine in the car. So far I've had to do this: 1) Remove PS rear wheel 2) Remove entire wheel well liner & splash guard. 3) Remove exhaust manifold heat shield near alternator. 4) Remove dog bone. 5) Remove dog bone bracket on engine. 6) Remove both rear sway bar end links (for alternator removal). 7) Remove alternator & belt. Luckily I've done this before and knew that the only way this was coming out of the engine compartment was through the wheel well. 8) Remove EGR vacuum controller. 9) Remove EGR controller bracket. 10) Remove alternator bracket. 11) Remove wire harness protector bracket on right side of water pump (on the 2 studs in the water pump). 12) Remove water pump pulley. 13) Install the little stamped metal piece to hold the timing cover in place when the pump is removed. The one that came with my pump was out of spec so I needed to do a bit of grinding on it so that I could attach it. 14) Remove the battery tray left side plastic panel for ease of access to the water pump screws/bolts. 15) Remove the 12 screws & bolts that fasten the water pump to the timing cover. Why God why, are there 12 fasteners of 5 different sizes needed to mount the water pump to the engine?
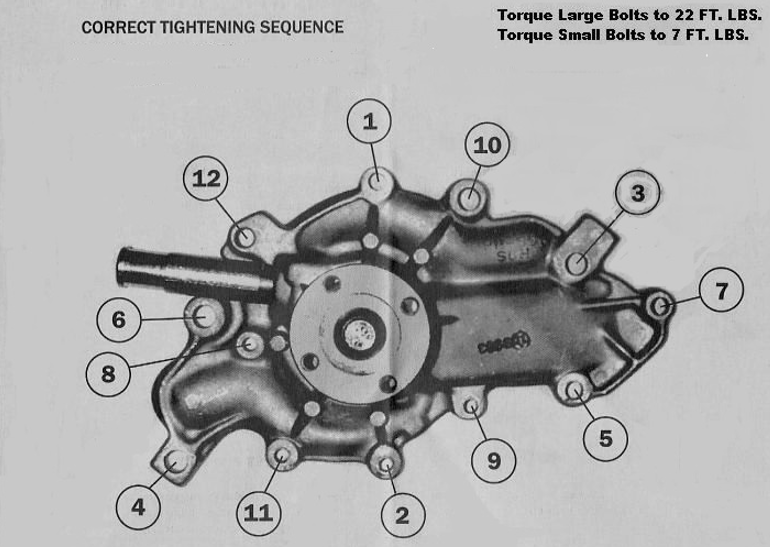
I have not pulled the pump off yet, as I probably will remove the crank pulley so that I can see the bottom of the pump to make sure that the two screws I removed are actually screws #2 and #9 in this image:
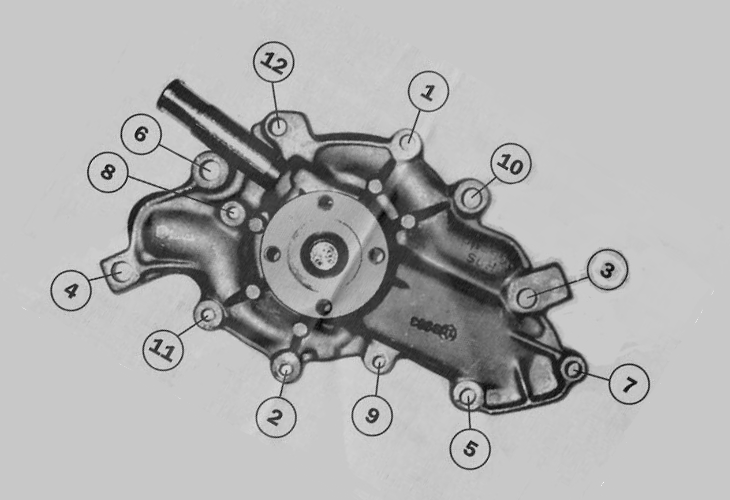
It's either that or get some lights in there and fiddle around with a mechanics mirror to see the bottom of the pump. I just don't have line of sight for those 2 screws. Also, that image of the tightening sequence really needs to be rotated for the Fiero to something like this:
Because that's what the orientation of the pump on the engine really is.
13) Install the little stamped metal piece to hold the timing cover in place when the pump is removed. The one that came with my pump was out of spec so I needed to do a bit of grinding on it so that I could attach it.
Glad to hear you remembered that step before loosening the mounting bolts.
I went through all that fun with my Formula a few years ago, as reported Here.
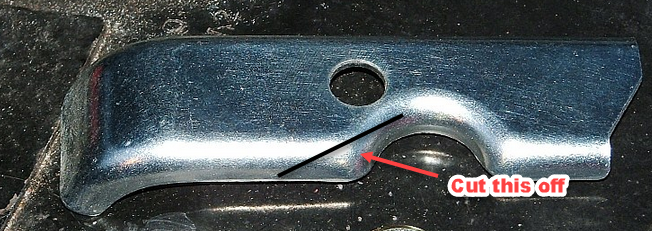
Is this what your "stamped metal piece" looks like?
Make sure that your new water pump has a METAL impeller; I had one with a plastic impeller and the car would overheat- the plastic impeller (Directly exposed to hot coolant) expands quicker than the metal shaft (which is NOT exposed to the hot coolant).....so it would stop spinning.
There are some successful plastic-impeller pumps that are designed to deal with this situation- but the after-market pumps we get for the Fiero are not an advanced design- just a replacement.
Also, be extremely careful with the smallest screws that hold the pump on- they are threaded into the aluminum timing chain cover and easily strip the threads
I was able to remove the waterpump without using the special tool or a clamp. As long as you make sure no outwards force is acting on the timing cover, there should be no problem. In other words, don't pull on the waterpump (since that will apply an outwards force on the timing cover as well). Use something between the waterpump and the timing cover to pry the waterpump loose. That way, all forces acting on the timing cover will go inwards.
Also, I was able to replace the water pump without removing anything (so I skipped steps 1-7). I actually had plenty of space from the top.
Late, while you are down there with things more accessible, you might want to check the condition of the hoses going to/from the pump. Also, it's a good opportunity to make the timing groove on the harmonic balancer easier to see (wax pencil, etc.)
I did something a little different when I replaced my water pump earlier this year: I fixed it so the use of that special bracket won't be necessary ever again.
See that one bolt there just beneath the special bracket? It's the one where there is a gap between the water pump and the timing cover. Anyway, before installing my new pump, I replaced that bolt with a length of threaded rod, with a nut and washer, and then I installed my new water pump with another nut and washer. The threaded rod secures the timing cover to the block, thus eliminating the need to use the special bracket. Too bad they didn't do this originally from the factory because it will be a time-saver next time (if there is a next time).
See that one bolt there just beneath the special bracket? It's the one where there is a gap between the water pump and the timing cover. Anyway, before installing my new pump, I replaced that bolt with a length of threaded rod, with a nut and washer, and then I installed my new water pump with another nut and washer. The threaded rod secures the timing cover to the block, thus eliminating the need to use the special bracket. Too bad they didn't do this originally from the factory...
Great minds think alike. Back in 2014, I was wondering about doing the same thing...
What is the purpose of the gap that I've indicated with a question mark? Shouldn't there at least be a stud with a nut on it used to hold down the timing cover below the water pump at that location?
[This message has been edited by Patrick (edited 10-18-2022).]
Hey, good looking picture too! It shows the gap really well, the gap which I am certain is there for exactly that purpose. It's gotta be for a stud and nut!
It might even have been your picture which I subconciously remembered from years ago that led me to do it this way. Actually, I've been meaning to keep an eye open for any very old 2.8s I might see in the junkyard, to check them to see if they use a stud or not.... Chevy Citations, early S-10 pickups, etc.... They're mostly about all gone by now though.
I agree. What makes using a bolt there even worse, is that so many guys over the years have over-torqued the bolt... and ended up cracking/breaking off that section the water pump!
[This message has been edited by Patrick (edited 10-18-2022).]
I agree. What makes using a bolt there even worse, is that so many guys over the years have over-torqued the bolt... and ended up cracking/breaking off that section the water pump!
Absolutely great pointer!! Somebody should of said this back in 1990. It’s one part on the 2.8 engine, that never should of been approved by GM, that was just BS.
So a couple weeks ago I got this all wrapped up and running. This story takes an interesting twist...
My car had been in a cocoon in my garage for at least 8 years, as I *thought* it needed a new water pump and wanted to replace it before I drove it again. Didn't want to be out joyriding in the car and have a cooling system failure. Why did I think I needed a new water pump? At slow speeds in neighborhoods (15-20MPH) I would hear a sound from the engine that sounded like marbles or ball bearings rattling around in a coffee can. I never could figure out what was causing the noise, but had read that this could be a symptom of a failing water pump. So after replacing it on the first drive out, I heard the sound again. Then on repeated drives, same sound. I know it is not the water pump, especially because during the replacement I also installed a Dodgerunner belt tensioner. Also, the water pump that I removed looked fine from all sides and the bearings were not loose.
But then I remembered that a few years ago on another car I owned that I had a rattle noise in the engine under very specific speed/engine load conditions. I took it in for diagnoses/repair and found out that the engine in that car (V6) had a small heat shield on one of the down pipes that was fastened with a metal zip tie at each end. One of those zip ties had broken, and under the right engine load, the vibration from the engine would cause that little heat shield to rattle on the pipe. So now I am pretty confident that the noise I am hearing in my Fiero is a rattling of the heat shield on the Y pipe.
But hey, my 34 year old car now has a new water pump and fresh coolant!
...another car I owned that I had a rattle noise in the engine under very specific speed/engine load conditions. I took it in for diagnoses/repair and found out that the engine in that car (V6) had a small heat shield on one of the down pipes that was fastened with a metal zip tie at each end. One of those zip ties had broken, and under the right engine load, the vibration from the engine would cause that little heat shield to rattle on the pipe. So now I am pretty confident that the noise I am hearing in my Fiero is a rattling of the heat shield on the Y pipe.
I have a JDM Subie STi that developed a similar noise after I had swapped in an aftermarket exhaust from the downpipe back. The rattling sound is rather loud, and damn annoying! Someday I'll crawl under there and rectify the situation.
quote
Originally posted by lateFormula:
But hey, my 34 year old car now has a new water pump and fresh coolant!
Never a bad thing!
[This message has been edited by Patrick (edited 11-13-2022).]
Yes, looked like that out of the box. Had to cut a bit off with right angle grinder:
Something I just noticed - Rodney sells an improved version of that bracket. The difference is, his doesn't require removal of the alternator bracket. Should save a few steps.
Make sure that your new water pump has a METAL impeller; I had one with a plastic impeller and the car would overheat-
I echo this... I had a plastic impeller (one of the Coltec Industries ones) and the impeller broke free from the shaft after only 6 months of use... car completely overheated on the highway, and I trashed the main bearings... had to get the engine rebuilt.