My '88 Formula suddenly started leaking coolant. A lot. This is a Fiero that had sat for several years, but I've resurrected it and it's been fine for six months or so. It's leaking from the water pump area, but apparently not from the seal in the hub/impeller area. It's absolutely dry behind the pulley. When the engine is running the coolant really comes out fast, but it'll also drip out slowly just sitting there when the engine is cold. The car is undriveable in it's present condition.
When I'm under the car, I can see coolant dripping down directly from the middle of the front of the block/timing chain cover behind the harmonic balancer. What's above there that would leak so badly? Obviously the water pump is up there, but if the seal in the hub/impeller area is fine, what else would suddenly let go like that? A gasket? Seems unlikely unless a bolt has worked loose.
Just wondering of course if there's any chance the water pump doesn't need to come out.
[This message has been edited by Patrick (edited 04-12-2014).]
My guess is the area behind the large radiator hose that comes off the pump toward the front of the car. The gasket is very narrow there. I had one come loose there and start to leak bad. Took me a while to figure out where it was leaking since it was very hard to see and ran down off other places. It's actually the timing cover to block gasket where the water passes through.
[This message has been edited by Dodgerunner (edited 04-12-2014).]
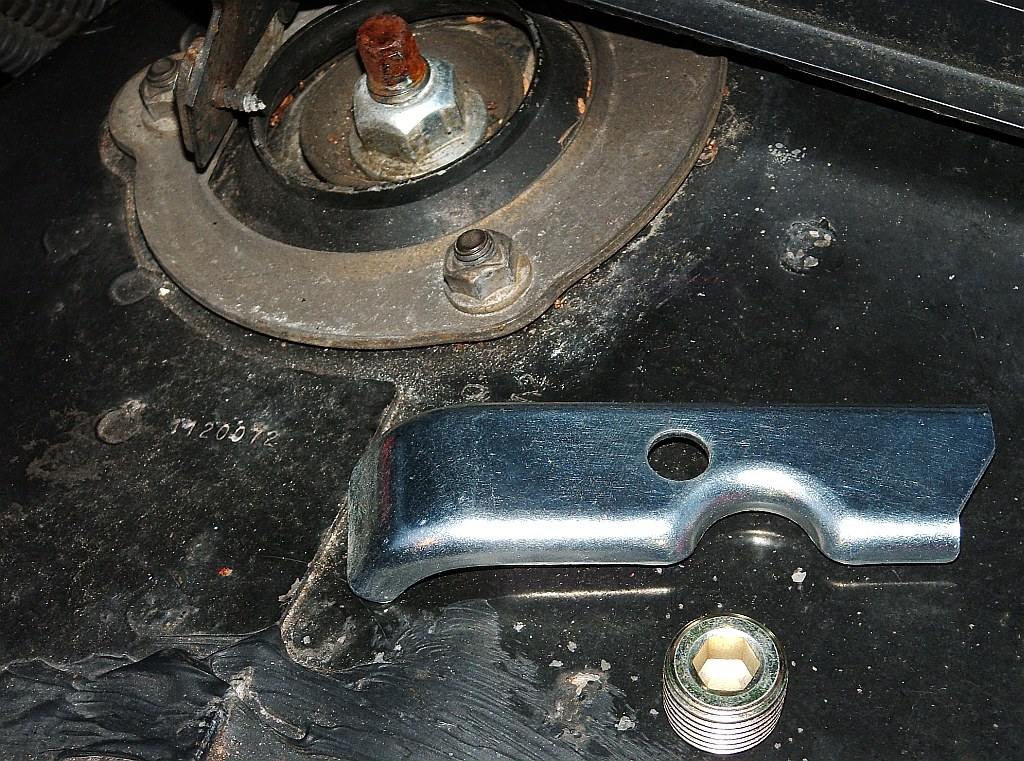
The little hole is called the 'weep' hole. It is located after the seal but before the bearings. It allows the fluid to leak out before being pushed through the bearings. All rotating seals will end up leaking some. This way a tiny leak doesn't cause the water pump bearings to fail early.
The timing cover gasket that connects the heads to the timing cover and then to the pump are very bad actors. They leak often, and mostly when the pump is changed without clamping the top of the cover. If you do not clamp the cover it will pull the cover back and seperate the gasket from the block. Then in a little while you will end up with a coolant leak. Very common problem. Larry
The little hole is called the 'weep' hole. It is located after the seal but before the bearings. It allows the fluid to leak out before being pushed through the bearings. All rotating seals will end up leaking some. This way a tiny leak doesn't cause the water pump bearings to fail early.
ditto
just means the thing is gone and needs replacement that's what happens when it leaks out the weep hole. Get an inspection mirror under there to be sure but I bet that's what it is.
Steve
------------------ Technology is great when it works, and one big pain in the ass when it doesn't
Detroit iron rules all the rest are just toys.
[This message has been edited by 84fiero123 (edited 04-13-2014).]
My guess is the area behind the large radiator hose that comes off the pump toward the front of the car. The gasket is very narrow there. I had one come loose there and start to leak bad. Took me a while to figure out where it was leaking since it was very hard to see and ran down off other places. It's actually the timing cover to block gasket where the water passes through.
This. My 3.4 sprung a (slow) leak here. If you can get the car up on ramps or a lift, you can see it dripping down the big coolant hose. Other than pulling the balancer, it's not too bad a job. You get to work mostly through the wheel well. Fun. Go ahead and replace the crankshaft seal in the timing cover, while you're in there.
They may try to sell you the wrong water pump gasket in the gasket kit. (Most 2.8s, by this time, were using reverse rotation water pumps.) I forget how I resolved it. Either asked for an 87 timing cover kit, or just bought the water pump gasket separately.
Thanks for all the responses, guys. It's much appreciated.
I'll be shuffling three Fieros in my back yard to position the Formula in a location on the driveway where I can more comfortably work on it. As I had stated earlier, I don't think the seal at the hub/impeller is leaking as the backside of the pulley is completely dry. The leak might be at the gasket location that's been mentioned a couple times. Hopefully I'll know a lot more by the end of the day!
Doing some research here about this task, I came across several references to the danger of potentially creating a coolant leak between the timing cover and the block, which has been touched upon here...
quote
Originally posted by trotterlg:
The timing cover gasket that connects the heads (block?) to the timing cover and then to the pump are very bad actors. They leak often, and mostly when the pump is changed without clamping the top of the cover. If you do not clamp the cover it will pull the cover back and seperate the gasket from the block. Then in a little while you will end up with a coolant leak. Very common problem.
How is this clamping accomplished? I hope to be at this stage a little later today.
I grabbed some images I found and altered them a bit. The first two images were originally posted by ManMadeChickens in This thread, and I lost rack who originally posted the third one.
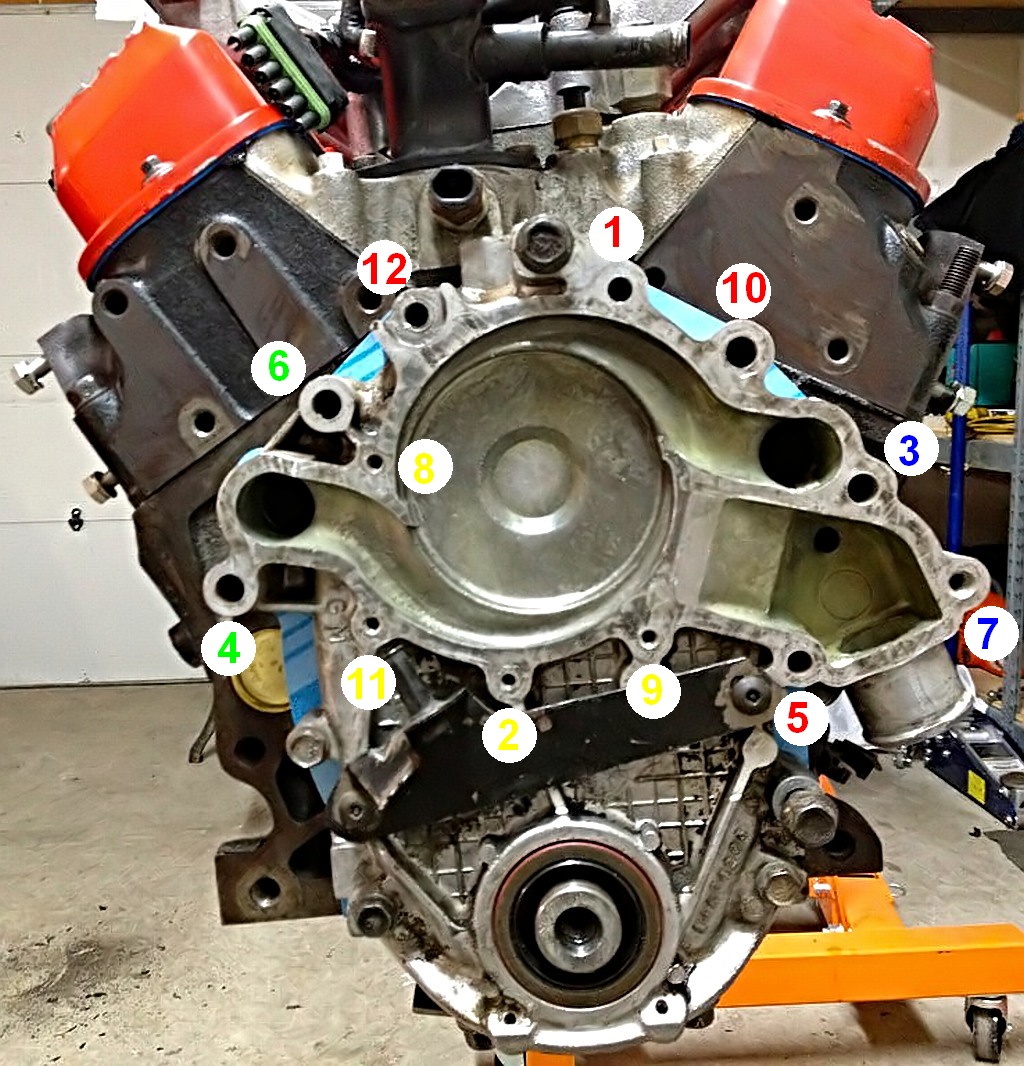
What is the purpose of the gap that I've indicated with a question mark? Shouldn't there at least be a stud with a nut on it used to hold down the timing cover below the water pump at that location?
I've added numbering in this image to match it up with the third image.
quote
Originally posted by Dodgerunner:
My guess is the area behind the large radiator hose that comes off the pump toward the front of the car. The gasket is very narrow there. I had one come loose there and start to leak bad. Took me a while to figure out where it was leaking since it was very hard to see and ran down off other places. It's actually the timing cover to block gasket where the water passes through.
Just to clarify, I suppose it's more than the water pump that needs to come off if this is the issue? The timing cover as well?
[This message has been edited by Patrick (edited 05-13-2024).]
Originally posted by Patrick: ... Just to clarify, I suppose it's more than the water pump that needs to come off if this is the issue? The timing cover as well?
Unfortunately, that's where mine was leaking. Between the timing cover and the block. Sounds like others have had the same issue.
I would be inclined to fill up the coolant, back the car up on ramps, leave the engine running, and climb under and have a look. (Or if you have someone nearby with a lift, it would be even better.) Check between that large coolant hose and the block. It's where I saw the drips on mine. At first I thought the hose clamp was loose. No such luck.
I would be inclined to fill up the coolant, back the car up on ramps, leave the engine running, and climb under and have a look.
I was under there yesterday with the engine running, but I couldn't tell for sure where the coolant was coming from.
quote
Originally posted by Patrick:
When I'm under the car, I can see coolant dripping down directly from the middle of the front of the block/timing chain cover behind the harmonic balancer.
Hopefully I'll get a better look today and figure this out.
Originally posted by Patrick: When I'm under the car, I can see coolant dripping down directly from the middle of the front of the block/timing chain cover behind the harmonic balancer.
Hopefully I'll get a better look today and figure this out.
Interesting. All the coolant passages are way above the balancer. The nearest thing is the water pump itself. Maybe you'll get lucky and it won't be the timing cover-to-block gasket.
Might try spraying a dusting of baby powder all over the front of the engine. The water should leave tracks where it washes it away. (As an added bonus, it'll be soft as a baby's behind. )
[This message has been edited by Raydar (edited 04-13-2014).]
If you do end up finding the leak is the timing cover and you are going to fix it. It give you a chance to change the timing chain while you at it. Also if your harmonic balancer is bad you can either change it or when I did mine the balancer seal had worn a groove in the hub and was leaking oil. I got a new hub seal kit that came with the repair sleeve for the hub. Fixed that oil leak completely.
Okay, I got a bunch of stuff out of the way (including the water pump pulley) so I could see better, and by using a mirror from the top I can see moisture that has come out the weep hole. I'm quite surprised that this didn't result in the backside of the pulley getting wet, but it appeared to stay dry which threw me off the trail. Coolant came out of the weep hole, ran along the underside of the impeller hub towards the timing cover, and then ran straight down behind the harmonic balancer and out at the bottom.
I'm hoping to find out how the timing cover is supposed to be "clamped" before I remove the pump.
[This message has been edited by Patrick (edited 04-16-2014).]
The new water pump should come with a small metal bar or tab thingy. You are going to use this to clamp the timing cover down. I recently had a WP weep hole start it's leaking and did my WP.
When you purchase a new WP make sure the impeller is metal. I guess the plastic ones end up spinning on the shaft and going bad quickly. Also check the box for the aforementioned metal tab.
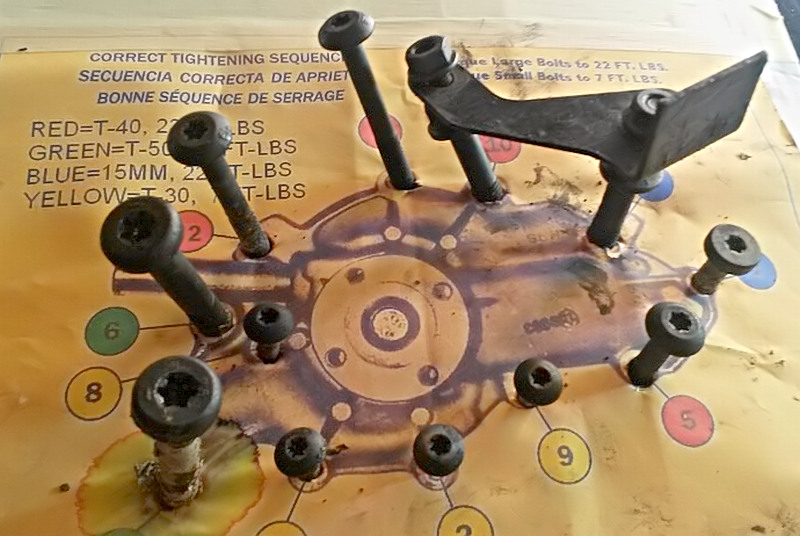
Also check to see if the factory Torxs bolts are still in the WP. If so look at changing them to regular bolts. Doing so will save you TONS of work in the future.
Welcome to one of the many, "rights of passage" involving our beloved Fiero's!
The new water pump should come with a small metal bar or tab thingy. You are going to use this to clamp the timing cover down.
Thanks for mentioning that. I had read about this clamp earlier, but your post was a good reminder to keep this in mind when I went to pick up the pump from a local store. (I could've got the pump for half the price online, but there were a few things I wanted to check in person.)
I had ordered an ACDelco Part # 252613 water pump. First thing I checked was where it was made. China. Oh well, to be expected. Second thing I checked was the impeller. Metal. Good. Third thing I checked was for the clamp. No clamp. Not happy. I asked the counterperson about the clamp. She didn't know what the heck I was talking about. I asked to see if they might have another brand of water pump in stock for the same application. They had a Cardone Select Part # 5513114 pump in the store. Great. She brought it out and I opened the box. Bingo, a clamp! It also had a plug to put in place of the heater hose pipe which isn't required on the water pump with the 88's. (The ACDelco unit didn't have that piece either.)
Here's a picture of the "extras" supplied with the Cardone water pump... the clamp and the plug.
I noticed the Cardone pump had a metal impeller, but I didn't want the Cardone pump. The ACDelco pump was definitely more skookum (solid, heavy) than the Cardone unit. I wanted the ACDelco pump, so I asked if I could have the clamp and the plug from the Cardone box. She asked the manager. He didn't care, so I scored the pump I wanted as well as the extras I needed. Me happy.
I found this bit of info on the clamp at the Cardone site HERE.
quote
IMPORTANT: On GM 2.8L engines, the timing cover MUST be clamped to the cylinder block BEFORE removing the water pump attaching bolts. This prevents the timing cover from pulling away from the engine block and breaking the seal. IF the seal is broken, coolant may enter the engine block.
When it stops raining, I'll continue working on the beast. (I'm doing several things to it while I'm at it.)
[This message has been edited by Patrick (edited 05-13-2024).]
I want to save those of you with an '88 2.8 a lot of hassle. Don't buy an ACDelco water pump!
As mentioned in my previous post, the ACDelco Part # 252613 water pump does not come with a plug to use in place of the unrequired heater core pipe (which is only necessary for the '85-'87 2.8). I suspect the reason it doesn't come with a plug is because the pipe appears to use a non-standard thread. When I removed the pipe from the pump (with some difficulty), I soon discovered that a replacement plug with a matching thread couldn't be found.
As also mentioned previously, the ACDelco pump doesn't come with the clamp that is required to prevent the timing cover from breaking its seal against the block when the pump is removed.
So...
Get the Cardone Select Part # 5513114 water pump instead. It comes with a plug. It comes with the clamp. (I should also mention that this mass produced stamped-out clamp required a few minutes of "modification" to properly fit where it had to go.)
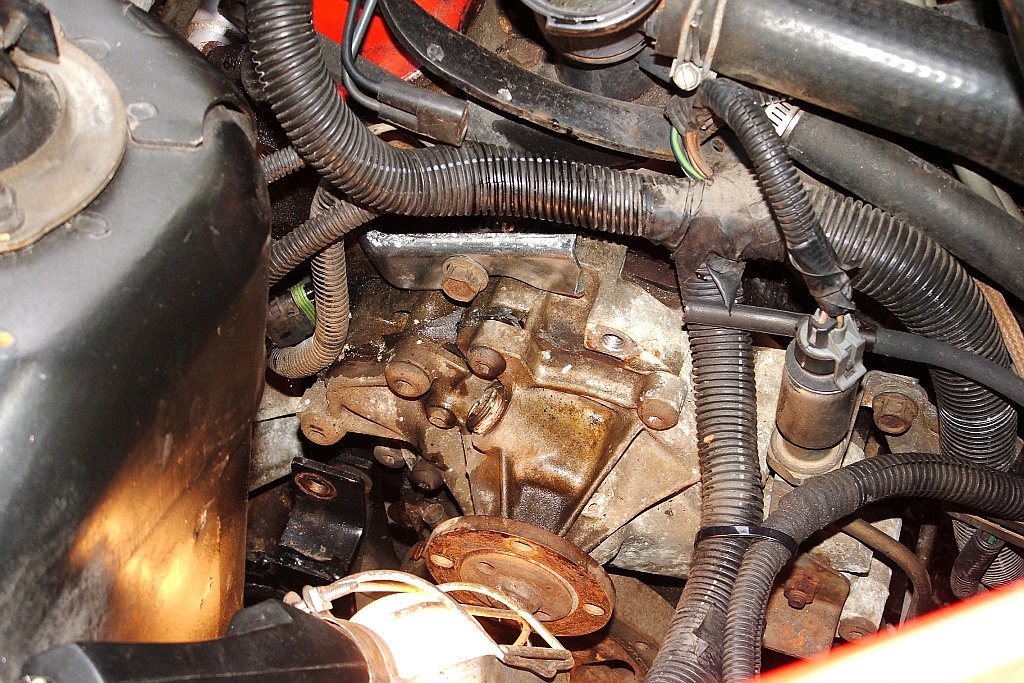
Speaking about the clamp, I have never seen an image anywhere on the 'net (including Pennock's) of one actually being used. Behold...this is where it goes!
And yes, you install the clamp before you loosen any water pump bolts!
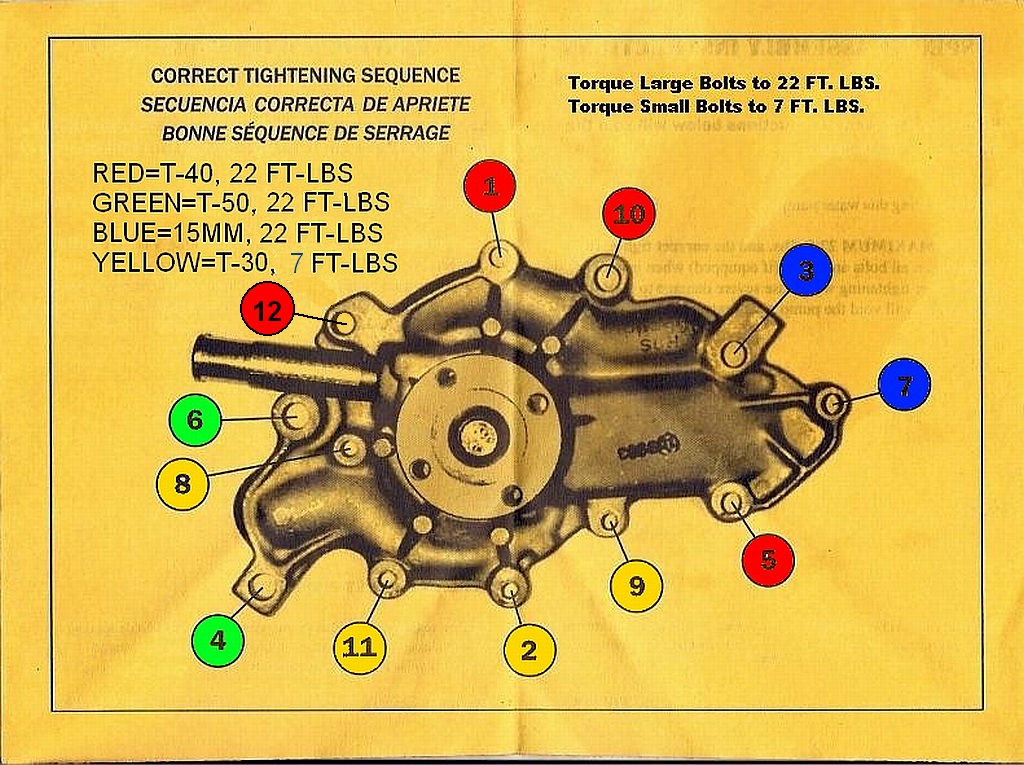
I'll also mention that bolt # 4 in the diagram posted earlier is the only bolt that requires sealant on the threads. I used anti-seize on all the rest.
[This message has been edited by Patrick (edited 05-13-2024).]
Got my first pump from the Fiero store. It came with everything but when I bolted it up, the lug that the bolt (arrowed) goes through on the pump was slightly too small. As a result, as I torqued it up, it got pulled into the gap behind it and of course broke the lug off the pump. Not happy.
I was able to get a Duralast one from the local store so that's what's on there now. The lug at that location is slightly wider on the new pump so it sits on the sides of the opening behind it.
------------------ Anything I might say is probably worth what you paid for it, so treat it accordingly!
I recommend using Permatex® Aviation Form-A-Gasket® on both the gasket and the threads of the #4 bolt. I've used this stuff for 40 years.
quote
Originally posted by ltlfrari:
...when I bolted it up, the lug that the bolt (arrowed) goes through on the pump was slightly too small. As a result, as I torqued it up, it got pulled into the gap behind it and of course broke the lug off the pump. Not happy.
After reading of so many people breaking that part of the pump off, I was very careful not to over tighten the bolt, plus I used a large washer to help dissipate the force of the bolt against where it goes through the pump. I was very pleased that I had no problems.
[This message has been edited by Patrick (edited 05-19-2024).]
I have receive my Cardone water pump totay but no clamp! Is it absolutely mandatory for my GT88?
It's certainly a nuisance that the clamp wasn't supplied, but it's a very simple device that could easily be fashioned from a scrap piece of metal. Use my images posted above to get an idea of how it needs to be shaped and where it needs to be located.
It's not "mandatory" to use the clamp, but by not doing so you risk breaking the seal between the timing cover and the block. If that occurs you'd have a whole lot more work ahead of you.
quote
Originally posted by pommejaune:
Another question, how to remove the pulley properly? A little bit afraid of this!
The pulley is just held on with four bolts. Leave the belt in place until you've loosened those bolts.
Stupid question, I'm trying to remove the bolts but of course the pulley is turning !? What is the trick?
Concerning the clamp I've nothing to create this piece, where is it possible to buy one? Can I borrow it to a nice soul, I'll send it back directly after replacement and of course pay for shipping!?
[This message has been edited by pommejaune (edited 07-20-2014).]
Notice that some of the water pump bolts extend into the water jacket. It is very important to use Permatex (or similar) sealer on the threads and apply a small dab under the bolt head before you tighten. Also follow the Torque sequence and torque tightening specs for each bolt. The Torx bolts can be especially fragile and should be replaced if they show rust erosion. Replacing the water pump and getting a quality leak free seal can be a tricky job, so take your time and follow the recommended procedure and everything will work out. When I replace a water pump on a 30 yr old engine, I also replace the cover seal gasket and the front oil seal but do not consider this unless you have the tools to pull the harmonic balancer.
Stupid question, I'm trying to remove the bolts but of course the pulley is turning !? What is the trick?
As Patrick said, leave the belt in place until you've loosened the pulley bolts. You can press down on the belt with one hand to prevent the pulley from turning, while breaking the bolts loose with your wrench and other hand. Or, jam something soft between the belt and pulley, like a small piece of rubber hose. As it's pulled in between the belt and pulley, it can stop the pulley from turning.
Thanks for the information, I've of course anti-seize and sealent ... but I'm still fighting to remove the pulley. Firefool, I've tried blocking the pulley but this is not possible, the bolts are very hard, possible that they have been tighten with a machine?!
Is there another way to block the backward rotation?
My self-made clamp ....
Thx pJ
[This message has been edited by pommejaune (edited 07-27-2014).]
pJ, I'm afraid that "clamp" you made won't do a thing. The timing cover needs to be held absolutely rigid against the block when the water pump is pulled off the timing cover. Only if your water pump practically falls off will your "clamp" hold. Otherwise, there's a chance that the timing cover will pull away from the block, and the seal will be broken. It wouldn't take much movement to do that.
quote
Originally posted by pommejaune:
What do I have to do. Release the alternator bolts like on the picture below?
Yes remove the two bolts to detach the alternator from its bracket. And then remove the alternator bracket from the block/head.
And I know you're excited, but please delete the duplicate post.
[This message has been edited by Patrick (edited 07-20-2014).]
Notice that some of the water pump bolts extend into the water jacket. It is very important to use Permatex (or similar) sealer on the threads and apply a small dab under the bolt head before you tighten.
One bolt, as stated earlier in this thread.
quote
Originally posted by Patrick:
I'll also mention that bolt # 4 in the diagram posted earlier is the only bolt that requires sealant on the threads. I used anti-seize on all the rest.
quote
Originally posted by Patrick:
I recommend using Permatex® Aviation Form-A-Gasket® on both the gasket and the threads of the #4 bolt. I've used this stuff for 40 years.
[This message has been edited by Patrick (edited 05-19-2024).]
Thx Patrick, sorry for the second post but I'm not allowed to delete it!
Question concerning the timing chain, this is the part concerned, red arrow correct?
I've created a small piece that is putting pressure on the timing, yellow arrow. If fact this part is scrolled inside but this is not visible on the picture. Normally it should keep the timing in place when the water pump will be removed, I hope :-)
[This message has been edited by pommejaune (edited 07-27-2014).]
Thx Patrick, sorry for the second post but I'm not allowed to delete it!
You may not be able to delete the "post" itself, but you can certainly delete the contents (including the image) by clicking on EDIT and highlighting everything... and yes, deleting it. It might be necessary to replace it with something. If so, just stick a smiley face in there.
quote
Originally posted by pommejaune:
Question concerning the timing chain, this is the part concerned, red arrow correct?
Yes, that's the part... but it's a timing chain cover.
quote
Originally posted by pommejaune:
I've created a small piece that is putting pressure on the timing, yellow arrow. If fact this part is scrolled inside but this is not visible on the picture. Normally it should keep the timing in place when the water pump will be removed, I hope :-)
I can see what you've done just fine. My concern is that its clamping pressure is minimal. If this is what you're going with, my only suggestion is to be as gentle as possible when pulling the water pump away from the timing cover. Do not try and tap it off. If need be, carefully pry it off by putting pressure between the water pump and the timing cover... not against the block or heads.
My water pump came off very easy as it wasn't stuck anywhere. Hopefully yours will be the same.
[This message has been edited by Patrick (edited 07-21-2014).]
I have now two questions, how to clean-up the timing chain cover? Same question for bolts removed?
Everyone has their own method, but I used a sharp gasket scraper, being very careful not to dig into the relatively soft aluminum of the timing cover. Slow and steady was my mantra.
A wire brush wheel would work fine on the bolts. And I always clean up the threads (both on the bolts and whatever they screw into) using my tap and die set.
quote
Originally posted by pommejaune:
Concerning the new seal, I suppose that I have to put permatex on the gasket?
I addressed that a couple times already in this thread.
quote
Originally posted by Patrick:
I recommend using Permatex® Aviation Form-A-Gasket® on both the gasket and the threads of the #4 bolt. I've used this stuff for 40 years.
I cropped your image a bit, but it demonstrates perfectly which bolt (there's only one) that protrudes into the water jacket, and therefore needs to have sealer on it.
[This message has been edited by Patrick (edited 05-19-2024).]
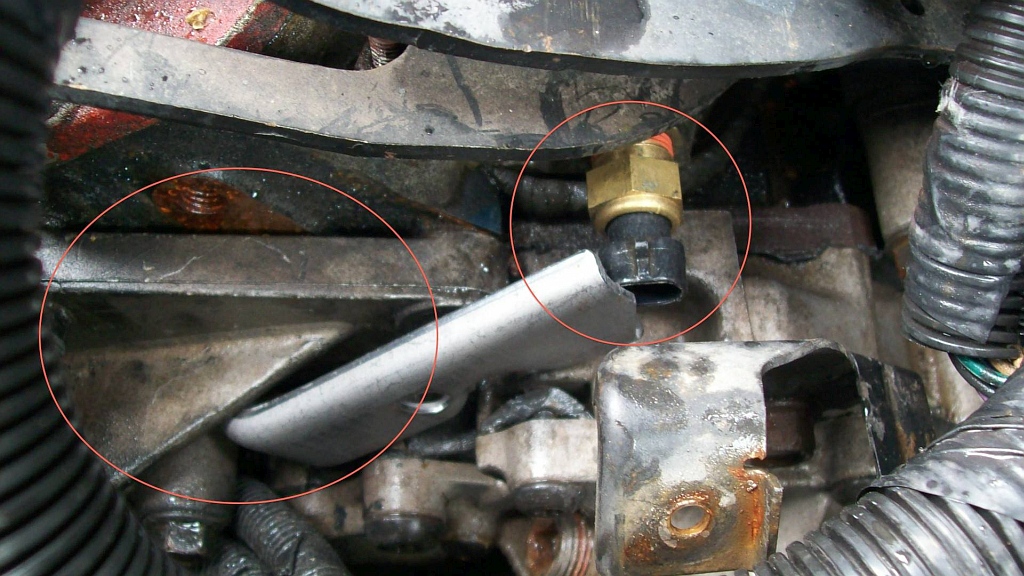
I am trying to use this clamp (featured in the picture below), but so far in the pictures in this album (link below) is about as close as I can get. I've circled some parts that are in the way. Do I need remove both to make bolting on the clamp for the timing belt cover possible?
Speaking about the clamp, I have never seen an image anywhere on the 'net (including Pennock's) of one actually being used. Behold...this is where it goes!
[This message has been edited by Doctor Clu (edited 05-24-2015).]
I am trying to use this clamp, but so far this is about as close as I can get. I've circled some parts that are in the way. Do I need remove both to make bolting on the clamp for the timing belt cover possible?
As you can see in the picture I posted of my own engine, the alternator bracket needs to come out for sure. I don't recall taking the ECM temperature sensor out, but that should be more apparent to you (if it's necessary or not) once you get the clamp in the proper position. It's a nuisance, but it's a whole lot less work than not using the clamp... and then needing to remove the timing cover to replace the gasket.
[This message has been edited by Patrick (edited 05-13-2024).]
Now that you all see what an incredible pain it is to replace the waterpump, now is the time to put Dodgerunner's Idler set up on! No more early failure of WP's and Alternator's since you no longer need to overtighten the belts trying to stop belt squee! A really great product....I have not heard of a single case of waterpump failure by anyone who has put his idler in their Fiero.
Now that you all see what an incredible pain it is to replace the waterpump, now is the time to put Dodgerunner's Idler set up on!
I have not heard of a single case of waterpump failure by anyone who has put his idler in their Fiero.
If you look closely at the picture of my engine, you'll see Dodgerunner's bracket.
Dodgerunner's auto tensioner had been on my engine for about a year before the water pump failed. However, I suspect the pump was already on borrowed time due to 26 years of previous use/abuse.
[This message has been edited by Patrick (edited 05-24-2015).]
Patrick do I need to apply rtv sealant to the bottom of my timing cover?
Jim, are you referring to where the bottom of the timing cover butts up against the front of the oil pan? Keep in mind that I've never had the timing over off any of my 2.8 Fieros. However, I did have the timing cover off one of my 2.5 dukes, and yes, I used a sealer... although at this point I can't remember what I used. Whatever it was, it worked.


 )
)