Either my search FU is off, or there aren't a lot of posts on the matter. I've found a few.
Don't know how many you've found, or how many you need... but using the words in your subject heading, I found five threads under Subject/Username... and 1064 threads under Entire thread.
[This message has been edited by Patrick (edited 05-18-2021).]
Is it just a matter of unbolting the old, and bolting in the new?
I believe that using the Lumina tie rods to replace the Fiero rear tie rods was an option created by Anthony Cook of Nova Scotia. The Lumina rods do not have threaded studs on the joint end so It works as follows. You use the Fiero tie rods, to make studs for the Lumina rods so cut you off the threaded end and use this as a stud to mount the Lumina Rod on the inner side. . Then you put Loctite on those studs you made and insert them into the threaded ends of the Lumina tie rods but not to far to bind the joint. You tighten them in place with a nut and lock washer. Then you just use that rod to replace the Fieros but the mounting hole just needs to be enlarged just a bit. The adjusting nut is the same for both rods and is reused.
------------------ " THE BLACK PARALYZER" -87GT 3800SC Series III engine, custom ZZP /Frozen Boost Intercooler setup, 3.4" Pulley, Northstar TB, LS1 MAF, 3" Spintech/Hedman Exhaust, P-log Manifold, Autolite 104's, MSD wires, Custom CAI, 4T65eHD w. custom axles, Champion Radiator, S10 Brake Booster, HP Tuners VCM Suite. "THE COLUSSUS" 87GT - ALL OUT 3.4L Turbocharged engine, Garrett Hybrid Turbo, MSD ign., modified TH125H " ON THE LOOSE WITHOUT THE JUICE "
I believe that using the Lumina tie rods to replace the Fiero rear tie rods was an option created by Anthony Cook of Nova Scotia. The Lumina rods do not have threaded studs on the joint end so It works as follows. You use the Fiero tie rods, to make studs for the Lumina rods so cut you off the threaded end and use this as a stud to mount the Lumina Rod on the inner side. . Then you put Loctite on those studs you made and insert them into the threaded ends of the Lumina tie rods but not to far to bind the joint. You tighten them in place with a nut and lock washer. Then you just use that rod to replace the Fieros but the mounting hole just needs to be enlarged just a bit. The adjusting nut is the same for both rods and is reused.
I've read that a bunch of times, but I could deal with a visual much better. Is there a photo writeup? Better, a video? It sounds like there is welding involved?
Don't know how many you've found, or how many you need... but using the words in your subject heading, I found five threads under Subject/Username... and 1064 threads under Entire thread.
I found the five, but they didn't seem to be much help to me. "five" is what I meant by "there's not a lot out there".
If that info is within the 1064 threads containing various iterations on those words....well, information overload.
I have to imagine that more than five people have dealt with this specific issue.
also, it looks like very few merchants sell them. They're not on Rock Auto (that I've found). Rodney Dickman has them, but they're also four times EACH the price of other inner tie rods.
I've read that a bunch of times, but I could deal with a visual much better. Is there a photo writeup? Better, a video? It sounds like there is welding involved?
Sorry, I do not have a video or pictures as I am not doing this repair right now. Re-read my post. I laid the process out step by step. I did not mention any welding. Its actually very simple. Make a stud by cutting off the threaded end of the Fiero tie rod. Now throw the rest ot the rod away. Now you have a fully threaded stud about 3" long. Screw the threaded stud that you cut from the Fiero rod into the inner end of the Lumina rod and just bolt it in using nuts and washers. Add the standard Fiero outer tie rod to the Lumina rod. It shouldn't take more than a few minutes to get this done.
------------------ " THE BLACK PARALYZER" -87GT 3800SC Series III engine, custom ZZP /Frozen Boost Intercooler setup, 3.4" Pulley, Northstar TB, LS1 MAF, 3" Spintech/Hedman Exhaust, P-log Manifold, Autolite 104's, MSD wires, Custom CAI, 4T65eHD w. custom axles, Champion Radiator, S10 Brake Booster, HP Tuners VCM Suite. "THE COLUSSUS" 87GT - ALL OUT 3.4L Turbocharged engine, Garrett Hybrid Turbo, MSD ign., modified TH125H " ON THE LOOSE WITHOUT THE JUICE "
Sorry, I do not have a video or pictures as I am not doing this repair right now. Re-read my post. I laid the process out step by step. I did not mention any welding. Its actually very simple. Make a stud by cutting off the threaded end of the Fiero tie rod. Now throw the rest ot the rod away. Now you have a fully threaded stud about 3" long. Screw the threaded stud that you cut from the Fiero rod into the inner end of the Lumina rod and just bolt it in using nuts and washers. Add the standard Fiero outer tie rod to the Lumina rod. It shouldn't take more than a few minutes to get this done.
Thank you. I am sorry that I didn't understand it the first time. I did read it several times before replying to clarify. I've always been a visual learner, so a text description does make it more challenging.
Your second attempt was incredibly helpful! Thank you.
What kind of Loctite? Red, or, blue?
Should i use a thread chaser on the piece that I cut off to make it easier to thread into the tie rod end? If so, I'll have to get one.
Then, the new tie rod is inserted into the cradle via this stud, and secured with a washer, a lock washer, and a nut, does that sound accurate?
Originally posted by Patrick: That's where adding relevant words to the search terms comes into play.
Very true.
The challenge, for me is, then, what are the relevant words for a search?
What I did end up doing was going through, page-by-page, looking at possibly relevant subject lines and article blurbs. I didn't find exactly what I was looking for, but I did find a link to a fellow who had an interesting way to tighten a tie rod end that just spun.
That's my overall issue - the tie rod ends are okay when I disassembled them, but when I went to reassemble, they would simply spin in the joint.
Although at this point it's likely that I'll just replace the whole shebang with a '93 Lumina end, since that looks to be the easiest thing to do.
Thank you. I am sorry that I didn't understand it the first time. I did read it several times before replying to clarify. I've always been a visual learner, so a text description does make it more challenging.
Your second attempt was incredibly helpful! Thank you.
What kind of Loctite? Red, or, blue?
Should i use a thread chaser on the piece that I cut off to make it easier to thread into the tie rod end? If so, I'll have to get one.
Then, the new tie rod is inserted into the cradle via this stud, and secured with a washer, a lock washer, and a nut, does that sound accurate?
Wow, if so, that's remarkably easy.
When I make the studs for the Lumina rod I just cut off the threaded end of the Fiero inner tie rod. If the cut has rough edges I just smooth the edges on the bench grinder so that it is easy to thread them into the Lumina rod. I use Loctite Red. Then use a nut and a lock washer to hold the stud in place. Just don't screw the stud in too deep or it may bind the new rod at the joint. Now you should have an inner tie rod with screw threads at both ends. Secure the inner side in place on the cradle with a nut and lock washer and screw on the Fiero outer tie rod.
When I make the studs for the Lumina rod I just cut off the threaded end of the Fiero inner tie rod. If the cut has rough edges I just smooth the edges on the bench grinder so that it is easy to thread them into the Lumina rod. I use Loctite Red. Then use a nut and a lock washer to hold the stud in place. Just don't screw the stud in too deep or it may bind the new rod at the joint. Now you should have an inner tie rod with screw threads at both ends. Secure the inner side in place on the cradle with a nut and lock washer and screw on the Fiero outer tie rod.
I just want to make sure I understand - insert the rod (with red Loctite), THEN add a lock washer and nut. But, also use an additional lock washer and nut to hold it to the frame?
I just want to make sure I understand - insert the rod (with red Loctite), THEN add a lock washer and nut. But, also use an additional lock washer and nut to hold it to the frame?
Yes you got it. The inner nut at the new tie rod inner end holds the stud from loosening and will provide the correct overall length. The holding nut just works like stock. Anthony has done over a dozen of these tie rod replacements and not one had a problem. Its a good cost saver and it adds a later available component
------------------ " THE BLACK PARALYZER" -87GT 3800SC Series III engine, custom ZZP /Frozen Boost Intercooler setup, 3.4" Pulley, Northstar TB, LS1 MAF, 3" Spintech/Hedman Exhaust, P-log Manifold, Autolite 104's, MSD wires, Custom CAI, 4T65eHD w. custom axles, Champion Radiator, S10 Brake Booster, HP Tuners VCM Suite. "THE COLUSSUS" 87GT - ALL OUT 3.4L Turbocharged engine, Garrett Hybrid Turbo, MSD ign., modified TH125H " ON THE LOOSE WITHOUT THE JUICE "
Yes you got it. The inner nut at the new tie rod inner end holds the stud from loosening and will provide the correct overall length. The holding nut just works like stock. Anthony has done over a dozen of these tie rod replacements and not one had a problem. Its a good cost saver and it adds a later available component
I was just reading another post about this - I wish I'd seen it earlier - it mentions, specifically, the use of Moog inner tie rod ends.
Do they *have* to be Moog? I chose a different brand.
I was just reading another post about this - I wish I'd seen it earlier - it mentions, specifically, the use of Moog inner tie rod ends.
Do they *have* to be Moog? I chose a different brand.
No. As long as the rods are for the same application as the Moog interchange rods (91 Lumina) , you will be OK. Once you get into the repair you will see how easy it is.
------------------ " THE BLACK PARALYZER" -87GT 3800SC Series III engine, custom ZZP /Frozen Boost Intercooler setup, 3.4" Pulley, Northstar TB, LS1 MAF, 3" Spintech/Hedman Exhaust, P-log Manifold, Autolite 104's, MSD wires, Custom CAI, 4T65eHD w. custom axles, Champion Radiator, S10 Brake Booster, HP Tuners VCM Suite. "THE COLUSSUS" 87GT - ALL OUT 3.4L Turbocharged engine, Garrett Hybrid Turbo, MSD ign., modified TH125H " ON THE LOOSE WITHOUT THE JUICE "
When I make the studs for the Lumina rod I just cut off the threaded end of the Fiero inner tie rod. If the cut has rough edges I just smooth the edges on the bench grinder so that it is easy to thread them into the Lumina rod. I use Loctite Red. Then use a nut and a lock washer to hold the stud in place. Just don't screw the stud in too deep or it may bind the new rod at the joint. Now you should have an inner tie rod with screw threads at both ends. Secure the inner side in place on the cradle with a nut and lock washer and screw on the Fiero outer tie rod.
Thanks! I'll check out the prices on those bolts. I ended up getting another set of tie rods. At just under four bucks each, I figured I could either use one for my other Fiero, or cut off the end instead of wrestling with my original (still can't get it apart).
I still have a question that I asked, above, about that peg.
It looks like Rodney is making the Fiero rods from the 91 Lumina front tie rod. Its appears that he is using a large threaded spacer and a new stud to form the end and mount the rods to their brackets. He does a great job at making these rods and his stuff is usually super but there is a DIY method for folks that want to make their own. For "plug and play" Rodney is the man. I really like his parts.
------------------ " THE BLACK PARALYZER" -87GT 3800SC Series III engine, custom ZZP /Frozen Boost Intercooler setup, 3.4" Pulley, Northstar TB, LS1 MAF, 3" Spintech/Hedman Exhaust, P-log Manifold, Autolite 104's, MSD wires, Custom CAI, 4T65eHD w. custom axles, Champion Radiator, S10 Brake Booster, HP Tuners VCM Suite. "THE COLUSSUS" 87GT - ALL OUT 3.4L Turbocharged engine, Garrett Hybrid Turbo, MSD ign., modified TH125H " ON THE LOOSE WITHOUT THE JUICE "
I figured, but since the 91 Lumina tie rod doesn't have a peg, how do you handle that?
We assume that you know how to employ a lock washer, , Red thread locker, Channel Lock pliers and a wrench. You must measure the length of the old rod that you are replacing and you will need to create that length on the new rod. You may need an alignment anyway but if you get close you can drive the car to the alignment shop without a problem..
------------------ " THE BLACK PARALYZER" -87GT 3800SC Series III engine, custom ZZP /Frozen Boost Intercooler setup, 3.4" Pulley, Northstar TB, LS1 MAF, 3" Spintech/Hedman Exhaust, P-log Manifold, Autolite 104's, MSD wires, Custom CAI, 4T65eHD w. custom axles, Champion Radiator, S10 Brake Booster, HP Tuners VCM Suite. "THE COLUSSUS" 87GT - ALL OUT 3.4L Turbocharged engine, Garrett Hybrid Turbo, MSD ign., modified TH125H " ON THE LOOSE WITHOUT THE JUICE "
We assume that you know how to employ a lock washer, , Red thread locker, Channel Lock pliers and a wrench. You must measure the length of the old rod that you are replacing and you will need to create that length on the new rod. You may need an alignment anyway but if you get close you can drive the car to the alignment shop without a problem..
Sorry, let me be more specific. It wasn't about the use of tools, and their use, rather that the use of an alignment pin may mean that the tie rod must be installed at a very specific angle.
Frequently, that's why they exist, and before I go tearing apart something and turning a five minute project into...well...a PROJECT...I wanted to check in.
If it's just about holding in in place so that it doesn't spin, yes, I can work with that.
I'm not stupid, I'm just ignorant. I'm part of today's lucky 10,000.
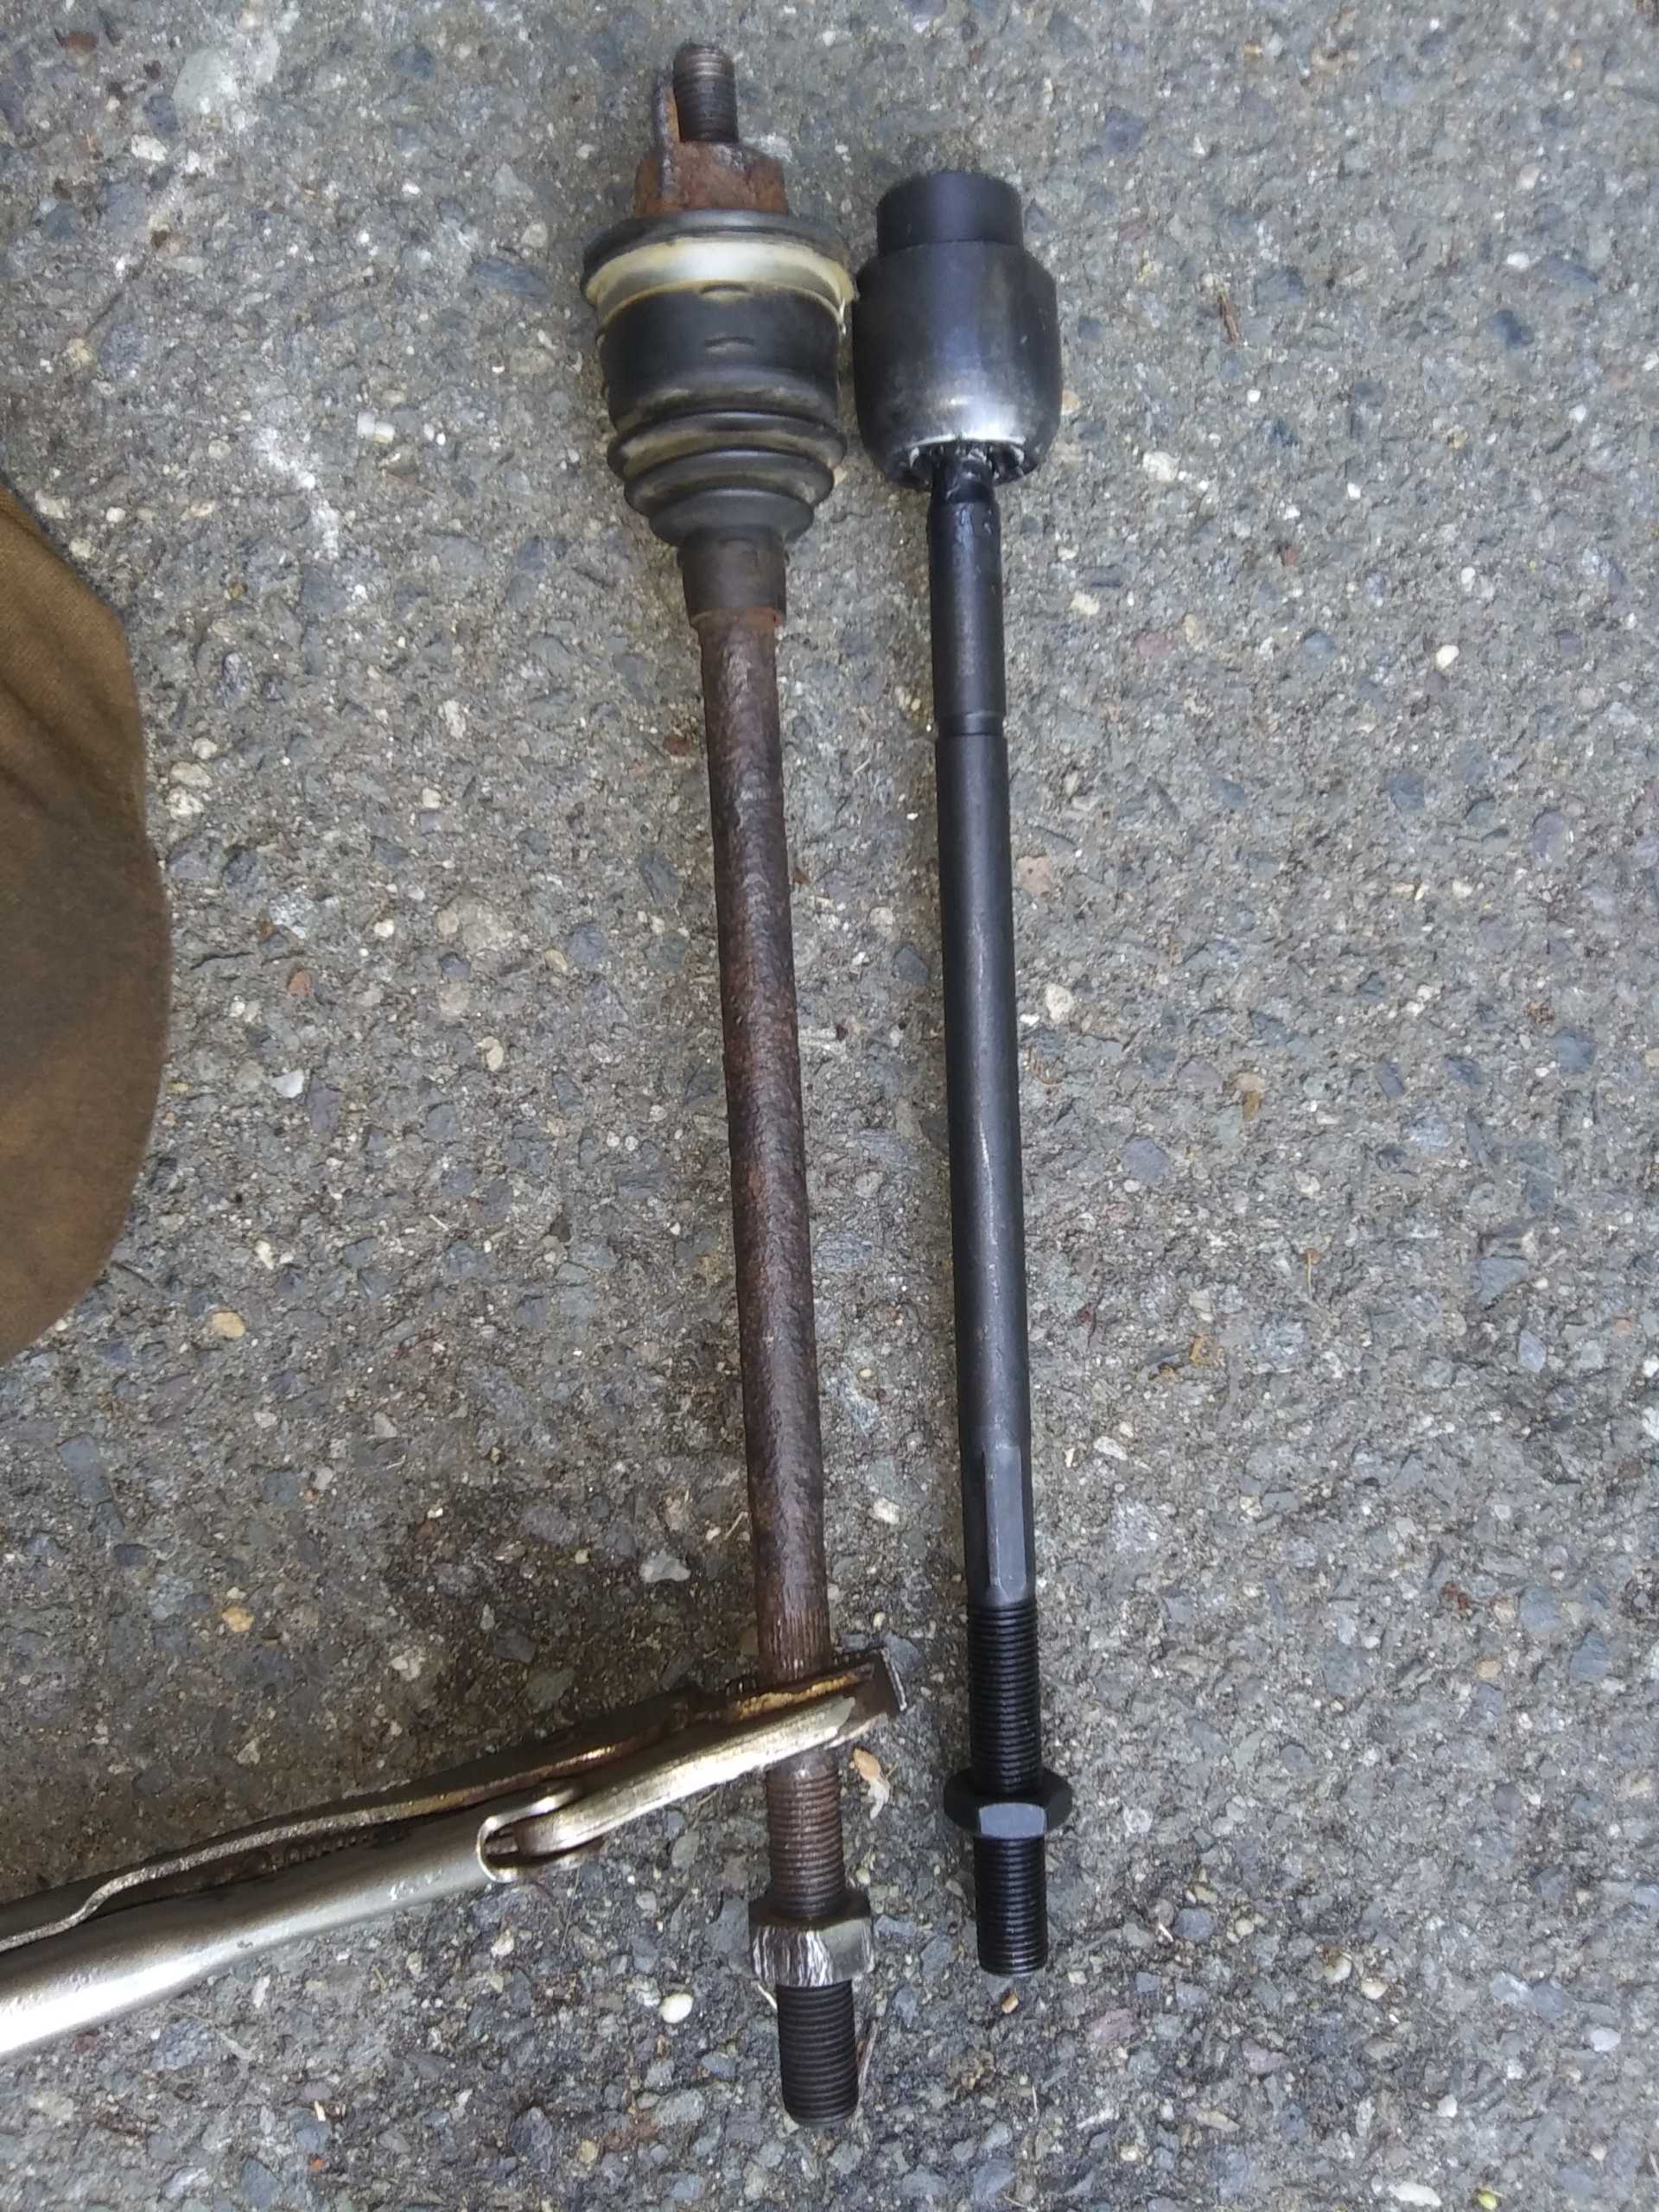
After much beating, and swearing, and more beating, and more swearing, I got the driver's side off, and apart.
In comparing it to the tie rod from the Lumina...there's a bit of a length difference.....
So, I'm at a bit of a loss. The tie rod needs to be butted up against the frame for stability. I unscrewed the original outer tie rod sixteen turns, there's no way that could be stable enough.
If you guys are going to all this trouble, why not find a shorter tie rod and relocate the mounting point to be more or less perpendicular to the range of motion and eliminate most rear-bump steer...?
After much beating, and swearing, and more beating, and more swearing, I got the driver's side off, and apart.
In comparing it to the tie rod from the Lumina...there's a bit of a length difference.....
So, I'm at a bit of a loss. The tie rod needs to be butted up against the frame for stability. I unscrewed the original outer tie rod sixteen turns, there's no way that could be stable enough.
With the extra nut and washer holding the stud that you made in place; the Lumina rod should be close in length to the Fiero rod. The nut butts up against the holding bracket on the cradle. If its tight it wont move.
------------------ " THE BLACK PARALYZER" -87GT 3800SC Series III engine, custom ZZP /Frozen Boost Intercooler setup, 3.4" Pulley, Northstar TB, LS1 MAF, 3" Spintech/Hedman Exhaust, P-log Manifold, Autolite 104's, MSD wires, Custom CAI, 4T65eHD w. custom axles, Champion Radiator, S10 Brake Booster, HP Tuners VCM Suite. "THE COLUSSUS" 87GT - ALL OUT 3.4L Turbocharged engine, Garrett Hybrid Turbo, MSD ign., modified TH125H " ON THE LOOSE WITHOUT THE JUICE "
With the extra nut and washer holding the stud that you made in place; the Lumina rod should be close in length to the Fiero rod. The nut butts up against the holding bracket on the cradle. If its tight it wont move.
I was less concerned with movement (e.g., the threaded part coming undone) and more concerned with shearing and bending issues.
The OEM inner has a wide, flat portion which butts right against the frame, adding a lot of stability to the whole.
If I'm understanding what you're saying, there's going to be a sizable gap between the Lumina tie rod end and the frame.
Perhaps...thread the bolt end into the Lumina tie rod. Add a nut, and a fender washer. Insert into the frame. On the other side, another fender washer, a lock washer, then a nut to secure, sandwiching the assembly.
I'm surprised that no one has done a photo write-up of this process, I'm probably misunderstanding the mechanics of this.
Consider that the front Lumina tie rods just stays in place by screwing it on the steering rack. The shoulder that you have on the new rod is the nut and a washer on both sides. you do use Red Locktite and lock washers If you have convinced yourself of a level of discomfort by using the Lumina rod then just buy Rodneys tie rods where he has added the shoulder with a custom spacer or make one from a piece of cut pipe.
------------------ " THE BLACK PARALYZER" -87GT 3800SC Series III engine, custom ZZP /Frozen Boost Intercooler setup, 3.4" Pulley, Northstar TB, LS1 MAF, 3" Spintech/Hedman Exhaust, P-log Manifold, Autolite 104's, MSD wires, Custom CAI, 4T65eHD w. custom axles, Champion Radiator, S10 Brake Booster, HP Tuners VCM Suite. "THE COLUSSUS" 87GT - ALL OUT 3.4L Turbocharged engine, Garrett Hybrid Turbo, MSD ign., modified TH125H " ON THE LOOSE WITHOUT THE JUICE "
[This message has been edited by Dennis LaGrua (edited 06-07-2021).]
If you have convinced yourself of a level of discomfort by using the Lumina rod then just buy Rodneys tie rods where he has added the shoulder with a custom space ror make one from a piece of cut pipe.
I think there must be some misunderstanding. I'm just trying to figure this out. The majority of how I learn new things is visual, and I don't have that here. I'm forced to picture in my head what you've already done, and there's bound to be differences between my perception of what needs to be done, and what's actually being done.
I appreciate how frustrating that must be for you to deal with trying to relay the information. You think you're being clear, and when I ask clarifying points because of how unsure /I/ am, you try again - even though I must be frustrating the heck out of you.
It's been very helpful to me. I appreciate that, and I appreciate you!
Hopefully one last clarifying piece - you keep mentioning "washers" but, what kind? Fender (the one with large surface area, but hole big enough for the bolt), or a standard washer (just slightly larger than the bolt itself, but enough surface area to increase mating strength by a lot) ?
Catalog error... see them all over the place in rare/weird applications.
After you verified that these were for the '88 I figured that was the case.
I bought a brake caliper for my 2011 Kia Sedona from RA. When I got it I could immediately see that something was wrong. The bracket was completely wrong.
Good news was that the caliper itself was identical to the one on the van, even though the bracket was different. So, I just swapped the caliper, and returned the old caliper and new (rebuilt) bracket for core.
After some research on the part numbers embossed on the parts, the caliper crosses to a bunch of different vehicles, but the bracket was for a 2012 model.
I let RA know, they said they'd pass it to the catalog team, IDK if they ever did anything about it