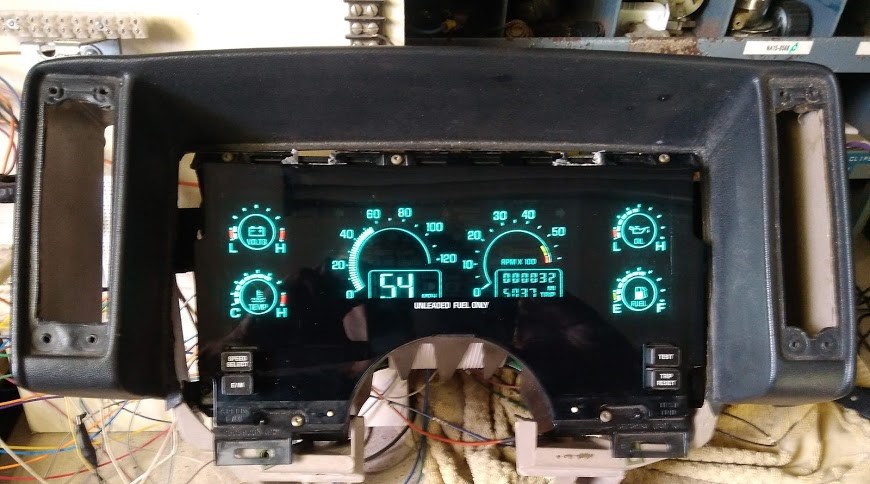
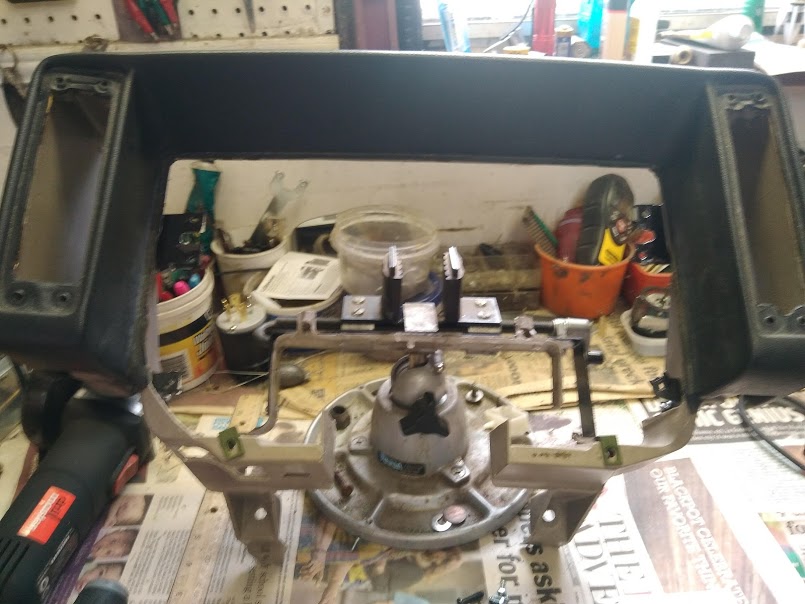
As the topic states, I'm in the process of installing a 92 Buick Riviera digital instrument cluster into my 86 GT dash. I have already made the necessary modifications to the Fiero IC surround to facilitate the mating of the Riviera IC into the Fiero IC surround.
Before I can install the new Riviera/Fiero instrument cluster I need to remove my entire dash. Normally for the Fiero IC removal the removing of the dash is not required. But in my case it is as I need to make room for the new "Fiero BCM" module. To accomplish this it will require me removing the 2001 HUD circuit board that I have installed under the dash on the driver sider under the speaker. The new Fiero BCM will occupy this space.
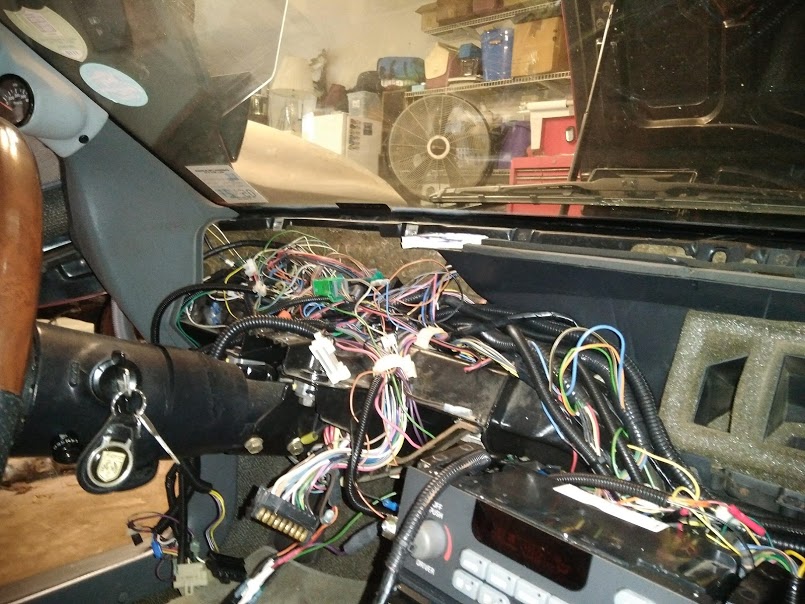
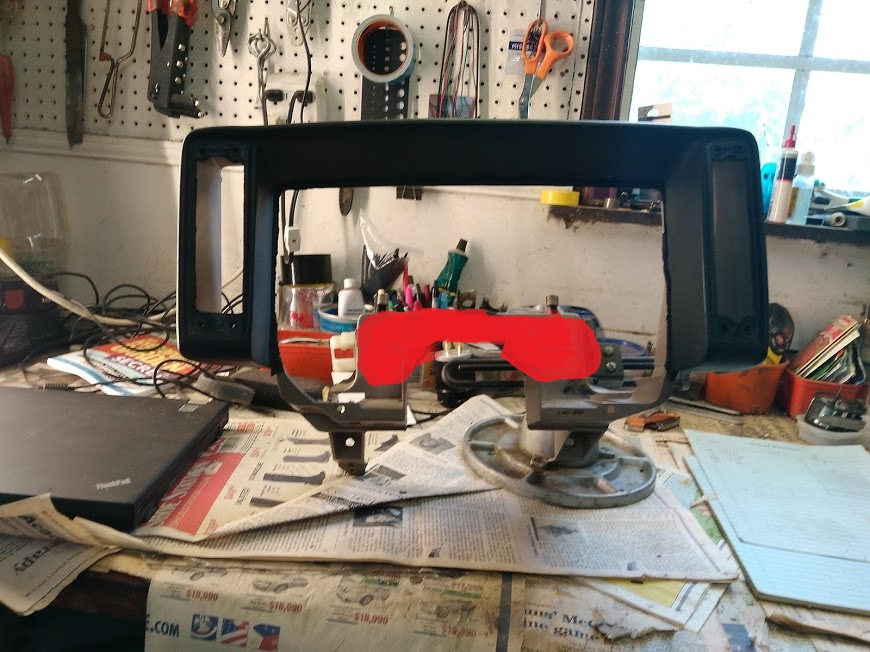
The attached photo is what the setup will look like. Bear in mind the final Lexan face plate is not yet installed. My plan is to post additional information and photos of the install, to include surround modifications and the necessary wiring modifications.
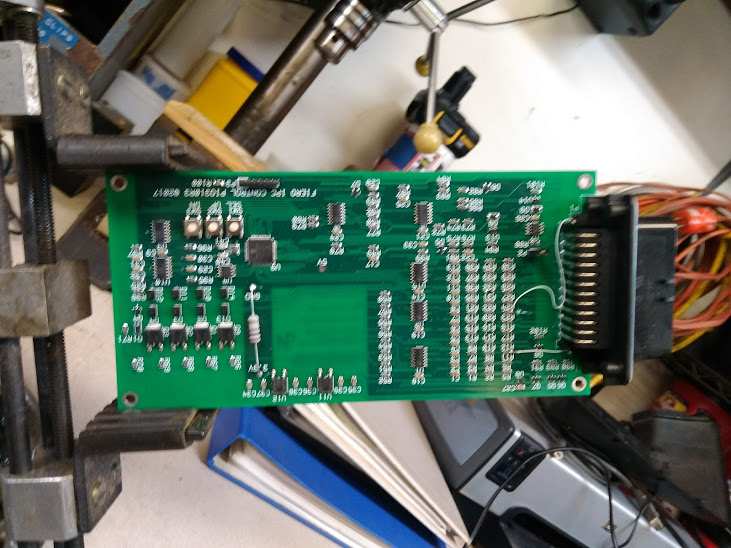
None of this would be possible without the hard work and development of the Fiero BCM hardware and software by Chris Eddy. The BCM allows the Fiero to communicate to the Riviera digital Instrument cluster.
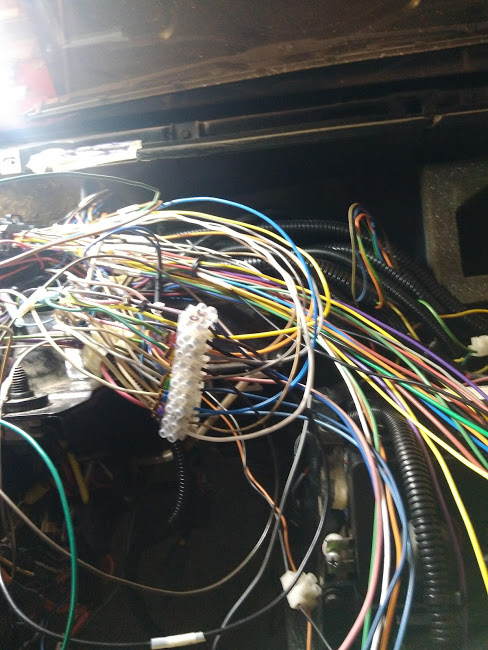
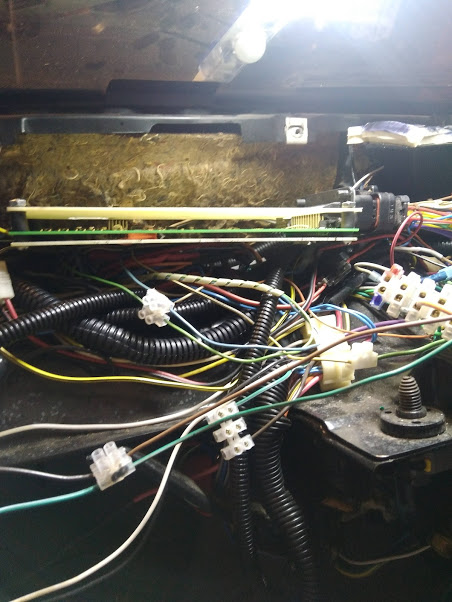
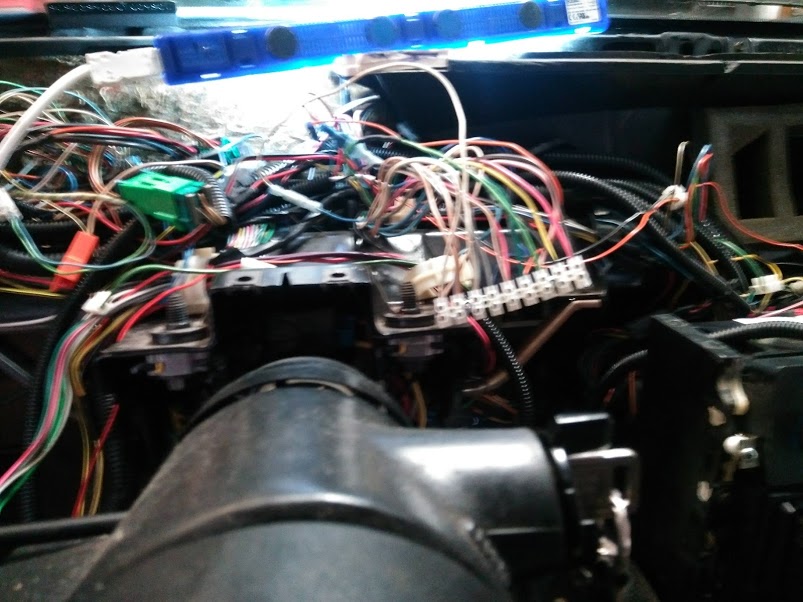
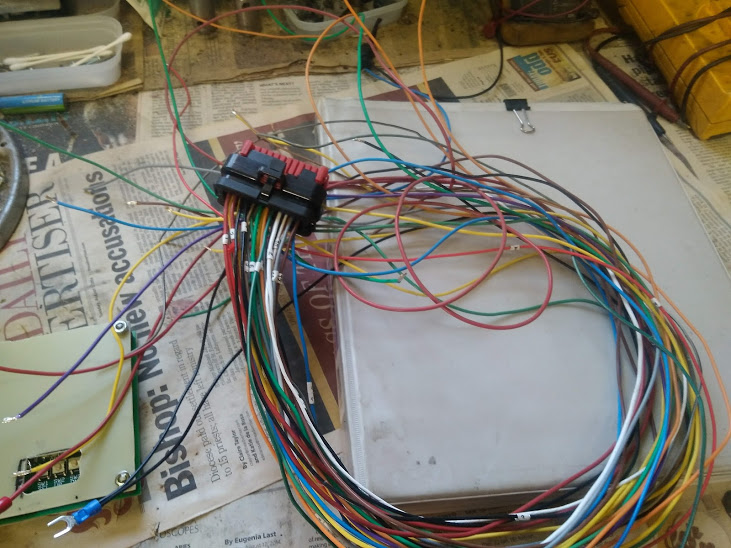
I have removed the dash, the HUD unit and associated circuit board. Now I have to clean up this rat nest to make room for the Fiero BCM. I am currently fabricating the necessary wiring harnesses for the transition to the digital instrument cluster.
I have already did the needed modifications to the Fiero IC surround to accept the Riviera digital IC. I am currently editing the photos so all can make sense of what I have done. Once complete I will post the photos.
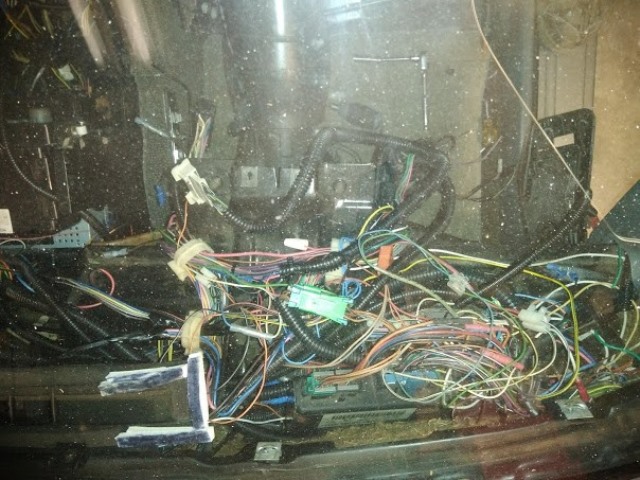
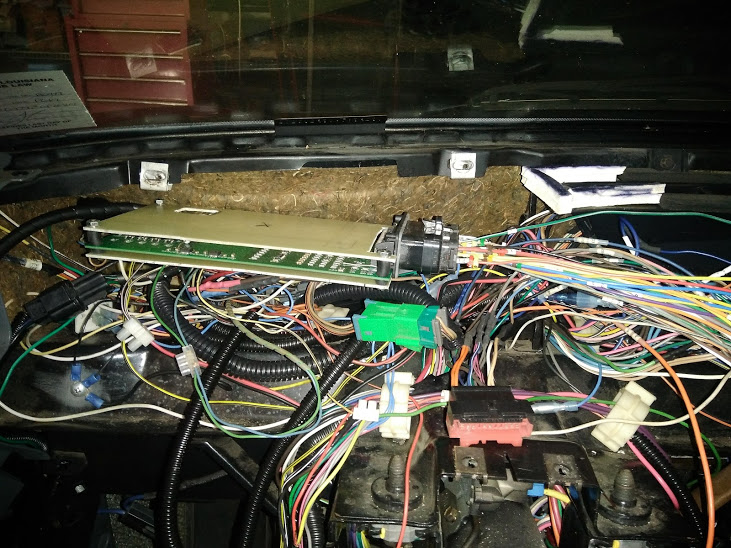
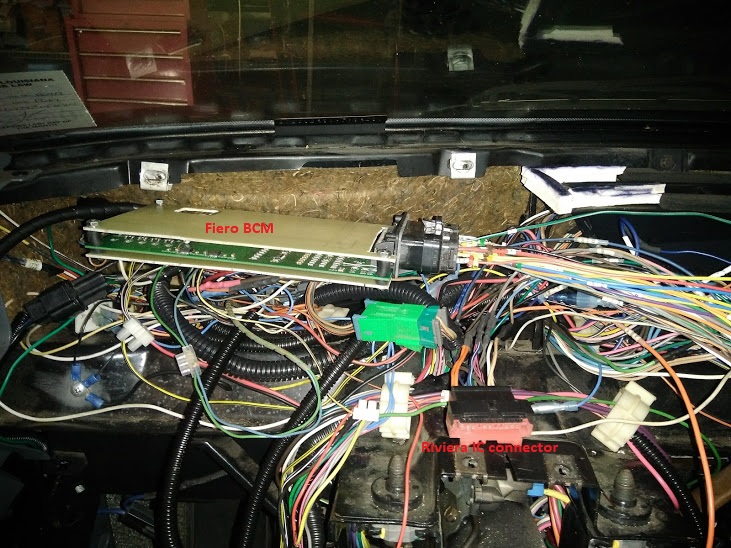
Below are photos of the dash removed and the "rat nest" of wires that needs to be sorted out.
None of this would be possible without the hard work and development of the Fiero BCM hardware and software by Chris Eddy. The BCM allows the Fiero to communicate to the Riviera digital Instrument cluster.
Originally posted by Cajun: ... The attached photo is what the setup will look like.
Now that is damned sexy! Is the new BCM also sourced from the Riviera?
I am guessing you are running an OBD2 PCM, in order for the BCM to not be lonely. Correct? Or is the BCM going to be stand-alone? (Sorry... I am not familiar with other things you have done to your car. I don't get here much, lately.)
The BCM is new, it is a design that I did specific to mate the Fiero with the Riviera IC. It takes all of the discrete wiring, and processes the signals through a microcontroller, and then digitizes the data onto the IC. The analog inputs are all current sources. The digital inputs are either connect to ground or connect to 12V to activate. The speedometer has a divide by 2 so that (doing this from memory) 4000 PPM becomes 2000 PPM for the ECU. Speedometer and tachometer inputs are digitized in software, and delivered to the IC. When you pull out the Fiero IC, we loose the odometer. So the board has a little bit of memory and it keeps the odometer. The trip odo does not work, or specifically the reset button, as I could not work out how that bit of data comes back on the serial line. To set the odometer, there are buttons.. select digit, set up set down, and so forth. The last setting is the tach scale.. 4, 6, or 8 cyl. The board has a serial input to take in the Fiero ECM signal, but no software for that yet. The board also has a CAN port to make an OBDII port, but no software for that either. I designed the PC board, so I have to make them by hand when I build. I have two right now, one with Mike and one with me. When it is all sorted out, we will be sure to share the joy.
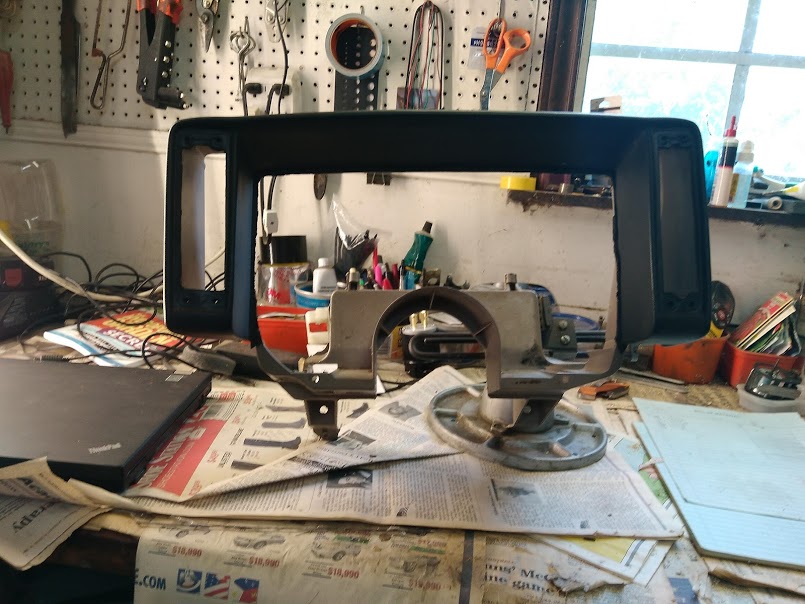
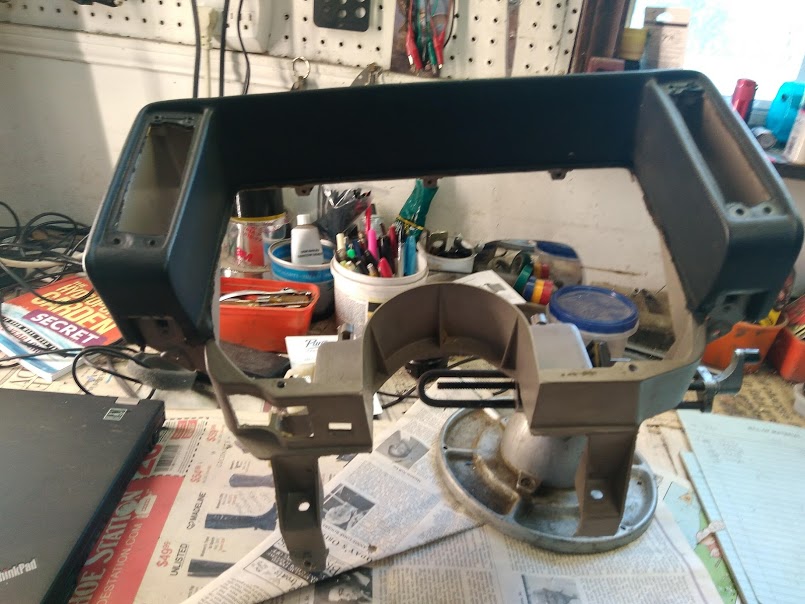
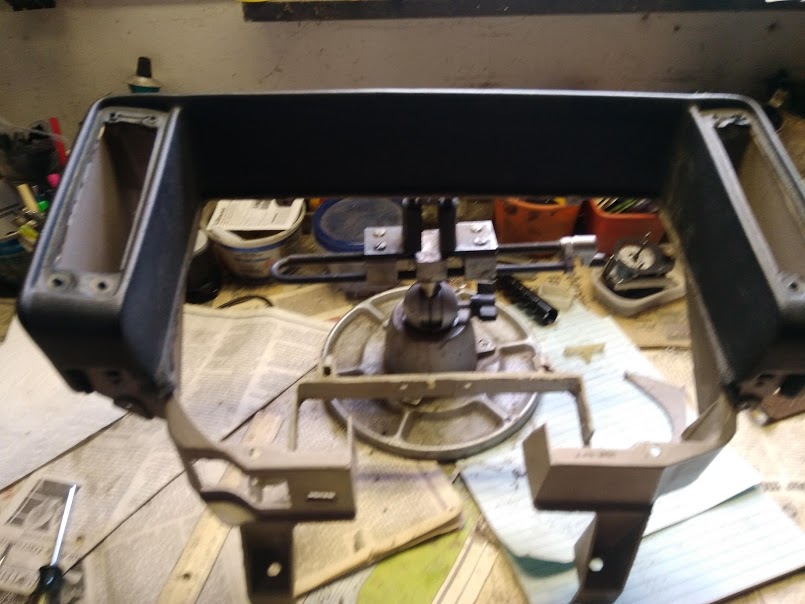
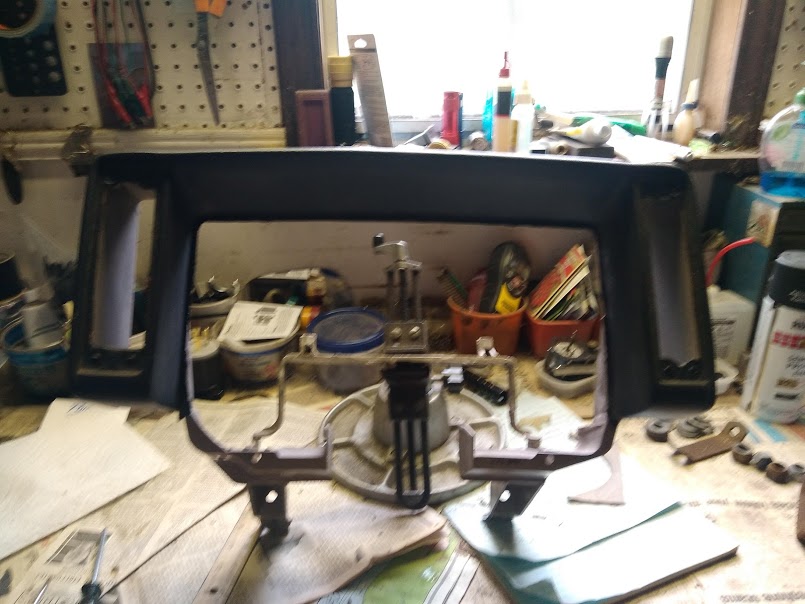
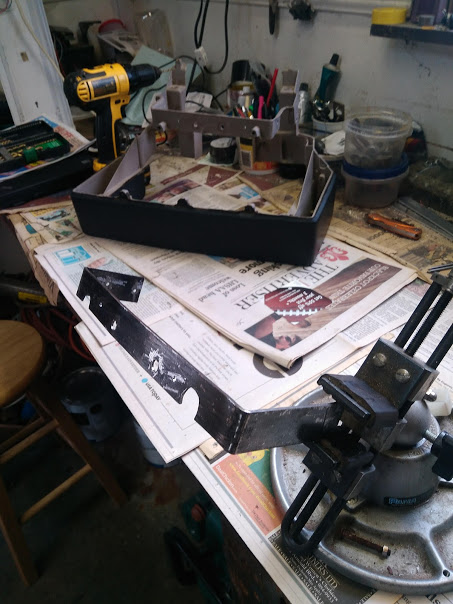
Below are a couple, three photos of the Fiero IC (instrument cluster) surround structure and what will need to be removed in order to accept the Riviera digital IC.
The red section in the next photo is what areas need to be removed.
The next sevreal photos of what the surround looks like with material removed. Note: a bracket will need to be frabricated to support the surround structure.
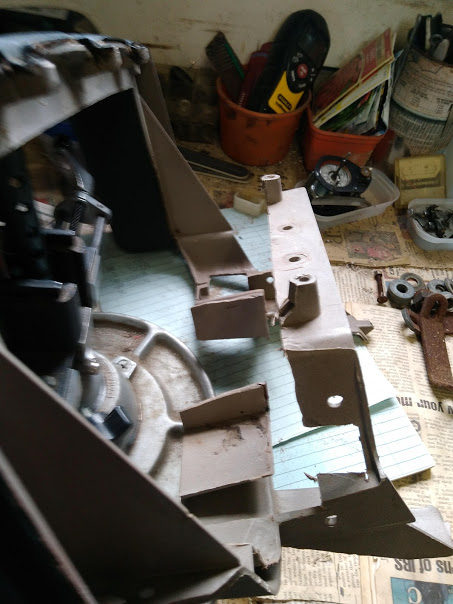
The next photo is of the bracket that will need to be fabricated.
I know this may be all too confusing. It took me a while to wrap my heard around what I needed to do and what needed to be removed. It was pretty much trial and error. A little bit of material removed here and there. Test fit, remove more material, test fit again unit it all came together.
The BCM is new, it is a design that I did specific to mate the Fiero with the Riviera IC. It takes all of the discrete wiring, and processes the signals through a microcontroller, and then digitizes the data onto the IC. .... When it is all sorted out, we will be sure to share the joy.
At some point I have to make the PC board, and will charge what it costs me, as I do not figure many people will embark on this project.. Meanwhile, if you want to get ahead of it, you should secure a working Riviera IC. Look for 1990-93 Buick Riviera and 90-91 Buick Reatta. It will be hard, I see 2 listed on car-part and 3 on ebay. They were known to overheat and burn out, so I would be wary of that (although you cannot exactly test them, I could connect up it to test for you).
I picked up my two Riviera digital instrument clusters from the local Pull-a-Part a few years back for about $30. I noticed now the price has gone up a bit, $35.
That price is a far cry from people on eBay are asking if you are lucky enough to locate one!
Currently working up a road map for the crossover wiring and have ordered additional mini terminal strips for the crossover wiring.
A side note, I am having surgery Monday and will be out of commission for about two weeks. Once the doctor gives me the all clear I will resume the project.
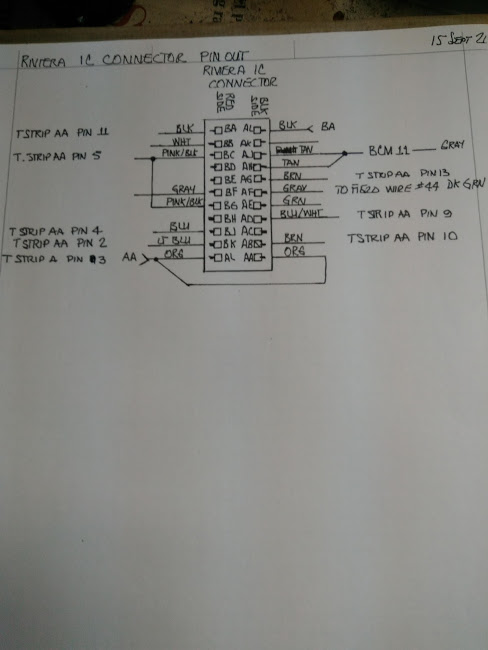
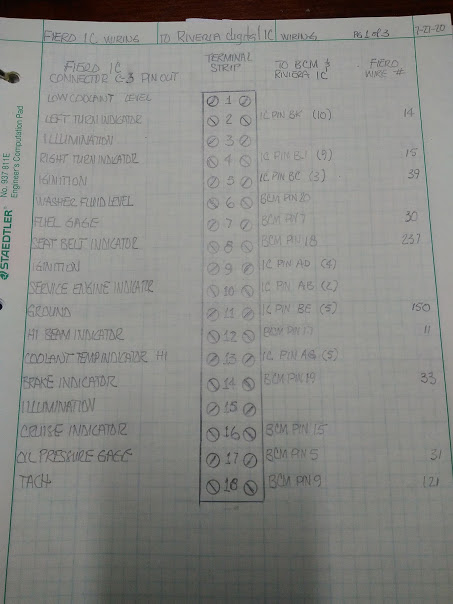
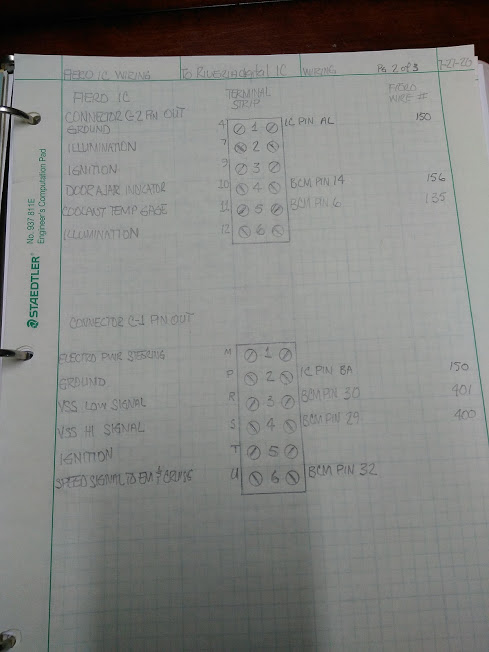
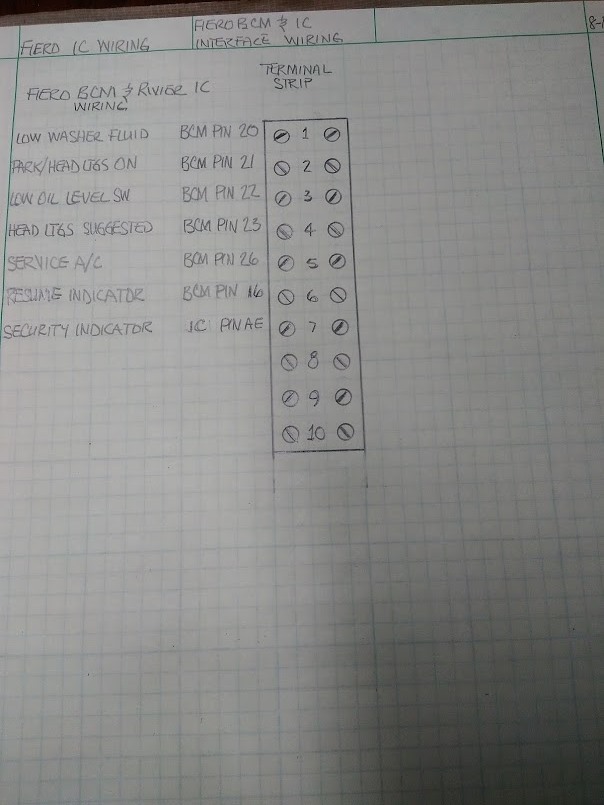
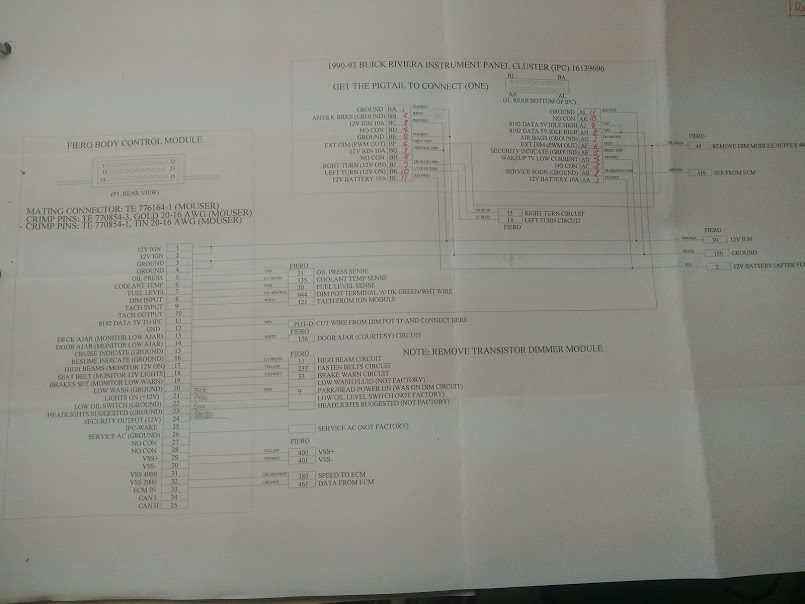
I have completed the interface wiring road map. That is about all the doctor will let me do for the time being. Anyway, the following drawings (hand drawn) are drafts and for the moment does not reflect what the actual will look like. Once the wiring is actually completed I will update as required. The fourth dwg. is by Chris Eddy. His wiring interface interpretation version 3. You will notice in reviewing the drawings there are a number of features that are not currently available a Fiero instrument cluster.
This first drawing represents interface wiring from the "Fiero IC connector C-3":
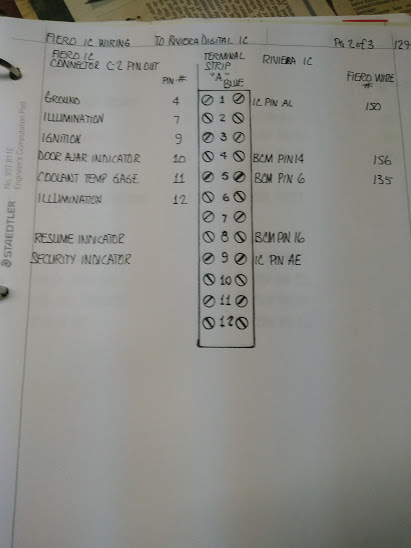
This next drawing represents interface wiring from the "Fiero IC connector C-2 & C-1":
The next drawing represent interface wiring from the Fiero BCM & Riviera IC:
This last drawing is of the "Fiero BCM" interface wiring:
If anyone has any questions or comment please do not hesitate to ask.
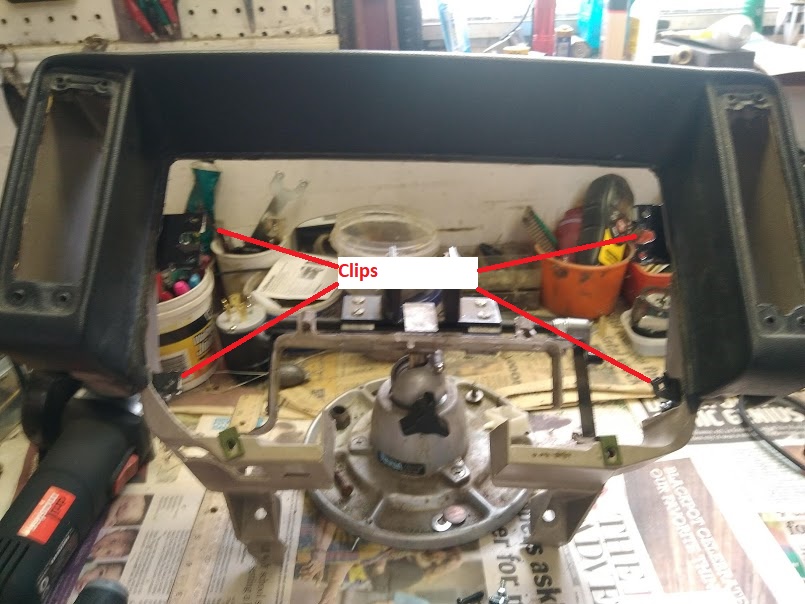
To support and mount the Riviera digital IC I fabricated several clips that were attached to the Fiero surround. I used 1/4' rivets to attached the clips to the surround. The position of the clips correspond to the location of mounting holes on the Riviera IC. This mounting option will allow for the removal of the Riviera IC with having to remove the surround.
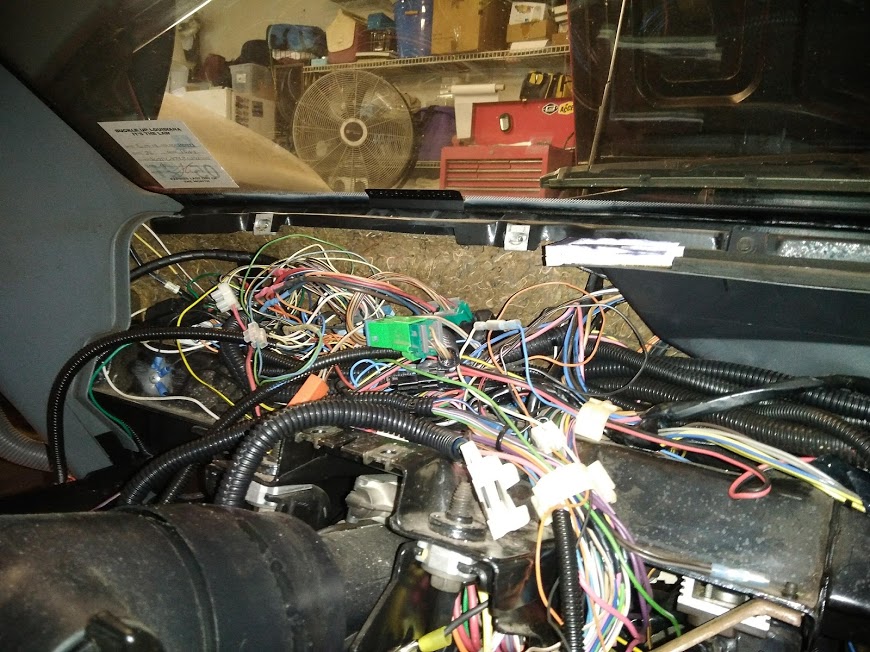
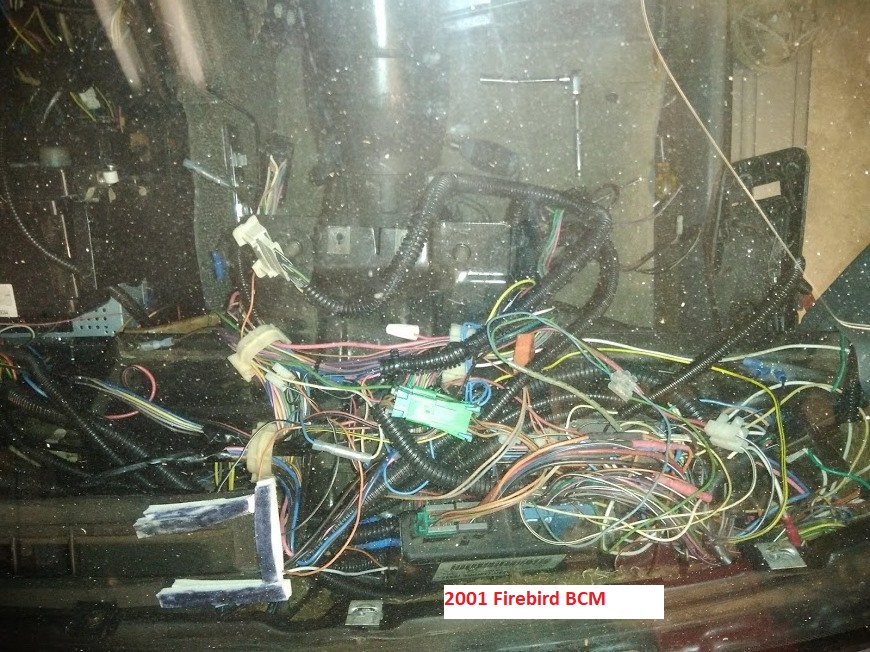
A side note; When this project is all said and done, complete my GT will have three (3) BCMs installed. 1) the dedicated Fiero BCM to interface with the Riviera digital IC, 2) 2001 Firebird BCM to give me RAP, remote door lock & unlock plus other functions and 3) 2002 Grand Prix A/C controller (modified) for the digital AC unit. Here is a photo of the Firebird BCM. It's amongst the wiring associated with the dash.
[This message has been edited by Cajun (edited 08-15-2020).]
Sorry for the delay on any progress on this project... Laura paid us a visit. No real damage here, no electricity for 3 days and no internet for 4 days. Now that I have some time to spend on the project the temperature is unbearable! My garage/shop is not air conditioned and for the most part the day time temperature inside the shop is hovering around 102. Not a pleasant place to be working inside. Anyway.....
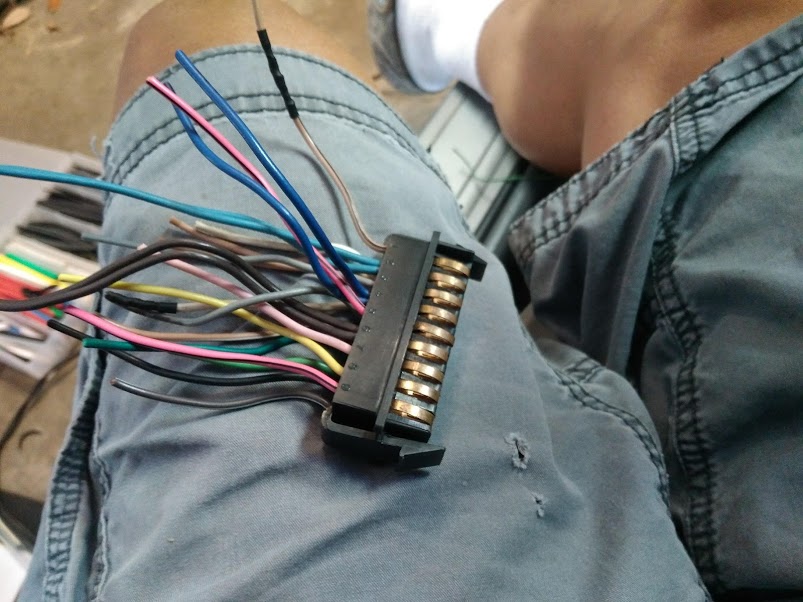
I have begun the rewire process in earnest. I have cut out the Fiero instrument cluster connector "C3". Made the necessary wiring adjustments and installed (wired) the interface terminal strip. Hopefully, next week I will continue with the removal of IC connectors C2 & C1. Then wire in the Fiero BCM interface connector to the Fiero wiring and the Riviera digital IC.
This is the Fiero IC C3 connector:
The Fiero IC C3 connector removed:
Finally, the Fiero IC C3 connector interface terminal strip:
Originally I was going to use Mini-Fit connectors. However, once they arrived I saw their size and decided to go with the mini terminal strip route do to space availability.
Hey Cajun, nice work so far. I did something similar except I swapped in a 4th gen firebird cluster. I wanted my interior to look like a prototype Fiero. I needed to trim a lot of the upper surround in order to see the gauges. I still need to remove everything again and trim it even more this winter. Then I had it wrapped in vinyl (which is coming loose so I need to take it somewhere when it's done.) Here are the links. Might be helpful. I also have a build thread. PM me if you need anything.
Cajun, if you think that the minifit are not the right size, have a look at the Amp (TE) Universal Mate N Lock. They can handle larger gauge wire. Glad to see you are recovering well!
I just ran across an achieve post by Darth Fiero dealing with the same devior. Unfortunately it appears he gave up on the project. The list was dated 2004.
I'm wondering if Darth Fiero and or Stinkin_v8 are still around and active here?
I'm looking for a little assistance. In that 2004 post information about in referencing files from diy-efi; ALDLStuff.zip, files A146.DS & A180.DS. Apparently the files are able data stream information from the Riviera BCM!
I have done a little more work on this project. A pause due hurricanes, heat and honey-dos.
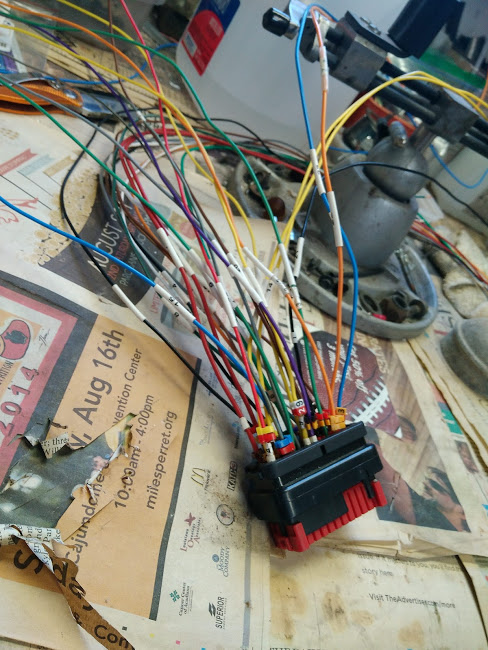
I have been in the process of installing wire markers {labels) on all the wiring. I did not want to leave anything to chance as there a bunch of wires from multiple connectors to deal with. Initially I had installed tape on type wire markers but found that after a while they begin to peel off, rub off, etc. In some cases I have placed clear shrink wrap over some of the wire markers where it made since. On other connectors, i.e. the BCM connector I have installed plastic wire markers. Oh, I am waiting for additional plastic wire markers to arrive.
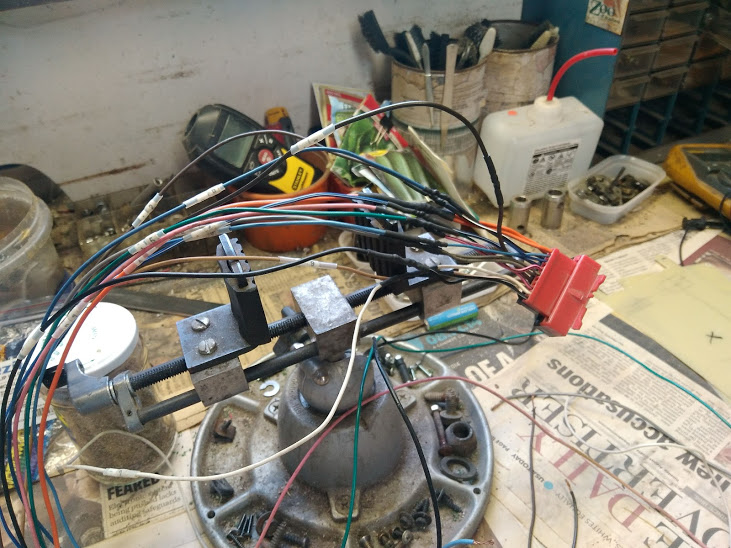
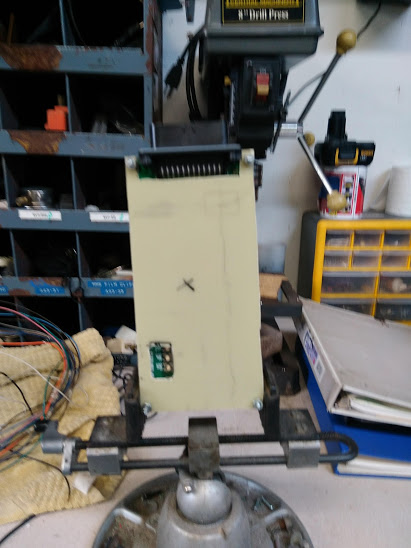
In the mean time i have tore down my test jig setup as I needed some of the parts to complete the install.
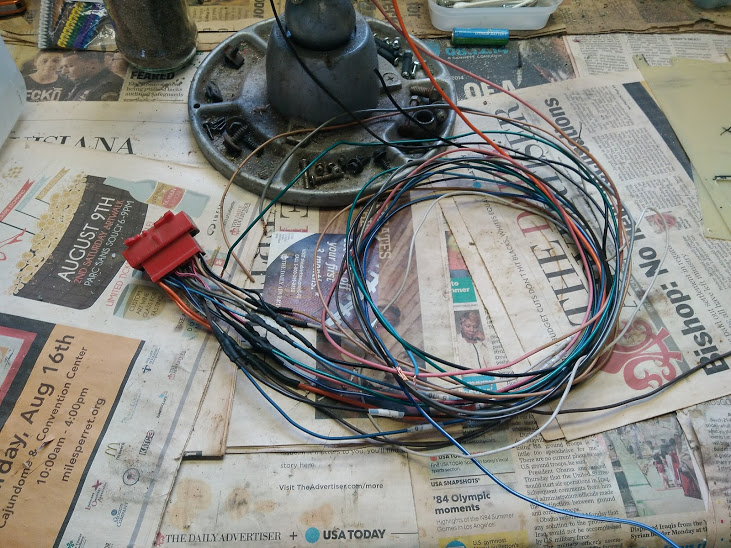
I have prepped the connector and wiring for the Riviera digital IC.
I have installed some protectors over the Fiero BCM. Did not want to anything shorting a component out once it was placed under the dash board. The first photo is of the Fiero BCM without the protectors installed.
BCM with protector installed:
BCM with protector installed side view:
BCM connector and wiring. On this wiring harness I need to complete the install of the plastic wire markers.
I have reconfigured my wiring road map. I think this approach will workout much better than my initial wiring configuration.
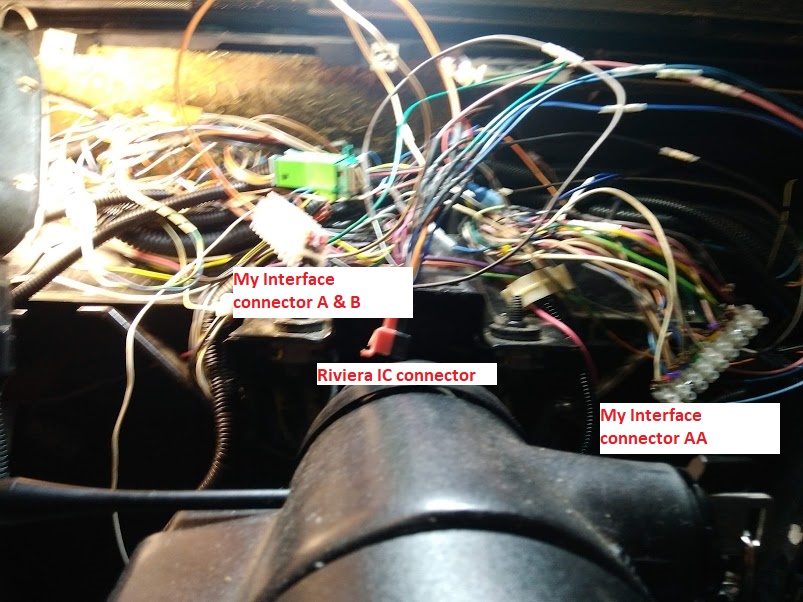
My proposed placement of the BCM is directly under the driver side speaker. I have checked to see if the BCM could be serviced from this location. It appears to work doing a test fit?
A couple of set backs: 1. the smoked Lexan has not yet arrived. It was supposed to have arrived Friday but when I checked it was "marked" as back ordered. 2. Another hurricane is scheduled to make landfall Tuesday which means I now have to pickup everything and prepare for a storm again!
If I get a little free time I will begin wiring the various connectors. Hope to shoot a couple of photos with the connectors in placed wired up.
Awesome, that all looks great. Meanwhile, since you are doing all of that, I have been working on the software for reading the serial stream from the ECM and the OBDII code read port software. This will take some time to work out all of the details and test, but while you are doing wiring et all, I can beaver away at that. Those features are not necessarily even needed in your case. The PC board would not easily get smaller, as it is already surface mount, but I could re-arrange it to fit in an enclosure. The only issue there is that any enclosure would certainly be larger than the board and harder to tuck away. Maybe a board that fits piggy back on the back of the Riviera IP? Is there any clearance there? We are all pulling for you to pull through the next hurricane. You must be getting pretty good at it!
There is insufficient room to place the BCM behind the Riviera IC. I have already attempted that fit. Also, I'm thinking that the Riviera digital IC may be more sensitive to heat?
Did you receive my email with the ALDLStuff.zip? If so, did the files make any sense?
[This message has been edited by Cajun (edited 09-13-2020).]
While I was messing around with the connectors and wiring I figured I would do a test fit of the connectors in the dash location. It appears that I will have room to place the BCM in that location and have the ability to remove or service it if needed.
I know, it's pretty messy...............
[This message has been edited by Cajun (edited 09-13-2020).]
A little more progress today. I know progress has been a bit slow, but hey I'm dealing with some 65 plus wires and I don't want to make any mistakes or at least too many mistakes in the wiring interface changes. I would hate to have to remove the dash a second or third time to troubleshoot wiring errors.
Anyway, I have cut our the OEM Fiero instrument cluster (IC) connectors C1 & C2 and prepped the wires for the interface connections. That's the next step!
My next step will be to connect the Riviera IC connector to the Fiero C3 interface terminal strip (connector).
The faceplate Lexan still have not arrived. If it arrives after I get all the interface wiring sorted out I plan to just go ahead and install the Fiero surround & Riviera IC. A faceplate template has been cut and test fit. Hopefully I'm good to go on that end?
Since it's raining out and waiting on what Tropical Storm Beta is gonna do figured I would do a little more wiring work. I have now completed wiring in the Riviera digital IC connector into my GT. Guess that was the easy part? Next comes wiring in the Fiero BCM and of it's associated wiring.
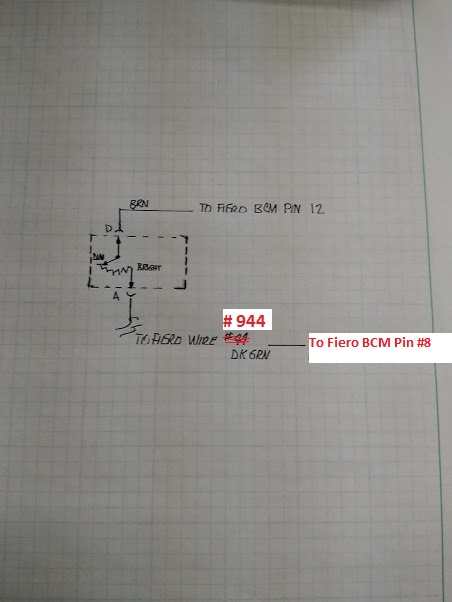
The real fun part at least for me was making the wiring changes to Fiero wire #44 at the remote diming transistor. Nice there is a connector at the transistor. But crawling under the dash area to wire in connectors is a PIA affair!
I have made a few changes to my wiring road map. I will include those photos also.
Here is a photo of my wiring road map for the Riviera digital IC connector:
Wiring diagram for the changes to the interior lighting control:
Just FYI on the dimmer.. it was a real PITA. The dimmer module is a transistor set up as an "emitter follower". It amplifies the current through the dimmer pot to a current about 50 times the dimmer pot, enough to drive a fistful of lamps. But the Riviera IC has it's own built in PWM dimming output.. and the command to the IC comes through the serial communications with the rest of the gauge signals. So the dimmer command must come from the BCM board. And therefore the dimmer pot must go into the BCM board. There are many analog inputs on the BCM board that are current sources.. the ideal way to measure a resistor, such as the fuel gauge or the temp sensor. So a similar circuit drives the dimmer pot.. a current is sourced, and the voltage across it is measured. V=I*R. On top of that, the current source circuits all want to drive a resistor that is connected to ground. The original dimmer wiring has one wire from the pot wired to +12. Again, backwards. So wiring has to be changed to ground. All of that leads up to the reason why the dimmer module is removed.. because it is wired completely different than how we need it to be.
Another snag!! Waiting on additional wire markers for making up the wiring for the 35 wire connector on the Fiero BCM. I thought I had enough to complete the wire marking but that is not the case. The additional markers are scheduled to arrived Tuesday.
Also, just off the phone with estreetplastics. They tell me my Lexan order is not scheduled to ship until mid next week. They indicated they were running a bit behind and was hoping to get all their August orders out by now. I can still install the surround without the Lexan face plate but would rather have the Lexan cut and fitted before re-installing the surround. Don't want to do work twice.
My plan is for today is to re-wire the Fiero interior dim light control rheostat. Get that out of the way.
When this project is completed I plan on posting a set of "As Built" drawings, photos, etc. for anyone that wants to install a Riviera digital instrument clusted into their Fiero.
[This message has been edited by Cajun (edited 09-23-2020).]
The additional plastic wire markers have arrived. However, once installed at both ends of the wiring harness for the Fiero BCM they add too much bulk to the harness. Space is a premium under the dash. So I have sourced some heat shrink wire markers from a local Oil & Gas Instrumentation company. They didn't charge me an arm & leg plus a pint of blood for the heat shrink wire markers. Now I am waiting for those to arrive.
In addition, I have been informed by the Lexan suppliers there will be a delay in shipping due to Tropical Storm Beta that has caused severe flooding in the Houston area.
The good news is that I have received word that the Lexan panel has shipped. The bad news is that once again we are locking down for hurricane Beta. Storm number 6 so far this year, a record!
Also, the shop that will be cutting my Lexan is in Vermilion parish, they are under a mandatory evacuation. So that will delay in getting the Lexan cut.
This is fascinating stuff. I'm interested in doing something similar, and have started researching how to do a small computer display IC based on Raspberry Pi. I'm very interested in how to capture the input information like VSS, Speedo and so forth, and how to massage that data to get the Pi to turn it into a digital gauge display. I'd also very much like a HUD. I'll be following this build!
Just getting internet back after a visit from Hurricane Delta and no power for 4 days. Now the clean up and repairs.
On the project.... some good news and some bad! I have received the heat shrink wire markers and the Lexan panel. The bad news is the shop that will be doing the Lexan cut to fit the Fiero surround is still without power.
The other issue is that wifey said house first and toy second!! Oooch. Hope to have repairs completed in about two weeks. Will be back once most of the repairs have been completed.
Oh, this morning I installed the heat shrink wire markers on the BCM wiring harness!
Did a little more wiring today, not much but some. For me this exercise is the critical part of the Riviera digital IC install, the interface wiring.
I was able to finish up the interface wiring for my terminal strip "AA".
Also wired up the interface wiring for the Instrument dimmer control pot. Not a very good photo!
In the above photo you will notice the location of the Fiero BCM. Hopefully this is it's final resting place.
Hopefully sometime this week I will have some time to wire up the remainder of the interface terminal strips (2). I am still in the mist of home repairs from hurricane Delta. Then the tough part test the system in place. My plan is to install the Riviera digital IC & Fiero surround in place without installing the dash. Hopefully this will allow me access to any wiring I may need to address due to any issues.
Great work! Can the dashboard lights be ordered in ‘Red’ like the Fiero? Are there any provisional plans to utilize the two auxiliary gauges spaces above the center HVAC/Radioactive controls? What information can be used within area? Kevin
The Riviera IC is made up of vacuum fluorescent displays (looks like one panel, but is made up of pieces). They are all baby blue, with some red, green, blue accents for such things as high temp, low oil, etc. That is why it has a very 80's look, even though it was 91/92. So the answer is no, no red, as there is no backlighting per se. Just the VF displays. So the real question is whether to leave the other lighting, such as HVAC and radio, with their red color, or change them to blue or light blue. And I believe that modifying the radio would be hard, but maybe there is a GM radio that was light blue already. I had not considered the center console gauges.. The BCM reads the analog sensors directly, IE uses a current source to drive the sensor and then reads the voltage across the sensor. So it would not be possible to put gauges in parallel. The volt meter would work, but I am sure that one working gauge would not a center console make. And to the fellow that wants to use a Raspberry PI, I will share the project so that you can do that.. but keep in mind that the PC board has a lot of other circuitry to support that effort, so just a Raspberry would not be enough to complete the interface.
Chris Eddy replied to the question about the ability to change IC lighting color.
The second question; short term I have no plans for the current Aux gauges. Long term I current have a 3-gauge Al blank for installing in the Aux gauge location. I would say pretty much any gauge one would want to install and wire could be placed in that position.
I don't have a stock radio or HVAC control head in my 86 GT. The radio is a 1din unit, back lighting is adjustable. The HVAC unit is a digital control unit out of a 2001 Grand Prix. The instrument colors are "red".


.jpg)
.jpg)