Pennock's Fiero Forum
  Technical Discussion & Questions
  Gauge/dash light issue

Post New Topic  Post A Reply
Email This Page to Someone! | Printable Version


next newest topic | next oldest topic
Gauge/dash light issue by 4evrnyt
Started on: 12-02-2017 10:07 PM
Replies: 9 (449 views)
Last post by: 4evrnyt on 01-09-2018 12:11 PM
4evrnyt
Member
Posts: 24
From: calistoga
Registered: Nov 2017


Feedback score: N/A
Leave feedback

Rate this member

Report this Post12-02-2017 10:07 PM Click Here to See the Profile for 4evrnytSend a Private Message to 4evrnytEdit/Delete MessageReply w/QuoteDirect Link to This Post
My pod gauge lights work fine as do the tachometer and the smaller square indicator/warning lights. The speedo/ fuel/ water temp gauge however do not light up. When I put a volt gauge on the spedo's copper contacts where the bulb holder touches I only get .2 volts. The working bulbs are all getting nearly 12v. I also pulled the bulb and holder from the lights that don't illuminate and had continuity between the points so they're fine.

Also, when I turn on the lights my temp gauge pegs to the right. Only does it when the lights are on, otherwise works fine.

Thanks in advance.

IP: Logged
PFF
System Bot
theogre
Member
Posts: 32520
From: USA
Registered: Mar 99


Feedback score: N/A
Leave feedback


Total ratings: 572
Rate this member

Report this Post12-02-2017 11:22 PM Click Here to See the Profile for theogreClick Here to visit theogre's HomePageSend a Private Message to theogreEdit/Delete MessageReply w/QuoteDirect Link to This Post
dash bulbs go to gray and black wires on both connectors on back.
likely 1 wire or small connector has problems to read nothing on a meter for light pads on left side of dash.

Correct bulb layout... see https://www.fiero.nl/forum/Forum2/HTML/138175.html
connectors should be:
Small connector
4 ground
7 12 dash lights
9 12v for ignition power On
10 ajar light
11 temp gauge
1 2 3 5 6 8 not used

big
11 ground
15 dash lights

copper traces in plug area can get lose the "glue" holding it to plastic. If so then can bent and even short out to other "pins." Look in the dash plug using mirror if needed to see w/o tearing apart whole dash.

------------------
Dr. Ian Malcolm: Yeah, but your scientists were so preoccupied with whether or not they could, they didn't stop to think if they should.
(Jurassic Park)


The Ogre's Fiero Cave

[This message has been edited by theogre (edited 12-02-2017).]

IP: Logged
4evrnyt
Member
Posts: 24
From: calistoga
Registered: Nov 2017


Feedback score: N/A
Leave feedback

Rate this member

Report this Post12-14-2017 10:43 PM Click Here to See the Profile for 4evrnytSend a Private Message to 4evrnytEdit/Delete MessageReply w/QuoteDirect Link to This Post
Turned out not to be a loose connection under the dash.

[This message has been edited by 4evrnyt (edited 01-07-2018).]

IP: Logged
4evrnyt
Member
Posts: 24
From: calistoga
Registered: Nov 2017


Feedback score: N/A
Leave feedback

Rate this member

Report this Post01-07-2018 01:11 AM Click Here to See the Profile for 4evrnytSend a Private Message to 4evrnytEdit/Delete MessageReply w/QuoteDirect Link to This Post
Discovered the problem.

[url=http://i49.photobucket.com/albums/f257/4evrnyt/0106182200b.jpg][/url]

Whats the best fix?

[This message has been edited by 4evrnyt (edited 01-07-2018).]

IP: Logged
Easy8
Member
Posts: 369
From: Jacksonville, Fl
Registered: Feb 2009


Feedback score: (1)
Leave feedback

Rate this member

Report this Post01-07-2018 01:58 AM Click Here to See the Profile for Easy8Send a Private Message to Easy8Edit/Delete MessageReply w/QuoteDirect Link to This Post
The fix depends on if you can solder. If you can you can simply solder a wire from the contact to the first bulb contact on the run. This removes the need to try to clean off the coating from the run. I would use a 22 or 20 guage wire, the bulbs will not pull that much current. If you can not solder (or know some one who can) the you are in the market for a new part.

[This message has been edited by Easy8 (edited 01-07-2018).]

IP: Logged
theogre
Member
Posts: 32520
From: USA
Registered: Mar 99


Feedback score: N/A
Leave feedback


Total ratings: 572
Rate this member

Report this Post01-07-2018 03:21 PM Click Here to See the Profile for theogreClick Here to visit theogre's HomePageSend a Private Message to theogreEdit/Delete MessageReply w/QuoteDirect Link to This Post
I would Not solder this. Typical soldering from most people will wreck the plastic or heat the glue holding copper fast. IOW more problems to solder.

Carefully "strip" any spot in thumb triangle area. thumb side only is enough.
Pierce 2-3 small holes in striped area and tread w/ small wire. If thumb covers mounting hole tread wire there too. Pin should keep wire tight contact in the copper.
connect other end of wire to the plug.

Use enough wire so can release the plug w/o pulling the wire.

I believe broken "pin" is a ground. (Pin 4 of left plug? Right viewed from back.) If so can simply ground the wire anywhere easy to get to.
CLICK FOR FULL SIZE


if needed...
I think Contact are remove from body by carefully pushing small tool in the front of body then pull wire.
I don't have a example for this type.
IP: Logged
4evrnyt
Member
Posts: 24
From: calistoga
Registered: Nov 2017


Feedback score: N/A
Leave feedback

Rate this member

Report this Post01-07-2018 11:14 PM Click Here to See the Profile for 4evrnytSend a Private Message to 4evrnytEdit/Delete MessageReply w/QuoteDirect Link to This Post
Thanks. It is the ground wire.

Do you think this would work?
https://smile.amazon.com/gp...00_s00?ie=UTF8&psc=1

[This message has been edited by 4evrnyt (edited 01-07-2018).]

IP: Logged
theogre
Member
Posts: 32520
From: USA
Registered: Mar 99


Feedback score: N/A
Leave feedback


Total ratings: 572
Rate this member

Report this Post01-08-2018 01:43 AM Click Here to See the Profile for theogreClick Here to visit theogre's HomePageSend a Private Message to theogreEdit/Delete MessageReply w/QuoteDirect Link to This Post
Easier then above...

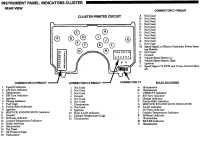
C2/p4 grounds other things... Like the clip to ground temp gauge.
jump top clip on temp gauge to bottom clip for fuel gauge. You can follow both traces in this...
CLICK FOR FULL SIZE


Most any old network/phone cable w/ solid wire can be used.
Strip ends only.
If a bare jumper moves can short 12V to ground and cook the board.

To attach...
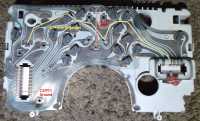
I think push wire in the dash then look at other side to catch big ear or back of clip then push back so can twist tight on board side.
Less risk damaging the clips or have jumper get loose.
Small hole is clearance for screws on the gauges... If screw hits the jumper can cause minor reinstall issues. So don't just push hard when gauges don't fit flat.

If C3/p11 traces look thin near idiot lights then jumper to the tach bottom clip next to C3 bottom.
Nothing draws many amps so short jumper should be ok.
big jumper should be glued w/ RTV silicon. short jumper is optional.
IP: Logged
4evrnyt
Member
Posts: 24
From: calistoga
Registered: Nov 2017


Feedback score: N/A
Leave feedback

Rate this member

Report this Post01-08-2018 11:05 PM Click Here to See the Profile for 4evrnytSend a Private Message to 4evrnytEdit/Delete MessageReply w/QuoteDirect Link to This Post
Thanks for the help, will be working on it tonight.
IP: Logged
4evrnyt
Member
Posts: 24
From: calistoga
Registered: Nov 2017


Feedback score: N/A
Leave feedback

Rate this member

Report this Post01-09-2018 12:11 PM Click Here to See the Profile for 4evrnytSend a Private Message to 4evrnytEdit/Delete MessageReply w/QuoteDirect Link to This Post
I had already ordered the tape and being Amazon it arrived yesterday so I gave it a try first.

I peeled back the top layer of clear plastic that sandwiches the copper. I cut a small strip of the copper tap I ordered and placed it as a bridge between the broken contacts and then reconnected everything and it works great!

Easy fix, thanks again for all the help.
IP: Logged

next newest topic | next oldest topic

All times are ET (US)

Post New Topic  Post A Reply
Hop to:

Contact Us | Back To Main Page

Advertizing on PFF | Fiero Parts Vendors
PFF Merchandise | Fiero Gallery
Real-Time Chat | Fiero Related Auctions on eBay


Copyright (c) 1999, C. Pennock