Heh, thanks man... I should just ask you directly, you're helping me so much!!! haha
I figured that the Moroso thing would make filling easier to deal with... Needed that last few dollars to clear the free shipping on Summit Racing so I figured why not since I read that a few guys were running it... I may still use it since I have it, we'll see what happens when I actually get this thing going and how ugly it will be sitting there. I love the way your engine looks Olejoedad and I can only hope mine looks as good as yours does when it's done...
I'm still trying to nail down how to run these coolant lines - from what I gather so far, the big outlet on the water pump connects right to the factory V6 hose that is already there, apparently with a reinforcement zip tie to keep it away from the AC compressor pulley. In my case, since mine is going to be in an 88, the smaller hose off the water pump gets blocked off, as stated by Olejoedad above... others say to fill with JB weld, brazed, or whatever technique to seal it off, and capped for good measure. the hose that connects to the coolant pipe on the driver side is a 4 cylinder hose (87 duke hoses are available from the Fiero Store) that connects from the driver side coolant pipe, up to that Moroso 63740, then a small piece of the hose taken from the original hose at that port from the Cadillac to the bigger of the 4.9 thermostat housing ports. *The hose I don't know how I'm going to run yet is the smaller of the hoses from the thermostat housing to the heater core return line...* It seems that I'll have to fab up my own custom crossover pipe I guess, eh? That's ok! Some of my favorite TV shows are watching the car-build guys and seeing their amazing fab work and how it's done. I would love to figure out how to do it. My priority is to simply have the engine in the car and the car mobile for small things like taking the lawnmower out of the shed and things like that (I have a terribly designed driveway for working on cars) so stuff like making an exhaust can be created in due time. I plan on cutting the trunk bottom out for more room to put a bigger and longer style 2.5 exhaust complete with an electronic exhaust butterfly cutout. I'm going to keep the single O2 sensor with no catalytic converter.
I ordered all the stuff to make the fuel lines from Summit... Going to do stainless steel lines off the fuel rail to the factory Fiero fuel hoses. Gonna mount and route them along the trunk wall and connect to Fiero lines under the battery's soon to be former location. I will be relocating my battery.
I'm going to make this post a master list of what I have ordered to keep record for myself and anyone else in the distant future who may want it down the line in a nice orderly fashion. I love having everything organized and in one location. This is a mixture of a lot of research (with Photobucket making all pictures unavailable to look at anymore it made things really difficult), and soon, experience. This list is consisting of many pre-made parts to make this swap as "bolt in" as possible.
Hi everyone from the future reading this!
 Battery relocation:
Battery relocation tray from V8Archie
2 gauge welding wire kit with required terminals, 25 feet
"Battery terminal relocation block" to mount in a convenient location the right side where stock battery was (still currently is at this point) - This is to allow easier jump starting if battery dies. (cable run from battery "+" to starter, to relocation block.
"-" ran from battery to starter mounting bolt)
Conventional battery and terminals to rid myself of that stupid GM side post design
Engine intake:Stock Fiero air filter thingie to "82-87 4 BARREL 88-92 TBI CAMAROFIREBIRD V8 AIR BREATHER INLET FLEX DUCT" to the stock 4.9 throttle body etc cover thingie
Clutch and flywheel:eClutchmaster Stage 3 clutch kit for an 85-88 Fiero GT 2.8 5 speed. Part number: EC-82105HP3-EXE-FIR
To save a few hundred dollars I will be re-using my flywheel and bolts. Bringing it to machine shop as soon as I drop the engine to get plugged and drilled to 4.9 pattern. Many have done this with good results. Otherwise, many have used SPEC or LSC Performance to make a new custom flywheel to the tune of $300. EDIT: I decided to get a new flywheel from LSC Performance. IIRC it was around $250.
Fuel lines:-6 AN to 14mm x 1.5 adapter, AN Flare to Metric, Part number: EAR-AT991954ERL (three of these, two to connect to 4.9 fuel rail to custom made SS fuel lines, one to factory Fiero hose)
-6 AN to 16mm x 1.5 adapter, AN Flare to Metric, Part number: EAR-AT991955ERL (one of these, from factory Fiero hose to custom made SS fuel line)
-6 AN Fitting, Hose End, Straight, -6 AN Hose to Female Part number: SUM-220690B (four of these, to make the SS fuel lines)
Harness:Out of my hands in my case, as I ordered one from Olejoedad. Thanks again!
If you want to make your a harness, check out Mickey_Moose's thread
here. A lot of pictures went missing making life extremely difficult, but I saved a copy of it a year or so ago. I recently made a post (page 4, which is linked above) in the thread with an archive of screenshots I took a long time ago complete with the lost pictures so all the information back where it belongs, albeit at the end of the thread.
 ECU programming
Sinister Performance
Exhaust:Stock 1993 Cadillac DeVille exhaust manifolds, fabbing up custom routing as required to clear the shifter cables, slave, etc. After headers I will be using 2.5 inch exhaust pipe after the headers as I want to cut my trunk to fit a bigger exhaust and muffler setup while adding an exhaust cutout to make my neighbors angry! :P
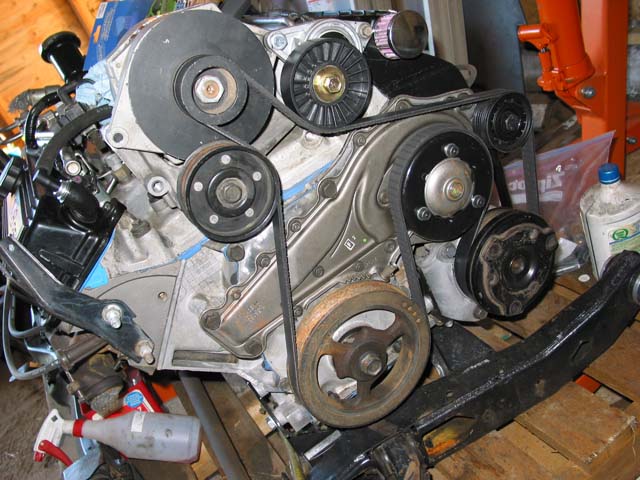
Cooling:As stated above, I'm still trying to nail down how to run these coolant lines - from what I gather so far, the big outlet on the water pump connects right to the factory V6 hose that is already there, apparently with a reinforcement zip tie to keep it away from the AC compressor pulley. In my case, since mine is going to be in an 88, the smaller hose off the water pump gets blocked off, as stated by Olejoedad above... others say to fill with JB weld, brazed, or whatever technique to seal it off, and capped for good measure. the hose that connects to the coolant pipe on the driver side is a 4 cylinder hose (87 duke hoses are available from the Fiero Store) that connects from the driver side coolant pipe, up to that Moroso 63740, then a small piece of the hose taken from the original hose at that port from the Cadillac to the bigger of the 4.9 thermostat housing ports. *The hose I don't know how I'm going to run yet is the smaller of the hoses from the thermostat housing to the heater core return line...*
Mounts:I originally wanted to go with John's 4.9 performance engine mounts, but he unfortunately doesn't have 88 mounts available yet. If they are not available by springtime, I will be ordering a set of everything I need to attach the engine and my Getrag transmission to the cradle through West Coast Fiero.
Oil Cooler Bypass: Procedure -
https://www.fiero.nl/forum/A...110502-2-104610.htmlThrottle cableModifying a V6 cable for the 4.9 -
https://www.fiero.nl/forum/A...041015-2-052836.htmlIdler and tensioner:Idler - Off a 1990 Chevy Astro Van 4.3 V6 with no AC according to Mickey_Moose's "4.9 wiring thread" mounted like in this pic by Mickey_Moose under alternator. Use spacers behind it to get it lined up correctly so belt doesn't get torn up. Part number: GATES 38007
According to the info I found, I don't remember the thread unfortunately, but this is info I wrote down for the bolt to mount the pulley: 17mm bolt for pulley, GM part number: GM24501175 name: F-bolt/screw
Tensioner - 3.4 Camaro tensioner Part number: DORMAN 419107 (Credit again to Mickey_Moose)
https://www.fiero.nl/forum/A...050818-2-052483.html Apparently you will need a longer bolt for the alternator bracket due to the tensioner.
Tensioner bracket (Credit to Oldbob): 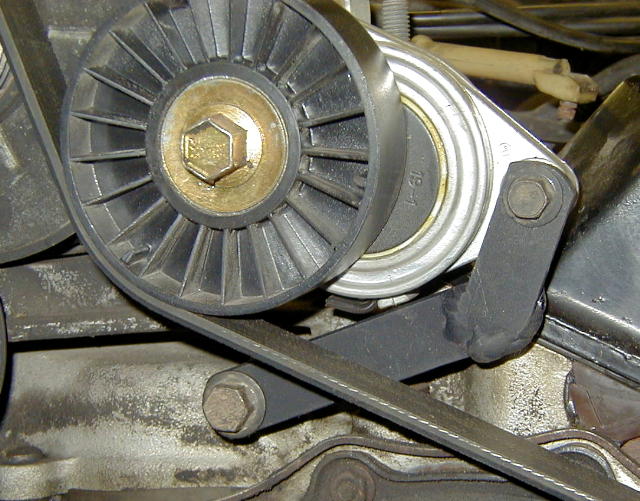
"The material is 1/4" x 3/4" hot rolled steel.
The short leg is 2" long with a 11/32" hole in the end.
The long leg is 4" long with a 13/32" hole in the end.
The angle between the two legs is 50 degrees.
The two legs overlap about a half inch at the weld. The short leg
is in front of the long leg.
There is a 15/16" long spacer between the lower bolt and the
threaded hole in the manifold.
There is a stop projection on the stationary part of the tensioner
which can be removed which will allow more movement of the
arm in the clockwise direction. Gives a little more room to slip
the belt on.
Bob"
Belt:From what I gathered in a few spots, anywhere from 79" - 80.5" belts (take this with a grain of salt, this can vary) 6 ribbed. Pro tip: take some rope or twine and loop it around each pulley in the correct routing you desire... mark where they meet and measure the distance. Boom, you have a basic idea of how long your belt needs to be! Should be smaller than that number, remember!
Air Conditioning:The Fiero hoses will reach and work with the Cadillac compressor. The mounting on the Fiero's AC lines may need to be loosened to reach though. Fiero compressor is interchangeable, though you need to swap the pulley from the Cadillac to the Fiero's to ditch the Fiero's "V" belt style pulley.
Am I missing any other info guys? This is
ALL the information I have consolidated for this swap so far.
------------------
"Discord"Red 1988 GT under restoration!
Let's Go Mets!
( ͡° ͜ʖ ͡°)
[This message has been edited by Shho13 (edited 01-08-2018).]


.JPG)


