The boss finally gave me permission to start my long dreamed of Murcielago kit car project . I’m aiming to complete the project within 2 years. First step of the project is the Fiero and engine swap….may as well start with something that’s fun to drive. I’ve long researched this, and decided that for my needs and driving style, I think the best swap would be the 4.9L Cadillac V8. I love the high torque down low, and will look at adding a low boost turbo at a later date to help give a little kick at the higher rpm range.
Hunting around, I found this 88 Fiero (base, 4 cyl, 5spd Getrag) for $900 last month. The car only had 101,250km on it, but hadn’t been driven for 10 years. He’d kept it in the garage, taking it out to the driveway every summer and running it, then putting it back into the garage. As expected, since the fuel was never changed it stopped running a few years ago. I expected the worst, but after inspecting it I found that other than some paint issues, it looked to be in near mint condition. It’s been a long time since I’ve seen a car this clean underneath. Spaceframe looked to be immaculate . Even the interior was in awesome shape.
I grabbed it and towed it home.
The plan was to get the car registered before changing out the engine. Makes life a little easier here in Ontario…however requires a Safety inspection and e-test for registration. (…figures…88 is the first year that requires e-tests here )
Quick rundown of what I’ve done so far:
1. Removed gas tank. There was about 2L of...your guess is as good as mine, lol. Varnish?? Tank was in good shape, though obviously needed a good cleaning 2. Changed fuel pump...didn't even waste time with that one. Parts were melting. Pump was no longer connected to the discharge line 3. Changed the fuel sender unit. The lines were gummed up, but salvageable. However, the sender only read 22ohm empty and 68 ohm full (should be 0-90ohm)...actually a common Fiero problem I gather. The potentiometer wasn't in great shape (no luck in trying to repair) and unfortunately wasn’t available anywhere. Since this part will stay with the car throughout the build, I opted to change the whole sender. May as well have a fully functional gas gauge 4. Changed fuel filter...no brainer...however...it was seized to the lines. Actually this is the only part that has been a problem to remove so far. I gave up trying to remove the filter from the lines and opted to go with some new SS supply lines...also a part (half of it) that stays throughout the build, so may as well change them out now. 5. Fuel pump relay. I was worried initially about ECM output...wasn't correct. However, turns out the fuel pump relay was so corroded internally that it was sinking the ECM fuel pump output. Changed it. ECM and relay operate perfectly now. 6. Plugs...changed them...not worth the effort of cleaning them (even though the engine will hopefully be pulled in the next few weeks). They suffered the effects of bad fuel...covered in carbon, but otherwise healthy. 7. Brakes were fully functional (including handbrake) but obviously coated in some minor rust. Could have just turned them, but decided to change them to some vented, slotted, cross-drilled rotors with ceramic pads. I’ll paint the calipers later…(I’ll also be switching to a lowered, wide track suspension when I start the body kit swap)
8. Lastly, changed oil and air filter.
Took the car in for safety inspection and e-test. Wow…only needed a single ball joint for the safety!!! …also no issues on the e-test...scored better than most new cars!!
Now that I’m registered, and I have a baseline for everything, time for the new engine…
Found a 93 Deville with just 84,000km on the engine. Sold. Cost me $1000 for everything…engine, accessories, harness, computer. I might have been able to get a little cheaper, but I couldn’t find any engines within several hours of here with less than 150,000km on them.
Donor Caddy...
Caddy 4.9L engine removed...
On stand...
Damn...2 sheared spark plugs and sheared exhaust manifold bolt ...(needs some cleaning as well) ...(not shown is cracked exhaust manifold ...to be replaced this weekend)
Ok...let's make it look nice...cleaned and painted …note valve covers are swapped…
...add some custom wires...
What do you think?
Next steps...
Some new parts (distributor cap, HEI coil, rotor) on order...
Need to build custom belt routing tensioner/idler system to account for removed power steering and AC pumps...
Need new Stage III clutch to handle the power...(keeping the Getrag )
Need to remove Fiero engine...
Need to plug/drill flywheel for 4.9L crank bolt pattern...
Need to build new engine mounts...
Install engine... (ok...probably simplified this step lol)
Let me know what you think! I'll try to keep my progress up to date.
Cheers,
Neil
p.s. if anyone is interested in an 88 Iron Duke with less than 102,000km on it, let me know…
1. I want to change the stock air filter assembly to something (low profile) that looks better than the stock Caddy setup...any ideas? I will probably end up custom fabricating the whole assembly, but if someone knows something available that would look good with minimal mods... 2. Does anyone know of anywhere that makes headers for the 4.9 (instead of using the stock manifolds). I've never made headers myself before, but I suspect I will jump into this myself when I look at the turbo(s) setup...I plan on using the stock manifolds initially until the swap is up and running
Originally posted by Neils88: ... I found this 88 Fiero (base, 4 cyl, 5spd Getrag) for $900 last month. ...
One detail that needs mentioning. If it's the tranny that came in the car, stock, it's an Isuzu. Not a Getrag. Look at the cables. If they both come in from above it'll be an Isuzu. If one comes in from above, and the other comes in from the bottom front corner and loops around, it's a Getrag.
I bought a new proper flywheel for the conversion. I think it was LSC I bought it from. I can check if my memory fails.
Re-jigging the stock one really isn't a good idea.
Arn
Just did a little checking and found this picture from CaptFiero of a LSC flywheel....
...this worries me...did anyone else have this issue from them? I have a CNC Mill and can drill a '88 flywheel with an extremely high tolerance...the issue comes back to the plugs and whether or not they significantly affect the strength...I'd really like more thoughts on this before I make the decision to buy one or plug/drill mine
One detail that needs mentioning. If it's the tranny that came in the car, stock, it's an Isuzu. Not a Getrag. Look at the cables. If they both come in from above it'll be an Isuzu. If one comes in from above, and the other comes in from the bottom front corner and loops around, it's a Getrag.
Good luck with your project.
Good point...not sure how I missed that...guess I wasn't focusing on the transmission well enough . Ok...that raises the next question...how will the Isuzu handle the torque of the 4.9L? Ideally I'd love to switch to an auto tranny with paddle shifters...I just didn't want to do it immediately lol. Will this tranny survive for now?
I have a CNC Mill and can drill a '88 flywheel with an extremely high tolerance...the issue comes back to the plugs and whether or not they significantly affect the strength...I'd really like more thoughts on this before I make the decision to buy one or plug/drill mine
I redrilled and plugged my 88 flywheel, added a centering ring (there's a guy in the mall that sells them I think), and had it resurfaced for around 70 bucks, used a centerforce clutch $265 (seemed to be the best bang for the buck locally), and stuck it all in the stock isuzu trans with 200,000 kms on it. I also added those axel stabilizer bearings/seals.
I've been driving it regularly including all through the winter for almost one year now;
I haven't had any problems with the flywheel at all.
I like the centerforce despite the poor durability experiences others have had. It's light on the pedal and seems to grip tight.
isuzu is holding fine...so far. I like it so I bought a spare from the wreckers last year for $130
The axel support bearings/seal are working just fine despite the high kms on the trans
Just about every launch is a hard one...I just don't drop the clutch and spin the wheels...that's what kills these transmissions I think. I put it in gear, let off the clutch till it rolls, then mash the gas pedal. It hooks up great so the launch is solid and only occasionally spins the tires.
I'm looking forward to following your progress. I've been keeping my eye open for a patially completed diablo kit...still dreaming. Just in case you're interested in any of the steps I went through with my swap... https://www.fiero.nl/forum/Forum2/HTML/122389.html
I have an LSC flywheel on my 4.9. I have no complaints. The holes lined up perfectly. The 4.9 crank hub is not drilled evenly. The holes are "skewed" to match. It looks like it should fit however it's placed on the hub, but there will always be 1 or 2 holes that are off, unless it's situated correctly.
I redrilled and plugged my 88 flywheel, added a centering ring (there's a guy in the mall that sells them I think), and had it resurfaced for around 70 bucks, used a centerforce clutch $265 (seemed to be the best bang for the buck locally), and stuck it all in the stock isuzu trans with 200,000 kms on it. I also added those axel stabilizer bearings/seals.
I've been driving it regularly including all through the winter for almost one year now;
I haven't had any problems with the flywheel at all.
I like the centerforce despite the poor durability experiences others have had. It's light on the pedal and seems to grip tight.
isuzu is holding fine...so far. I like it so I bought a spare from the wreckers last year for $130
The axel support bearings/seal are working just fine despite the high kms on the trans
Just about every launch is a hard one...I just don't drop the clutch and spin the wheels...that's what kills these transmissions I think. I put it in gear, let off the clutch till it rolls, then mash the gas pedal. It hooks up great so the launch is solid and only occasionally spins the tires.
I'm looking forward to following your progress. I've been keeping my eye open for a patially completed diablo kit...still dreaming. Just in case you're interested in any of the steps I went through with my swap... https://www.fiero.nl/forum/Forum2/HTML/122389.html
I just went through your build (first 4 pages so far...maybe I should be working at work not reading Fiero forums...but couldn't stop myself ). Wow!!! Your workmanship is second to none! I hope my build can be half as good as yours!! I'll be referring to your build notes daily as I progress. This should be required reading for anyone doing a 4.9L build! ...can't wait to read the rest of it. Awesome job Reallybig!!!!!
Thanks Raydar. Good info. I'll probably go with the LSC just to minimize issues. It really is a strange bolt drill pattern on the 4.9L...obviously must have been designed by an engineer...
What did you finally come up with for your exhaust crossover issue? What can I expect with the Isuzu? Reallybig ran the fwd bank under the engine and used two fwd manifolds, would that be better than attempting a crossover pipe?
My crossover is pretty much like it was, only taller and uglier, to clear the shift linkages. I can't say that it's a bad thing. The crossover exits in the stock Fiero location. The 2.5 inch single exhaust is plenty loud and not restrictive at all for what it is. It includes a cat in the stock location and a glasspack in the stock muffler location. You can use two front manifolds if you want. I'm sure they'll work just fine. Just seems like a lot of trouble. BTW, before I had the 2.5" system built, I was running through a stock cat and a Fiero Store Ocelot system. You could barely hear it.
My crossover is pretty much like it was, only taller and uglier, to clear the shift linkages. I can't say that it's a bad thing. The crossover exits in the stock Fiero location. The 2.5 inch single exhaust is plenty loud and not restrictive at all for what it is. It includes a cat in the stock location and a glasspack in the stock muffler location. You can use two front manifolds if you want. I'm sure they'll work just fine. Just seems like a lot of trouble. BTW, before I had the 2.5" system built, I was running through a stock cat and a Fiero Store Ocelot system. You could barely hear it.
Sorry for the confusion...if you kept the cat in the stock location (forward of the engine) did you reverse the manifolds and then run both exhausts (using the crossover) to the forward side, through the cat then under the engine? Is this a better setup than having both sides exit on the backside, feed into a single cat that T's into two glasspacks? That would require less piping...but an extra glasspack.
I'm hoping to pull the cradle this weekend...I think It'll be easier for me to figure the exhaust once I get the engine in place...
...if you kept the cat in the stock location (forward of the engine) did you reverse the manifolds and then run both exhausts (using the crossover) to the forward side, through the cat then under the engine?
ok...thought about this for a few seconds...obviously wouldn't work reversing the manifolds...crossover hookup would now be on the wrong side...
Still can't figure out how to keep the cat in the stock location
[This message has been edited by Neils88 (edited 02-02-2014).]
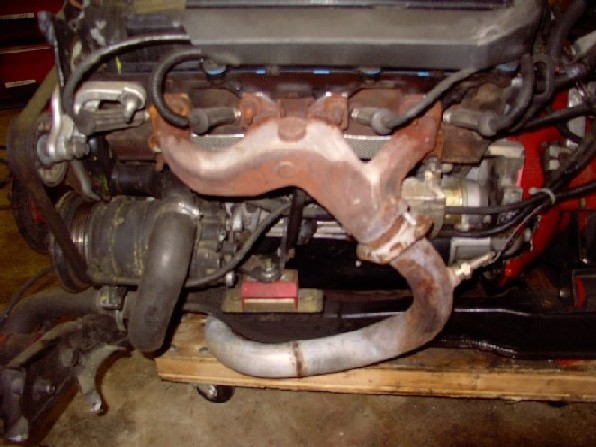
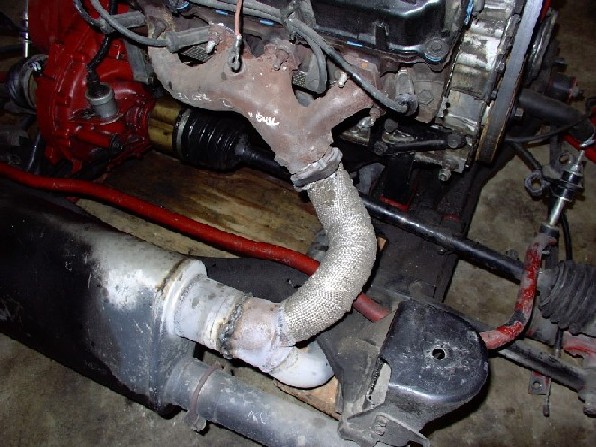
Originally posted by Raydar: The 4.9 exhaust outlet (the one that points at the trunk) is capped off. That leaves you with two manifolds, with the outlets both pointed toward the "tranny" side of the engine. The crossover goes from the trunk-side manifold, loops across the tranny to the front (window side) manifold, then down to the exhaust system in the left front corner of the engine compartment. There is a 90 bend that goes straight across in front of the engine. The cat is in the middle of the "straight across" piece of pipe.
ok...makes perfect sense now Never thought to cap off the trunk side manifold
[This message has been edited by Neils88 (edited 02-02-2014).]
I took a couple of days off due to a sore shoulder...wrenched it while taking off caliper bolts a couple weeks ago. Back at it today. Decided to start dropping the Iron Duke today...I have a 4.9L that is itching to be driven
Ok...first time dropping the Fiero engine so I'm a bit slower than everyone else. I spent about 3 hours getting everything ready, just need to drain the coolant tomorrow, undo the struts, and the 4 cradle bolts. Everything else is disconnected and ready. I was a bit slow since I was discovering all the interesting places you can drop tools that the fingers can't reach I need to start wearing Velcro gloves...It's really annoying when you drop your 7mm socket into the center console...and realize that you need your 7mm socket to finish undoing the bolts so you can retrieve the socket you just dropped....
I would have drained the coolant, but realized I had nothing to put it in...you'd think this was the first engine I'd ever pulled
Here's a pic of the Iron Duke...last assembled pic of it in the car...it was a fun engine for the 2 weeks I got to drive it...hopefully someone will grab it and give it a new home.
A shot of the battery tray...this really is the only spot on the car with any substantial rust...not a problem...it'll be removed in a few weeks...
I wanted to grab a pic of the ECM...I'm guessing this is the last time it'll look so organized...
Ok...here we are...just cooling system to drain and disconnect...looking forward to rolling the cradle out tomorrow...
I've decided to go with the LSC flywheel and avoid the issues of plugging and drilling the 88 flywheel. Next decision...which clutch does everyone recommend?
Ok...this is the post where I wanted to say triumphantly that the cradle was out, everything is great and time for a beer...
However...
Everything has been disconnected and is ready to go for the drop.
Issues...
1. The nut on the forward driver's side cradle bolt sheared off...the bolt remains jammed in the hole 2. The nut on the forward passenger's side cradle bolt came off ok (one small victory)...however the bolt remains jammed in the hole 3. Both rear cradle bolts have been loosened about 3/8"...however the welded nut on both have now come dislodged and the bolts just spin
I'm expecting that I'll end up having to cut everything off and then replace pieces as required...
Help!!!!!!!!!!!!!!!!!!!!!!!!!!! Any ideas?????????
I just went through your build (first 4 pages so far...maybe I should be working at work not reading Fiero forums...but couldn't stop myself ). Wow!!! Your workmanship is second to none! I hope my build can be half as good as yours!! I'll be referring to your build notes daily as I progress. This should be required reading for anyone doing a 4.9L build! ...can't wait to read the rest of it. Awesome job Reallybig!!!!!
Thanks for the compliments! I'm glad you'll be referring to my thread for help, after all, that's why I spent the time building it, but much of what I had done (aside from the labour itself) was from knowledge gained through reading many of the fine threads here on pennocks. Make sure to search them all.
I agree with your decision to get the new flywheel, If I tear things apart again, I'll probably do so as well.
Luckily, I don't have to pass smog or even legally need a cat so...
Just a side note; I spent many hours stripping, sanding, filing, and prepping my valve covers. Primed them with zinc chromate rattle can primer, multiple coats of engine enamel only to have all the paint on one valve cover completely fall off. The other is still holding but looks like crap. I can't get the bad cover off without dropping the cradle a bit so it's become a bit of a sore spot for me. If you are interested in keeping them looking good, I'd suggest soaking them in lacquer thinner to strip them of paint and hopefully remove all the oil from the magnesium and then have them professionally powder coated. This will be my process with two new replacement covers. then I can drop the engine, install the newly coated covers, and reinstall all in one day. Maybe not for everyone, but something to consider. I'm not sure if any one here has found the right process to keep the paint on these covers...I know GM sure didn't!
I followed the same procedure as you for the valve covers (plus baked them in the oven to my wife's disgust), sad to hear it hasn't held up for you. I'll look at the powder coat option myself later. The engine will be out again when I do the cradle stretch.
Although it may not seem like it, I actually don't do anything without searching the forum and internet for the ways others have done things...and of course it must all be true or they wouldn't post it on the internet...right?
(sorry battery died in camera, I'll have to post pics later)
I used the frame cut method to gain access to both rear cradle bolts. After lots of heat, PB blaster, a pipe wrench and ratchet with a breaker bar I managed to get one off properly, and sheared the other bolt off. I'm ok with that since it probably saved me time lol. I'll be changing all these bolts anyway. I also saw a kit somewhere that fixes this problem (on another post in this forum). I'll probably go that route.
After getting the weight right, I managed to easily unbolt the passenger side forward cradle bolt (nut was already off).
However, the driver's side forward cradle bolt is still stuck (the nut had sheared off from this one earlier). I broke my ratchet (that's ok...lifetime warranty and it was 20+ years old...probably due for a change) and split a socket...unfortunately I had already picked up the new ratchet before the socket broke...didn't feel like making a second trip today
I've tried all the usual remedies (adjusting weight, heat, PB Blaster, BFH, clamp, yelling, waving sacrificial chicken around while performing dance to several major and minor deities...) but nothing seems to have worked. Am I destined to have to cut something that I probably don't want to cut? I'll keep looking around the forum for ideas, but if anyone has anything that worked for them, please let me know.
(thought of trying to use my balljoint tool, but just can't quite get it into position...)
As promised, here's the pic of the cut I had to make to get the rear cradle bolts out (both sides )
After lots of heat, PB Blaster, a pipe wrench and a breaker bar on the ratchet, I managed to get both bolts off...although I broke one in the effort. I'll be changing all cradle bolts and nuts.
Finally the Iron Duke is out!!!
Ok...2 hours for a seasoned pro to drop the engine...4 hours for a novice...took me 18 hours Probably the slowest Fiero engine drop in history...
Quick look at the engine bay...everything looks great!
A few things done over the last few days. Still waiting for a number of parts (...and going to be away for a few weeks, so not going to order the clutch until I get back).
Got the old engine off the cradle. I'll clean the cradle up tomorrow. Not going to paint it this time...I'll paint it when I do the stretch next year. It's looks to be in good shape so it can wait.
Having some issues getting the old O2 sensor out of the 4.9L manifold (this is the replacement manifold replacing the old one that had a crack...couldn't get the sensor out of the old one either...). Actually broke two pipe wrenches...(add that to the list of broken ratchets, sockets, extensions...). Two options...leave the remains of the O2 sensor where it is and drill/tap a new location when I build the exhaust....or....drill through this one and see if I can't pick the pieces out and retap the threads. Anyone ever drill through an O2 sensor???
Been a while since I posted, but been away taking my son to college, away on a business trip....and spent the last 6 days trying to remove the last cradle bolt.
Finally...after 6 days, I must share my triumph!!!! The bolt is out!!!
As I posted before, I sheared off the nut and depite, PB Blaster, heat and an impact gun, I had to resort to using a hacksaw to cut through the hardened bolt. Nothing else I tried (that I could fit there) would make a dent!
Once the cradle was out, I thought it would be easy to remove the remains of the bolt...was I ever wrong!!! I tried everything, but finally had to resort to trying to drill it out. After 6 days (about 2-3 hours a day) I had still only made it about 1 1/2". I kept using different size bits to enlarge the hole to ensure no bit was likely to break off...until finally one finally broke off and seemed to be melted in place! Can't drill through a drill bit, so back to heating the bolt. I think enough material had been removed that I was able to finally press the bolt out slightly using my ball-joint removal tool (basically a giant c-clamp). After another half hour of working the bolt I finally was able to get it out!!!
I won't repeat the words that went through my mind about all the people who said just a bit of PB Blaster and it'll slide right out...or a little heat and it'll come out every time...grrrrrrrrr
The short piece in the pic is what's left of the bolt...probably want to replace that....lol
Ok...time for a break!!!
As I mentioned before, I am planning on getting the LSC flywheel...but I was bored and I decided to measure up the 4.9L flexplate and see if I could drill the pattern on the 88 Flywheel using my CNC mill. Since the measurements are a bit tough to make accurately, so I figured I would post the basic G-Code for anyone else who wants to drill one themselves.
The reference is the center of the flywheel, which is easy to determine if you are used to using a CNC mill. This code doesn't include your feedrates for drilling, and will just drill a 0.005" mark at the center of each bolt hole. Adjust depth and speed as you would normally. The point of this was to give the G-Code locations for the center of each hole for those that are interested.
I decided not to reused my V6 88 Flywheel for only one main reason.
"This thing will spin at 5 000 rpm at about 1 foot from my back" so, I want it rock solid not full of holes.
"Sounds like a challenge..." says the person aiming to win a Darwin award...
Although I do plan on getting an LSC, I was bored so I created the G-code to help those that were interested. I also plugged/drilled mine just to see how easy it was to do...ok...it was extremely easy. If I get bored again I will create an FEA (Finite Element Analysis) model and end the debate once and for all of whether or not a modified flywheel is safe. Transfer of power between engine and flywheel is different than most people think...it's not through the bolts. The bolts are used to create a "normal" force between the flywheel and crankshaft mating surfaces. The torque is then transferred through the friction between these items...will plugged holes compromise the integrity??? I don't think so, based on the path of power transfer. There's never been a documented failure...although I suppose a failure would likely take out the person who would be in a position to do the documenting...
Came out well, however, I question the strength of the steel when it only takes a few seconds to drill a 7/16" hole through 3/8" steel...I normally have a harder time drilling through aluminum
Ok...I'm done playing around with the 88 flywheel...easy to modify...it'll probably hold...but now's the time for a new LSC flywheel...
Dry fitting the 4.9L to the cradle. I'll start work on the mounts shortly. The forward mount appears easy enough. I'll use the existing mount from the 4.9 with a piece of angle. For the rear mount, I was thinking of using the 2.5L mount (under the oil pan) with a bracket that comes out back and up. Not sure yet if this will fit, but I am trying to avoid having a mount right near the axle. I'll also use the existing dogbone.
Finally got around to taking the gas tank out again. When I was getting the car running I replaced the pump and sender unit, but I only put in the smaller capacity pump. At the time I didn't want issues from using the higher capacity pump for the V6. Now I'm thinking this was poor planning on my part. I'm pretty sure the higher capacity pump would have worked just fine and saved me the time from dropping the tank again. The down side at this point was with the cradle out it is awkward to jack the car high enough to get ground clearance to remove the tank. My jackstands were already as high as they could go and though I could unbolt the tank (lots of space to lie down in the empty engine bay to reach the hoses, etc, and could reach the other bolts from the side) my jack wouldn't get the car high enough to slide the tank out. Had to set up the cherry picker, lift up the rear end about 4" and stand in the engine bay to slide the tank out. Less than 1/4 tank so the tank wasn't too heavy. I may wait until the cradle is in before I put the tank back in place.
I was thinking about painting the outside of the tank as well. There's a touch of surface rust on it, so now would be the perfect time to take care of that.
I also finally got the manifold drilled and tapped for the oxygen sensor. However, the hole is a touch larger than it should be as the drilling was probably fractionally off center. Once I made it through the hole, the old o2 sensor metal finally came dislodged. I'll have to decide if there is enough bite for the thread to leave it as is, or I may weld a little metal back into the hole and redrill and tap it properly.
Your timing couldn't be better....I was just sitting down tonight to design the tensioner bracket. I'm using the 94 Camaro tensioner and 90 Astro Van idler (...for some reason that is listed as a tensioner at Rockauto, but it's just a grooved pulley without a spring...so I'll call it an idler for the sake of argument). I like the idea of using the existing bracket for simplicity, but I may take a kick at machining a more custom bracket out of aluminum on the mill first. If I'm not happy with it then I'll go back to the steel version. Hopefully I'll have something to show in a couple of days.
The fuel pump used with the 4.9 is the V-6 Fiero pump. It is the same pump Cadillac shipped with the 4.9 when it was new. I dont think the Duke pump puts out enough pressure for the injectors.
PM me with your email addy, I will send you pics of some 4.9 Fiero mounts, brackets, etc.
The fuel pump used with the 4.9 is the V-6 Fiero pump. It is the same pump Cadillac shipped with the 4.9 when it was new. I dont think the Duke pump puts out enough pressure for the injectors.
PM me with your email addy, I will send you pics of some 4.9 Fiero mounts, brackets, etc.
PM sent.
The duke pump definitely couldn't handle the requirements of the 4.9. Unfortunately, when i swapped the pump earlier I didn't think ahead to what I would need for the swap. I think that was my only oversight at the time...not too costly, but did end up repeating the tank drop which I could have done without.
The 4.9 exhaust outlet (the one that points at the trunk) is capped off. That leaves you with two manifolds, with the outlets both pointed toward the "tranny" side of the engine.
I am sure it will work, as in exhaust will end up going up over the transmission, but just looking at it says it's going to be less than optimal...
I've see this done on a couple 60* V6 swaps as well but that rear manifold entire designed purpose is to funnel exhaust out the center... Objectively, I just don't see how that setup could possibly be anything other than 'convenient'.
If you used 93' Eldorado manifolds it would give you base to building true duals or you could merge further back, since you're using a manual tranny, such as this swap:
I've also see this setup merged below the axle as there is quite a bit of room around the axle in reality... Looking forward to seeing what you build!
I must admit...I've stood and stared at the engine/cradle for more than a few hours trying to decide which exhaust setup will work best. Eventually I plan on adding a turbo (max 8psi). Since this would be after I've done the 10.5" stretch, it would make perfect sense to position the turbo just forward of the tranny and carry on with the cat and muffler in basically the stock position. At this point I would switch to the El Dorado exhaust for the rear manifold for optimum flow. Unfortunately, being in Ontario I must have the Cat. If I had an '87 or older I wouldn't require anything, but the '88 is the first year that needs to be e-tested here. I think right now I'm leaning towards doing the simplest option, using a crossover to connect the front manifold to rear, then running a small profile Cat just under the rear manifold, and then splitting to 2 mufflers/dual exhaust.
I've resigned myself to having to deal with the exhaust twice...once before I put the body kit on, and once after. There isn't a good single solution. Once the body kit goes on, I'll have to cut up the trunk anyway...combined with a central exhaust it should change my options dramatically.
...before anyone asks why I don't just jump in and rip everything apart in preparation for the body kit and just do it once, I've decided to divide the project into small manageable steps. Historically, only a very small number of people complete full body kits once they've started. I don't want to get to a point where there is no end in sight where I get frustrated and quit. Small steps ensure a sense of accomplishment and will keep me motivated.
[This message has been edited by Neils88 (edited 03-30-2020).]
I've been working on the alternator belt routing this weekend. Made some good progress, and got the tensioner bracket completed.
I started with a series of prototypes, first in wood, then finally in 7075 Aluminum, 3/8" thick.
Here's the CNC mill I'm using...last years project.
Here's the final rendition (front and back views)...
Fit looks good...
Of course have to make that little notch to account for the manifold bolt...
You can see the bracket is also recessed slightly for the alternator to ensure proper alignment with the belt. I'm a little worried about this compromising the strength of the bracket at this point, but hopefully no issues...
Everything fits great. You'll notice that I haven't made the two spacers yet. They are straight forward. I'll cut the old power steering bracket for the alternator spacer since it's already an exact fit. I'll machine a simple spacer for the lower bolt.
Overall belt routing view....(yes...I'm using the original Caddy belt which is way too long, but this was just for visualization. I also need to machine the bushing for the idler, it's just hanging loose on a bolt)
Thanks Carbon, I appreciate the comment...I always feel good about my work until I look at the work that Reallybig has done...makes anything I do look like it was slapped together...
...if by "one of THOSE guys" you mean someone who changes projects so often that it irritates the wife...yup...you nailed it...


 . I’m aiming to complete the project within 2 years. First step of the project is the Fiero and engine swap….may as well start with something that’s fun to drive. I’ve long researched this, and decided that for my needs and driving style, I think the best swap would be the 4.9L Cadillac V8. I love the high torque down low, and will look at adding a low boost turbo at a later date to help give a little kick at the higher rpm range.
 )
)


 . Ok...that raises the next question...how will the Isuzu handle the torque of the 4.9L? Ideally I'd love to switch to an auto tranny with paddle shifters...I just didn't want to do it immediately lol. Will this tranny survive for now?
.JPG)
.JPG)
 ...can't wait to read the rest of it. Awesome job Reallybig!!!!!


 I need to start wearing Velcro gloves...It's really annoying when you drop your 7mm socket into the center console...and realize that you need your 7mm socket to finish undoing the bolts so you can retrieve the socket you just dropped....


 )
)