Have you dyno'd this thing yet? I'd love to know how much power/torque your putting to the wheels. I've heard of people getting around 215HP to the wheels which doesn't make sense since this engine only produces 200HP new. Im assuming they bore the engine?
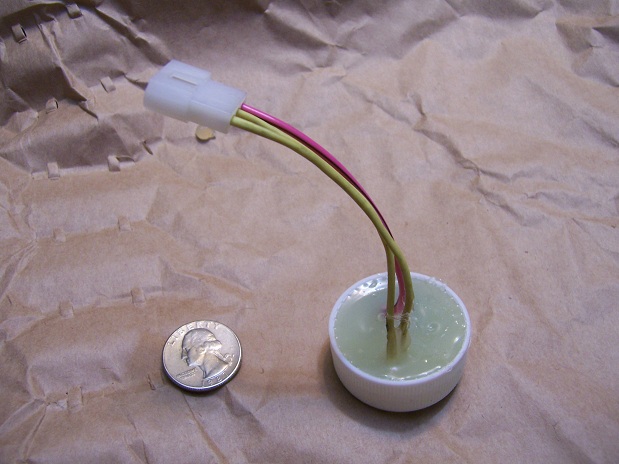
I wanted the tach filter to look a little better. After building a prototype, I decided to build a small circuit board and then encased it in epoxy. The final product wasn't as smooth as I would have liked, but good enough.
Like - You motivated me to change my speedo buffers & HEI tach filters to an SMD board.
Have you dyno'd this thing yet? I'd love to know how much power/torque your putting to the wheels. I've heard of people getting around 215HP to the wheels which doesn't make sense since this engine only produces 200HP new. Im assuming they bore the engine?
Likely they have an Allante intake which is supposed to be good for an extra 15hp. I don't think I'll bother putting this on the dyno since the actual hp value isn't that important to me.
For prototypes and small quantities OshPark is the place to go. Upload the .brd file and they will do double sided boards with mask and lettering. http://oshpark.com They charge by the sq in. so small boards are actually quite cheap.
For prototypes and small quantities OshPark is the place to go. Upload the .brd file ana they will do double sided boards with mask and lettering. http://oshpark.com They charge by the sq in. so small boards are actually quite cheap.
I've used a few places before and always been happy with the results and the cost. But now that I have my cnc mill I can turn out prototype boards in just a few minutes. I'll always go to a professional place if the board is needed for something critical or if I need multiple boards. I also don't have the ability to coat the boards or tin the solder points. If I want to do SMD boarsd I just need to pick up some sharp angle milling bits.
I wanted the tach filter to look a little better. After building a prototype, I decided to build a small circuit board and then encased it in epoxy. The final product wasn't as smooth as I would have liked, but good enough.
quote
Originally posted by Neils88:
I've used a few places before and always been happy with the results and the cost. But now that I have my cnc mill I can turn out prototype boards in just a few minutes. I'll always go to a professional place if the board is needed for something critical or if I need multiple boards. I also don't have the ability to coat the boards or tin the solder points. If I want to do SMD boarsd I just need to pick up some sharp angle milling bits.
Do I understand that you made that little board yourself? That's pretty sharp.
Do I understand that you made that little board yourself? That's pretty sharp.
Thanks Will. Yes I made that myself. I designed and built a CNC mill last year. I use it for everything from 3D milling of small plastic, wood or metal (aluminum) parts, to printed circuit boards. I'm going to make a bigger mill next year, so this one will just used for circuit boards and possibly 3D printing. The design is done on software (such as Eagle, KiCAD, LibreCAD, etc), then turned into G-Code and sent to the mill. I use an angled engraving bit to cut the traces. The best part is I can change to tiny drill bits and have the mill accurately drill all of the holes needed...then use a standard mill bit and have the board cut out. The result usually looks quite profeessional.
Likely they have an Allante intake which is supposed to be good for an extra 15hp. I don't think I'll bother putting this on the dyno since the actual hp value isn't that important to me.
I am very familiar with the Allante and the intake set up but I don't understand how they can fit that on the 4.9L. The 4.5 was the engine they used with that set up, though they aren't that different but it still seems 'iffy' as far as producing an extra 15HP.
I can understand that the figures shouldn't be too big of a deal. As long as your seeing people in your rear view mirror that is.
I am very familiar with the Allante and the intake set up but I don't understand how they can fit that on the 4.9L. The 4.5 was the engine they used with that set up, though they aren't that different but it still seems 'iffy' as far as producing an extra 15HP.
Because the 4.9 is externally identical to the 4.5...
I don't think I've ever seen a before/after dyno comparison of the 4.9 intake and the Allante intake.
There is a dyno test of a 4.9L on You Tube that claims a reported 217 HP at the wheels. On an automatic I would say if you hit 200HP you'd be lucky. This summers project is the install of a 93 4.9L/4T60e in my 85 GT/ California Convertible ragtop . We are using a 68K mile Deville engine that is very clean and has given like new cylinder leak down test readings. I guess that we will see shortly what these engines have first hand. I don't know about the OP but I would like to run an around the engine exhaust system so that I could use a larger muffler and quiet down the V8 roar. Trying to come up with a custom downpipe design that exits to the firewall side. Sure wish that someone offered one premade.
------------------ " THE BLACK PARALYZER" -87GT 3800SC Series III engine, custom ZZP /Frozen Boost Intercooler setup, 3.4" Pulley, Powerlog manifold, Northstar TB, LS1 MAF, 3" Flotech Afterburner Exhaust, Autolite 104's, MSD wires, Custom CAI, 4T65eHD w. custom axles, HP Tuners VCM Suite. "THE COLUSSUS" 87GT - ALL OUT 3.4L Turbocharged engine, Garrett Hybrid Turbo, MSD ign., modified TH125H " ON THE LOOSE WITHOUT THE JUICE "
There is a dyno test of a 4.9L on You Tube that claims a reported 217 HP at the wheels. On an automatic I would say if you hit 200HP you'd be lucky. This summers project is the install of a 93 4.9L/4T60e in my 85 GT/ California Convertible ragtop . We are using a 68K mile Deville engine that is very clean and has given like new cylinder leak down test readings. I guess that we will see shortly what these engines have first hand. I don't know about the OP but I would like to run an around the engine exhaust system so that I could use a larger muffler and quiet down the V8 roar. Trying to come up with a custom downpipe design that exits to the firewall side. Sure wish that someone offered one premade.
I'm really happy with the way my exhaust came out. I really like the Jones Full Boar Quiet Tone muffler sound (with the hi-flow Catco catalytic converter). V8 throaty, but not too obnoxious. I'll have to post a more current video of the sound shortly now that all the little bugs etc have been sorted out. The good thing about the Jones Full Boar Quiet Tone is that it is the same size as the stock muffler.
I'm really happy with the way my exhaust came out. I really like the Jones Full Boar Quiet Tone muffler sound (with the hi-flow Catco catalytic converter). V8 throaty, but not too obnoxious. I'll have to post a more current video of the sound shortly now that all the little bugs etc have been sorted out. The good thing about the Jones Full Boar Quiet Tone is that it is the same size as the stock muffler.
A deep throaty tone would be good. I am trying to avoid a repeat of the drone sound of my 3800SC. Its so loud on the highway that you can't hear the radio. When I have occasion to cruise for a few hours I would like to have it somewhat quiet and comfortable in the cockpit. I know that the 4.9L just purrs along at about 1700 RPM @ 65 MPH and that was one of the attractive attributes. With a decent exhaust system it should sound powerful but not deafening. The stock crossover pipe on the 4.9L is 1.75 " I see that you welded together you own Y but how did you manage the transition to a 2 1/2 downpipe?
------------------ " THE BLACK PARALYZER" -87GT 3800SC Series III engine, custom ZZP /Frozen Boost Intercooler setup, 3.4" Pulley, Powerlog manifold, Northstar TB, LS1 MAF, 3" Flotech Afterburner Exhaust, Autolite 104's, MSD wires, Custom CAI, 4T65eHD w. custom axles, HP Tuners VCM Suite. "THE COLUSSUS" 87GT - ALL OUT 3.4L Turbocharged engine, Garrett Hybrid Turbo, MSD ign., modified TH125H " ON THE LOOSE WITHOUT THE JUICE "
I wanted the tach filter to look a little better. After building a prototype, I decided to build a small circuit board and then encased it in epoxy. The final product wasn't as smooth as I would have liked, but good enough.
That looks practically bullet-proof. Are there any components that need to dissipate heat that shouldn't be encased like that? I thought resistors might need to 'breathe'...
Originally posted by Dennis LaGrua: A deep throaty tone would be good. I am trying to avoid a repeat of the drone sound of my 3800SC. Its so loud on the highway that you can't hear the radio. When I have occasion to cruise for a few hours I would like to have it somewhat quiet and comfortable in the cockpit. I know that the 4.9L just purrs along at about 1700 RPM @ 65 MPH and that was one of the attractive attributes. With a decent exhaust system it should sound powerful but not deafening. The stock crossover pipe on the 4.9L is 1.75 " I see that you welded together you own Y but how did you manage the transition to a 2 1/2 downpipe?
Sorry about no good pictures.
It took a little bit of fiddling, but I started by putting the two 1.75" pipes together at the right angle with a v-notch between them (tack them together). The thickness across the two pipes should be a little greater than 2.5"...I can't remember the exact number, but around 2.75" if I recall correctly. Next I crushed the end of the 2.5" pipe gently until it was just slightly over 1.75", which results in the other dimension expanding to around 2.75" (or so). The end of the 2.5" pipe then gets cut to match the v-notch. Tack the pieces together. Now...if things have worked out well...the 2.5" pipe has to "tabs" that can be tapped down lightly with a hammer until they close up the gap on each side. When you're happy, weld everything.
That looks practically bullet-proof. Are there any components that need to dissipate heat that shouldn't be encased like that? I thought resistors might need to 'breathe'...
Good question, but there is minimal current through the tach connection (around 2mA). Negligible heat dissipation. It's encased since I wanted it in the engine bay near the C500 connector and therefore needed it weather tight. Maybe overkill .
It took a little bit of fiddling, but I started by putting the two 1.75" pipes together at the right angle with a v-notch between them (tack them together). The thickness across the two pipes should be a little greater than 2.5"...I can't remember the exact number, but around 2.75" if I recall correctly. Next I crushed the end of the 2.5" pipe gently until it was just slightly over 1.75", which results in the other dimension expanding to around 2.75" (or so). The end of the 2.5" pipe then gets cut to match the v-notch. Tack the pieces together. Now...if things have worked out well...the 2.5" pipe has to "tabs" that can be tapped down lightly with a hammer until they close up the gap on each side. When you're happy, weld everything.
Not sure if that made any sense...
Ingenious plumbing work indeed. My approach will be to try and employ a true Y where the two 1 75" pipes go into a union that exits to a 2.5" pipe. I guess that you have this but I want to insure a completely non-restrictive junction.
------------------ " THE BLACK PARALYZER" -87GT 3800SC Series III engine, custom ZZP /Frozen Boost Intercooler setup, 3.4" Pulley, Powerlog manifold, Northstar TB, LS1 MAF, 3" Flotech Afterburner Exhaust, Autolite 104's, MSD wires, Custom CAI, 4T65eHD w. custom axles, HP Tuners VCM Suite. "THE COLUSSUS" 87GT - ALL OUT 3.4L Turbocharged engine, Garrett Hybrid Turbo, MSD ign., modified TH125H " ON THE LOOSE WITHOUT THE JUICE "
Ingenious plumbing work indeed. My approach will be to try and employ a true Y where the two 1 75" pipes go into a union that exits to a 2.5" pipe. I guess that you have this but I want to insure a completely non-restrictive junction.
I wish I had taken a better picture. The 1.75" pipe in the back of the picture curves down before they merge. This actually gives a very unrestrictive flow as the two pipes open up to the 2.5" pipe just before the flange. I spent quite a long time staring and figuring this out.
I wanted the tach filter to look a little better. After building a prototype, I decided to build a small circuit board and then encased it in epoxy. The final product wasn't as smooth as I would have liked, but good enough.
Been meaning to post my somewhat more ghetto version for a while...
Been meaning to post my somewhat more ghetto version for a while...
My original prototype was one long string of components. I thought of potting it, but it was just too much to shrink it up. I like your potting job...and good idea using the connector. I just soldered my leads in place.
Finished putting together the air intake system. I looks pretty sharp. I'll post some pics tomorrow. I will be building an engine cover shortly to finish dressing up the engine.
I took it for a good shake down drive today, and had some fun with it. Still need to work on the tuning and will be getting that all set up soon. I had soldered a DIP socket to the memcal, but was never truly happy with this. I had some problems with it and found a couple of the connections were dry solder connections, so they had intermittent contact. It's tough to solder due to the position of the contacts and the surrounding plastic. I fixed it, but my memcal now looks like it has seen better days . I found several replacement memcals at the Pick n Pull...wrong chips, but I am only interested in the connector. I will solder in a ZIF instead of a DIP for the EPROM and then DIPs for the two other chips which don't get changed. Once I get the new memcal soldered together I'll be able to jump in full force with the tuning.
I have two issues that I will have to deal with. The first issue is a small "ticking" sound (I'll try to post a video tomorrow). Hard to describe the sound, but something between a valve tick, and the sound you get when a plug wire is worn and it is shorting across something metal. At idle (600 rpm), it sounds like it ticks about 2 times a second, but not consistently. The second issue is stalling at every stop light. As I slow down, the engine speed just keeps dropping to zero regardless of if I just push in the clutch and only use the brake or if I engine brake on the way down. However....if I push in the clutch and as the engine speed drops below 600-800 rpm give it a couple of shots of gas, then just hold the clutch in and brake normally, the engine won't stall. There are a couple of things that can cause stalling, but I'm thinking this is a tuning issue.
I'm still finding the engine is running rough, though I haven't put many miles on it yet since I added the injector cleaner. Still feels like the injectors are a bit dirty. Despite the slight roughness, it still accelerates impressively....and wraps the speedometer extremely quickly! (Honestly I was on a race track when I did that....honestly....)
The second issue is stalling at every stop light. As I slow down, the engine speed just keeps dropping to zero regardless of if I just push in the clutch and only use the brake or if I engine brake on the way down. However....if I push in the clutch and as the engine speed drops below 600-800 rpm give it a couple of shots of gas, then just hold the clutch in and brake normally, the engine won't stall. There are a couple of things that can cause stalling, but I'm thinking this is a tuning issue.
This is the result of idle follower settings for an automatic transmission being used with a stickshift transmission. My Northstar used to do it before I switched to a "clutch aware" PCM. It's also common behavior in 3.4 TDC swaps.
There is a dyno test of a 4.9L on You Tube that claims a reported 217 HP at the wheels. On an automatic I would say if you hit 200HP you'd be lucky. This summers project is the install of a 93 4.9L/4T60e in my 85 GT/ California Convertible ragtop . We are using a 68K mile Deville engine that is very clean and has given like new cylinder leak down test readings. I guess that we will see shortly what these engines have first hand. I don't know about the OP but I would like to run an around the engine exhaust system so that I could use a larger muffler and quiet down the V8 roar. Trying to come up with a custom downpipe design that exits to the firewall side. Sure wish that someone offered one premade.
My donor 93 Deville had 122,000 kms. I used the stock Deville exhaust manifolds with a modified cross over to clear the shift cables, and it dumps into 2.5" pipe on the back just like stock. My first dyno showed 206 hp. and I had too much advance and was too rich as well. I'll go back when I have the cash to do it. I think the 217 isn't out of the question, but I am expecting more like 210-212 myself. I am using a pair of Spintech 3 swirl mufflers with 2.5" pipe. Sounds great. Goes like stink with a 4 speed.
Here are pics of the new air intake system. I wanted something that was a little bit more custom looking than the big black stock plenum. I built the plenum from 14 gauge steel sheet metal. The tubing is 3" polished aluminum, capped off with a K&N filter. I am still planning to build an engine cover to completely dress up the engine.
Here's a video of the sound that has started. At first it was on and off, but as you can hear in the video it is now very consistent. It is getting a little louder now, and I'm thinking it is coming from the under forward valve cover, driver's side. It now sounds like something in the top end (translation....damn, I'm going to have to pull the engine ). Actually my biggest fear is that I'll have to remove the head...since I have yet to be able to find head bolts anywhere!
For some reason the ticking sound in the video is about 3 times louder (as compared to the sound of the engine running) than it actually is. But hopefully that will make it easier to figure out what it is. My phone really seems to zoom in on that frequency
My vote... the sound is from one of the rocker arms pulling loose from the aluminum bridge. Its quite common with these engines unless you are running the steel allante bridge.
To get the front valve cover off, you can just remove the rear cradle bolts and rock the engine back far enough so the valve cover clears the decklid hinge box. That's how I replaced mine way back when (2003 ish).
[This message has been edited by fieroguru (edited 08-05-2014).]
My vote... the sound is from one of the rocker arms pulling loose from the aluminum bridge. Its quite common with these engines unless you are running the steel allante bridge.
To get the front valve cover off, you can just remove the rear cradle bolts and rock the engine back far enough so the valve cover clears the decklid hinge box. That's how I replaced mine way back when (2003 ish).
Yes, it definitely is starting to sound like a rocker arm. I guess that is good since I had thought about switching out to the Allante bridge. Do you stick with the same rocker arms and just change the bridge or do you need the Allante rocker arms as well? Any other parts that need to be swapped? It'll be good if I can swing the cradle down far enough without having to rip everything apart. What chance is there of subsequent damage from having run with it like that?
Possible lifter not pumping up....how long did the engine sit without running? Did you hear the engine run before the install? Have you over-revved the engine? Sure, the Allante steel bridge is stronger, but the 4.9 is a pretty stout engine with few issues unless it is horribly abused. GM made a boatload or two, issues are not that common.
Possible lifter not pumping up....how long did the engine sit without running? Did you hear the engine run before the install? Have you over-revved the engine? Sure, the Allante steel bridge is stronger, but the 4.9 is a pretty stout engine with few issues unless it is horribly abused. GM made a boatload or two, issues are not that common.
1. The donor Deville had been driven regularly until a month or so before I got the engine. 2. Yes, I heard it running. And I've had it running for about a month now. I've put about 60 km on it (~40 miles)...it has run a little rough, which I've assumed was dirty injectors, but basically sounded nice with no bad sounds. 3. Ummmmm......well......maybe..........this engine just seemed to love accelerating. If my tach is accurate, then I've hit 5500 rpm under power (just once). Which actually surprised me since I was expecting it to run out air around 4400 rpm as so many people have stated
Was the engine running rough in the deVille? Why would you suspect dirty injectors if the deVille ran smoothly? Did you flush all of the lines between the fuel filter and the injectors prior to install? Did you have the rev limiter programmed out of the ECU chip? Have you diagnosed rough operation; spark quality, inspect plugs, F/I pulse via NOID light?
Just questions that need asked before assuming internal damage... Not at all giving you a hard time...
My 4.9 Formula has no issues going to 5500 (tach is accurate) on a frequent basis with no issues.
If I'd known there was going to be a test, I'd have studied....
1. I didn't notice it running rough. I only heard it at idle (and a few revs) for a minute or so. Quiet stock exhaust. 2. I suspect dirty injectors, because honestly, that's what it sounded like, and all other parts have been replaced and tuned up. I should point out there are different levels of "rough"...it is really not "very" rough, and certainly could have been running this way in the donor car and I probably wouldn't have noticed. I obviously have a louder exhaust and notice it more now. I have added injector cleaner into the tank, and in the short time that I've been running the engine (used maybe a quarter tank so far), it certainly had started to smooth out. 3. New fuel pump, sock, fuel filter, tank cleaned, new lines up to engine. Since I heard it running (one week before I picked it up), I didn't bother flushing the lines. I have injector cleaner in the tank. 4. No. I am still using the stock EPROM. I was waiting to finish the air intake system before getting into the ECM tuning. 5. Nothing yet...I haven't had a chance. Again...one step at a time.
I am still trying to track down the ticking sound. I was going to drop the engine slightly this weekend and pull off the front valve cover, but ended up a bit distracted and never got to it. However, I did notice that the distributor cap wasn't sitting right and a couple of the bolts were loose. When I took it off, I found the rotor was also loose Not sure why these had come loose!? I hoped this was the root of the sound, but unfortunately tightening everything really had no effect. I'm not completely convinced that the sound is coming from a rocker since the sound really seems like it is coming from near the fuel pressure regulator...just can't isolate it.
I also pulled the EGR valve. I wanted to clean it and make sure it was sitting properly. A little carbon build up, but it was sitting nicely and moving freely.
I made a little name plate for the air intake plenum It was just a prototype...the real one will go on the fibreglass engine cover that I plan on making once everything has been fixed and tuned. This one turned out ok, but I didn't account for the size of the milling bit. The result was some of the details were milled out. e.g., the letters O, R, 4 & 9 all should have a center piece to make them clear, but the detail was too fine and didn't survive the milling. The next one will be 25% larger and should look a lot better. It will also be sitting on a black background so the image should stand out better.
I didn't bother sanding the details on the prototype, so there are lots of rough edges. I really was just playing around. The intention is not to have this on the plenum
Did you happen to check the underside of your distributor cap to make sure the rotor was running across the each of the plug wire posts without hitting the plastic on the cap? I had a rotor cap become mis-aligned one time and it ended up hitting parts of the distributor cap posts plastic...I don't think I had placed it on or tightened it properly causing it to shift after running a while which caused a similar ticking.
The Hornet 4.9 piece came out really nice. If you do decide to use it there maybe paint black under the plate for contrast.
Thanks
I'll definitely be putting a fiberglass cover over top of the plenum - and it will be black to ensure the contrast. One issue with the plenum is that it has a securing bolt exactly in the wrong spot. I'll be shaving that down to minimize it, and the fiberglass cover will be secured somewhere else so it doesn't interfere with the logo.
Did you happen to check the underside of your distributor cap to make sure the rotor was running across the each of the plug wire posts without hitting the plastic on the cap? I had a rotor cap become mis-aligned one time and it ended up hitting parts of the distributor cap posts plastic...I don't think I had placed it on or tightened it properly causing it to shift after running a while which caused a similar ticking.
Yes, that was my fear that something had been hitting and resulted in damage. I checked everything and there were no marks at all so the misalignment must have been minor. On the downside, it wasn't the cause of the ticking...so back to figuring out what it is.
get a stethoscope with a probe (may be available at Advance) and listen to the valve cover, distributor cap, etc. to isolate where the noise is coming from.
get a stethoscope with a probe (may be available at Advance) and listen to the valve cover, distributor cap, etc. to isolate where the noise is coming from.
That's a good idea, Will. We don't have Advance here, but there are a couple of other places here that probably sell them. I had tried using the screwdriver method, but didn't get any results. I'll be much happier knowing where the sound is coming from before I tear into the engine.


 I just soldered my leads in place.
 I'll post some pics tomorrow. I will be building an engine cover shortly to finish dressing up the engine.
 . I found several replacement memcals at the Pick n Pull...wrong chips, but I am only interested in the connector. I will solder in a ZIF instead of a DIP for the EPROM and then DIPs for the two other chips which don't get changed. Once I get the new memcal soldered together I'll be able to jump in full force with the tuning.


 ). Actually my biggest fear is that I'll have to remove the head...since I have yet to be able to find head bolts anywhere!
 .....this engine just seemed to love accelerating. If my tach is accurate, then I've hit 5500 rpm under power (just once). Which actually surprised me since I was expecting it to run out air around 4400 rpm as so many people have stated

 It was just a prototype...the real one will go on the fibreglass engine cover that I plan on making once everything has been fixed and tuned. This one turned out ok, but I didn't account for the size of the milling bit. The result was some of the details were milled out. e.g., the letters O, R, 4 & 9 all should have a center piece to make them clear, but the detail was too fine and didn't survive the milling. The next one will be 25% larger and should look a lot better. It will also be sitting on a black background so the image should stand out better.


