My original thread was neglected and seems to be lost forever, but I discovered some new things that maybe, just maybe, will help people figure this out.
I have a 1986 Fiero SE 2m6, auto transmission. Mileage is only 116,000!
Here's a brief explanation of how the nonrunning Fiero came to be: Drove along, coolant hose came undone and white smoke started coming from the back, but car never overheated. I parked the car and saw all the coolant poured out. I had it towed home a few blocks, figured out the issue a week later and I fixed the hose (after buying a new water pump which I then did not install), refilled coolant, and now car will "start" for not even a full second before dying. A past poster said in response to a video I posted, "Sounds like it's trying to start on 2 cylinders."
Now, I've adjusted to life without a car but am certainly wishing I had the trusty Fiero again, as I'm certain if I could simply figure it out, it would be a cheap fix.
The new info: I have noticed my Service Engine Light doesn't come on when I turn the key anymore. Can't say for sure this is related to the current issue, but that's where you all come in. The seatbelt light also only comes on sometimes.
Also, another electrical thing is that my lighter socket no longer works, *but* if I press in the lighter, my floor lights come on, but they don't when I open a door (dome light does).
The car, when starting, does emit a gasoline odor and I was also told the fuel pump can be heard coming on (though I've never been able to hear it within the car).
Just hoping some random piece of info will be helpful. I have a horrible looking spark plug wire, but I've read the car should still start up or run. I don't know anything at all about cars, and a few people have checked out my car and been unable to tell me anything useful or point me in the right direction. I also have limited tools available to me, plus little car knowledge beyond basic maintenance.
edited to remove the dumbs
[This message has been edited by noerrorsfound (edited 06-30-2013).]
The weird electrical stuff could be blown fuses....that has been known to cause that kind of havoc. Plus you might want to disconnect the battery ....and reconnect it. That might reset the computer. I am sure others on the site might have some other ideas
If it is plugged together and you don't see any troubles you need to get a 12v trouble light like this one. It should be about $4.00.
The 2.8 Fiero has a cold start injector. That is to help it start faster when cold. It will inject fuel during cranking. If your ECM isn't running what will happen is the engine will fire on the cold start injector but then die right away. This will only happen on the first few attempts at starting since the cold start injector heats up and turns off. Let it sit for a while and it will do it again.
Your check engine light not coming on indicates your ECM isn't functioning. Most likely it isn't because it isn't getting power, not because the ECM is bad.
[This message has been edited by phonedawgz (edited 06-30-2013).]
If the white smoke was coming out the tail pipe, sounds like a blown head gasket. The over pressure in the cooling system would cause it to blow a hose off.
So to clarify things: the fuses are all perfect (I've checked a few times) The ECM was connected, so I disconnected it, checked for corrosion, and it looks perfect, surprisingly. I have one of those little jabber dealies and wasn't able to get it to light up for either end of the cable, but should I try just poking in the wire? I did ground the other end of the tester and it lit up on the positive battery terminal.
Also, regarding the blown head gasket possibility: I never saw white smoke come from the exhaust, only from the engine when I had parked and lifted the trunk lid. And as far as I remember, I also didn't see it coming from the tailpipes in the rearview before I could pull in somewhere.
I do not exactly know how to check the fuse links that may have been exposed to coolant but all wires around the area look OK and have been disconnected and reconnected during my troubleshooting.
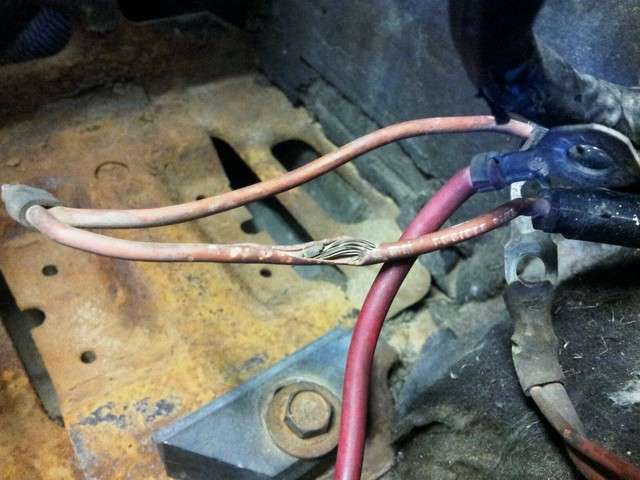
picture of weird part of wire: http://db.tt/Kszrr52U just looks like it was crimped together.
lastly, I forgot to mention that I have definitely disconnected the battery...a lot. I've had to walk it to oreillys a couple times for charging as it eventually depletes if left hooked up.
[This message has been edited by noerrorsfound (edited 06-30-2013).]
Yeah that is your problem. Having no power to the ECM will give you that short firing on the first crank or two and then nothing.
No need to poke the test light into the insulation of the wire. The bare metal is exposed at the end of the wire.
I assume the two wires in your fingers run to the engine harness. One is the alternator output (connecting to the power distribution post) so the alternator can charge the battery. The second thinner one runs to the ECM reset connector, and then that runs to the ECM.
If the wires don't run back to the engine harness, and if one isn't the ECM reset connector then you need to ignore the following and first figure out what wires you are dealing with!
That is supposed to be connected to a ring terminal and that ring terminal is supposed to be on the power distribution post.
Note - Those posts are live and if you work on them with the battery still connected, expect to short them and start a fire or blow up your battery, So disconnect the battery first.
Put a ring terminal on the two wire and put it under the nut on the stud. Note also the ring terminal that it used to be connected to was a double ring terminal. That double terminal connected the upper post to the lower post. Since that is still on the posts, everything is fine, as long as you leave it on there. Remove it and the two posts are no longer electrically connected. They need to be electrically connected.
When you put your new ring terminal on, crimp it and solder it. The orange wires are fusible link wire. The general rule is not to solder fusible link wire since the solder will wick up the wire and thus disable the fusible link. The problem if you don't solder it is that it will only hold for a few months (maybe) and then it will corrode and you will have problems again.
First cut off whatever terminal is left on the wires. Then strip just enough to fit in the new ring terminal. If your new ring terminal is insulated, cut off the plastic insulation. You need to solder this and the insulation is going to get in the way. Scrape the copper wires that you exposed in stripping the two wires till you have shiny copper. Rotate the strands in the wire as you are scraping them to scrape clean all 360 degrees of the strands. Twist the two wires together and then insert them into the ring terminal crimp. Crimp the terminal on the wires. Now heat up the terminal with your soldering gun and apply only enough solder, from the opening in the terminal away from the wires to get the wires coated. You want to stop as soon as you see solder at the wire end of the terminal. You do not want the solder wicking up under the insulation of the wire.
The ring terminals pictured are non-insulated. If you get an insulated ring terminal and cut off the plastic, yours will then be non-insulated also. Make sure the hole in the center is the size that will fit on the power stud pictured above. btw, the lower stud is bigger than the top one.
After it cools put the ring terminal under the big stud. Reattach the battery. Turn the key to on and verify the SES light comes on and the fuel pump runs. Then turn it to start and start the engine.
[This message has been edited by phonedawgz (edited 07-01-2013).]
Yeah that is your problem. Having no power to the ECM will give you that short firing on the first crank or two and then nothing.
No need to poke the test light into the insulation of the wire. The bare metal is exposed at the end of the wire.
I assume the two wires in your fingers run to the engine harness. One is the alternator output (connecting to the power distribution post) so the alternator can charge the battery. The second thinner one runs to the ECM reset connector, and then that runs to the ECM.
If the wires don't run back to the engine harness, and if one isn't the ECM reset connector then you need to ignore the following and first figure out what wires you are dealing with!
That is supposed to be connected to a ring terminal and that ring terminal is supposed to be on the power distribution post.
Note - Those posts are live and if you work on them with the battery still connected, expect to short them and start a fire or blow up your battery, So disconnect the battery first.
Put a ring terminal on the two wire and put it under the nut on the stud. Note also the ring terminal that it used to be connected to was a double ring terminal. That double terminal connected the upper post to the lower post. Since that is still on the posts, everything is fine, as long as you leave it on there. Remove it and the two posts are no longer electrically connected. They need to be electrically connected.
When you put your new ring terminal on, crimp it and solder it. The orange wires are fusible link wire. The general rule is not to solder fusible link wire since the solder will wick up the wire and thus disable the fusible link. The problem if you don't solder it is that it will only hold for a few months (maybe) and then it will corrode and you will have problems again.
First cut off whatever terminal is left on the wires. Then strip just enough to fit in the new ring terminal. If your new ring terminal is insulated, cut off the plastic insulation. You need to solder this and the insulation is going to get in the way. Scrape the copper wires that you exposed in stripping the two wires till you have shiny copper. Rotate the strands in the wire as you are scraping them to scrape clean all 360 degrees of the strands. Twist the two wires together and then insert them into the ring terminal crimp. Crimp the terminal on the wires. Now heat up the terminal with your soldering gun and apply only enough solder, from the opening in the terminal away from the wires to get the wires coated. You want to stop as soon as you see solder at the wire end of the terminal. You do not want the solder wicking up under the insulation of the wire.
The ring terminals pictured are non-insulated. If you get an insulated ring terminal and cut off the plastic, yours will then be non-insulated also. Make sure the hole in the center is the size that will fit on the power stud pictured above. btw, the lower stud is bigger than the top one.
After it cools put the ring terminal under the big stud. Reattach the battery. Turn the key to on and verify the SES light comes on and the fuel pump runs. Then turn it to start and start the engine.
phonedawgz: I appreciate the time you've taken to post such a detailed explanation, and upon seeing that much earlier today at work, I was extremely excited to come home and get to work on trying this out. I have a huge amount of confidence that this is going to resolve my issue.
To keep things brief yet provide an update on the situation, the world worked against me and my Fiero today and I wasn't able to accomplish this task just yet. I have a full day of work ahead of me tomorrow and it's going to drive me crazy all day until I get home.
I did, however, make a bit of an attempt before things went wrong in the world, and realized the nut toward the bottom (larger one) is actually rusted to where no amount of force seems to remove it. Not knowing how to remove the...base?...there's very little room to work to even try to unscrew it anyway. 1) you can't use a socket as the bolt is too long/tall for the socket to reach the nut. 2) you can't use a wrench as not enough maneuverability 3) pliers just barely have enough space to get them situated properly, but upon trying to turn the nut it just makes the black base thing start to rotate somehow. If I could get you some pictures it would would help here, as I don't quite understand how the whole structure of this thing works and thus can't explain properly. But can I perhaps just put the new terminal above the old nut, then secure it with a second one? :/ Think I'll try to get some oil to loosen it up.
Also, regarding soldering, it may become clear as I get to that point, but I have a hard time visualizing this:
quote
Now heat up the terminal with your soldering gun and apply only enough solder, from the opening in the terminal away from the wires to get the wires coated. You want to stop as soon as you see solder at the wire end of the terminal. You do not want the solder wicking up under the insulation of the wire.
And if all this works out, I think I may need either an Amazon wishlist or a Paypal address from you.
http://db.tt/FD0yqter still trying to remove this. i sprayed some Nuts Off on it, but despite the great name it hasn't done the trick. To stop the thing spining (the little bolt on the other side which you can't see is missing) I stuck something in there. Unfortunately maybe it's the lack of leverage but I can't remove it. gonna let it soak, maybe pick up one of those sockets if I might have enough room to use a socket wrench.
If the back side is spinning a deepwell isn't going to do any good.
Send me $15 and I will send you a used one that works. Paypal it to gofast@reddevilriver.com. Make sure you send me your address also.
You are going to have to take that one off and then cut it up till you get the wires off of it, without damaging the wires. If you had a compressor and a 4" cut off wheel that is what I would suggest. A dremel with a cut off wheel would work too (wear eye protection always)
Don't break any of the fusible links by rough housing it around. They do get brittle over time.
No not the same problem. Your fusible links need to be replaced. You can do it in the garage or you can wait and then have the car towed back to the garage when it fails the rest of the way and then have them replaced.
Start a new thread with your starting/idle problem and we can troubleshoot it there.
[This message has been edited by phonedawgz (edited 07-03-2013).]
No not the same problem. Your fusible links need to be replaced. You can do it in the garage or you can wait and then have the car towed back to the garage when it fails the rest of the way and then have them replaced.
Start a new thread with your starting/idle problem and we can troubleshoot it there.
Just to clarify, the black plastic thing is what kind of rotates because there are screws (or supposed to be) on each side, but one side is missing a screw. I am able to hold it in place by jamming let's say, the voltage tester in there. I don't want to give you the wrong idea by being unclear on anything. Should snap another pic when I get home, probably.
If I really need to get a replacement part from you, the removal process there sounds over my head. :-/ I'd still get it, but that means I'm probably towing to a mechanic for the actual work.
I guess I was confused at the cutting it up part. So as it stands if I got the nut off, you're thinking I need to replace something else? Sorry to not understand. The black piece though, if it slides / rotates, this means it's needing replacement?
GM to be cheap mounted the black plastic piece on a sheet metal "stud' on one side and a screw on the other. If what you are saying is that let loose somehow and is spinning, but otherwise everything is ok, then yeah but if what you are saying is the actual stud with the nut on it has let loose inside the plastic, then to get the wires off I would cut the plastic up and cut the mounting post of, preserving the wires. Then replacing the black plastic piece with it's two studs get's it fixed, minus replacing the terminal that broke off the two wires.
Working on older cars sometimes you realize it is easier to cut up a part to get it off and then replace it. I had a brake caliper stuck on with stripped bolts heads recessed in the caliper. I had to cut up the caliper to get it off even though the caliper was good, but the bolt heads were stripped.
The stud with the nut on it remains still, but rotates *with* the plastic. Sorry to seem a tad bit redundant as you obviously know what you're talking about, but I'm uncertain of my own descriptions here. Pretty much if I were to hold the black plastic in place, and could use the proper force I'd be able to remove the lower nut (upper one came off so easily -_-).
PROBLEM RESOLVED I was unable to remove the nut and unable to find an 11mm deep socket to do so, so I went with my initial idea of placing the ring terminal over the nut, then putting another nut over it. Car is RUNNING!