I cleaned out my a/c blower motor resistor located on the firewall of the front trunk compartment and found it was completely filled with debris that looked like the contents of a birds nest (or perhaps a mouse nest). It's a miracle that when these elements heated-up my Fiero didn't catch on fire!
For PFF members that don't know what the a/c blower motor resistor looks like there's one for sale on eBay complete with pictures as per following link: http://www.ebay.com/itm/SMP...xp=mtr#ht_1217wt _931
If you've never cleaned-out your a/c resistor, I would highly recommend you do it ASAP! We certainly don't need anymore Fiero Fires.
------------------ Now new owner of a Black TTop 88 Fiero GT and owner of a Silver 88 Fiero GT. Also a second time owner of an 85 Fiero GT. Bought my first fully loaded Red Fiero GT new in 1985. Fiero's are Fabulous, Fix'em and have Fun! Note, Avatar picture is Mr. Bean (not me, ha ha).
[This message has been edited by canfirst (edited 07-14-2012).]
Is it possible to get just the gasket for that resistor pack? I've gotten into the habit of replacing any gasket/seal I can when disassembling stuff like this.
I was just about to post the same topic. I decided to check my heater resistor just to see what all the hype was about and sure enough there was "kindling" stuck in the resistor coils. While I was in there I poked my finger back towards the heater core and there was lots of debris stuck there too. To be sure I got it all, I removed the heater blower for better access and fabricated a wire coat hangar into a hook that could reach back into the crevice by the heater core. Pulled a good handful of crap out of there.
This is now going to be an annual checkup!!
Spoon
------------------ "Kilgore Trout once wrote a short story which was a dialogue between two pieces of yeast. They were discussing the possible purposes of life as they ate sugar and suffocated in their own excrement. Because of their limited intelligence, they never came close to guessing that they were making champagne." - Kurt Vonnegut
WOW, great call......mine was full of leaves and twigs.....absolutely amazing that there was no fire. Maybe because I rarely use a low fan setting....but thanks for the tip. Could have just saved another Fiero.
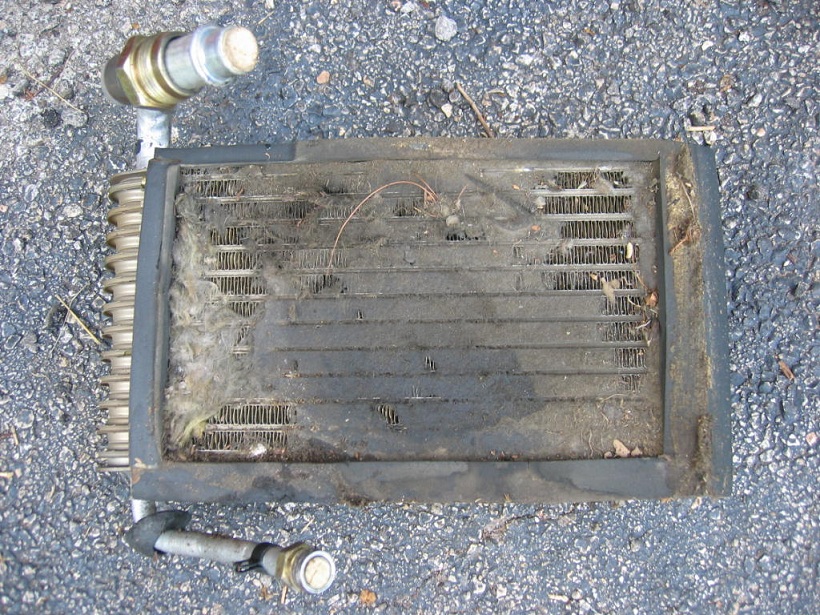
If you find debris on the resistor wire it would benefit you to also look in there real good to see as much of the evaporator as you can. I pulled my resistor piece to see if I could see any debris and after seeing some and pulling the evaporator coil this is what I found. Mike
If you find debris on the resistor wire it would benefit you to also look in there real good to see as much of the evaporator as you can. I pulled my resistor piece to see if I could see any debris and after seeing some and pulling the evaporator coil this is what I found. Mike
This type of thread usually gets posted every spring (and it should be a sticky warning). Pulling the resistor is a good start. You should really pull the housing to get all the crap out of there. Plus your A/C & Heat will work much better. I mean seriously... just look at the above pic.
------------------ Whodeanie built 1988 Fiero GT, loaded, 14k original miles, F23, built L67 swap, ST2 cam and matching valvetrain, PT67 bb turbo, w2a charge-cooled ----400-500whp?????? More mods when I get it back (interior, suspension, lighting etc). Stay tuned! 1987 Fiero GT Road Racer. 1st documented 3.4TDC swap- built in 1994. 5MT Isuzu, Quaife prototype LSD, HT Tubular A-arms, Fully poly & Heim jointed suspension, Custom 3 way adjustible sway bars, HT Bump Steer kit, Koin's, 320# springs, GA brakes, ZEX N20 and more! Under full restoration. 2007 Toyota Tacoma Double cab Prerunner SR5 Stock, and staying that way. 2009 KTM 250SX motocross bike. Modded and fun as hell! 2012 Can-Am Commander 1000 XT For the redneck in all of us! SideXSide's are sooooo fun!
[This message has been edited by BV MotorSports (edited 07-19-2012).]
One of the members in my club brought up a point about my evaporator getting so clogged up and I didn`t even think about this. Since there is no control, like in newer cars, for choosing recirculating air or fresh air is the Fiero system defaulted to one way? If it recirculates air and you had a dog with a shedding problem, as light as hair is, I`m sure quite a bit could be drawn in over a period of time.
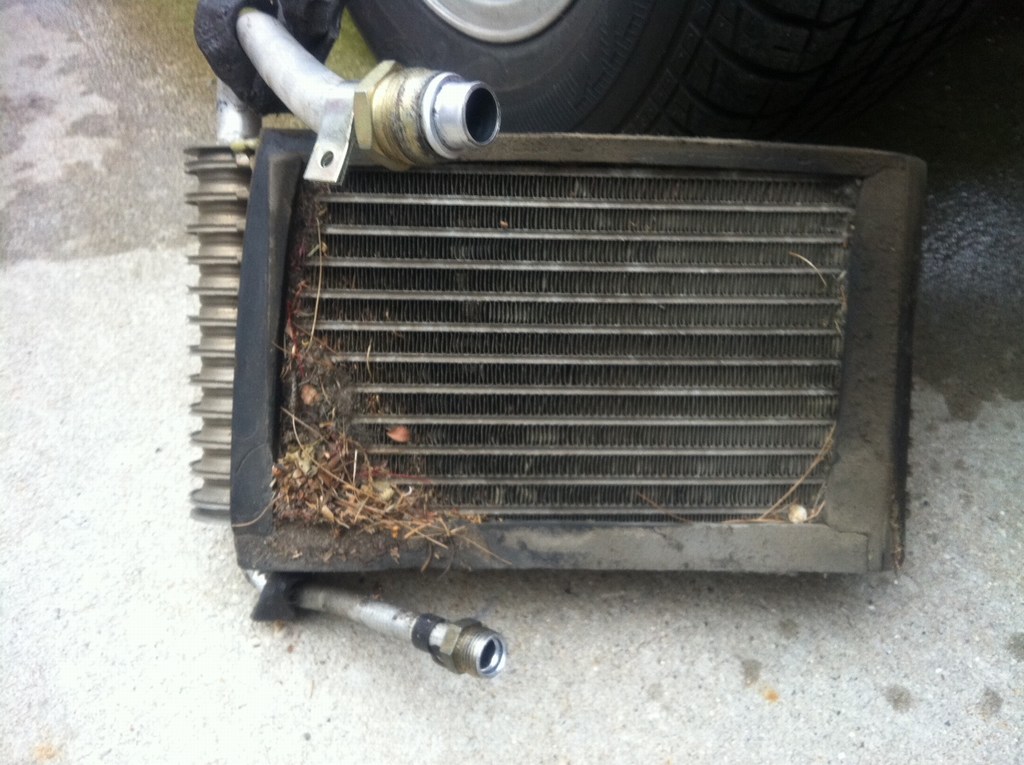
I just took mine out and took a picture, not bad after almost 30 years. I've cleaned out the duct before by removing the blower motor, but this is the first time I've actually taken the evaporator out of the car.
One of the members in my club brought up a point about my evaporator getting so clogged up and I didn`t even think about this. Since there is no control, like in newer cars, for choosing recirculating air or fresh air is the Fiero system defaulted to one way? If it recirculates air and you had a dog with a shedding problem, as light as hair is, I`m sure quite a bit could be drawn in over a period of time.
"Max AC" = recirculate, all other modes = outside air with a stock AC control head.
------------------ Dr. Ian Malcolm: Yeah, but your scientists were so preoccupied with whether or not they could, they didn't stop to think if they should. (Jurassic Park)
My resistor went bad so I pulled it the other day and found it stuffed with pine needles. I cleaned what I could but after seeing this thread I think I will pull out the entire housing and clean it thoroughly. This should definitely be a sticky thread. -Josh
I had a pack of dead mice and a house of twigs in mine..definitely good to check in there.. I also ended up finding dead mice in my center console and underneath my carpet...
why do mice like our cars so much??
------------------ 1988 Pontiac Fiero Gt (fully optioned, factory leather, 5-speed, CJB T-Tops: Black w/ gray interior and blk wheels) 1992 GMC Typhoon #0203 1971Chevorlet Corvette 454cu/ LS5/ 4-speed/ convertible 1993 BMW 850 Ci 6-speed V-12
this is were the fire starts. I was close to home. I saved it. I would, if it did it again, use the tire tool/jack handle to beat my why in to the fire to get it out. And save the car.
Removing the evaporator requires having the AC system empty. If that's done, it's not that hard.
-Remove blower motor -Remove heater core hoses -Remove blower motor resistor -Remove Relays and relay bracket -Remove accumulator -Disconnect AC line -Remove housing cover
Nothing like bringing back a dead thread but it's not archived yet so here goes.
My "new" Fiero should be home in about a week. I think this will be the first thing I do. I figure I can completely remove everything (including the condensor), clean it all and reinstall in a few hours (and that's even without having seen a Fiero in 10 years). My A/C is already dead (needs a new compressor) so I don't have a problem removing the condensor. Better to do it now than to wait until I fix the A/C (which will be my first "task"). I'll take my time and write up a good tutorial (with the required pics) that Cliff can (hopefully) sticky for everyone to see.
Removing the evaporator requires having the AC system empty. If that's done, it's not that hard.
-Remove blower motor -Remove heater core hoses -Remove blower motor resistor -Remove Relays and relay bracket -Remove accumulator -Disconnect AC line -Remove housing cover
Do you have to remove the heater core hoses to get everything else out of there or can you wiggle things loose with those in place? I want to do a full service on this area ASAP but don't want to have to mess with the coolant (since it's a bugger in a Fiero).
Got a link to the steps? I've got a 3800 n/a in an '87 GT, if it matters.
Here's a list of my steps. Has worked just fine on half a dozen of my Fieros over the years... dukes and 2.8's. I've never had a problem with air in the cooling system.
quote
Originally posted by Patrick:
* Make sure rad cap is the proper one for Fiero use. The catalogs are wrong! You want a non-vented one, * Check that the overflow tank and the small hose to the rad are both in good shape. Otherwise air gets sucked in. * Ensure that coolant level in overflow tank is at the "Cold" level. * Position rear end of Fiero higher than the front. * Remove thermostat housing cap and thermostat... and then add coolant to thermostat housing with rad cap also removed until coolant runs out the top of the radiator. * Re-install rad cap.
* Continue to add coolant until you see the level come up to where the thermostat normally sits. * Put thermostat cap on and turn just barely enough to hold cap on. * Start engine and run for about 30 seconds. * Remove thermostat cap and check coolant level. * Repeat last four steps until coolant level no longer drops.
* Re-install thermostat and thermostat housing cap.
As long as there are no blockages anywhere in the cooling system and the water pump is circulating coolant, you should be good to go.
[This message has been edited by Patrick (edited 04-19-2015).]
Use a mirror(s) or small USB camera and light to look in resistor hole to see condition of AC. Or HF Digital Inspection Camera Cen-Tech is very handy (on sale often)
You can often just loosen a lot of crap w/ a stick and suck out w/ a shop vac. Be careful you don't bend AC fins.
Originally posted by ninjayogi: Yep, full of leaves. What a horrible design. Something like that would start a massive recall these days.
Not likely as you think and similar designs are still in use, including resistor coil(s).
Only thing added now is many have thermal fuse/cutout that blows temp above X° and kills power to the blower etc. Some have a "cage" etc to try to stop crap getting in the coils. Examples, Google Image: car blower resistor
Many 2 speed radiator fans work same way as 84 Fiero w/ AC too... High watt resistor somewhere fan blows air to cool it but now w/ thermal fuse.