When I have done this swap, I kept the stock Fiero AC compressor and just swapped out the clutch/pulley to the serpentine setup. The removal/install tool isn't too expensive.
When I have done this swap, I kept the stock Fiero AC compressor and just swapped out the clutch/pulley to the serpentine setup. The removal/install tool isn't too expensive.
Seems to be what I hear. Just seems woerd to buy a new compressor only to put old parts on it. I have never done it, does that mean it will have old bearings / moving clutch parts? Id hate to get it all said and done and the old parts fail. Also mine is a GT with a 305 that has the brackets set up for a V5. Thanks
If anyone knows please let me know. saw a good deal on ebay for one, but I asked the seller and he said he drop ships them and even though the pic shows a serp belt drive he doesn't know if that is what it will have on it.
[This message has been edited by 2.5 (edited 08-26-2016).]
Update: Dorman has acknowledged their part is defective in the sense of not having a press fit ( such as Pioneer part). At the same time Rock Auto has (finally) agreed to take the part back.
This has taken me an extraordinary amount of time with Rock Auto and their telephone answerers to even discuss a defective part they sold me. Finally the end is in sight: They sold me a defective part, would not discuss it and blew me off, and forced me to solve it myself. So I took it up with Dorman who was highly responsive and acknowledged the part was defective.
Rock Auto tells me they will take it back...finally..after all I told them..duh!
Rock Auto: My experience with routine parts was OK but when I found a defective part it was a huge disappointment when their "programmed" customer service was useless, it was clear to me their customer service was unacceptable when it came to an honest question.
[This message has been edited by V8Steve (edited 09-06-2016).]
V8Steve, when Dorman admitted the part was defective, was that a manufacturing defect or is that a design defect? I just bought the same Dorman part number thru Summit a couple months ago to do this serpentine conversion on my V8. Sounds like I should just go ahead and return it.
Hi Formula, I was told it was defective and that could mean by design or manufacture or both. Mine was a loose fit with several thousandths clearance. The Pioneer balancer from Autozone was a press fit.
Thanks V8Steve. I decided to return the Dorman balancer. Summit customer service was excellent - no questions asked, and they provided a pre-paid shipping label. When I am ready to drop the engine down to do this I'll pick up a Pioneer at Autozone.
So how did yours turn out? Got any pictures?
[This message has been edited by Formula350 (edited 09-10-2016).]
Formula, I'll be glad to share pictures when I'm further along. That works both ways, and I'd be glad to see pictures and learn tips from anyone who's done this belt mod. For now, the 355 CI engine is still in the shop and the balancer is mounted. In fact, it's ready for dyno test now. Expected HP is between 425 and 450.
Here's the Auto Zone balancer installed. It's not exactly a bolt on as it was honed to reduce the amount of "press fit". Since it went on and off several times, the holes were fitted with heli-coils. Finally it was shimmed between the timing gear and inner nose of balancer to make the balancer face slightly proud of the crank nose. Although the balancer was pressed on, the shimming allowed the final Grade 8 bolt to be fully preloaded against the face of the balancer.
I haven't yet figured out how to cut the relief in the Archie alternator bracket for the tensioner.
Note: The Canton Racing remote oil filter is temporarily attached there for purposes of the upcoming dyno test.
Originally posted by V8Steve: I haven't yet figured out how to cut the relief in the Archie alternator bracket for the tensioner.
Hole saw does the trick. It needs to be about 1/4" larger than the flange on the tensioner body because the tensioner arm has a tab (limits travel) that will need to pass through the opening in the bracket.
Hole saw does the trick. It needs to be about 1/4" larger than the flange on the tensioner body because the tensioner arm has a tab (limits travel) that will need to pass through the opening in the bracket.
Will the hole saw trick work on a steel alt bracket? I finally found mine. Want to start mocking this up over the next few weeks. How far up the bracket should the center of the hole be?
Originally posted by Formula350: Will the hole saw trick work on a steel alt bracket? I finally found mine. Want to start mocking this up over the next few weeks. How far up the bracket should the center of the hole be?
Yes, I have used a hole saw to cut through 3/8" steel plate before and I have done this modification on a steel alternator bracket before, just make sure you keep the teeth lubricated. I normally use the grey anti-seize compound as a lubricant.
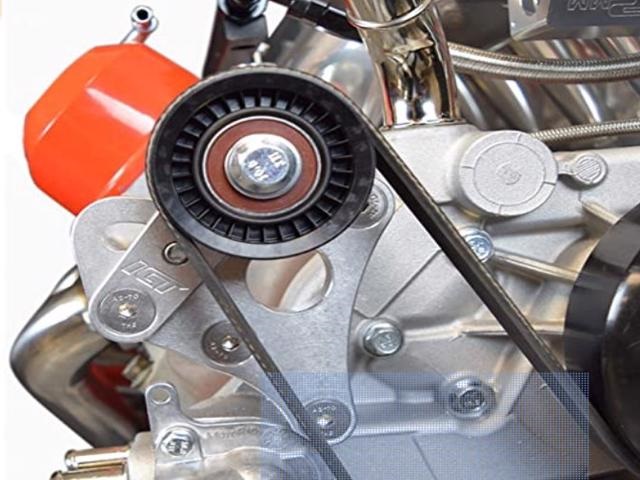
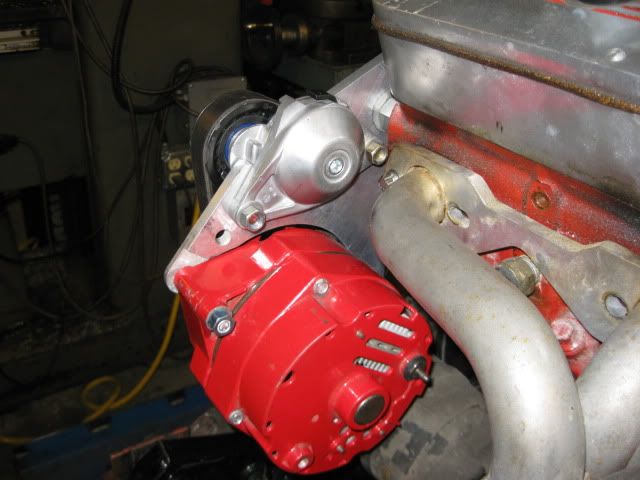
Placement isn't super critical, but you do want to make sure the mounting bolts will clear the head and the body of the tensioner clears the exhaust primary tube. These two pictures should help you get the placement pretty close to where it is needed.
Here is another example, but this one was with the steel bracket.
[This message has been edited by fieroguru (edited 09-21-2016).]
Guru, these pictures are helpful. I'll have my 355 CI motor back in a few days and will start soon. BTW, it dyno'd on Monday at 400 ft lb @ 3200 RPM and 409 HP at 6200 with strong vacuum at 850 idle.
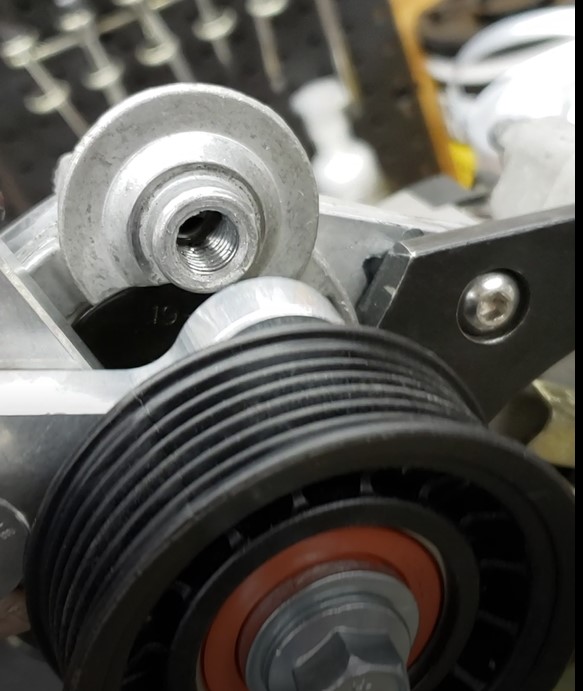
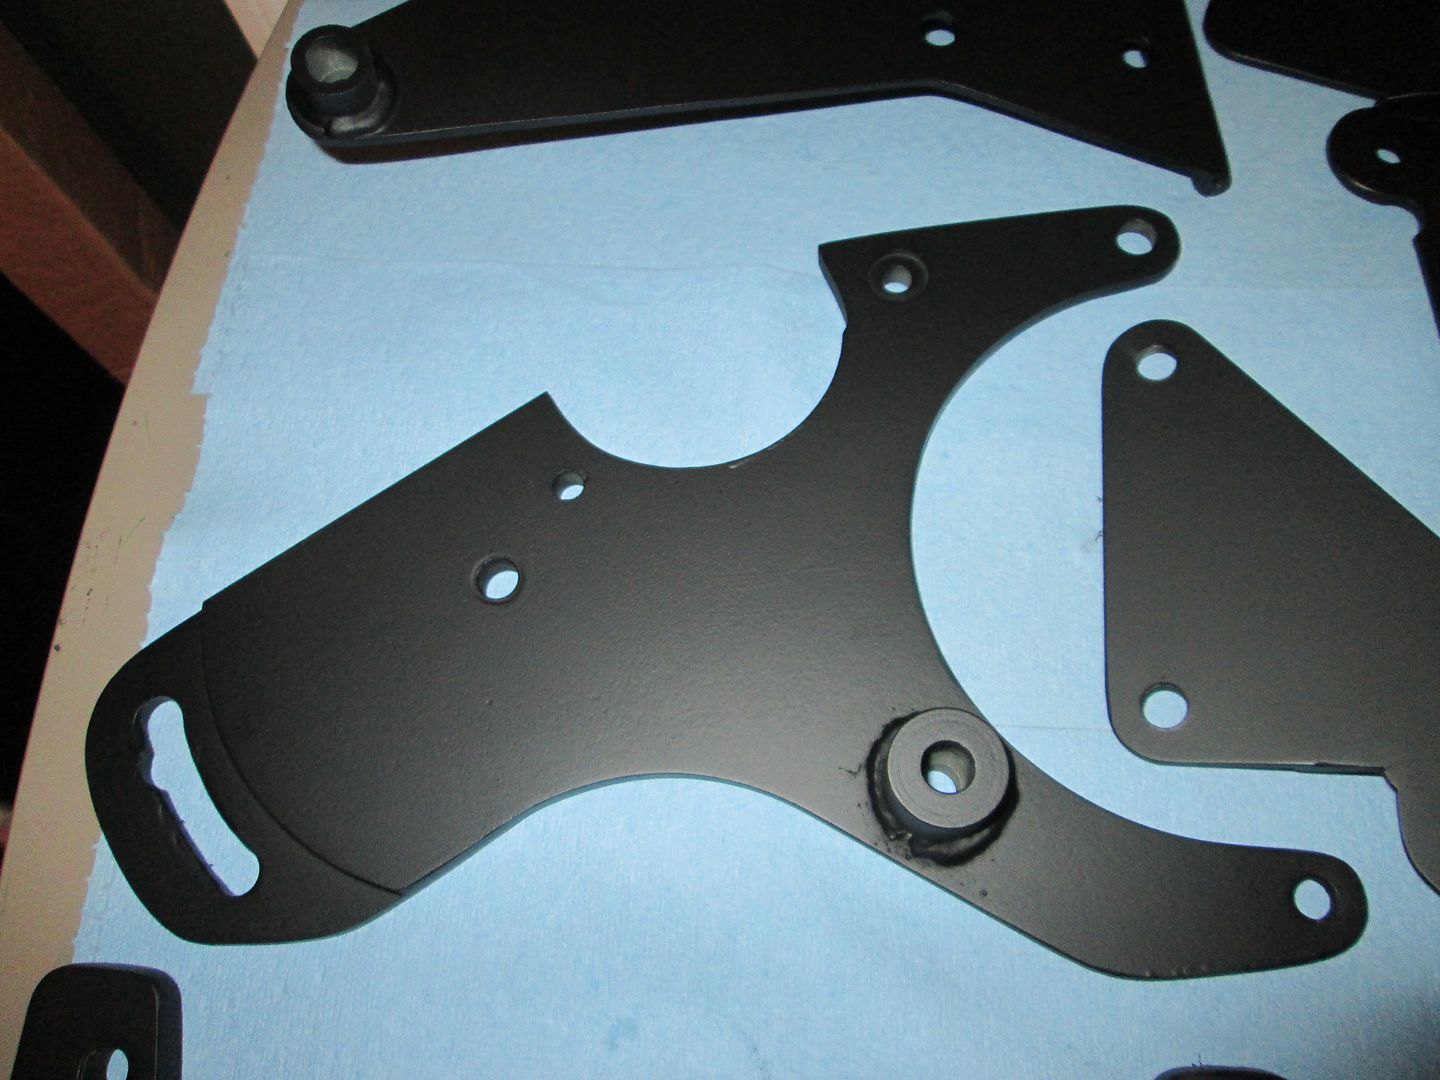
I noticed what appears to be a notch in the arc shaped slot. Is that to prevent the bracket from rotating?
Originally posted by V8Steve: I noticed what appears to be a notch in the arc shaped slot. Is that to prevent the bracket from rotating?
This particular bracket had the adjustment slot misplaced by about 1/8". Not sure if the cause was the bracket, AFR heads, or a combination between the two. Whatever the cause, the serpentine modification locks the alternator into a specific location (no longer need the adjusting slot), so I notched the bracket for proper bolt clearance in the position it was needed.
This particular bracket had the adjustment slot misplaced by about 1/8". Not sure if the cause was the bracket, AFR heads, or a combination between the two.
The plate steel alt bracket I have did not line up with the accessory bolt holes in my AFR heads either. I enlarged the pivot hole instead of the slot.
I'm well on the way to restoring my 1999 V8Archie (88 GT - ZZ4) build and the serpentine is just one small part of this, so I'm planning on a new thread so as to not detract from this one. The original ZZ4 failed prematurely at 22K trouble free miles and the 355 was delivered yesterday after waiting a very long time from a reputable engine builder here in Massachusetts. I am the original builder of this car dating back to 1999 when I first met Archie. I'm also doing a V8Archie 6- speed swap at the same time.
With a 4 BBL the final dyno test was 427 HP at 6K RPM. I expect higher numbers because I have BigStuff3 Pro sequential injection.
Since I'm removing and replacing a lot of '88 vintage parts, this has been a long road and still is............. I'm also selling old ZZ4 heads privately.
The new thread will pick up on another Pennock thread about the Canton Racing remote filter. The photo below shows the Canton setup and now I have to refit the starter.
I plan to stay on this thread because I need a lot of help with the serpentine drive. My alternator and AC compressor are nearly '88 vintage and I need to replace them now.
[This message has been edited by V8Steve (edited 10-08-2016).]
I'm ready to cut the Archie bracket but I made cardboard model first, just to be safe. Space behind the tensioner is limited because of the Tru-Ram manifolds so I have to mount the tensioner much higher than any I've seen on this thread. It's also moved closer to the firewall and away from the head. Since the alternator is closer to the firewall than the tensioner I don't see any problems that way.
Does anyone see any issue with it being set so high?
So far so good. I borrowed a 2-3/4" hole saw and positioned the pilot bit one drill diameter from the outside edge. A thick Never Seez lube was used together with the drill press on the lowest speed. This diameter exactly fits the tensioner body. Then I drilled a hole near the raised lug and connected the hole to the main bore with a band saw. I have one of those portable band saws and mounted it on a Swag table. It's a great setup and is helping with the exhaust fabrication.
Here are some pictures of the installed tensioner. There is more work to do with pulley alignment, idler, etc.
------------------ 88GT 355 CI Sequential EFI Bigstuff3 , AFR milled 180, Dyno'd at 427 HP anderson@gdsconsulting.com
Well, we finally got this car running after countless hours trying to get the (14 year old) BigStuff3 working again. We switched to a Holley multiport ECU with harness and it started right up.
During the last chassis dyno pull the serpentine failed, tensioner failed, belt broke/flew off etc. The car is coming back to me next week and I'll have to trouble shoot the tensioner. Any help on this would be really appreciated!
Post a pic of the tensioner. I have had a couple of these pensioners break after a couple of years, but I shimmed the belt further from the body too.
I ended up making a billet aluminum arm and installed it in the tensioner housing.
Also, did you add the stabilizing bracket to the rear of the alternator? Under WOT pulls the bracket without the stabilizer will flex and allow the belt to be tossed.
[This message has been edited by fieroguru (edited 12-05-2019).]
Both the alternator and the AC compressor are secured to the block at the opposite end of the pulley.
I have a theory: The chassis dyno folks told me it happened during the last "Pull" and that the belt had been rubbing against the E-Brake cable. In looking at the failed belt and the roughly foot long strand, I wonder if that strand wrapped itself around a pulley and eventually ripped the tensioner in half. The car just came home the other day and I've not had time to take the passenger wheel off and begin inspecting.
The mounted base of the tensioner is still attached to the bracket and I'll post a photo of that one when I take it off.
PS: On the last pull, the recorded WHP was 320.
[This message has been edited by V8Steve (edited 12-16-2019).]
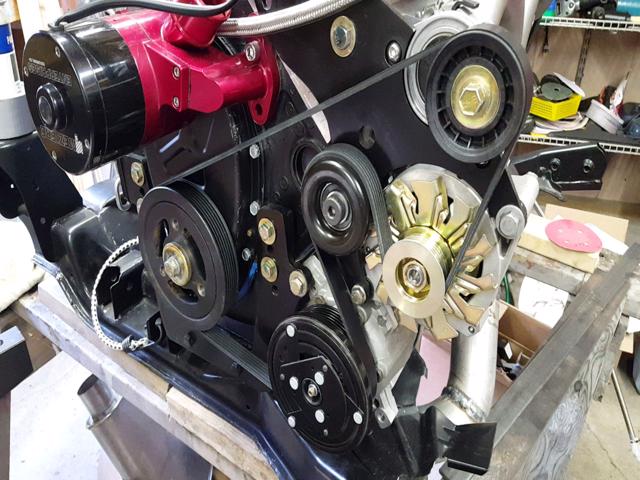
Here's how the pulleys lined up and belt was routed:
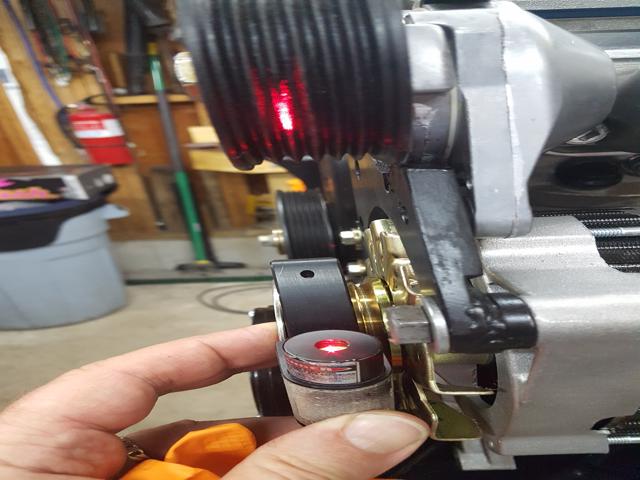
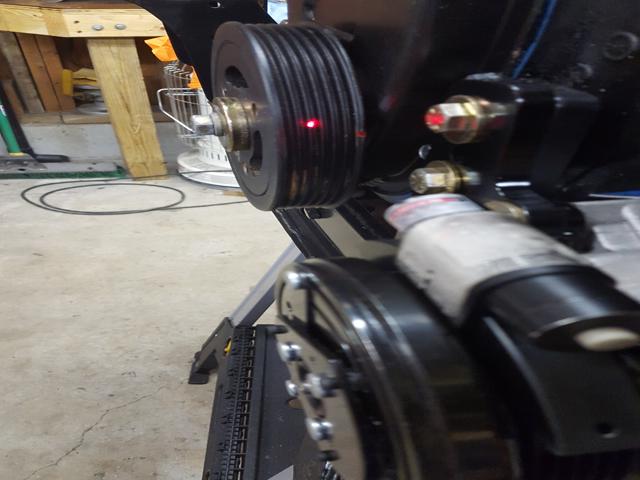
Pulley alignment was done with a borrowed laser and everything was perfectly aligned for every one. They were checked for parallelism and run-out right from the harmonic balancer to the next pulley, then look back at the preceding one, etc. There's a systematic way to do this and I followed all the steps, including checking the laser calibration first.
Routing of Belt
Here's the final routing before it went into the car:
------------------ 88GT 355 CI Sequential Holley Multiport , AFR milled 180, Dyno'd at 427 HP, 320 WHP anderson@gdsconsulting.com
[This message has been edited by V8Steve (edited 12-17-2019).]
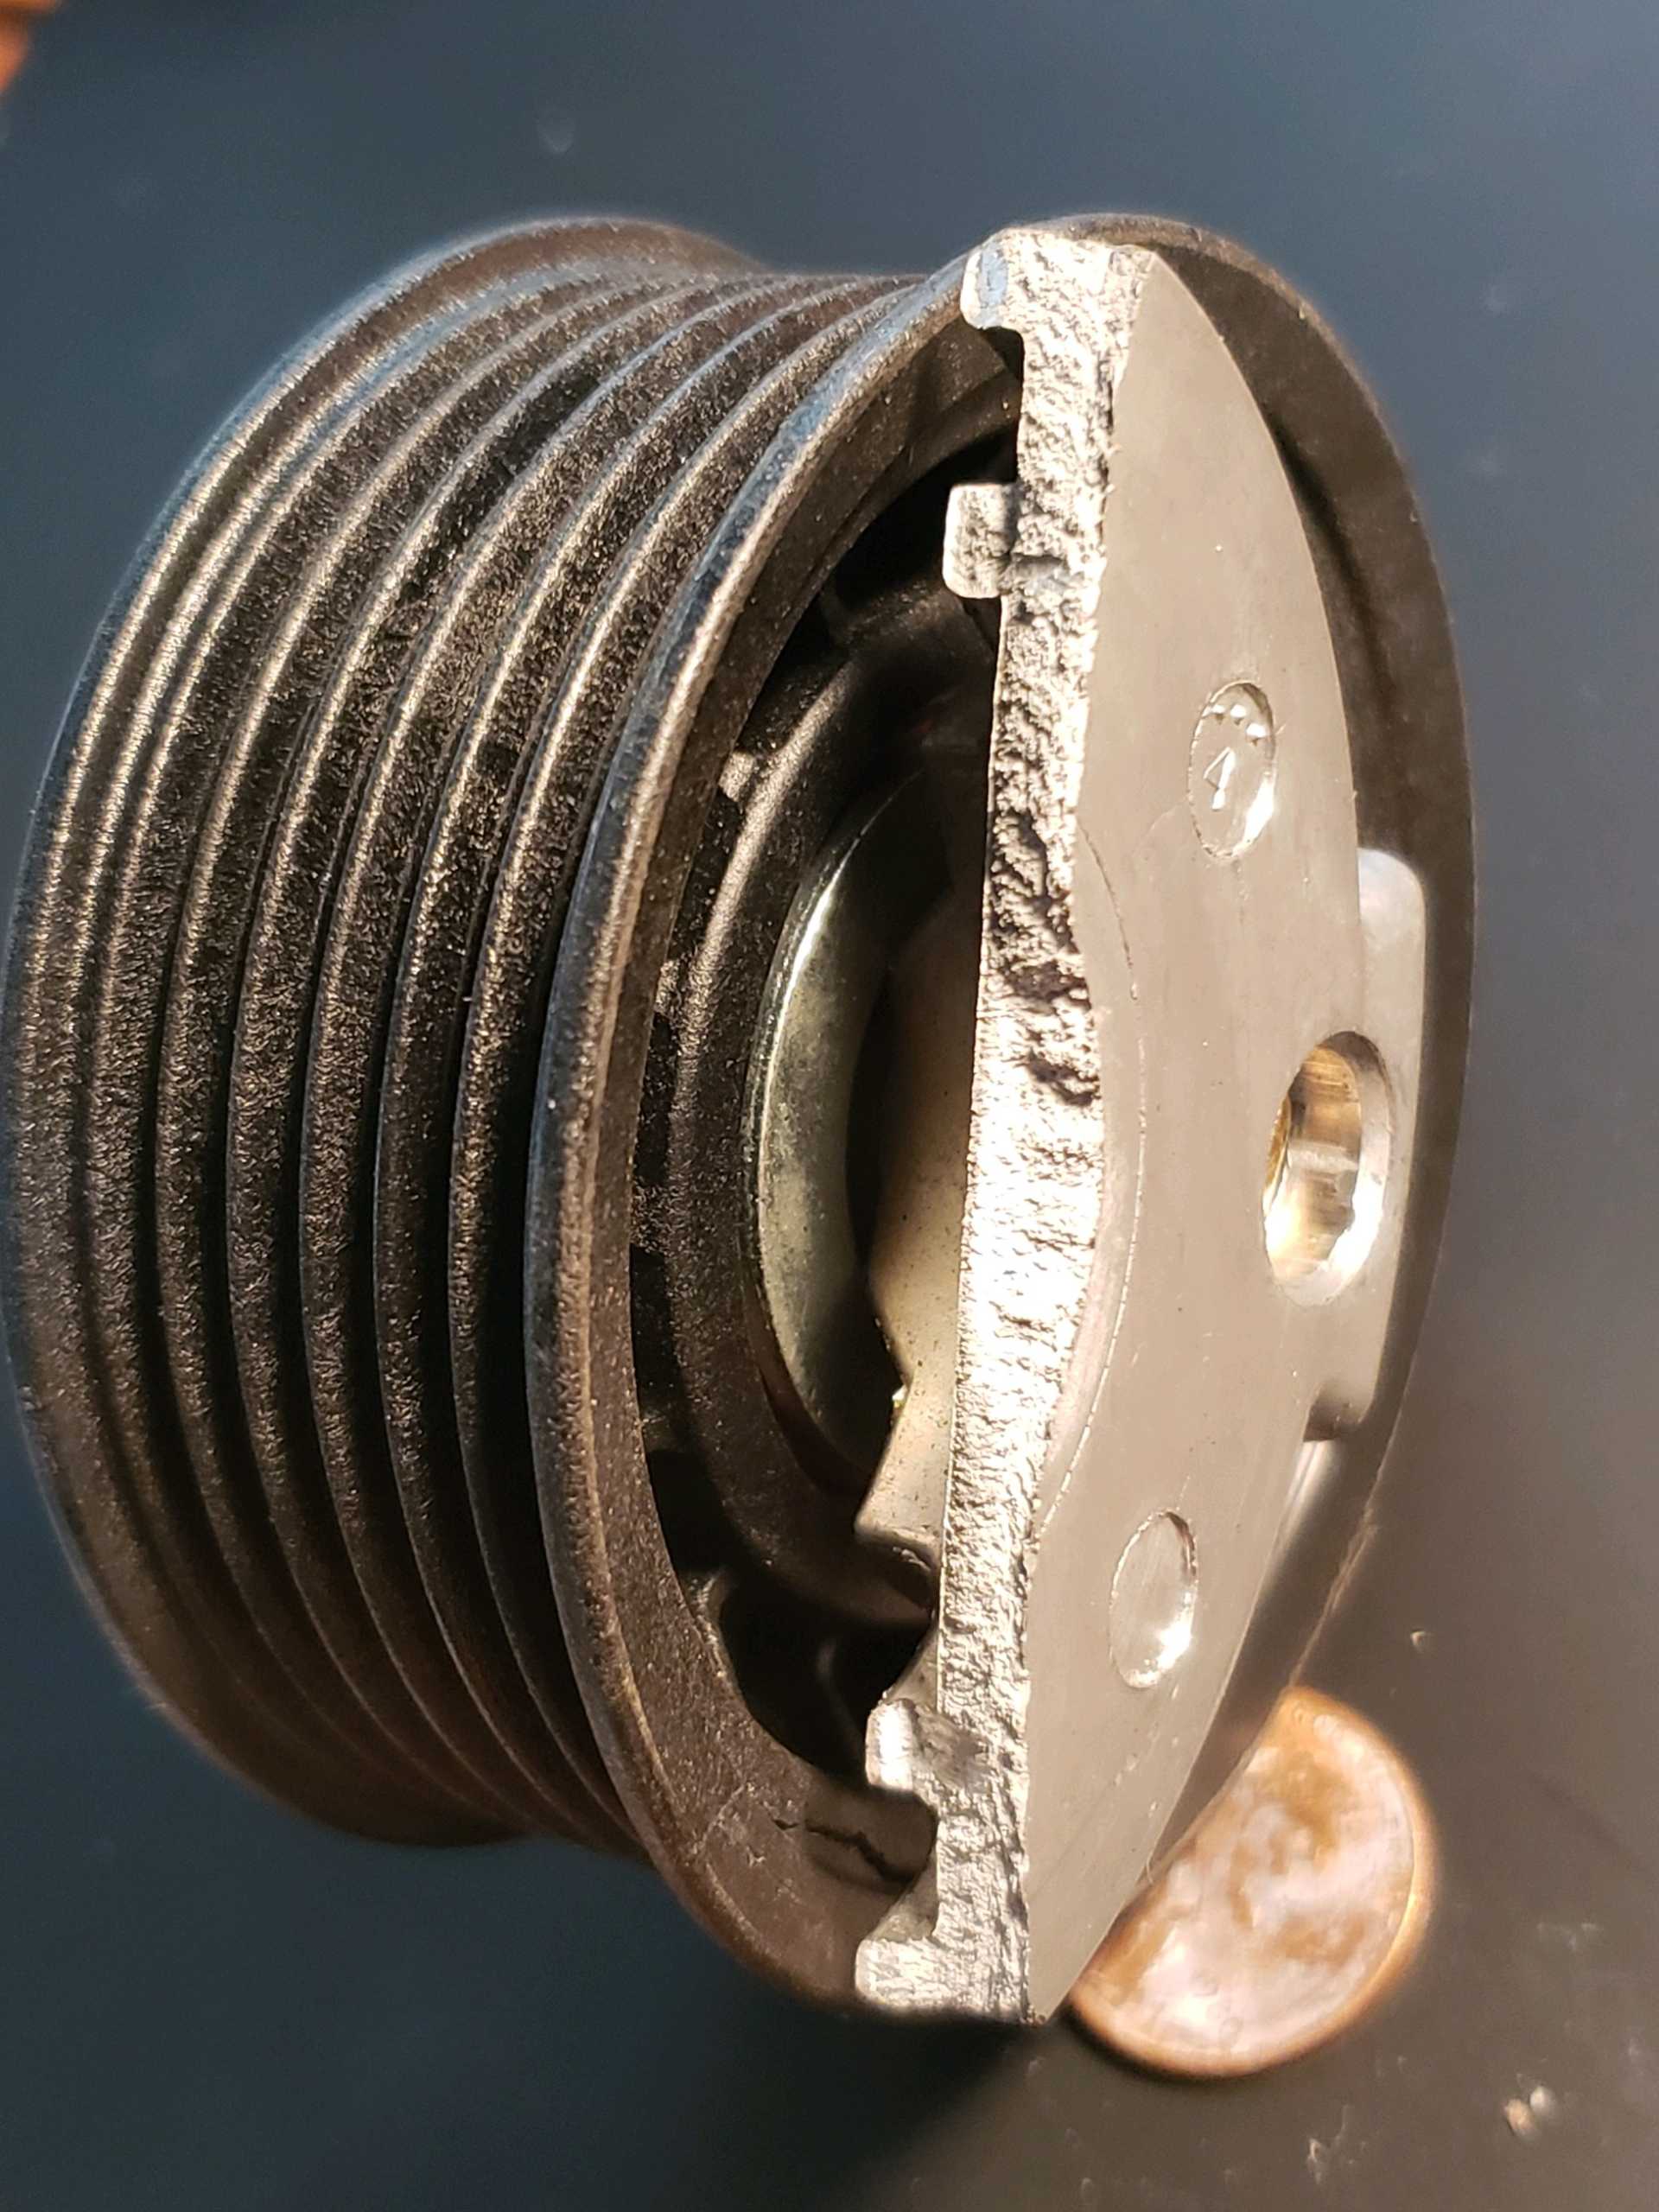
I think I found the root cause of the belt walking off the outer edge of the pulley on two different tensioners. The unit that failed on the dyno came from Rock Auto several years ago so I don't remember the brand. The new one, two weeks ago was a Duralast from Autozone. After checking the alignment and angularity of all the pulleys with a Gates laser tool, I put on the Duralast and also used a belt one size longer. All was well after a few hours of run time but then the belt began to walk off again.
It became clear that the tensioner pulley goes out of alignment when swung down to receive the belt. While the tensioner body doesn't move, it's obvious that the moveable part is shifting out of alignment when the spring is energized and holding the belt. One the belt is on the pulley, that pulley is no longer parallel to the upstream pulley nor is the angularity correct. You can see the moveable part of the tensioner shift outward away from the main body while the pulley itself is beginning to go off course .
[This message has been edited by V8Steve (edited 01-05-2020).]
Here is progress on fixing the problem with the substandard automatic tensioner not staying true when loaded with the belt.
I wanted to "only do this once" and especially so when I had to remove half the exhaust, the AC compressor, etc. to remove the alternator from under the car. Once I got everything out I searched for something online that might fit or could be made to fit.
My goals were as follows: 1) Use off the shelf components 2) Use existing holes and opening from the earlier automatic tensioner 3) No welding or any operation that would alter the known flatness and positioning of the original alternator swing arm 4) Use the collection of belts that I already had. 5) Maintain the outermost range of the tensioner pulley from the automatic tension design.
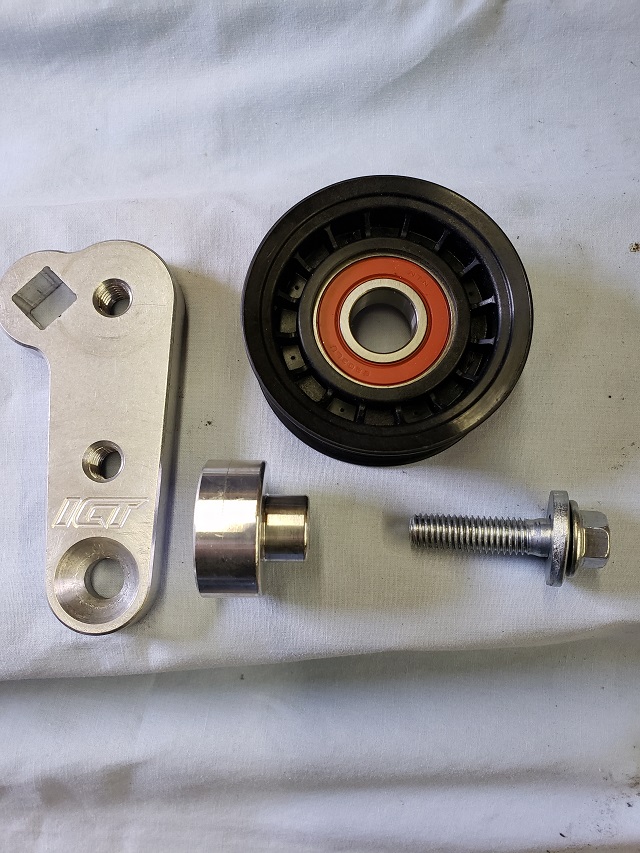
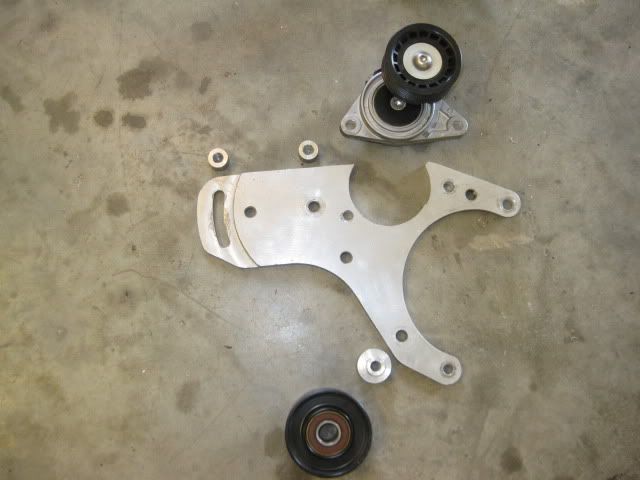
So I bought the ICT Billet LSX manual tensioner as shown below. The product is VERY high quality, especially the robust arrangement to hold the pulley.
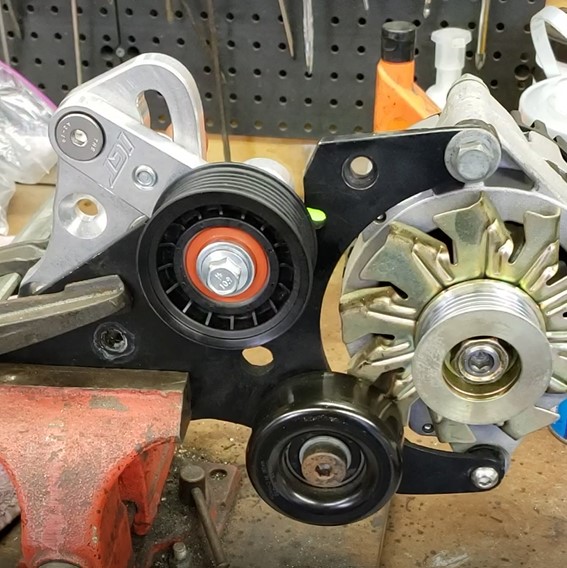
No matter how I positioned the ICT main bracket, there was no way it would work without welding something on to the existing arm to hold it in place. See below.
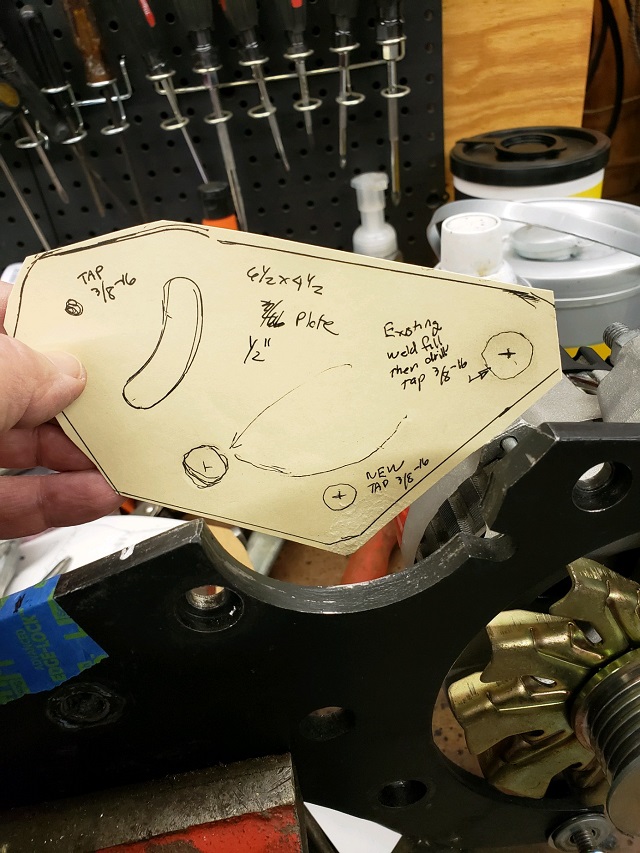
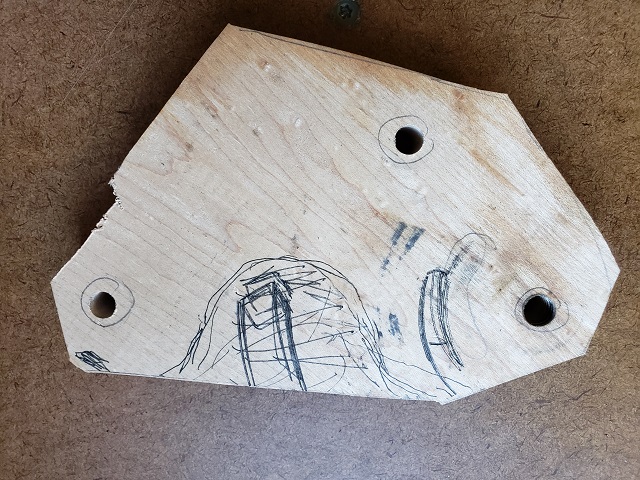
I installed the ICT pulley and arm with one long bolt into the old spring loaded tensioner and then positioned the bracket so the swing slot would give me the right geometry. It became obvious, I'd have to make my own billet plate, so the next step was a paper model, followed by a hardwood model for a test fit.
[This message has been edited by V8Steve (edited 04-18-2020).]
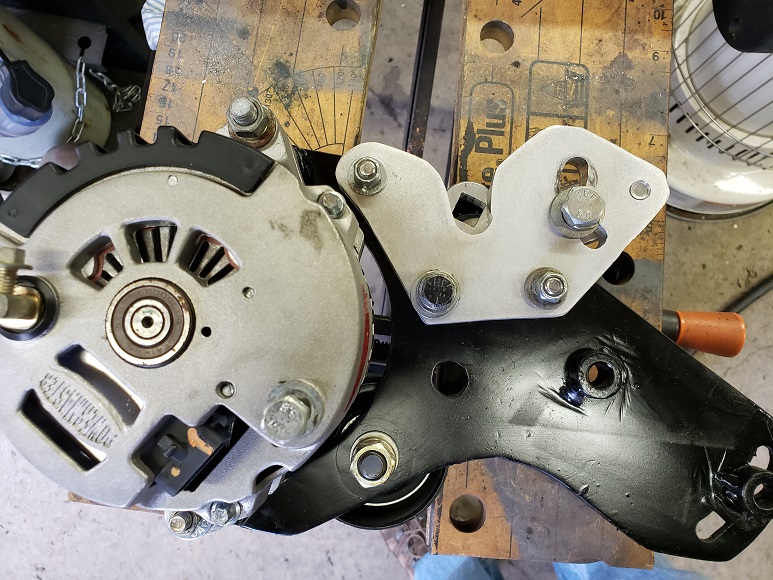
The wooden model was notched to clear the alternator body and drilled to utilize the same mounting holes as the previous tensioner. I wanted to have a 3 point mounting like the ICT bracket so I added a 3rd tapped hole in the swing arm. Then I removed the alternator and did a test fit in the car. All OK.
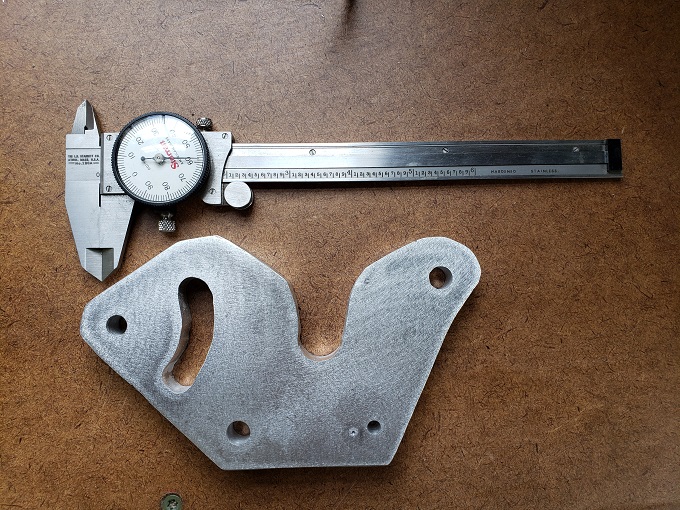
The next step was to buy some billet aluminum. Along the way I also used a vernier to to calculate any required standoffs to line up the pulleys. McMaster-Carr supplied the standoffs and a selection of shims to be used later.
Here's the DIY billet mounting plate:
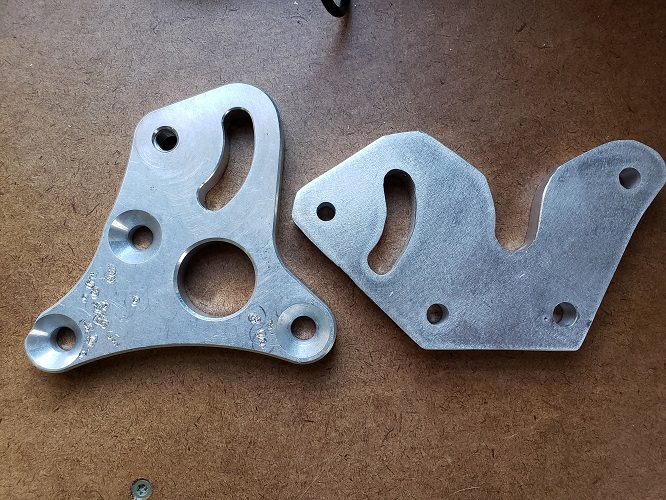
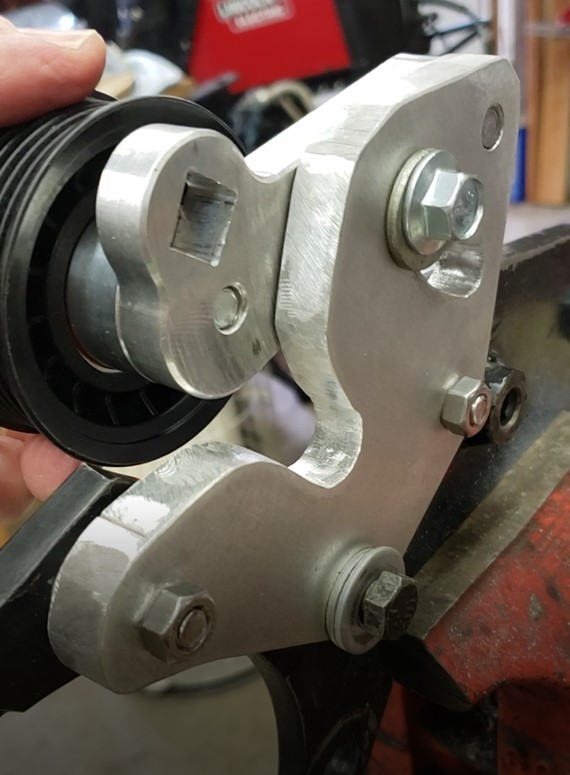
Just for comparison the photo below shows the adjustment slot, the breaker bar slot for tightening, etc. of the DIY bracket compared to the original ICT bracket.
Here's the back side:
Everything is done, new paint on the scuffed up arm, etc. I know the alternator was always true/plumb and checked with a laser relative to the harmonic balancer, neighbor pulleys, etc. so I'm confident in the next step which will be putting it back together with the McMaster-Carr spacers and shims, all done on the bench.
Then, back in the car for hopefully the last time. If there is still a belt walking problem it will be much easier to fix. With this ICT robust setup, there will be no flexing or "moving out of true" like the two automatic tensioners that were poorly made and caused belt walking.
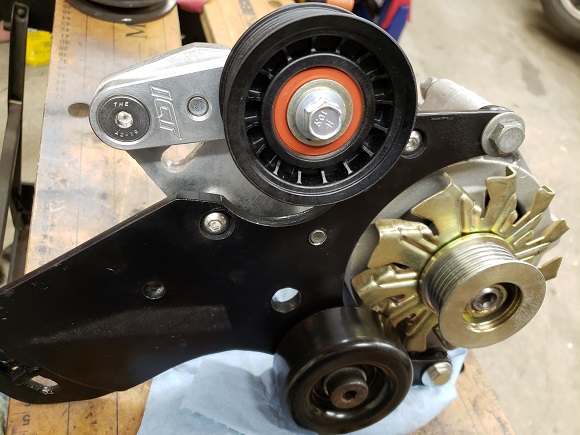
Here it is, ready to go back in the car. I checked it with a borrowed laser and found the manual pulley to be dead on with the alternator throughout the entire travel range. It's not possible to check it against the harmonic balancer when installed but I know from earlier when the motor was out of the car, the alternator was dead on with the balancer. In fact, everything was well aligned except the automatic tensioner going out of "true" when the little arm on it moved. If the manual tensioner is now true with the alternator, I'm confident it's indirectly well aligned with the harmonic balancer, especially since it has zero flex. The manual tensioner billet base is secured at three rigid points.
So now I hope this problem is behind me.
Here's the back side. The square hole in the moveable part is for a 1/2" drive to tension the belt. The ICT product is very well made.
Everything is on with self locking nuts, etc. The tapped hole in the steel arm has blue Loctite.
------------------ 88GT 355 CI Sequential Holley Multiport , AFR milled 180, Dyno'd at 427 HP, 320 WHP anderson@gdsconsulting.com


.jpg)
.jpg)

.jpg)
.jpg)
.jpg)
_1.jpg)
.jpg)
.jpg)
.jpg)