I just thought i'd start up a swap thread to keep track of my woes as the project continues. I didn't know anything about cars when I first came to the forums, now I'm attempting a 3800 swap. I'm sure there are others who are like me that have contemplated swapping the engine but feared that they wouldn't be able to do it. I'm here to hopefully prove it's possible, and provide tips for other people who are looking to attempt the same thing .
Originally I had planned on having the fiero driving to a car show today, but as you can tell, this didn't even come close to happening. Let's start out with the status of the project.
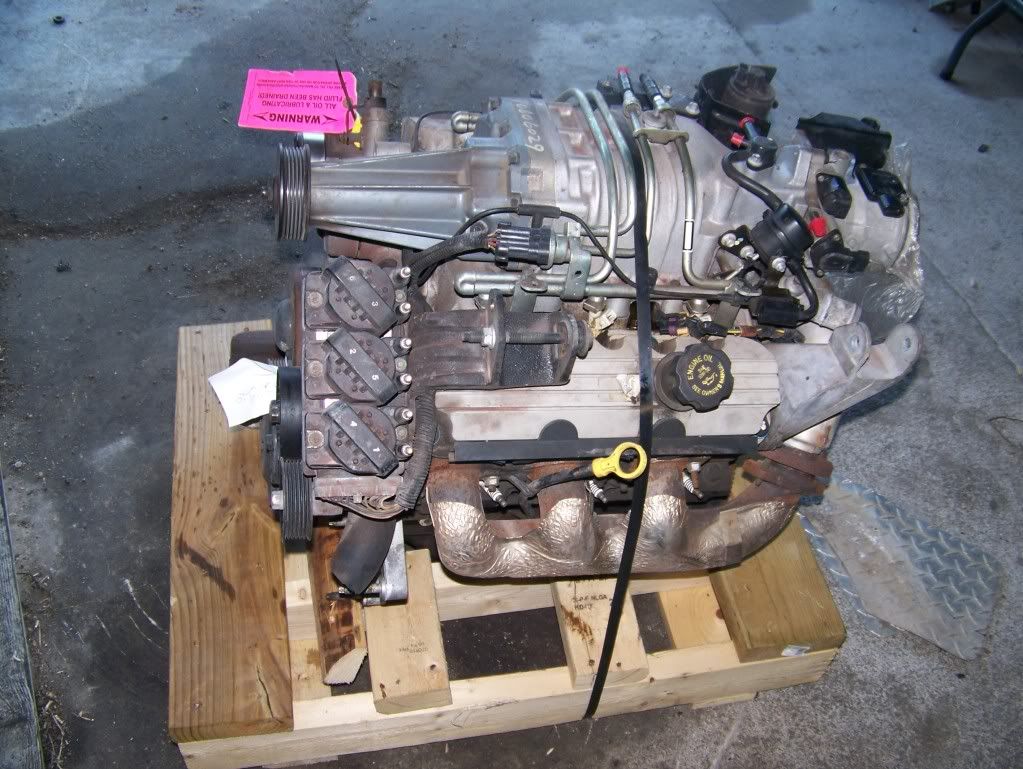
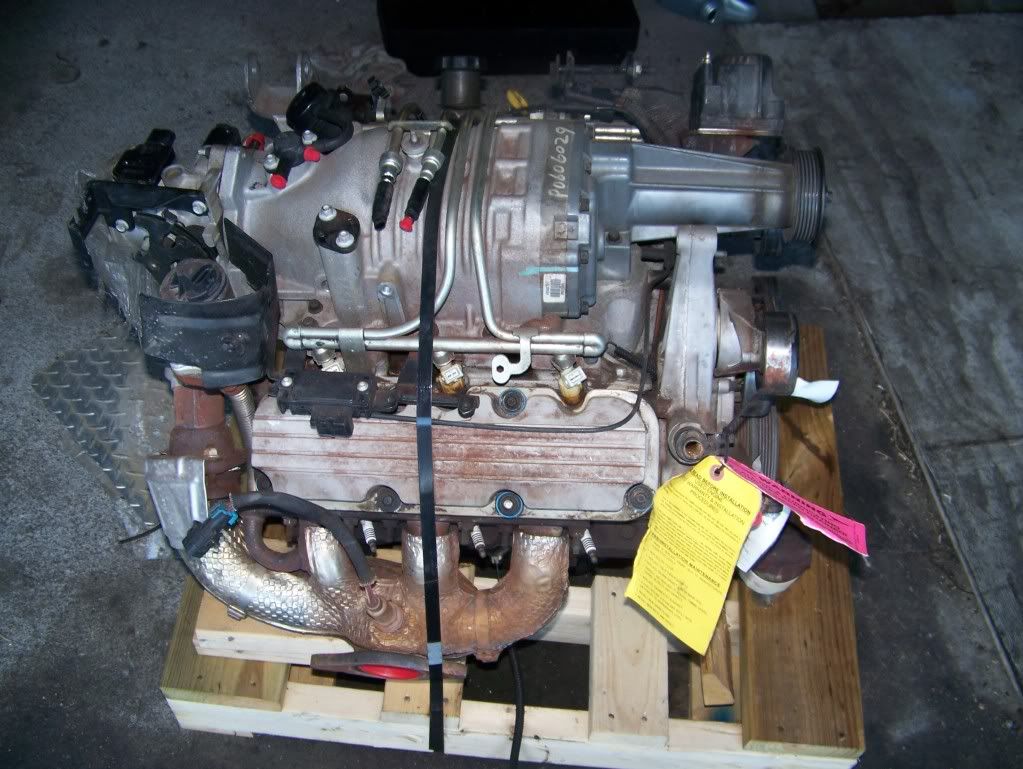
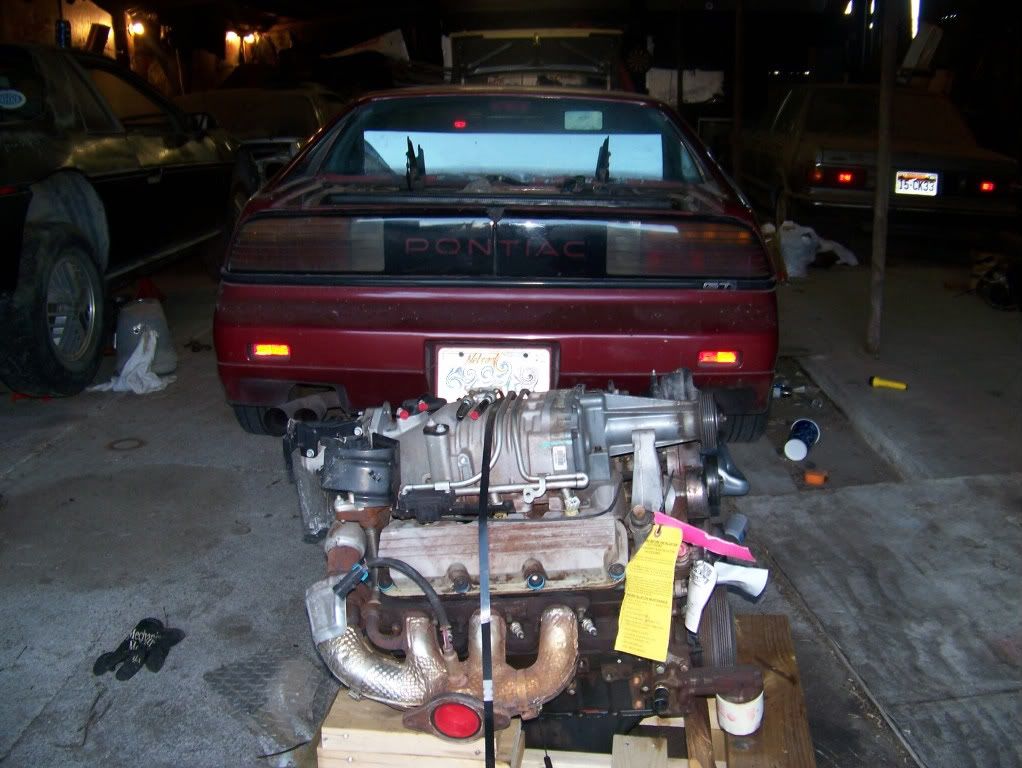
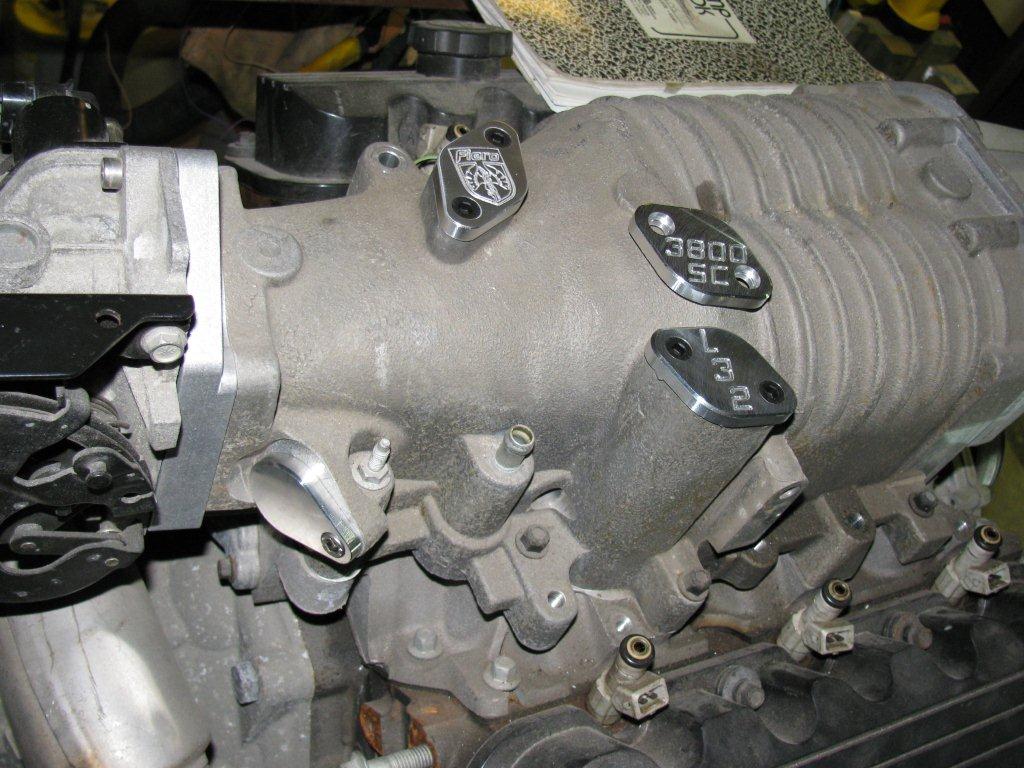
Currently I have a 1998 gtp 3800 mated to my getrag 5spd transmission with a spec stage 4 clutch (non-sprung hub). I have the engine and transmission sitting on purple reign's mounts.
Today was the day my car was supposed to be cruising at a local cruise night! At least I have something to be happy about, I fixed all of my current problems, and now I'm moving on to the wiring later tonight.
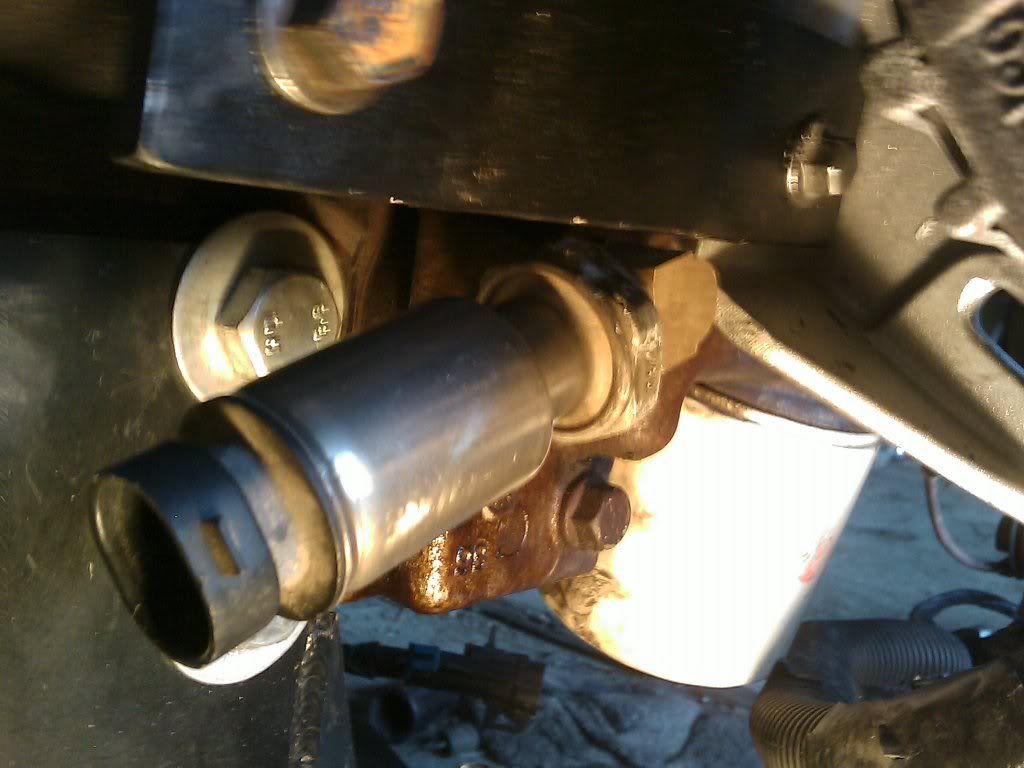
Oil Filter Adapter/Low Alt Mount interference - FIXED! Solution - 1/4" 90* "street" bronze elbow
Thermostat Housing interference - FIXED! Solution - Since most people disconnect the solenoid anyways, I snipped off the nozzle for the vacuum line going to the solenoid on the actuator. This fixed the clearance issue.
A/C Delete from ZZP - Figured out! Solution - Yeah they supply bolts and spacers and fancy equipment, but really all I needed to do was put it on the existing studs, and tighten it down with 3 10m nylon-lock nuts.
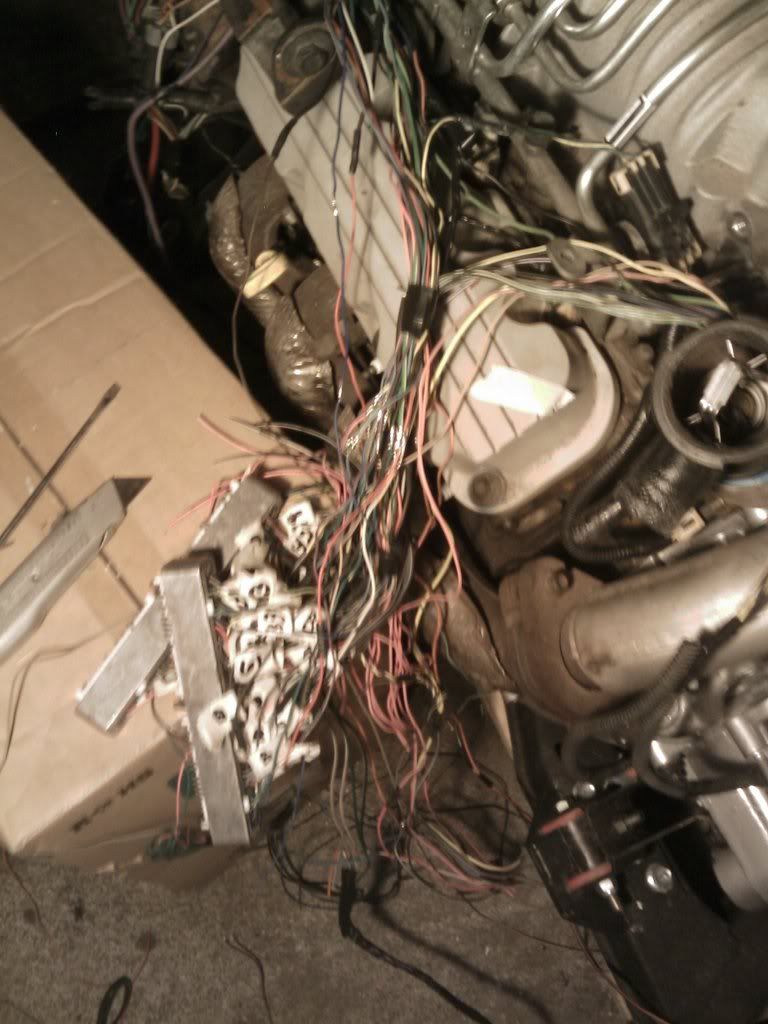
Wiring - Holy Crap! There are soooo many wires on this harness that don't need to be here. I haven't even figured out a way to lay the harness on the engine that makes sense. Will begin work on this soon!
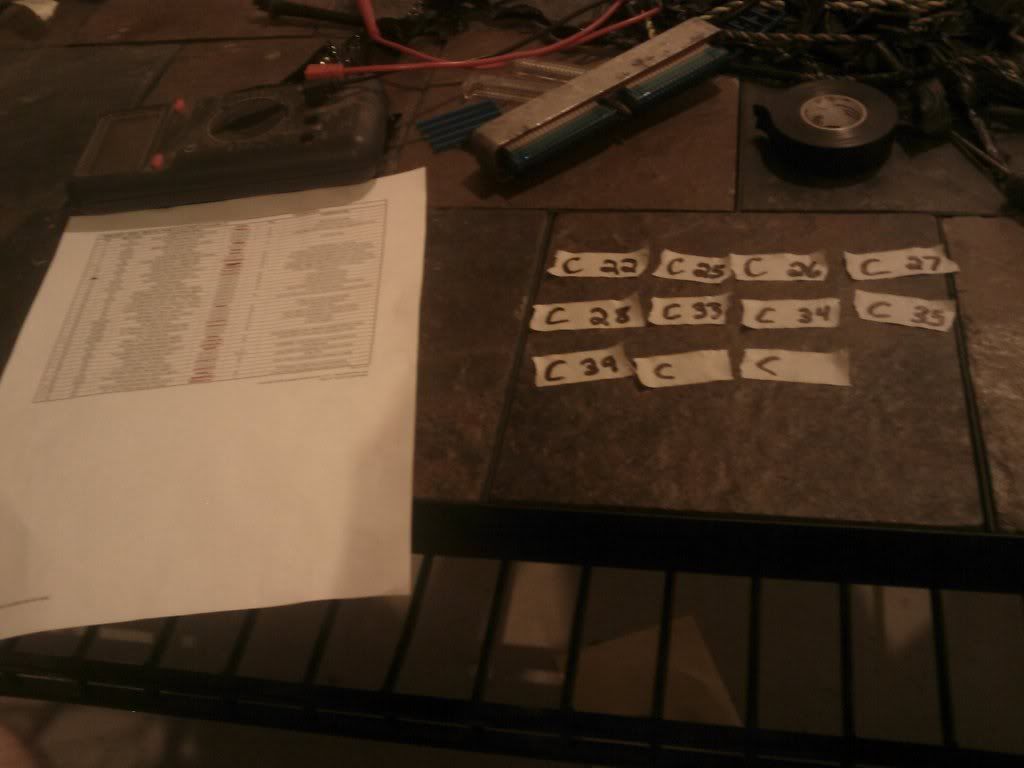
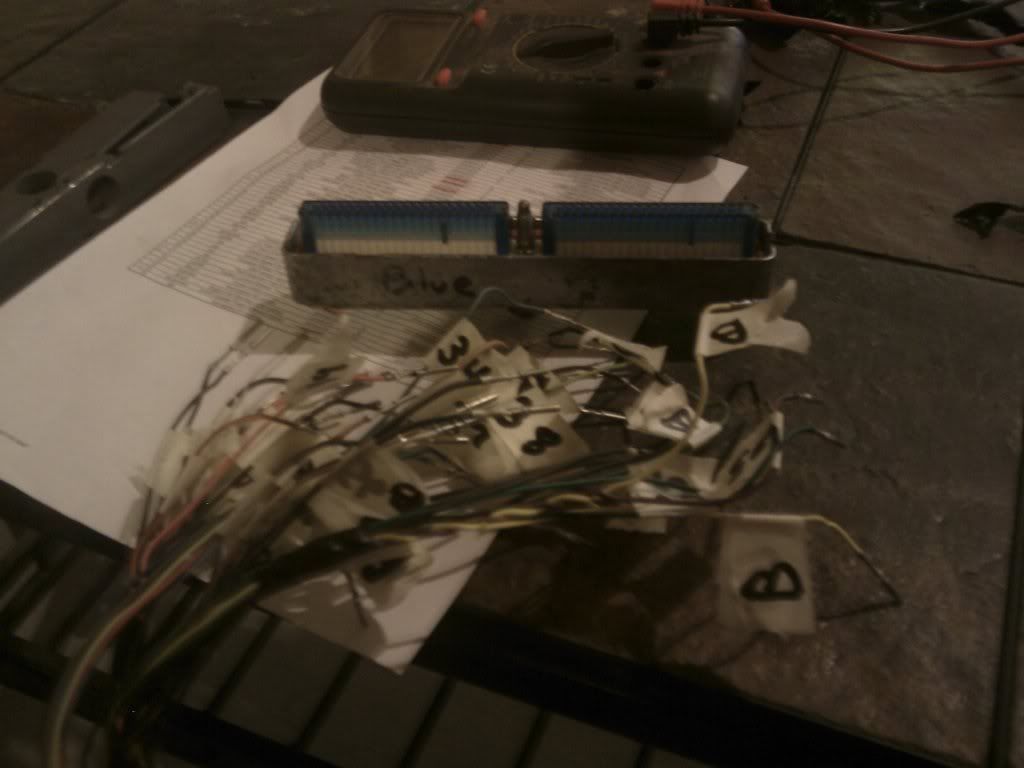
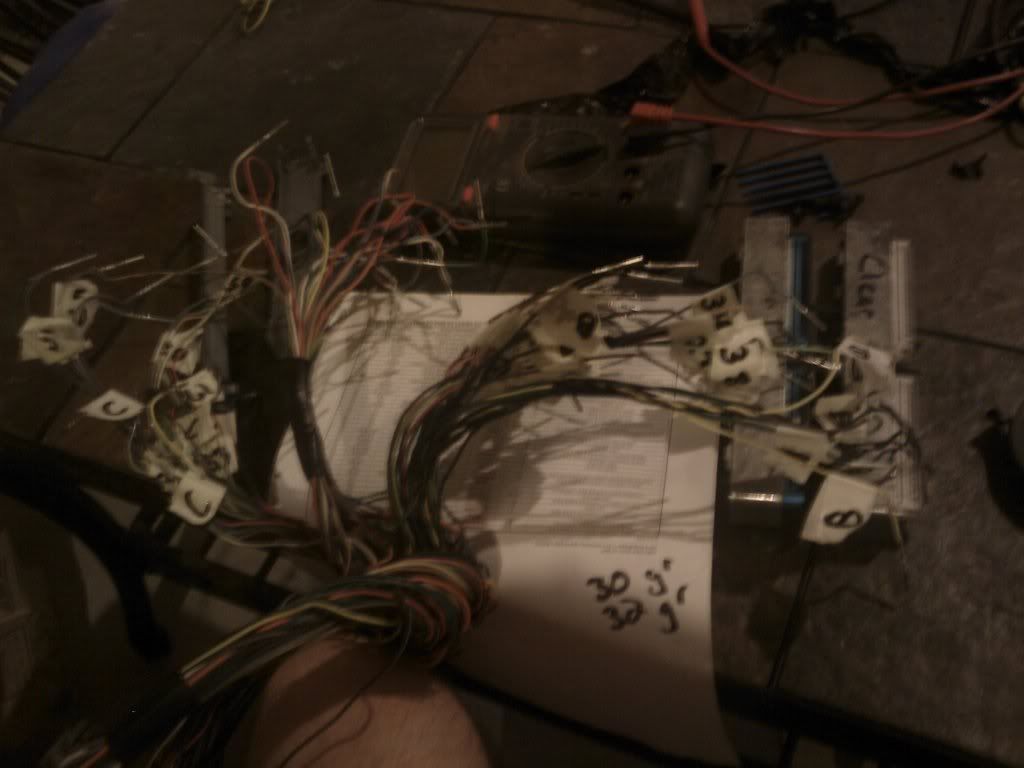
Progress - 7/19/2009 I did some more research on the wiring harness and have been privately talking to a few people about it. If I can find the correct pins at the part store then I'm going to disconnect all the pins from the blue and transparent connectors, take all of the wires out and bundle and label them, then rerun all of them to a custom length. If I can't find the pins locally then I'll just cut and splice (yuck).
I've managed to get one of the half-shafts in and hooked up to the knuckle, and have the other one almost all the way in, I just haven't managed to get the ring to snap into place (last 1/2"). After I get that in, I'll finish putting poly in the three links, and reinstall the swaybar and get the emergency brakes hooked back up. Tomorrow I'm headed out to do some camping at a lake, and I'll be there til' wednesday. I'll be moving 3 hours away this coming thursday or friday. I'm really cutting things close here.
Note - I ordered the water pump inlet hose from WCF due to convenience, and the tube isn't even big enough to go over the water pump inlet. The outer diameter of this hose is nearly the same as the inner diameter of the hose that the salvage yard chopped off that was on there previously. I'll be sending it with my core thermostat housing to get a refund.
[This message has been edited by JamesCurtis (edited 07-19-2009).]
Update and bump, 100 views and no replies? Oh well, I have all of the motivation I need. Once I get the fiero back on the road I can sell my '02 sentra which will make my transition back to being a college student A LOT easier .
Question - Where should I mount the PCM? I have the WCF Custom sub box which doesn't leave me enough room behind to mount the pcm where the old one went. Do I remove the battery tray and mount it there, or wire it up into the trunk?
Stock airbox area is where I stash them (because this is where most wiring harnesses put them anyway). On my turbo car I could put it in the "wheel well" area where the stock water separator is. When I had my intake and filter there, and on the other 2 swaps I did, the PCM just hangs out under the driver side grate.
While you're here DH, do you happen to have a spare BBV actuator handy, and/or pics of how the stock wiring harness lays on the engine? I'm having the damndest time getting the wiring harness on the engine, it just doesn't seem like it's means to go on there any way I turn it around .
Thanks for the pic, I'll be headed out this evening to work on the car a bit more. Are there any special precautions I should take with oil changes after bringing a junkyard engine back to life after it's sat around for 2+ years? I know on newly rebuilt engines people put in cheapo oil and replace it after 500 miles or so. Do I do anything special with the junkyard engine, or just take the oil to 3-5k miles like a normal engine?
Things are taking a little longer than I had hoped, but I have a whole additional week to get it running. I have the 3800's wiring harness completely torn apart and today I'm going to set the fiero down onto the engine so that I can run wires a little more easily.
Chris West has sent me out the fittings that I was missing, I should have those showing up on tuesday. I have pics of the wiring mess I put myself through, but I'll post those later. I started disassembling the wiring harness at about 2-3pm, ended up being all done and organized at 2-3am.
Anyways, it' now time to go back to my new day job - working on the fiero .
I actually decided against using the evap canister and bbv. I have pegged the bbv 180* like lloyde suggests, and I'm still trying to figure out a good filter to use on the fuel tank vent line. It was suggested by mike gonzalez that I just hook up the line to the charcoal canister but don't do anything else. That way it would act as a filter. I'm not so sure about this idea, will the charcoal canister work just fine as a filter without any vacuum?
Lloyde, thanks again for the help on the phone. I will definitely give those dressup items a good look.
Question - I'm trying to find a good place to hook in the brake booster and what type of line to get. What do you guys suggest, my local advance auto doesn't have anything that large in stock labeled as a vacuum line. Also, can I tie it into the TB or is it meant for the vacuum nozzle at the top of the supercharger?
Well I hope that's the end of that dispute, keep it clean guys! I'm heading into town to buy some front cradle mount bolts (lost them!) and look into the brake booster vac solution. I'm also going to purchase a driver & passenger side coolant tube. When I set the car down on the cradle, it was very obvious that the one WCF supplied was not the right length or shape. When I get back I'm going to be lifting the car off the cradle again and then running some more wires.
I managed to find the bolts I was looking for at ACE Hardware (m12-1.75x100). Menards and the Tractor Supply company were both close, but no cigar. I'm feeling really good this evening. I took the engine back out from underneath the car, and now I'm getting things rigged up, taped, and loomed. I found the oil pressure sender connector from the 2.8's harness and snipped off the orange/blk and tan/wht wires. The middle tan wire on the connector is the one that sends the oil pressure to the gauge, and it gets its ground through the threads in the block. Right now I'm hunting for a few good grounds and putting a lot of brainpower into how I want the harness routed.
Question - If I get rid of the oil pressure sender wiring to the fuel pump relay, do I need to solder them together or what's the deal? I can't imagine just cutting them is going to make the relay happy.
at 9 PSI, the sender closes the contacts inside it and puts power to the relay that trips the fuel pump. So, if you do cut the wires, delete the wires, whatever you want to call it, the PCM is the only thing that is going to be running the relay. Not usually a problem with this, but in the last 8 years I can recall 3 PCM's that the internal triggering for the fuel relay malfunctioned and the fuel pump was purely running based on the engine turning over, and getting the 9 PSI threshold so the fuel relay was engaged.
So, you have 3 wires... the wires are ... one wire oil pressure gauge via input to C203 then to the gauges. The other 2 are the fuel pump relay. +12 on one side, and pass thru to the fuel pump on the other.
What I have seen with this setup over the years...
Failed oil pressure switches that cause the fuel pump to run all the time and run the battery down over night. Failed oil pressure switches that cause the fuel pump not to come on because the ECM already had internal failure.
Thanks for the info Lloyde, I'll take it into consideration .
Wiring question - Did you guys do everything while the engine was out of the car, or did you finish it up mounted in the car? Right now I have it outside of the car and I'm not finding an easy way to rig up the fuel pump relay and get the correct distance to the c500.
but in the last 8 years I can recall 3 PCM's that the internal triggering for the fuel relay malfunctioned and the fuel pump was purely running based on the engine turning over, and getting the 9 PSI threshold so the fuel relay was engaged.
Yet this is NEVER a problem in every single car to ever have a series2 3800? Why do you say it is the PCM's failure when it would logically be a failure coming from the swap wiring?
quote
Wiring question - Did you guys do everything while the engine was out of the car, or did you finish it up mounted in the car? Right now I have it outside of the car and I'm not finding an easy way to rig up the fuel pump relay and get the correct distance to the c500.
I just mock it up while it is on the cradle... If you put the strut in the place it should be, you can measure off of the top of the strut tower with some degree of accuracy. I will add that I did end up making it a bit too short on my first swap, and a bit too long on my second, but got it right on my 3rd
I would not attempt doing the swap wiring while it is in the car... If you want to take the extra hour or so, I would mock it up inside the car first, and do some loose connections between some of the connectors you want to keep the length and routing. Or you could make a jig similar to how dan/loyde make their harnesses.
[This message has been edited by darkhorizon (edited 07-29-2009).]
You've just opened up a can of worms my friend . My removing the BBV was a personal choice. If you have the ability to do it, leave it in there. For me I got tired of having it in the way and I don't mind a little extra blower noise. Some people say that it will put extra load on the supercharger thus lowering the life expectency of it. The BBV from what I understand allows incoming air to bypass the supercharger. This allows your car to control your boost and get rid of boost when you don't need it. Once again I believe that it bypasses the supercharger unless you are at WOT.
I removed it to clean up the engine compartment and make things easier on myself. I did this fully knowing the possible consequences of removing the BBV. There are people who have run their cars for many years without it without any problems, but there are also people who swear that removing the BBV will cause a lot of problems. This topic is cause for quite a bit of contention .
Well in my hopes that I wouldn't have to do any modifications or fabrication to the parts that I've ordered for this swap, I've been let down a few times. I am still waiting on the 2nd quick disconnect fitting for the fuel kit I ordered through WCF that was supposed to be for delivery yesterday. Also upon test fitting today I tried hooking up the throttle cable and found there's no chance it's fitting in the pricey ($125) bracket without modification. I'm not very upset about either and I was expecting a few delays. I'm still trying to get the wiring all ran before I can even begin to worry about the fuel lines and throttle cable. It should take just a little working over with a dremel to make it wide enough for the cable to fit in there.
I started my FastFieros FastTech section for the purpose of saving people money, giving back to the Fiero community, and just in general making sure I dont forget how I do some things.
this shows the V6 throttle cable being used on the 3800sc TB with no modifications to the bracket that comes on the 3800. You do need a U shaped bracket, and I happen to use a A frame spacer bushing. The hole is already drilled in it, it is just about right for the securing of the Fiero throttle cable, and paints very easy.
The most part of the work is grinding that rivet brad off and lightly punching it out. Then you have to grind the slot in one place for the Fiero cable to lay in there nice and flat. The distance is perfect and gives the same feel as when the 2.8 was in there.
ACE started the ( you have to have a 4 cylinder cable deal ) and so alot of people go this route, but requires you to remove that whole center console section so you can remove the V6 cable and install the 4 cylinder one.
Thanks Lloyde, I had actually read that article before I decided on purchasing this bracket. At the time I had a lot more money than time and I still am afraid of any custom fabrication. I had hoped that $125 would order me a bracket that i'd slap on and be good to go, but as with what seems to be almost all aftermarket fiero parts, it's not always that easy!
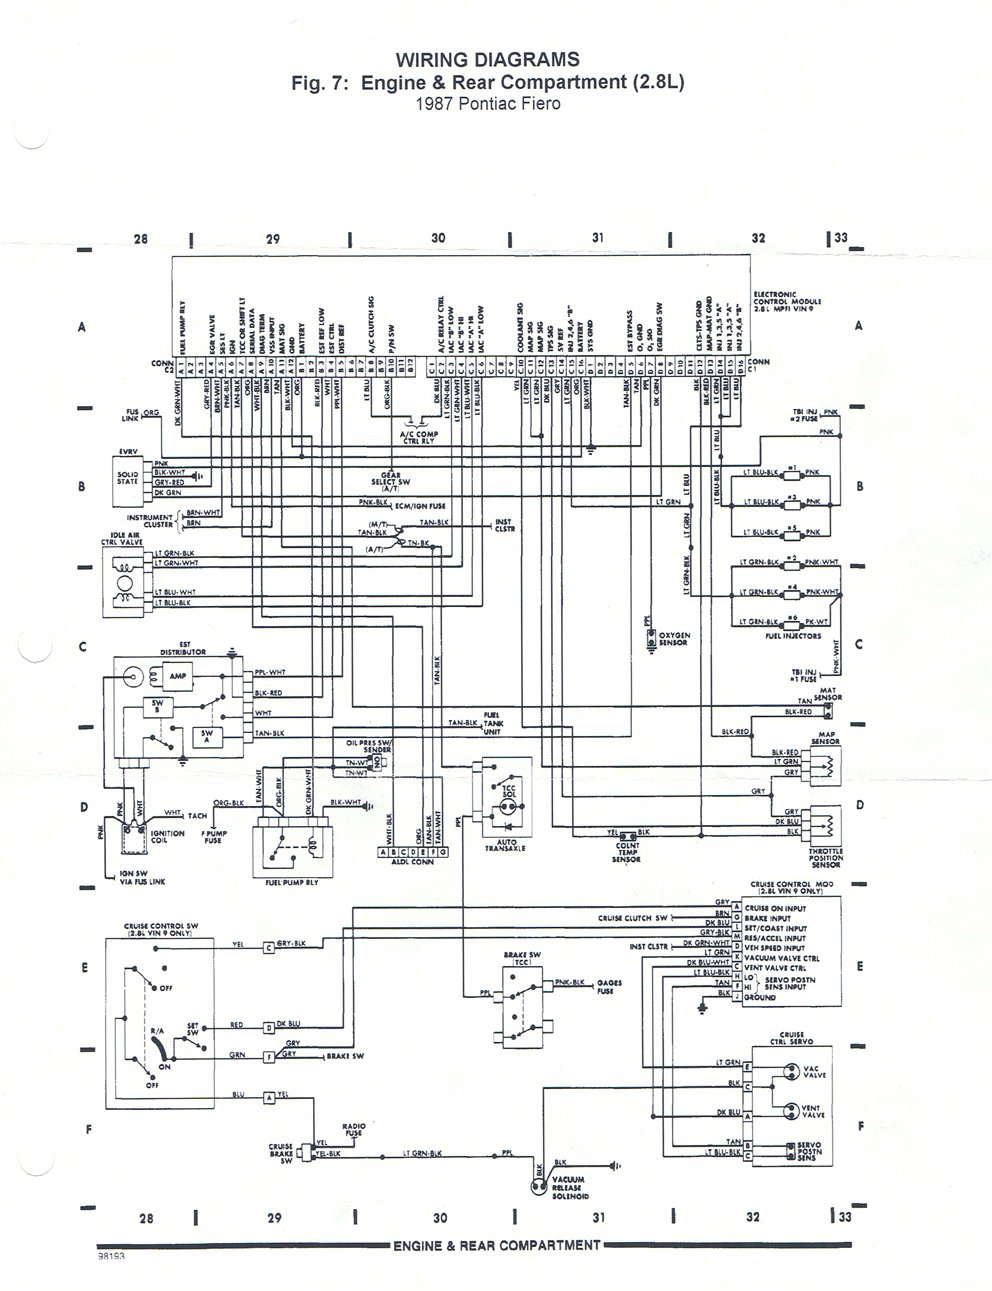
I've already dremel'd it to fit so it won't be needed DH, this has to run by sunday . I am at a loss right now though, I cut the wires to the fuel pump relay and didn't bother to note where they went. I have two orange/black wires, a black/white, and I believe two others. I've been looking for schematics in PFF but all of the threads have Jazzman linking to pics that have gone dead. I can only assume that the fuel pump relay wiring is extremely simple, I just don't have a diagram to tell me where it goes
So it sounds like all I need to do is ground the black/white, and run the dk grn/wht to the pcm, but the orng/blk is headed to a fuse. Would that be pin L on the C203 connector? Also, it doesn't look like it matters which orange/black that I use, I assume they both tie together.
------------------
[This message has been edited by JamesCurtis (edited 07-29-2009).]
Did GM change the wiring to the fuel pump in 88? The fuel pump connector was still tied into the car's wiring even after I removed the c203, c500, and ecm. With all the wiring out I can still plug in the fuel pump to a connector, and that connector looks like it heads up to the c500 area in a big loom of wiring.
I'll answer my own question - I don't think so. You need the orange/blk from the relay going to pin B c203. You also need tan/wht going to pin L c203. Ground the relay and that's all that's required (make sure the 3-pin fuel pump connector is plugged in!). I went into town again today and I HOPE I purchased everything I need for the rest of the wiring. The engine is coming out of the car after a mock-up of the wiring harness, and I'll finish pinning the pcm and c203 and c500 outside of the car. Thanks for all your help guys!
I'll answer my own question - I don't think so. You need the orange/blk from the relay going to pin B c203. You also need tan/wht going to pin L c203. Ground the relay and that's all that's required (make sure the 3-pin fuel pump connector is plugged in!).
LOL, talkin to yourself now eh ? this wiring has you going nuts !
This wiring is driving me nuts, that's for sure . I've started soldering all of the connections together very slowly.
Will the stock 3800 coolant sensor feed the right input for the fiero's coolant temp gauge?
Yes there was a change in the 88 fuel pump wiring. you have that fixed it seems now.
The 3 wire ECT from the 98 GTP will run the Fiero gauge and talk to the PCM as it should. if you have a 2 wire ( yellow and black wires ) , this will not work.
I must've been lucky, my 2000 gtp engine had the 3-wire cooler connector.
Sunday is growing closer, but I don't seem to be getting much work done. My soldering gun decided to poop out after about 6 wires (frustrating wires at that) and that's all I have to show out of about 2 hours of work tonight. I also found out that Darth Fiero's wiring schematic isn't quite as spot on as I'd hoped. It says that A2 should be black and there should only be one light green. Well I didn't bother checking pin number, but I tied my backup lights into what I thought was the only light green. Well it turns out that A2 was light green and I almost tied what was supposed to be a ground into my backup light. I'm sure that would've worked well!
Now I have my ohm-meter out and I'm checking pins before I hook anything up. Darth's diagram also says that only 84's have a dark green wire coming out of A1, but my 88GT mysteriously had a dark green wire as well . I've now learned my lesson and will check and doublecheck before terminating and soldering wires. On a positive note, I have the lengths to the c1, c2, c203, c500, and fuel pump relay. All I have to do now is run the wires and terminate them. I'll be waking up early tomorrow morning to continue soldering.
All I have to say is that this wiring is scaring me. I've tied in the c500 (easy!) now I'm working on the pcm and c203. Those are the scary ones as it's going to be very tight getting the two connectors through the firewall. I have to make sure my wiring is tight and clean, and sorting out the chaos of wires I have sprawled out is going to be a challenge. My worst fear is that I'm going to end up with a twisted unorganized knot. Let's hope that doesn't happen!
Still waiting on the part from West Coast Fiero. So much for it being scheduled to be delivered last tuesday. I have yet to hear a response from him about a tracking number.
I was at WCF wnen the fitting was shipped to you, although I cannot remember the exact date. It was so small, it may have been mailed, but I am not sure.


 .
. 


 . I am at a loss right now though, I cut the wires to the fuel pump relay and didn't bother to note where they went. I have two orange/black wires, a black/white, and I believe two others. I've been looking for schematics in PFF but all of the threads have Jazzman linking to pics that have gone dead. I can only assume that the fuel pump relay wiring is extremely simple, I just don't have a diagram to tell me where it goes