After 8 hours of not knowing whether my hands were covered in my blood or the red Mobil 1 synthetic suspension grease I am using, side one is done. I replaced the outer Tie rod and tie rod end, upper and lower ball joints, wheel bearings and races, all rubber bushings have been converted to poly, a new high performance shock has been installed along with an Eibach lowering spring, and everything has been blasted with about 3 cans of brake parts cleaner and painted. Whew!
As for shortcuts, I really found none. The worst part of the entire job was probably reattaching the lower control arm. What a pain! Stick one side in, get the bolt in, and get the other side into position. I had to use the spare tire prybar to align the hole on the other side. Speaking of, you DO have to cut down those caps considerably. Mine had to be cut down to literally half of their previous size and they barely squeezed in. I actually had to grease the sockets for the arms.
Thanks for all the pictures, Brian. Pretty much everything was self explanatory but if it were not for your pictures I would have installed several of the poly bushings the wrong way around. The only thing left on this side is the end link for the sway bar (Mine was in very bad shape and it will need replaced rather than reinstalled).
Let me say this to everyone thinking about this swap...it does not require much specific knowledge, but it is NOT for the faint of heart. Just make sure you have the right tools, a lot of time, and a mindset that this isn't getting done in 3 hours. Take your time, do it right, and try not to bang up your hands and arms s much as I did. There's blood caked on the metal surrounding the rotor as I never removed the rotor...haha. I'll post again once the passenger side is done.
And once again, thanks, Brian. It would have been terrible to get this far and realize I installed bushings backwards only to take the entire thing apart again!
PM Me if you need: Interior/Exterior Parts Stock Switches/Bezels Gauge Clusters Body Panels Fiero Rotor Hubs for Brake Swaps Or custom fabricated parts! My prices are very low.
I'm going to both *agree* and *disagree* with those who said don't use the poly dust boot covers. The fact is, you *can* use them, but you must modify them slightly by using a small knife or an xacto blade and open the small end of the poly cover up enough to fit OVER the stock rubber dust boot. I don't fault anyone for using the nifty red polyurethane dust boots, they look great, and I used them on my 87 GT specifically because they look good. Only difference is I used them with the rubber OEM style boots under them. They fit just fine.
I did the same thing. MORE sealing power that way and better looks.
I don't know about other kits, but the Prothane boots are very soft, almost as soft as rubber. I think they would actually seal well on their own. I just used both at once since mine were in good shape anyway....well, at least some of them were!
The whole dust booth thing is a bot ridiculous, I think. Your car is unlikely to explode or fall apart if you -properly- use poly dust boots. And I haven't heard of any poly dust boot related engine fires yet.
Forgot to mention a useful tip...buy 4 or 5 cans of brake cleaner if you're like me and don't have an air ratchet. These bolts have been in for 25 years and believe me, they don't want to come out. Spraying break parts cleaner on the bolts and the threads on the other side of what they are bolted to makes removal MUCH easier.
Edit for another good tip:
The upper A-Arm or control arm or whatever you want to call it uses two thick washers. It is nearly impossible to fir both of them back in once you do the poly, the trick is to pound the poly back out a bit so the washers fit in and then use the force of tightening down the big long bolt to push the poly back in. Some tapping may be required to get it to seat all the way in again. This will save you at least 20 minutes of frustration.
Yet another suggestion: Replace the upper ball joints and steering stabilizer while you do this. The lower ball joints are, as always, a pain in the ass, but the uppers are extremely easy and you have to almost remove them anyway.
[This message has been edited by MadDanceSkillz (edited 03-10-2010).]
I didn't take pictures because Brian already did a great job of that. Mine looks a lot like his just with new ball joints, tie rods/ends etc and blue sway bar end links instead of red.
And yes, I'm very, very sore. Hopefully my girlfriend will help out with that with a back/shoulder rub. She's reading this as I type it. Hint, hint
[This message has been edited by MadDanceSkillz (edited 03-10-2010).]
After around 21 hours of work my front suspension has been completely rebuilt. My hands and arms are bloodied and scarred and I don't know if the grease will ever wash out, but it's done. Now I just have to do the struts and limp it into down for an alignment.
these threads are so great to have when you're working on stuff like this
when I disassembled my front suspension I noted that the front and rear bushings/pivots of the lower control arms don't line up. has anyone noticed any excessive wear due to this?
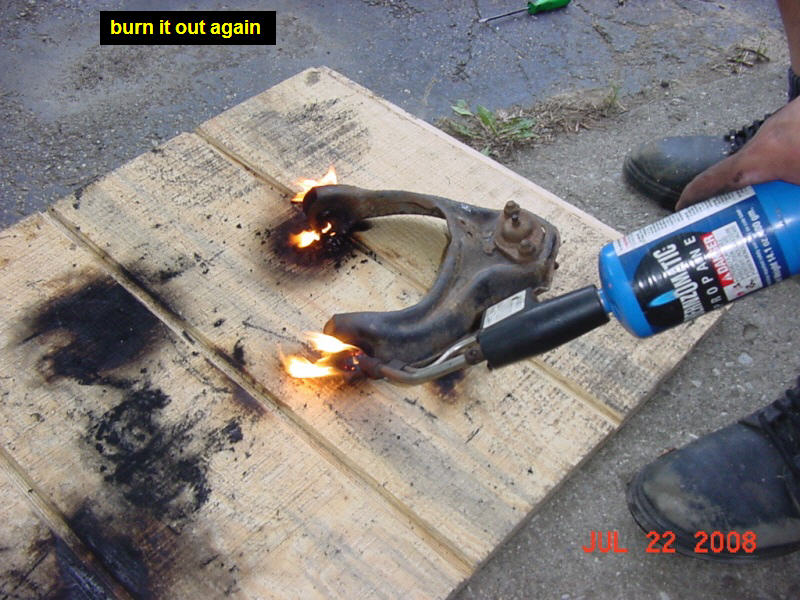
I also feel that while the upper control arm bushings were easy to press out, I have to recommend the fire process for the (front) lower control arms. I managed to deform the left LCA trying to press the rubber out of its sleeve (managed to get it somewhat proper with a hammer, but I have a lot of measuring, hammering and brazing to do before I can even think of putting new bushings in there)
edit to add a question: do you re-use the old bushing inner tubes or do the poly bushings come with new ones?
[This message has been edited by PerKr (edited 07-01-2010).]
I just wanted to post that the seller ilikeike1 is who I used on eBay to get my bushings the first time and have used him everytime since. He has been fast to ship and I have never had any issues with him. I have also purchased dogbone bushings and cradle bushings from him.
a bump to keep a great thread alive! I found it just in time to start my front poly install.
Thank you all for the informative posts! And kudos to the OP for taking and posting informative pics for all to follow! You have made me much more confident going in!
This IS a great thread, espessially as I too am doing this project right now! Only one corner done so far though. If any of you guys do the aluminum cradle bolts, please post alot of pictures!!! Particuarly if you are not removing the cradel! Thanks again for a very good visual thread!!!! Later, Mike.
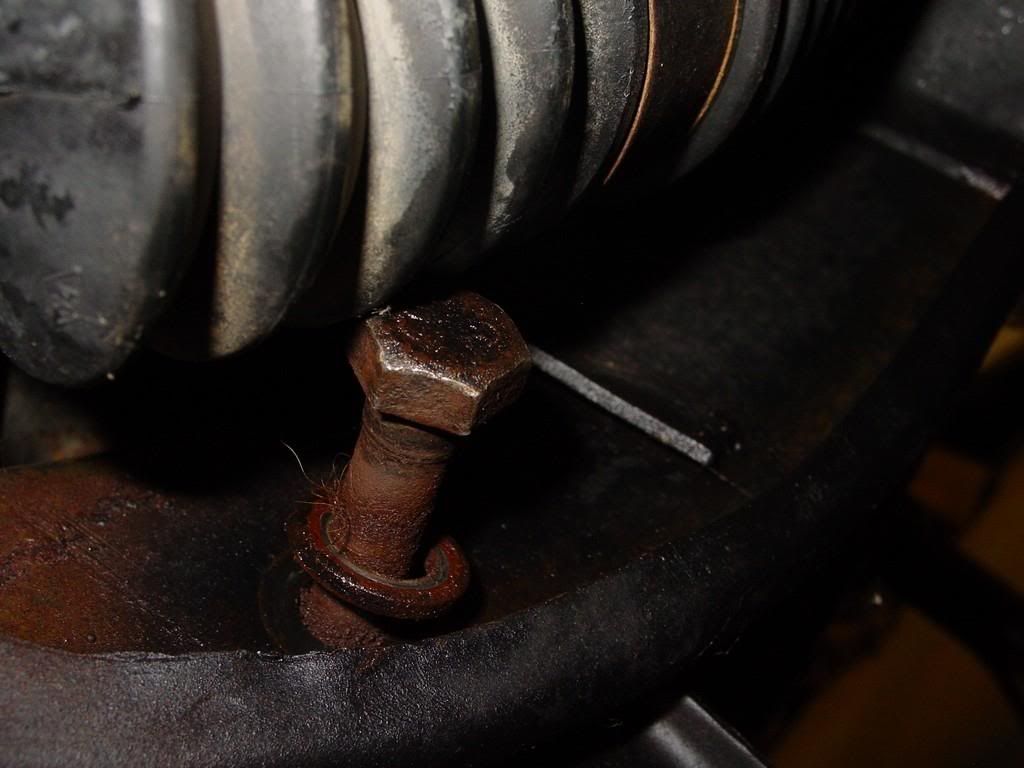
Got through it, but the darn front lower control arms are a beast... the bushing were really in there. I tried to drill them... burning I think is the ticket! Also, it does not show here, I can back for referance... the front most bolt on the front LCA... is it supposed to be oriented with the nut to the rear of the car. I had a bear of a time pulling the bolt out from under the steering rack boot. It was hitting horribly... Did anyone else have this issue?
Originally posted by redraif: Got through it, but the darn front lower control arms are a beast... the bushing were really in there. I tried to drill them... burning I think is the ticket! Also, it does not show here, I can back for referance... the front most bolt on the front LCA... is it supposed to be oriented with the nut to the rear of the car. I had a bear of a time pulling the bolt out from under the steering rack boot. It was hitting horribly... Did anyone else have this issue?
quote
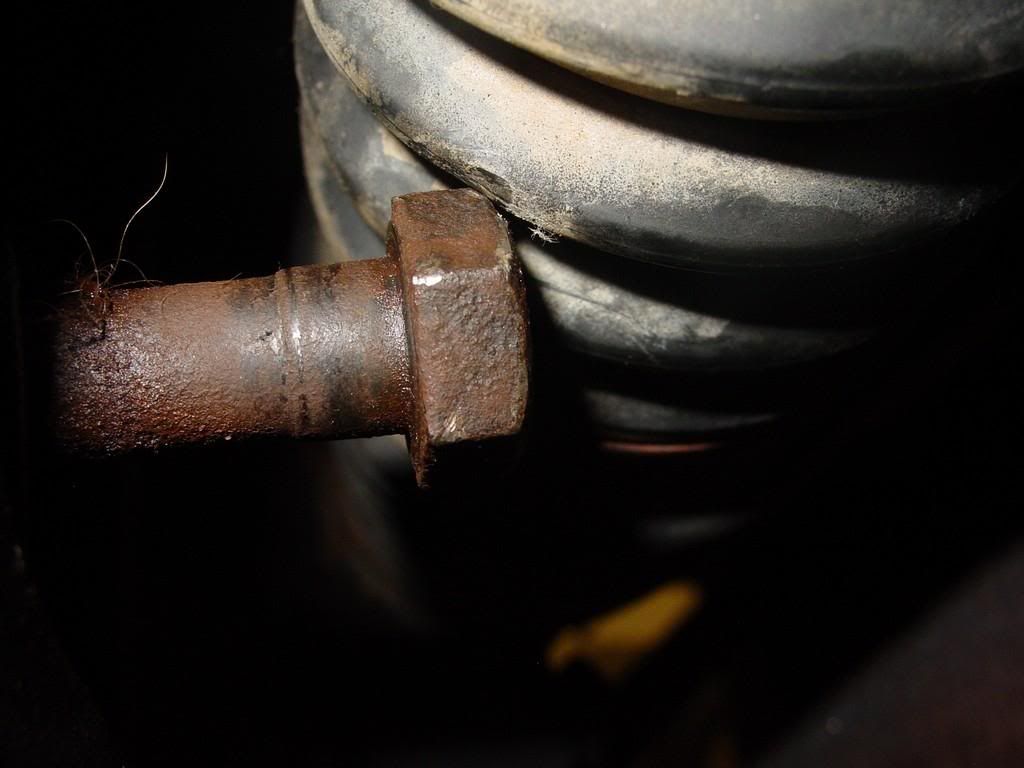
Originally posted by redraif: Ok is this normal? Why would GM do this? Did the Previous owner take it apart and put it back backwards? I'm getting total interferance from the rubber boot on the steering rack while trying to remove the bolt from the front most leg on the lower control arm. I had to pry on the rubber boot to even try to get it out and it did not work. Surely GM did not intend for us to remove the rack to remove the LCA's. Yes it's the same on both sides... I even pushed the tierod up hoping the joint would move it further out of the way... nope...
Is the nut supposed to go on this side instead?
So here was what I had to do to get the darn thing out... So I got them both out, but I don't see how on earth I could ever line it back up to get it back in this way, esp get it back in straight. The next question is, do I put is back together like this? or reverse it and put the nut to the front instead? What did you do?
Thank you!
So, I saw your other thread and brought your pictures over here. Yes, my bolt did the exact same thing. I think that one 87 was more of a PITA then the other. Sorry that I didn't capture that, I did the best that I could. When you are making progress, sometimes you just want to plow through and get it done...
Way back I said I would post some pictures of the tool I made for removing the bushings, I guess 3 years is a long enough wait... Seriously though, I hadn't done any bushings until last week.
quote
Originally posted 06-10-2009 by MulletproofMonk: At some point I need to post pictures of the bushing removal tool that I made to do my current car. It reduced waiting for the bushings to burn out and it only cost about $25 to make 2 (one for the large bushings and one for the small bushings). Anything that helps reduce inhaling that toxic black smoke is good...
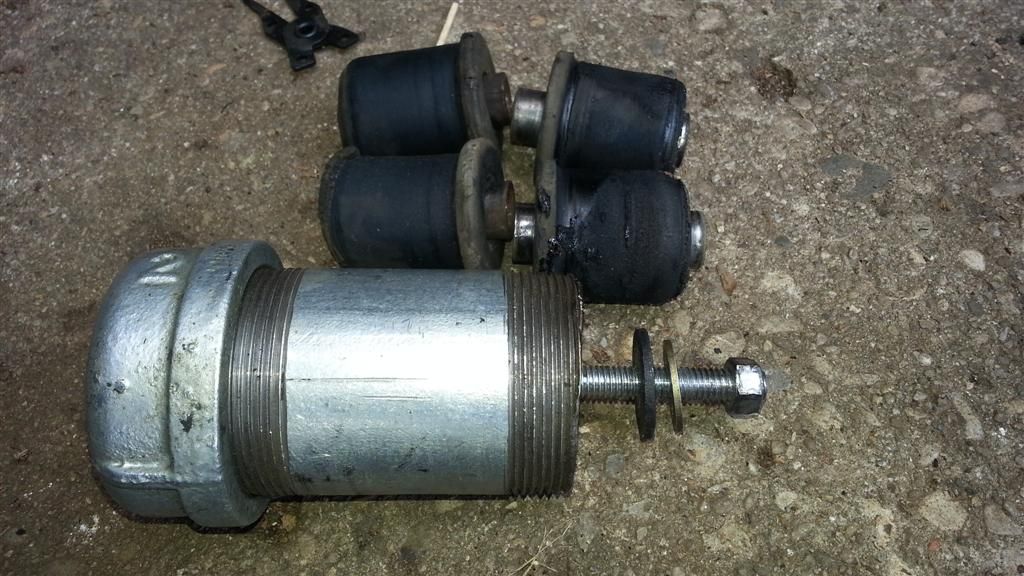
So, my bushing removal tool is just a length of pipe with a cap. The diameter should just fits over the bushing. It should be deep enough to hold the bushing that pops out. Lastly I used a lag bolt long enough to go through the pipe plus control arm and have 2 washers with a nut. I tried one washer but it bent everytime. I ended up with one washer the same size as the bushing and then a smaller washer that was thicker and higher grade.
Once you attach the tool, I heat the sleeve evenly with a propane torch. You should hear the bushing start to sizzle (and maybe see some smoke), start turning the nut with a ratchet wrench. If you start torquing it down to where the washer is pulling in at the center but the bushing doesn't move around the edges, more heat on the sleeve. If the bushing isn't ready to be released, you will pull the whole sleeve out...
You can see how the edges of the bushing gets hot and releases. Oh yeah, wear some gloves. It gets hot from the heat transfer.
Just a little residue in there, but much better than my old burn out process.
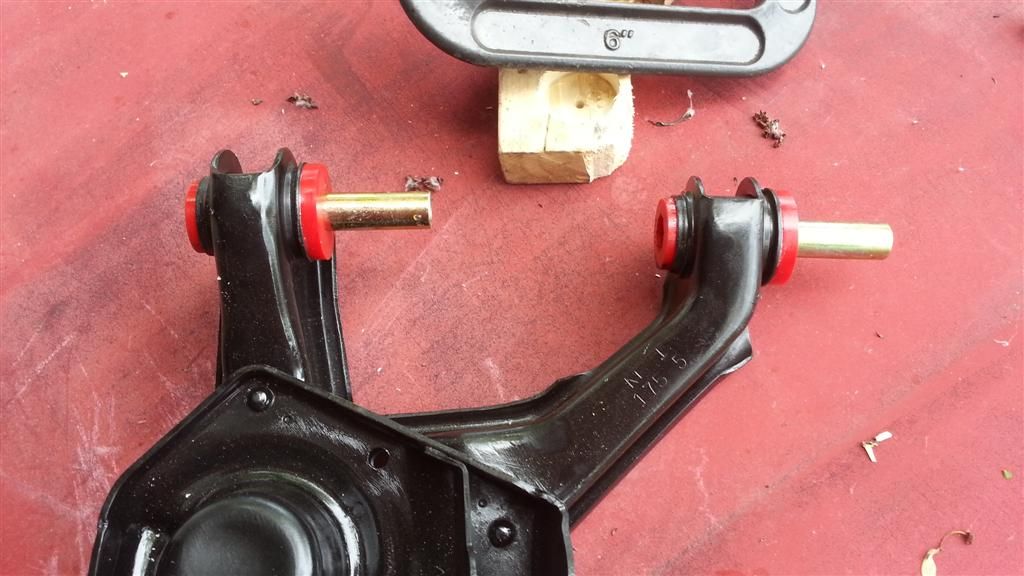
All 4 bushings from both of the lower control arms. Also a better shot of the lag bolt and washers.
Shoes still kicking!
[This message has been edited by MulletproofMonk (edited 05-21-2013).]
Let's do another update... And talk about more tools.
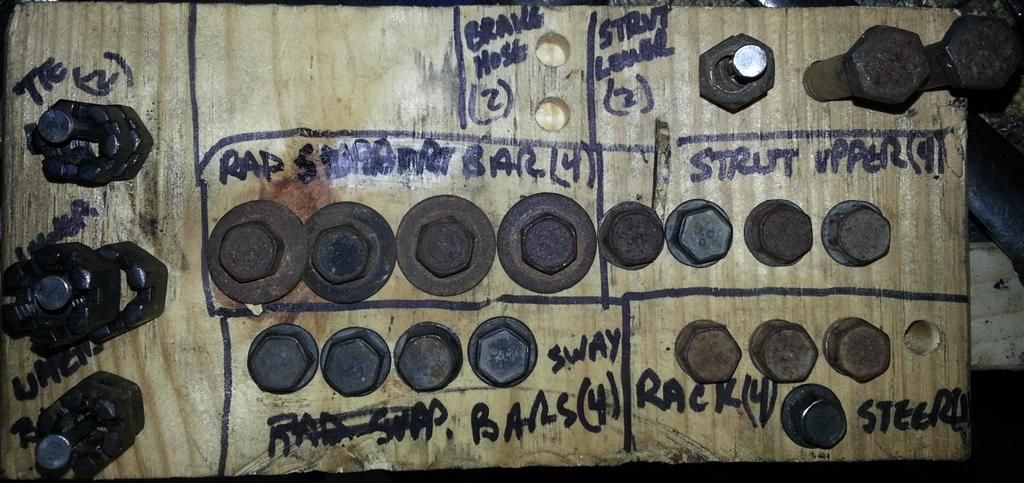
Organization. K.I.S.S. Keep It Simple Stupid. If you can misplace a bolt or thread the wrong bolt in somewhere, you probably will. While reading other peoples threads in quests of poly (and losing bolt sizes, locations, etc), I thought I would share my simple method. Wood with drilled holes, a couple of nails and a marker.
[This message has been edited by MulletproofMonk (edited 05-21-2013).]
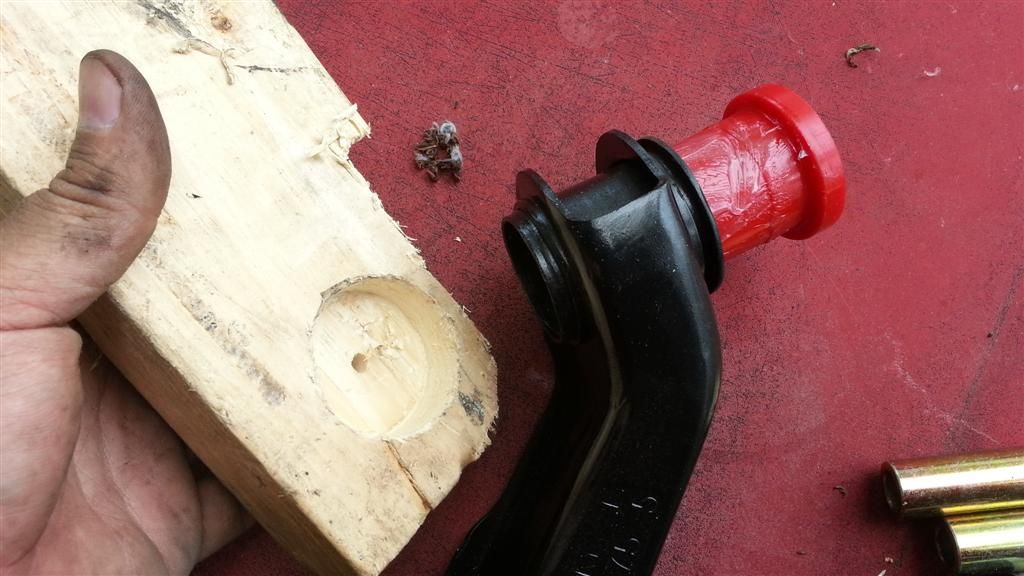
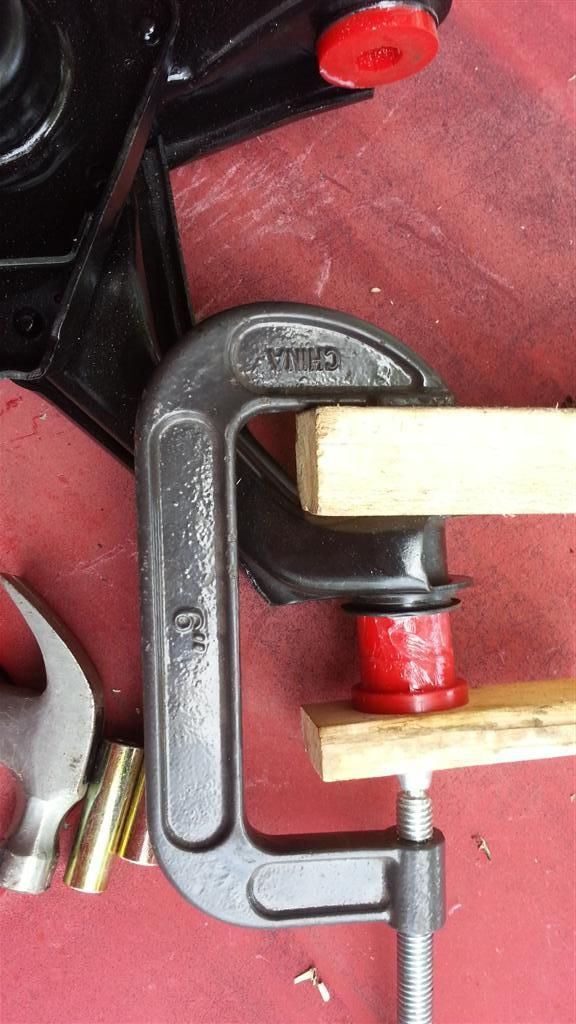
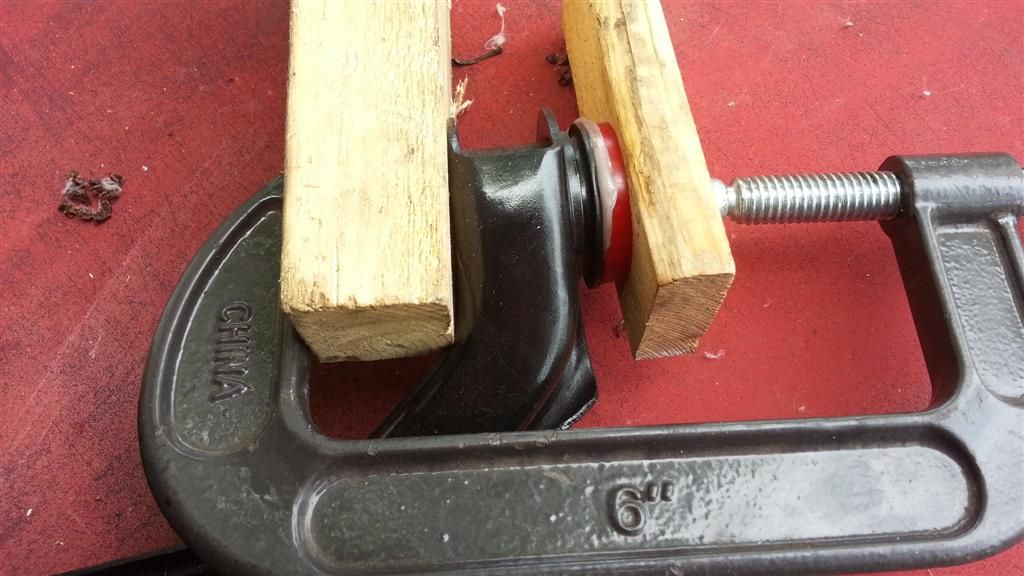
I'm sure that there is a toolkit for pressing bushings in... but since the wife calls me her "Asian Hillbilly", here are my tools to press the bushings in. Piece of 2x4 with a hole cut in the center, 6" clamp and another piece of wood. Can you get a cheaper tool?
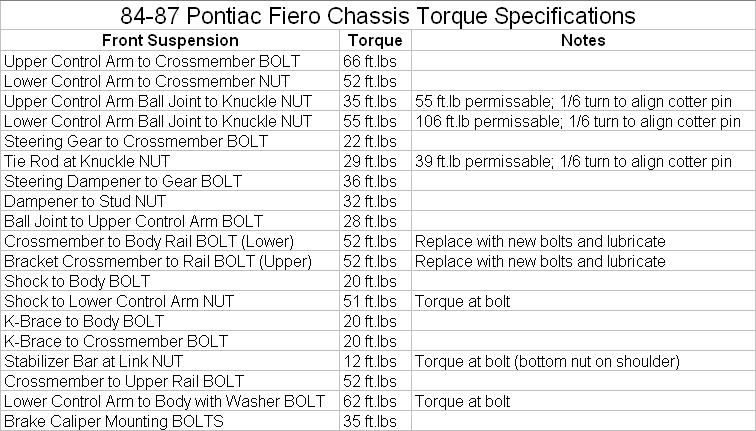
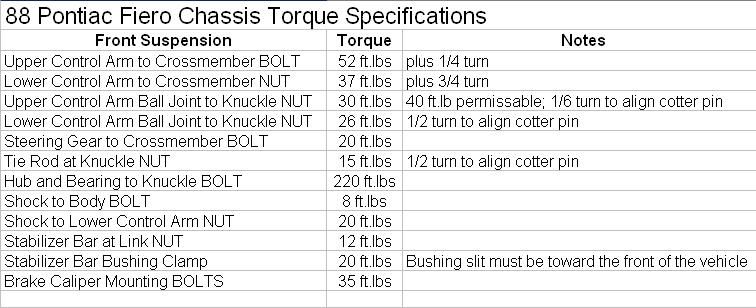
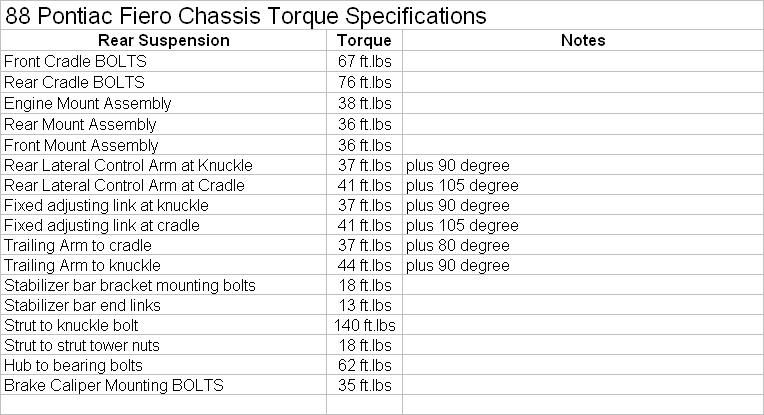
The 220 ft.lbs. for the hub/bearing bolt into the knuckle is horribly wrong. I'll have to dig for the correct value. It's more like 62 ft/lbs. (Same as the rears.)
From the 88 Service Manual
[This message has been edited by MulletproofMonk (edited 05-12-2024).]
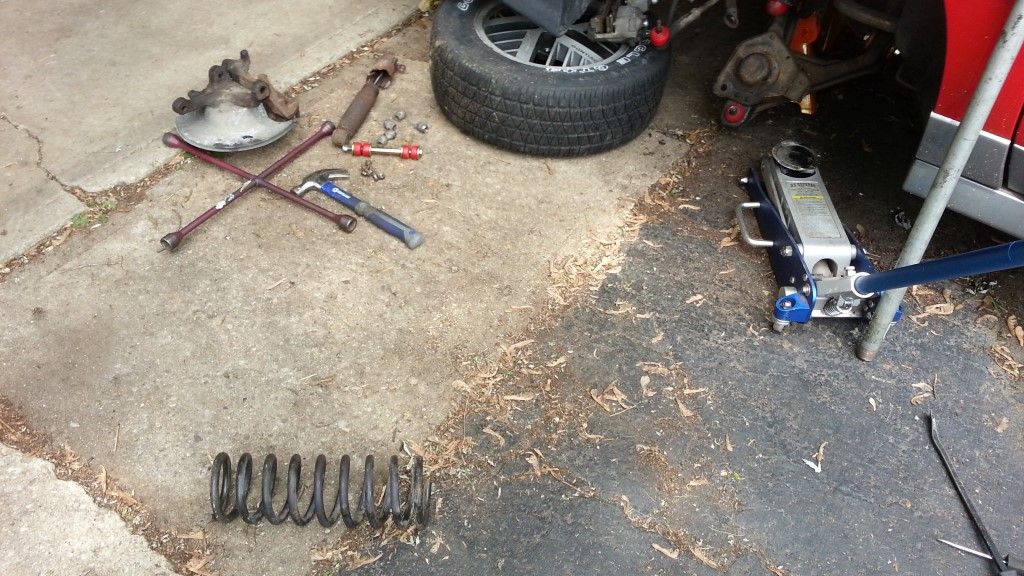
So, I keep hearing about the front spring jumping out and biting you or giving you rabies or laying its eggs under your skin or some other pile of hot garbage. This hasn't happened to me (yet). So, I decide that I want to see what all this brouhaha is about. As all good internet videos start out, "Hey Y'All, Watch This!"
BTW, the spring is sitting 4 feet from the lower control arm and only stopped because of the rolling mechanic chair I had my phone on. I have seen the light, use something to secure that spring before you pop it loose...
BE SAFE
[This message has been edited by MulletproofMonk (edited 05-30-2013).]
Originally posted by sniper69: Could the old bushings be pressed out with a hydraulic press?
If I had a press...
So... While I was sitting around pissed off because I tore another steering rack boot getting the control arm bolts out... and I noticed this in the service manual... It shows putting the front bolt in forward so you don't hit the boot. I can only assume that they installed the bolts one way at the factory and changed it in the service manual. I haven't seen one Fiero with the bolts going forward yet. Of course mine do now...
Originally posted by MulletproofMonk: UPDATE link on 5/23/13 Install that =http://hhttps://www.fiero.nl/forum/Forum2/HTML/094633-2.html#p43]Dodgerunner belt tensioner while the control arm is out to give you more room to work.
FYI the above link in this post on page 1 doesn't work, the "http://" part is messed up as you can see in the quote (I removed the URL tag so you could see where the problem is).
Great tutorial btw.
[This message has been edited by benoitmalenfant (edited 08-31-2013).]
The 220 ft.lbs. for the hub/bearing bolt into the knuckle is horribly wrong. I'll have to dig for the correct value. It's more like 62 ft/lbs. (Same as the rears.)
Hell of a writeup. I'm surprised I've never seen it before. Thanks for taking the time!
[This message has been edited by Raydar (edited 09-02-2013).]
Originally posted by benoitmalenfant: FYI the above link in this post on page 1 doesn't work, the "http://" part is messed up as you can see in the quote (I removed the URL tag so you could see where the problem is).
Great tutorial btw.
Fixed and thanks for the compliment. It has been a long process and gets updated if I find something new (or easier) doing another upgrade. Hope to post some pictures of the 88 cradle when I get the time...
Originally posted by Raydar: The 220 ft.lbs. for the hub/bearing bolt into the knuckle is horribly wrong. I'll have to dig for the correct value. It's more like 35-45 ft/lbs. (Same size bolt as the caliper, IIRC.)
Well, according to the 88 SM:
Front Suspension(Page 3C-5)
5. (Tighten) Three bolts attaching hub and bearing assembly. Torque to 260NM (220 lb. ft)
SM might be wrong though.
[This message has been edited by benoitmalenfant (edited 09-01-2013).]