Usually when the blinkers wont flash at all, it's due to one of the bulbs being burned out. However, with LED bulbs being in the circuit, it may change things. Sometimes, LED bulbs require an Electronic Flasher in place of the stock Flasher solenoid.
There's another way of fixing the problem, you put in some sort of resistor in. I'm not sure if runs in line or if it runs tandem. But please see below!!!
quote
Originally posted by mr_corean:
What's the plan for new shoes?
No clue yet. That's so far off my radar at the moment. I think it'll eventually have aluminum rims, stock sized. I'll probably focus on that in 2018; my retirement gift to me! Right before it goes on a trailer for my next destination haha
Like I said to Mike, I fixed the blinkers. My problem was in the blinker capacitor underneath the steering column. I removed that and switched it out with the hazard one. I'm not sure what the rhythm is supposed to be, it seems a little quick, but then again I do have the LEDs in the back with a resistor. I'm not sure if I have the resister wired in correctly though.
Like I said to Mike, I fixed the blinkers. My problem was in the blinker capacitor underneath the steering column. I removed that and switched it out with the hazard one. I'm not sure what the rhythm is supposed to be, it seems a little quick, but then again I do have the LEDs in the back with a resistor. I'm not sure if I have the resister wired in correctly though.
That "blinker capacitor" is actually the blinker/flasher unit. With the LEDs I agree with the others and say go get a "electronic" blinker/flasher unit. Normal ones are a "thermal" flasher, they get hot with the current running through them and they trip and 'blink' You can get the electronic ones at autozone, not a rare part. It may or may not fix it, but you need one anyway as yours went bad, so you can't lose there.
For your window alignment,.. we have doors apart or close to at the shop you can come look at one/few for reference.
I did feel the blinker module and it did feel hot; I thought that was normal operation. If I put in an electric module, do I need to get rid of the resistors?
I went over to the shop today, the gent was parkinghis rig; I needed a reference photo. I'll most likely be over Wed afternoon after a doc appt at Nellis.
So tomorrow, around 9 Pacific, I'm going to go on social media of the Face and do a live stream session and give a tour of my car. I'll answer any questions if I can and if the experience is there, ask questions for myself. I have the same handle if you'd like to tune in.
Sorry, it’s been a while since I’ve last posted, but it was a busy summer with slow progress. However, with the end in sight and cooler weather in the future, hopefully I’ll be getting back into the swing of things.
When fierostore.com made a push late July for more photos for their calendar, I tried to get some in; however, it was late at night, my wife got her stuff out to take some shots; but time unfortunately beat us. No worries, the car just isn’t ready for that yet. Here are some shots of us taking shots.
I helped Mike (darbysan) install his new 3800 motor into his car; he had issues with a Series I and put in a L67. We had his cradle stabbed in about an hour; good times, good learning experience, great person. Hopefully he won’t have the anomaly that he had with the old engine! He had no use for these seats and kindly gave them to me; mine went to Nate (mr_corean) and hopefully he can use them. They’re much more comfortable than my old ones.
Another project that I worked on was securing the lower end of the rear fascia; it was wobbly. I also have to further secure the exhaust system; I’ll do that in the near future. I also had an issue where I was popping fuses from the alternator to the battery. I read on here somewhere that it was a good idea to have one going inline but then I also talked some people and they didn’t have one; so I took it out. It also gave me an opportunity to start setting up for wiring up power windows, mirrors, and locks. To clean things up, I also wanted to get rid of the fuse block on the motor and bring those components inside the crew compartment. I ordered a separate fuse block and did just that. Later on, I’ll be better prepared to put the battery up front with this setup as well; but that’s a project for next summer.
It's a little messier than I want it to be, but I'll eventually be cleaning it up. The black cable is coming from the battery to the alternator. The red cable runs into the passenger compartment for the new CJB with an 80 amp fuse inline.
Speaking of windows, earlier, I mentioned that my passenger window seemed to be jammed and out of whack; and I think I found out why! More to come on that. With new motors in hand, I set to disassemble the door guts. I was able to move the glass down to the bottom and unbolt it from the regulator assembly and then drilled out the rivets. Unbolted what needed to unbolt and stumbled upon these shenanigans:
I think this is supposed to be straight? That explains a problem or two; fortunately, I had a door out back; though manual, seemed to look legit so I yanked it out. Now I’m onto reassembly. I was kind of clueless as to how the motor correlated with the gear and spring assemblies, but after consulting a couple of people, I should be good to go with this.
During disassembly, I noticed something funny with my wires; the brown wire got caught somewhere and was internally damaged. Unfortunate that it had happened, fortunately fixable. I’ll whip out the ol’ soldering iron this weekend to do just that. Once both window motors are in place, it’ll be time to start wiring them into the car. Since the car wasn’t wired for any of this, I have some liberties as to how I can do it. Matt (fierobsessed) uses relays to power his; I will be following his lead. So, my next venture to the local pick-a-part will be securing three relays (2 for windows and one for the door locks) and go from there.
Another project that went down this summer was to cover up some ugly holes in the front fascia and fill in some of the blank space in the rear light panel. What I did there was made my own emblems; I cut them out of some .040” aluminum and painted them using some of my leftover paint (I also repainted my light panel, hood, mirrors, spoiler and door panel) They’re a little smaller than what I’d hoped for, but I’ve started making larger ones. Unfortunately, I’m out of paint so I’ll have to figure something else out.
I also put in the electronic flashers, all lights work well and should last for years to come. That's it for now, as usual, more to come. I'll be spending the weekend pulling the doors apart and putting them back together and tidying up wires. Please stay tuned and chime in if you feel like it!
Hard to tell from the pics, are your lic plate lights green? Because in NV lic plate lights have to be white.
In the picture, they're green. However, with a flick of a switch on the dashboard, it switches all of the green LEDs to white. Thanks for the NV law tip; I'll either have to get NH (my home state) plates or put another switch in somewhere to ensure that the license plates stay white!
quote
Originally posted by sardonyx247:
What are you putting that 80 amp fuse on? because fyi the rad fan pulls about 80 amps to start it spinning then drops to about 18 running.
The 80 amp fuse goes from the alternator to my new fuse panel in the center console. I'm not sure if I need it; if I don't, I'll go ahead and rewire it. The three fuses that are in the new box are for the fuel pump (hotwired,) a couple fusable links that came out of the C203 harness? (or near that area) and something else engine related. Power for the windows, locks, and mirrors will eventually come out of this box. The wires for the radio are practically non-existant, I may tap into that here as well.
quote
Originally posted by sardonyx247:
Did that Fiero not come with PW PL?
No, the car came with manual doors. I'm putting in all the stuff to make it electric. The power will come from the new electric box and I'll just build the necessary harnesses to make it work.
An A/C alternator is rated at 94 amps, plus uses a fusable link as it can take surges that would pop a fuse, I would go with a fusable link off the alternator or a higher amp fuse than 80 amp. Also if you look way up under the dash by the fuse box on (most Fieros) there is another panel you can tap for power, as that is where GM did, just FYI.
Not some awesome day today, I've put the window back together. The window only has about 1.5" of up and down motion. It's all the way down right now but will have full function if I take the actual glass out. I did not use rivets to install the regulator, I've used 1/4 inch screws with a 1/2 grip length. It must be my fasteners or a bad track. More investigation and pictures tomorrow. Any other things I should look for? Thanks
Check the bolts you used to attach the regulator to everything. I had a similar issue and it turned out one was a fraction of an inch too long. I shaved off about a threads length and all was good.
Check the bolts you used to attach the regulator to everything. I had a similar issue and it turned out one was a fraction of an inch too long. I shaved off about a threads length and all was good.
That's exactly what happened in this instance! There was one of the four bolts that was interfering with the regulator's gear mechanisms, I took it out and it now goes up and down. I've got some 1/4 inch rivets to put in its place, once I get an installer, I'll go ahead and shoot it
Adjusting the window's pitch and lift height has been a challenge. I've stripped a couple of fastener threads, but fortunately, they're in areas where I can easily access them and install nuts and bolts in their place. I've got the window lift height almost fixed; the top of the glass is about 1/8th inch of sitting in its seal. The window seems tight against the seals but it's a lot better than what it was. The tint on my glass isn't tearing anymore but I'll have to re-do both sides.
The motor on the driver's side is this weekend; once that's done, I'll put the outer doors back together and commence building the wire harnesses for the windows and door locks.
Have to put some new brakes on the Wife's car first!
It's been three months since I've last posted, I apologize about that. It's been slow goings but I have got some done during that time. I'll have pictures soon.
Power Windows: As the car was not equipped with them when I bought it, I changed out the door frames with ones with power windows. There weren't any wire harnesses coming out of the fuse boxes/carpets/console/etc so I built one and put it in the fuse block that I added near the ECM. Power to the windows goes through a relay much like how Fierobsessed has his. They also needed a considerable amount of rigging/adjustment. I have one foreseeable problem though, the driver's motor is extremely loud when it raises the window into position. It's a new motor, granted, it's from ebay, but the one on the passenger side was bought at the same time and makes a quarter of the noise. I wonder if I didn't load the spring enough. Has anybody else had this issue?
Power Locks: Once again, the car came out of the factory without this feature, so I added it. I had to build a relay and a harness for it. I deleted the switch out of the doors and it now sits near the power window switch. I currently have two challenges with this; one, the motors are weak. Two; this goes for the windows as well, the switches I have are generic and are wired in to have power all the time. They're also illuminated when hot; therefore, they're always lit. Until I figure this one out, I've put a toggle switch inline to cut the power when I don't want it. In the future, I believe that I'm going to turn this toggle switch into a "push down for power" switch to power the features when the car is off and override it with power when the car is on.
Chin Scoop: I couldn't get the car out of the driveway without scraping the poor fiberglass chin scoop along the concrete so I deleted it. In it's place, I had a piece of steel sheet added with some aluminum extrusion providing stiffness and supporting it to the car's framework. When it comes time to add an intercooler, this will be strong enough to hold it. That's year(s) down the road. I'm not sure if I'll need an air dam below this or not. I've only had the car up to 30 mph in my housing development
Side Scoops: In earlier pictures, you'll see that I cut holes out of the side scoops of the car. They provide me with a massive blind spot and I'm trying to reduce that. I went to Home Depot and bought some cheap Lexan and covered them up. Unfortunately, they're frosted so visibility is slightly improved. I'll get some smoked acrylic soon and it'll look much better.
Windshield Washer: Motor died, replaced as required. No real excitement there.
That burning smell: So I had the car on the road running for about minutes and noticed that burning plastic smell coming from the back of the car, opened up the trunk and there was a little bit of smoke. After some digging, I noticed that the exhaust assembly was touching the rear fascia and most likely the culprit. When I let everything cool down, the bottom edge of the fascia is a bit warped, the paint is still fine (phew!) so I pulled built some brackets to further secure the exhaust assembly and pull it away from the bodywork. Seems to do the trick; I've got about a 3/8" gap. I don't have a heat shield for my trunk yet, that is coming. I'm going to extend it down along the fascia and possibly make an air scoop to force more air into the engine compartment.
Future Challenges
Horn: A little back history on the car, when I bought it, there was something wrong with the key release system in the car and I replaced the steering column because of it. I believe that it came out of an automatic car as there's no key release switch. I couldn't tell you what year it came out of as it was just a column that was just hanging out at the junkyard. The horn never worked with either column and I found that the relay was missing. So I picked one up and installed it this weekend. No luck, that wasn't the fix. I troubleshot the wiring at the relay and constant power is there. No power coming from the switch terminal when pressed. There's a horn that works because I jumped the terminal and she tooted loudly! I went back to the steering column and noticed a couple wires disconnected, but I can't find where they connect to. By chance, does anybody have a picture of that connection? Or even, can anybody tell me the colors of the wires? It'd be greatly appreciated.
Trunk release switch: Once again, the relay was missing so I added it in hoping for a positive result. Unfortunately, it's a no go. There's no signal coming from the switch and no constant power. I've read on here that the system on the 88 is incorporated into the parking brake system, I would assume that interrupts the switch's signal not the constant power. I can and will fix this to my liking by possibly rewiring it. I'm not sure if this car was originally equipped with the system, I added the switch myself and the wiring was there, but the car was converted from a Formula to a GT by a previous owner. So, who knows!?
Cruise Control: I have yet to wire it up. Need to pick up a bracket for my box and put to together.
Steering Column: Speaking of steering column, I don't think it's aligned right. The wheel, when driving straight, is not centered. I think I'm a little off on the installation, I'll have to pull it back and re-center it.
quote
Originally posted by mr_corean:
What's the plan for new shoes?
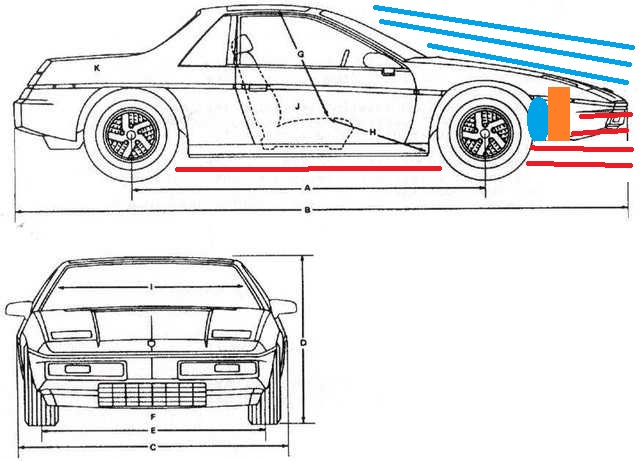
This is my biggest fear/challenge. I didn't put too much thought into this before, but the passenger wheel sticks out about 1/4 inch from the wheel well. The driver's side sits where I believe where it should be.
At first I suspected wheel offset but I also threw this on the Las Vegas Fiero Club's Social Media site and somebody came back suggesting toe in. I'm hoping it's something like that. Hopefully it's a simple fix. When I bought the car, we took four rims out of the yard, the tires were all flat and had holes in them. I replaced the rubber with used tires from a local shop and I see dry rot in the tires. I have no idea what is on the car when it comes to year, offset, original position, etc. My plan of holding off on buying new wheels and tires won't happen, I should be getting new shoes for the car soon.
Hopefully in the next month or so, I'll get some, if not all of these issues resolved along with hooking up the e-brake and getting the side markers installed. I hope to be ready for the Las Vegas Fiero Drive in March Thanks for reading!!!
For a manual car, re: the trunk release, the hand brake, when engaged, supplies ground for the relay. That's if the wiring to the handbrake is good. Mine was bad, so I bypassed it on the relay. When you hit the upper part of the trunk release button, it fires the relay. In the trunk, the ground for the release solenoid is achieved through the trunk hook on the body. If the trunk is not closed, the solenoid will not fire. HTH
For a manual car, re: the trunk release, the hand brake, when engaged, supplies ground for the relay. That's if the wiring to the handbrake is good. Mine was bad, so I bypassed it on the relay. When you hit the upper part of the trunk release button, it fires the relay. In the trunk, the ground for the release solenoid is achieved through the trunk hook on the body. If the trunk is not closed, the solenoid will not fire. HTH
I'm not even getting power at the relay so I don't know what's going on. I'm going to test the part of the circuit between the relay and the solenoid tomorrow and pump voltage from the relay to the back of the car. If it works, I'll make my own system to incorporate the switch and constant volts!!
About the horn, the wire to the steering wheel is hot from the relay. When you push the horn button, it grounds the wire.
Thanks for the info. I think my problem is going to lie between the horn button and relay. I have constant voltage coming out of one of the terminals in the relay. The second terminal sends power to the horn and I get nothing out of the third. I'll take apart the horn button tomorrow and see if I have voltage there to ground. If I get voltage there, I can safely assume that the button/assembly is shot, if not, I'd like to assume that the connector from the car to the steering column isn't installed. I just don't know what that one looks like or what color wires to look for.
quote
Originally posted by qwikgta:
any idea what ground effects are on the car. Can you get a better shot of them, thanks
Not sure where they came from, they came with the car. They're made of fiberglass. I'll get some photos for you tomorrow.
Troubleshot the trunk release problem today; turns out that the switch is shot. I was able to jump it at the swtch and all worked as advertised.
Originally posted by solman105: Troubleshot the trunk release problem today; turns out that the switch is shot. I was able to jump it at the swtch and all worked as advertised.
Common problem. Mine was broken as well. There's a small tab on the rocker part of the switch that gets broken off--I think when folks push on the bottom part of the switch instead of pushing just on the top part. It's not real obvious to push only on the top, and it seems more intuitive to push on the bottom. I tried gluing the broken piece back on, but no joy.
------------------ '87 GT , '00 3800 Series II SC, 4t65e.
On the trunk release switch, it only pushes one direction, if you can push it on both the top and bottom, the switch is broke, very common. Now the circuit is on when the key is "on, not running". Now when the car is running, THEN you need the park brake on for it to work, (It's so you can't bump it while driving)
If your steering wheel is not straight, then your alignment is off or not centered to the wheel. There is no adjustment in the column or wheel.
Here is a horn circuit. I do not know what year this is for, but the colors should be the same.
Thanks for the info Dave, I really appreciate it! My trunk switch is definitely shot, it rocks both ways and no voltage flows when it's supposed to. I'll have to make a trip to the yard soon to get that among other things. I'm looking for a driver's side quarter panel rounded molding, an intake screen, and now these parts. Also, I found what I think my problem is in the horn this morning; I popped the horn button off and the contact and spring weren't there! There looks to be a white plastic tube in there and it looks damaged, but if I repopulate what's missing inside that tube I may get lucky.
I was figuring it'd be an alignment issue, I was just hoping that something had splines and I could rotate it clockwise a tooth or two
My car is driving!!!! I got her registered Friday and took her for to the local grocery store for a loaf of bread. I'm trying to keep my revs and torque down, it's going to be a long 500 miles to break the clutch in. The darned thing smoked like crazy and got me worried, but then I forgot I never removed the 18 months of dust off of the exhaust.
The gears seem to mesh well; I can't imagine what it'll be with an F23 later on down the road!
My son got a kick out of it and hopefully it'll spur him into wanting to start building a car in a few years. (he's 9)
The one thing I worried about was the cooling system because I'd never seen the gauge move and it turns out that it still doesn't. The tachometer is a diva; it works when it wants to. Fortunately, I have a WiFi OBD2 adapter and can get that information on my phone. I am impressed with how the cooling system works; the motor will first heat up to 207 and then drop to about 180 degrees. After that the motor will rise to 200 and then drop down to 177.
My next stop was to a darbyan's house to service the air conditioning but found some other issues under the vehicle. First one, I forgot to tighten the front cradle bolts; oops! Second, the wire harness above the rear driver wheel was chaffed through a couple wires but after doing some diagnosis on the rear lights we found it to be negligible and fix another day. And sadly, my compressor was bad but fortunately, Mr_corean had one to throw in and it was a match. In removing the part, I noticed one of the idler pulleys in the supercharger system was loose so I tightened it down. With help from good friends, the car has a good a/c system! We also tried to fix the parking brake system but diagnosed the lever as bad; it won't ratchet and lock into place. Something to look at later on down the road.
Still pondering how to fix the rear wheels; the right wheel sticks out considerably more than the left. The actual wheels themselves look straight and true so I'm wondering if I can shift the cradle slightly left and resolve that issue. Being a junk yard car, the rims may be from other year cars; meaning, I could have an 88 front in a rear position or something crazy like that. I have new wheels coming and once they go in, I'll be able to rule that out.
Rear of vehicle
Here's the passenger wheel from the rear
From the top looking straight down
Driver wheel from the rear
Driver wheel from the top
If anybody has any ideas, please feel free to reply. I'd greatly appreciate it.
So far, I've put about 90 miles on the car, loved just about every one of them! Got some things resolved in the tire department when I bought four new wheels and tires. The passenger rear tire isn't sticking out as much. I am running into a few other problems though, if anybody could help out, it'd be greatly appreciated.....
Coolant Fan- It seems that when the car gets to temperature, the coolant fan will turn on and won't turn off. I don't have the air conditioning on and the fan is only wired into the PCM's low speed fan port. The cooling system is happy because the OBDII readout on my phone tells me that the motor stays around 185-197 degrees. You can see the moment when the thermostat opens! Thought that was cool.....
My temperature gauge, I think, is shot. It's never moved. I used phonedawgz's wiring schematics on page one of this thread to wire it up. I verified it with sinister performance's page as well. I haven't used the A/C system so it's stayed off. When we ran the car to fill the A/C system, the fan would turn on and off like assumed normal; I've yet to try it again at idle. Any ideas? Bad sensor? If it were the sensor, wouldn't the PCM be giving me false information through the OBDII reader?
I've bought a ballast resistor and relay; I plan to make the fan low and high speed, I just lack time (maybe Thursday/Friday) Not sure if this will resolve anything.
Clutch- Ok this one freaked me out a bit, but I think I resolved it. I was decelerating from highway speeds and something in the driveline momentarily locked up and then broke loose. There was a smell of clutch so I assumed that's where it was. Got her home and checked the fluid level and she was way low. Topped her up and didn't have the problem today when I took it to my local park and ride. I assume that was the problem; I'm still breaking the clutch in so that kind of worried me........
#6cyl misfire- When the car's cold, it'll throw me a #6 cyl misfire code but run normally. After clearing the code, it won't throw it again. Figured it would be either a cold/dirty injector or a faulty coil. Replaced the coil but it threw it this afternoon on it's second drive. Figure its the injector; I'll fill her up on Friday and throw some cleaner in with it.
Tach is still a diva, moves when it feels like it and the temperature gauge, like i said, doesn't work. The PCM is receiving an input and I can live with my phone telling me both these readings for now.
If anybody has any input, please, chime in if you can. Thanks!
Did you change the temp sender? Stock 3800 one may have had ECM output plus "light" vs one with ECM output plus Gauge. You can measure the resistance of the sender pin. Should be about 2.7K ohms at ambient temp. Also, have you done the "Temp gauge Fix"? If so, it may make a difference on where you input your wires on C500. Depends on whether the swap was done at the gauges, at the C500, or at the sender.
Did you change the temp sender? Stock 3800 one may have had ECM output plus "light" vs one with ECM output plus Gauge. You can measure the resistance of the sender pin. Should be about 2.7K ohms at ambient temp. Also, have you done the "Temp gauge Fix"? If so, it may make a difference on where you input your wires on C500. Depends on whether the swap was done at the gauges, at the C500, or at the sender.
I thought that adding a ballast resistor to the existing wiring and adding a second relay for the high speed fan signal out of the ECM would have resolved this but this morning as I drove to work and the fan still kicked on, at a lower speed.
I began to wonder at what temperatures the fans kick on and off so I consulted Ryan at Sinister Performance who programmed my ECM. Here's how he programmed my computer
Fan1 on: 192 deg F Fan1 off: 188 deg F Fan2 on: 212 deg F Fan2 off: 208 deg F
So, with my 195 thermostat, the fans would constantly be on. So, I've disconnected the "Fan 1" signal.
You'll likely still get an error. Rather than disconnecting the signal wire, disconnect the low speed power wire from the relay to the fan. The ecm looks for the coil connection on the relay.
Took the FrankenFiero to work this morning and ran like a champ! It's a 70 mile round trip and the cold temps kept the car temperatures below 199*F
However, the problems started developing on my way home. When I got off the highway, the temperatures started spiking........207.....212.....the fan should have kicked on.....
Fear then developed; I did something wrong.....220......
I got home and the temp was about 230*F; put it in the garage and killed the motor.......the sounds of gurgling came from the front the car; it was loud......Looking at the overflow tank, the water level was well below add.
It turns out that I hooked my high speed relay up incorrectly; therefore, it didn't kick the fan on. I pulled the wiring apart and took the high speed relay out, of my circuit, but this time, I used the high speed signal and put it in the correct spot. Ran the car up and sure enough, right at 212*F, it kicked on. Just as advertised.
Big thanks to Ryan at Sinister for helping me out with this. Hopefully it'll survive our drive tomorrow!
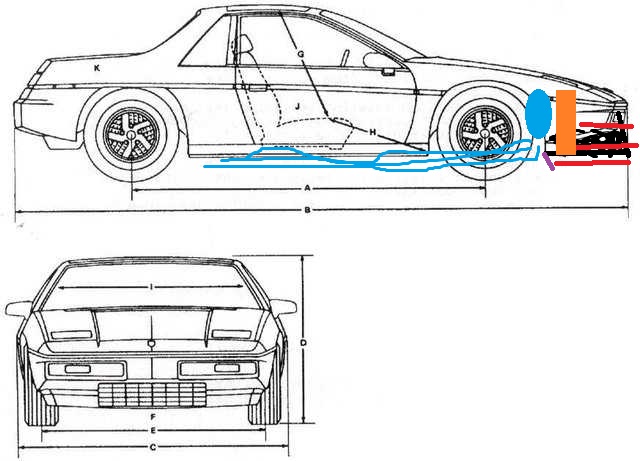
Time for some science. As I mentioned earlier, I believed that I had a cooling problem; and I have a few. I'm slowly knocking them out. The first problem was self-induced; the fan motor relay was improperly rewired and the car went very hot for a few minutes before I turned it off and the sound of an almighty gurgling came out of the front of the car. I fixed the wiring, bled the system and so far it hasn't done that since. However, it's not consistent and fluctuates between 203 and 220; and according to my research, it possibly boils down to aerodynamics.
As the car moves through the air, a higher pressure of air is created under the car than above it; much like how a wing on aircraft works. The area behind the radiator is also a lower pressure as the amount of air running through the radiator is far less than underneath the car. The hot air behind the radiator gets stuck back there so your radiator becomes inefficient. If I didn't have the reverse hood scoop, I think it would have been worse but I think that it's not long enough to actually be effective; the air pressure above the hood must be greater than behind the radiator.
The red represents the air flowing underneath the car at a higher pressure than what's behind the radiator (blue.) Therefore, I think it gets stuck back there
Higher pressure under the car as the air encounters less resistance than the drag above.
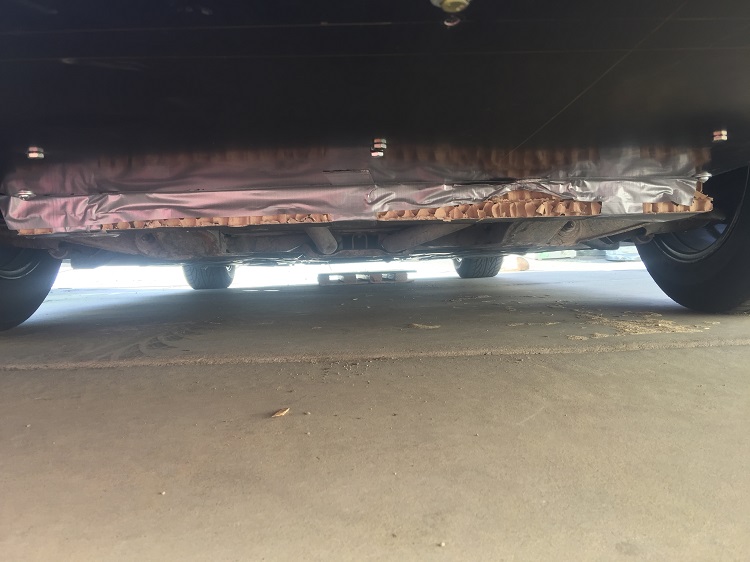
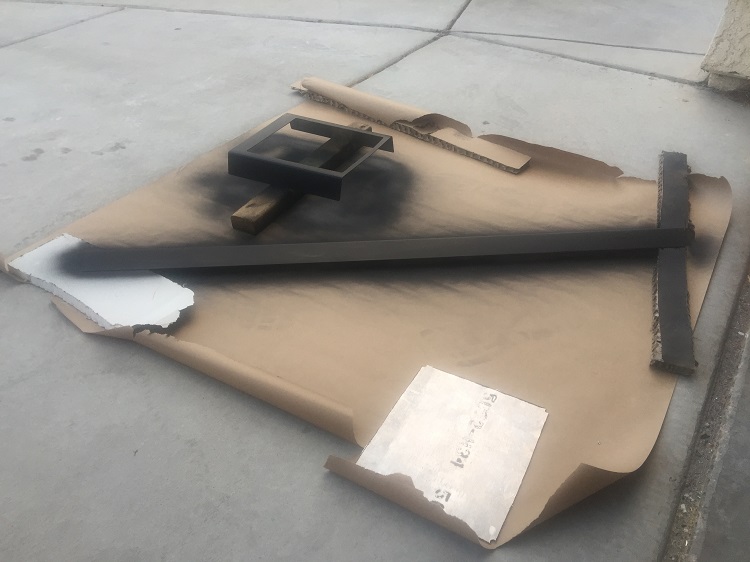
To test my theory; I grabbed some thick cardboard (they use this stuff to pack those Varidesk office things) and duck taped it to the bottom of my car. All in all, it protruded two inches below the car and in front of the radiator. Wouldn't you know, the darned thing worked! It kept the motor at a cool 196*F on the highway.........that is, until it fell off. Then it was back to bobbing between some hot and inefficient temperatures.
What happened.......
The purple bar represents my hillbilly fix drag bar assembly. It created drag just before the radiator which reduced the air pressure underneath that spot on the car and allowed hot air from the radiator to escape.
I made something more permanent back home; it's a piece of aluminum bent at an angle, the face is 2 inches tall and runs about 4 feet underneath the car. It allows the radiator to keep the motor at about 198* (195* thermostat) at highway speed, so I consider that a success.
So if you have a problem with your radiator not being and don't have a nose spoiler, try this. You may be surprised with the results.
The second cooling gremlin that I had was the heater core, after the overheat, it decided to start leaking. After reading on here that there were two different sizes, for the air conditioning core (the spectra 94498 model is a tiny bit shorter) I went ahead and ordered the Murrary brand from O'Reilly's. I received a spectra brand core in it's place, Murrary must not make them anymore. It was a little short but I did install it and it seems to be tight and in there.
Finally, my last cooling gremlin was the thermostat and once again, I have to thank the overheating issue for this. I just didn't feel "safe" with it because it opened whenever it felt like it so I popped a new one in. Seems to be working much better now.
My future plans for the cooling system are to upgrade the radiator and fan assemblies. I'll pull a fan off volvo and do the upgrade as mentioned here and go from there. I'm not sure what's supposed to be in the front fascia but it's a giant open cavity in there. I'm not sure if there are supposed to be walls on the sides of the radiators to reduce possible turbulence or what but it's something that I can experiment on. WAY later on down the line I'll be able to install an intercooler system on the floor of the area; if you look at the picture of my cardboard drag bar, the bottom of the fascia is black and flat. That piece of steel came from some office furniture and is ripe for upgrades (when the funds permit)
With the three core radiator setups come an integrated oil cooler for the transmission. With my car being a manual, it wouldn't be needed; however, could it be used for the motor with the help of a filter relocation kit? Has anybody done this?
Sorry for taking so long for update, but it's been an extremely busy couple of months. I'll try to keep up on it.
For your question about "ducting" inside the bumper to the radiator, yes, on a stock car there are fairly large rubber panels that basically create a tunnel from the bumper opening to the radiator. With your belly pan on I imagine they would be more effective than on a stock open bottomed car where their actual effectiveness is questionable at best.
For the hi vs lo pressure are, we may be saying the same thing, but here is my explanation of it. You are correct that the air flowing under and over the car is hi pressure air and the air flowing into the nose that is hitting the front of the radiator is also. Initially the area behind the radiator is lo pressure, but very quickly, like with in seconds of driving, it becomes a hi pressure area as well. The air flows through the radiator and then has basically no where to go from there. The high pressure air under the car keeps it there and the high pressure air over the car keeps it there as well. So essentially a bubble of high pressure air is formed there and eventually it balances out the pressure in front of the radiator so very little air is actually flowing through the radiator. This of course renders the radiator basically useless. When you put that lip under the radiator it breaks up the high pressure air under the car for a short distance. Doing a yarn test suggested about half way down the gas tank the high pressure air was back in contact with the car. This small window of lo pressure air formed behind that lip essentially creates a vacuum which then sucks the hi pressure air through the radiator and dumping it into that dead area where it picks up speed and joins into the flow of high pressure air halfway down the car. On the stock car there is a 4" or so plastic/rubber panel that runs the width of the nose right on the bottom of the radiator that does the exact same thing. If I were you I would ditch the aluminum panel since it can't flex and replace it with those plastic garden edgers from home depot. They will just bend on and speed bumps or whatever and will do the same thing. Like this. http://www.amleo.com/black-...ay6gywCydESF5J8Ff8LZ sIaAs4v8P8HAQ
It's been a rough couple of weeks for the FrankenFiero, a few Gremlins finally showed their face and some were kind of self induced.
1. Cooling: I went ahead and bought an aluminum 3 core radiator and installed it about 3 weeks ago and helped drop the stabilize the operating temperatures (at that time.) It also came with a cooling fan that claimed to move about 1800 CFM; it attached directly to the radiator. I tried to find the OEM fan's capacity and couldn't find much about it. Google failed me! I did however, run the car until the fan kicked on and it didn't seem to blow that much air.
2. Electrical: I installed an electrical distribution box inside the console for 12 connections; at this moment, 5 are being used (windows, locks, ECM power?, Fuel Pump, and aux power). There's a big red wire off of the alternator that powers this box.
3. Keys: I lost them all
So about a 2 weeks ago, I'd taken the Fiero to Home Depot; the window motors were sluggish and the electrical gauge was pinging all over the place. I come out of the store and go to fire the car up and no luck. The fuel pump relay makes this funny buzzing noise . Panic sets in; had to tow it home. I tear the interior wiring apart to find nothing. Replace the battery (it was old) still no luck. I lock up the car for the night and swear I put my keys in my shorts pocket.......they walk away. The following morning, I turned every stone to find them, no luck. Break in the car, no luck there either. I did press on with the origional issue and found that the big red wire was the culprit; there was a tear in the insulation that I think grounded out to the alternator.
So Friday, with new locks and keys on hand, I proceeded to change out all of the locks. Turned the car over and fired right up. Took it on a test drive and that's when the Cooling Gremlin decided to rear its ugly head. When I installed the radiator, the temperatures were 85* at its highest; yesterday, it was about 102. I put some gas in the car, it was running ok, until I hit some traffic. The coolant temperature creeped past 214 degrees and the fan kicked on. The AC system started failing and I could hear gurgling; I turned off the AC. The temps kept creeping up; 219......I killed the AC, got on the highway and ran it a few miles but still no luck. I made it to one of the casinos with covered parking, killed the motor at 229*F. I opened the bleed valve in the back and it blew out some air, turned the heater onto full blast and I drove it home. When I started for home, it started out at 220 and by the time I parked it, the motor was at 239. Four hours later, the engine was still warm but the radiator and motor were still full of coolant.
From that escapade, I can safely assume that the aftermarket fan I installed was horrible and I've lost all my refrigerant. This morning, I went ahead and put the original fan back in and followed mr_corean's advice, extend the lower air dam with garden edging. Now there's only about a 3" gap between the car and the ground. We'll see how it goes.
Sometime today, I'm going to run the car until it gets too hot. We're going to have another scorcher day so hopefully it'll be a good test of the cooling system efficiency. I hope that the AC system just over pressurized and all I have to do is replace the refrigerant. One problem at a time.
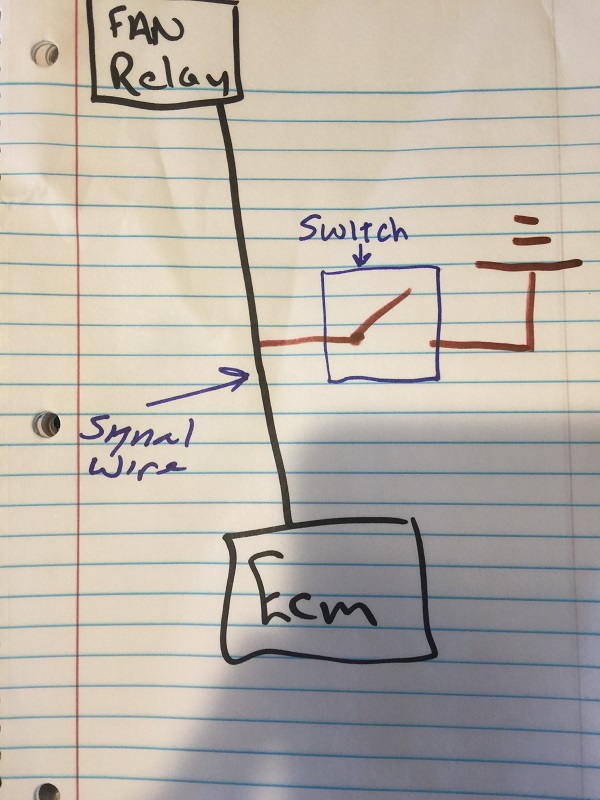
I'd like to do a couple of things to the fan circuit but I want to make sure that it won't affect the ECM. 1. I'd like to put a power switch in the front of the car to use the fan in emergency purposes to cool down the radiator when the car is off. 2. The other switch I'd like to put in is so that I can use the relay to turn the fan on when the car is running and when the ECM isn't ready to tun the fan on. My plan is to splitthe ECM signal wire and use a switch to ground which would turn the fan relay on. Would I damage the ECM in doing this? Hopefully this will give a better idea
Thanks for reading, any help would be appreciated.
** Edited to add reference picture **
[This message has been edited by solman105 (edited 06-04-2017).]
Can't answer your question for sure about the Fan wiring. I've done it on other cars, but not sure how the Quad driver in the ECM will respond to the new ground signal. Looking forward to hearing about this too.
As for the AC, be happy to help diagnose whenever you need help. Just let me know.
Can't answer your question for sure about the Fan wiring. I've done it on other cars, but not sure how the Quad driver in the ECM will respond to the new ground signal. Looking forward to hearing about this too.
As for the AC, be happy to help diagnose whenever you need help. Just let me know.
I posted this question to social media, someone mentioned that I should add a diode to the signal between the ECM and the relay if I go this route, I'll just have to find out how to wire it in. I think I'm going to buy in bulk, if you need one, I can help you out with that!
I would be very much appreciative to use your help in diagnosing the A/C system. I think with that fan I was using not pulling enough air through the system caused it to over pressurize and blow that valve in the compressor. Or at least I hope that's what happened. When those valves go, do they re-seat themselves for future use or are they done once they blow?
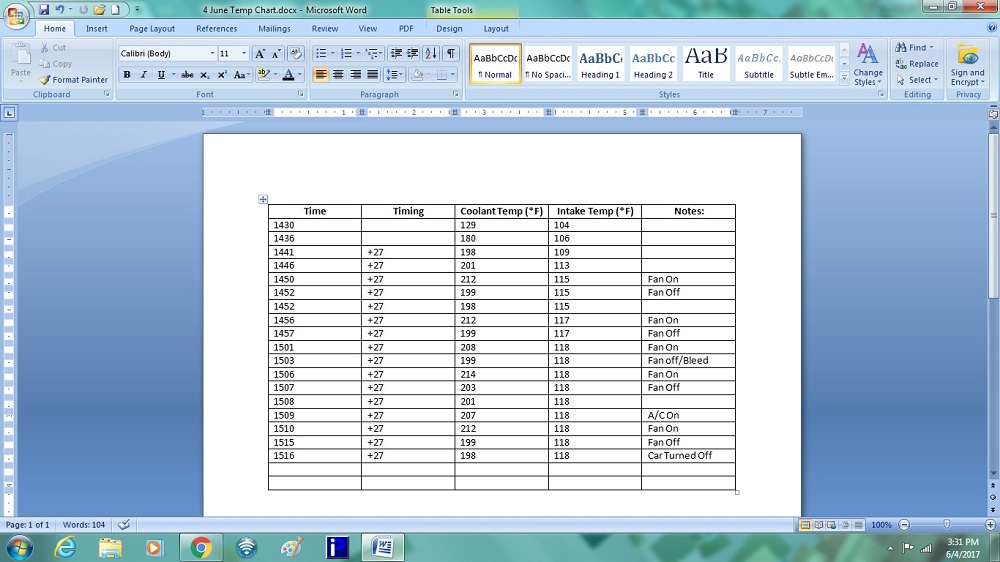
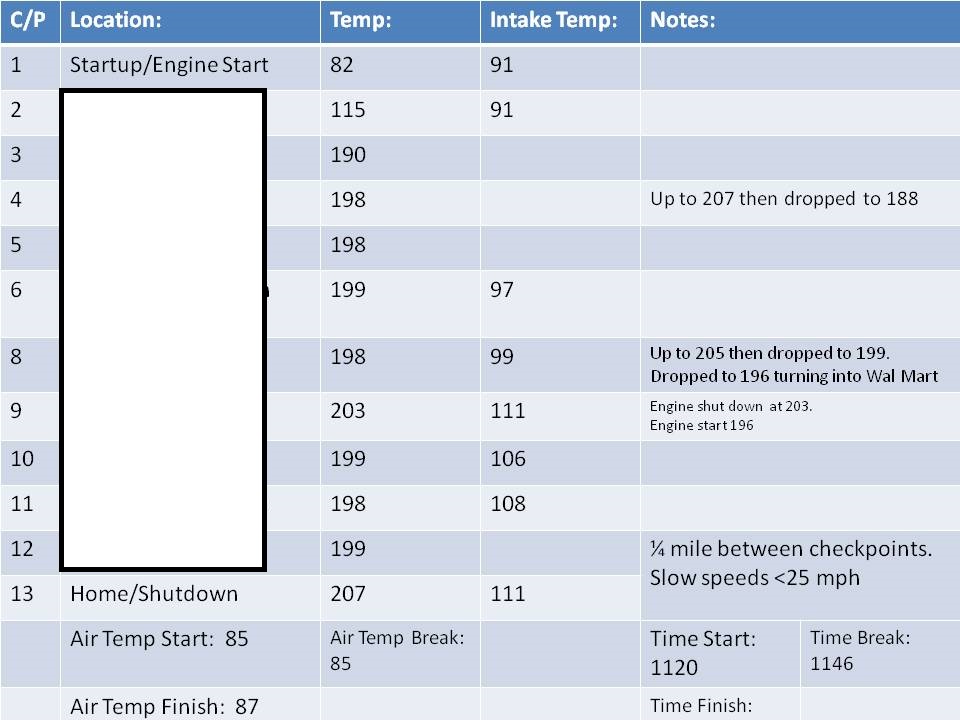
With the OEM fan back on, I ran the car at idle for about 40 minutes for an OPS check. Here are my results:
Seems to have done the trick. I'll take it for a drive later this week to see how well it does in real world conditions.
I also have to replace the clutch master cylinder and re-align the steering wheel.
Blowing the relief valve in the Compressor takes about 450 PSI+. It will reset once the pressure has dropped back down to normal levels, about 250. You will have lost some R134a, but not all. I've had it happen to me a couple of times while testing, but always when the fan was completely off. Any air flow should have been able to keep it below the kickoff point. Don't mean to insult, but could the fan have been wired backwards ( pushing vs pulling).
CFM levels of most of the aftermarket fans are guesses, and marketing guesses to boot. Amp draw is a good indication of airflow. Stock Fiero fans pull about 15 amps. The Volvo fan I installed ( 2 speed) pulls 15 on low, 21 on high. It moves some air!. The Mark VIII fan I had on my EL Camino pulls 33 amps ( 70 on startup!). That one pulls about 3500 CFM ( good testing on the net on that one). You can estimate airflow at about 100 cfm per amp of draw, so a 10 amp fan will move about 1000 CFM ( not at all scientific- just a good ballpark!) . A full shroud is also important too.
------------------ '87 GT , '00 3800 Series II SC, 4t65e, Vue Power Steering.
Blowing the relief valve in the Compressor takes about 450 PSI+. It will reset once the pressure has dropped back down to normal levels, about 250. You will have lost some R134a, but not all. I've had it happen to me a couple of times while testing, but always when the fan was completely off. Any air flow should have been able to keep it below the kickoff point. Don't mean to insult, but could the fan have been wired backwards ( pushing vs pulling).
I may have more of an issue than just a popped relief valve because there isn't any cold coming out of the vents. We'll see after I get the engine cooling system squared away. As for my aftermarket fan, I hope that I didn't put it in backwards, it felt that it was pulling rather than pushing. It's of no use in this application, I just don't think it was powerful enough!
quote
Originally posted by darbysan:
CFM levels of most of the aftermarket fans are guesses, and marketing guesses to boot. Amp draw is a good indication of airflow. Stock Fiero fans pull about 15 amps. The Volvo fan I installed ( 2 speed) pulls 15 on low, 21 on high. It moves some air!. The Mark VIII fan I had on my EL Camino pulls 33 amps ( 70 on startup!). That one pulls about 3500 CFM ( good testing on the net on that one). You can estimate airflow at about 100 cfm per amp of draw, so a 10 amp fan will move about 1000 CFM ( not at all scientific- just a good ballpark!) . A full shroud is also important too.
My aftermarket fan didn't have a shroud so I think there was an issue there; especially when it came to cooling at idle. I think this fan was rated at 12 amps and claimed to pull 1750 CFM so I think...I know now that it was weak!
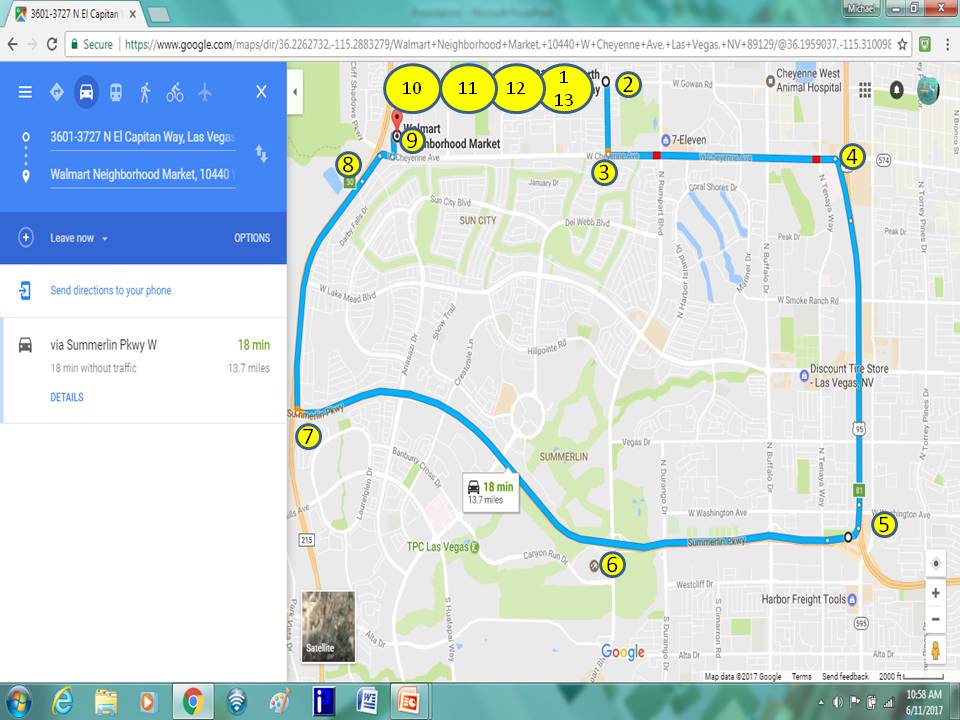
I wrote this during my lunch break today:
Thought I had the cooling system figured out, the late spring/early summer of Las Vegas proved me wrong. I took it to Wal Mart last night; the ambient air temperature was about 95*. I didn't bring my phone with me so I didn't have an accurate temperature reading from the ECM. I was only going out for 10 miles in traffic..
I got to my destination and the radiator fan wasn't running; I thought this was a good sign. When I got home, the fan was running, my curiosity got to me so I went in the house and got my phone, linked it up to the car and sure enough, it was at 217*. I then fired the car up, it ran idle for about 3 minutes and the car dropped to 200. I don't get it.
I have a few assumptions in mind but I'm going to assume that they're long shots.
1. The thermostat is new (< 3 months) It's a Murray 3849 from O'Reilly's. I DID NOT DRILL A BURP HOLE IN IT. Maybe there is an air bubble in it that cannot escape. Something I kind of regret now.
2. The new 3 core radiator came with an 11lb radiator cap. I used the one that came from my old radiator. It may not be the correct one. More to come. I just may replace it; they're just $6 at the local auto parts store.
3. Coolant temperature sensor. I don't really think that this is the problem; the computer is reading a temperature and the fan is kicking on and off.
4. There is a dent in the driver's side coolant tube. It's not crushed, just a 1/8" dent in the bottom bend of the front of the car. I don't think it's THAT bad, but you never know.
5. The upper hood scoop, is this causing a disturbance behind the radiator? Most hood modifications I see go into the hood, not come out of it. I doubt this is an issue but I'll block it off and see what happens.
6. My car is a diva....most likely the case.
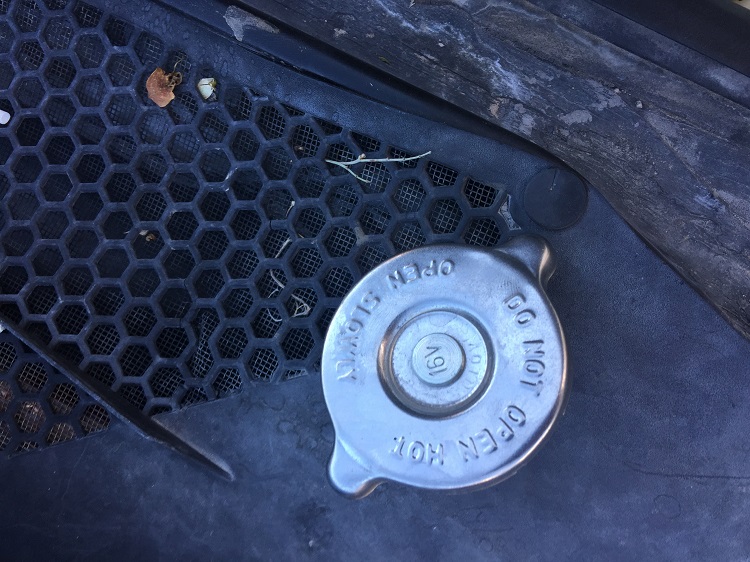
After I got home, I was reading Ogre's Cave and some forum inputs which made me decide to start with assumption #2; the radiator cap. It's the least labor intensive. For giggles, I went out to the car and this is what I found:
This MAY be the problem; I'll start with this. Also, I've experienced coolant loss in the back of the car but the holding tank up front is full. New caps will be in later this week; I'll replace them, top up the fluids and hope for the best. I still am not smart about vented and un vented caps; if both resist 16 pounds of pressure, what difference does it make?
Why would the cap cause the car to overheat when driving and be fine at idle? Does the system pressurize more when under a load causing the system to pressurize faster?
The 11 lb cap may actually be a 1.1 Bar cap (14.7 x 1 1= 16.17 lb). I have one at my fill point that is marked the same way. I think the cap at the radiator has to be a lower pressure number than the cap at the engine. This means that the cap at the radiator will release first, allowing radiator fluid to migrate to the overflow tank when too hot. If the cap at the engine goes first, then the coolant may be lost ( depends on how that fill point is set up on your swap. Need to block off completely any "burp" point).
You won't build much pressure until you go over 200+ in temp. The Vented cap you have, according to Stant, is designed to not allow pressure to build initially, but then when it sees steam or high temp water, it then closes. Meant to provide low pressure at idle or at first start- guess you can open this cap when the system is semi-hot and get no blow-back, since it is not yet sealed. Just to quirky for me. I would think about a 15 Lb cap at the radiator, and a 16 Lb cap at the engine.
For your AC, enough of the R134a may have leaked out to prevent cooling. It only takes a few ounces to kill the performance. We can fix this!
The fan definitely sounds like one of the "over-rated" fans. No shroud doesn't help either. I picked up a new Volvo fan on Amazon for less than $92, and it fits the stock shroud with some simple fab work. It definitely does the job, and is a 2 speed fan from the factory. Depo 373-55006-100 Radiator Fan Assembly .
I had bought a used Volvo fan at the Pick and Pull, but found out too late that the fan blade was cracked, throwing it out of balance. Cheaper in the long run to go new.
------------------ '87 GT , '00 3800 Series II SC, 4t65e, Vue Power Steering.
For your AC, enough of the R134a may have leaked out to prevent cooling. It only takes a few ounces to kill the performance. We can fix this!
If you are available next Saturday morning, can we make this happen? I have 4 cans of refrigerant, should be enough. I'm also going to pick up a can of top up kit as well.
I do think that I have the majority of the cooling issues sorted out; I replaced the vented caps with the non-vented. I took it out for a 5 mile trip on Friday and the temps shot up and i panicked; turns out that I had a huge air bubble. Bled the system again; let it sit 9 hours and drove it home and it was night and day. My temps stayed down and consistant!!!
So today, I ran another test; a 15 miler and I monitored the temps. She stayed around the 200 degree temps and I'm extremely happy with that. However, it took the thermostat to reach 207 the first time it opened.....I've had this problem with both T-Stats; is this normal?
Tomorrow, I intend to put 100 miles on it and that'll be the true test of whether I've got the issue sorted out or not. If so, I'll press on with the A/C system and my small laundry list of other things to do
Next Sat for the AC is fine. Just let me know what time. As for the Stat opening at 207, it's possible, since you didn't drill any bypass holes in it. The Temp sender is in a different location from the stat, so it could be seeing a slightly different temp until the water starts flowing. Assuming you mean the stat, and not the fan turn on temp.
------------------ '87 GT , '00 3800 Series II SC, 4t65e, Vue Power Steering.
An update on FrankenFiero She's still running, I've clocked about 4K miles on her since February. I've had more ups than downs with the beast, the worst one was having to have it towed home in July due to an electrical failure. It turned out that the power cable I have going into the passenger area chaffed out. With a quick fix of some electrical tape, she was back to running like a champ.
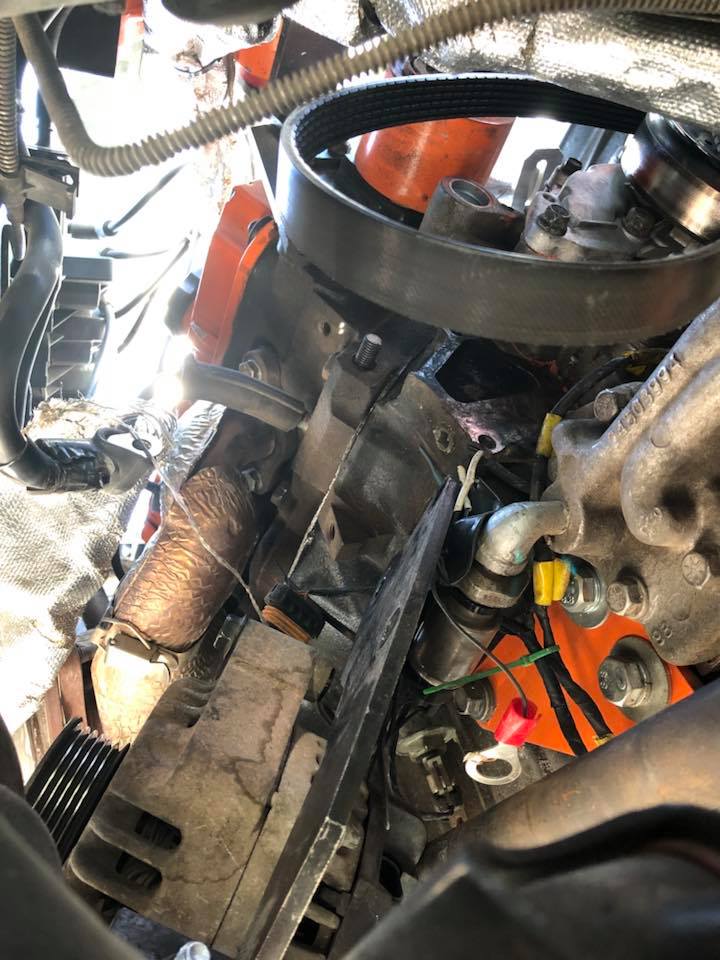
Something that always plauged the car was this constant chirping system out of the belt drive assembly. The supercharger belt that came with the motor was the one I was using, most likely, it needed a change. Using the Zone of Auto app on my phone, the supercharger belt called for was a -665. I replaced that and the tensioner; bad things came of it. Loss of power, slippage, and the darn noise didn't let up! I also noticed that the tensioner was moving tons more than the one on the accessory drive. Went to a competitor's store and they sold me a -663 belt and that resolved just about everything! I'll most likely go smaller when I hope to put a 3.5" pulley on.
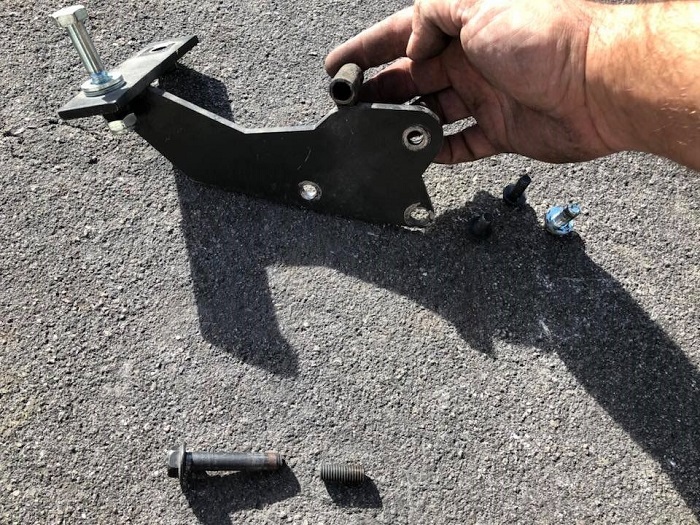
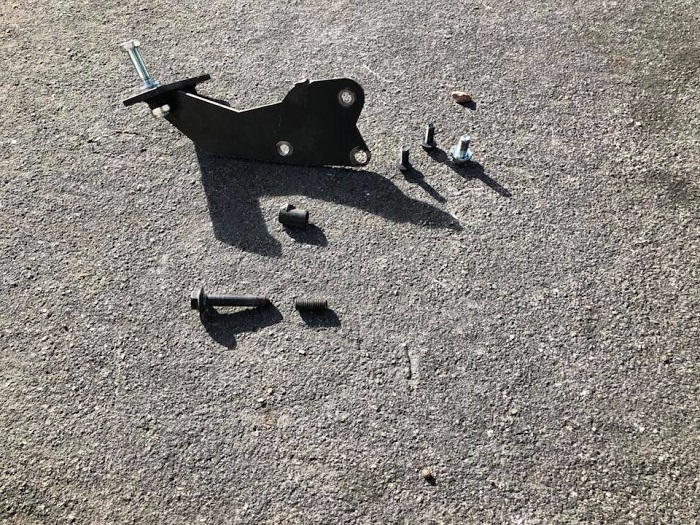
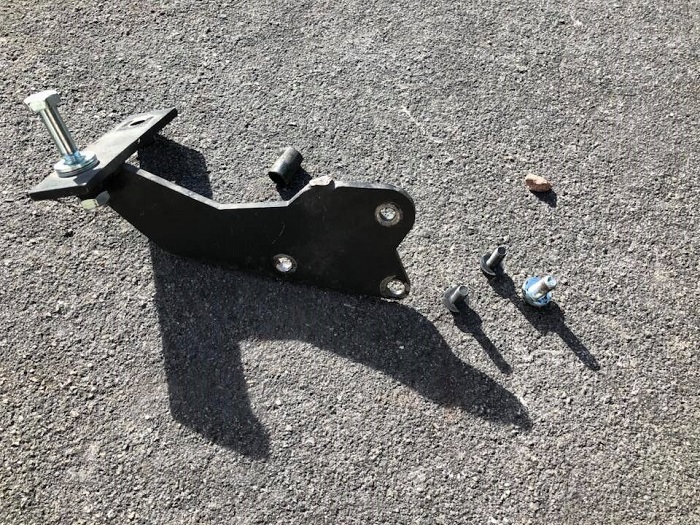
I also managed to break FieroRog's alternator bracket and the 80 MM bolt going into the block. The spacer welded to the bracket cracked off; most likely due to the bolt shearing off about 1/2 inch above the block. I asked Rog about it, he'd never seen this fail, so call me a first! I don't think it was product failure, I'm putting it down to operator error. To repair, I sanded back the welds, replaced the bolt and returned to service.
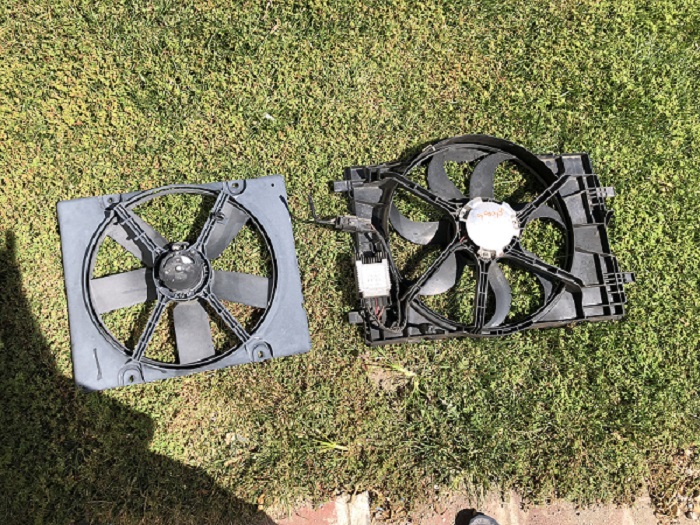
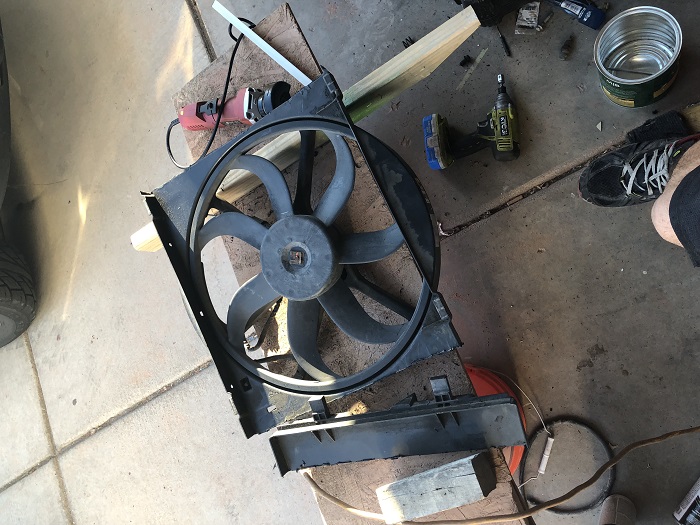
I resolved most of my cooling issues, the 100* + temps of the Las Vegas summer were brutal. My whole idea of blocking off the bottom of the front fascia went to the wayside so I could get more air into the radiator. I did start a cool (I think) project for a fan upgrade. I'm thinking with my thicker radiator I'll need something more powerful to move air over the cooling fins. On my last trip to the pick and pull, I went looking for a Lincoln Mark VIII fan; go big or go home right? I found one big fan.....real big.
The car that I got it out of was a Ford.....something. The body was cut in half and most of the body panels were gone, I only identified what vehicle it came out of by running a part number. It turns out that the fan is out of a 2006 Fusion, 3.5L. Thinking that I could just cut the fan out and apply it to the the Fiero shroud. I was hoping that the box that's on the side would control the fan with a high and a low speed.........no heavy modifications needed. Nope....the box has three wires going into it and the fan is HUGE. Using this fan would require some out of the box thinking.
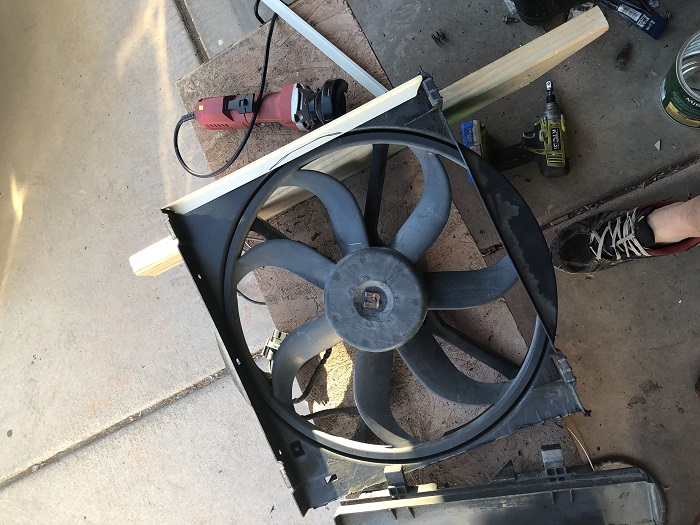
First....out with the cutter and trim the Ford shroud to size.
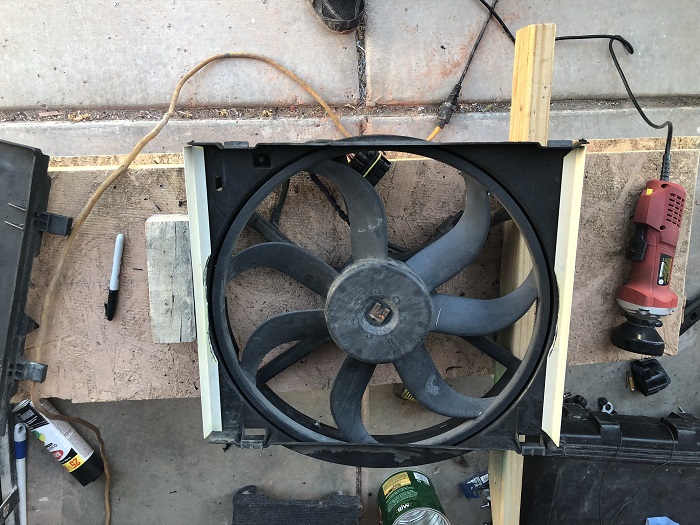
The next step is to figure out how to close up the sides; I had some thin aluminum L angles laying around so I tried those....perfect fit. I even notched the flange to accommodate the fan blades, just some final sanding and paint. I'll put these together with pop rivets and some sort of adhesive; seal the gaps with speed tape.
Another issue is securing this into the car. My idea is to fabricate a Z angle and have it slide into the lower radiator shroud mounts. The upper bolts will be used to hold it in, I have enough room so that it won't interfere with the fan blades. More to come!
With a more powerful fan comes an issue with wiring. My research for this fan calls out for a 60 amp fuse, I'm not sure if the existing wiring can handle it let alone the OEM relay. I configured the car for a dual speed fan though the high speed is the only one plugged in. I'm going to run a stronger wire from the battery and put a set of 60 amp relays in. I will slow the fan down using a 30 amp fuse for the low speed configuration.
Stay tuned, I'll try to keep this up to date more often.