I’ve been meaning to start a build thread for a few months now and I haven’t set aside the time to do it. There are tons of build threads out there on so many peoples 3800 projects and most are pretty helpful in showing their progress or giving the future builder an idea of what it takes to actually get a 3800 into a Fiero so why do another one? Well, first and foremost this is going to be for me. It will be my build diary. I also want it to also serve as another resource for those future 3800 builders out there who want to see it explained in a simple and easy to follow log. This is my first 3800 build so it is a learn-as-I-go process that anyone is welcome to follow and offer up support from their build experiences. I can’t say if my build thread will be any better than any of the others because I’ve read some really good threads but all I can offer is what I’m learning as I go. The unique difference I can share in my build thread is the end results will hopefully end with a running L67 in my car and a series of build videos that show what it took to make that happen. I think first and foremost anyone following my journey should probably get to know the car a little better since this thread is centered around it.
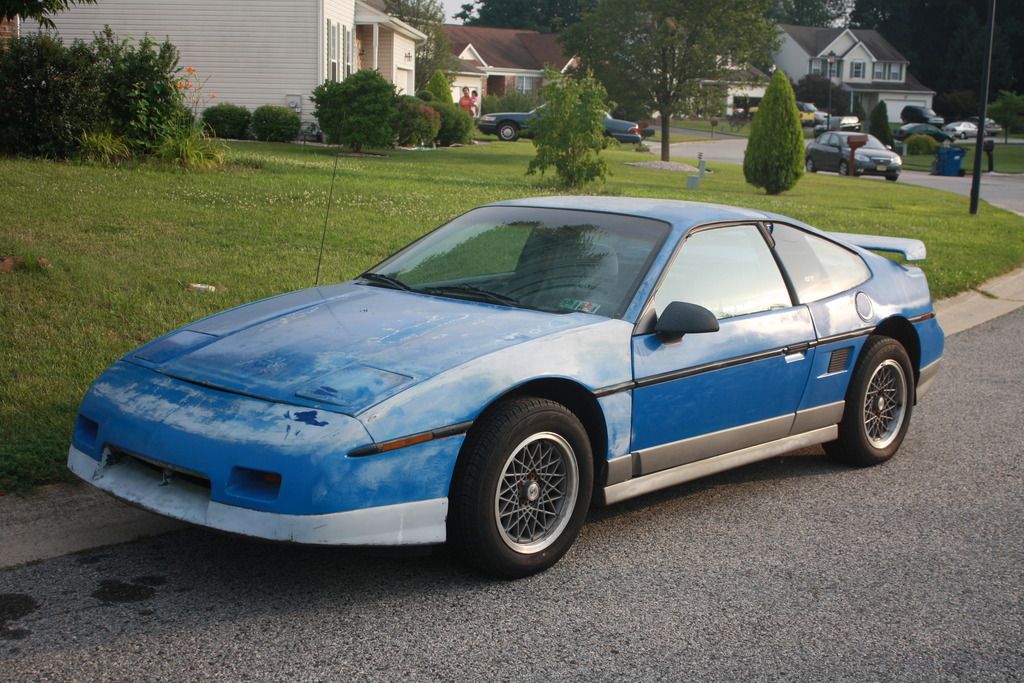
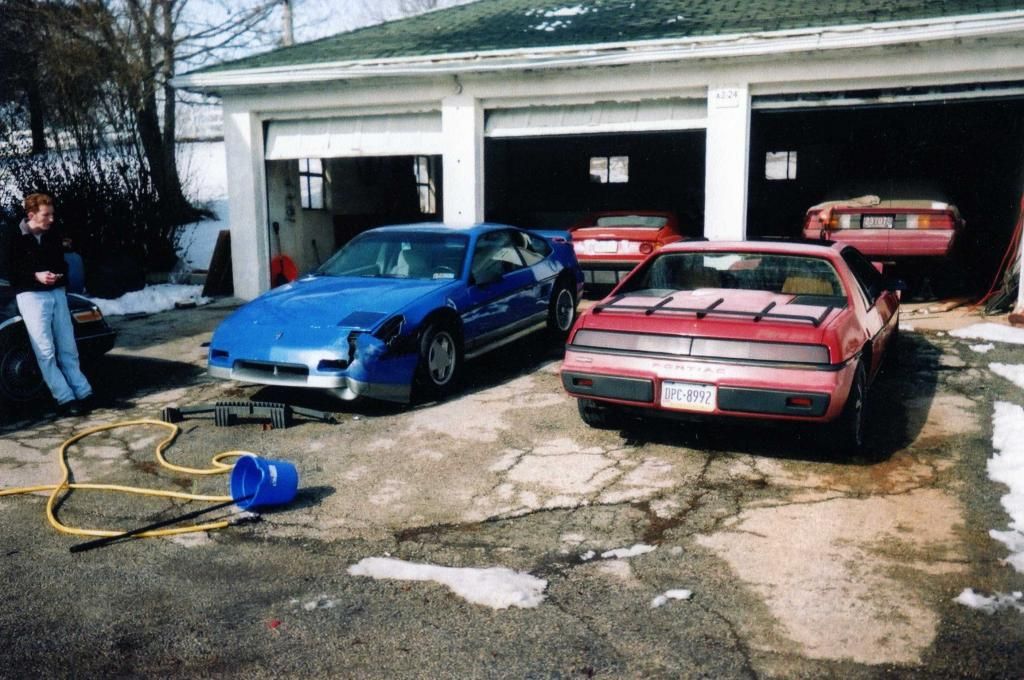
The subject of this build thread will be a 1987 Fiero GT that was originally the Bright Blue Polly paint option offered for that year. I bought the car April 12th 1997 from Woodbury, NJ with 109k. It was the first car I ever bought and it was my senior year in high school. I drove this car EVERYWHERE. I loved it! In 1999 I bought a red 85 SE which I then gave the distinction of the red car and the blue car. In 2001 I sold the SE to my brother but I still identified the 87GT as the blue car so it morphed into being its name, The Blue Car. Not the coolest name but it stuck. I got married in 2004 and started a family in 2005. By 2007 I had to park The Blue Car due to my growing family. In the summer of 2012 I was told that I was going to get laid off in three months so to thin out the budget I sold my Buick Rendezvous to pay down debt and bank as much as I could to prepare for the worst. My company ended up rehiring me with a raise 7 weeks after being laid off so now I was back in the market for a car. I’m pretty sure my wife regrets making the comment to this day but she said “why don’t you either drive the Fiero or get rid of it.” That is car like family to me so selling it was out of the question but that DID reignited the Fiero Fury in my soul that has since never left me. The car had been sitting for 5 years. Surprisingly it still ran but the brakes were shot. I gave it a complete brake overhaul and started looking for any kind of 3800 swap videos to see if it was within my mechanical abilities but nothing was out there that gave me that confidence. In fact there weren’t really any Fiero videos showing how to do anything. After thinking about it, I had wished that I had recorded myself doing the brake job on the Fiero and shared what I know about servicing the car with anyone who might be in my shoes wanted to learn how to do something. That kicked of the trend in pulling out the camera when something needed to be fixed.
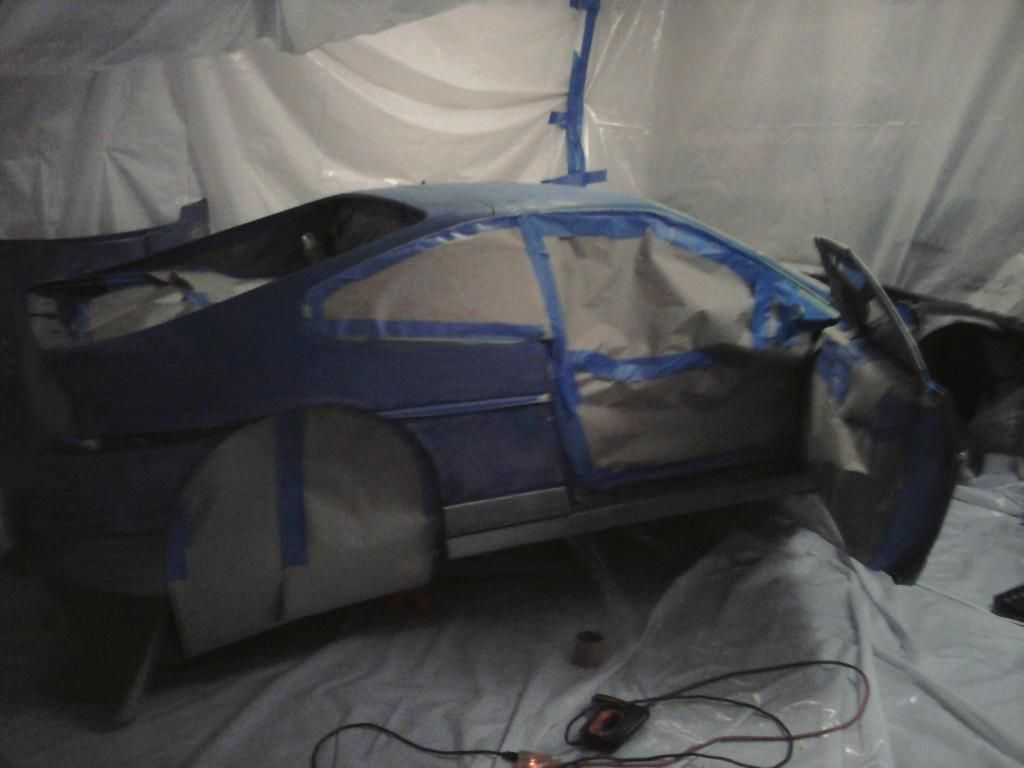
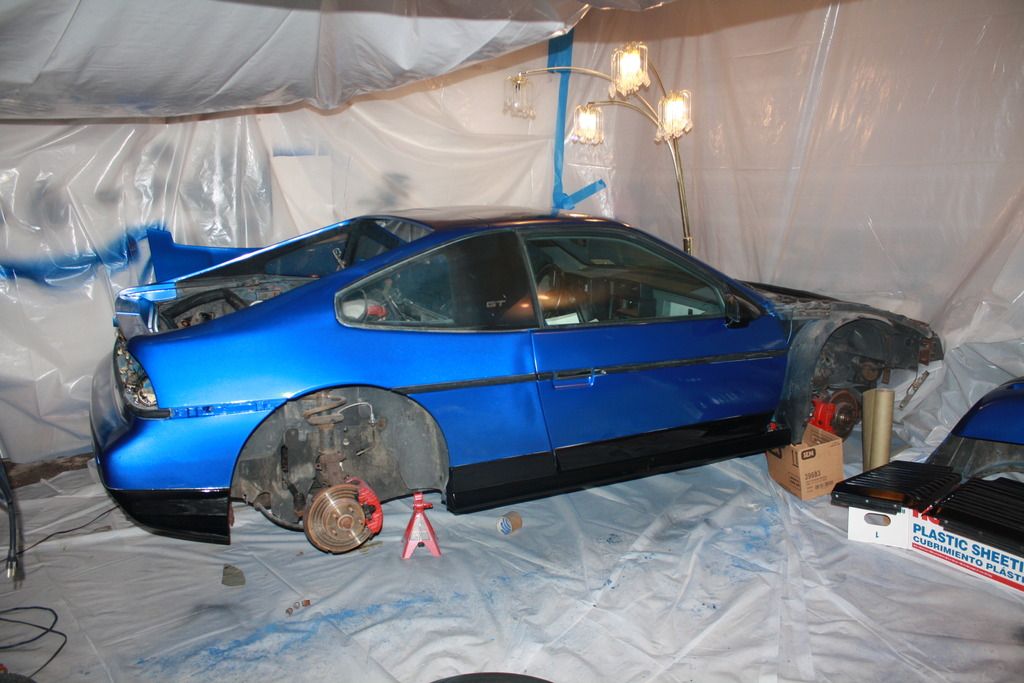
Over the past several years The Blue Car has gone through a transformation. We’ll call it The New Blue Car. I spent some time and came up with a NEW blue color scheme that would breathe new life into the car. I of course pulled out the camera and recorded myself painting the car Long Beach Blue Pearl (B510P) with a high gloss black on the rocker panels. The wheels were a reverse of the paint scheme as they were painted high gloss black with Long Beach Blue Pearl accents around the edge. The camera has been rolling any chance I get after that.
At 184k miles in 2012 I felt the tired old 2.8 needed to retire so I did my first video log of that swap process. There have been other service and upgraded videos over the years but this year will be the biggest contribution yet. I know the Fiero is seen as more of a niche car in the automotive world so viral hits and fortune was not my intent. I wanted to help my fellow “niche’y” Fiero friends do what I’ve been doing all these years. Keeping those Fiero’s alive!
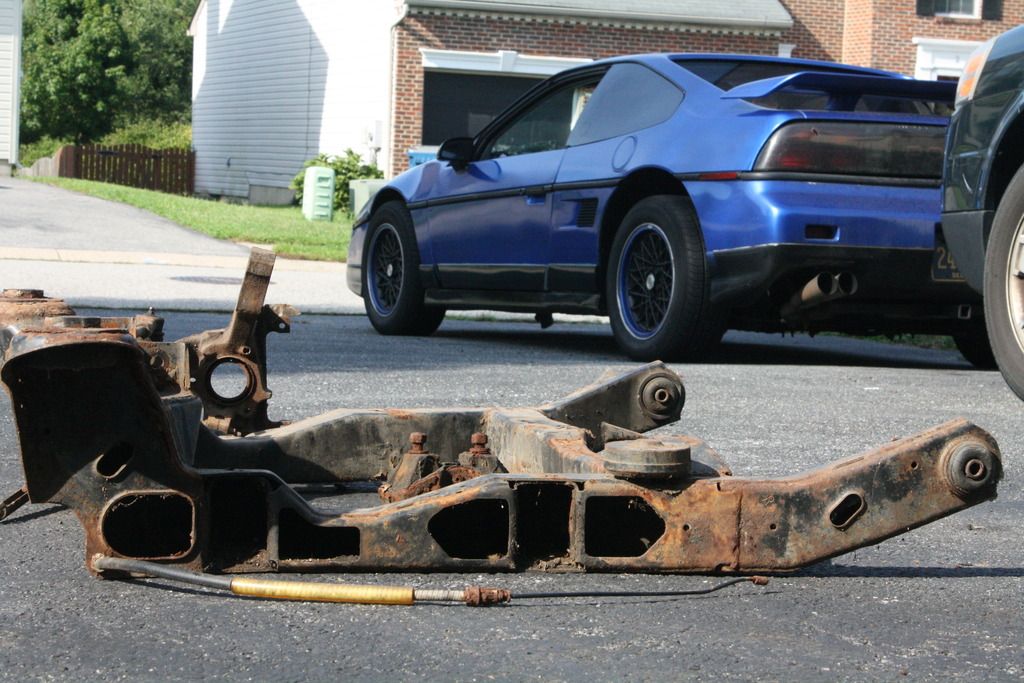
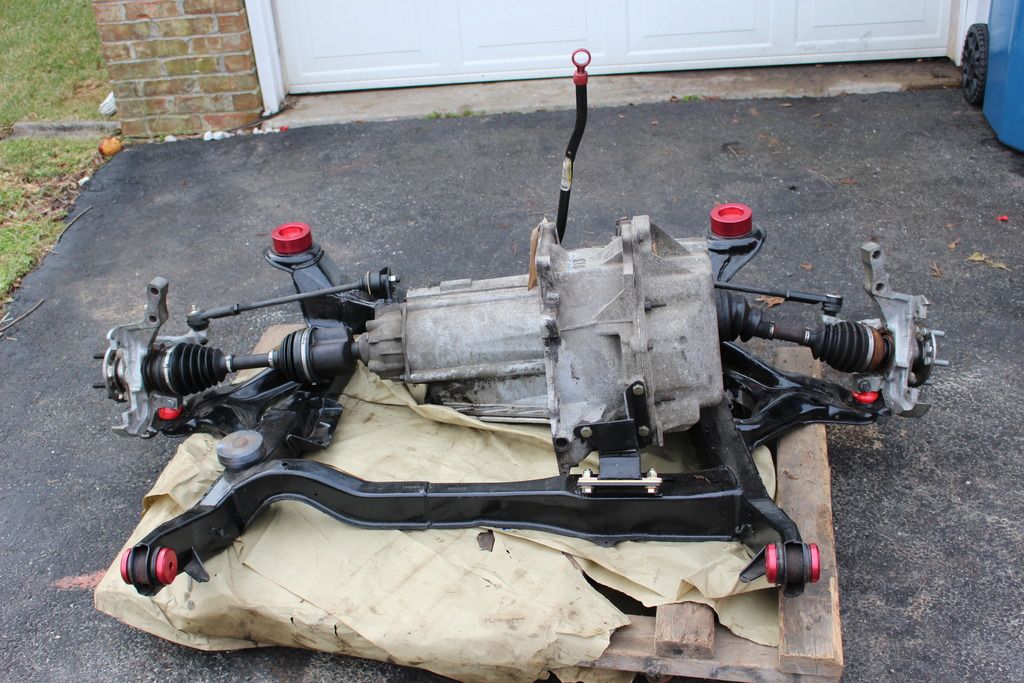
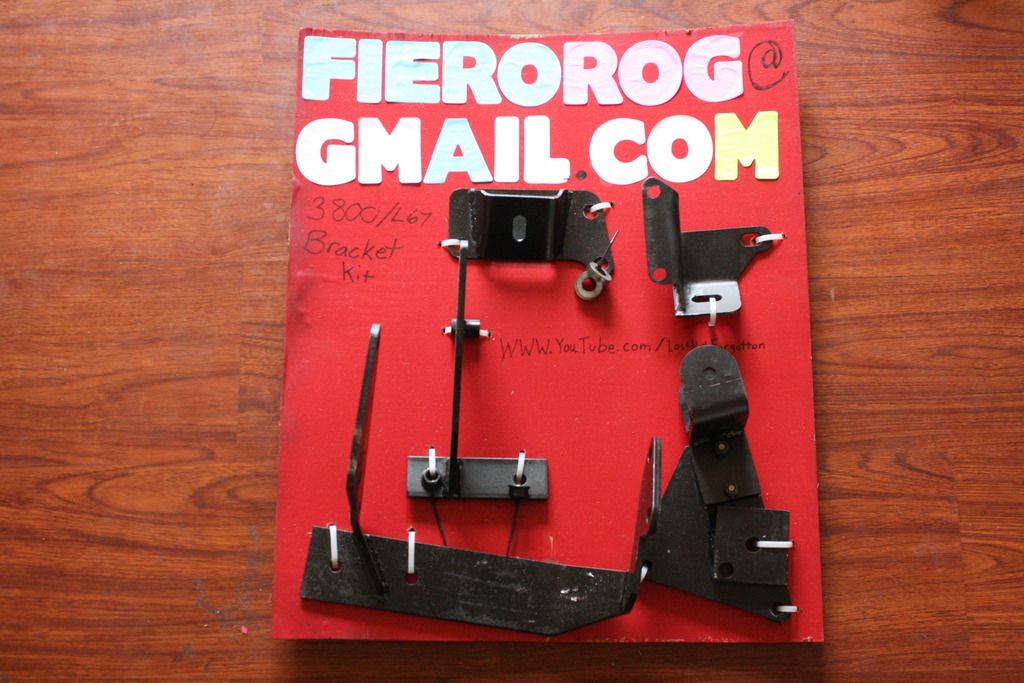
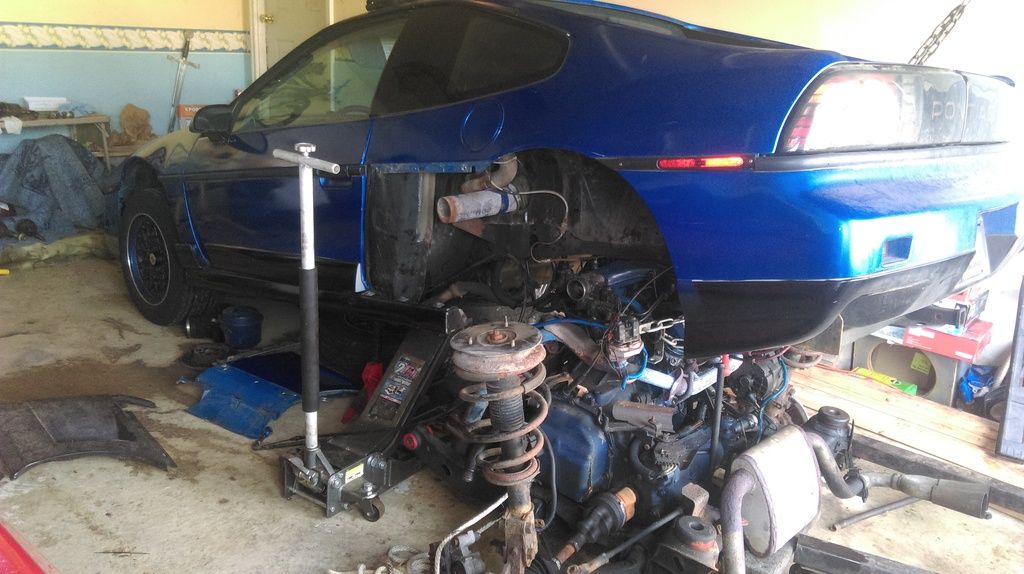
Now that we’ve been properly introduced let’s get up to speed on this 3800 project. I spent most of last year (2015) saving and buying pats. A huge (THANK YOU) to the PFF members who have sold me parts including FieroRog for the quality parts that make this project a reality. I’m not a welder so I couldn’t fabricate these types of parts. As I have been buying up parts I’ve kept a detailed log of what I bought, when I bought it, what the part number is, what I paid for it and a direct link to the part on the internet (if one was available). There is a common saying that Fiero owners have two cars, one to drive and one for parts. My parts car was an 86GT with t-tops that I completely stripped and chopped up. I have nearly an entire cars worth of parts in my attic so that will also be a source of parts for me. First, I pulled out an old rusty engine cradle I had laying around. This will be the base of my new 3800 build. For anyone who doesn’t have a spare cradle and needs to pull their Fiero engine out. Here is my video on removing the 2.8 engine from a Fiero.
My project officially kicked off in September 2015. I wanted to keep my first swap as a budget build but at the same time I want to try and make it look nice. I took a wire brush and a drill and stripped off the old paint and grease from the cradle.
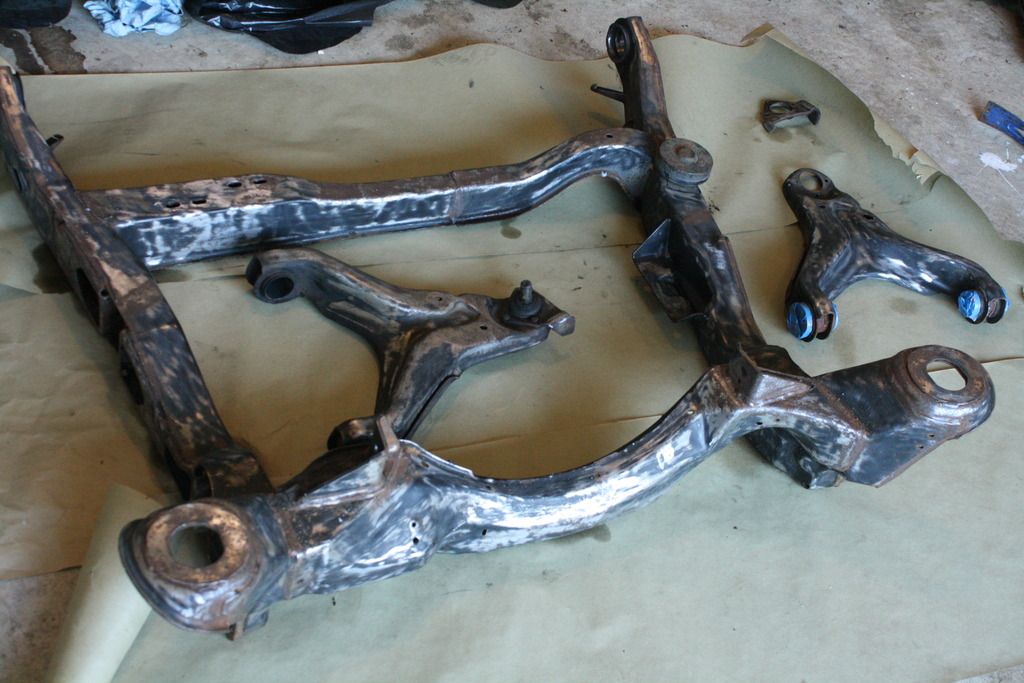
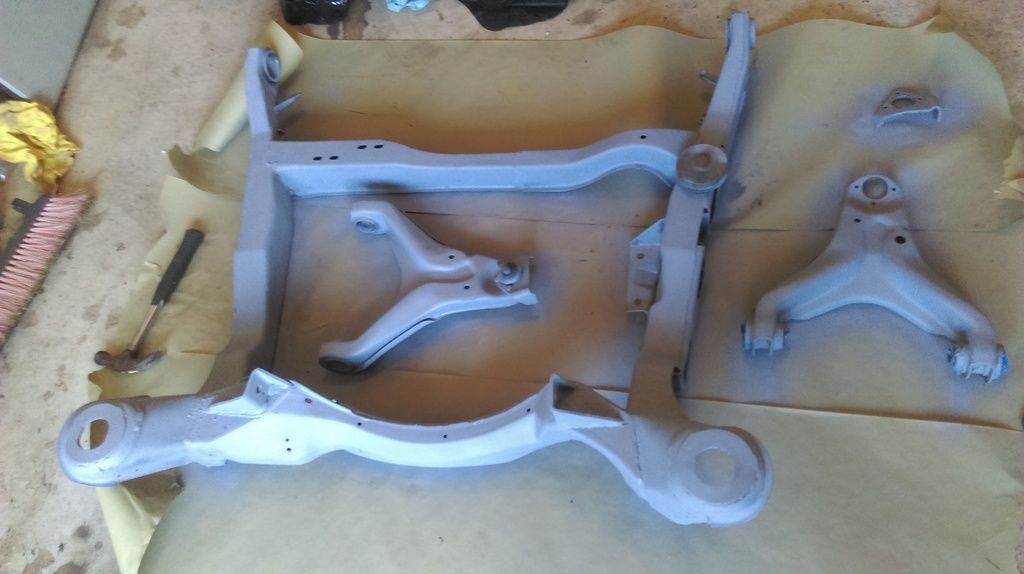
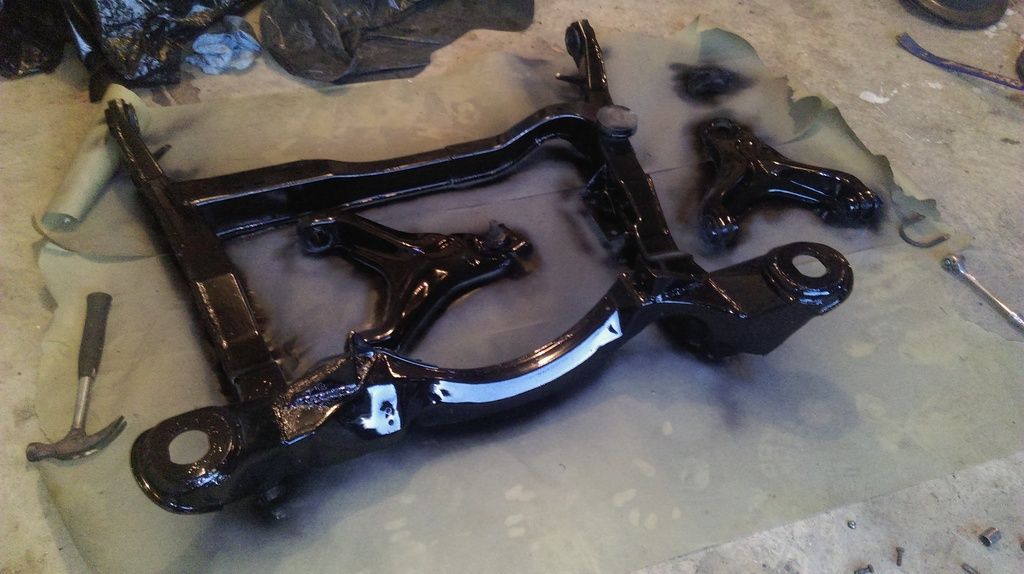
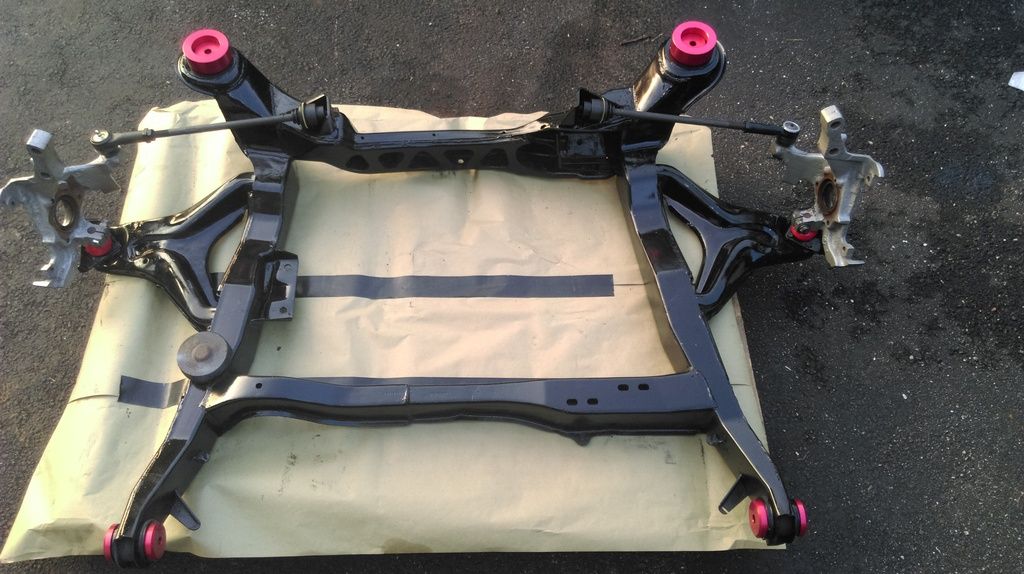
If I was going to do a build video I at least needed a presentable cradle to work off of. Refubishing this from the ground up meant that I needed a nice and clean frame. My first unofficial 3800 build video was replacing the old dry rotted cradle and control arm bushings. I decided to go with Rodney Dickman’s red aluminum cradle bushings and the Fiero Store’s Polyurethane control arm bushings. 84-87 Aluminum Engine Cradle Bushings (red) Rear Polly Transmission Mount Here is a video on that process.
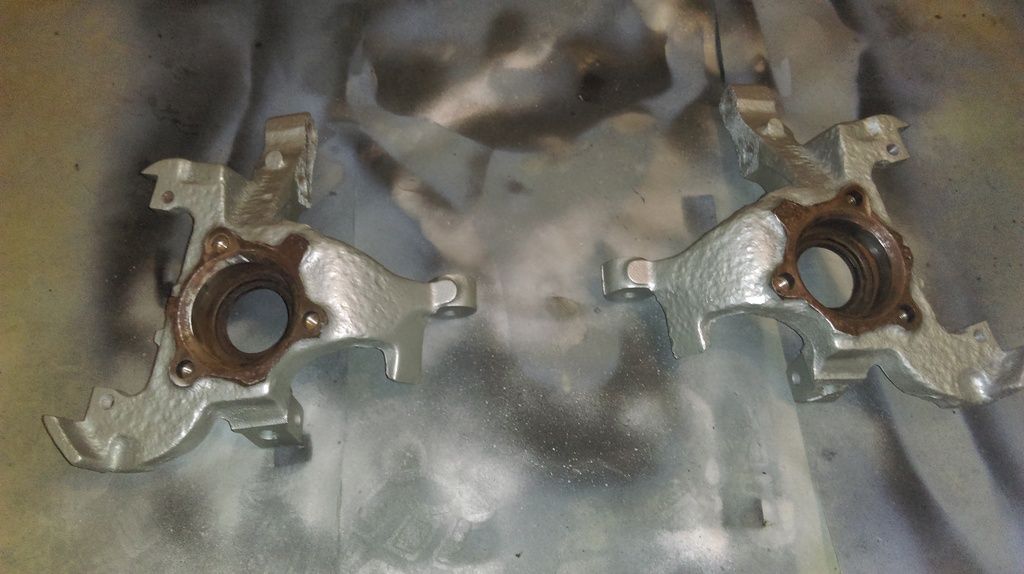
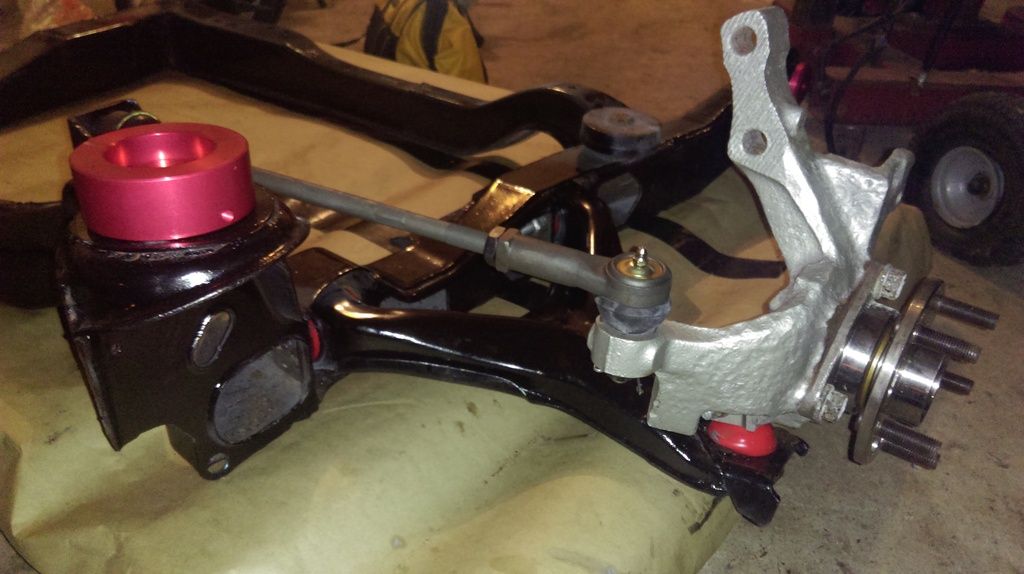
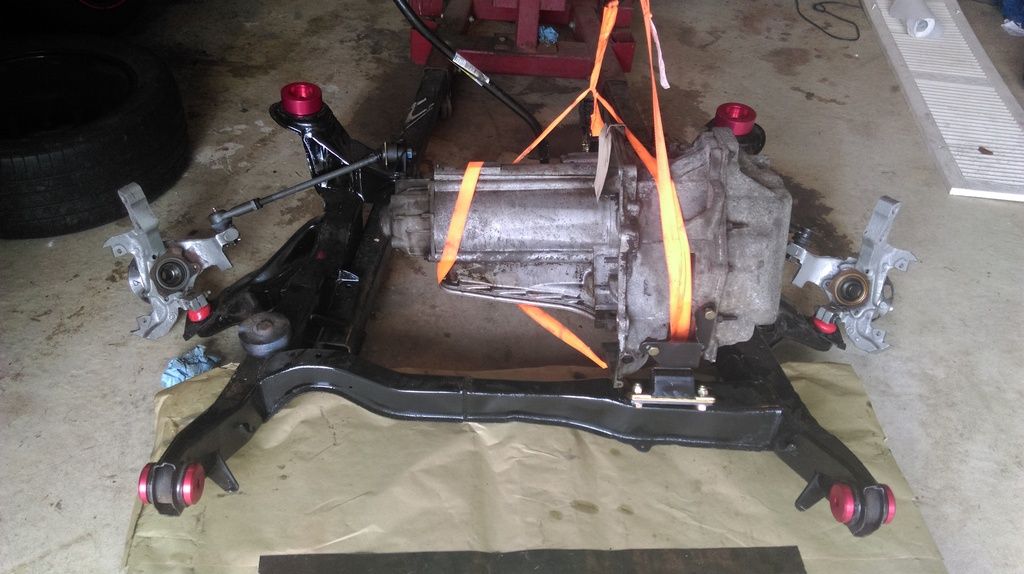
After the bushings were installed I set out to attach the knuckles, hubs and tie rods. After which I felt I had a platform ready to build on.
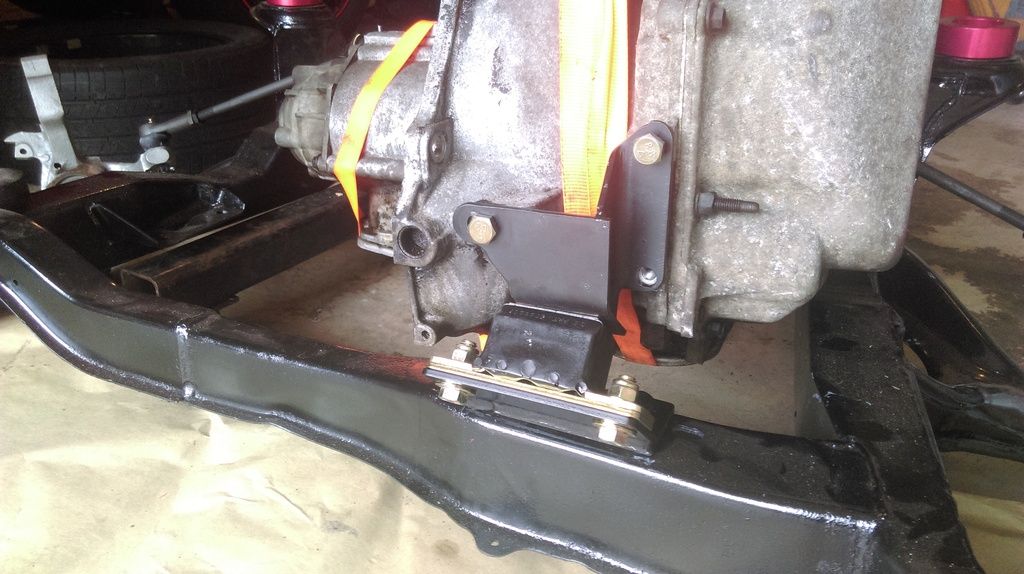
Now it was time to get my 4t65e-HD transmission mounted on. I order some Rodney Dickman transmission mounts as the old rubber mounts wouldn’t stand the test of time against the torque of a supercharged 3800. Front Polly Transmission Mount Rear Polly Transmission Mount
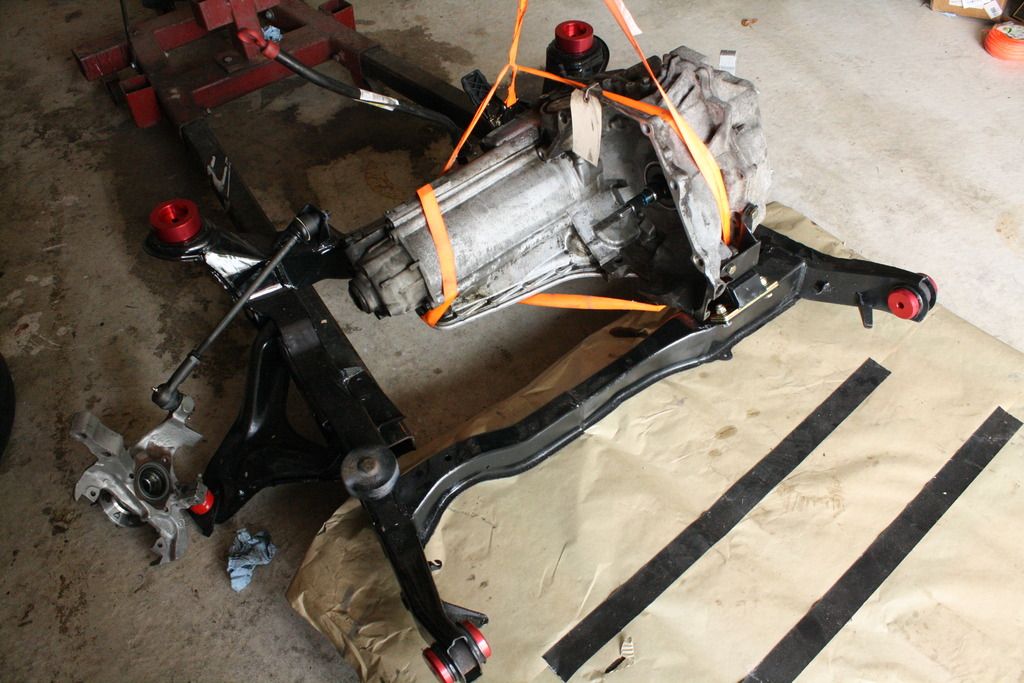
Here is the installation of the transmission to the cradle.
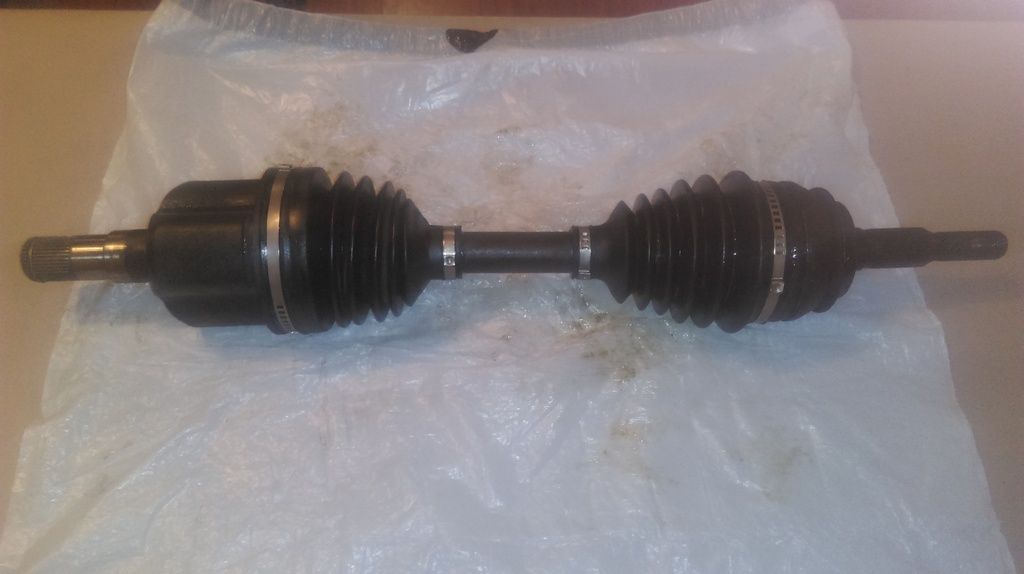
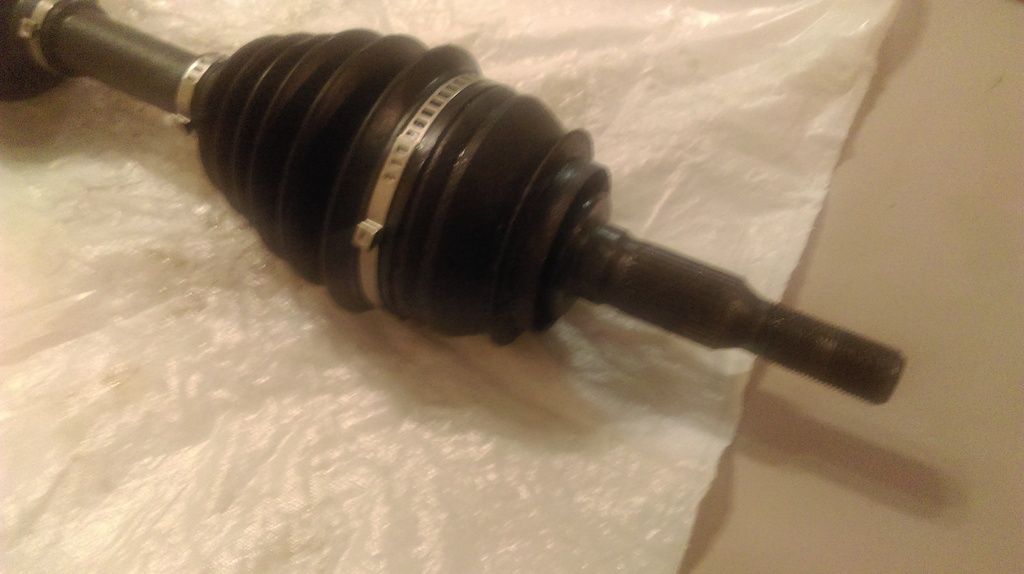
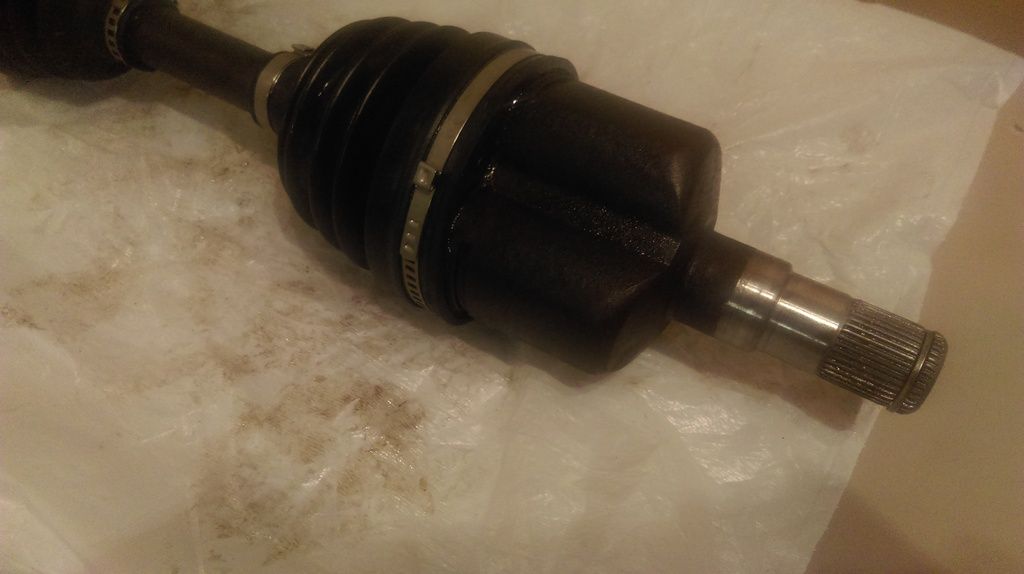
Once mounted, the path I chose was to then get the axles installed. My logic was that the transmission alone isn’t as difficult to move around on the cradle if I needed to make some slight adjustments to its position so that the axles would properly seat in. Trying to make those adjustments with the engine mounted seemed like more work than I wanted to tackle. When it comes to axle building there seems to be an overwhelming list of options out there. I was eventually directed to Stephen Poe who has axle building and 3800 installs down to a science. He set me down the path I decided to take. Anyone looking to have axles made for their auto trans 3800 swap can talk to Stephen Poe. He will build you what you need. Anyone looking to build their own should check out my axle build video for more information.
That is all of the videos released so far. I’ve already recorded videos for two and a half more segments. The next one I hope to release will be converting the fuel rail and swapping around the valve covers. That would be the half video I mentioned. I have the fuel rail removed and recently sent that to FieroFreak to chop up and make into a more Fiero friendly setup. I saw not too long ago on FB that Jason injured his eye so I plan on finishing this video whenever he’s back up to speed. I hope to release the next video on 04/09/2016 so if I get the fuel rail back before then I will try and make that the next video published. If not I will move on and publish the fuel rail whenever I can. The next video in line after the fuel rail would be installing FieroRog’s brackets, accessories, misc pulleys and the serpentine belt. The third video I have on the editing table is replacing the lower intake gasket and supercharger gasket. The next video I plan to start recording in the coming days would be swapping out the super charger pulley for a 3.4 and changing the plugs. My goal is if all goes smoothly and I can maintain this pace is to try and publish a new video every two or three weeks. Knowing my luck, delays and life will come into play and stall my timeline.
Now that I’m up to date on where I’m at I can try and keep a more accurate update as to where I’m at, issues I’m running in to and new videos I post.
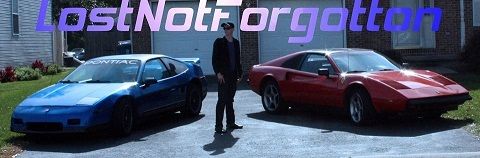
------------------ 87 Fiero GT 3.4 Pushrod with 7730 ECM & DIS 88 MERA #8013 85 Fiero SE with 3.1 pushrod 86 Fiero SE 2.8 stock www.youtube.com/LostNotForgotton
I can't wait to see this, this will determine if I want to do the 3800SC swap or just refresh my stock motor and live with it.
Good luck keeping your head from spinning, I know there is gonna be a LOT of info in this thread that is going to be INVALUABLE to countless others in doing this swap...
------------------ "Discord" Red 1988 GT under restoration!
I am glad our discussion on your axle building video was that little extra push to start a thread here! This will make it very easy for us to find all you video's in one place, and keep track of you build.
I look forward to learning more from your future videos!
Oh, and by the way, I rewound your video to get Stephen Poe's email address, contacted him, and will have a new axle in hand here soon.. Thanks! Stephen is better know here on the forum as MstangsBware.
[This message has been edited by JohnWPB (edited 03-31-2016).]
I can't wait to see this, this will determine if I want to do the 3800SC swap or just refresh my stock motor and live with it.
Good luck keeping your head from spinning, I know there is gonna be a LOT of info in this thread that is going to be INVALUABLE to countless others in doing this swap...
Hopefully it will be a good source of information so that future builders won't have to ask as many repeated questions. If everything goes how I imagine it then this thread should have a lot of useful info and I'm hoping that the videos can be published in an order that makes sense for converting and installing the engine.
I see that you might be at Carlisle this year. I'm hoping to be there too. Last year was my first year attending the event with my 87GT and MERA but the rain was crazy! Tents were getting waterlogged and you could almost watch the water level creeping closer and closer to the cars. Even though it wasn't ideal show conditions it makes for some cool stories
I'm hoping to get the car finished in time to make it this year so hopefully you can see it all finished and we can chat.
I am glad our discussion on your axle building video was that little extra push to start a thread here! This will make it very easy for us to find all you video's in one place, and keep track of you build.
I look forward to learning more from your future videos!
Oh, and by the way, I rewound your video to get Stephen Poe's email address, contacted him, and will have a new axle in hand here soon.. Thanks! Stephen is better know here on the forum as MstangsBware.
Ha ha yes, you planted the seed that motivated me to actually start a thread. Thanks for that!! And thank you for telling me that you emailed Stephen from the email address on my video. I didn't want to put his email address in the description to prevent any possible spamming so I listed it in the video. I try to promote others who offer up Fiero products or services whenever I can but always wondered if it actually impacted them or not. I'm glad to know that it really does help. He really knows his stuff and you can be assured that you'll have a good axle for your swap. When I was inquiring about building an axle several people on PFF mentioned Stephen by name but said I should contact him on FB as he is rarely on PFF. I never new his PFF name but now I do
Once I get the engine in and confirmed that it runs I also have some plans for a few body enhancements. I’ve always been a huge fan of the IMSA body and always wanted to own one. Maybe someday I will but for now I’m happy to have my hands on some IMSA style scoops that will eventually be painted and mounted. Before I mount them I want to try and make the scoops functional so at some point I’m going to try and fiberglass an intake tube to the scoop. Then try and build my own custom fiberglass air box. I’ve been so busy working on the engine that this is only an idea. I haven’t actually sat down to figure how feasible my idea is.
I also plan on removing the fenders to fiberglass in fender scoops. I’d like to try and make these functional as well. I’m not sure if I should vent them to the wheel well or over to the radiator area. I also plan on cutting the hood for a hood scoop which should make a huge difference in venting heat from the radiator.
Wow! I never knew your car started off like that. This will be a great 'behind the scenes' kind of stuff.
Look forward to move videos in the future.
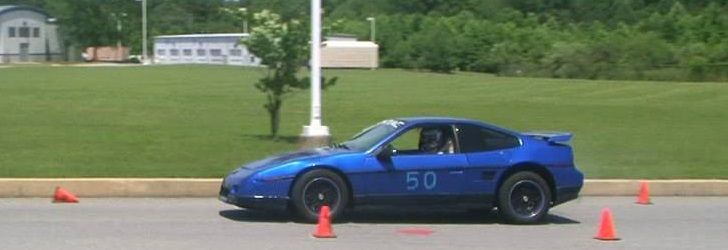
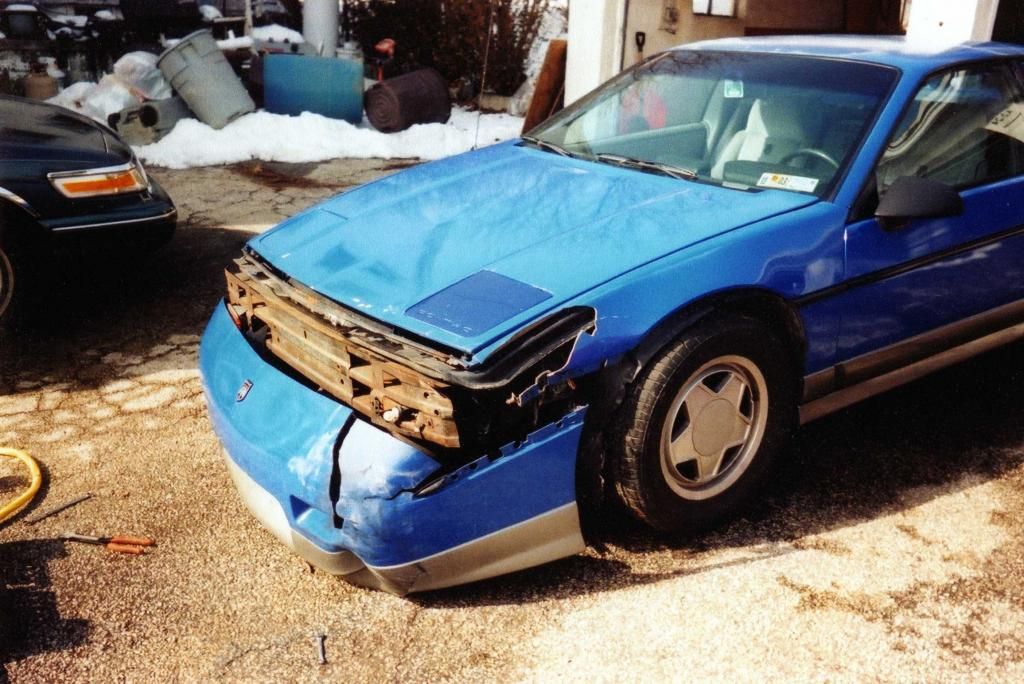
Yeah my car started out in really good condition for it's age but in 98 I hit a deer coming home from a midnight showing of a scary movie so that was freaking me out even more. The deer tore both headlights off so I had to drive home with just my parking lights. No video or pics of that though. In 99 I was pulled over for speeding and had 4 girls in the car with me. The cop let me off on the over capacity of the car but not the speeding ticket. I think he may have just been amused by it. Later in 99 and again in 2000 I had "speeding issues" with other vehicles that led to the suspension of my license, being arrested and having the car impounded. No video of that either. In 2003 I slid going around a curve after hitting a snow patch that caused me to hit a brand new Jeep Liberty coming the other way. No video of that but I did start recording videos of repairing the car and repainting it. That's why the front end looked worse than the rest of the car bad in the first pic of my original post. The PPG store that mixed the color never got it just right. Plus it was my first paint job and I applied it to thin which caused it to start flaking after I parked it in 2007. I also got pics of giving my oldest daughter a ride in it when she was just a couple of months back in 2005. As you noticed in that first pic it was pretty beat in 2012 when I put it back on the road. It had 184k at that point. I took the car in to a shop for some work and the owner called me the next day to tell me to come pick up my junk and drive it to the junk yard. He refused to work on the car and doesn't want it at his shop. All I did was say "hello" and he never gave me a specific reason. Ha ha, the jokes on him because now the car has 196k and I've had better AutoX runs in that car than a lot of Corvette's and even an AC Cobra I've seen running. I've always placed 2nd or 3rd in my class. I do have video and pics of when I repainted the whole car to give it a fresh makeover in 2012. From there I have tons of footage of the 3.4 build that has never been released as well as racing footage never released. If cars could tell stories mine could write a novel We've had some fun adventures. I've thought about making some sort of history video on it and set to music but a similar video I made last year of a bunch of cars I had the honor of "pedal mashing" never really did well on YouTube. I like the video so I'm sure that half the hits are probably mine, lol.
Here are other videos on my production list after the 3800 videos are finished:
-Changing the fuel pump/sending unit. (well this one will actually be in with the 3800 videos but it can also stand alone too) -How to put a 2.8/3.4 engine back into your car (A long awaited seaqual to my taking the engine out only I'll be using a manual trans car) -Rebuilding Gen 2 headlights -Building a hood scoop -Upgrading to the C5 Corvette Front & C4 Corvette rear braking kit. -Installing a larger brake booster -Installing a faster Power window kit.
Those videos are in the pipes because I already have the parts on hand and just waiting to install them. The 3800 videos plus the ones listed above that I'll be putting out this year have already cost me thousands of dollars so after they are all finished and posted I'll probably have to take a break on YouTube videos for a bit so I can pay all that off.
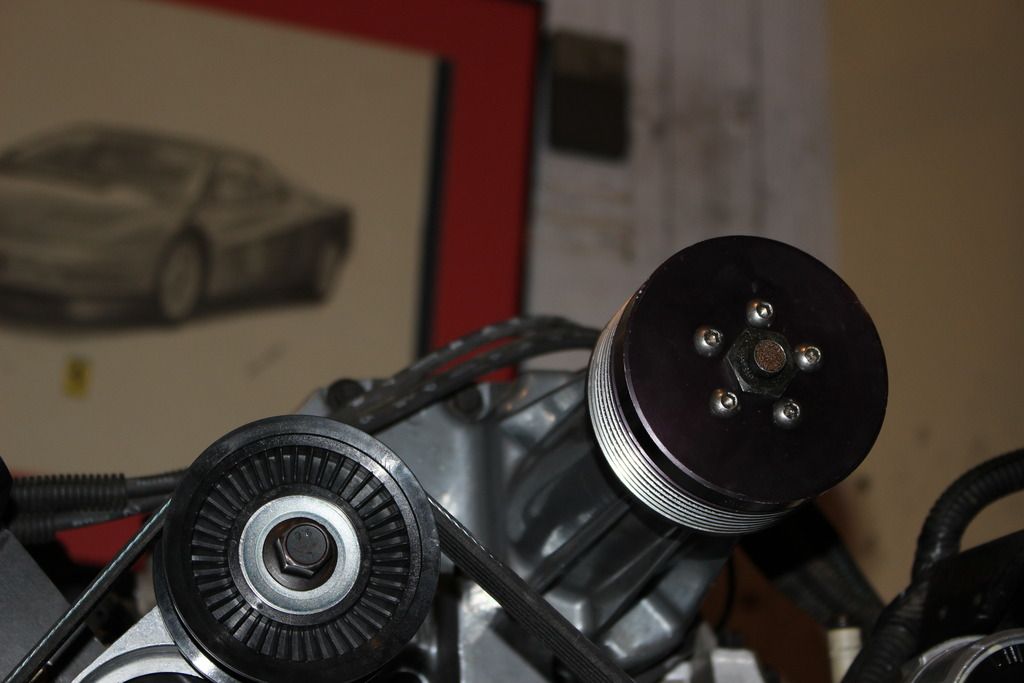
Last week I changed out the stock supercharger pulley with a 3.4 modular pulley. I used ZZP’s pulley puller kit and it worked out great. The directions say to read them through completely before starting and in this case, yes, I agree with that. Other than making sure everything lined up properly and having a tube of anti-seize on hand it was a pretty straight forward process. I hear that the 3.4 can add somewhere in the ball park of 20-25hp. I’m not sure how accurate that it sounds nice!
I ordered a pair from Summit Racing on 03/17 and received an email on 03/31 that they are unable to get them for me. I placed another order on 04/01 for a set at TireRack and they just called me to tell me they will not be able to get them until July. At the same time when I originally ordered the struts on 03/17 I also placed an order with Ground Control for their coilover conversion kit (w/ 350lbs springs). I had to specify what struts I was going to use when I placed the order. I don't know if that makes any difference on what kit to send me but I have Special D's already on the front and would prefer to have them all around. I see 1 on Amazon and I'm tempted to get it but the car's handling will be negatively affected with only 3 shocks.
Last Saturday I uploaded another video of the installation process of my 3800. This one goes through the installation of the FieroRog engine brackets as well as installing some missing pulleys, accessories and the accessory belt. I always suggest that anyone buying an engine from a salvage yard have it checked out if at all possible. If you can't do it yourself it's good to have an engine shop check it out and do a leak down test on it before installing it. It's also good to change some of the belt accessories that would normally be a pain to do when the engine is in the car. As you'll see in this video I suggest changing the water pump and to my surprise it was good that I did. I was met with a lot of sludge that built up in the pump from it sitting for a few years. I think that had I skipped the replacement of the water pump I might have ended up with an engine that would over heated on me.
I also ran through the installation of a few other items that maybe someone else might find useful as used engines can typically be picked over before getting sold off like mine was.
The next video in the pipes is the replacement of the lower intake manifold gasket as well as the supercharger gasket. I was told that this is a weak point in the 3800 and that it is wise to change it now before it becomes a problem in the future so I heeded that warning.
After that I have a video on the replacement of the supercharger pulley with a 3.4 pulley mostly finished and still waiting on the fuel rail so I can finish that video too. I also have a misc. video of odds and ends I'll be posting before I wire it up next weekend. I'm sure there will be several odds and end videos of things I just can't roll into another video. The momentum is slowing a bit last week with spring activities and birthday's going on but I'm hoping that it doesn't stall out. April and May are the busiest months of the year for me when it comes to birthday's and anniversaries but I'll try and work around them.
I'm going to add one additional post today that I think will be good for any future builders looking to try this swap. One of the first questions asked is how much is it going to cost to do a 3800 swap. The obvious answer is that it varies depending on one’s abilities as well as parts already on hand from donor cars (3800 and Fiero). So the cost will be a bit higher for someone who has to source their parts individually as well as rely on the welding skills of others to make their custom brackets as opposed to someone who bought a whole donor car and can make their own brackets. I'm not a welder and I do have to source my parts.
The project costs that I've seen floating around that I used to create my budget was numbers in the $3,000-$4,000 range so I went high and budgeted $4,000 for my build. Anyone seeing my recent posts in the Market on parts I’m selling can safely assume, yes, I’ve gone over budget and need to offset some of the cost by selling off excess parts. I keep a detailed record of my build and as of today I'm sitting at $4,958.80. I’ve most everything I need but there are still several hundred dollars in parts I still have to pick up. I was recently questioned as to why my project cost is so high with so few mods so I’m going to take some time to share a section of my project costs here. I’m only going to share the costs up to what I’ve spent making the current videos you see on my channel. I’ll update my cost and parts list as they fit the newly released videos.
Keep this thread saved because I’m sure some of these links will come in VERY handy and save LOT’S of time in searching. I will DISCLAIMER that you need to verify part compatibility with your engine before purchasing parts. Most parts are interchangeable but some might be different based on model and year of your donor engine. Let’s crunch some numbers (yes I work in accounting):
*Any parts bought from RockAuto will have a link to the RockAuto search bar. Just copy and paste the part number in and search for it.* Skipping the first video on removing the Fiero engine, let’s start with the bushing video. This is a spare cradle I had laying around and decided to give it a face lift before I officially started the build. The cradle is the foundation so I might as well start with the cost of prepping it and then building it from the ground up.
Total cost of everything seen in the Bushing video = $347.48
Moving on to the next video. We have the installation of the transmission using FieroRog’s kit. FieroRog’s kit will be included in this price and not included in the engine conversion video because I had to buy it now in order to have the parts I need.
Total cost of everything seen in the transmission installation video = $934.98
Next up is the axle build video. The axles needed for this build have to be OEM axles and not aftermarket. For these you will have to look at salvage yards and EBay so I won’t have a link. I will share the costs though:
1999 GTP axles from B&H Auto Salvage in Elkton, MD - $70.00 X2 = $140.00 Fiero Manual Transmission Axle – (Had in stock so I did not have to purchase this part) $0 Axle Straps. (two large & two small) from NAPA (I don’t have the part number handy because they just handed me straps) - $7.65
Total cost of everything seen in the axle build video = $147.65
Now we’re looking at the latest video I posted on installing FieroRog’s engine brackets. I’ll include the cost of the 3800 engine here as well as the components installed on it minus the FieroRog kit. That cost was included in the Transmission video.
Total cost of everything seen in the Engine bracket video = $1,078.70
All together with JUST what you see in these videos I’ve spent $2,508.81. Sure I may have been able to skimp on costs by not buying paint, tie rods, hubs, an AC compressor, water pump, alternator, etc. but these are things that I feel will add longevity to the car by buying new as opposed to reusing old worn parts. I don’t feel that I’ve gone excessively overboard on purchases so the price figure of $3,000-$4,000 can easily be blown out of the water if you have to source a lot of parts.
My overall opinion on the project so far is that it is not a difficult build and actually quite enjoyable to work on. I think that anyone that knows their way around a car should be pretty capable of doing the swap thus far. What really needs to be factored in is budget. This could get expensive fast if you’re hoping to keep a low budget but is totally worth the cost and experience so far. I hope this post sheds some light on build info and provides useful tools (links, pics and videos) to help future builders on their quest for more power.
[This message has been edited by LostNotForgotton (edited 04-12-2016).]
Excellent helpful post for a 3800 swap. Only one recommendation; I would use Timpken rear hubs instead of those Chinese units. The Chinese units may not hold up. Look online for user reports. .
------------------ " THE BLACK PARALYZER" -87GT 3800SC Series III engine, custom ZZP /Frozen Boost Intercooler setup, 3.4" Pulley, Northstar TB, LS1 MAF, 3" Spintech/Hedman Exhaust, Autolite 104's, MSD wires, Custom CAI, 4T65eHD w. custom axles, HP Tuners VCM Suite. "THE COLUSSUS" 87GT - ALL OUT 3.4L Turbocharged engine, Garrett Hybrid Turbo, MSD ign., modified TH125H " ON THE LOOSE WITHOUT THE JUICE "
I'm going to add one additional post today that I think will be good for any future builders looking to try this swap. One of the first questions asked is how much is it going to cost to do a 3800 swap. The obvious answer is that it varies depending on one’s abilities as well as parts already on hand from donor cars (3800 and Fiero). So the cost will be a bit higher for someone who has to source their parts individually as well as rely on the welding skills of others to make their custom brackets as opposed to someone who bought a whole donor car and can make their own brackets. I'm not a welder and I do have to source my parts.
The project costs that I've seen floating around that I used to create my budget was numbers in the $3,000-$4,000 range so I went high and budgeted $4,000 for my build. Anyone seeing my recent posts in the Market on parts I’m selling can safely assume, yes, I’ve gone over budget and need to offset some of the cost by selling off excess parts. I keep a detailed record of my build and as of today I'm sitting at $4,958.80. I’ve most everything I need but there are still several hundred dollars in parts I still have to pick up. I was recently questioned as to why my project cost is so high with so few mods so I’m going to take some time to share a section of my project costs here. I’m only going to share the costs up to what I’ve spent making the current videos you see on my channel. I’ll update my cost and parts list as they fit the newly released videos.
Keep this thread saved because I’m sure some of these links will come in VERY handy and save LOT’S of time in searching. I will DISCLAIMER that you need to verify part compatibility with your engine before purchasing parts. Most parts are interchangeable but some might be different based on model and year of your donor engine. Let’s crunch some numbers (yes I work in accounting):
*Any parts bought from RockAuto will have a link to the RockAuto search bar. Just copy and paste the part number in and search for it.* Skipping the first video on removing the Fiero engine, let’s start with the bushing video. This is a spare cradle I had laying around and decided to give it a face lift before I officially started the build. The cradle is the foundation so I might as well start with the cost of prepping it and then building it from the ground up.
Total cost of everything seen in the Bushing video = $347.48
Moving on to the next video. We have the installation of the transmission using FieroRog’s kit. FieroRog’s kit will be included in this price and not included in the engine conversion video because I had to buy it now in order to have the parts I need.
Total cost of everything seen in the transmission installation video = $934.98
Next up is the axle build video. The axles needed for this build have to be OEM axles and not aftermarket. For these you will have to look at salvage yards and EBay so I won’t have a link. I will share the costs though:
1999 GTP axles from B&H Auto Salvage in Elkton, MD - $70.00 X2 = $140.00 Fiero Manual Transmission Axle – (Had in stock so I did not have to purchase this part) $0 Axle Straps. (two large & two small) from NAPA (I don’t have the part number handy because they just handed me straps) - $7.65
Total cost of everything seen in the axle build video = $147.65
Now we’re looking at the latest video I posted on installing FieroRog’s engine brackets. I’ll include the cost of the 3800 engine here as well as the components installed on it minus the FieroRog kit. That cost was included in the Transmission video.
Total cost of everything seen in the Engine bracket video = $1,078.70
All together with JUST what you see in these videos I’ve spent $2,508.81. Sure I may have been able to skimp on costs by not buying paint, tie rods, hubs, an AC compressor, water pump, alternator, etc. but these are things that I feel will add longevity to the car by buying new as opposed to reusing old worn parts. I don’t feel that I’ve gone excessively overboard on purchases so the price figure of $3,000-$4,000 can easily be blown out of the water if you have to source a lot of parts.
My overall opinion on the project so far is that it is not a difficult build and actually quite enjoyable to work on. I think that anyone that knows their way around a car should be pretty capable of doing the swap thus far. What really needs to be factored in is budget. This could get expensive fast if you’re hoping to keep a low budget but is totally worth the cost and experience so far. I hope this post sheds some light on build info and provides useful tools (links, pics and videos) to help future builders on their quest for more power.
Thanks so much for your dedication to film and do these "How-to" videos. Your old 3.4 swap video helped me allot back in 2012, and now your 3800sc video series is helpful too. My only suggestion is, when you have any 84 to 87 cradle out of the car, you should do a bump-steer fix, to make your Fiero go down the road perfectly stable. It's just a matter of cutting off tie rod anchors, flipping them around and re-welding them approx. 3" out-board to line up the joint with the control arm bushings, then cutting off the threaded tie rod ends about 3" and re-threading them. I have a picture album of the procedure in my face book picture albums, also in Onix Taveras' up-grades and repairs link. I'll be referring to your other 3800 swap videos.
[This message has been edited by hypo327 (edited 05-24-2016).]
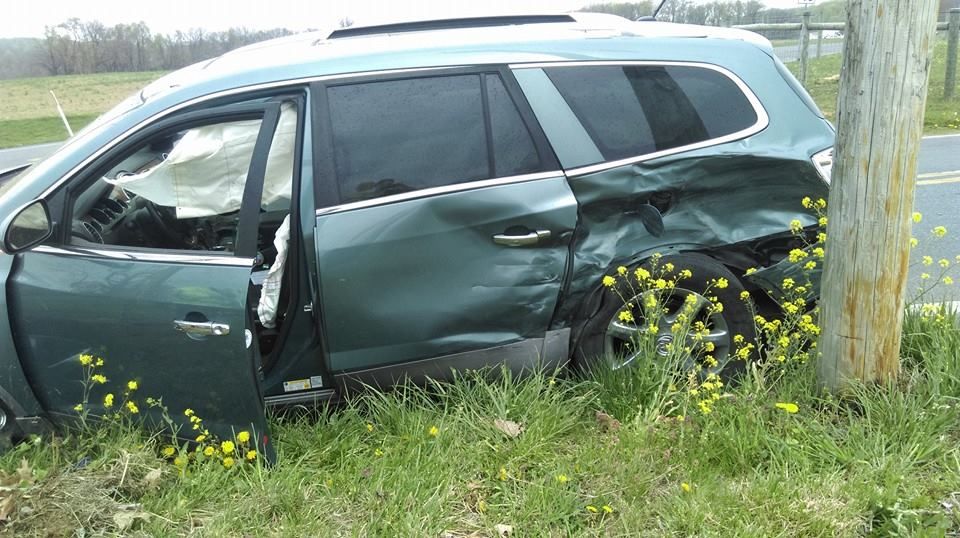
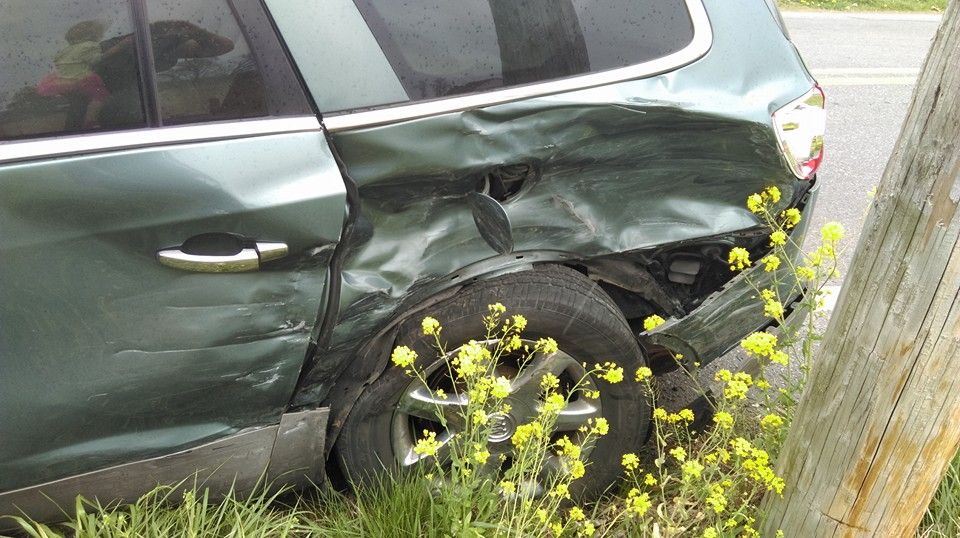
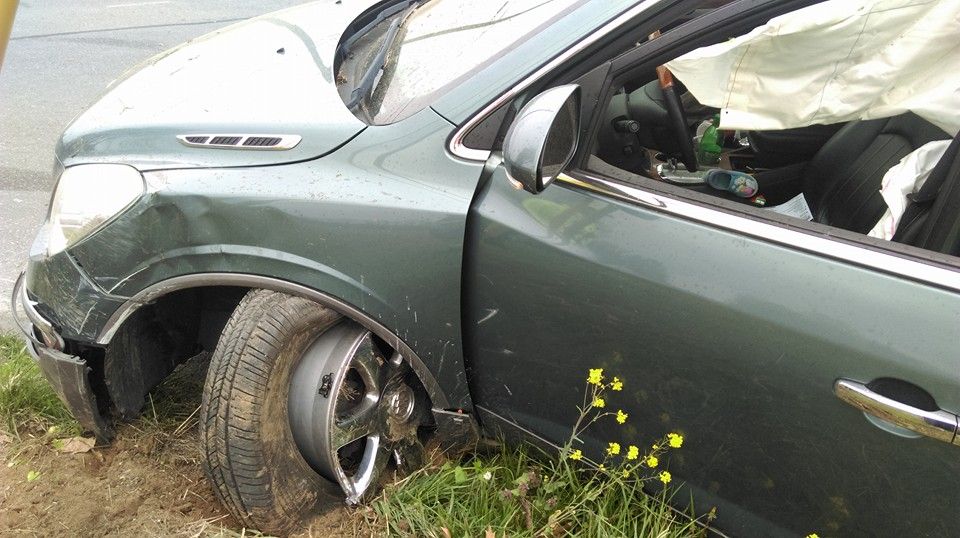
Sorry for falling off the Earth for a while. Life threw me a few curve balls over the past few months that I've had to deal with. April and May are typically the busiest months of the year when it comes to birthdays and anniversaries so it was already a bit of a challenge as it was to keep my 3800 project on task. On April 22nd (the day after my birthday) my wife was in an accident in her Buick Enclave. She was ok for the most part but the car didn't survive. It was a great car too! So I've had to take time to work that out with the insurance company.
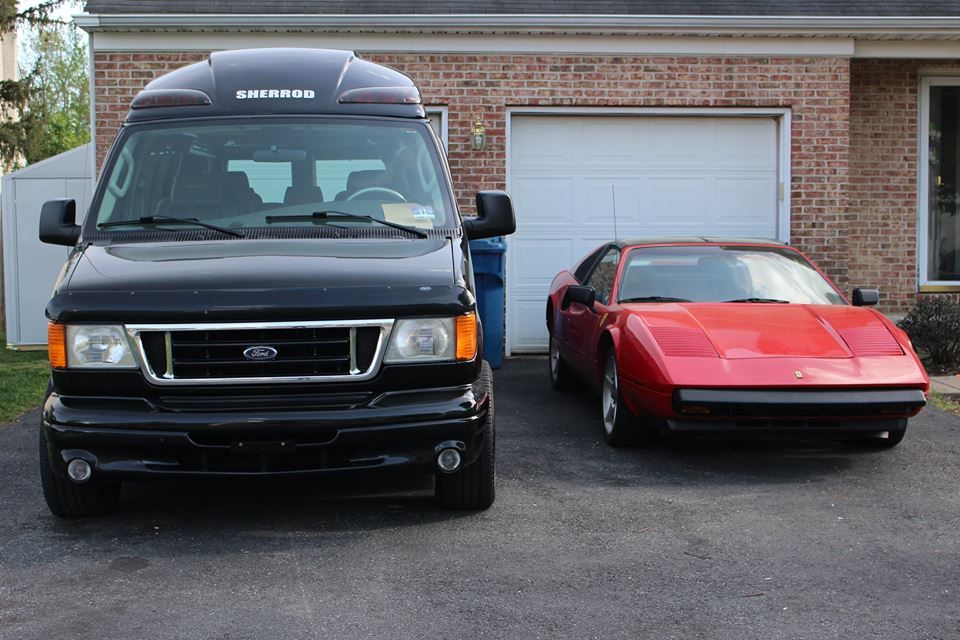
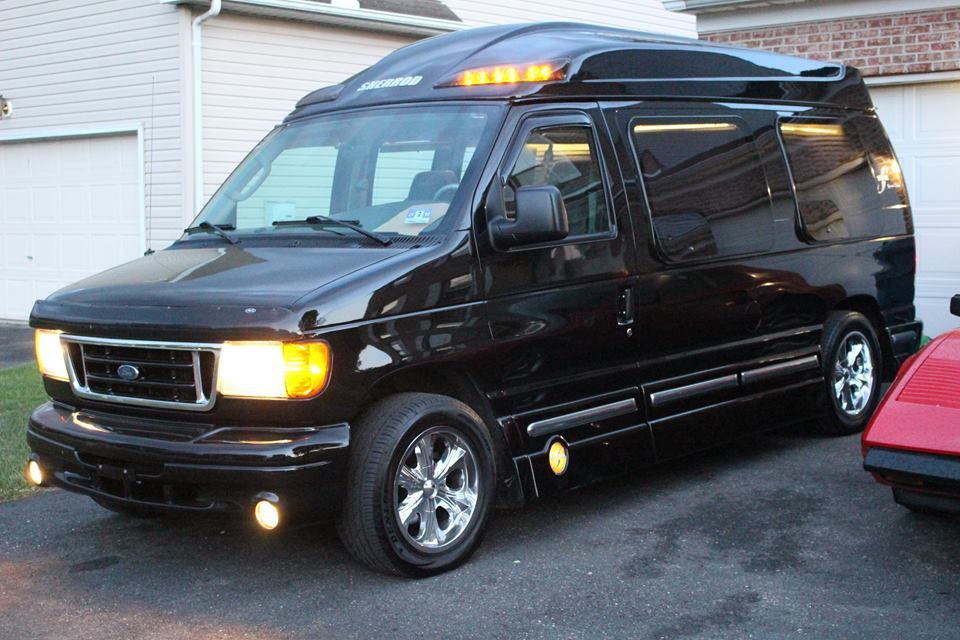
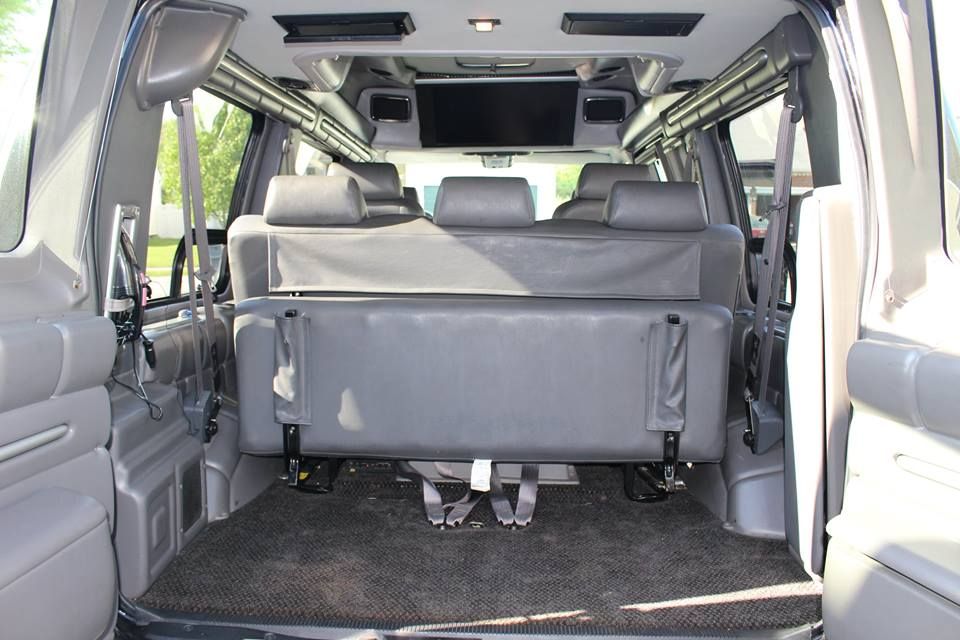
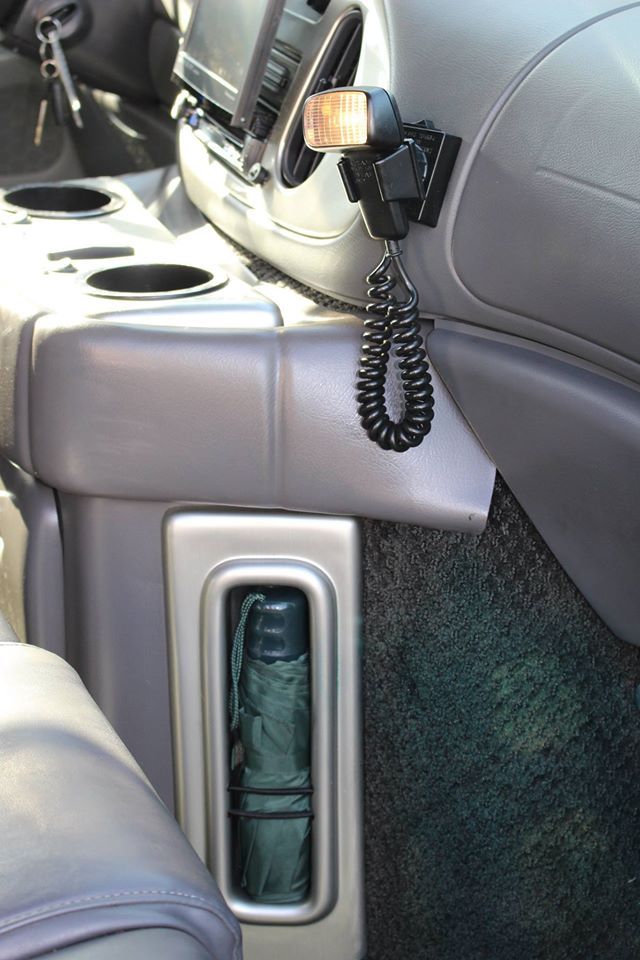
Once we got the ball rolling on getting that cleared up I decided to start sourcing a new family car. Anyone who knows me knows that I like cars that can't be mistaken for anyone elses. I found a 2004 Ford E150 Sherrod conversion van in north Jersey for a pretty good price. When I got there I found that none of the rear electronics worked so I talked the dealer into a sweet price and took it home. The next day I gutted the rear of the car and found that someone poorly rewired the car so I wired it up better than it was originally and put it back together. I love this van! I could go on and on about it.
Then on May 10th I get pulled into my bosses office and told that the company I've been working for for over 10 years is restructuring and that I won't be a part of that. I was laid off so fast that I didn't even get to finish the day out. Not only was I not able to finish the day but I didn't even have a chance to sign any off-boarding paperwork. They said they'd FedEx it to me to sign and send back. That was quite a bombshell!
A week later my main desktop computer crashes and I can't get it to boot up even with a Windows 7 disc. Now I've lost all the video work I had done on at least 4 unpublished videos. The editing software is gone too as I had purchased a one time download several years ago. My videos are stored on a seperate drive so they are fine but all the editing I've done on 4 videos that were ready to render and upload to YouTube are gone. I have to start from scratch. I've also lost a bit of my 3800 parts spreadsheet used to track parts, prices and links. I maintained that on my work computer but I did email it to myself a few months ago so I have an older version I can try and salvage and update.
Over the next few weeks I applied for unemployment but got denied, applied for food assistance (I have 5 girls) and got denied. I did get a severance but I need to strectch that as much as I can until I can get on my feet. DE's unemplyment only pays $330 a week and I don't want to get to a point where that is my only source of income. The whole sytem seems screwed up. A family of 7 has to wait until there is no more money in the bank in order to collect $330 a week which wouldn't even keep a roof over their heads. Food stamps was an even bigger joke.
Anyway. Needless to say I've been offline and MIA for the past few months. I haven't done anything with the car or the videos. I'm working through things and picking myself up again. The computer is running and I've purchased Pinnacle Studio 19 to start editing videos again. I had 15 before and there is quite a big learning curve. They changed A LOT since Studio 15. Hopefully a new video will be ready in a few weeks.
Still looking for a job. I've worked in finance for over 10 years but I'm feeling that life is calling me in a different direction. We shal see what that might be.
I've been getting the Fiero bug again lately and have the urge to get back in the garage again and start working on the car more. It will help get my mind off of other things. I have a lot of 3800 conversion parts but still missing some. I'll work on the 3800 swap and pump out videos until I get to a point where I have to buy more parts and that is where I'll stop for now. Hopefully when I get working again I can continue to fund Fiero projects and videos because I enjoy both. My posts may be spotty so be patient. I definently don't mind anyone checking up or checking in. Keep checking back and hopefully I'll have some new posts shortly. Right now I'm re-eding the 3800 lower intake gasket video. Next will be swapping the super charges pulley. I have a few others to edit as well. I'll also be filiming the installation of an updated transmission bracket from FieroRog so look for that coming soon. After thai I hope to wiring everything up.
Great thread. Really clean work. Sorry to hear that life has dealt you a few curves but that's just the way it it. My Chrysler 300 was just totaled, no injuries, but its off to the salvage yard. Purchased a lightly used 2015 300 from the online Manheim auction courtesy of my friend Carfinder Fred. Its on a truck coming up from Florida right now. Point is that life must go on and new opportunities eventually present themselves. Meanwhile keep up the great work and the 3800SC install. You will really love the performance.
------------------ " THE BLACK PARALYZER" -87GT 3800SC Series III engine, custom ZZP /Frozen Boost Intercooler setup, 3.4" Pulley, Northstar TB, LS1 MAF, 3" Spintech/Hedman Exhaust, Autolite 104's, MSD wires, Custom CAI, 4T65eHD w. custom axles, HP Tuners VCM Suite. "THE COLUSSUS" 87GT - ALL OUT 3.4L Turbocharged engine, Garrett Hybrid Turbo, MSD ign., modified TH125H " ON THE LOOSE WITHOUT THE JUICE "
Unfortunately I'm still unemployed but I've finally started to work my way back into the garage last week. If I could only make a career working on Fiero's I'd be in my glory I've also buckled down and spent countless hours getting my editing software working properly again. I believe the next video I was going to put out was replacing the lower intake manifold gasket so that's what I worked on. It's a slow process but I'm trying to get back on track. I haven't taken any time yet to research the missing items on my project build spreadsheet. I have some work ahead of me getting that back up to date but I'll get there. Anyway, lets change gears and focus back on the project at hand.
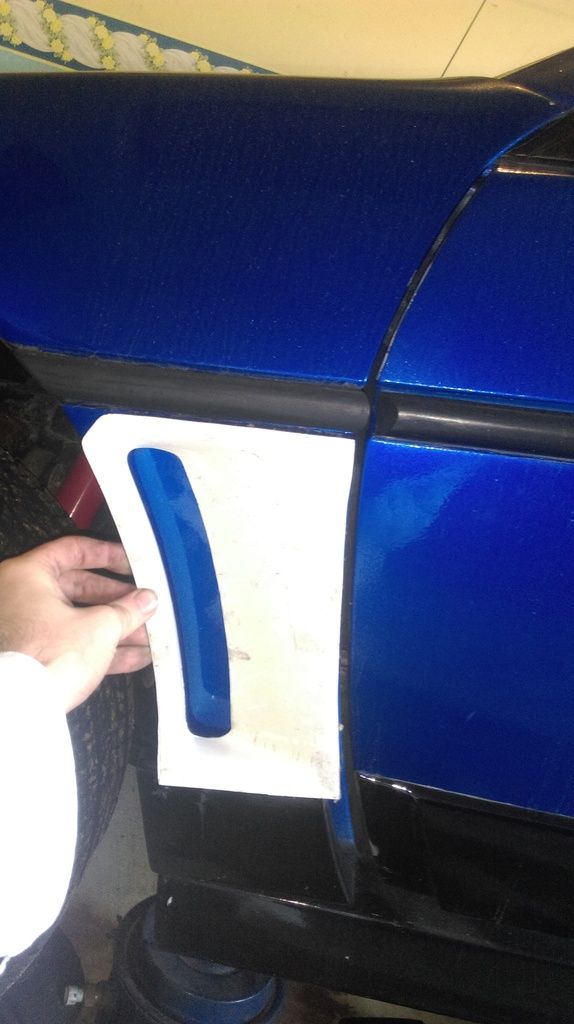
This video goes through the steps I took to replace the lower intake manifold gasket. From what I was told this is a common weak area on the L67. The old plastic gaskets eventually crack and leak so it is better to replace them now with better metal ones than to put it off and and have a bigger and harder project to do later. Originally I wasn't planning on removing the supercharger or the valve covers because I wanted this to be more of budget build. The valve covers are swapped in my fuel rail conversion video that will hopefully be posted soon. I'm still waiting for my fuel rail to come in the mail. Once I get it I can finish that segment and get that video posted. had I planned on removing these components in advance I would have painted them some cool color before reinstalling. Replacing the lower intake gasket wasn't as bad as I thought and so far my overall opinion of the 3800 is despite it being a more modern and advanced engine than the Fiero's 2.8 it seems much easier to work on than the Fiero engine. If I had to replace the lower intake gasket on the 2.8 engine I'd probably dread it and put it off for as long as possible. Having to disconnect wires, remove the fuel rail and especially taking off the vacuum lines would be a pain. On the 3800 it was a lot less stressful to do and I didn't mind it at all. When reinstalling the lower intake plenum you just have to remember to torque the bolts properly and sequentially. Here is the latest addition to my 3800 build series. Hopefully the other videos waiting in the wing won't be far behind in getting posted The next one I've been putting back together is swapping the supercharger pulley. Look for that coming soon!
I’ve finally gotten the next video posted. This one is a little out of order but I got the editing finished on this one first and figured I’d post it now. This video was on changing the supercharger pulley using the ZZP Pulley Puller. I swapped the stock pulley for a 3.4 pulley which I believe is the smallest pulley you can put on without having to chance the fuel injectors and cam. I also changed the sparkplugs to a colder plug that was more appropriate for this setup. The plugs I ended up going with were Autolite 104’s. I had to get them on Amazon because I had trouble finding them anywhere else. While changing the plugs I did notice that the plug closest to the alternator wasn’t removable with the alternator attached. The alternator ended up having to come off so that I could change the plug so my suggestion for anyone changing their plugs is to change them before mounting the alternator. It will save you from having to take it back off later. Here is a list of the parts used in this video:
This is a well detailed instructional build thread for anyone doing the 95-02 3800SC series II /4T65eHD swap. For those doing the series III swap 04-07 GTP just note that the later 4T65eHD trans mounts are different and use a different PCM. While I love my 3800SC swap and there's nothing wrong in having one; I've just come to realize that this is now old technology. Today's GM high feature engines are 33% lower in weight and make 300-325HP stock. In short far more power for less weight. As for his employment, I really hope that he's back to work by now.
------------------ " THE BLACK PARALYZER" -87GT 3800SC Series III engine, custom ZZP /Frozen Boost Intercooler setup, 3.4" Pulley, Northstar TB, LS1 MAF, 3" Spintech/Hedman Exhaust, P-log Manifold, Autolite 104's, MSD wires, Custom CAI, 4T65eHD w. custom axles, Champion Radiator, S10 Brake Booster, HP Tuners VCM Suite. "THE COLUSSUS" 87GT - ALL OUT 3.4L Turbocharged engine, Garrett Hybrid Turbo, MSD ign., modified TH125H " ON THE LOOSE WITHOUT THE JUICE "
Thanks for checking in on my build thread! After getting laid off things got hectic and I didn’t keep up on this build thread at the same rate I was building the car. Life has thrown me a lot of drama the past few years. I did eventually find another job but not in my field of work so it was a huge pay cut. The Blue car engine swap WAS eventually finished but it took about 2 years longer than I was hoping. There are videos on the build process that I will post here with a description behind them. Unfortunately in September 2018 while driving my supercharged Fiero a car coming the other way made a left turn in front of me totaling the car. I will post more on that later as well as some pics. In November 2018 I pick up a new 87GT to swap everything over from my wrecked car but 2 weeks after bringing the car home I got hit with divorce papers so that project has been severely slowed. Can’t catch a break I tell ya. I have been making a new set of Fiero videos on this new swap project that I hope to have out later this year. More on that later as well. Anyway I should update this thread with the last sets of videos.
------------------ 87 Fiero GT 3.4 Pushrod with 7730 ECM & DIS 88 MERA #8013 85 Fiero SE with 3.1 pushrod 86 Fiero SE 2.8 stock www.youtube.com/LostNotForgotton
This video is the first of a collection of miscellaneous videos that can’t be logically bundled with other certain part installations. In this video I will be plugging the open channel in the water pump. The freeze plug needed is a Dorman Freeze Plugs (1.00 in. diameter and 0.440 in. height) part number 555-017 https://www.summitracing.com/parts/RNB-555-017
In this video I will be swapping out the stock 3800 fuel rail for a custom made one that works better with the Fiero. You can order your rails on this PFF thread https://www.fiero.nl/forum/Forum4/HTML/065100.html
You can email FieroFreak00 (Jason) directly with the email seen in the YouTube video. I do not embed email links in the text of YouTube descriptions or post in forums to prevent spamming. That is why I list email address in the video. The redesigned fuel rail involves relocating the front mounting bracket to be able to facilitate using rails with an inter-cooler and that's using either the short stack or the full stack. Instead of using the injector spacers, rail spacers or buying an aftermarket set you can use this one with no issues. This helps with serviceability, in that you don't have to remove the fuel rail to service the supercharger. Install the injectors into the fuel rail with the clips first, then install the fuel rail onto the engine. Be sure to use a little petroleum jelly to lubricate the O-rings to allow for an easier instillation into the rail and into the head (this includes the regulator). Also, you can clock the regulator for ease of installing the vacuum lines.
These rails use quick connectors from the Pontiac Transport braided stainless fuel lines, that you can get from another member on PFF or can get one at the junkyard yourself. They are the newer Push lock style fittings and the inlet and outlet exit at the valve cover which is directly over the top of where the Fiero lines are and allows easy access to them. This gives the rails a cleaner look as well as being safer than bending the original rails or running rubber hoses over the supercharger which ruins the look of the engine compartment and is possibly a fire hazard. You can buy the Pontiac Transport braided stainless fuel lines or get a set from the junkyard and put them together yourself using instructions located in a couple of threads here on the forum https://www.fiero.nl/forum/Forum4/HTML/062079.html
I highly recommend picking one up. Serviceability of your fuel system, supercharger or accessing the valve covers are much easier This video also covers the swapping of the valve covers. The oil cap would be on the back side of the engine compartment so it is wise to swap them around. When removing the valve covers it is recommended that you replace the gaskets. Here is a link to those gasket kits: FEL-PRO Valve Cover Gasket Set (supercharged options) VS50465R https://www.pepboys.com/pro...L/0/V6-3800%25203.8L
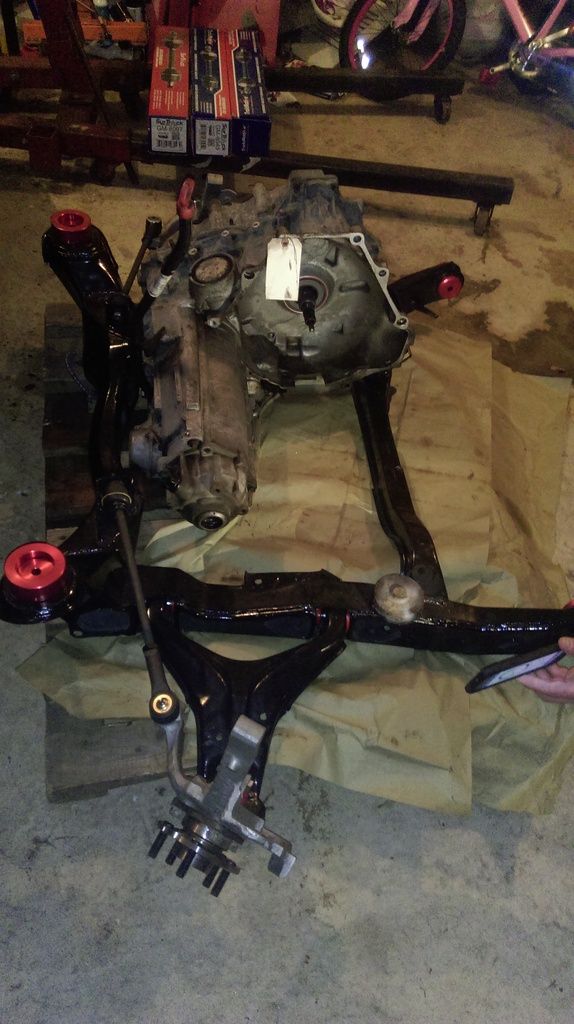
In this video I use FieroRog’s lower engine bracket and mount it to an aluminum engine mount made by Rodney Dickman. I happen to have an engine mount from West Coast Fiero as well so I did a side by side comparison of the two mounts. I explain what I like and dislike about each and make a conclusion on what mount I prefer with my build project. If you’re sourcing parts for your build project I would recommend check out that portion of the video and decide for your self on what bracket works for you.
I also finally mount the engine to the transmission and show how to route the supercharger belt system for anyone who isn’t sure how to install the belt.
In this video I install the engine wiring harness. The harness I use was purchased through a company called Injection Technology. These harnesses are built brand new and are not old re-pinned harnesses. I decided to use their harness because of the fact that the wires and connectors are all brand new. There is no concern of plugging up and harness that might have a worn connector or broken wire. Injection Technology also offered a 1 year warranty so I had the assurance that if there is any issue they would correct it. As of now I am not sure if the company is still in business but either way the video should be helpful in showing how to route the harness around the engine.
This Video will go through the steps on removing the fuel tank, removing the sending unit and replacing the fuel pump. My Fiero is already up on stands and I am swapping in a bigger fuel pump for my 3800 swap. Check it out and let me know what other videos you'd like to see. Below are links to stock fuel pumps as well as the fuel pump I am using for my supercharged 3800 swap and a sending unit if you need them
In this video I attached the transmission shift cable arm and bracket as well as hooking up the SpinTech exhaust system. After that I FINALLY get the opportunity to do a pre-installation of the engine and test start it. Now that I know I have a good running engine I am ready to do the final hookups and finish up this project. Please check back soon for the LAST video in my 3800 install video series. The content seen in this video is for reference use only. Every engine/transmission will be unique in various ways. Please confirm the proper setup needed for your particular engine and transmission. I’m hoping to eventually be a one stop shop for most of your 3800 Installation and parts information. These 3800 installation videos will be broken down into different build segments so keep checking back for new videos.
This is the final video in my 3800 build. This shows that everything done in my previous videos has gotten me a running and driving supercharged 3800 Fiero. If you need to have your PCM re-tuned you can get more information and contact Ryan Gick via e-mail at sp1@gmtuners.com or visit his website www.gmtuners.com
------------------ 87 Fiero GT 3.4 Pushrod with 7730 ECM & DIS 88 MERA #8013 85 Fiero SE with 3.1 pushrod 86 Fiero SE 2.8 stock www.youtube.com/LostNotForgotton
[This message has been edited by LostNotForgotton (edited 01-23-2019).]
Man, I don't stop by much since I don't own my Formula(really getting the Fiero itch again though) but it's really cool to see another Delawarean kicking around. Chances are I've seen you scooting around in a Fiero or two. Going to have to go through and check out all your videos too! Just gave you a sub on YouTube.
This was an excellent thread and it was great that the OP decided to make some great videos and share his build with all of us. The only extra that might be beneficial is a separate video on another thread showing how to measure up for the custom CV axles that are often needed. In this build he was able to use certain Fiero and GTP parts but on some builds, depending on the design of mounts used, it becomes necessary to measure up and have axles made. All and all still the best detailed 3800SC build video that I've seen.
------------------ " THE BLACK PARALYZER" -87GT 3800SC Series III engine, custom ZZP /Frozen Boost Intercooler setup, 3.4" Pulley, Northstar TB, LS1 MAF, 3" Spintech/Hedman Exhaust, P-log Manifold, Autolite 104's, MSD wires, Custom CAI, 4T65eHD w. custom axles, Champion Radiator, S10 Brake Booster, HP Tuners VCM Suite. "THE COLUSSUS" 87GT - ALL OUT 3.4L Turbocharged engine, Garrett Hybrid Turbo, MSD ign., modified TH125H " ON THE LOOSE WITHOUT THE JUICE "