I would like to start off by thanking those like DoubleC4, and Katatak. Following through the Slim pop up thread https://www.fiero.nl/forum/F...1/HTML/076247-3.html , I was able to use a few ideas, as well as come up with a couple of my own that I would like to share.
Enjoy...
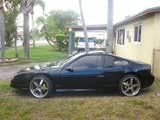
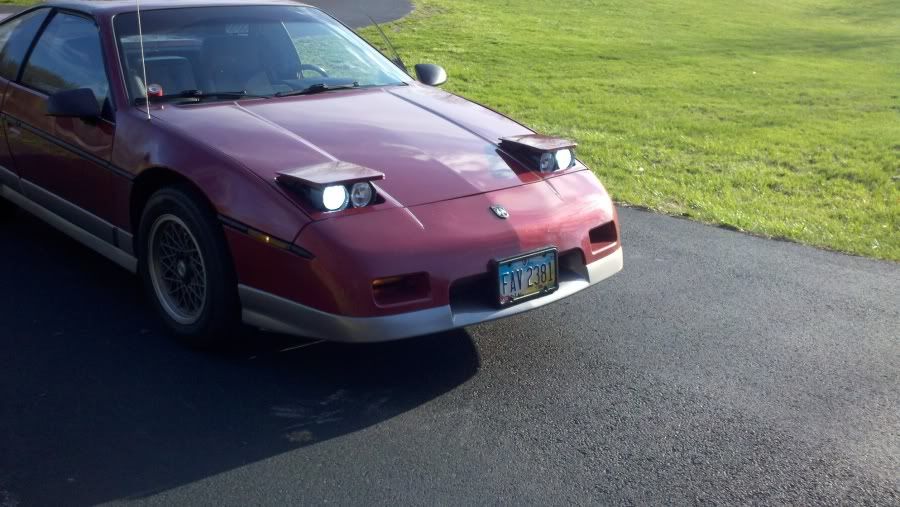
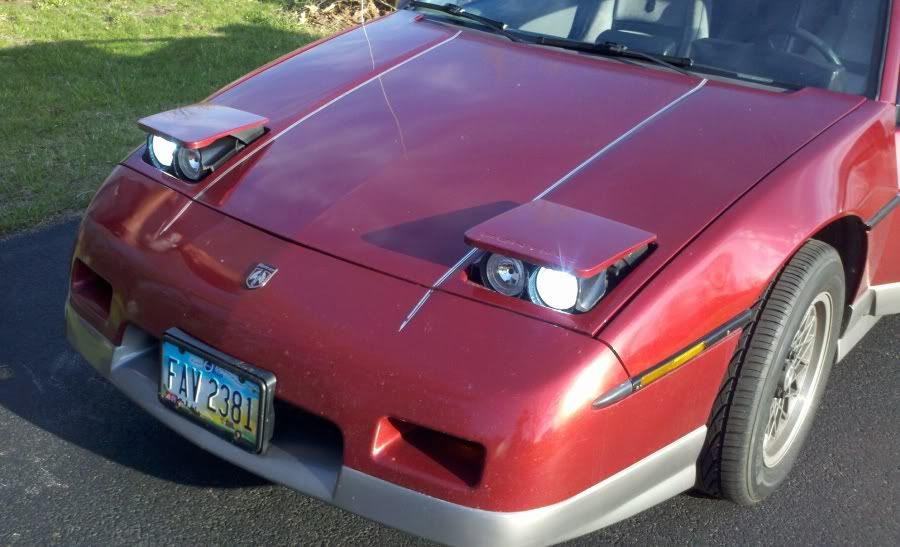
I am the proud owner of a TLG Level II HID light kit for my GT. http://www.tlg-auto.com/Fie...ion-Kit-Level-2.html I have always wanted that slim, sleek pop up look. My GT looked sad with the lights up? Why did they mount such large lights on a tiny car? (I know, laws...) After much research, I decided to modify my lights to accept a 4" x 6" headlight. I planned on still using the TLG HIDs, and wanted a more DoubleC4 look to my front end. So, I ordered a set of EBay projector, diamond cut beams, and went to creating.
(I should have taken more pics in the beginning, but eh?)
I used four adjuster screws from the parts store to mount the headlight in the Fiero assembly. They were in the help section, and were made for Ford/mercury cars. I threw out the cheap China metal screws, and substituted in SHCS 1/4" 28 x 1 1/2" for adjusting the headlights. I drilled holes through the Fiero assembly, and used JB Weld to set the adjuster nuts into place. The Ford adjuster screws have a nice diamond shaped base, with two holes to JB Weld to the Fiero assembly.
The EBay headlights that I bought were $30 with shipping. They came with a "projector" housing that was crap. Those went into the junk drawer instantly. I used the TLG HID setup, and had to adapt it to the H4 housing. Meaning, the cheapo lamps had a very chinsey spring to hold it all in. I needed to drill out, and use 3 small screws to hold it all in correctly. Yes, worth the $30, but expect to work on them to make it right.
The EBay link to these headlights. They come with a very blue in color H4 bulbs. Also, I needed to seal up the glass to the plastic housing in several spots. The spring that holds the bulb in is garbage. And the "projector" housing mounted inside is pretty much junk also. I used 3 small scres to mount the TLG bulbs, and removed the "projector" bits. My TLG HID harness is defferent from stock, and I did not test out the output of the EBay lights. But, worth the money, and I would do it again with these headlights. All easy fixes. http://cgi.ebay.com/ws/eBay...em&item=350449811321
I used Nyloc nuts to hold the adjustment screws in place. I had some rubber grommets between the Nyloc and the headlight assembly. You can see how I had to drill out the Fiero assembly to fit for the adjustment screws. The angle of my cuts in refrence to the Fiero assembly can be seen here. This easily took up most of my thought process. I did not want to mess up farther than I could recover. Using the Fiero assembly let me build, and set my new headlights very low in the bucket.
In this pic, you can see where i had used some 1/8" aluminum strips to reenforce the Fiero assembly before I drilled for the adjustment nuts. I used a lot of JB weld, so i bout the big tube for $15. I used about half, and have more for other things. Money well spent.
I still need to cut the decorative trim to match the new lines, but that will be easy. I plan on taking one apart, and take more detailed pics of the plates that I had JB welded to the 4" x 6" headlights. I basically made four plates out of 1/8" aluminum. The inside of the plate, nearest the headlight, is concave to fit around the headlight, and provide strength. The JB weld is awesome stuff, and I am not at all concerned about it cracking, or breaking. One of the reasons for the four adjusters. The entire setup is extremely solid, and adjusting the lights only requires an allen wrench. It adjusts solidly, and does not have any motion from bumps or vibrations.
Tony
[This message has been edited by Tony Kania (edited 04-26-2011).]
I was told recently that you can buy Hid that do not require ballasts if so any glass housing would be good I found mine years ago for $15 with halos. To convert with Ballasts can be done for about $35 on ebay.
Nice job, looks like a better system than I came up with.
Did those lights have mounting bosses on the back of the housing? Its hard to see how you mounted them to the black "plate" that gets adjusted with the adjusting screws.
How is the light output at night? By the way, hopefully those aren't the exact same housings I went with... the "TOP" of the light is actually the bottom...
That looks EXCELLENT!! Really looking forward to hearing how you did this. I was getting ready to machine my own version of the Fiero1fan buckets but paying for those damn hellas is expensive!! Peace
Thanks for all of the great compliments. When I get a chance, I will take one of the assemblies apart, and take some pics of my process. Quite honestly, a lot of it is measiuring, eyeing, and praying as the grinder takes hold of the materials the way that your brain intends it to. Besides the TLG HIDs that I already had, (which are awesome with the 7" x 6" Fiero housing!) I have maybe $60 in the deal. I even went to Pull and Jerk and got buckets out of an S-10, but after a lot of thought, I went with what I have. It is rather light, and I am sure that the whole system is lighter after the build. The headlights are actually really quiet when they pop up. You hear the motors working, then they are up. An unexpected added bonus, that was shear coincidence.
I have not adjusted them yet. Easter. But, I will do that soon. I have already adjusted them during mockup many times to figure out the functunality of my setup. I also did not want to post up until all of the kinks were worked out, but the system works so nicely, a bit of trim can wait.
Personally, I do not plan on making anything like this for the market. I will post up more detailed pics and measurements for the good of the forum, and anyone can do this, make their own, patent it, or whatever. I am very happy how well this came out. I just wanted a stock appearing look to my build, and want to share it with the community. It does take a lot of thinking, but even the EBay headlights came with "blue" bulbs. It accepts any H4 bulb, and this project can be done for less than $60 if frugal. You won't have HIDs, but any improvement over the giant Fiero eyelashes, well you know. That is why there are so many great low profile setups out there. From Fiero1/Synthesis, to TLG, to Hairbalm (sp), there are just so many great options. This is just another take, and like I said, not going to manufacture them. So, feel free to have at it. It was most gratifying.
DoubleC4, the lights look to be very generic. There is a TOP, but it resembles the bottom. The TLG bulbs have a cutoff built in, and I incorporated that into the 4" x 6" headlights. It took some drilling and fitting, but they fit perfectly in the new housing, and there is a cut off, but later this evening I plan on testing them out. The beam looks very much like the original TLG setup, so I am not worried just yet about output. I plan on making the beam as true to it's intended purpose as possible. (remember, we have a 6 month old, and quite often, his schedule superscedes mine. )
Katatak, for you, I will cut out new brackets, and ship them to you for free. The rest you will need to pick up yourself. Let me know.
This project can be interpreted many ways. Hopefully you can adapt on it, much like what I had done with other's ideas. It is not for the weak. There are some cutting decisions that I cannot relay on the internets as easily as actually touching the part. And some of the materials were salvaged from my scraps of parts. The rubber washers are approxamately 1/4" deep. I cut them from a 1" grommet that I had. Something similar can be found at the hardware store. Also, the SHCS were just because I like them. And they don't melt under a little screw driver force. The holes in the aluminum plates are just larger than the SHCS, and they spin freely. The Nylocs along with the plastic adjustment nuts molded into the Fiero assembly provide solid, secure adjustment, and keep the whole thing solidly mounted to the car.
Keep the questions coming. I cannot tell you just how happy i am with this setup. It all just flows so well, and I hope that it inspires others.
Thanks for looking,
Tony ------------------
[This message has been edited by Tony Kania (edited 04-25-2011).]
One more thing, for DoubleC4, the 4" x 6" headlights are now the buckets also. I threw away the bucket idea after struggling for something that I had in my head. I looked at how newer cars mound their buckets, and found that newer cars do not use those tin buckest anymore. That made me think how I could adapt the headlight into an assembly that could hold the light, adjust, and flow with the Fiero assembly. Throwing out the tin buckets, springs, and allowing for even more XYZ adjustment allows me to set the depth of the headlight assembly as much as an inch or more. It is currently set in deep, but that may change when mocking up the trim piece to hide the adjustment screws. I just wanted it to look as if it was made at the factory when done. The edges of the Fiero assembly took a lot of blend sanding to match the pair together. Just a lot of tedious work.
They look good. I've never liked the Fiero's stock height for there headlights. they look to toyish when there up. but these look really good...... ideas for my one 84
Katatak, for you, I will cut out new brackets, and ship them to you for free. The rest you will need to pick up yourself. Let me know.
Tony
Thanks Tony, I would not dream of having you cut a set of buckets for free but I would take you up on the offer to cut a set for me. I have several extra buckets - I would be more than happy to send you as many sets as you want. Figure out what your time is worth and I'd gladly pay you for a set. Sounds like Rick88 is interested too. Not in a big hurry either so get yours perfected then we can talk!
Thanks Tony, I would not dream of having you cut a set of buckets for free but I would take you up on the offer to cut a set for me. I have several extra buckets - I would be more than happy to send you as many sets as you want. Figure out what your time is worth and I'd gladly pay you for a set. Sounds like Rick88 is interested too. Not in a big hurry either so get yours perfected then we can talk!
Pat
Pat is correct. I am in definitely interested in a set also Tony. I really like this "factory" but so much better look!
I was not able to aim them this evening. Rain, and time.
Thanks again for the compliments. I just really mod my GT to my taste, and will surely never be done with her. Like the lights that ghost posted, it is just great that we get to do this to these cars. Fieroking did a RX7 mod to his yellow Fiero many a year ago, and they still look fresh and new. I just wanted the slim look, solid build, and a from the factory appearance.
That looks EXCELLENT!! Really looking forward to hearing how you did this. I was getting ready to machine my own version of the Fiero1fan buckets but paying for those damn hellas is expensive!! Peace
Pete
Hey... I like my expensive German optic paperweights (until I get them mounted, that's all they are ). Also, very pretty.
Anywhoo... Nice looking mod, there, Tony. Makes the car go from "moody introspective" to "angsty ne'er-do-well." I still have to bug ya about the legalese - hey, someone has to do it, right?
Exactly! Those nice German paperweights are probably the guage at which all things should be measured. Every so beautiful in design, and rendering.
And yes, the legality of what I/we are doing is borderline illegal. Hence my apprehension to build these for the public. I may make a few for some select folks, but I will not produce these for the public. I will leave that to the pros. There are so many great options that we have for one, and for two, I don't feel the need to compete with those that I respect in the Fiero world. I absolutely love my own little niche, and would't think of changing the scale of things.
Personally, I still think a rectangular headlight in a Fiero just looks right. It was just the hideously high door height, and you have solved that very nicely.
Check out these American made paperweights. JW Speaker Model 8800 These are currently way too expensive for normal mortals. They are configured to be used in pairs for hi and low so they really won't work for us. But this is a company to watch
I was told recently that you can buy Hid that do not require ballasts ...
You were told wrong. HID capsules use an electric arc to generate light. (The 'D' in HID stands for "Discharge.") That requires two things: 1) a very high starting voltage to initiate the arc, and 2) some means of limiting and regulating operating current once the arc is established. A ballast (or its equivalent) is necessary to provide those functions.
[This message has been edited by Marvin McInnis (edited 05-03-2011).]
You were told wrong. HID capsules use an electric arc to generate light. (The 'D' in HID stands for "Discharge.") That requires two things: 1) a very high starting voltage to initiate the arc, and 2) some means of limiting and regulating operating current once the arc is established. A ballast (or its equivalent) is necessary to provide those functions.
Thats right. High Intensity Discharge. A capacitor will work. I know guys that use audio capacitors on their bow fishing boats to power their HPS lights. (High Pressure Sodium) It also takes a jolt to start them.
A capacitor will work. I know guys that use audio capacitors ... to power their HPS lights.
Unless you can explain to us exactly how that works, I'm going to say, "No." An appropriate-value capacitor can be used to limit the AC current through an electric-discharge light (they are commonly used in inexpensive electronic fluorescent ballasts, along with other components), but "a capacitor" alone won't work to create the starting voltage spike.
Perhaps you mean that they use a capacitor in parallel with the battery to lower the effective battery impedance during lamp startup, but that's not the same thing as simply using a capacitor in place of a ballast. And the idea of using a capacitor to "power" a light for more than a few seconds is simply not feasible.
[This message has been edited by Marvin McInnis (edited 05-04-2011).]
How did you mount the headlight housing cause i thought jb weld doesn't work on plastic?? and i noticed the housings had no screw mounts??
In this pic, you can see how I fabbed up aluminum plates about 3 1/2" tall by 1 1/2" wide. I put a concave on the inside to match the headlight housing. I JB welded one side, then flipped the light over, and did the other side the next day.
You can see headlight hardware nuts that I had mounted into the Fiero housing. The JB Weld was put on heavily, and for an application like this, it is bullet proof. The 4 adjustment screws hold the headlight in place in the Fiero mechanics. There are no springs in how I did this. I thought about how new cars do their lighting, and it is all with adjustment and pivot points. I really don't see rusted out springs anymore, and I just went with that notion of how I was going to do this project. To finish it off, I shot semi flat and calle dit a day.
[This message has been edited by Tony Kania (edited 05-31-2011).]
Did u just do the right and left side or does the plate wrap around the whole edge of the housing? and is there anything holding the back or is the aluminum piece just on the front?
There are two plates per headlight. One on each side. With JB welding the aluminum to the headlight, it is now an assembly. The assembly floats in place on the four adjustment screws.
Tony
Edit: I hope that I answered your questions. I may have lost translation over the internet of just what you are asking. I will check back later.
would it be possible to get a closer top picture of one of the brackets
and is the headlight housing made of metal or plastic?? cause if their plastic i though jb weld doesn't stick to plastic,
i think my problem i have is understanding the concave piece and how it holds the light with jb weld,
I understand its one piece but i'm having trouble understanding how the aluminum sticks to the what i believe to be plastic housing cause my understanding is jb weld doesn't work on plastic
does the aluminum make like a clamp around the edge of the housing to hold it or is is just straight attached if i could get a little more explanation on the bracket that would be great
i understand the side screws help to adjust i understand that just fine
Thanks for putting up with all my Questions Josh
[This message has been edited by redwingshat (edited 05-31-2011).]
Josh, when I get to my computer later, I will post up some more pics. I have a few things apart, and I will do a better pic with the parts exploded. I also saved the template for the aluminum, and will post those also.
The bonded pieces are holding really well. The ebay headlight is plastic. I roughed up the plastic area to be mated with some very coarse sandpaper. I then bored 5 or 6 (can't remember) holes into the plastic, so the weld would sit in it. The aluminum also has several holes drilled through, and the weld oozes through. After a day, it is probably possible to break off the pieces, but in a few days, it is stronger than the headlight. It would easily break above the JB welded areas, rather than at it.
Let me get those pics up later. Even when originally posted, I knew better, explanitory pics were needed.
Tony
Pics tomorrow. sry
[This message has been edited by Tony Kania (edited 06-01-2011).]
You can see how the JB weld is put on. Both top and bottom were done a day apart.
The rubber washer, SHCS, and Nyloc assembly...
Only coming off with sandpaper...
It is obvious, but a little more cleaning up, and completely finished. They function properly, and there is no binding when the mechanisms operate. Hope that this helps.
I love this look, its sleek, the only question is what about headlight mechanics? as far as raising and lowering the headlight itself. i might be retarded, well i am, but doesnt the motor want to throw the arm too far out, as if the bucket was the same height as before? I only ask because its cold, and i have time to do this, and i love it soooo much.


 So, I ordered a set of EBay projector, diamond cut beams, and went to creating.
.JPG)
.JPG)
.JPG)
.JPG)
.JPG)
.JPG)
.JPG)
.JPG)
.JPG)
.JPG)
.JPG)
.JPG)
.JPG)
.JPG)
.JPG)
.JPG)
.JPG)
.JPG)
.JPG)


 NICE JOB !!! Do you have the specs of the back plate (measurements)


.JPG)

.JPG)
.JPG)
.JPG)
.JPG)
.JPG)
.JPG)
.JPG)
.JPG)


