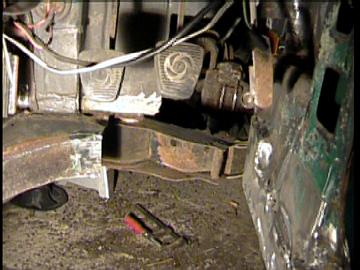
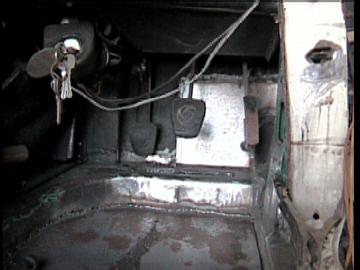
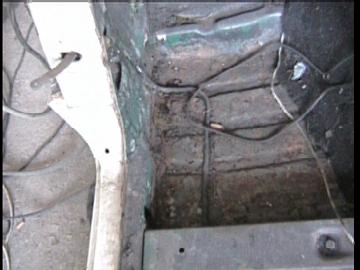
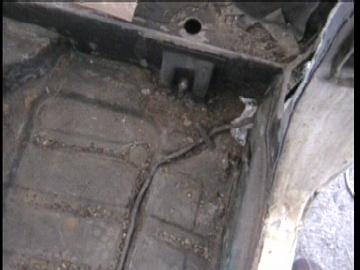
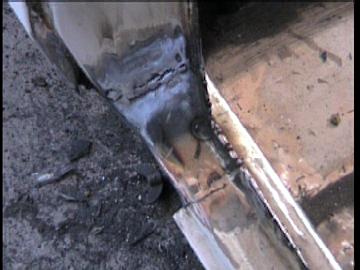
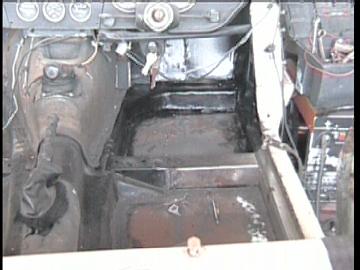
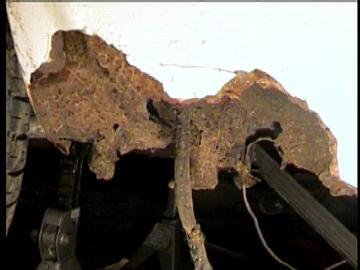
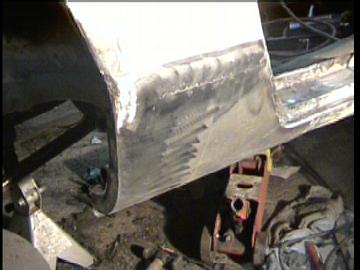
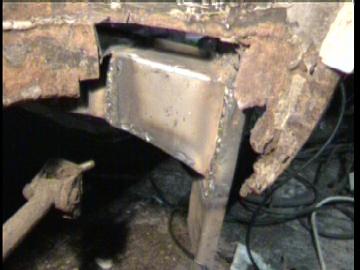
I've heard a lot of comments about the metal worm in the US.......how about this? It is a UK registered triumph spitfire...how the guy managed to drive it for the 1000 miles to here without dying is beyond me...now he wants me to rebuild it!!!Will have to fabricate all the panels: none available in Spain..should take about three weeks and $2000...EDIT: Update...6 weeks and $3500..it is really bad!! The photos are of the righthand side floor panel and rear suspension tiebar mounting ....or where it should have been!! fierofetish
[This message has been edited by fierofetish (edited 01-22-2004).]
IP: Logged
08:03 PM
PFF
System Bot
Firefox Member
Posts: 4307 From: New Berlin, Wisconsin Registered: Feb 2003
I can say without a doubt that that rust looks like imported genuine U.S. grade A rust from Wisconsin! I bought an old plow truck, a '77 Chevy Blazer, missing about as much of the floor as you could imagine. The seats were mounted on wood planks, and when the planks were moved, you could unbolt and lift the transmission and transfer case out without removing the floor.....it was gone. This truck was actually driven about 20 miles to it's final disassembly place (after removing the plow and engine we swept up the rest of it) and every bump we hit the thing dropped about 5 lbs of rust and settled an inch or so. We didn't realize how bad the condition of the truck was until we got it home and started to tear it apart. Not good.
Our project wasn't to be put back on the road. Good luck with your project, and enjoy that prime Wisconsin rust.
No Mark, I believe that is, without a doubt, the Harris County Pirhana Variant, a Texas Gulf Coast Rust. In the wild. Destructive paylod..Yes. Threat assessment-high. Has the capacity to reduce a D-8 Cat to a pile of iron oxide within 96 hrs, if left unchecked. Go here to get the latest preventative and removal procedures. (best viewed with Human Brain beta 1.0 or higher version) http://www.por15.com/
[This message has been edited by maryjane (edited 12-11-2003).]
IP: Logged
07:08 AM
PK Member
Posts: 1249 From: Oxford, England Registered: Sep 2001
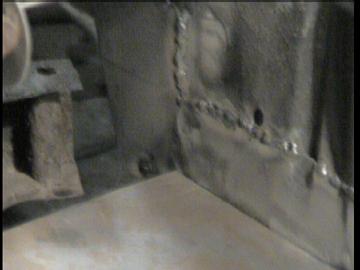
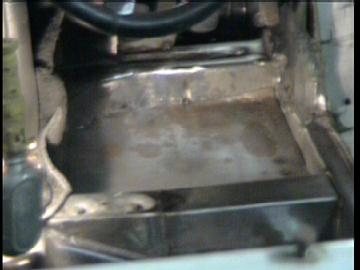
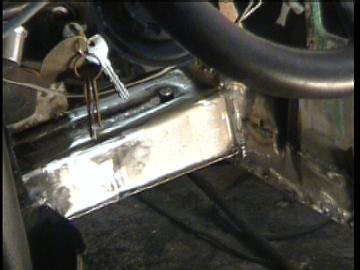
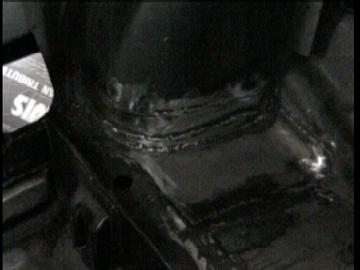
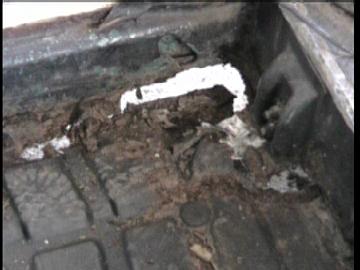
Well, in between Christmas, New Year, and various other jobs, I have started the rebuild.If you are interested, I will post progress. I am making all the panels, because to ship to Spain from UK would be more than double the cost of the new panels!!I decided to start at the worst spot, which is where the rear axle tie-bar bolts to the body, as seen in one of the photos above. I have removed all the rust,and also some of the worst welding repair work I have seen in my life!!I don't believe this car had a legitimate test in years!! Here are a couple of pictures to show before and after.. after: view inside wheelwell: Because I am making all the panels, I have to replace them one at a time, in order to line up the new ones.That accounts for all the rust you can still see!! fierofetish
[This message has been edited by fierofetish (edited 01-22-2004).]
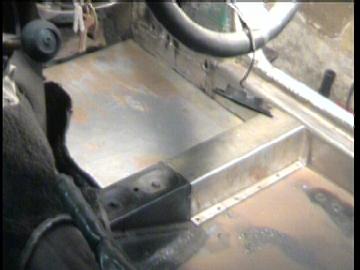
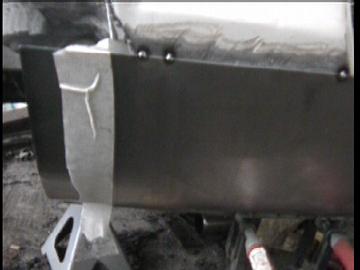
An update: I have cut out all the floor on the driver's side, and am replacing it with a flat steel floor, with bracing welded to the underside. The inner sill was a bit difficult to make....it is made of 1.5mm thick sheet steel, and there are 5 different bends in it: The outer sill also has a lot of bends, and with them being over 3 ft long, and not having a bending machine, I have to do it all by hand. There is also a centre sheet between the two, so now the sill is 50% stronger than before.The whole of the lower half of the car was totally rotten, and so I have made every replacement panel.3 dimensional curves are the hardest bit to make, and so I make them in 3 sections, and weld them together.The footwell is hard to get to, but I am going to finish the whole of this side tomorrow, and then remake the other side.All the panel joints and welds are to be dressed, and then sealed with a polyurethane sealer, to prevent further rust damage. I am buying a lefthand drive steering rack, and changing the driver's side to left hand side to make it easier to import to Spain. Fortunately, the chassis is reasonably sound, but the whole of the steering, back axle and suspension will have to be sandblasted and repainted.I am toying with the idea fitting the engine and drivetrain from an Alfa Romeo, which is a twincam 2 litre engine,producing 145 bhp, and a 5 speed gearbox. This will require a little beefing up of the rear suspension, but should be fun to drive!!I hope to have most of the welding repairwork done by Wednesday, and then the bodywork repairs must begin...I never use filler, except to get a fine finish on repaired sections before painting. fierofetish
[This message has been edited by fierofetish (edited 01-11-2004).]
IP: Logged
04:50 PM
Jan 12th, 2004
Fie Ro Member
Posts: 3735 From: Soest, The Netherlands Registered: Sep 2001
Hi Roderick!! Yep, it looks that way.I expect you know these cars..they rot like mad from day 1!! Still, it is great to rebuild a car totally, and that is what I am going to have to do!!The engine ia supposed to be rebuilt only 1100 miles ago, but if it was, it was done by somebody from Randstad Uitzend bureau!! How is it going with your car? I bet it is a bit cold now in Holland, for garage work!! fierofetish
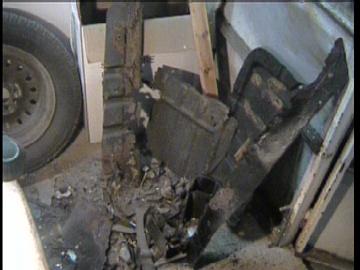
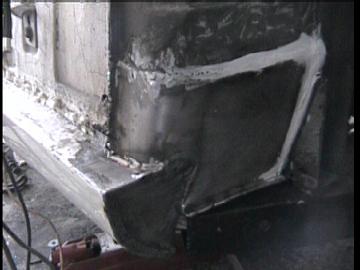
This car is a real can of worms...Every time I think I am getting nearer to having at least one side finished, I discover that the metal I am trying to weld to is body filler!!Can you imagine somebody repairing bodywork and chassis with bondo, and then moulding and finishing it to look like welding? Whoever did the repairs on this vehicle obviously couldn't afford a proper job, and did it the cheapest and easiest(and most DANGEROUS )way. I guess his aim was to fool the government inspection agents, and it looked like it worked!! Acouple more pictures to keep those of you who are interested up to date...I haven't bought a single panel yet....and hope to keep it that way!!! Much cheaper and better quality and fit, than using replica panels made out of the thinnest steel possible!! The driver's side footwell The front crossmember or outrigger was rotted completely away under the filler, and it was a difficult job to replicate it!! Here is some of the rotten metal cut out so far!! Tomorrow is another day!! fierofetish
[This message has been edited by fierofetish (edited 01-13-2004).]
IP: Logged
08:10 PM
Jan 14th, 2004
Liquid-Reality Member
Posts: 2031 From: Fredericktown, MO Registered: Aug 2003
Hi Liquid-Reality!! I live near a Tourist resort here in Spain, and a lot of People come over to work the summer.The owner drove the car 1250 miles here, and was lucky not to have killed himself!!! Ignorance is bliss, I suppose.He has now gone back to the UK, and asked me to repair itf.It will be completely rebuilt, and repainted top half a beautiful metallic purple, and the lower half dark silver, with a blue ragtop.Thanks for your interest!! fierofetish
[This message has been edited by fierofetish (edited 01-22-2004).]
Is this thread of interest to y"all?...plenty of hits, but no comments either way!! I will stop using bandwidth and finish the job without posting progress, unless you find it interesting...just let me know!!! If not, I will just post a final set of photos to show finished product fierofetish
[This message has been edited by fierofetish (edited 01-16-2004).]
IP: Logged
05:37 PM
Xantavar Member
Posts: 1158 From: Big Rapids, MI...Ferris State Registered: Nov 2002
That question is a bit too deep for me.....HHMMMM!! Looking at all the rot, I think it more likely that He had the English Channel parked in the car!!!! fierofetish
[This message has been edited by fierofetish (edited 01-16-2004).]
More pics.. front bulkhead repaired Finished footwell...pedals going to other side today: Before and after...the side repaired was much worse than this!! [IMG]EDIT UPDATE: or so I thought!! the next side is in fact, far worse...https://images.fiero.nl/pffimages/old_and_new.jpg[/IMG] next: and: and: I am going to remodel the inside using my Fiero to give you an idea as to how it will look!! Anybody care to give an estimate of value of repairs so far? fierofetish
[This message has been edited by fierofetish (edited 01-22-2004).]
i had a Fiat Spyder years ago. The car was great, but the chassis rusted out around it. Was a 1969, engine had 45,000 original miles, and ran beautifully, but the floorboards were gone, and the whole underside was practically as strong as a piece of carboard. I had to finally get rid of it.
Glad to see one of the similar style car saved. And pretty cool to see all the build up pics.
IP: Logged
08:45 PM
mvstar Member
Posts: 209 From: Ortona Fl. USA Registered: May 2002
You must want a Spitfire pretty badly. not me (years of experience with them when they were new) but it looks like you are doing a great job of saving the old girl.
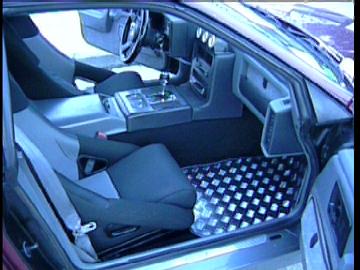
Thanks for the posts!!I guess the desire to own a Spitfire doesn't really come into it... don't we all like a challenge??!!!!This is basically a car with beautiful lines, badly made with cheap materials in the first place.I chose to make all the new panels myself, because the originals, and replacement items, are made of very thin sheet steel....0.8mm in most cases.I am making all the panels the way they used to many years ago...panel beating.I love to make 3dimensional things out of a piece of flat sheeting!! and using 1.4mm sheet.This will, of course, make the car a bit heavier,but also stronger,and all seams and welds will be dressed and sealed with polyurethane seam sealer.The welding may not look terribly smooth in the pictures,but I have ensured excellent penetration,and so inherent strength, in all the joints.When all the chassis and inherent loadbearing work has been completed, I am going to rebuild all the coachwork, removing all the rust.It is a challenge to do all this without proper bending and forming mandrells, but it can be done.I am going to have a local Upholsterer make a new Hood in dark blue Duck, and paint above the bodyline a metallic purple/blue, and below the bodyline in a dark Mitsubishi silver.I am looking for some really nice modern wheels,and when it is finished, I am going to start on my Dream Car.. I already have a Rover V8 3.5 litre 300hp engine,box and axle.....Projected figures are: 0-60 ..3.7 secs 0-100...7.5 secs top speed(theoretical with 5 speed g/box)165 mph 30 mpg at normal legal driving !! overall weight 675 kilos so this learning curve on a Spitfire will stand me in good stead to build it!! fierofetish
[This message has been edited by fierofetish (edited 01-22-2004).]
IP: Logged
10:37 PM
Jan 18th, 2004
TennT Member
Posts: 1523 From: Humboldt, Tenn Registered: Nov 2002
Thanks for all the postings,Guys. Today I had a bit of a shock...I thought the other side was not as bad....what a shock!! I needed something from the other side of the car, and didn't walk around as before...I just stepped on the old flooring, and....it fell out completely!! Oh well, saved me having to cut it out!! I also found out something else...I hadn't paid any attention to the hood, because it looks fine...not surprising!! It is made out of glass fibre!! Saves a lot of time in repairs!! I was more worried about the floors and suspension mountings, and so hadn't paid any close attention to it.I would really have liked to take the body off the chassis, but that is impossible on my own, so will have to lie flat on my back to clean underneath, and to rustproof all the new panels...more pics tomorrow fierofetish
IP: Logged
08:35 PM
Jan 21st, 2004
malacite Member
Posts: 2213 From: Casselberry Fl 32707 Registered: Oct 2001
Wow Nick. You like a challenge! I wish I could weld at all...
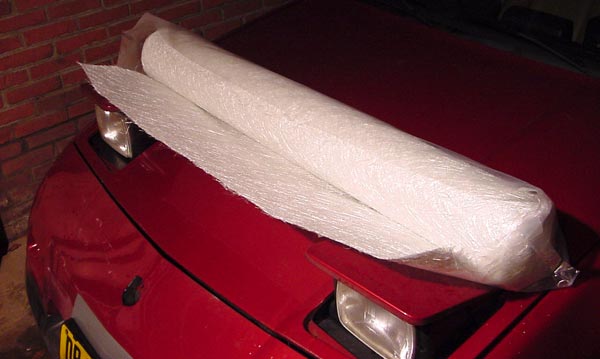
This is my new sheetmetal:
20 m/2 roll of heavy grade fiberglass It will help to finish all the hard work of the last 2 years. And I have a garage now! It is cold but with a couple of warm 150Watt lights I get some things done Good luck with your project!
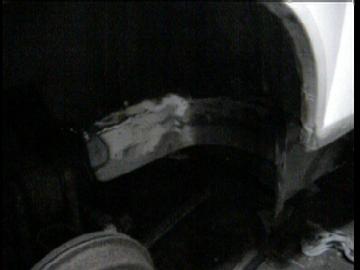
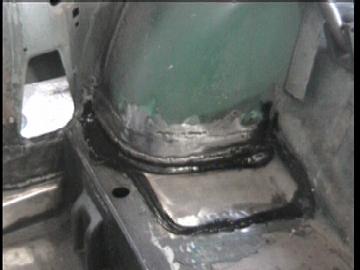
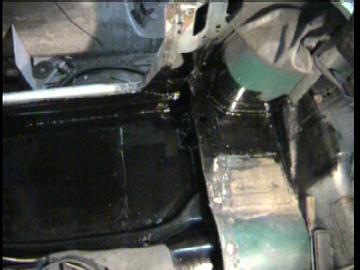
Hi Folks!! First" Fie Ro...I tried welding that stuff...it didn't like it!!!sort of shrunk up in a huff in the corner!! I always get more of the ************stuff stuck to me than what I am doing!! Glad you now have a garage and can get on with your project.. Malacite...$Rich$ and TennT...Thanks for your encouragement!! I have now finished all the basic welding on one side...thought the other side was going to be easier, until I stepped in to the car, and this happened!! Oh well ,as I said earlier, saves me cutting it out!! Here are some more phtos from Todays' labours: This is where the "back seat" and the wheel arch meet...a must for strength, because here is where the rear suspension and also seat belt mounting attach: rear wheel arch meets the sill, which is,surprisingly, still good...can't say the same for the lower wheel arch extension.Now that IS gonna be fun!! Here is the view inside the rear wheel arch...bit dark cos I don't have flash on my video camera!! and last but not least by a long way..Polyurethane seam sealer finishes all the welded joints and keeps the nasty water out!! Well, here we go for another night in front of the Monitor!! See you all in the Forums!! fierofetish
[This message has been edited by fierofetish (edited 01-21-2004).]
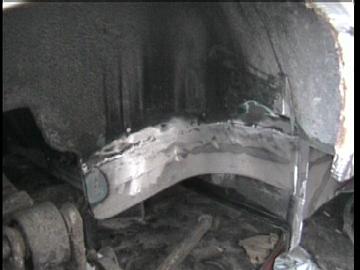
A quick update, with a couple of better pictures...unfortunately, the lefthand side is far worse than I thought:the metal worm has crept right up the footwell sides, and so I must extend the floors up, to replace the bad metal.Nasty job!!! Lots of complicated curves!! Better pic of inside the wheel well. Can't get POR 15 over here, and so I am testing a special paint, used for Industrial machinery, which is meant to be very resistant to rust and scratching etc. It is difficult to reproduce panels that are half rusted away!! However, under the rear wheelwell, there is an inherent rust spot, and I have redesigned how it is made, and done away with it...it is now all sealed in, with no nooks and crannies for the water and mud to start its nasty work!! fierofetish
[This message has been edited by fierofetish (edited 01-22-2004).]
IP: Logged
02:46 PM
PFF
System Bot
Fie Ro Member
Posts: 3735 From: Soest, The Netherlands Registered: Sep 2001
man.. i wish i was motivated like you.. I'd be done the stang now.. The most motivation i've had recently is to spend 20 minutes DA sanding the quarter, and it's not even bare yet.. Hey.. just a question.. gonna be replacing teh whole quarter with a patch, but am going to leave the originals where they attach to the car (on the rear taillight housing, and the door jamb).. So i'm gonna break all the spot welds on the wheel well, and cut a straight cut where it starts to turn into the roof (this is a 67 fastback).. My questions are.. Do I flange the original or the patch? And I'm a little iffy about this whole flanging process.. I've heard of people doing it like i'm going to do (Cut out a big rectangular patch from a new quarter skin, and cut the same from the car but leave the original welds), but there are some creases on the original.. Like in the middle of the quarter, there is a 'flare' that sticks out and runs back for awhile (cosmetic I mean).. Maybe an inch high.. i can't really flange that, it would warp it to hell.. How would you guys go about this? Thanks!
Hi JohnnyK...wonder if you are near my two Brothers?They both live near Toronto!! Can you send a photo of what you want to do? It is a bit hard to imagine the problem!! As a rule, if I have a complete new quarter panel, would not cut it, but fit it complete.It is relatively easy to remove the spotwelds if you have a special "spotweld removal drill" (Very cheap...about $8 in the UK!!)You just have to locate the spotwelds, drill a small guide hole(1/16 inch) and then put the point of the spotweld drill into the guide hole, and the hollow drill will cut through the old panel around the spotweld. When you have done them all, the old panel will lift off, with a bit off assistance!! All you have to do is then, carefully using a soft disc in an angle grinder , remove the old spotweld material left behind on the frame and then fit the new panel with the method I am just going to explain(it is called plugwelding in UK) If you decide to patch the original panel, you have two options.I use a "joggler" on the patch, which makes a small flange all around the edges to be joined.( The patch obviously has to be about 3/8inch wider all around than the hole you have cut out in the original panel) Then make drill holes in the original panel, about 1/4inch from the edge, all around the cutout part. you can then slip the new patch underneath, and put a suction cup on the patch to pull it up level, and then migweld through the drillholes , which then welds the two pieces together.It is really just duplicating spotwelds, and I have a lot of success with this method.No warpage due to trying to buttweld all around the patch,which is the other method you can use,and because of the flange, the outside surfaces are virtually flat.Just use a soft disc to level all the welds, and then fill it...I use lead to fill this sort of joint, but I guess bodyfiller will do just as well! If you or anybody else wants an illustrated explanation, Email me and I will prepare an instruction guide with photos. fierofetish
[This message has been edited by fierofetish (edited 01-22-2004).]
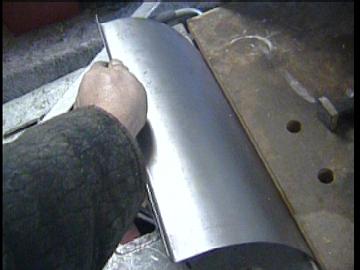
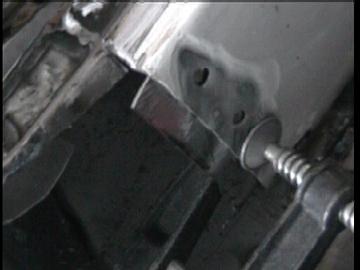
Today's update..lot of pics!! Making a new lower wing replacement panel Making the panel: clamped a piece of thin sheet to the existing bodywork to get a profile cut out a patch in 1.4mm sheet, and bent a lower flange: then put the flange in the vice between two long pieces of bar,and start bending the sheet to shape: once the bottom curve is set, put the sheet in a slot in the bench, and bend gradually until it is the same profile as the pattern Now drill holes along the flange to plugweld to the sill: after checking that the panel is still the correct shape,remount the panel in its place, and mark the line of the opening of the wheel well on the new panel. weld the pattern into the wheel well end: run a heavy weld on the inside of the joint from top to bottom,(see next posts for picture) to give depth to the joint, so the external profile can be polished.(see next posts for picture)Next, fix the panel back in place, and tackweld to hold position and mark out where the panel meets the existing sill.Cut off the panel, and weld a small piece of sheet steel to the back of the sill, to line up the new panel,using migplug welding.Replace the new panel, and mark the joint where the new panel meets the rear wheel arch, and cut precisely a butt joint.Weld a piece of sheet to the back of the new panel where it joins the wing, to make a supported butt joint. Now reweld the whole panel into place temporarily again, and measure and make a fillet between the new panel and where the sill rises to the doorshut.When everything fits perfectly, weld all the joints to mount the new panel... you can now smooth all the joints with a soft abrasive pad, being careful not to go through the steel!! I have abreviated the process not to take up too much bandwidth, and I have a lot more photos of the making of the panel.It is stronger, a better fit, and guaranteed to last a lot longer than the original!!!THIS SIDE IS DONE!!! Now to start all over again on the other side!! fierofetish
[This message has been edited by fierofetish (edited 01-25-2004).]
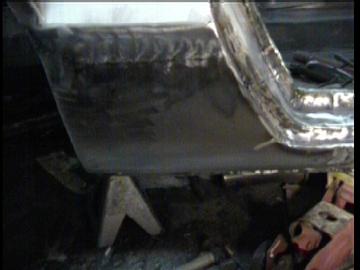
Oh Sh1t!! Can only post 8 pics in one post...here are some I had to delete:As it was: bending the panel to profile: plugwelding a backing to the original sill almost there!! everything in place and welded: Almost there!! This panel will not require any filler, just 2 coats of high-build primer: I shall continue with the other side now, but as it is the same process, I will only show you things that haven't happened before, and then post pictures of the finished object. I hope you have enjoyed it so far!!!! fierofetish
[This message has been edited by fierofetish (edited 01-23-2004).]
good god, your a machine. YOu'll have that done in no time! Yeah, I am about 40 minutes from your brothers.. Guelph is a small city (110000 pop. or so) an hour away from toronto..
I planned on flanging, but what I mean is, there is a lot of 'contours' to the original metal.. let me see if i can find a photo..
right below the 'sold' spray paint, you can see there is a crease up there.. it's pretty big, the picture doesn't show it though.. I can't really flange that can I? WHat i originally wante dto do was cut out from the wheelwell, up to almost the crease, and to below the 'sold' spray paint, and almost to the back, in eseence making a 'square' patch to fit on.. But I don't think I can flange areas that are creased like that? Thanks
Hi JohnnyK!! Sorry for the delay in replying...big time difference from here!!I looked at your pic, and am wondering if you want to patch the quarter because of the wheel arch rust, or if you want to go higher to replace the rusting in the upper panel as well!! From the picture, the rust further up looks to be only surface, and not perforation.This is where I would use lead filling to repair it, and would only cut out the wheel arch for replacement.In UK you can get repair panels for wheel arches.They go to about 6-7inches up the wing, and pretty easy to do.It all depends on what quality repair you want to make...restoration or repair.I guess the inner arch is also pretty bad where it joins the outer arch, and these too are available as part-repair panels in UK.I guess these panels must be available there too. That is a very big area to repair, if you want to put in a patch, and when cutting it, it will lose its rigidity, and become hard to get the panel to stay straight.Welding the edges will also lead to distortion.So, if you have a complete new panel, and dont want to remove the old one, I would suggest you cut all around the panel, about 2 inches below the swage line (flange) keeping the same distance all the way round from the edges.Then place the panel over the top of the old one, and scribe around it with a sharpened piece of steel so you get the actual outline of the new panel on the old one.I hope you have a mig welder, because anything else will burn too much at the joint, and you will be chasing holes all over the place, trying to fill them in with weld!!This will lead to distortion!! Do you have a joggler? This is like a hand operated pair of pliers, that when placed over the edge of the new panel and squeezed, will make a step in the steel which will pass under the original panel, and leave the jointed surfaces level .Practice first on a scrap of sheet!! and make sure the flange bends the right way, so it fits UNDER the existing panel!!! You cannot joggle over a flange, unless it is very shallow, so when I come to one, I cut the two panels so they butt up together. If you don't want to do it that way, you could cut the pacth to fit directly into the original panel, and using butt joint clamps, join the two panels edge to edge...not easy!!You can make butt-joint clamps like the ones I made, in the picture. easy and cheap to make!! Let me know what you think, and by the way, if People prefer this online panel repair course should be done by Email, let me know!! I am posting it here because I hope it will help others too!! fierofetish
[This message has been edited by fierofetish (edited 01-25-2004).]


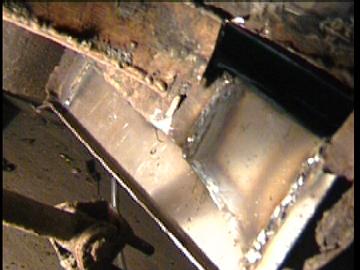
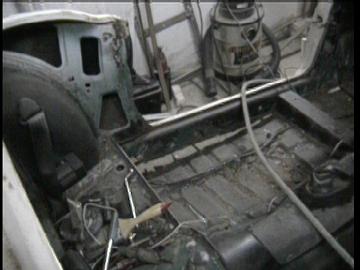
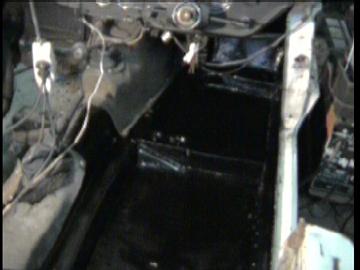
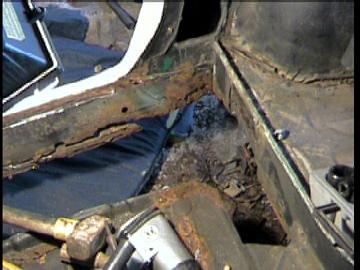 It is a UK registered triumph spitfire...how the guy managed to drive it for the 1000 miles to here without dying is beyond me...now he wants me to rebuild it!!!Will have to fabricate all the panels: none available in Spain..should take about three weeks and $2000...EDIT: Update...6 weeks and $3500..it is really bad!! The photos are of the righthand side floor panel and rear suspension tiebar mounting
 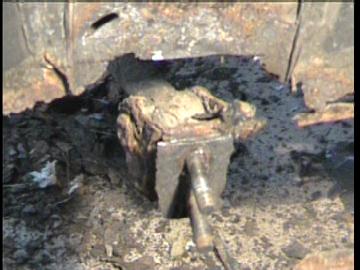 ....or where it should have been!!


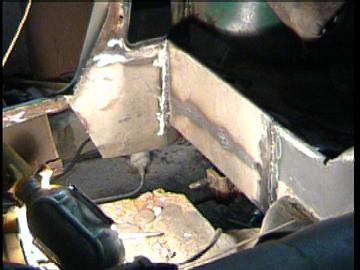
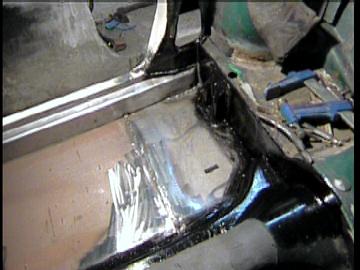
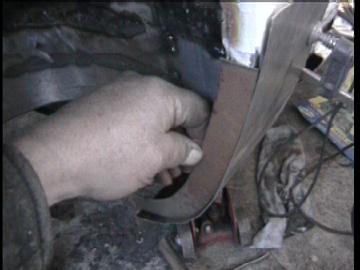
 The outer sill also has a lot of bends, and with them being over 3 ft long, and not having a bending machine, I have to do it all by hand.
 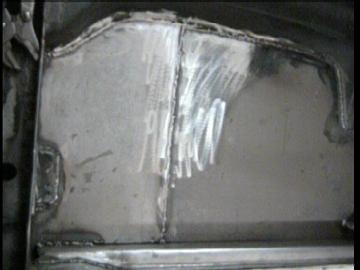 There is also a centre sheet between the two, so now the sill is 50% stronger than before.The whole of the lower half of the car was totally rotten, and so I have made every replacement panel.3 dimensional curves are the hardest bit to make, and so I make them in 3 sections, and weld them together.The footwell is hard to get to, but I am going to finish the whole of this side tomorrow, and then remake the other side.All the panel joints and welds are to be dressed, and then sealed with a polyurethane sealer, to prevent further rust damage.
 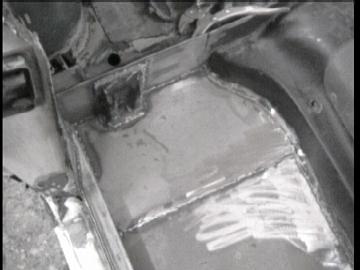 I am buying a lefthand drive steering rack, and changing the driver's side to left hand side to make it easier to import to Spain.


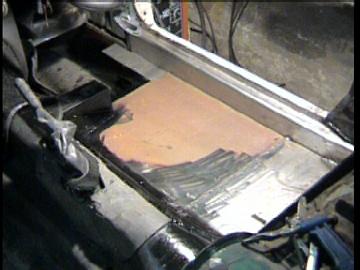
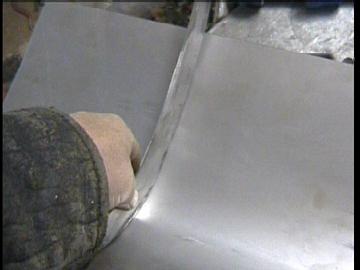 profile as the pattern
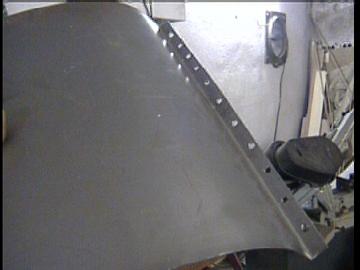
 weld the pattern into the wheel well end:
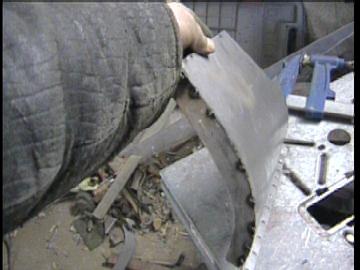
 almost there!!
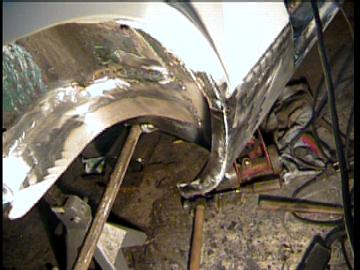

 right below the 'sold' spray paint, you can see there is a crease up there..
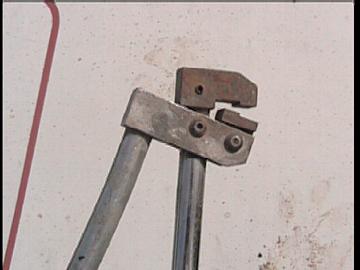 that when placed over the edge of the new panel and squeezed, will make a step in the steel
 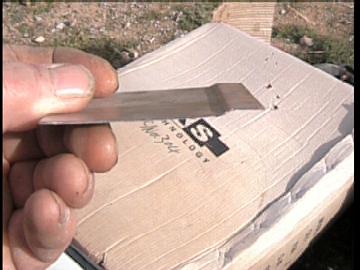 which will pass under the original panel, and leave the jointed surfaces level
 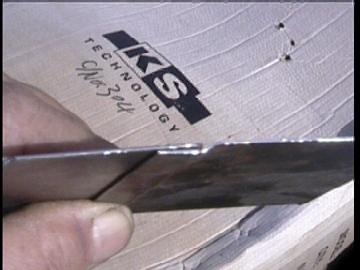 .Practice first on a scrap of sheet!! and make sure the flange bends the right way, so it fits UNDER the existing panel!!!
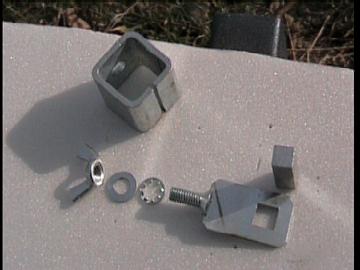
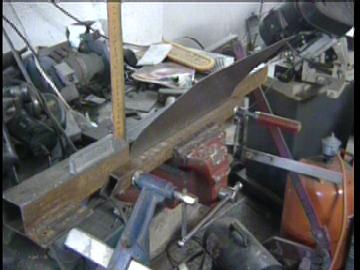
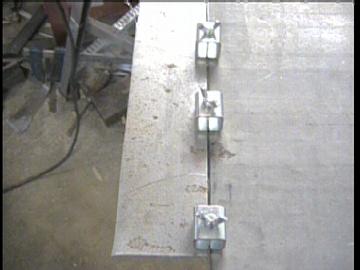 join the two panels edge to edge...not easy!!You can make butt-joint clamps like the ones I made, in the picture.