Pennock's Fiero Forum
  General Fiero Chat - Archive
  Enterra "Dark Shadow" Restore Thread (Page 6)

T H I S   I S   A N   A R C H I V E D   T O P I C
  

Email This Page to Someone! | Printable Version

This topic is 6 pages long:  1   2   3   4   5   6 
Previous Page | Next Page
Enterra "Dark Shadow" Restore Thread by Lady Lisa
Started on: 06-11-2012 09:44 AM
Replies: 226
Last post by: madcurl on 02-08-2013 06:08 PM
Archie
Member
Posts: 9436
From: Las Vegas, NV
Registered: Dec 1999


Feedback score:    (12)
Leave feedback


Total ratings: 546
Rate this member

Report this Post01-31-2013 05:37 PM Click Here to See the Profile for ArchieClick Here to visit Archie's HomePageSend a Private Message to ArchieDirect Link to This Post
Fiberglass flinging continues.....

Still working to correct the damage around the bumper (grill) opening on nose.


Checking out the door jambs after fiberglassing...


Working on closing up the rivit holes on the muffler cover. Grinding the old "skin" off of the fiberglass so that the new fiberglass has something to bond to....


The exhaust pipe areas (black areas) of the muffler cover are full of black carbon from years of running rich.


There's even an area where the exhaust tip burned thru from touching the fiberglass....


Holes are glassed up...


Here we are putting more fiberglass inside the 3 ribs of the muffler cover to stiffen them up.


Glassing uver the rivit holes in the rear facia where the muffler cover mounted to it.


Finishing up the mounting areas of the rear facia where we had previously glassed them ......


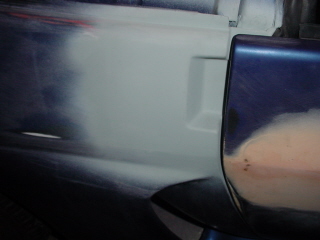
Here we have bolted many of the panels back on the car with the all new bolting methods (no rivits here)......checking out the gaps & fit of the panels.... We still have to do bodywork & filling, this is just to determine if we are done with fiberglassing in these areas.


The door jambs after some sanding.....all the holes are gone......


Fitting the muffler cover so we can locate & fit the bolts that will bolt it together.


Finally for today, here we are glassing an extension to the inside edge of the rocker panel. this edge will go up under the rubber seal, so that we can hide the fasteners ...


Archie


IP: Logged
bubbajoexxx
Member
Posts: 1630
From: Ontario Canada
Registered: Aug 2003


Feedback score: N/A
Leave feedback


Total ratings: 112
Rate this member

Report this Post01-31-2013 07:52 PM Click Here to See the Profile for bubbajoexxxClick Here to visit bubbajoexxx's HomePageSend a Private Message to bubbajoexxxDirect Link to This Post
dam nice jod on the repairs Archie and crew your doing a fantastic job on the rebuild of a relick from the past
IP: Logged
madcurl
Member
Posts: 21401
From: In a Van down by the Kern River
Registered: Jul 2003


Feedback score: N/A
Leave feedback


Total ratings: 314
Rate this member

Report this Post02-02-2013 12:42 PM Click Here to See the Profile for madcurlSend a Private Message to madcurlDirect Link to This Post


I'm not feeling the old style door handles. You could use the same type of set-up that JScott used on #014. You can then tweak the already side vent inward near the edge in order to use the GM style electric door poppers.

This what I would do if the car was mine, because it not only modernizes the area with the new Camero side mirrors but also tweaks the side vents too. This tweak IMHO doesn't take away from the original design, but enhances and brings it up to date.

------------------


"Friends don't let their friends drive stock."

IP: Logged
troyboy
Member
Posts: 2075
From:
Registered: Sep 2005


Feedback score: N/A
Leave feedback


Total ratings: 154
Rate this member

Report this Post02-02-2013 03:45 PM Click Here to See the Profile for troyboySend a Private Message to troyboyDirect Link to This Post
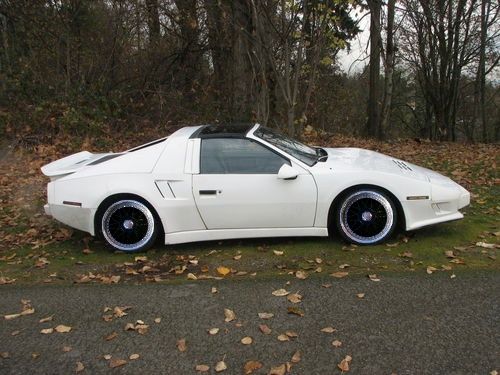
Just found a nice set of shop rollers for the Enterra. ! The rims that came with the car were only 14" so the enterra was sitting on the ground. It's hard to see in the pics but the Enterra is wider in the front and rear than the IMSA
I hope they fit:
JDM DE RACING WHEELS 17X8.5 +20 OFFSET, 17X11 +24 OFFSET. WITH 5X100 BOLTPATTERN. 3PC WHEELS.


IP: Logged
troyboy
Member
Posts: 2075
From:
Registered: Sep 2005


Feedback score: N/A
Leave feedback


Total ratings: 154
Rate this member

Report this Post02-02-2013 03:46 PM Click Here to See the Profile for troyboySend a Private Message to troyboyDirect Link to This Post

troyboy

2075 posts
Member since Sep 2005
Archie said they should fit

[This message has been edited by troyboy (edited 02-02-2013).]

IP: Logged
madcurl
Member
Posts: 21401
From: In a Van down by the Kern River
Registered: Jul 2003


Feedback score: N/A
Leave feedback


Total ratings: 314
Rate this member

Report this Post02-02-2013 03:58 PM Click Here to See the Profile for madcurlSend a Private Message to madcurlDirect Link to This Post
Sweeeet!
IP: Logged
Carcenomy
Member
Posts: 1109
From: Invercargill, New Zealand
Registered: Jan 2009


Feedback score: N/A
Leave feedback

Rate this member

Report this Post02-03-2013 04:14 AM Click Here to See the Profile for CarcenomyClick Here to visit Carcenomy's HomePageSend a Private Message to CarcenomyDirect Link to This Post
 
quote
Originally posted by madcurl:
I'm not feeling the old style door handles. You could use the same type of set-up that JScott used on #014. You can then tweak the already side vent inward near the edge in order to use the GM style electric door poppers.

This what I would do if the car was mine, because it not only modernizes the area with the new Camero side mirrors but also tweaks the side vents too. This tweak IMHO doesn't take away from the original design, but enhances and brings it up to date.

I agree, that'd look very sharp and smooth the profile of the door too.

IP: Logged
PaulJK
Member
Posts: 6638
From: Los Angeles
Registered: Oct 2001


Feedback score:    (25)
Leave feedback


Total ratings: 237
Rate this member

Report this Post02-03-2013 05:11 AM Click Here to See the Profile for PaulJKSend a Private Message to PaulJKDirect Link to This Post
 
quote
Originally posted by troyboy:

JDM DE RACING WHEELS 17X8.5 +20 OFFSET, 17X11 +24 OFFSET. WITH 5X100 BOLTPATTERN. 3PC WHEELS.


since the fiero has "front wheel drive" type wheels, i thought the offset had to be 35mm to 40mm (?)
IP: Logged
troyboy
Member
Posts: 2075
From:
Registered: Sep 2005


Feedback score: N/A
Leave feedback


Total ratings: 154
Rate this member

Report this Post02-03-2013 07:04 AM Click Here to See the Profile for troyboySend a Private Message to troyboyDirect Link to This Post
 
quote
Originally posted by PaulJK:
since the fiero has "front wheel drive" type wheels, i thought the offset had to be 35mm to 40mm (?)


That changes with the Body of the car, wide-body cars can use lower offsets. On my IMSA I'm using 20x12 with a 7mm offset in the rear.
Charlie64 is using this setup on his wide-body:
19x9 up front with an offset of 22.86...19x11.5 on the rear with an offset of 6.35

Archie's notes to me on the new wheels:
On the front wheel the outside edge of the WHEEL will be about .115" inside of the edge of the wheel well at the top center. If the front tire is a 245/40 17, then the outside bulge of the tire will stick out .155"

On the rear wheel the outside edge of the WHEEL will be about .430" inside the lip of the wheel well opening. If the rear tire is a 315/40 17, then the outside bulge of the tire will be inside the lip of the wheel opening by .187".

note: I'm having a hard time finding a 315/40 17 tire
Edit to correct my offset on my IMSA

[This message has been edited by troyboy (edited 02-04-2013).]

IP: Logged
1988holleyformula
Member
Posts: 4109
From: SE MN
Registered: Jul 2009


Feedback score: (3)
Leave feedback


Total ratings: 68
Rate this member

Report this Post02-03-2013 07:47 AM Click Here to See the Profile for 1988holleyformulaSend a Private Message to 1988holleyformulaDirect Link to This Post
How deep is that rear lip?
IP: Logged
troyboy
Member
Posts: 2075
From:
Registered: Sep 2005


Feedback score: N/A
Leave feedback


Total ratings: 154
Rate this member

Report this Post02-03-2013 11:15 AM Click Here to See the Profile for troyboySend a Private Message to troyboyDirect Link to This Post
 
quote
Originally posted by 1988holleyformula:

How deep is that rear lip?


I'm not sure but we will know in a few days
IP: Logged
PFF
System Bot
troyboy
Member
Posts: 2075
From:
Registered: Sep 2005


Feedback score: N/A
Leave feedback


Total ratings: 154
Rate this member

Report this Post02-03-2013 11:18 AM Click Here to See the Profile for troyboySend a Private Message to troyboyDirect Link to This Post

troyboy

2075 posts
Member since Sep 2005
.

[This message has been edited by troyboy (edited 02-05-2013).]

IP: Logged
solotwo
Member
Posts: 5374
From: Grand Rapids, MI. USA
Registered: Jun 2002


Feedback score:    (9)
Leave feedback


Total ratings: 62
Rate this member

Report this Post02-03-2013 09:34 PM Click Here to See the Profile for solotwoSend a Private Message to solotwoDirect Link to This Post
give yall sum thing to complain about. LOL
IP: Logged
solotwo
Member
Posts: 5374
From: Grand Rapids, MI. USA
Registered: Jun 2002


Feedback score:    (9)
Leave feedback


Total ratings: 62
Rate this member

Report this Post02-03-2013 09:35 PM Click Here to See the Profile for solotwoSend a Private Message to solotwoDirect Link to This Post

solotwo

5374 posts
Member since Jun 2002
 
quote
Originally posted by solotwo:

give yall sum thing to complain about. LOL

just jokin but someone is always bitchin.
IP: Logged
troyboy
Member
Posts: 2075
From:
Registered: Sep 2005


Feedback score: N/A
Leave feedback


Total ratings: 154
Rate this member

Report this Post02-04-2013 05:54 PM Click Here to See the Profile for troyboySend a Private Message to troyboyDirect Link to This Post
 
quote
Originally posted by madcurl:


I'm not feeling the old style door handles. You could use the same type of set-up that JScott used on #014. You can then tweak the already side vent inward near the edge in order to use the GM style electric door poppers.

This what I would do if the car was mine, because it not only modernizes the area with the new Camero side mirrors but also tweaks the side vents too. This tweak IMHO doesn't take away from the original design, but enhances and brings it up to date.


looking to go in this direction using the middle rectangular one and paint it white to match the car


IP: Logged
troyboy
Member
Posts: 2075
From:
Registered: Sep 2005


Feedback score: N/A
Leave feedback


Total ratings: 154
Rate this member

Report this Post02-05-2013 05:48 PM Click Here to See the Profile for troyboySend a Private Message to troyboyDirect Link to This Post
 
quote
Originally posted by 1988holleyformula:

How deep is that rear lip?

[This message has been edited by troyboy (edited 02-05-2013).]

IP: Logged
1988holleyformula
Member
Posts: 4109
From: SE MN
Registered: Jul 2009


Feedback score: (3)
Leave feedback


Total ratings: 68
Rate this member

Report this Post02-05-2013 06:29 PM Click Here to See the Profile for 1988holleyformulaSend a Private Message to 1988holleyformulaDirect Link to This Post
 
quote
Originally posted by troyboy:

[IMG]measurement[IMG]


Looking good! I think the chrome lip will look nice:

IP: Logged
troyboy
Member
Posts: 2075
From:
Registered: Sep 2005


Feedback score: N/A
Leave feedback


Total ratings: 154
Rate this member

Report this Post02-05-2013 07:35 PM Click Here to See the Profile for troyboySend a Private Message to troyboyDirect Link to This Post
Thanks for the photo shop!
IP: Logged
Archie
Member
Posts: 9436
From: Las Vegas, NV
Registered: Dec 1999


Feedback score:    (12)
Leave feedback


Total ratings: 546
Rate this member

Report this Post02-08-2013 02:18 PM Click Here to See the Profile for ArchieClick Here to visit Archie's HomePageSend a Private Message to ArchieDirect Link to This Post
It's only been 8 days but there is lots here to update.

Next up, it was time to redo the mounting studs for the rear sail panels. We are welding SS bolts into some steel flat stock...


And digging out a recess in the filler they had in there....


After a test fitting we will be fiberglassing the stud plates into the sail panels...


Using a little filler to hold them in place while we do the test fitting....


After grinding down the excess filler flush, we test fitted the sail panels. Then we fiberglassed the stud plate in....


While that cures, we are revising the mounting for the rear spoiler.

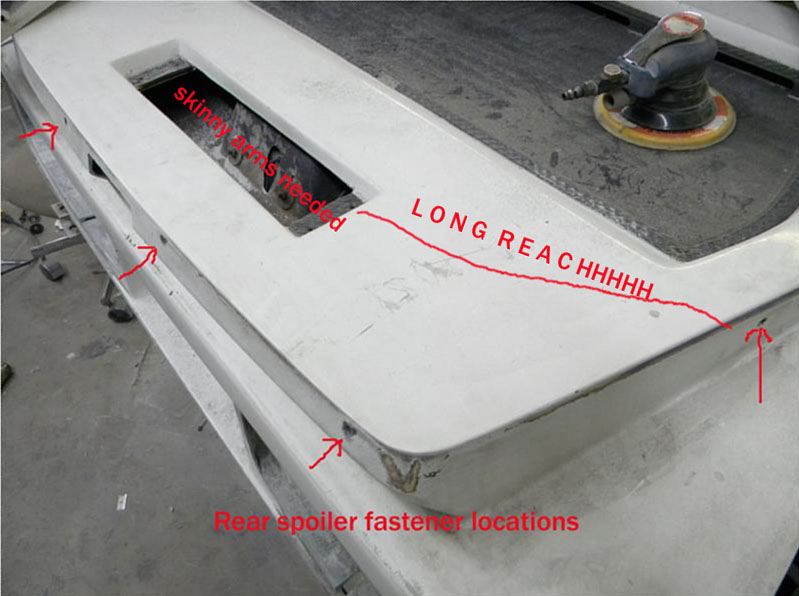
When we removed the spoiler, we found that you had to have a long armed skinny guy to remove the 2 bolts farthest from the only opening we had for access. We called in Abe Lincoln for the job.....


Abe, said he was good with removing the fasteners but even he wouldn't be able to reinstall the front fasteners. So he didn't want us to call him back.

So we came up with a plan & made 4 new mounting tabs at the back end of the spoiler.....


In the meatime as that fiberglass cures, we're back to the sail panels. We did some sanding then fitted the sail panels again....


We also removed the previously glassed rockers & fiberglassed the extensions from the underside.


As you can tell, Kris works on several area at the same time.

Back to the new spoiler, the mounting tabs get sanded & cleaned up for a fitting.


We also re-did the key lock cylinder mounting for the decklid. Before it was pop-rivited on & the cylinder stuck out 3/8" to 1/2" from the panel. Now it's stud mounted & flush.


In the meantime the Shop roller wheels come in....


More to come......
IP: Logged
Archie
Member
Posts: 9436
From: Las Vegas, NV
Registered: Dec 1999


Feedback score:    (12)
Leave feedback


Total ratings: 546
Rate this member

Report this Post02-08-2013 02:47 PM Click Here to See the Profile for ArchieClick Here to visit Archie's HomePageSend a Private Message to ArchieDirect Link to This Post

Archie

9436 posts
Member since Dec 1999
Earlier when we were fiberglassing on the inside of the rear fenders, we had the rear suspension off to make room to get in there. Now we'd like to do some test fitting of the rear wheels. So Kris is going to do the mods for installing the sidemarker lights.......


While the FGlass was curing Kris was working on the rocker panels for fit to the chassis & some more glassing for repairs & shape.


Back to the spoiler. The middle 4 bolts that were used as studs were a little loose so we fixed them up.


The 4 spoiler mounting tabs provide for new fastener locations along the rear & we also added to similar mounting locations up under the area where Abe said he wouldn't be able to replace the blots he removed for us. Here are the holes where the new fasteners will come up thru the decklid.


.......
IP: Logged
Archie
Member
Posts: 9436
From: Las Vegas, NV
Registered: Dec 1999


Feedback score:    (12)
Leave feedback


Total ratings: 546
Rate this member

Report this Post02-08-2013 03:11 PM Click Here to See the Profile for ArchieClick Here to visit Archie's HomePageSend a Private Message to ArchieDirect Link to This Post

Archie

9436 posts
Member since Dec 1999
Finally (for now anyway).

The spoiler fits pretty much as it did before.


Fitting the modded rockers....


Got the fasterner up under the rubber molding....


Now with this mounting, Troy can use any kind of sill plate that he wants & still be able to remove the rocker panel if needed.

We have started to do a little of the bodywork


I'd like to make a note right here.

One of the things we've been working on every since we have been able to reinstall the Sail Panels is the originally the spoiler was touching the right side sail panel. It cleared the left side fine but was rubbing at time on the Right side. This along with the fact that there were no rubber stops for the decklid to close against, ment that the decklid would viberate and rub against the right sail panel.


So we needed to take someof the twist out of the right side sail panel. We propped it up at the top end....


And clamped it down at the back end.....


With the new rubber stops we put in we think this is helping.

Archie

P.S. Bonus coverage later today.......

Right now we are trial fitting the wheels......

IP: Logged
PFF
System Bot
troyboy
Member
Posts: 2075
From:
Registered: Sep 2005


Feedback score: N/A
Leave feedback


Total ratings: 154
Rate this member

Report this Post02-08-2013 03:55 PM Click Here to See the Profile for troyboySend a Private Message to troyboyDirect Link to This Post
Fantastic!!
IP: Logged
Archie
Member
Posts: 9436
From: Las Vegas, NV
Registered: Dec 1999


Feedback score:    (12)
Leave feedback


Total ratings: 546
Rate this member

Report this Post02-08-2013 04:06 PM Click Here to See the Profile for ArchieClick Here to visit Archie's HomePageSend a Private Message to ArchieDirect Link to This Post
 
quote
Originally posted by troyboy:

Fantastic!!


OK, just so you don't get too worked up.

IP: Logged
nosrac
Member
Posts: 3520
From: Euless, TX, US
Registered: Jan 2005


Feedback score:    (6)
Leave feedback


Total ratings: 51
Rate this member

Report this Post02-08-2013 04:20 PM Click Here to See the Profile for nosracSend a Private Message to nosracDirect Link to This Post
That looks pretty damn good.
I like the wheel choice are those just "temp" shop rollers?
Any details about the interior choice?
IP: Logged
Lady Lisa
Member
Posts: 24
From: New York
Registered: Jun 2012


Feedback score: N/A
Leave feedback

Rate this member

Report this Post02-08-2013 05:07 PM Click Here to See the Profile for Lady LisaSend a Private Message to Lady LisaDirect Link to This Post
I'm sorry I have not replied in a while. Archie, the work is superb! Nosrac, while they are shop rollers, I will be holding on to them for a while...Ladies and their shoes..... They do look nice though..... I am also feeling the door handle mod.
IP: Logged
Lady Lisa
Member
Posts: 24
From: New York
Registered: Jun 2012


Feedback score: N/A
Leave feedback

Rate this member

Report this Post02-08-2013 05:12 PM Click Here to See the Profile for Lady LisaSend a Private Message to Lady LisaDirect Link to This Post

Lady Lisa

24 posts
Member since Jun 2012
Nosrac, the interior will be black with white accents. I love amida's G1 dashboard. So if it's available, it would be my 1st choice.
IP: Logged
madcurl
Member
Posts: 21401
From: In a Van down by the Kern River
Registered: Jul 2003


Feedback score: N/A
Leave feedback


Total ratings: 314
Rate this member

Report this Post02-08-2013 06:08 PM Click Here to See the Profile for madcurlSend a Private Message to madcurlDirect Link to This Post
Simply beautiful!
IP: Logged
Previous Page | Next Page

This topic is 6 pages long:  1   2   3   4   5   6 


All times are ET (US)

T H I S   I S   A N   A R C H I V E D   T O P I C
  

Contact Us | Back To Main Page

Advertizing on PFF | Fiero Parts Vendors
PFF Merchandise | Fiero Gallery | Ogre's Cave
Real-Time Chat | Fiero Related Auctions on eBay


Copyright (c) 1999, C. Pennock