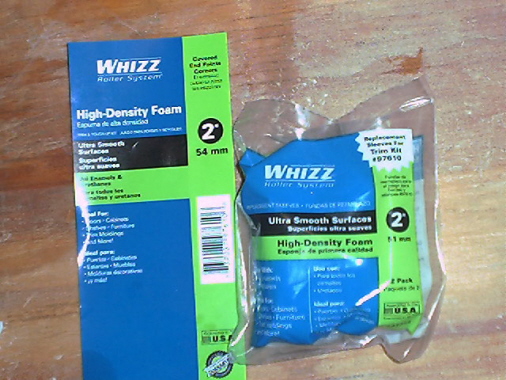
Home Depot in Raleigh had "Ultra Fine" white foam rollers (4" and 6") Lowes in Raleigh had Ultra High Density Foam rollers (4" and 6") I bought a pack of each to see if there is a difference. Other than color, they "appear" to be the same as the yellow, less expensive foam rollers from Walmart. I'll post my results. Home Depot here didn't have Rust-Oleum that I could find. Lowes had the "Professional" version only. From what I read on the MOPAR site the STOP RUST version from WalMart is the same as the Tremclad
This is the responce I receive from Rustoleum about Tremclad
"The equivalent to the Tremclad,would be our Industrial Product line, High Performance and Industrial Choice. On our web-site click on Industrial the black bar across the page. High Performance and Industrial Choice are two options."
Home Depot in Raleigh had "Ultra Fine" white foam rollers (4" and 6") Lowes in Raleigh had Ultra High Density Foam rollers (4" and 6") I bought a pack of each to see if there is a difference. Other than color, they "appear" to be the same as the yellow, less expensive foam rollers from Walmart. I'll post my results. Home Depot here didn't have Rust-Oleum that I could find. Lowes had the "Professional" version only. From what I read on the MOPAR site the STOP RUST version from WalMart is the same as the Tremclad
Both of those foam rollers(Ultra fine and Ultra high density) work great thats what you need, the yellow will work but the white ones leave the paint a little smoother.Less sanding
[This message has been edited by chopfren-z (edited 12-03-2006).]
I'm not sure if by "both of those" you meant "STOP RUST" and "Professional" or "High Performance" and "Industrial Choice". I imagine these oil based enamels are pretty comparable, but I'll see if I can locate the Industrial version locally. The STOP RUST is the most common around here and it appears several people have used it with success. Does anyone have any direct knowledge of the differences? I applied the 2nd coat to my wing tonight and it's looking nice. It's starting to cover and gain a uniform color now. I used the walmart foam roller again for the second coat, but I did switch to 80 / 20 paint to MS mixture. It's much easier to work with, but still levels out nicely. I didn't have nearly as much run off trouble on the edges and it started to settle within 10 - 15 mins. It's a bit wavey at the moment, but I know from the first coat, it will look much different in the morning. I really like the Sun Rise Red, I hope it proves out to be ok to use the Stop Rust version.
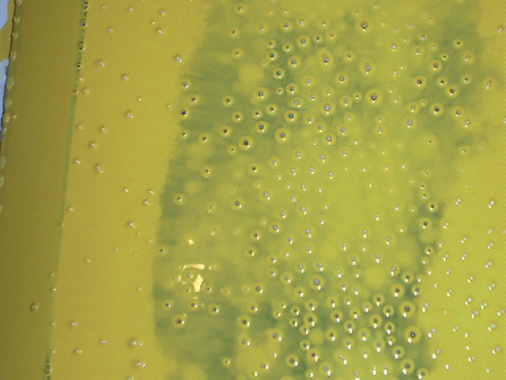
Checking out the Civic site, I see several more people using the Stop Rust series. Not that, that means anything, but we'll see how it holds up. I found some SunBurst Yellow at a different Home Depot today. I flipped the wing over and applied the first yellow coat at lunch time. I'll give it a day and see how the color looks. I may need another coat to judge, but it looks a little soft for my taste. I used the HD rollers today and it did produce fewer bubbles. I'm experimenting with storing these wet rollers in plastic pill bottles (coated with MS) between coats, It would be nice to get more than one coat out of a roller, but I'm cheap.
Update 12-01-06 Ok, unless you have a volkswagon, this yellow is way to soft in color, pastel like. I'd be interested if anyone has tried any other colors. The red is close to a Spectre red used on the Firebirds in the 90's (brighter than the factory Fiero red). I've thought about trying the dark red in the Professional series, if anyone has seen any pics, I'd be interested. I now understand why so many people choose black.
[This message has been edited by ApexNC (edited 12-01-2006).]
IP: Logged
07:40 PM
Dec 1st, 2006
ApexNC Member
Posts: 239 From: Apex, NC, USA Registered: Dec 2004
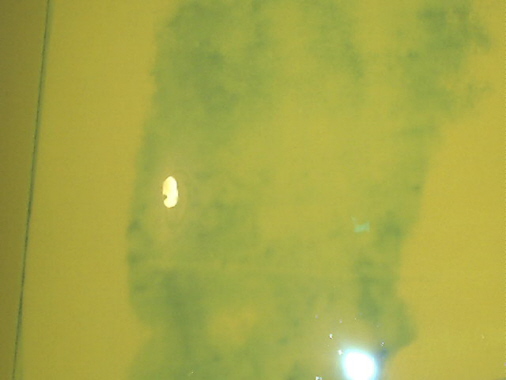
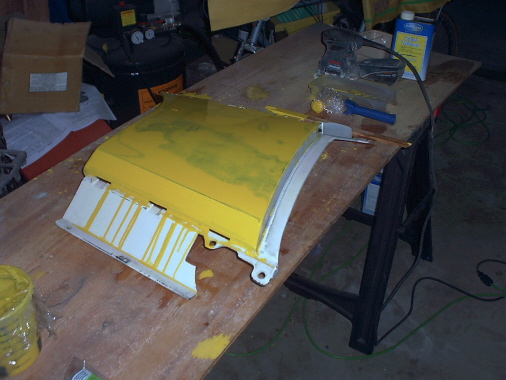
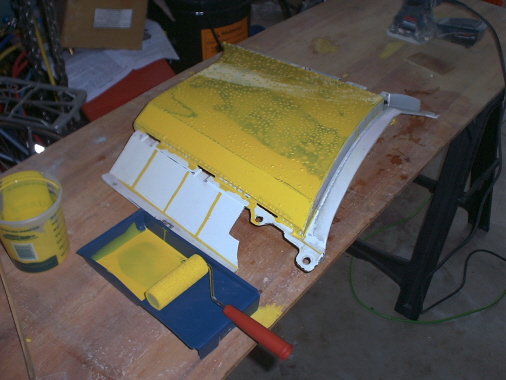
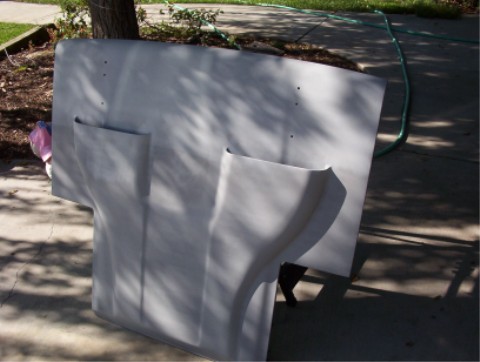
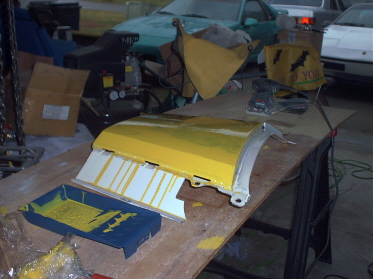
Ok, here are a couple pics of the roller job. This is my fire damaged wing. I don't plan to use it, so I used it to test this roller paint idea. I wiped it down and did some rough sanding, but I'm interested in proof of concept, not fixing this panel. Here's a relatively good area of the wing to gauge with. This is after two coats and no wet sanding, compounding or polishing. I would wetsand this with 800 and add 2 coats and wetsand again with 1000, compound and polish, but I've decided to go ahead and go for it and paint the car this way, so now it's just between red and yellow. Ok, this is like mustard yellow, so I didn't even bother coating it completely. I may fix this wing later, but for now..RED it is! Wish me luck. I start on the Hood and Deck in the morning.
[This message has been edited by ApexNC (edited 12-01-2006).]
when you do this can you document here what materials you used and how it's working out/ I don't have ant cars that need paint but next time I do I'll be trying this...
IP: Logged
11:13 PM
Dec 2nd, 2006
DandRauto Member
Posts: 419 From: Middletown, NJ Registered: Mar 2001
Question? The going formula is for a 50/50 mix of paint to Mineral Spirits. Can I buy a gallon and mix it up at once and divide it up into quart cans for latter use. Thus all the paint will be the same mix every application.
Or should you mix only what you expect to use at that time?
IP: Logged
07:16 PM
ApexNC Member
Posts: 239 From: Apex, NC, USA Registered: Dec 2004
I have only seen this in the 1 quart cans myself. Thinned out, a little goes a long way, so I'm using a couple plastic pill bottles to measure out my 20 / 80 mix and combine the two into a third bottle to mix.
IP: Logged
07:37 PM
DandRauto Member
Posts: 419 From: Middletown, NJ Registered: Mar 2001
I was only able to find safety yellow and safety red in gallons. The local stores have the white lable cans in quarts but the professional stuff in the silver can was gallons.
I guess my real question is will the diluted paint when mixed keep in paint cans till used, or should it be mixed as you need it.
IP: Logged
11:39 PM
Dec 3rd, 2006
ApexNC Member
Posts: 239 From: Apex, NC, USA Registered: Dec 2004
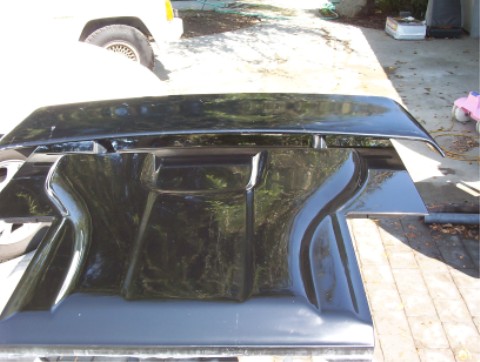
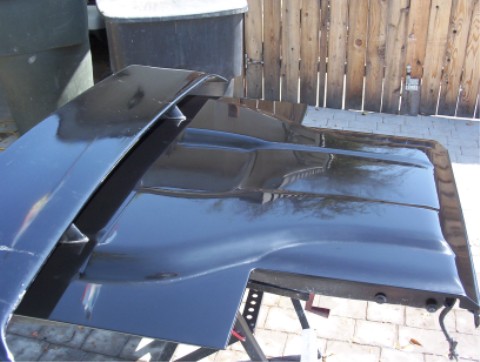
I'd hate to steer you wrong, I can only say that twice now I have had left over mixed paint. I poured it into pill bottles and put the cap on over night and it was fine a day later. I don't know about longer term or larger quantities. Anyone else? My red is laying over the original red pretty well. It doesn't seem to take to the silver panels as well, even with 400 grit and 800 grit sanding. Perhaps it will improve with the second coat today. I have four good coats on the rear deck. I plan to pickup some turtle wax and polish today and give the rear deck a go, to get an idea of what to expect of the final finish. It looks like I'll get the whole car with one or maybe two coats from the first 1 quart can. 2 quarts should be enough for the whole project. This is of course with a red base from the factory paint. The hardest thing thus far was removing the 20 year old graphic tape along the bottom of the car. Razors wanted to dig into the paint and sanding gummed up with the sticker. Ultimately this was a slow razor job. Hard to see the sticker above the silver here, this went around the entire car and had Limited Edition on the quarter panels - PITA This is after sticker removal and some 400 grit work. This is the first coat, with the silver peaking through. I'll clean up this coat and apply the second today.
[This message has been edited by ApexNC (edited 12-03-2006).]
Question? The going formula is for a 50/50 mix of paint to Mineral Spirits. Can I buy a gallon and mix it up at once and divide it up into quart cans for latter use. Thus all the paint will be the same mix every application.
Or should you mix only what you expect to use at that time?
Mix just what you need for each panel the paint dries fast.
IP: Logged
02:33 PM
PFF
System Bot
Dec 5th, 2006
86SEin93003 Member
Posts: 274 From: ventura,ca USA Registered: Feb 2005
Ok I went ahead and bought my supply�s at Wal-Mart yesterday and spent about $63 but I bought a buffer for $35 so I really only spent $28 on the paint and paint supply�s. I started with my driver side fender and all I can say is wow this stuff really works good I went from dull sun faded paint to a nice good shine with only one coat, I went ahead and painted the front bumper, hood, and the passenger side fender and everything came out really nice, I cant wait to see what it looks like with the other coats and the buffing at the end. and yes a liitle goes along ways.
IP: Logged
05:28 AM
m0sh_man Member
Posts: 8460 From: south charleston WV 25309 Registered: Feb 2002
its about time other fiero people started trying this... i had posted about this a long long time back in about agust on the yahoo list. everyone there thought id be crazy to try it.. lol... also posted on the mopar one.. im in the second set of 50$ pages.. anways.. so.. i did attempt to do it.. sorta put the job off though.. i took an extra skin i had and prepped it using way to low a number of a wet sand.. lol.. make sure u do not use a really low grit to start.. use as low as possible if ur gonna prep, plasit and sandpaper.. not a good combo.. lol.. anways.. so i sectioned the door pannel off into 3 sections.. i used all different mixes 1-4 1-1 1-3, and found out that measuring was a bad idea.. jsut eyball it till its like watery.. i was gonna use the industrial style stuff, it was nongloss i bleive it was saftey red... im planning on doing it agian this summer but am reconsidering the color.. i do have a few questions though for the people who have done bigger pieces..
1. how many layers do u think you guys are gonna do... my plan orginally was to do 6-8 layer.. sanding between evey 2.. adnusing like 1200 girt on the last layer 2. how long are u guys waiting between coats? 3. people who have done it.. do you have problems with scratching at all? i did wat i called a scratch test wit my nail.. and was able to scratch off all the paint.. even up to a week after doing it.. 4. industrial or not? i belive the industral is supposed to be alot stonger.. but.. dunno.
anways.. i do plan on doing my fiero this summer, and after that have to decide to sell it or keep it..
sorry for any typos.. i hate typing..
--matt 86 se with the killer sound...
[This message has been edited by ibshile (edited 12-05-2006).]
IP: Logged
02:38 PM
86SEin93003 Member
Posts: 274 From: ventura,ca USA Registered: Feb 2005
3. people who have done it.. do you have problems with scratching at all? i did wat i called a scratch test wit my nail.. and was able to scratch off all the paint.. even up to a week after doing it..
I did this test today I have one coat on and all my nail did was slide across the fender and I dug in deeper and my nail did the same thing just slide
IP: Logged
12:49 AM
Dec 14th, 2006
86SEin93003 Member
Posts: 274 From: ventura,ca USA Registered: Feb 2005
The clear coat will probably give you a nice finish, however, I have read threads suggesting your just as well off, if not better off to leave the clear coat off. They suggest that you can polish and wax the finish just as nicely and retain the option to touch up the paint whenever you need to. It's suggested that if you clear coat, you'll have to sand that off, touch up or repaint an area and re-clear coat, which can be tricky to blend. I don't know what I'm talking about, just repeating what I read on the mopar thread. I plan to compound, polish and wax only.
IP: Logged
03:12 PM
Dec 15th, 2006
David DeVoe Member
Posts: 1358 From: Grand Blanc, MI US Registered: Jul 2001
In regard to the yellow being too pale, has anyone thought to try combining colors? It seems (I'm not a color guy) that mixing some red into the yellow would give it some kick. As to thinning the paint all at once I think I'd thin it as I needed it. Just my 2 cents
IP: Logged
06:33 PM
DandRauto Member
Posts: 419 From: Middletown, NJ Registered: Mar 2001
I have been trying this and am up to my 4th coat. I see my question about thinning it all at once was stupid as is needing a whole gallon and mixing it 50/50 so you have 2 gallons. It will be way to much paint. This stuff does go a long way as the others have said. So my first 2 recommendations are: 1. Mix what you need as you need it. 2. Look for the quart cans.
I am using the white from the professional series. The 4th coat is just beginning to hide the primer that is underneath. The first 3 coats where 50/50 and the 4th one was 60/40. The thicker paint will cover faster but I honestly think (from what I have experienced thus far) that the thin layers are what will make this method work. I liked the way it flowed out better with the 50/50. I have been painting in my garage which was been in the high fifties or low sixties temperature wise, and it has been working out ok. I heat my garage with a small gas heater. This paint even with the odorless mineral spirits does have a smell to it. So I try to vent the garage out some right after painting and then heat it back up. So my next sets of recommendations are: 3: Seems like thinner is the better way to go. 4. Have ventilation. 5. Keep temperature at least near 60 or above. 6. Keep the doors to the garage from the house closed. Go in and out of the garage door or you will get comments from the wife and/or other family members. It (both the smell and the comments) hangs around for days. I hardly smell anything, guess the sense of smell is another thing us men lose as we get older.
Patience is necessary as coverage is slow. You get lots of bubbles or texture at first, but they go away with time as it dries. I have had to go back over the area as I paint to even it out. Mainly, I put the paint on and then go over it with the roller (with no additional paint) to level and smooth it all out so it looks even (It will still have the bubbles but looks more even). Try and you will see. I have been doing this on a old roof section that is extra for practice. Last set of recommendations for today: 7: Have patience. 8. Practice to learn the method and gain the skills. Go thru the whole process down to the final steps of waxing, which is what I�m going to do. 9. What difference does it matter if you did in 6 coats or 10? In the old hot rod days you were not there (paint wise) to you could say you had 20 coats of hand rubbed lacquer. 10. Remember the goal is in the pride to say you painted it yourself in a non-traditional method. That the fun part when other say �you did what�?
I�ll post a picture when I finish my lessons.
PS: Number 11. - Stir paint, don't shake the paints as you do with latex house paint.
[This message has been edited by DandRauto (edited 12-15-2006).]
IP: Logged
11:42 PM
Dec 19th, 2006
jeffndebrus Member
Posts: 2772 From: Jacksonville, Fl- usa Registered: Aug 2001
Well, more curious than anything. I had an extra quarter panel so I sanded it gently with 220 and then used a tack cloth to remove the paint dust. However, I failed to wipe it with mineral spirits or laquer thinner (which is better?) sooooo as soon as I applied the 50/50 mixture it dispersed like it was running from the plastic and what did stay bubbled horribly. I assume there must have been wax ground down into the paint? I will say that the paint was glossy between bubbles and was hard the next morning to the fingernail test.
IP: Logged
04:04 AM
PFF
System Bot
Dec 21st, 2006
jeffndebrus Member
Posts: 2772 From: Jacksonville, Fl- usa Registered: Aug 2001
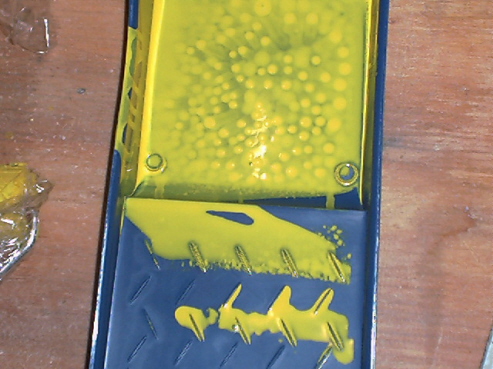
So today I sanded down to the plastic in most areas and then washed with detergent soap. Again I tried rolling the 50/50 mixture and just have a look at the bubbles.
IP: Logged
12:48 PM
Rickady88GT Member
Posts: 10657 From: Central CA Registered: Dec 2002
After about 30 minutes I realized that those bubbles were not going to self level so I ran the roller over it again at a painfully slow rate and now it appears a lot smoother. edit to add that it appears if you are going to sand this far it might be better to use primer first?
[This message has been edited by jeffndebrus (edited 12-21-2006).]
has the original poster made any further progress on his black 86?
i'm doing several pieces of my car in Regal Red rust-oleum, and other parts and accents in Black Interlux Brightside. this is my left-hand mirror housing, after 3 coats, applied with a small foam brush, thinned ~5% with interlux Brushing Liquid. links to unresized images, so you can see as much detail as possible http://alisonrain.terminalgarden.com/images2/Fiero/AliLHMirrorRO3raw.jpg
once its fully coated plus a couple for good measure, i want to spray it with clear with red and gold metallic .004 micro flake, using my airbrush. this is a lot of fun! color sanding is a bit tedious, but worth it. does anyone have a pic of a finished, compounded, polished, waxed part? i'd love to see how this method can turn out.
-edit to address the previous comment about primering. i agree, and this was done over several coats of primer, which was then sanded. i like the uniformity of surface and color a primering gives me, and i intend to do all my pieces that way, to remove the "will the paint adhere to the part without primer?" variable, thus reducing the number of things that can ruin the process.
[This message has been edited by TorqueWench (edited 12-21-2006).]
After about 30 minutes I realized that those bubbles were not going to self level so I ran the roller over it again at a painfully slow rate and now it appears a lot smoother. edit to add that it appears if you are going to sand this far it might be better to use primer first?
I was wondering about how it would cover, I wonder if you used a couple coats of black first. Going to try some black and red on my car next year so you guys and gals need to perfect this for me
IP: Logged
08:47 PM
David DeVoe Member
Posts: 1358 From: Grand Blanc, MI US Registered: Jul 2001
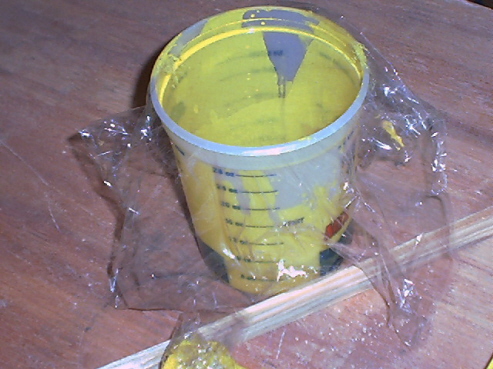
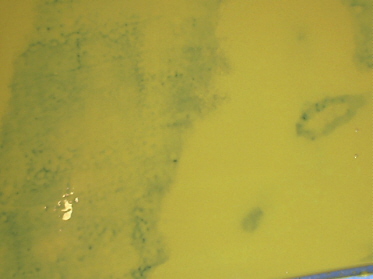
I don't know--------look what the paint did in the roller pan overnight-------seems like something is wrong here? I am beginning to suspect my mixing container----I did not wash it before mixing the paint and spirits.
------------------ Proud Member of the North Florida Fiero club 4T60E Parks harness/ Rockcrawl chip-- more to come--
IP: Logged
08:50 AM
02SOMFormula Member
Posts: 120 From: Carmichael, CA USA Registered: Apr 2006
I don't know--------look what the paint did in the roller pan overnight-------seems like something is wrong here? I am beginning to suspect my mixing container----I did not wash it before mixing the paint and spirits.
Believe this or not, but that is a sign of not enough thinner. The mixture is too thick still, it needs to be thinner or it will continue to gather/bubble. Some bubbles and gathering is impossible to avoid with rolling, but that's really bad and definitely needs to be thinned more.
Originally posted by 86SEin93003: there was a blue there that was kinda like the 87 blue i would say it was a little like microsoft IE blue alittle darker
Yeah, it's called 'Sail Gloss Blue'. I picked up a can and yeah it's like the 'microsoft' blue. it would work okay if you maybe weren't painting a 87 but rather another Fiero that you wanted blue and didn't mind that it didn't match the 87 color completely.
IP: Logged
04:09 PM
jeffndebrus Member
Posts: 2772 From: Jacksonville, Fl- usa Registered: Aug 2001
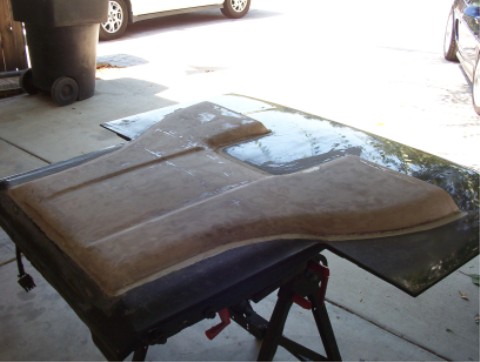
I wetsanded the quarter panel and washed it. I got rid of my previous mixture/ washed out my mixing container with paint thinner and made a new 50/50 mixture of Paint and mineral spirits. I also changed over to the high density roller. Wow--what a difference. The only thing that concerns me is that it appears it will take 10,000 coats to cover where I sanded through the old paint to the plastic. The paint was cracked as it is on the car I hope to paint so I am guessing after sanding out all the cracks I will need to primer the car first. Good thing I have a compressor and spray guns-lol. This is only a test bed panel but I really would like to get my technique down before moving on to the 4.9 car. here's a few pics of todays progress.
------------------ Proud Member of the North Florida Fiero club 4T60E Parks harness/ Rockcrawl chip-- more to come--
This morning the panel looks kind of dull-------------I must admit I am having a difficult time keeping interest. It seems others have had better results right from the start.
my mirror just got its 4th coat. it has lots of little pin holes in it, but they all seem to color sand out nicely. it rained last night and yesterday, so the humidity in the apartment here is 54%, but its about 75degrees. i have a fan blowing out all the time, so there's air movement over the part as it sits in the window drying. the rust-oleum says right on the can not to thin more than 5%, so i'm just pouring a small amount into a pyrex measuring cup, pouring just a dash of brushing liquid to thin, and brushing it right on. in one direction, cover the whole mirror, wait a few minutes, brush on another coat the other direction. it levels before my eyes within 15 minutes. i let it dry at least a full day, usually 2 or 3 between wet sandings. the thing i like about applying the paint with a foam brush is the control i have over how thick it goes on. i can brush it out thinner if i need to, or leave it a smidge thicker on areas like edges, where i've wet sanded too far. when my mirror is color sanded, it looks very even, matte, and smooth, with no visible orange peel, fisheye, pin holes, or brush strokes. so, so far so good... i haven't used a roller yet, so i'm paying attention to those of you who are. i'll be doing my wing soon with a roller. I used the Interlux Brightside on my rocker panel, and i have to exclaim that that paint is hard as he| | and looks very nice. i screwed it up, though, and had to sand it back down, and my gosh, was it a pain to get off. i can't wait to use the black Brightside on my rear wing, hood, and roof. meow.
IP: Logged
11:05 AM
Dec 26th, 2006
jeffndebrus Member
Posts: 2772 From: Jacksonville, Fl- usa Registered: Aug 2001
Hmmmm--seems this thread has died, however, I am continuing to work on the technique with my spare quarter panel. Another coat this morning after wetsanding-washing drying and tack clothing.


 color sanding is a bit tedious, but worth it.