I know that Synthesis did a review of the HID kit from TLG, but I thought I would do a "step-by-step" install thread, as well as another review of the product.
I have the 90mm round Hella lights in buckets from F1F and have been running them in my 87 GT for awhile now. Since I was already refurbishing a lot of stuff up front right now, I thought it would be a good time to also upgrade from the halogen lights to HID in my low beams. After asking a lot of questions and reading the excellent review by Synthesis, I got in touch with "Oslo" and ordered an HID kit with 6000K, H9 bulbs. Everyone assured me that this kit fits great and is "plug & play".....we'll see...
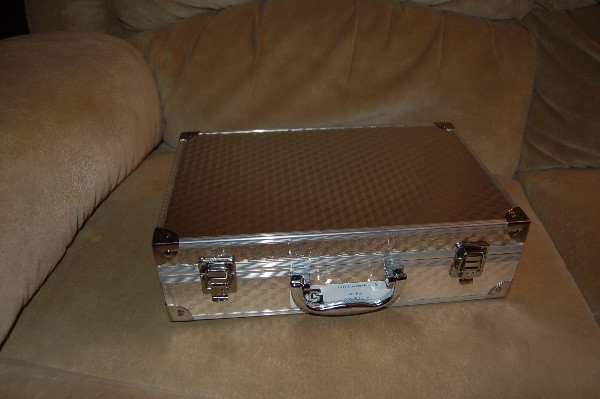
The kit arrived in this nifty aluminum case:
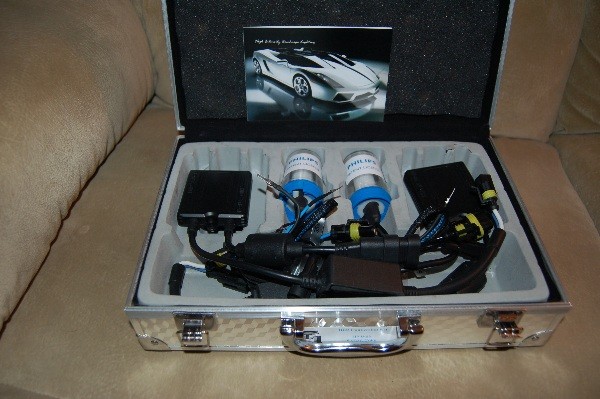
Open the case and remove the goodies: So far, it's great! These are some of the smallest HID ballasts I've ever seen. Should be no problem fitting them in the car.
The components of the kit were very well packaged and look like they are excellent quality. Nice weatherpack plugs on everything. High quality Phillips bulbs. This is looking better and better!
[This message has been edited by randye (edited 02-11-2010).]
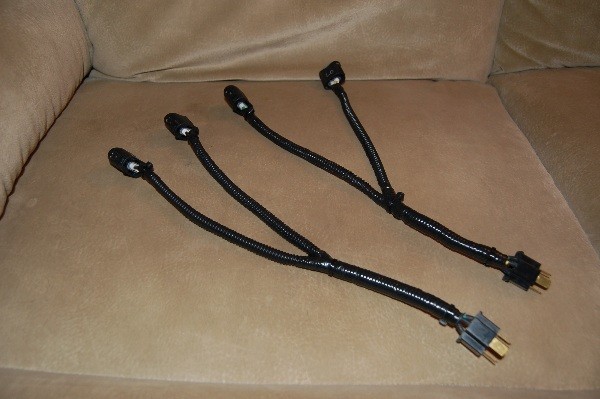
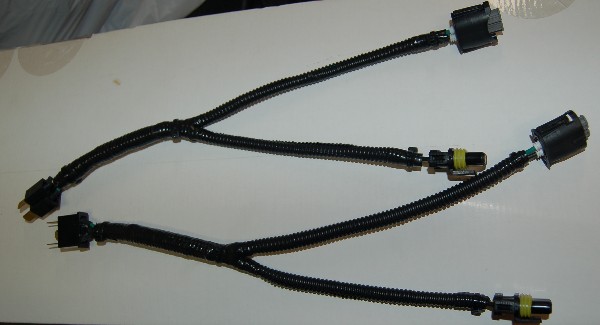
I already had made my own "Y" harness for the F1F lights, so this should be a snap to install the HID kit.
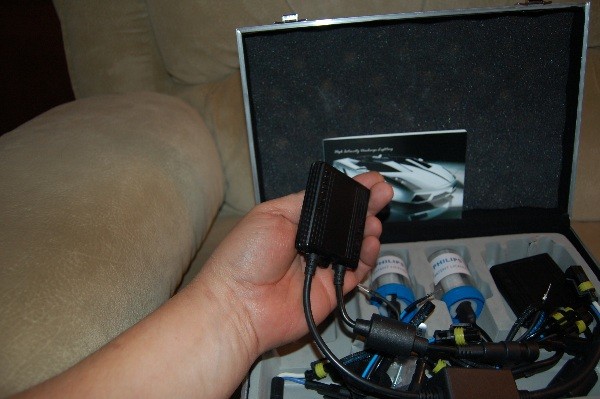
Time to run out to the garage and see how these ballasts will fit: WOW..I almost lost them in there! They're so thin and small I could mount them almost anywhere under the headlights.
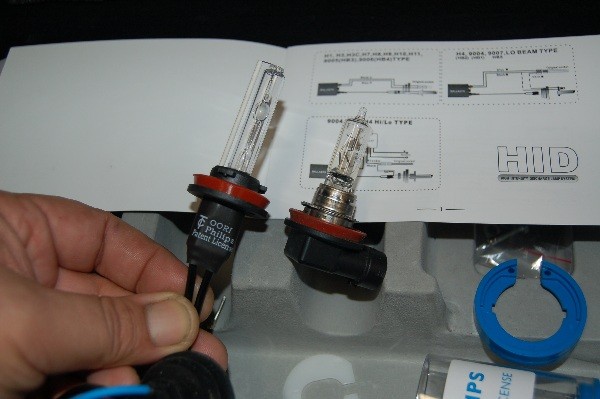
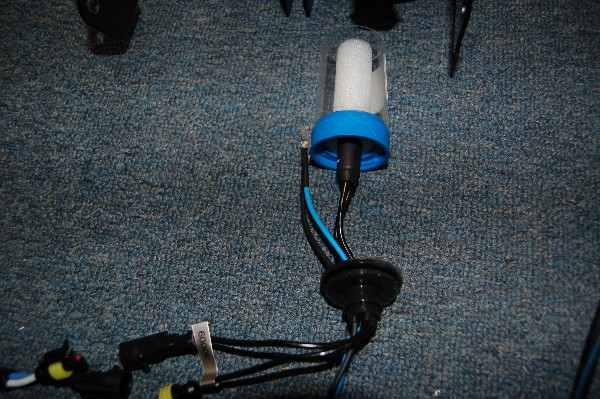
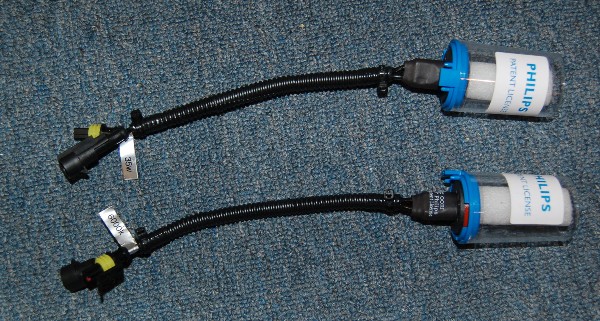
Now its time to see if the claims that these babies will not have any clearance problems with the F1F buckets and Hella housings is true.. First lets check the bulbs:
Nice! The base of the new HID bulbs is only about 3/8 to 1/2 inch longer than the halogen bulb! Shouldn't have any clearance problems at all
[This message has been edited by randye (edited 02-11-2010).]
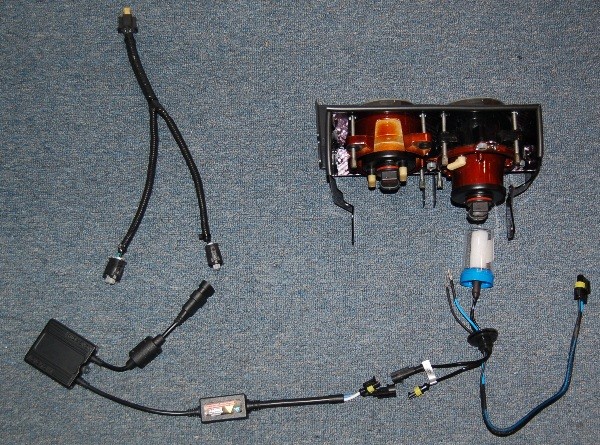
OK, let's see how all this stuff connects together.. I like to plan out my wiring and make sure things are placed well and I don't end up too short or too long with the harness.
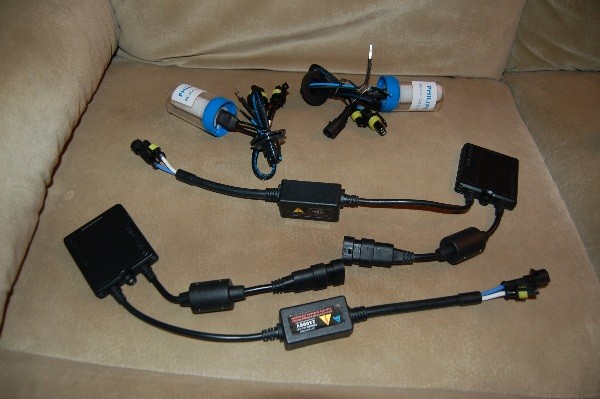
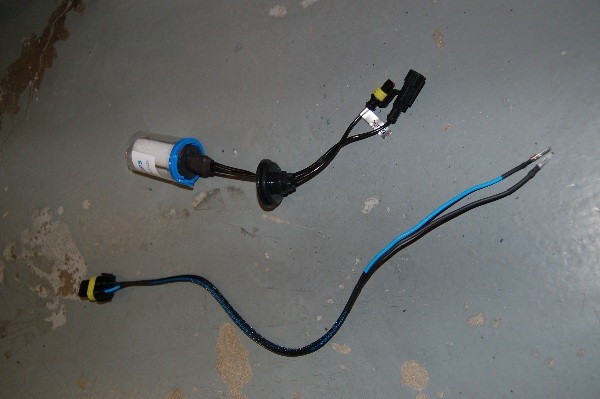
First thing I noticed is that the HID bulbs are already wired through a big silicone rubber grommet along with a set of blue and black wires that simply have pins on the ends: The opposite end of the bulb wires have individual, (single wire), weatherpack plugs on them. The blue and black wires are connected to a single, (2 wire), weatherpack plug:
[This message has been edited by randye (edited 02-11-2010).]
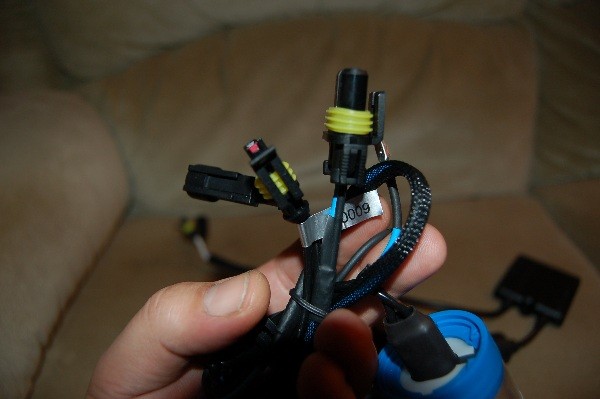
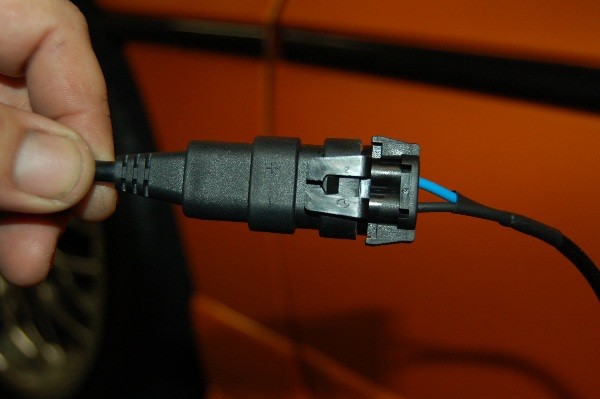
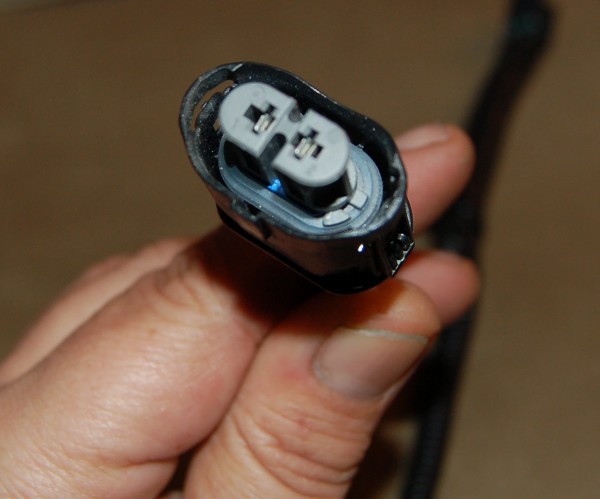
The idea is that you're supposed to be able to plug the harness connector for the low beam H9 halogen bulb into the input connector for the HID ballasts: This is where I hit a small snag in the "plug & play" concept. I have the Hella H9 connectors from Susquehanna Motorsports...The HID kit from TLG has some slightly different mating plugs on it Hella on the left, TLG plug on the right:
The plugs *will* fit together, but they are very loose and the TLG plugs don't have the side locks on them like the Hella plugs. I *could* just fit the plugs together as best possible and tape them together to keep the plugs engaged, but I feel like that's probably begging for trouble later on.
That "spare" weatherpack plug on the unused blue and black wires fits perfectly with the ballast input plug in the HID kit and has a hefty interlock on it:
I removed the blue and black wire from the rubber grommet since it has the plug I need on my old harness: It just pulls right out of the grommet, (the pins slip through the holes in the grommet).
[This message has been edited by randye (edited 02-12-2010).]
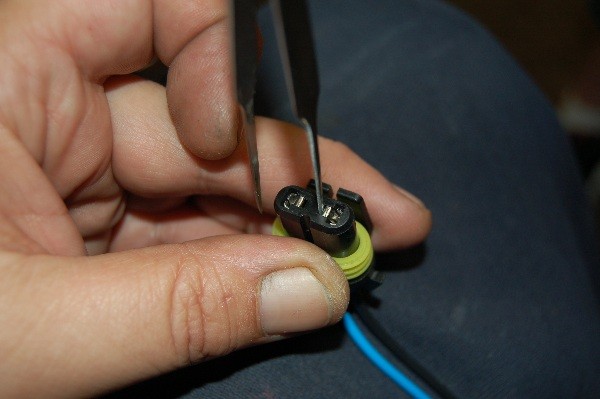
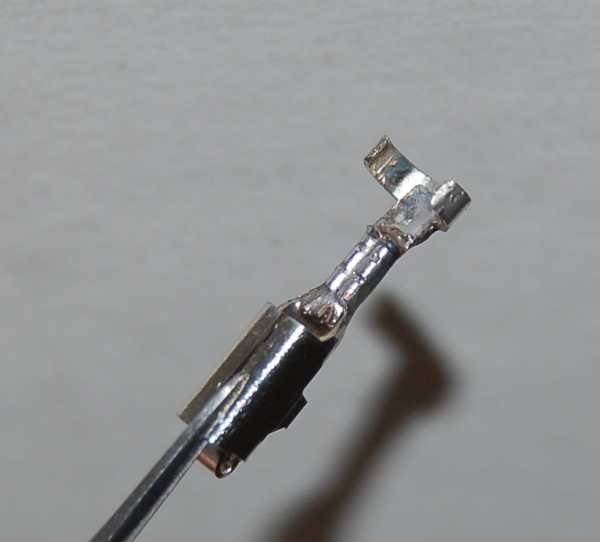
Now the trick is to get the new plug on my old harness. First thing to do is to remove the pins from the new plug and see what we're dealing with. Remove the snap-on keeper from the back of the new plug, (it just has 1 plastic snap lock on each side) Then just insert a fine pointed tweezer or probe into the slot and gently pull the pins out the back of the plug: The rubber wire seal pulls out with each pin:
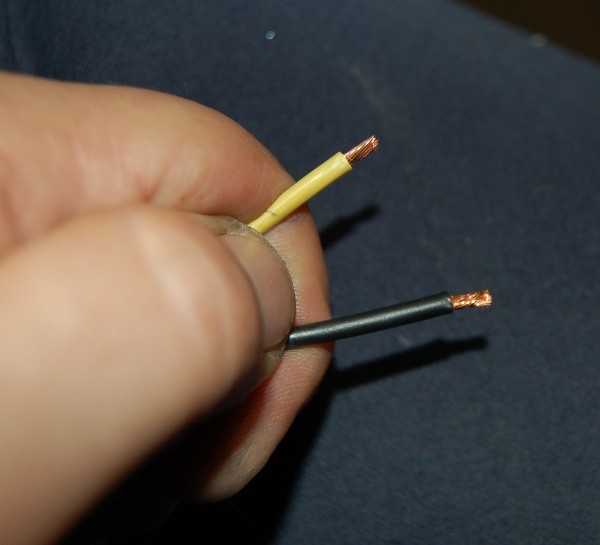
The good news is that the pins are just crimped onto the wires, (no solder), so now the goal is to remove the old low beam H9 female connectors from my old harness and see if we can install the new plug. After cutting the old low beam H9 plugs off my harness I bared approx. 1/8 inch of wire on each of the wires that will go to the low beam headlight:
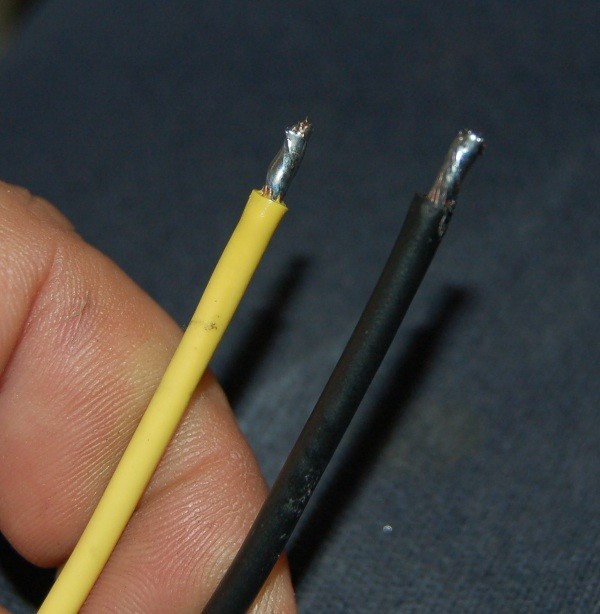
Once that was done I tinned them with a little solder:
Using my trusty tweezers, I was able to open up the crimped pins from the new plugs enough that they can be reinstalled on my old harness with some careful soldering: The previous crimp on the kits bare wires was so tight I didn't want to risk breaking the pins, so I just clipped them as close to the pin as possible and figured I'd just solder over the top of them. I also tinned the pins a little so that soldering would be a bit easier.
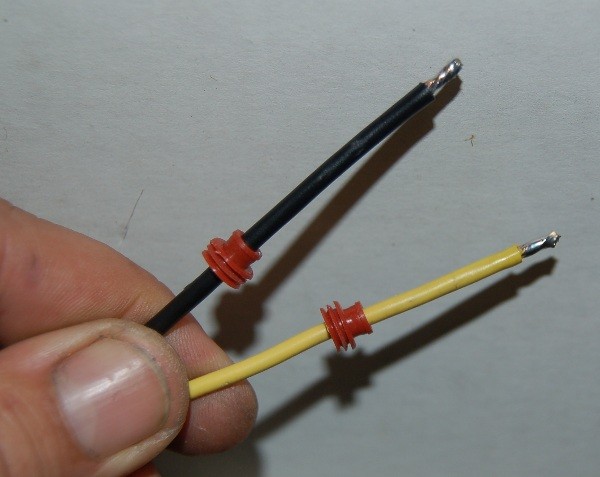
Next step; reinstall the new TLG plug's rubber wire seals on my old harness wires:
Then just crimp the open ends of the new pins on the wire insulation and solder the wires securely to the pins: (In this photo I soldered the pin to the wire before crimping the pin "ears" to the insulation) I generally crimp and *then* solder as the heat tends to melt the plastic insulation around the crimp, making a more secure joint, so I re-did this one after the photo...
Insert the pins back into the new plugs, making sure that I have the polarity correct. Let's see, positive, (yellow on my harness), goes on the same side of the plug the blue wire was...yep!, I think I got it! Then reinstall the wire / seal keeper, re-wrap the wires with the harness cover, tape it up and secure it with a single tie-wrap:
Both old harnesses now converted to the new, (correct), plugs.
Now that I have the *plug* part corrected, I think we're finally ready for "plug & play"
[This message has been edited by randye (edited 02-14-2010).]
Randy, this is a great write up! You are doing a great service by taking all of these pictures!! One question though:
Would you be able to use the small crimp-connectors on the right side of the screen and plug them into your existing headlight harness to make it plug and play?
I think the way you did it is definitely the best route to go, but probably not necessary. Let me know if I am seeing this correctly.
------------------ Top Line Group Automotive -Aftermarket accessories for the Fiero www.TLG-auto.com
IP: Logged
07:00 PM
Synthesis Member
Posts: 12213 From: Jordan, MN Registered: Feb 2002
Randy, this is a great write up! You are doing a great service by taking all of these pictures!! One question though:
Would you be able to use the small crimp-connectors on the right side of the screen and plug them into your existing headlight harness to make it plug and play?
I think the way you did it is definitely the best route to go, but probably not necessary. Let me know if I am seeing this correctly.
Yes, they plug in, but then you have to tape them in place. A solution that I used.. I will get around to modifying my harness and plug as well.
His ballasts are different from the ones I have from the same kit.
Randy, this is a great write up! You are doing a great service by taking all of these pictures!! One question though:
Would you be able to use the small crimp-connectors on the right side of the screen and plug them into your existing headlight harness to make it plug and play?
I think the way you did it is definitely the best route to go, but probably not necessary. Let me know if I am seeing this correctly.
Chris, Yes, you can do what you're suggesting but you would just be shoving the kit's flat pins into the pins in the Hella H9 plugs, with nothing to secure them in. It would obviously work fine if you taped it together securely, but I tend to be a little "anal" about these things sometimes, so I went with the plug swap
A better solution than putting the flat pins in the Hella H9 plugs would be to mate the Hella female plug to the TLG kit's male plug and tape that together. Hella plug on the left. TLG HID kit plug on the right. The only reason you need the tape with this is that the 2 plugs don't lock together. Other than that, the seals seem to fit OK and it makes a better interface.
[This message has been edited by randye (edited 02-12-2010).]
I should mention that while it might look complicated or tedious to some people, swapping the plugs out on TLG's kit was actually a breeze! I think it would have taken about 15 minutes per plug if I wasn't shooting photos of each step.
The kit *is* "plug & play", as (like Synthesis did), you can mate the 2 flat pins into the Hella H9 plug and tape it up, and it would probably be just fine. OR...you can plug the Hella and TLG plugs together like shown above and tape them together. (your choice).
PLEASE don't let my obvious obsession with details prevent anyone from buying this kit to convert your Hella H9 halogen lights over to HID. I honestly don't think there are any problems with it at all. It's such a high quality product that I couldn't resist going the extra step with it.
[This message has been edited by randye (edited 02-14-2010).]
You said that there are extra wires that aren't used.. Those blue and black ones with the connector that we need for the plug and play to the balast and open on the other end. What if we just found the male side of the H9 bulb connectors and added them to the open side of the unused wires?
This is my harness I made before the wrap. But in the making of mine I soldiered everywhere I felt necessary. I'd rather have a 2" or so coupling adapter than re doing everything.
Yes, I suppose you could do what you're suggesting and it would be easy, but Susquehanna Motorsports website says that a Hella H9 male connector is not available. http://www.rallylights.com/Connectors.aspx The Hella H9 connectors are unique and don't appear to fit other connectors precisely.
I also soldered everything in my "Y" harness for the halogens. That's why I cut off the old plugs. They're crimped and soldered so tight there's no way I'd ever get them apart unbroken.
[This message has been edited by randye (edited 02-12-2010).]
Yeah, the H9 males are easy to find, but the H9 females are difficult to find for less than 5-6 bucks a piece.
"...females are difficult to find for less than 5-6 bucks a piece." Brother, ain't that the truth!
Seriously though, using a male Hella H9 plug added onto the blue and black wires with the TLG female plug on the opposite end would allow you to make an adapter that would let you very quickly and easily change between the Osram halogen bulbs and the TLG HID kit.
With that, there are 4 ways of connecting up the TLG kit:
1. Plug the flat pins already on the TLG wires into the Hella female H9 plug and tape. 2. Plug the Hella female H9 plug and the TLG male plug together and tape 3. Add a male Hella H9 plug where the flat pins are on the TLG kit, thus making a "harness adapter" 4. Swap the TLG female plug onto the "Y" harness like I did.
I'll have more HID install photos posted later today....unless I happen to find a $5 female!
[This message has been edited by randye (edited 02-12-2010).]
It looks like we now have all the *plug* part of the "plug & play" thing all worked out. Plus we discovered that there's at least 3 other ways to handle this. Good stuff to know since it gives options to those who don't want to, or can't, solder. (it just takes practice to learn, and I'm FAR from being expert at it yet)
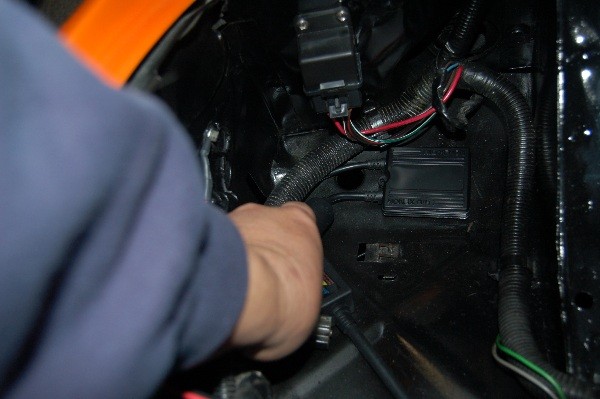
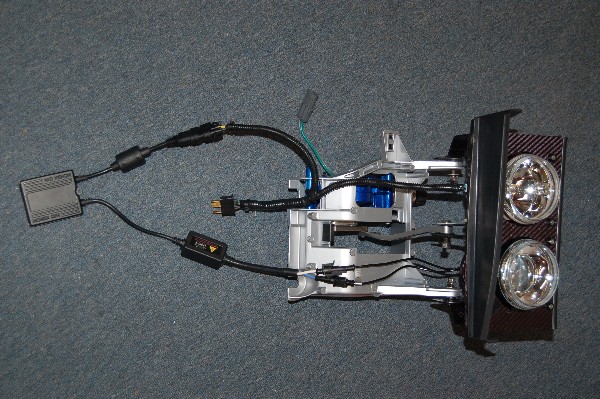
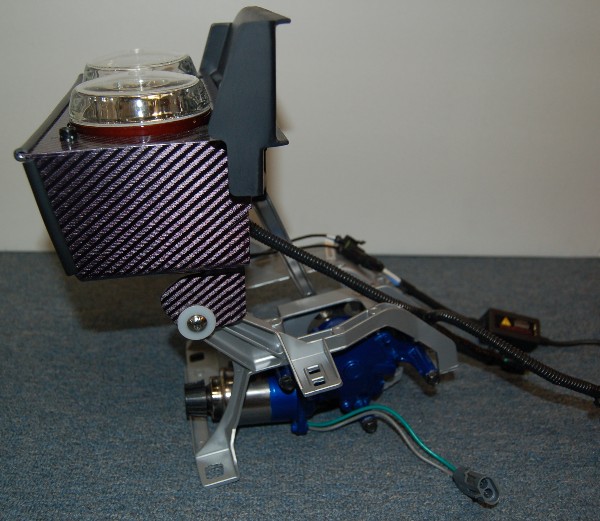
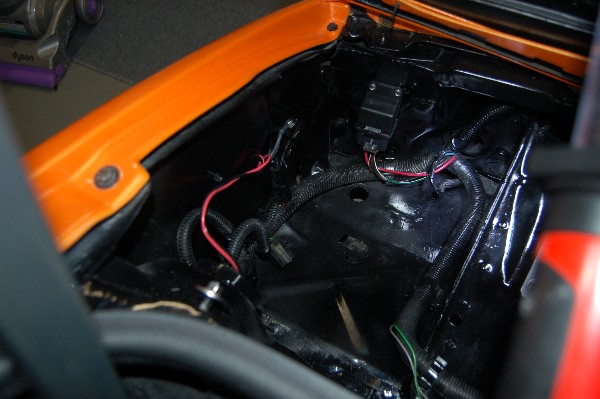
Here's how all the components now connect together with the headlight assembly:
I have both assemblies out of the car doing some obvious refurbishing, but you do not have to take the headlight assemblies out of the car to install the TLG HID kit.
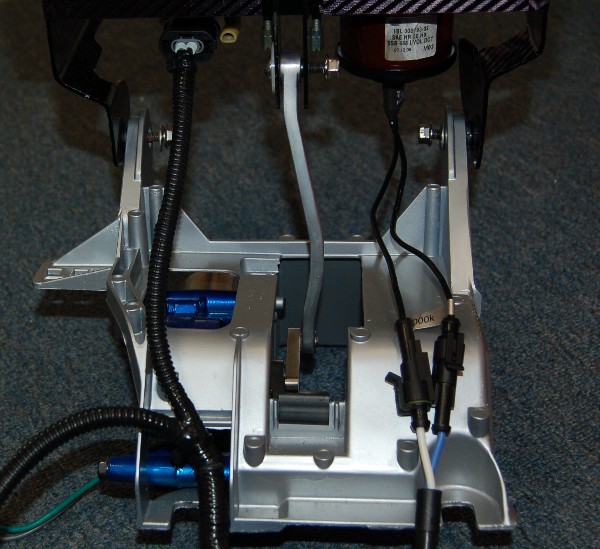
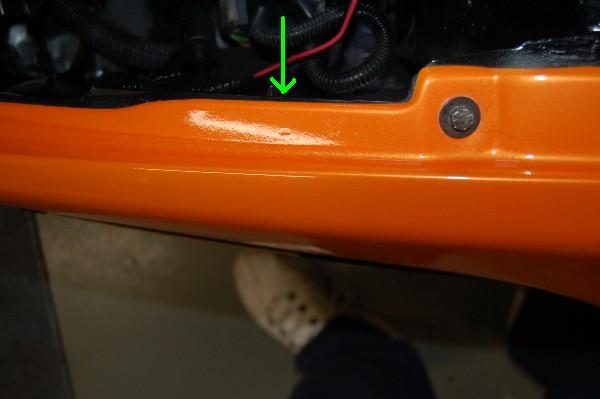
Lets take a look at a probably seldom seen view of the headlights, (from the bottom looking up): It appears that everything has plenty of clearance. I plan on trying to run my wiring to the headlights the way I have it shown here, instead of over the top of the support frame as it's installed the OEM way with the single headlight. There's plenty of room to do that with the F1F buckets, but we need to be careful that none of the wiring gets caught up in the mechanical mechanism.
[This message has been edited by randye (edited 02-12-2010).]
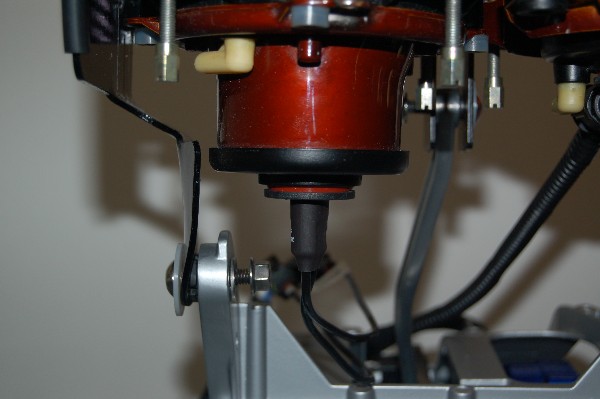
There are 2 major places we need to worry about the wiring getting pinched or abraded.
Here at the pivot arm and limit lever on the motor:
...and here:
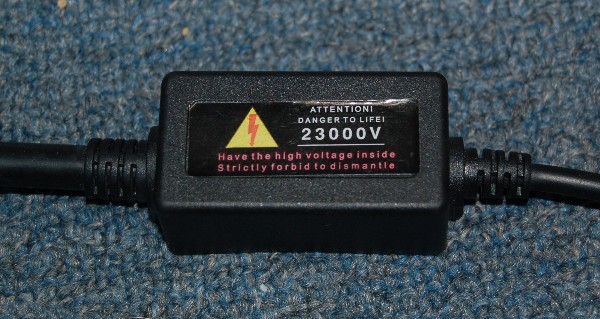
There's a good amount of clearance all around, but we don't want to just stuff those wires, (especially to the HID bulb), just anywhere and forget them. Here's why:
I'm not an electrical expert, but shorting 23 THOUSAND volts through my Fiero does NOT sound like a good thing to do. The instruction booklet with the TLG HID kit says that the ballasts have over-current protection, but I think it's best just to not allow a short from a pinched or "rubbed-through" wire to begin with. Once we get the assemblies in the car, I'll be sure that the harness is secured out of the way so it can't get caught up or bind anywhere.
[This message has been edited by randye (edited 02-12-2010).]
The install looks awesome though. Like you said, you cannot stress enough to avoid pinch points. The wires and hardware needs to be secured and free of any binding to ensure long life.
I will bask over your Fiero when you post pics of the complete install.
The install looks awesome though. Like you said, you cannot stress enough to avoid pinch points. The wires and hardware needs to be secured and free of any binding to ensure long life.
I will bask over your Fiero when you post pics of the complete install.
Haha! I thought you would be the first to comment on my blue anodized and nickel plated headlight motors and limit lever. (You could have also said "bask in the glow"...it would have been a great pun...)
[This message has been edited by randye (edited 02-12-2010).]
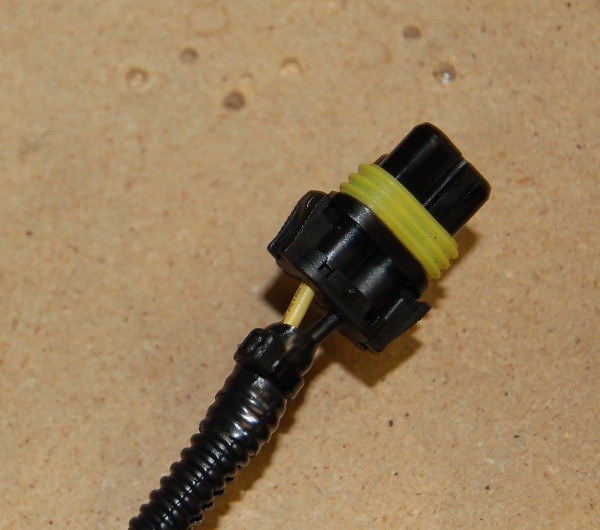
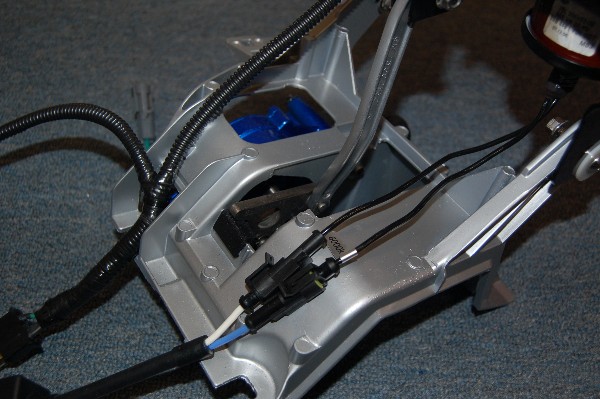
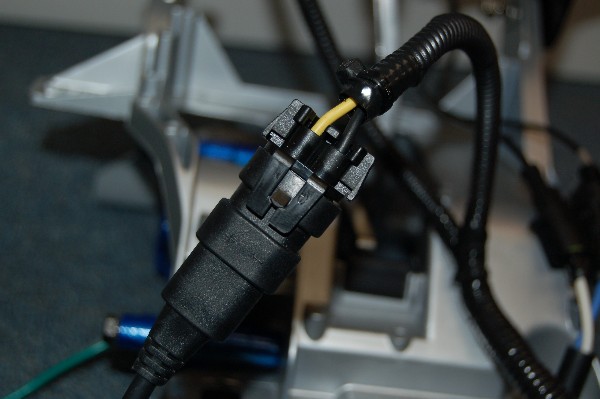
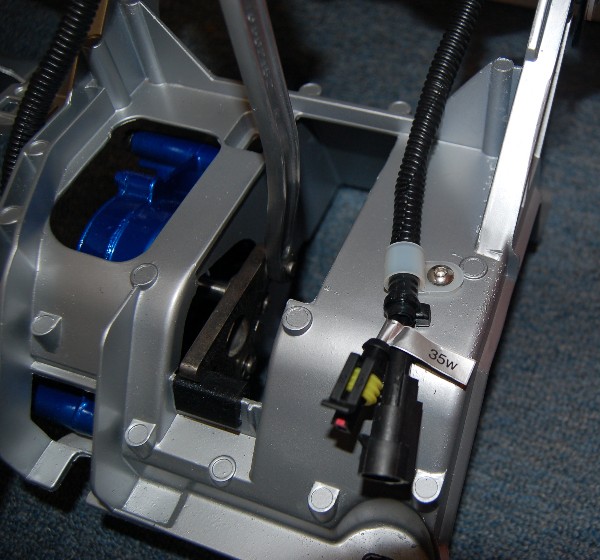
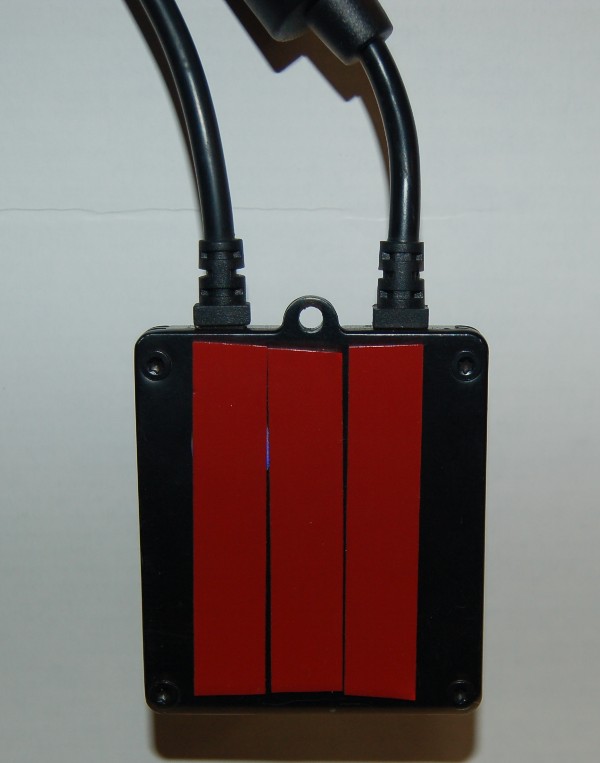
The "spare" H9 connector in the TLG kit that I installed on my old harness now fits nicely to the HID ballast input connector Note that the polarity, ("+" and "-"), is marked on the HID input connector. Make certain that you have the correct wires from your Fiero harness going to the correct terminals on the ballast plug. (yellow = "+" for the low beams on my old "Y" harness for the F1F halogens)
I really like this connector. Wish I had a bunch more of them for other wiring projects on the car!
[This message has been edited by randye (edited 02-12-2010).]
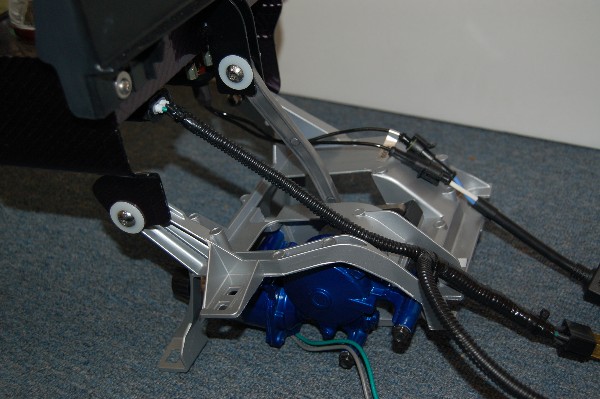
...and another view of the headlight support frame and wiring clearances: Yeah, I nickel plated all the nuts and bolts too (The thin white nylon washers are to help prevent rubbing on the carbon fiber wrap I had put on the buckets.)
[This message has been edited by randye (edited 02-12-2010).]
I just had to come back in from my shop to mention something I remembered:
An IMPORTANT note to anyone intent on making this conversion.
HID lights, (bulbs), require a "cooling off period" of several seconds before switching them back on. Serious damage to the bulbs and possibly the ballasts can result from rapidly switching them on and off. Because of this, I STRONGLY recommend that anyone contemplating this conversion to your F1F quad lights also do the conversion to your headlight circuit to allow the low beams to stay on with the high beams. This will prevent you from switching from low beams to high beams and back again without the required "cooling off" interval and thus damaging your new HID lights. I had previously done this conversion to my halogen lights, (using a relay), prior to starting this HID project. The thread and diagrams of how to do this are posted somewhere here on the forum and I'll reference a link to it once I find it again. If anyone has it handy, please feel free to post it... right now I'm back out to the shop again to try to finish this project....
[This message has been edited by randye (edited 02-14-2010).]
I didn't get as far along this afternoon as I had hoped. ("She Who Must Be Obeyed", (the wife), had other plans for the rest of my day....)
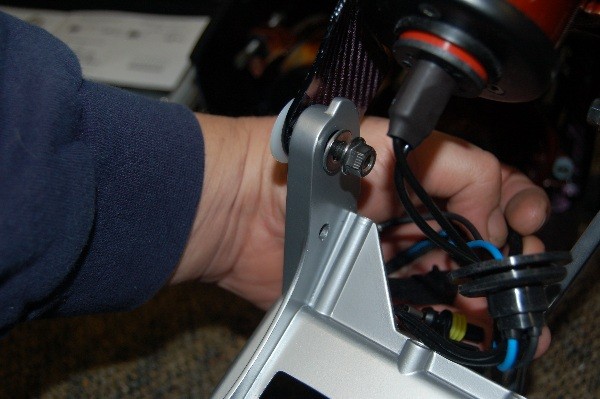
Both bulb cables are now safely encased in plastic conduit:
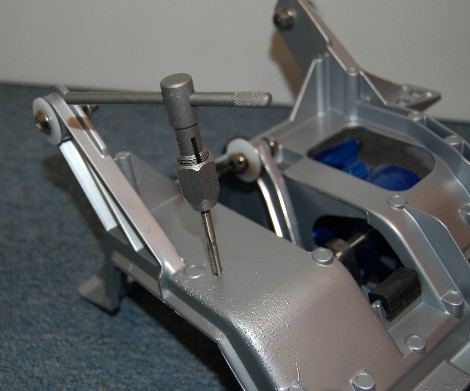
In order to keep the cables from getting into the headlight mechanism I drilled and tapped a 10-32 hole in each support frame:
...and then added a nylon cable clip and a stainless steel button head socket screw to each of the HID cables: I positioned the cable clips after running the headlights up and down by hand and observing how much slack the cable required to not put stress on the plugs or where they enter the bulb. The cables only bend very slightly between the full up and the full down position. The cable clips are not tight on the conduit and do allow it to move up and down through the loop freely. This little addition will slightly complicate things if I ever need to change out the bulbs, but the peace of mind is worth it.
The other cables will be secured once I have the assemblies back in the car and see where they need to lay.
[This message has been edited by randye (edited 02-12-2010).]
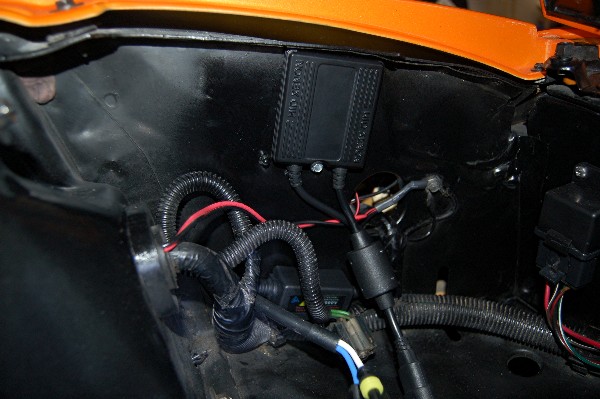
Now to figure out where I'm going to mount the ballasts...
Here's the area we have to work with:
The flat horizontal area in front of each headlight has plently of room, but I have noticed that water from rain or washing the car tends to pool there. Even though they're supposedly sealed, I don't want the ballasts just sitting in water for extended periods of time, so lets look at the vertical places we can put them...
Here's the side wall: The only problem here is that on my 87 GT the headlight control module is located right on the opposite side of the steel where the yellow lines are. If you stick a finger in the hole where the side marker wires go you can feel the edges of the module. Want to create a big problem?, just drill through a headlight control module...
Once I trial fitted the ballast on the side wall, I was sure that I could put the single sheet metal screw to secure it just above the control module with no risk. The passenger side is no problem of course, there's nothing on the outside of the sheet metal to worry about.
It would have been nice to be able to mount the ballasts in the spare tire compartment and run the cables through the bulkhead with rubber sealing grommets, but that would have meant extending the cable lengths and cutting holes in the bulkhead...in short, a lot more work for very little benefit.
Each ballast was cleaned with alcohol and 3M mounting tape, (same stuff used for quarter windows), was applied to back side of each one: The mounting tape probably wasn't 100% necessary, but I figure it will help suppress vibration and it will add a little to the security of each ballast as they're only mounted with a single sheet metal screw.
[This message has been edited by randye (edited 02-12-2010).]
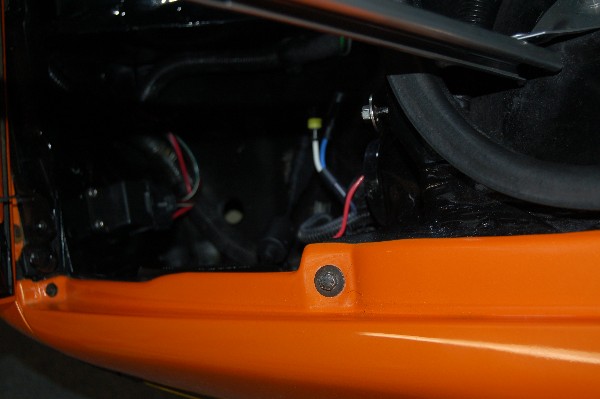
Once I had each ballast positioned where I wanted it, I drilled a 1/8 inch hole through the side wall, cleaned the surface with alcohol, peeled the backing off the tape and secured each ballast just under the steel lip at the top of each side wall with a stainless steel sheet metal screw: (The red wire going into the hole where the side marker wires go is routed down to my new LED driving lights.)
The ballasts are so thin, they don't protrude past the steel lip at the top of the fender:
The headlight buckets and the headlight door mechanisms should have no clearance issues.
[This message has been edited by randye (edited 02-13-2010).]
I just had to come back in from my shop to mention something I remembered:
An IMPORTANT note to anyone intent on making this conversion.
HID lights, (bulbs), require a "cooling off period" of several seconds before switching them back on. Serious damage to the bulbs can result from repeatedly switching them on and off. Because of this, I STRONGLY recommend that anyone contemplating this conversion to your F1F quad lights also do the conversion to your headlight circuit to allow the low beams to stay on with the high beams. This will prevent you from switching from low beams to high beams and back again without the required "cooling off" interval and thus damaging your new HID lights. I had previously done this conversion prior to starting this HID project, (with a relay), with my halogen lights. The thread and diagrams of how to do this are posted somewhere here on the forum and I'll reference a link to it once I find it again. If anyone has it handy, please feel free to post it...
I've been following this, thinking about combining HID low beam with the 90mm Halogens.
I've been following this, thinking about combining HID low beam with the 90mm Halogens.
If I understand you correctly, that's exactly what I'm doing. This conversion will have the HID low beams and halogen high beams.
One reason I'm not also converting the high beams to HID at this point is that "Synthesis" had fairly good results with the low beam cut-off pattern just using the shields that are already in the Hella low beam modules. He is tinkering around with modifying the shields to get them even better. I have not seen what the results are from attempting to convert the high beam Hella modules to HID. As an engineer, I've become a big believer in "incremental development", especially where we have so many unknowns. Once we have the low beam conversion working well we can consider going further, but I suspect that the high beams are going to be somewhat more problematic with regard to their light pattern, especially if we complicate things by having both the low and high beams on at the same time. Just taking this one step at a time...
[This message has been edited by randye (edited 02-13-2010).]
IP: Logged
12:03 PM
Synthesis Member
Posts: 12213 From: Jordan, MN Registered: Feb 2002
If I understand you correctly, that's exactly what I'm doing. This conversion will have the HID low beams and halogen high beams.
One reason I'm not also converting the high beams to HID at this point is that "Synthesis" had fairly good results with the low beam cut-off pattern just using the shields that are already in the Hella low beam modules. He is tinkering around with modifying the shields to get them even better. I have not seen what the results are from attempting to convert the high beam Hella modules to HID. As an engineer, I've become a big believer in "incremental development", especially where we have so many unknowns. Once we have the low beam conversion working well we can consider going further, but I suspect that the high beams are going to be somewhat more problematic with regard to their light pattern, especially if we complicate things by having both the low and high beams on at the same time. Just taking this one step at a time...
Since you brought it up, I discovered last night while playing with a set of the low beam modules that came in in the big order that the cutoff shield is NOT at the focal point of the projector lens. This was an intentional design by Hella to soften the cutoff line, allow a bit more scatter up for the DOT approval for illuminating overhead signs, and to prevent the "color change" issue that occurs right next to the cutoff when displaying on a flat wall.
I ordered two low beam modules for myself, as I will be modifying them into Driving Light projectors, and will eventually install HIDs in them as well.
What this means: As soon as I get my 12v power supply back, I will be pulling one of my existing HID ballasts/power/lamps from the car, and doing some in-home testing and calibration with the shield adjustments shining on a white wall.
My main issue with doing this, is I do not have a camera that is good enough for decent photos.
Edit: HID High Beams are BRIIIIGHT! Just for the record. You CAN do HID highs, but doing "flash to pass", or highway drives where you are constantly changing your lights from low to high and back will damage the bulbs, possibly the ballasts, and provide unsatisfactory results because HIDs have to warm up.
[This message has been edited by Synthesis (edited 02-13-2010).]
Edit: HID High Beams are BRIIIIGHT! Just for the record. You CAN do HID highs, but doing "flash to pass", or highway drives where you are constantly changing your lights from low to high and back will damage the bulbs, possibly the ballasts, and provide unsatisfactory results because HIDs have to warm up.
I agree with this statement based on the technical theory of the operation of Xenon HID bulbs as I have done a lot of research on the subject, but I have personal and second-hand experience that these bulbs can withstand normal high beam "flashing" back and forth at a normal rate for 2.5+ years if not longer. If anything happens to the bulbs within 2 years, they get replaced for free under the Top Line Group Automotive "No Questions Asked" warranty. I would encourage people to do the high beam modification if you wish because I personally have faith that they will not be destroyed or damaged.
[This message has been edited by Oslo (edited 02-13-2010).]
I agree with this statement based on the technical theory of the operation of Xenon HID bulbs as I have done a lot of research on the subject, but I have personal and second-hand experience that these bulbs can withstand normal high beam "flashing" back and forth at a normal rate for 2.5+ years if not longer. If anything happens to the bulbs within 2 years, they get replaced for free under the Top Line Group Automotive "No Questions Asked" warranty. I would encourage people to do the high beam modification if you wish because I personally have faith that they will not be destroyed or damaged.
While it's good to have evidence that your bulbs and ballasts appear to tolerate frequent flashing on and off and the TLG warranty is certainly a HUGE plus, what I'm more concerned about with converting the high beams to HID is the light pattern. I'll be watching for results from what Synthesis is doing. Although I don't do a lot of driving on empty roads at night, I'd love to have all 4 of my lights converted to HID.