Hi, I just started work on my hood for a new vent today. Got the lines laid out like I envisioned and cut into the hood.
I used Archie's measurements for a "Warber" vent as a starting point, but I narrowed it down a bit and made it longer. His measurements were for the sides to be 3 3/8 from the crease in the hood and 9 inches long. I went 5 1/4 from the crease and 21 3/4 inches long. I also cut a slot 1 1/2 inches each side of center to make 2 separate vents.
Here are the pics of my progress today:
Lines laid out with pencil:
The underside after the first cutting:
And a few pics from different angles with 2X6 holding vents open"
I did'nt want to cut into the trunk wall seat, but I ended up having to in order to get the vent to lay like I wanted it to. I'll have to cut the trunk divider 5/8 inch to clear the vent. It will be awhile before I get much farther on it since we will be going on vacation soon and I need to get some SMC compatible resin. Not to mention I'll need warm days over the winter to lay it up.
Any thoughts on it? Critisims always welcome.
Thanks Max
IP: Logged
11:33 PM
PFF
System Bot
vinny Member
Posts: 1690 From: starkville MISSISSIPPI Registered: Mar 2003
You know it's pretty sad when I have to see what you're doing in the garage on the forums!! I must be really lazy... oh well, guess that's the way it goes... Sno'ball really looks funny with Night Wolf's purple hood... laugh... he just needs the trunk piece purple to match now...
You know it's pretty sad when I have to see what you're doing in the garage on the forums!! I must be really lazy... oh well, guess that's the way it goes...
Well, you wouldn't have wanted to go out there with all the SMC dust blowing around when I was cutting that anyway. Not to mention when the cutoff wheel exploded and a big piece hit me in the cheek!!!
Max
IP: Logged
07:19 AM
jstricker Member
Posts: 12956 From: Russell, KS USA Registered: Apr 2002
Besides that, it's always better to ask forgiveness than permission.
John Stricker
quote
Originally posted by Max The Chainsaw:
Well, you wouldn't have wanted to go out there with all the SMC dust blowing around when I was cutting that anyway. Not to mention when the cutoff wheel exploded and a big piece hit me in the cheek!!!
Max
IP: Logged
12:48 PM
katatak Member
Posts: 7136 From: Omaha, NE USA Registered: Apr 2008
I think it looks good. I like the length too. My only preference may be for them to be wider - symetrical with the headlight covers maybe? Hard to say without a visual. I wish I had the "stones" to attempt some glass work. I have a spare hood that I may have to give it a shot. Keep us posted.
Pat
IP: Logged
07:20 PM
Tony Kania Member
Posts: 20794 From: The Inland Northwest Registered: Dec 2008
I think it looks good. I like the length too. My only preference may be for them to be wider - symetrical with the headlight covers maybe? Hard to say without a visual. I wish I had the "stones" to attempt some glass work. I have a spare hood that I may have to give it a shot. Keep us posted.
Pat
Thanks. I didn't make them any wider due to the fact I made them so long that they went back into the rear compartment. I set them to just clear the supports in the rear compartment cutout. any wider and they would have required a LOT more work on the bottom side, as well as may have weakened the hood more.
It doesn't take "stones" to do fiberglass, just to cut up the body panels. After the cutting is done, you are just trying your best to fix it.
Take care
Max
IP: Logged
09:36 PM
katatak Member
Posts: 7136 From: Omaha, NE USA Registered: Apr 2008
Do you have a few more pis of the underside - different angles / views. Curious as to how the barces are cut?
Thanks
Pat
Sorry for the delay. Winter and a Caribbean cruise kinda put a halt on this job for awhile. (The cruise was far better then the winter.....) Here are some pics of the underside with the first application of glass.
Hope this is what you want. The blue stuff is tape I put down before glassing. I plan on cutting the glass at the tape to square it off and try to simulate the flange look that the rest of the hood has where the parts adhere together. We'll have to see how it works out.
Max
Edit, forgot to attach the pictures. What an idiot!!! LOL
[This message has been edited by Max The Chainsaw (edited 03-22-2009).]
max, i dont see any pix attached to that last post. hood is looking great so far, i have a similar hood in progress except that we started with a homemade cowl raise first and then cut vents like yours into it. the look is similar and we didnt have to cut the hood framing or the trunk wall. the vent continues under the covered portion at the front to the cutouts in the radiator area.
[This message has been edited by wolf63 (edited 03-21-2009).]
IP: Logged
08:18 PM
cnander51 Member
Posts: 117 From: Clewiston, Florida Registered: Oct 2008
max, i dont see any pix attached to that last post. hood is looking great so far, i have a similar hood in progress except that we started with a homemade cowl raise first and then cut vents like yours into it. the look is similar and we didnt have to cut the hood framing or the trunk wall. the vent continues under the covered portion at the front to the cutouts in the radiator area.
Darn! I thought I had nailed down the final design of my cowl hood and actually started the install. Now I come across this modification which means I have more cutting and glassing to do. I really like that cowl induction/hood vent. I am starting to feel like I should stay off the forum until I get one area of my car complete. It would be my luck to start on a custom headlight install and half way through it I find a version I like better. lol
IP: Logged
10:39 PM
Mar 22nd, 2009
Max The Chainsaw Member
Posts: 1141 From: Danville, IL Registered: Oct 2000
max, i dont see any pix attached to that last post. hood is looking great so far, i have a similar hood in progress except that we started with a homemade cowl raise first and then cut vents like yours into it. the look is similar and we didnt have to cut the hood framing or the trunk wall. the vent continues under the covered portion at the front to the cutouts in the radiator area.
Took care of the missing pics. My bad.
I do like the changes you made in that cowl hood. I usually don't like a cowl type hood, but the cutouts really improve the look. Good job.
Max, what resin are you using? Any pics yet from the top?
Sorry for the delay, I have only about 1 day a month to mess with this vent. That's why I called the thread "STARTED on a new vent" it's gonna take a loooooooong time to finish.
Here is the resin I'm using:
At least it SAYS it's compatible with SMC panels. LOL
Here is the bottom side in it's current condition.
I'm going to give up on making the raised up part around the joints, I'm not fond of it and will just level it out all the way across.
And a few of the top side. I just filled in the openings between the top and bottom panels with glass. I plan to stand the hood on it's side to fill the sides so the glass can lay flat. I filled the openings first so the glass won't just drop down into the openings between the panels. It would take a lot of glass to fill up those channels!!
And last but not least, a radiator's eye view LOL
The final plan calls for the front end of the vent to be cut at an angle so the screened opening will be tilted to the rear of the car and upward. this should allow more radiator clearance, as well as a larger opening for better air flow. Plus I think I'd like it better angled.
Thanks for looking!
Max
IP: Logged
03:05 PM
pavo_roddy Member
Posts: 4351 From: State with a city named Gotham Registered: Apr 2004
Niiiiiice job man! And another mod raises the bar!!.....hehe... Any thoughts on what yur gonna paint it, when yur ready?
Well since I don't know when he'll get around to responding to this... I will.. he's looking at a nice metallic orange color... (I kinda nixed the yellow color... and for some reason that ZR2 body kit looks absolutely horrible in dark colors/black although you wouldn't think so!) PPG #5980 Mazda #25T Spicy Orange Metallic to be exact, but it's not set in stone yet... From the looks of it, it probably won't be till next year... our son is providing the paint, in exchange for his being painted... maybe later this year... he wants a metallic red.
Thanks for the bump Fiero1Fan. I guess I need someone to remind me when it's time for an update.
I've been working on the bottom side since the last post. I have discovered one thing. If you are gonna do fiberglass, buy the Sea Glass mat. It is 10X better than the glass mat you get at auto part stores!! It will actually lay down where you want it, the other glass mat keeps lifting from bends. This stuff stays where you put it and fills out wonderfully. Wish I had tried it years ago!
Well, on with the pics:
As you can see, I did away with the flange edges, wasn't worth all the extra effort and trouble. Looks better smoothed anyway.
Also I have cut the angle on the vent, so you can see how it sits. What I didn't take a pic of was the grille material I got (Free!! Was going to be thrown away from work.) It is the rock guard for the radiator on a late model Freightliner truck. It is about 2 inches high and 3 feet long. Has a hexagon opening pattern similar to the grid under the notchback engine grilles but in a 3/8 inch opening size. It is the perfect size of the openings on the vent!
Well, that's it for now. When I get this side sanded down, I'll turn the hood over and start on the topside.
Have a great day!
Max
IP: Logged
09:54 PM
Nov 20th, 2009
Max The Chainsaw Member
Posts: 1141 From: Danville, IL Registered: Oct 2000
Oh my God!! May!!! Funny how sometimes other things get in the way of a project and it seems to take forever to get back to it.
Finally got back to this one today. Still working on the bottom side of the hood, the front part (between the headlight doors) is done to the point of being wet sanded with 400 grit. Still need to do the back half up to that point and then I can start on the top side. Hopefully the top won't take as long since there isn't as much to do on it.
It is really amazing how much work is involved in making something entirely from scratch as opposed to using a part someone has already made up.
Well, here are the pictures, not a lot of change since May, but I hope to finish it soon since I now have to make a vented hood for my son's Fiero (He wants Trans Am fender vents put in to the hood) I already have a spare hood and a set of vents (Thanks a million Mike!!!!), and one for my daughters car.
At least I washed off the dust for these pics. And here is a pic so you can get an idea how big the openings are.
And, of course, a pic of the top side still in raw fiberglass.
Thank you for all your patience. I'm glad this didn't get archived!!!
Have a great day.
max
IP: Logged
09:45 PM
katatak Member
Posts: 7136 From: Omaha, NE USA Registered: Apr 2008
Wow, I am glad you posted....I've been holding my breath waiting for an update...... It's nice to breath again! Looking good Max. I just started doing some glass work the other day. Lots to learn. I have hood vent in my near future.
Poor Sno'ball! He looks so ricer with that purple hood! I will be glad when he's all put back together again and a few things improved like different rims and new paint!!
I'm sure glad you can breath again katatak... that was a very long time to hold your breath!!
Max has a list a page and a half long on what he needs to do or finish on each of the fieros (cause his memories not as long as other things.. giggle)... course the truck has a few things needing to be done as well... guess I'll have to add those to his list!!
I will be glad when he finally gets around to my car!! sniff, sniff... mine's the only one that doesn't have a working remote starter!! Not that I drive him a lot and absolutely need it, mind you... course Max is also going to have to replace the lumbar bellow in my drivers seat when he removes the 88 seat covers and puts Mr. Mike's seat covers on... woot woot... can't wait to see those!! Should be here in a week or two!! Where on earth are you going to have the floor space to do that??
But Max is making progress... now if the rest of the stuff around the house would quit needing fixed!! Like the spa room roof replaced, hot tub seal replaced, closet roof leaking... ugh... seems like there's always something lately... oh well, it will get better eventually!! And I may actually get Greye's seat out of the bird room and back in him and off the top of the freezer!! Along with his ice scraper, his umbrella... and some CD's, he's seriously lacking in the music department, that one Momma Mia CD is getting on my nerves!! lol..
That is one well thought out scoop that has now given me an idea...... I have a pontiac GTO scoop that i could reverse and do this mod too hmmmmmm almost a genius idea.
nice ! personally i would have rounded off the corners but a solid great effort none the less !
------------------
87 Fiero GT 5sp with Vortec L35 4300 Turbocharged V6 Bully Stage 2 clutch Syclone intake manifold and engine management with Moates adapter and chip burner Air/water intercooler and Devil's Own progressive water/alky injection 50lb injectors, 3 bar map sensor, Walboro fuel pump and Jabasco Intercooler pump LM1 wideband on custom manifolds and 3" stainless exhaust system T31/T04B H3 turbo and a S10 caliper conversion. Murphy's Constant Matter will be damaged in direct proportion to its value Murphy's Law of Thermodynamics Things get worse under pressure. Arthur C. Clarke "Any significantly advanced technology is indistinguishable from magic"
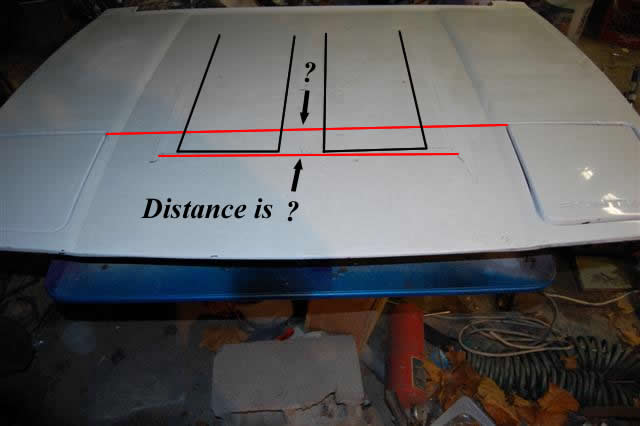
Max .....or anyone know the distance between the two red lines??? THX
You mean the distance from the cutout to the rear of the headlight door openings? I'll have to measure that. I got my cutout measurements from this picture provided by Archie:
This is the image he uploaded here for making Warber Hoods. I just adapted the measurements, extended the side cutouts, and left out a piece in the middle.
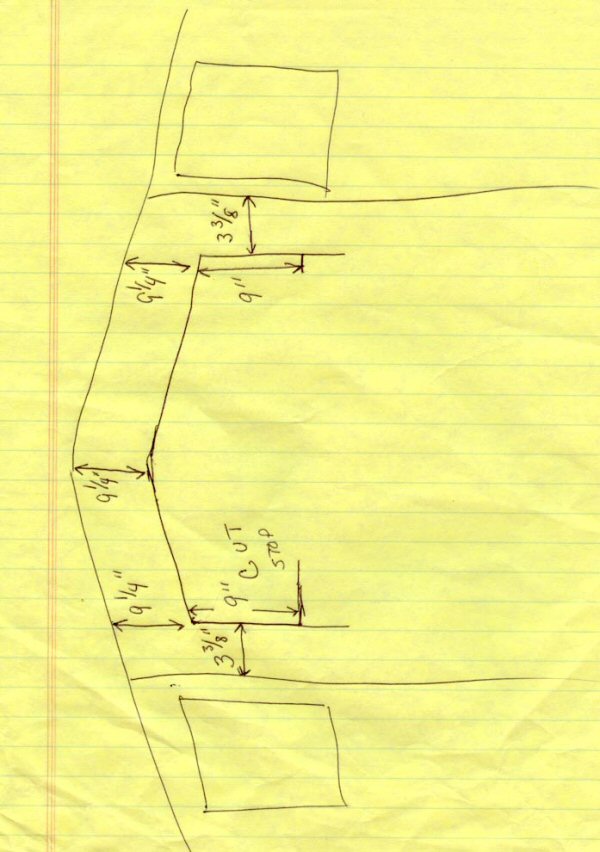
Here is another image of the same measurements in GIF format:
If you still want the measurement from cutout to headlight openings, Let me know, I can measure it.
Also, thanks everyone for the interest in my very slow moving project. I'll get some more pics soon, as well as some pics of the wheels I'm working on for this car.
Have a great day.
Max
Edit, can't type worth a darn.......
[This message has been edited by Max The Chainsaw (edited 01-17-2010).]
Max .... Thanks for the reply ..... its ok with the diags you provided ... If I may I would like to copy your idea which I think will look excellent on the Widow.. take care following this thread very closely ....
regards Danyel
I cant type worth a %$&?% either hehehe
[This message has been edited by Danyel (edited 01-17-2010).]
IP: Logged
07:50 PM
Max The Chainsaw Member
Posts: 1141 From: Danville, IL Registered: Oct 2000
Max .... Thanks for the reply ..... its ok with the diags you provided ... If I may I would like to copy your idea which I think will look excellent on the Widow.. take care following this thread very closely ....
No problemo!! Feel free to copy, change, whatever. I'm really flattered you like my idea. Actually I pretty much copied Archie's measurements and Soulcrushers idea with the Mustang Cobra vents he glassed into his hood to make this.


_1.JPG)
_1.JPG)
_1.JPG)
_1.JPG)
.JPG)
.JPG)
.JPG)
.JPG)


.JPG)
.JPG)
.JPG)
.JPG)
.JPG)
.JPG)


_1.JPG)
_1.JPG)
_1.JPG)
.JPG)
.JPG)
.JPG)
.JPG)
.JPG)


.JPG)
.JPG)
.JPG)
.JPG)

_1.JPG)
_1.JPG)
_1.JPG)
_1.JPG)
_2.JPG)
_2.JPG)