Is it me or does the decklid not shut correctly? It looks like it is sticking up. Is this because it hits the snout on the blower? Most 3.8SC installs I have seen notched the decklid so it would shut correctly, other than that it is a beautiful car. Nevermind, I saw in another thread that it was open to be judged. How a bout a picture with it closed all the way?
[This message has been edited by avengador1 (edited 03-28-2006).]
IP: Logged
01:15 PM
Mar 29th, 2006
slickrick2000 Member
Posts: 1369 From: Temecula, California Registered: Oct 2004
A very nice job you guys have done on that car. That is the nicest flowing widebody I have seen so far.
I have liked the look of the widebody around the tires areas, but hated how they flowed into the door and up towards the top of the car. You guys made it flow exactly the way it should be.
IP: Logged
12:44 AM
FieroGTRwideboby Member
Posts: 591 From: Socal (Pasadena) Registered: Jun 2004
Well lets continue this with some pics of the front and rear Plug along with some sanded quarters. Once again wood and drywall mud played a large role in the plug making.:
------------------ There's two types of cars in the world, Fieros and everything else.
IP: Logged
11:32 PM
Mar 30th, 2006
ducattiman Member
Posts: 674 From: TheNetherlands Registered: Mar 2003
hmm... so this is a homebuilt widebody? cool. How is the "widebody" rear end supported when you're working with the mud over the stock body?
Oh wait, I see... I think? You screwed some wood support onto the stock body, along with some wood legs on the bottom? What did you use for mounting points once the fiberglass was done?
[This message has been edited by ryan.hess (edited 03-30-2006).]
IP: Logged
12:52 AM
exoticse Member
Posts: 8656 From: Orlando, Fl Registered: Jun 2003
Am I to understand that the GTR still has wood structural support underneith?
That's an interesting idea, and it gives you more possiblities than just using old fenders to beef the car up. I'd like to know a little more: What type of wood did you use (Pressure treated, etc)? What type of screws did you use to affix it to the outer fiberglass? What type of fiberglass did you use to build the body over it? Is it practical for road wear, or only for show?
Sweet ride!
-Ross
IP: Logged
08:41 AM
jscott1 Member
Posts: 21676 From: Houston, TX , USA Registered: Dec 2001
I think it's great that you premiered the car first then showed the build up. For one it was more exciting that way, and two, you would have had a bunch of people giving you unsolicited advice on how to do things and how your way wouldn't work. As ExoticSE has said, you have perhaps inspired a group of people to attempt body mods that may never had thought to try it before. It's completely awesome.
IP: Logged
10:46 AM
ryan.hess Member
Posts: 20784 From: Orlando, FL Registered: Dec 2002
Originally posted by 12055: Am I to understand that the GTR still has wood structural support underneith?
as I understand it, he just used the wood and mud to make a mold to fiberglass over. I assume once it was done he popped off the fiberglass and mounted it.
I can tell you already that this is quickly becoming my favorite build up thread!
quote
Originally posted by ryan.hess:
as I understand it, he just used the wood and mud to make a mold to fiberglass over. I assume once it was done he popped off the fiberglass and mounted it.
The idea is correct, but the terminology is not - you use whatever materials needed (wood, foam, plaster, drywall mud, etc) to create a full size part known as a "plug". From this plug a reinforced fiberglass mold is made of the part (the more-perfect the plug, the more-perfect the part made appears). The mold is then cleaned and polished - then used to create a lighter, thinner, and usually stronger part - that is then attached to the original body. Depending on the complexity, size, & shape of the part - depends on how it is mounted to the car (if you make a full panel, it theoroetically could use the stock mounting points - if you make a partail panel, it would have to be bonded on and smoothed in like any other aftermarket part).
I can tell you already that this is quickly becoming my favorite build up thread!
The idea is correct, but the terminology is not - you use whatever materials needed (wood, foam, plaster, drywall mud, etc) to create a full size part known as a "plug". From this plug a reinforced fiberglass mold is made of the part (the more-perfect the plug, the more-perfect the part made appears). The mold is then cleaned and polished - then used to create a lighter, thinner, and usually stronger part - that is then attached to the original body. Depending on the complexity, size, & shape of the part - depends on how it is mounted to the car (if you make a full panel, it theoroetically could use the stock mounting points - if you make a partail panel, it would have to be bonded on and smoothed in like any other aftermarket part).
Hummmm sounds like SOMEONE should go into the buss. What are your plans Rob?????????
IP: Logged
12:28 PM
FieroGTRwideboby Member
Posts: 591 From: Socal (Pasadena) Registered: Jun 2004
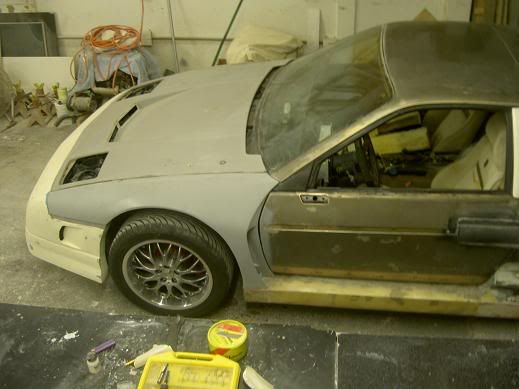
There is no wood or plaster under the body. Its like a regular car with fiberglass panels nothing under the fiberglass body, because of that it can be driven everyday, anywhere, anytime in any weather.
The wood , and plaster was taken off it was only used to make the plug to get the molds off of it, then once the glass was layed and molds were made the plug component was removed. So the new panels are exacty like the original parts. The factory mounting locations were used on the front, rear bumpers, fenders, along with stock hood and decklid. The only panels that had to be bonded were the rear quarters, doors, and rockers. Yes any materials needed were used to make the plug, which was full sized. Every panel was made that way. The molds were later made from the plug which was almost perfectly smooth due to the nature of drywall mud, very sandable. The molds were made with 2 layers of weaved, 2 layers of the mesh glass, and then a layer of the structural heavy duty glass. Then like you said MinnGreenGT the molds were cleaned of the plug materials, and polished and coated with a release agent to ensure separation of the actual fibergalss panel from the mold. The panels were made very strong due to the use of different structural fibergalss, and the only ones that were not made to attach to the factory mounting locations were the quarters, rockers and doors. I believe I used the right terminology in my previous statements, and pretty much explained the same thing that you did just now.? There was a plug, a mold, and a part produced until it was done and parts were made.
------------------ There's two types of cars in the world, Fieros and everything else.
[This message has been edited by FieroGTRwideboby (edited 03-30-2006).]
Awesome job!! I am very interested in trying something like this with mine. Do you have any tips or solutions to problems you ran into while building this? Or do you have a website with a detailed buildup? I think we all could learn a lot from this and all the info you could provide woould be more than helpful.
IP: Logged
01:15 AM
ryan.hess Member
Posts: 20784 From: Orlando, FL Registered: Dec 2002
Hummmm sounds like SOMEONE should go into the buss. What are your plans Rob?????????
LOL - I have a cousin already in the fiberglass business (he builds fiberglass kit planes) - www.teamtango.com (he also had made molds from my M3-style rockers... but we have yet to actually produce parts yet).
quote
Originally posted by FieroGTRwideboby:
...I believe I used the right terminology in my previous statements, and pretty much explained the same thing that you did just now.? There was a plug, a mold, and a part produced until it was done and parts were made.
Yes - you definitely have a heck of grasp on the process (far more than I ever have)!
Damn.. you beat me to it... I was going to do something very similar to your quarter panels, thought it would be original
haha, Maybe I still will, since my idea differs for yours a bit, but definatly nice touch on the vents behind the wheel, pulls off the quarter panels really nice.
Good Job.
IP: Logged
11:53 AM
FieroGTRwideboby Member
Posts: 591 From: Socal (Pasadena) Registered: Jun 2004
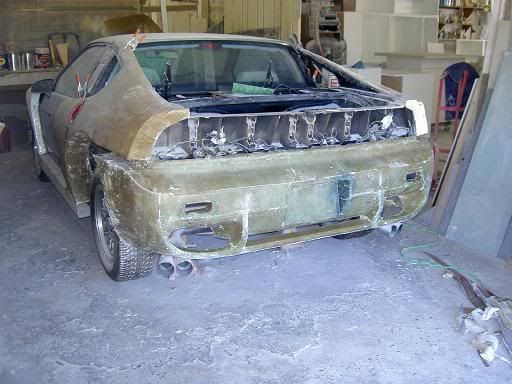
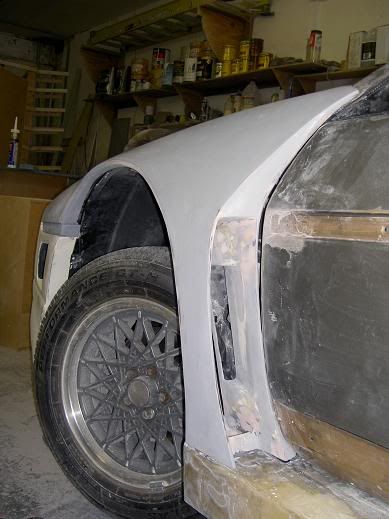
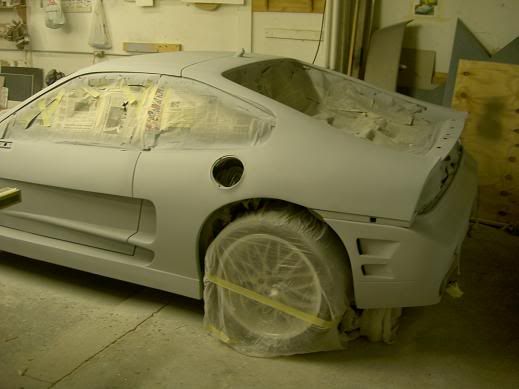
The car is 4 inches wider on each side at the rear quarters, and 2 inches wider on each side at the front fenders, the wide effect starts at the corner of the front bumper. This is the build thread so if you want pics ask.
IP: Logged
02:23 PM
ducattiman Member
Posts: 674 From: TheNetherlands Registered: Mar 2003
LOL - I have a cousin already in the fiberglass business (he builds fiberglass kit planes) - www.teamtango.com (he also had made molds from my M3-style rockers... but we have yet to actually produce parts yet).
I checked out his site... Very reasonable prices, I'm impressed. I think with his kits, you can have a 4-seater plane in the air for less than $60,000. I'll have to remember that, lol.
Oh, and you wanna put those molds to use for me? I'll definately buy a set of rockers from ya, lol.
IP: Logged
03:03 PM
jscott1 Member
Posts: 21676 From: Houston, TX , USA Registered: Dec 2001
The molds were made with 2 layers of weaved, 2 layers of the mesh glass, and then a layer of the structural heavy duty glass. Then like you said MinnGreenGT the molds were cleaned of the plug materials, and polished and coated with a release agent to ensure separation of the actual fibergalss panel from the mold.
Do you have a pic of what the molds look like? I'm sure they look like any other Fiberglass molds, but I'm still not clear exactly how one would go about making a mold from scratch.
IP: Logged
11:06 PM
FieroGTRwideboby Member
Posts: 591 From: Socal (Pasadena) Registered: Jun 2004
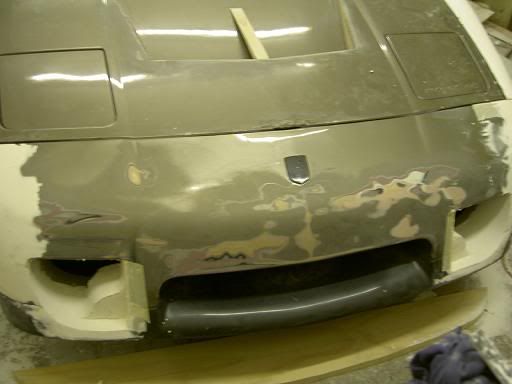
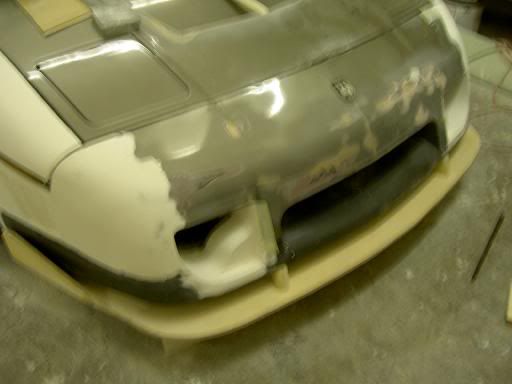
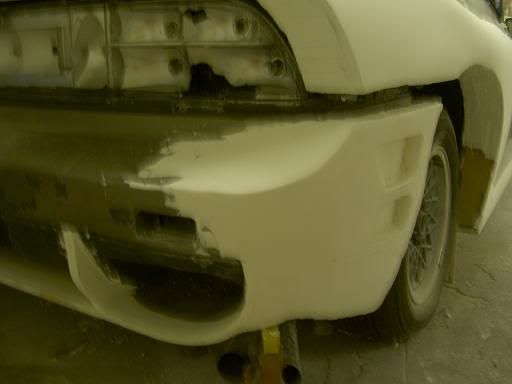
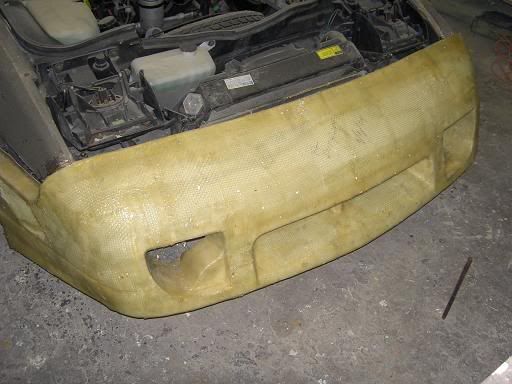
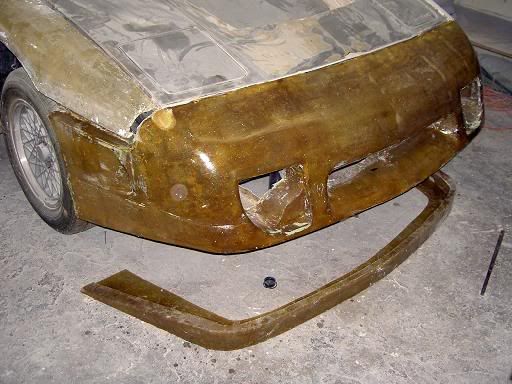
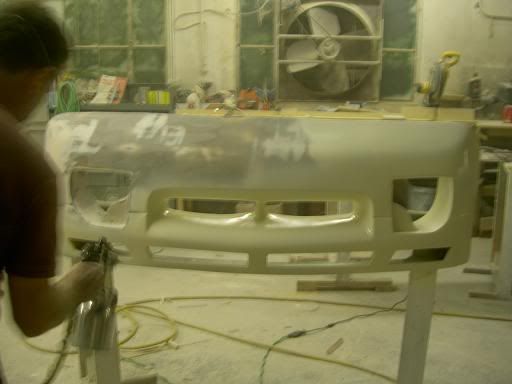
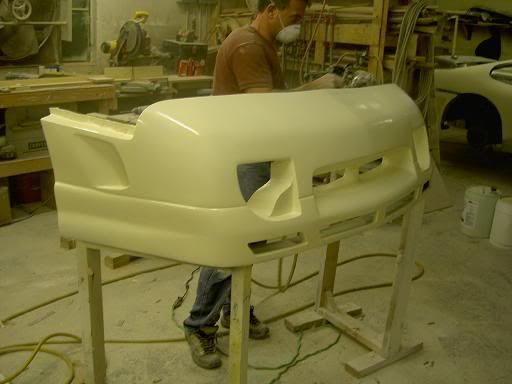
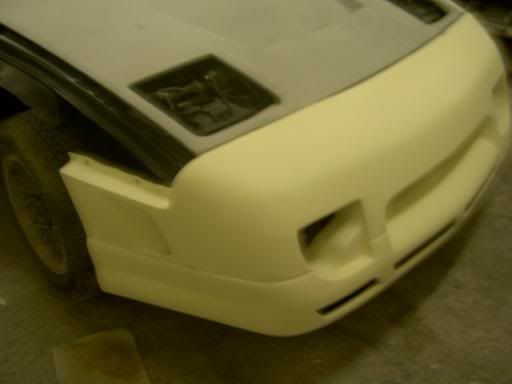
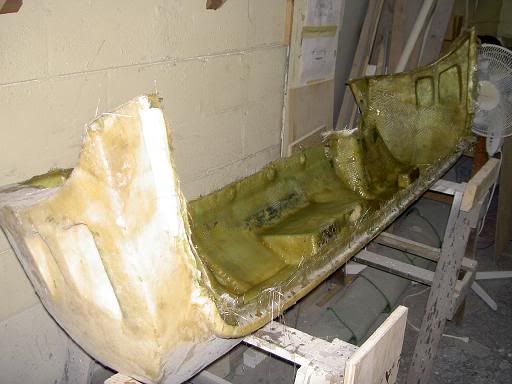
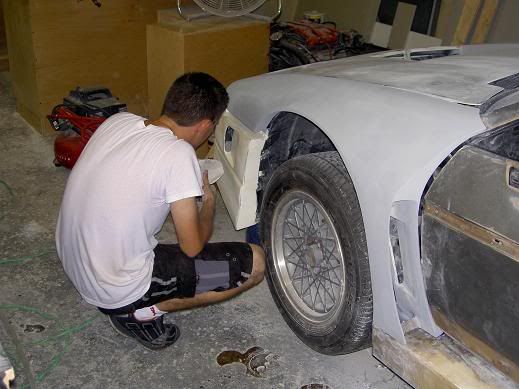
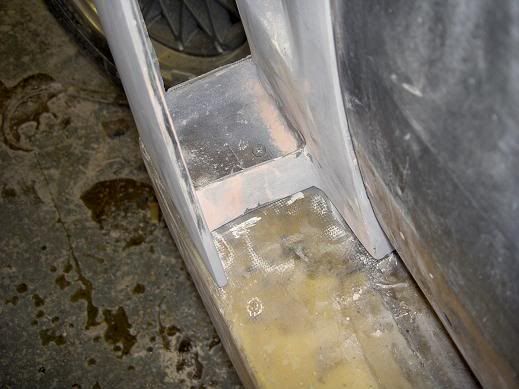
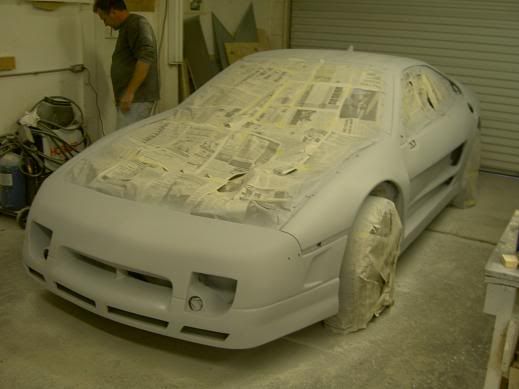
Ok lets continue with the pictures. The front bumper plug was completed and them the mold was layed over it.:
Once that was done the molds were cleaned and the new panels were made.:
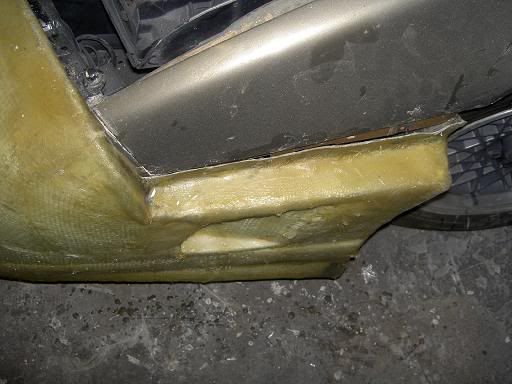
The front bumper was one piece and then the lower wide chin was made. They were bonded and then the grills were cut out and lips were added all along the inner edges.:
Thats the front bumper story. Feel free to ask away..
Alex
IP: Logged
11:07 PM
jscott1 Member
Posts: 21676 From: Houston, TX , USA Registered: Dec 2001
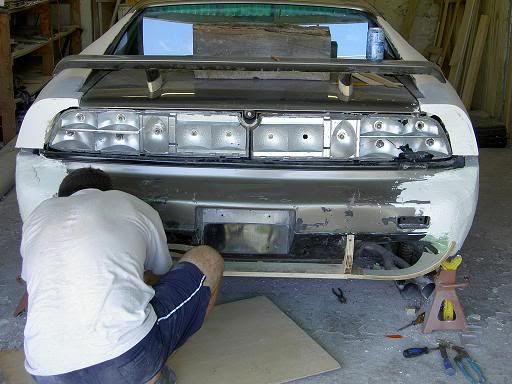
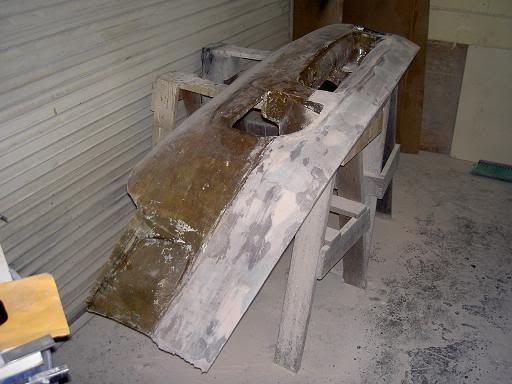
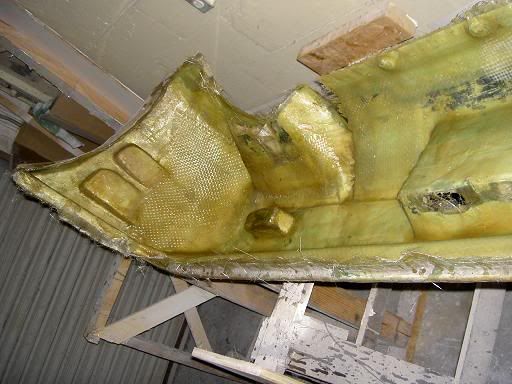
Now for the Rear. This will answer the how a mold looks question. Its the outed shape of the desired panel, so its slightly larger that the actual panel. When the glass is layed into it the inner shape is the exact shape of the plug part except without the wood, plaster ect.LOL we don;t need that anymore. The first two are of the mold with the fiberglass bumper layed into it. It is left to overlap a littel to ensure the part is bigger rather that smaller in the end. Its better to leave the ends longer and trim them so you have the same cosistensy of thickness all the way to the endge of the new part, the last picture (3) is of the rear bumper once it was separated from the rear mold. Pics: Some of you with experience in this may notice there is no gelcoat, well after working with it in the 1st design of front fenders, we did not like the number of air bubbles that would compramise the majority of the edges, even though we made sure to get all the air out sometimes it still showed up in the corners. This way without the gelcoat we ensured that there would be no air bubbles. The second design fenders were the perfect ones we used, they are next...
Alex
IP: Logged
11:18 PM
FieroGTRwideboby Member
Posts: 591 From: Socal (Pasadena) Registered: Jun 2004
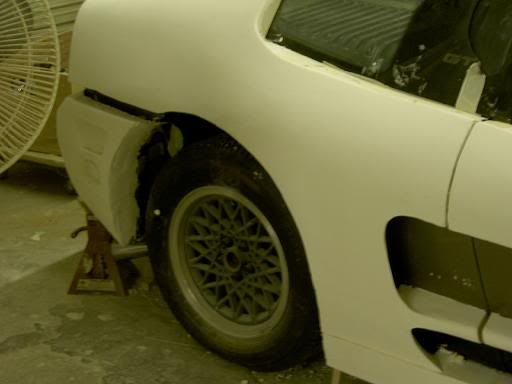
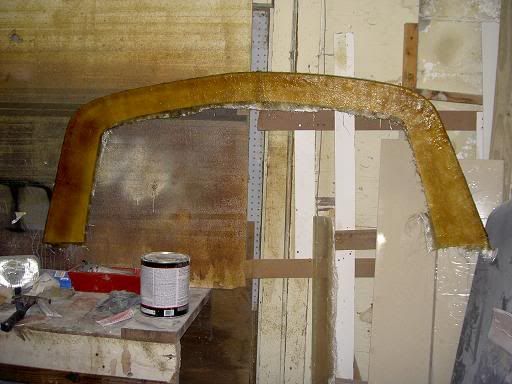
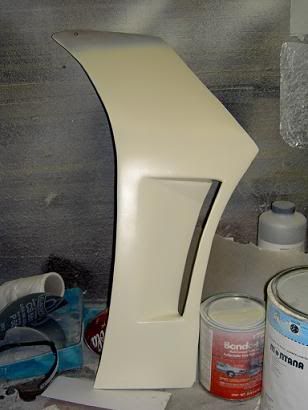
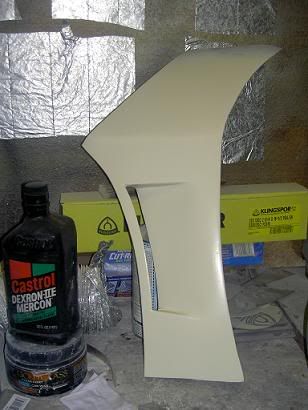
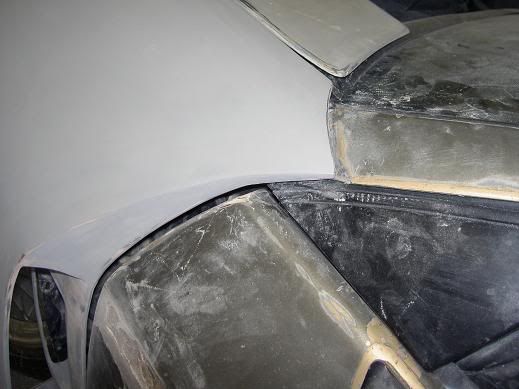
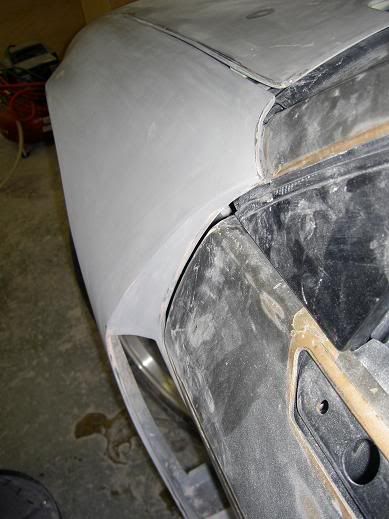
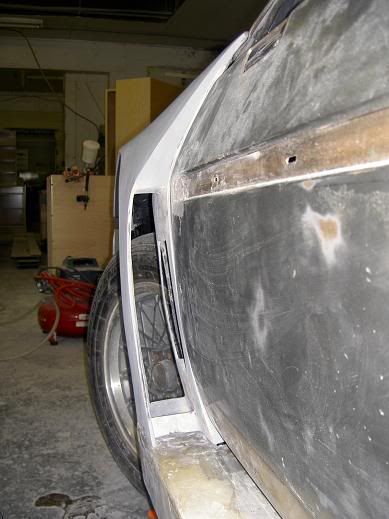
Last for the day. The front fender. First we made fibergalss replicas of original fenders to serve as the inner fender in the new second fenders. They have the F-40 look to them so they needed a inner wall. The inner fenders also had the TA vents in them, they are now not visible but behind the front fender grills they are there. Inners: Then the flared outer fenders were attached to the inner once to give the opening, which resembled the F-40 fenders:
Very cool Alex. You guys did an awesome job. I have a question for you, though. On the front and back bumpers, you have insets on the sides for vents. How did you pull the parts straight out with those insets?
Originally posted by jscott1: I have a better idea how they work now, but the devil is in the details. I am terrible with fiberglass, I could use that class.
Jonathan, You make the molds, I will do the glassin' !! between the two of us... Hey that chop top is still multi colored ....LET'S PLAY !!!
IP: Logged
10:09 AM
PFF
System Bot
Amida Member
Posts: 2362 From: Seattle, WA. USA Registered: Jul 2003
Very nice job GTR...you've got a good eye for design work. Two questions:
1) I noticed you kept the side trim mouldings at the front & rear bumpers, was that due to the necessary mounting screw locations under the trim? 2) When using the drywall mud for the plugs did you have any problems with it cracking when the mud dried?
Congratulations.
Rob Fiero Interior Conversions Seattle, WA. USA
IP: Logged
02:54 PM
FieroGTRwideboby Member
Posts: 591 From: Socal (Pasadena) Registered: Jun 2004
If you use enough release once you start separating the molds, the air enters between the mold and the new part and with little convincing it separates even with all the scoops, curves, and bends. Its all about angles, how you start separating it will influence how well it pops out.
The trim sidemarkers were kept because the fenders also attach there and personally I like the Fiero side markers. The drywall mud was layerd a couple times. You might get some cracking if its one very thick layer, but when you apply the 2nd and 3rd times, its like bando, you eventually get a smooth finish with a couple coats. If the 1st cracks sand a little and add another layer, it will fill in the cracks and get smoother with sanding.
[This message has been edited by FieroGTRwideboby (edited 04-01-2006).]
IP: Logged
04:43 PM
Apr 2nd, 2006
ryan.hess Member
Posts: 20784 From: Orlando, FL Registered: Dec 2002
Do you have a top secret source for cheap fiberglass materials? Or was this a really expensive project? I end up buying the gallon of resin at home depot for about $30, and the fiberglass there, which is really expensive, like $5 for I don't know how much - like 3' by 5'... You need 2 packages, one cloth, one mat to do something small like a quarter panel scoop.... let alone huge molds like a bumper + the bumper itself...
IP: Logged
12:58 PM
1986 Fiero GT Member
Posts: 3383 From: Eden, NY USA Registered: Mar 2005
Do you have a top secret source for cheap fiberglass materials? Or was this a really expensive project? I end up buying the gallon of resin at home depot for about $30, and the fiberglass there, which is really expensive, like $5 for I don't know how much - like 3' by 5'... You need 2 packages, one cloth, one mat to do something small like a quarter panel scoop.... let alone huge molds like a bumper + the bumper itself...
Check eBay... I just bought 100 yards of 38" wide 2.3oz. cloth for $70. You can find some stellar deals like that on eBay, but otherwise, that can turn into a costly project. Especially when you need to buy the heavy cloth to make to molds, but you generally only need a layer or two of that and a few layers of thinner cloth.
IP: Logged
01:18 PM
ryan.hess Member
Posts: 20784 From: Orlando, FL Registered: Dec 2002
wow, pretty sweet buildup and quite the nice ride. glad to see it has a GO motor in it too. i luv the side mouldings/door effects, etc!!! awesome!!! the front bumper is kinda cool, but im not 100% for it tho or some of the rear effects, tho still quite nice. have u tried to see what the car would look liek without the spoiler? pretty wicked im sure.
great job tho.
[This message has been edited by 3.8T (edited 04-02-2006).]
IP: Logged
03:28 PM
Amida Member
Posts: 2362 From: Seattle, WA. USA Registered: Jul 2003
We actually questioned putting on the wing, but yes it did look cool with out it. I am just a wing guy and with the 2.5 inch stands it lookes good enough for me. We also moved it back 1.5 inches.
I guess its time to continue with the pics and process.
IP: Logged
09:48 PM
FieroGTRwideboby Member
Posts: 591 From: Socal (Pasadena) Registered: Jun 2004
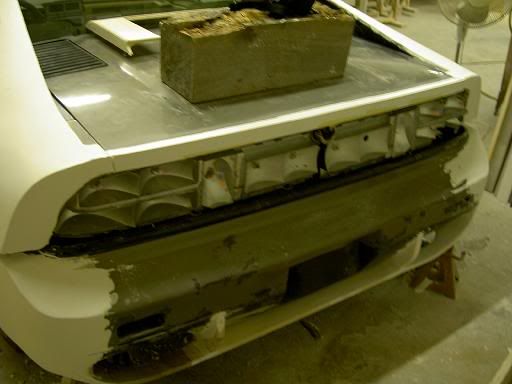
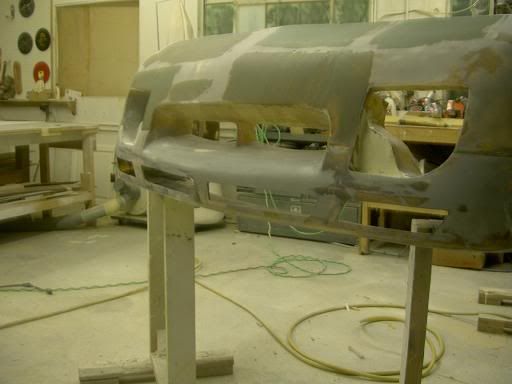
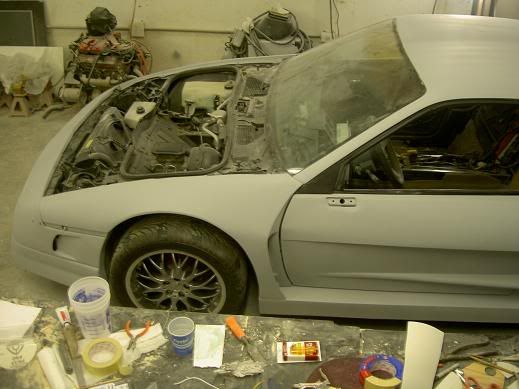
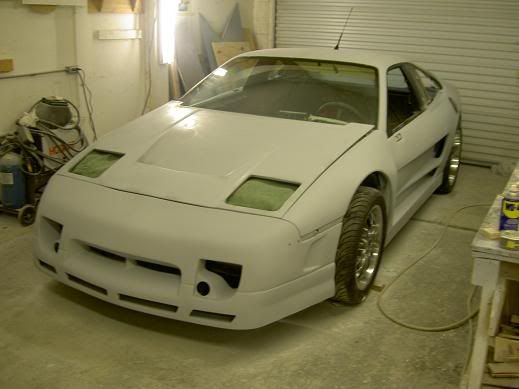
Primer Ohh yeah. We worked so hard to get it to this stage. It was lots of sanding on my dads part and me eyeing it for imperfections and straight lines. Over and over again. Primer: