Where do you get your supplies for the 2-part expanding foam and Duratec primer??
I've see those at Fibre Glast website but I'm not sure if that's the best place to shop for those.....if you have another, cheaper supplier please let me know..
Thanks and keep up the great Pantera build project.
VK
IP: Logged
04:05 PM
opm2000 Member
Posts: 1347 From: Versailles, Ky USA Heart of the Bluegrass Registered: Dec 2000
The overall best prices and also very fast response time is from U S Composites, if your living in the eastern half of the US. BTW, I use the least dense foam. It foams great at 70 degrees, and will perform not as well if 10 degrees cooler, but still works. At 70, you can cut and sand a fresh pour after 15 minutes. It cures all the way thru, and saws or sands nicely, and is compatable with both epoxy and polyurethane resins.
another question on the thickness of Fiberglass mat you use in your project:
sometimes (usually when starting a mold) you use 3/4 oz mat....other times you use 2 oz FG mat....what the reason for this besides building up the mold for strength??
I'm assuming that you get your fiberglass supplies from the same place as well....are you using 3 LB density Foam or higher for your projects??
Regards - VK
[This message has been edited by goyal99 (edited 01-15-2007).]
IP: Logged
05:18 PM
Jan 16th, 2007
opm2000 Member
Posts: 1347 From: Versailles, Ky USA Heart of the Bluegrass Registered: Dec 2000
I've allways used the 2 lb density foam. Maybe I need to expand my horizons....
I am in the middle of building a Pantera dash, and I am also using the foam boards made from this same type foam. I've only found these at Fiberglast, so they are a bit pricey, but they are extremely handy to use. So it depends on what your application is.
When doing any type layup using polyester or vinylester based resins and gelcoats, I almost allways will lay down a "skin" layer and let it peak or exotherm. Then I'll layup a second and thicker layer, and let it peak. Then I'll finish the layup, usually with two more of the thicker layers.
Polyesters have an ability to generate a lot of heat when curing, and the more resin present, the more intense the heat buildup is. When polyesters generate heat, they also shrink a bit...it's the bane of polyesters. It is possable for a part to shrink 1 %. That may not sound like much, but if your 100" long car body shrank 1", it just wouldn't fit.
Other considerations are how the gelcoat in a mold reacts to too much heat, the mold surface or mold itself and how it will react to too much heat, and on and on.
Now if you are just putting a fiberglass patch on the backside of some existing part, as a repair, I wouldn't be near as cautious.
I do recall an occasion in the shop when 2 gallons of mekp was added to 2 gallons of resin, obviously by mistake. Talk about fireworks
I would be interested (and others I'm sure) to see photos of your Pantera dash progress, if you have any....
BTW, my next project is to make a copy (mold) of an existing 308 dash I have and make it fit into a Fiero to give it a different look....I haven't started this project yet but your idea of using foam boards sounds interesting....will investigate further.
now back to work - Cheers!
VK
IP: Logged
10:23 AM
Jan 18th, 2007
opm2000 Member
Posts: 1347 From: Versailles, Ky USA Heart of the Bluegrass Registered: Dec 2000
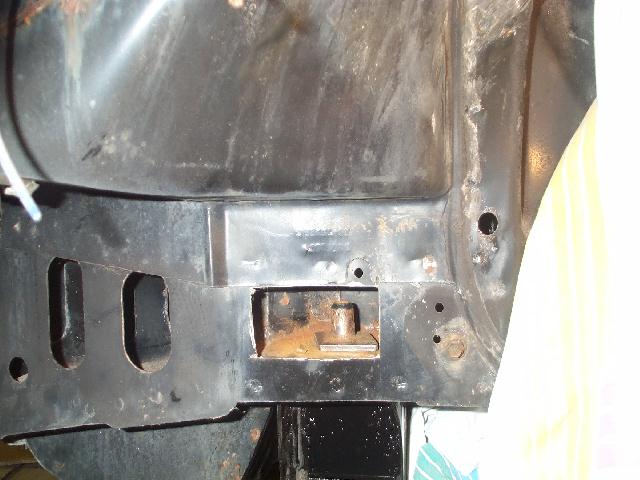
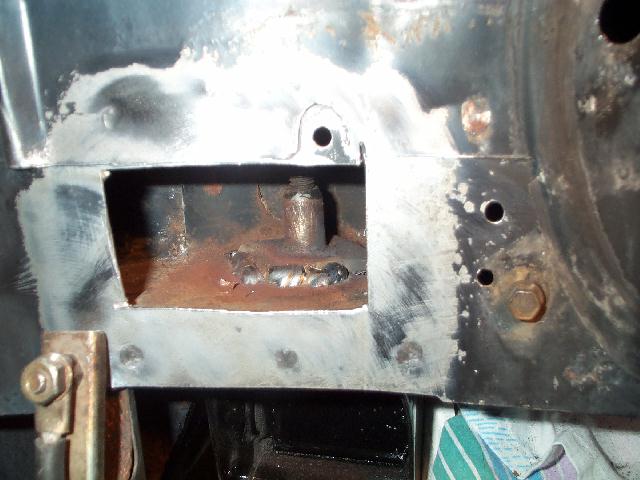
I've been working on & off lately on this, getting the annual inspection done. But after getting the engine & cradle back into the chassis, it was time to attend to a few details. One problem was what you will eventually run into if you drop many Fiero cradles. Sometimes the thin metal that cages the rear cradle nuts will just rust away. Then the "witch-hat" nut will just turn, making it difficult to get the rear cradle bolt out. That was the case with this chassis, and there are several ways to correct it.
In this case I cut open a small window in the side of the beam where the nut sets.
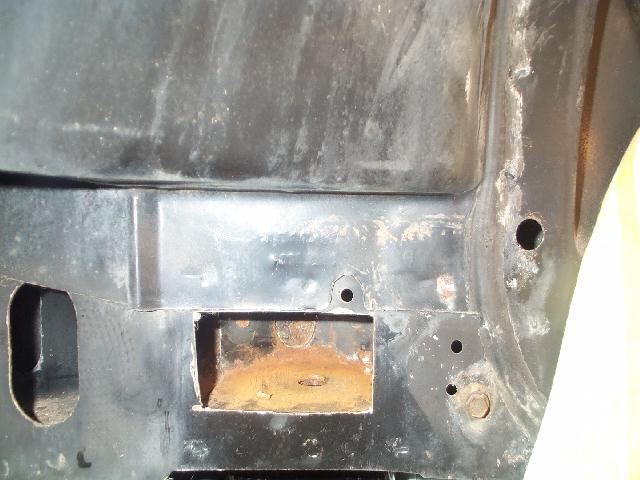
The ruined cage was removed, and the base steel cleaned up to allow the nut to set flat, and to allow welding.
And the sides of the opening were cleaned up for welding a patch back on.
The nut was centered over the pass-thru hole, and tightened in place with a bolt, and welded in place.
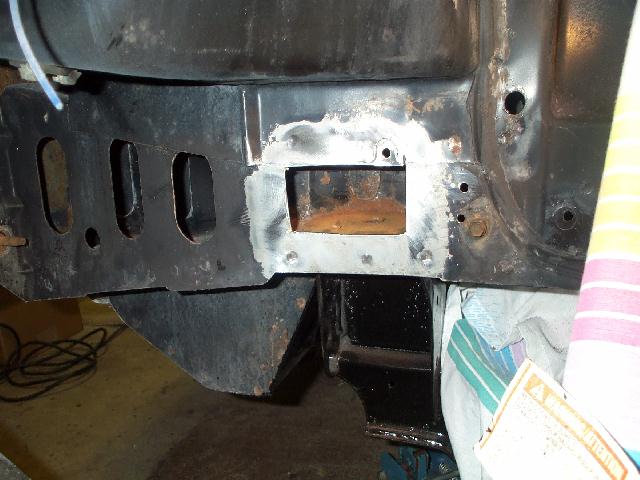
A patch was cut out of 14 gauge steel and tacked into place.
And it was welded in place.
BTW, I painted as much of the insides as I could after welding in the nut, and of course painted over the new patch.
David Breeze
[This message has been edited by opm2000 (edited 01-18-2007).]
IP: Logged
02:31 PM
opm2000 Member
Posts: 1347 From: Versailles, Ky USA Heart of the Bluegrass Registered: Dec 2000
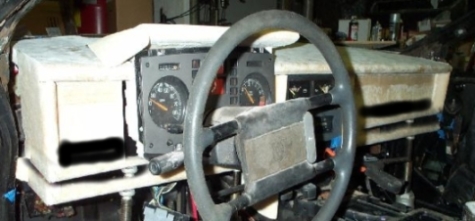
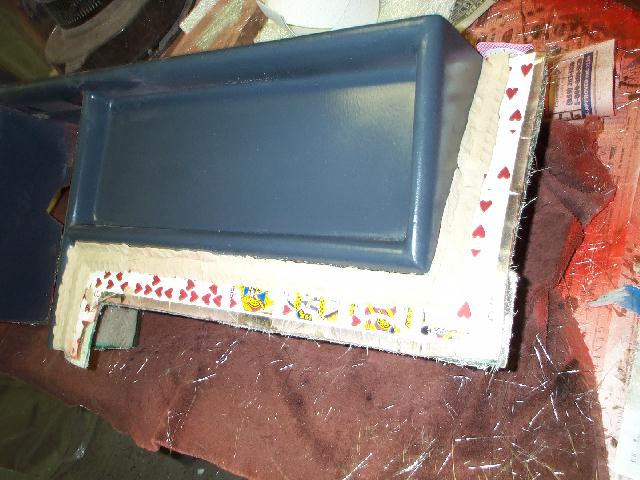
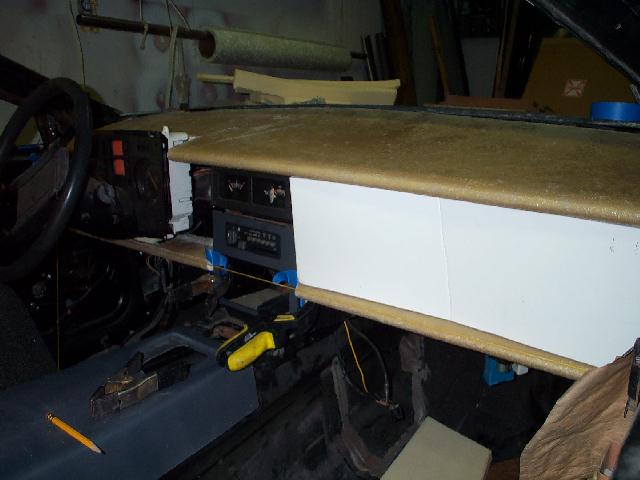
As mentioned earlier, I've begun working on a new dash. I wanted to create a dash that was inspired by a version of the Pantera dash. There were several versions. I also wanted to make it so that the Fiero instrument pod was used, and the Fiero center console was used. I wanted it to be able to be finished either by painting, upholstering, or overlaying. And I wanted to replace the Fiero defrost vents.
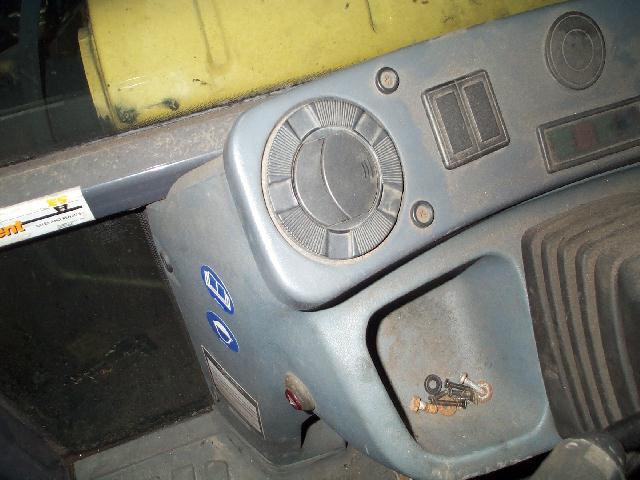
So what I've come up with uses the main instrument pod, sans any of the plastic mounting pedestal. Only the white instrument box and metal tab that secures it to the steering collumn is used. The stock Fiero instrument cover facia may be used, as well.
Over at the center console, the plastic "skeleton" frame that runs along the armrest console and supports the radio & hvac head is left in place. The radio & hvac head are also in place. And above that, you can either leave the two heater vents in place, or remove them and install the Fiero GT instrument pod (the oil pressure & voltage meter).
Since I'm reworking the vents for my own use, I put the GT pod in place above the hvac head.
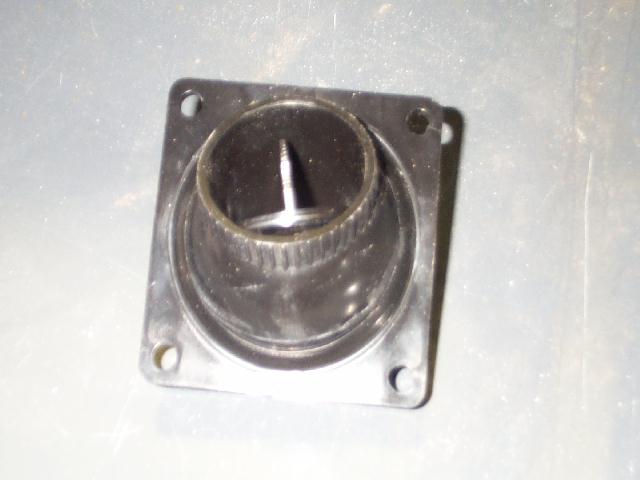
To replace the two heater vents at the far ends of the dash, next to the doors, I'll be installing these:
I've used these eveball vents in experimental aircraft, and they are the berries, and just $14.00 each. Replacing the in-dash heat vents, and the defrost vents are two of these:
These rotate 360degrees and have angular adjustability, and can be closed off entirely, just like the eyeball vents. These are exactly the type of vents used in Lamborghini dashes, but they just don't have a raging bull embossed into them. I found them in a Ford backhoe, and they cost $25.00 each.
The under-dash ductwork frame is removed and replaced with a box-like plenum that will recieve air in both the vent & defrost modes. CAT hose attaches to the two eveball vents, and the Lambo vents just set in the dash, and it forms the top of the plenum. So you have full controll of where your defrost air goes, and can run both defrost and vent at the same time. Keep It Simple.
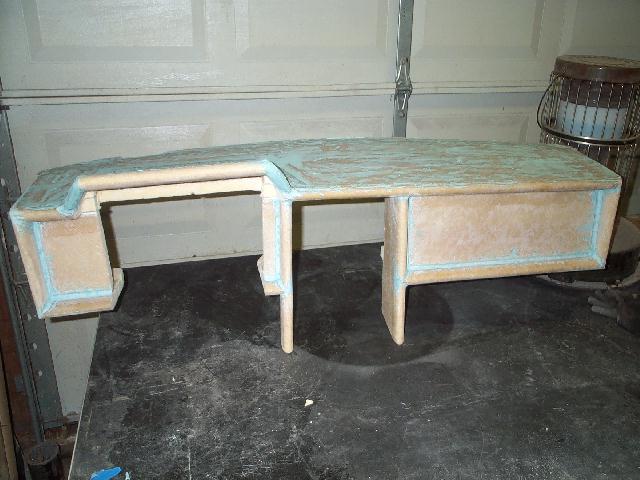
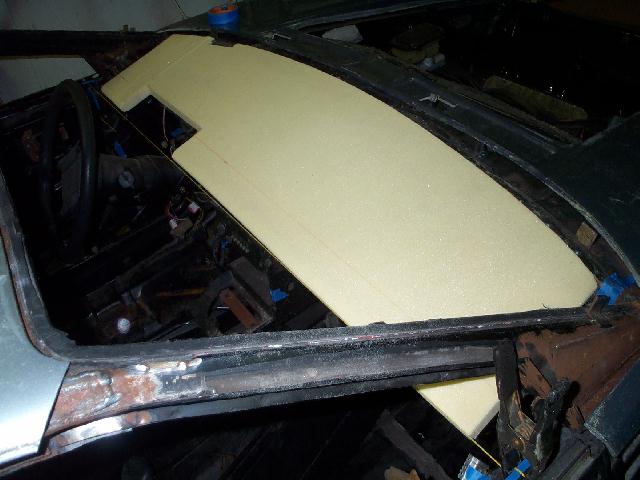
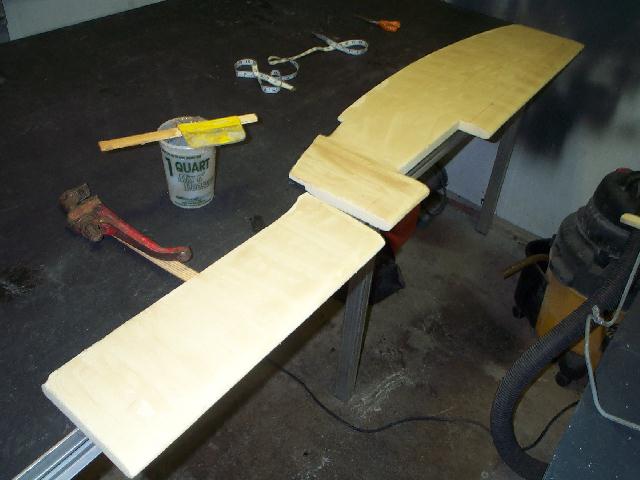
To the afore mentioned list of design parameters, I wanted the dash to match up with the door upholestry ques, just as the stock dash does. So the first step was to stretch reference strings to locate the top and bottom leading edges of the dash, and to make sure they would line up with the instruments.
Most of the dash is being built out of urethane sheet foam from Fiberglast. It comes in 2'x4'x1" sheets, and is the same material as the two part pour foam. It is a bit pricey but really helps in a project like this. Templates are made first for any panel using foam cores poster board. So the first templates & foam boards made were the top & bottom of the dash. To reproduce the windshield edge of the dash, the Fiero dash was simply turned upside down and traced onto foam-board. This was sut out and fit, making sure it squared up with both the windshield, the sides, and the string. Pretty much same thing for the bottom panel.
The foam core poster board cuts, saws & sands very well, and is fairly stout. It really helps if you have a small bandsaw.
Here you see the urethane board cut out and in place. The leading edge is rounded, and there is a cutout for the instrument pod. Height was set by both the string, and the fact that I wanted the GT pod fully visible.
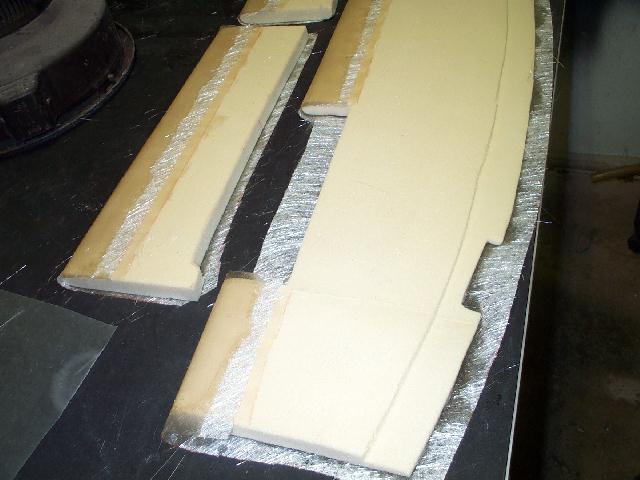
Once the upper & lower panels were cut out of foam and the fit look ok, they were prepared for glassing.
A slurry was mixed of resin & micro, and this was squeeged into the surface of the foam. The slurry was allowed to cure over night and then lightly sanded, to ensure there were no stickups. The slurry seals the foam and makes it adheare better to the fiberglass, especially if you have a layup where gravity wants to pull part of it down.
And that was the case here. I wanted the top panel to be glassed on the top, the rounded nose, and about 4" along the underside of that panel. Same thing for the bottom panel. To avoid a slow process of several seperate layups and endless sanding....I sstarted each panel out by cutting out the cloth and taping it to the last 1/2" of that 4" underside. This was laid on the worktable edge so that the excess cloth hung over. The 4" side and nose were then wetted out....and the whole assembly was flipped over and laid on a piece of wax paper. This then allowed the topside to be wetted out, and gravity was happy.
This shows how the 4" side was taped to the foam, using furnace tape. BTW, tape just will not stick to foam, so the slurry step is necessary to make the tape work.
This pic is also after, but shows how both sides and nose are able to be glassed at one time, and not bag off the foam mold.
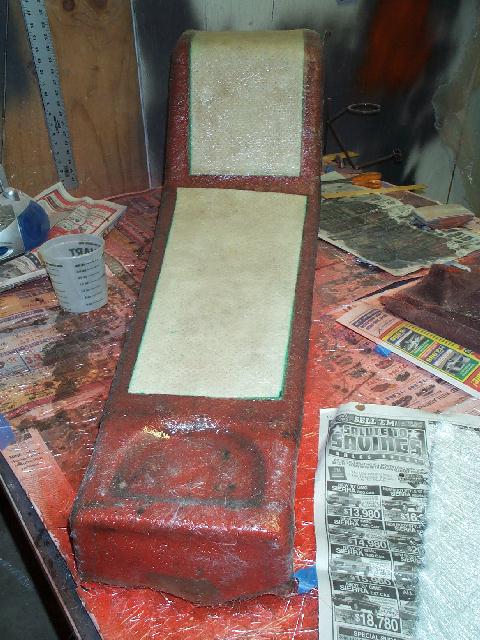
Once these were trimmed up they were jigged in place, and templates made for the various verticle pieces. These pieces are now being made up as fiberglass parts, as well.
Here you might notice the armrest console. It's all ready for making a production mold. And that is the same goal of this dash project.
David Breeze
IP: Logged
03:25 PM
Jan 26th, 2007
PaulJK Member
Posts: 6638 From: Los Angeles Registered: Oct 2001
Dave, I have a question about the linear actuators you're using on the rear hatch. If the power fails, can you raise tha hatch by hand ? I talked to Dakota Digital about theirs (the most expensive stuff in the automaotve world ) and they said if the power fails, their linear actuators CANNOT be moved by hand.
I'd like to use them on my car, but I need the actuators to be "free-wheeling" if the power goes off.
IP: Logged
03:33 PM
Jan 27th, 2007
opm2000 Member
Posts: 1347 From: Versailles, Ky USA Heart of the Bluegrass Registered: Dec 2000
Pauljk, The units I have also are locked up if power fails. That is why I located one of the pivot points at the rear window on the chassis. It could have been located almost anywhere on an arc using the hood-end as a pivot point, and that might have visually buried it even more than it now is.
As it is, the unit is nestled up into the strake and is pretty much out of sight. It certianly is not in the way when the hood is raised up and you need to lean into the engine compartment.
So what if the power fails? The Pantera rear hood has that opening just behind the chassis rear window. It acts much like the Fiero rear hatch vents....it lets air out of the engine bay. And it also lets you easily reach the pivot point of the actuator. Instead of a bolt & not at that end, I'll be using an AN bolt with a hairpin clip, just to make it easier to reach in...pull the clip....and pull both bolts.
I went thru the exercise when I first installed the actuators, and once the pivot point is pulled, you can open the trunk easily. So I guess that is a consideration in your application. Can you locate the actuators so that you can easily release one of the pivot points?
FWIW, the actuators seem to be well made, and I'll bet they last a very long time.
David Breeze
IP: Logged
03:47 AM
PaulJK Member
Posts: 6638 From: Los Angeles Registered: Oct 2001
Much thanks. I'll have to study my rear hatch, but I think it's too far enclosed to allow much access.
I'm watching your dash build-up with much interest; I may be in the market for a new dash someday soon . Here's a link to some cool interior accessories as food for thought:
Pauljk, Those are nice looking AC vents, thanks for the link. Those dash inserts should fit, one way or another. It looked like most of them were @ 14" or 18" wide. I'll have to measure the width of the pod this morning.
I did make the whole left side of the dash with that sort of customized dash in mind, though. Essentially you have an opening for the pod, which has a small flat panel on each side of the opening. If you were to eleminate the opening , you'd have a full with flat panel to work with.
I have allways fancied this dash, but if I use it, it will absolutely be the last purchased item on this current build. Check out
To be honest, the cavalier digital dash i already have will most likely be my first choice, but it's nice to have options. I like the Nordskog stuff; they're not too far from me (down in Orange County). Just be careful when you choose warning lights - calif. makes you have a functional "Check Engine" light or you won't pass smog testing . I know the Dakota Digital panels have all the indicator lights built in (including Check Engine), but they are Very Expensive and I've found Dakota Digital Very difficult to deal with. (They're also quick to charge big re-stocking fees).
Moneynomo, Interesting screen name, I feel your pain I don't suppose those pics are from one you happen to have setting around, are they? If so, I'd like to speak with you about getting some pics & measurements. Your pics pretty well show the style of dash that has inspired this build. The only aspect I couldn't really bring into the Fiero interior was the V shaped center console. It just doesn't have enough depth or height to be done. But I am pleased with what I've been able to bring into it so far.
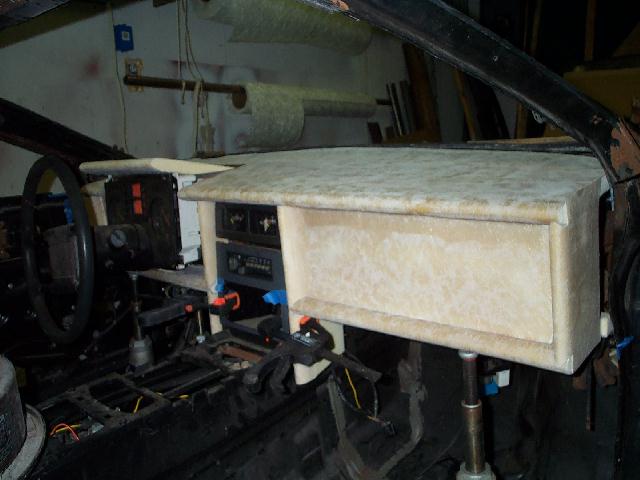
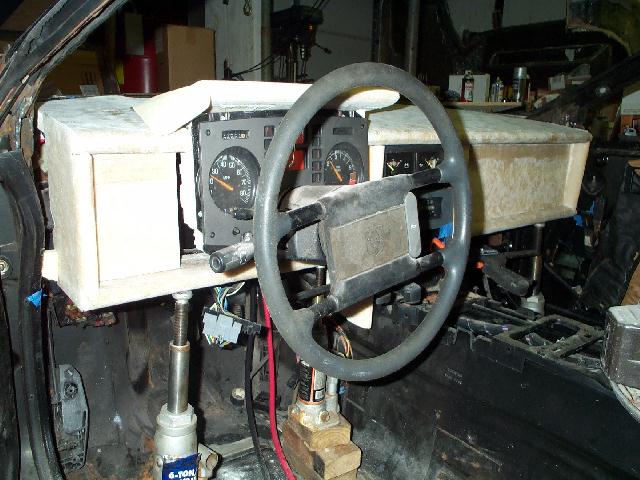
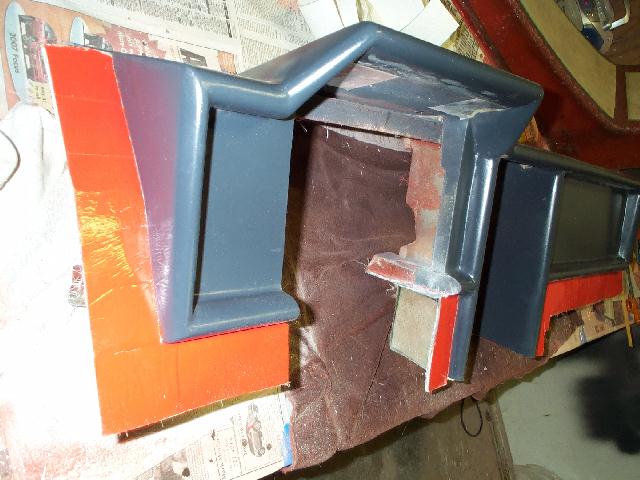
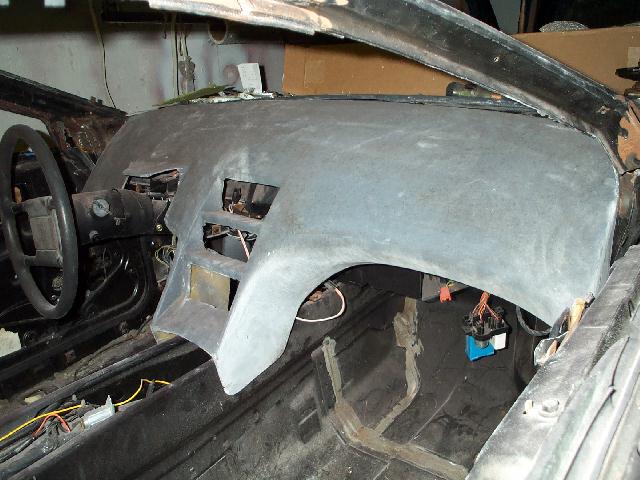
Above pic is after all of the various parts have been made and fit into place. I used hot glue dabs, clamps, jacks, or whatever it took to get it jigged into place and square with the chassis and other interior panels. Then the top was taken off and I began bonding th dash together from the inside. The foam was micro'd and 2 oz tapes were installed.
After those cured, I put the top back on and used a couple of 1oz tapes to secure it to the main dash. I'm using lightweight tapes on the outside of this plug, to minimize the amount of sanding needed to prepare it for the mold building process.
Sorry about my old camera. This shows the begining of installing and shaping the foam fillets on the sides of the instrument pod cover. Once those are shaped, the dash can be removed. On the bench, the intersecting corners will be given a final shaping, and the interior will recieve additional bracing. Then the fun begins.
BTW, the portion you see going under the steering wheel will not be there on the final dash. It has to be removed inorder to remove or install the dash. I will include it as an extra part though, incase the builder just wants to have it in place.
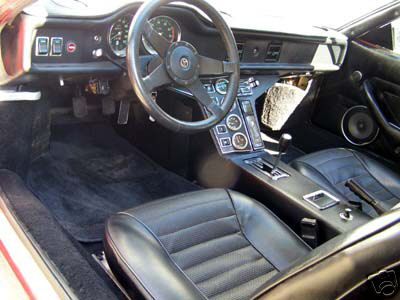
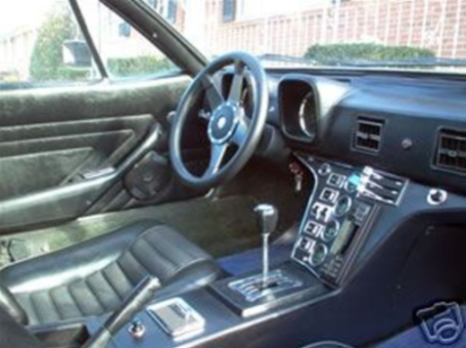
Only in my dreams, David. Those pics came from a pantera listed on eBay. However, I'm thinking that you could make a good guess to distances using the speedo and rocker switches (on the left in photo). If the speedo is maybe 5 and 3/8 inches in diameter and the rockers are maybe an inch and a half high, I'm guessing that the height of the dash face is probably something like 4 inches in the long rectangular places and maybe 6 inches in the space shaped for the speedo and tach.
I'm guessing that the one you have in the pic is maybe 8 or more inches. May I suggest that you more or less keep your total height, but make the face shorter and have a small "parcel shelf" running along the bottom. Maybe something like a 2 inch shelf and a 5 inch main face. I think the result would look more proportional to the pantera and add a cool place to put stuff.
[This message has been edited by MoneyNoMo (edited 01-29-2007).]
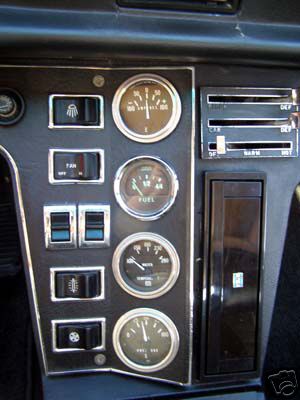
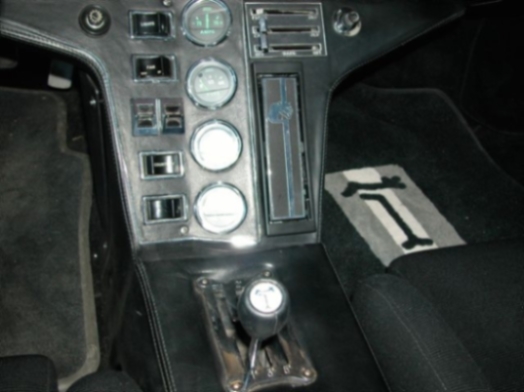
The wide at the top and tapering downward to narrow makes the side of the footwells. However, a flat face (instead of the 3-surface pantera design) would be better for mounting things liek the A/C panel and radio face. Here's a few pics I had:
See how the rocker switches, gauges and vertical radio are on 3 different planes - i think this would be better as 1 flat piece.
[This message has been edited by PaulJK (edited 01-30-2007).]
IP: Logged
01:39 AM
opm2000 Member
Posts: 1347 From: Versailles, Ky USA Heart of the Bluegrass Registered: Dec 2000
Hmmm, All good points & ideas. Moneynomo, you'r most likely right about dimensions & porportions. The "height" of the front panel came from duplicating the "height" of the stock Fiero dash. The horizontal top & bottom panels line up with the upholstery on the stock Fiero door panels. You'e got to start somewhere. I am intrigued to see what a slimmer front panel would do. As it happens, the bottom panel is just a very short distance below the main instrument pod. But it looks like a slimmer lower panel somewhere @ the height of mid-hvac head might work.
fourpoint9, that's what I set out trying to achieve, as far as integrating the V shaped center console into the new dash. It gets complicated by retaining the set location of the Fiero center instrument stack, and the relatively small amount of free space to work with. From the left side of the center stack to the right side of the main instrument pod is just about 3" or less. Although there seems to be plenty of room to work with the passenger side.
Pauljk, I agreee, a totally flat panel would be easier to work with. I'll bet most people just looking at photos don't even pick up on the 3-plane center console. If we were to completely forsake the stock center console mounting structure, then incorporating many of these suggestions might yield something interesting.
I plan to carry the existing plug thru to a finished mold and at least one produced dash. But meantime, I have plenty of materials around to try out some of these ideas.
David Breeze
IP: Logged
12:11 PM
Mar 7th, 2007
motoracer838 Member
Posts: 3751 From: Edgewater Co. USofA Registered: Jan 2006
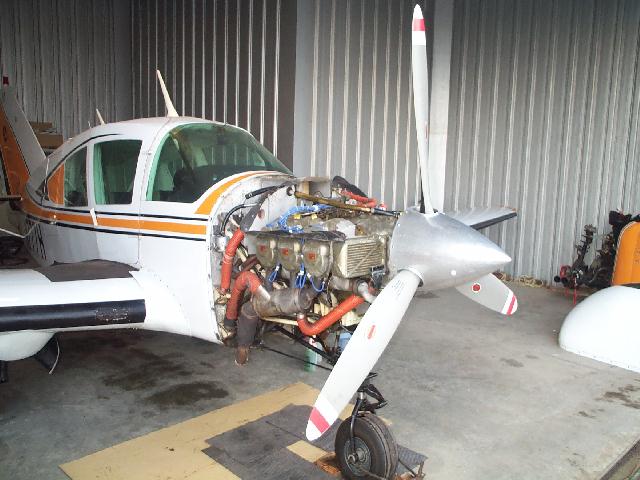
Hey Joe, I took a couple of weeks for some quality time with my son. This was taken two days before he shipped out to Bagram, Afghanistan. I hope everyone supports our troops....it's young men like Hunt that make our daily freedoms possable...things like this forum.
Meanwhile, Once the dash plug was built I began the process of preparing it for creating a mold. This involves a lot of 80 grit sandpaper and a sanding block and a sanding spline. Generally, you sand everything once, removing the high spots. This quickly reveals the low spots. Then you squegee bondo over the low spots and fill in any depressions or add fillets to sharp edges that might prevent easy mold release, later on.
Above shows the start of this process. On this plug, I worked with three applications of bondo applied to the fiberglass surface of the plug. It's easy to do, but very dusty, so allways take the precaution of wearing a respirator.
Once the plug was fairly smooth, I sprayed on three wet coats of Duratec, a polyester sanding primer. This cures to a nice smooth dark grey surface. Then you again begin sanding to lower high spots and fill the low spots. Thsi plug was smooth enough that I used a liquid form of bondo for the filler and switched up to 150 grit paper. Once filled and sanded, I shot a second layer of Duratec on, this time mixed with another Duratec product that imparts a slightly harder, glosssier finish. Usually I will then wet sand up to 500 grit and then polish and buff thru 2000 grit. But this plug was turning out so nice that I went straight to waxing.
Five layers of mold release wax are applied, with an hour between coats. The last coat is allowed to harden overnight. This wax is a parting agent, but it's main function is to fill pores in the finish. Once the waxing is cured, I shot on 3 coats of PVA release agent. When making parts from a mold, I usually use two coats of PVA, but when building a mold, I like the insurance of a third coat. PVA is a liquid release agent, and in a well seasoned mold you may not even have to use it, just one coat of wax.
Above is a typical detail gun. I use this to spray the PVA, undiluted. You want to use a pressure setting that creates a fine mist with the tip about 18" - 24" back from the surface. The PVA is misted on wet but not sagging, and allowed to completely dry till it is shiney and dry to the touch.
Also is the hvlp gun I use to spray Duratec and gelcoat. The tip size is 2.5mm. Thsi gun shoots undiluted Duratec ( which is as thick as hot syrup ) really well, and sprays gelcoat ( which is even thicker ) well enough. It can get really hectic spraying these two products if your gun isn't suited to it. You only have 15 - 20 minutes at best before the batch in the gun will gell, and if it isn't flowing quickly from the gun it will exotherm in the cup and gel even quicker. You really haven't lived untill you've tried to clean up a gun that is gelling up :>
You can thin both products with acetone, mek, styrene, or other products, but you get the best results if you can apply a 20mil coat of undiluted product. I have an old fashion cup gun for spraying gelcoat, and I've used it. But when you use a cup gun, it's "Katie bar the door" time. A cup gun will just about spray everything in three counties. I like spraying in a very controlled fashion, and these products are not cheap, so finding the right spray gun is the ticket.
David Breeze
IP: Logged
11:14 AM
PFF
System Bot
opm2000 Member
Posts: 1347 From: Versailles, Ky USA Heart of the Bluegrass Registered: Dec 2000
Above was actually taken after the mold building had progressed, but it shows the backside of the parting flanges I made. A plug is made so that it has no negative draft, hopefully. This would allow a one piece mold, which is easier to build and maintain. But if negative draft is unavoidable, or the plug it too large, or the part has a lot of complex corners and edges....you will build a mold that is really several molds that bolt together to form one master mold.
Such was the case here. I decided where the parting lines would be and ran a dam of plasticine clay along the backside of each line. On the side where the mold was to be built, I placed playing cards against the plug surface, and pressed them into the clay dam. Then I applied metalic furnace tape to the mold side of the playing cards. This creates a flange, and when you build the removable part of the mold, you also build the flange. It is later drilled thru so it can be bolted to the rest of the mold.
Note: The parting flange was actually installed after waxing, and before spraying the PVA. Then when spraying the PVA, the plug and the flange get sprayed. You can use any number of things to create a parting flange, but I like this method because it is easy to construct, and can follow contours easily.
Just before spraying the gelcoat, the rest of the plug is masked off. This is to prevent spraying gelcoat on it, and allows you to work only on the removable parts of the multi-part mold.
Above was actually taken after several layers of the mold were laid up. But it shows some of the masking. I use typical painters' paper and masking tape, you just have to be sure it sticks. So the next step was to spray the gelcoat. A tooling gelcoat gives the mold a hard smooth surface from which to build new parts. It is thick and dense so you can sand or buff it if necessary when building new parts. A color like orange is often used because it helps highlight air bubbles during the layup or new parts. But it can be grey, or black, whatever.
The gelcoat is pretty finiky stuff. It needs to be sprayed on in three wet passes to a thickness of 20 mils, and allowed to cure to a no thumbprint or thumb drag state. Then a second coat is applied, just like the first. There are many things that can screw up a gelcoat. I like to keep the layup area @ 65 degrees, and monitor part temps with an infrared temp gun.
As soon as the second coat of gelcoat cures, the layup can begin. The base of the flange is usually a pretty sharp angle, so it gets a fillet of resin thickened with cabosil and milled glass. Then a "skin" layer of 1 oz. mat is applied to everything. This layer is allowed to cure past peak heat an cool a bit. Then a second coat of 2 oz mat is applied. Between layers you lightly sand edges to remove needles of glass, and the surface of the layup itself to remove any unseen stickups. Anything that sticks up will create an air bubble in the next layer, and you want to achieve a solid layup for your mold.
For a mold I usually apply a 1 ounce skin, followed by two layers of 2 oz, and then a layer of coremat and 2 oz, another layer of coremat and 2 oz, and then a layer of woven tooling cloth. A mold needs to be thick enough to prevent warping and distortion. Some production shops will tell you you can apply 5 layers in a day, but I like to apply two at the most. Polyester resin generates heat as it cures. Too much heat causes shrinkage and warping, and can cause problems with the gelcoat. The resin I use has no wax added, so the outside never cures untill you air deprive it. This means you can take your time and add a couple of layers a day, and when finally thick enough, I spray PVA onto the backside of the mold, causing the final cure.
The pic with the sprayguns shows the coremat. It is a thin, cardboardpaper-like material with microspheres in it, and is used as a bulker to thicken layups. The manner I apply it is to leave an edge around the coremat, for the fiberglass layer above to bond around it. This creates a composite sandwich layup, similar to what we used in composite aircraft building, and imparts great strength and rigidity to the mold.
Above shows the center console taken thru these stages, with the first layer of coremat going on. Coremat also spreads the load of the eggcrate structure which is added to the backside of the mold. Eggcrating is simply wood or steel bars that create bracing and also create a stand for the mold.
David Breeze
[This message has been edited by opm2000 (edited 03-07-2007).]
IP: Logged
11:57 AM
opm2000 Member
Posts: 1347 From: Versailles, Ky USA Heart of the Bluegrass Registered: Dec 2000
Above shows the parting flange dam being removed. The removable apart of the mold and it's flange have been built thick enough to go ahead and remove the dam.
Next, the edges of the newly created flange are squared up and the PVA layer is removed. The PVA was now a thin film which easily removed from the orange flange.
So now we have to build the rest of the mold. The new parting flange will recieve three coats of wax, and then it and the rest of the plug will be sprayed with PVA, gelcoat, and then followed by the layup schedule. After the last layups are done, it's best to exercise restraint and wait 3 to 5 days for the mold to set. Then you can part the mold from the plug, and begin to make new parts!
BTW, this is a dash plug I'm working on for Blackram's convertable :>
David Breeze
[This message has been edited by opm2000 (edited 03-07-2007).]
IP: Logged
12:12 PM
Apr 1st, 2007
motoracer838 Member
Posts: 3751 From: Edgewater Co. USofA Registered: Jan 2006
Originally posted by FieroMontreal: That last dash one looks very much like the dash I had in my old 1991 Nissan 300zx! Keep up the good work
I'm assuming you consider that a good thing. In that my Pantero version will be a roadster with a raked windshield, I think the Lambo version works. It's all a matter of taste, some will like neither version. You can't please everyone but we feel that these two versions work for the car. I'm trying to decide if installion of a "glove compartment" in the Lambo dash is worth the effort. I know the utility of such a install would be very useful but I'm not sure it's worth the effort. As these projects move from one phase to another, lots of ideas come up. But every idea effects something else and slows the whole process down. Dave is the craftsman with the knowledge in this project, I'm more of the "stand by and hold this" helper but this is and has been one hell of a project. I'm thankful for the opportunity to work with Dave on this. ------------------ Ron Land of the Free because of the Brave. Most gave some, some gave all. Some ran the other way.
[This message has been edited by blackrams (edited 04-27-2007).]
IP: Logged
08:20 AM
jstricker Member
Posts: 12956 From: Russell, KS USA Registered: Apr 2002
One thing to consider, Ron, in the "worth the effort" equation is if you make the interior box of the glove compartment removable from the OUTSIDE, you can easily pull it and get to things like the mounting points, wiring to the back of the radio/HVAC controls, relay module, etc., without having to stand on your head and look up under the dash without being able to get any light on the subject.
You're old, like me, and not nearly as limber as you used to be. You're also getting bigger around, like me, and let's face it, we just don't fit places we used to.
John Stricker
Edited to add..................Not everyone is built like David. I think he has tapeworms or something.
quote
Originally posted by blackrams:
I'm assuming you consider that a good thing. In that my Pantero version will be a roadster with a raked windshield, I think the Lambo version works. It's all a matter of taste, some will like neither version. You can't please everyone but we feel that these two versions work for the car. I'm trying to decide if installion of a "glove compartment" in the Lambo dash is worth the effort. I know the utility of such a install would be very useful but I'm not sure it's worth the effort. As these projects move from one phase to another, lots of ideas come up. But every idea effects something else and slows the whole process down. Dave is the craftsman with the knowledge in this project, I'm more of the "stand by and hold this" helper but this is and has been one hell of a project. I'm thankful for the opportunity to work with Dave on this.
[This message has been edited by jstricker (edited 04-27-2007).]
IP: Logged
11:20 PM
Apr 28th, 2007
jscott1 Member
Posts: 21676 From: Houston, TX , USA Registered: Dec 2001
I haven't poked my head in this thread in a long time so forgive me if I speak out of turn, but I don't understand why someone would go through all the trouble to do a custom dash and stick with the stock gauges? To me, it instanly looks retro 80s and not as nice as a custom autometer or dakota digital, or a later model cluster like the firebird or grand am.
That's just my unsolicited opinion, you can easily disregard, but if its the wiring the scares you off I can help you with that.
IP: Logged
12:39 PM
blackrams Member
Posts: 33302 From: Covington, TN, USA Registered: Feb 2003
Originally posted by jstricker: You're old, like me, and not nearly as limber as you used to be. You're also getting bigger around, like me, and let's face it, we just don't fit places we used to. John Stricker Edited to add..................Not everyone is built like David. I think he has tapeworms or something.
John, The paragraph's that are not quoted are worthy of consideration. The part that is quoted is simply not true, I'm young, limber and skinny, just ask my....I can't afford to have anyone lie for me. ;( OH crap, never mind. You're right but I'm still cute.
------------------ Ron Land of the Free because of the Brave. Most gave some, some gave all. Some ran the other way.
IP: Logged
03:27 PM
blackrams Member
Posts: 33302 From: Covington, TN, USA Registered: Feb 2003
Originally posted by jscott1: I haven't poked my head in this thread in a long time so forgive me if I speak out of turn, but I don't understand why someone would go through all the trouble to do a custom dash and stick with the stock gauges? To me, it instanly looks retro 80s and not as nice as a custom autometer or dakota digital, or a later model cluster like the firebird or grand am.
That's just my unsolicited opinion, you can easily disregard, but if its the wiring the scares you off I can help you with that.
Your opinion is appreciated, I can't speak for Dave, speaking for myself, alternative gauges are a very real possibility, and that may end up where we go. My thoughts are that not everyone wants alternative gauges, with this dash, there are several possibilities. It's easy to put a different dash guage panel in for a different look, this set up allows us to go several directions. I'm personally leaning toward a digital dash with HUD but that is somewhere down the road. Who knows where this will end up. You have to start somewhere. Thanks for the input.
Now I have to start that diet so that Stricker will shut up.
------------------ Ron Land of the Free because of the Brave. Most gave some, some gave all. Some ran the other way.
[This message has been edited by blackrams (edited 04-28-2007).]
IP: Logged
03:34 PM
Apr 29th, 2007
opm2000 Member
Posts: 1347 From: Versailles, Ky USA Heart of the Bluegrass Registered: Dec 2000
Ahem, Well John, there is hope. If you & Blackrams keep it up with the diets & situps, then you guys can become sexual tyrannosauruses too, just like me
David Breeze
IP: Logged
05:32 AM
PFF
System Bot
opm2000 Member
Posts: 1347 From: Versailles, Ky USA Heart of the Bluegrass Registered: Dec 2000
Jscott1, Your point is well taken. In this particular case, I have tried to consider both how I'm going to be dealing with the instrument issue.....and also how a prospective builder might have to deal with it .
I agree, especially if the car is being shown, that the gauges should be changed out to their final design. This obviously can mean a rather tidy investment in itself, but the payback in appearance is tremendous.
With the design of this particular dash, as well as the Lambo-type I'm doing for Blackrams, you will be able to use the stock Pod. However, at any point you can easily remove the pod and install what amounts to a flat panel "filler" panel , and install the custom gauges of your heart's desire.
I did hit the wall regarding this concept while working on the center console portion of the Pantera dash, I'll give you that. I did want to stick with the stock hardware locations. The thinking was it was just plain easier for most builders to at least be able to start there. If we had assumed a clean sheet in this area, I might have been able to achieve the DeTomasso "V" center console. I will find out with later versions of this dash, so stay tuned.....
Anyhow, as I stated much earlier, my own plans are to initially get the Choptop-Pantera running and debugged using the stock Pod. Then as long as I'm not totally in the poorhouse, the Nordskog Designer kit goes in. And no doubt I'll be calling on you for assistance, as I'm a self confessed electrical-Neanderthal.
David Breeze
IP: Logged
05:52 AM
Cheever3000 Member
Posts: 12400 From: The Man from Tallahassee Registered: Aug 2001
Diet is a four letter word, go wash your mouth out. Actually, I'm more than a little impressed a KY country boy spelled tyrannosaurus correctly. Bet Ron can't do that.
All that aside, if you do go with a glovebox think ahead. On the dash on the Roadster, I positioned the instrument cluster and the glovebox so that I had access to everything (pretty much) behind the dash in one form or another. It makes assembly and service a whole lot easier.
John Stricker
quote
Originally posted by opm2000:
Ahem, Well John, there is hope. If you & Blackrams keep it up with the diets & situps, then you guys can become sexual tyrannosauruses too, just like me
David Breeze
IP: Logged
09:04 AM
blackrams Member
Posts: 33302 From: Covington, TN, USA Registered: Feb 2003
Originally posted by jstricker: David, Diet is a four letter word, go wash your mouth out. Actually, I'm more than a little impressed a KY country boy spelled tyrannosaurus correctly. Bet Ron can't do that. John Stricker
Huh??? Who, me???
------------------ Ron Land of the Free because of the Brave. Most gave some, some gave all. Some ran the other way.
I saw a yellow Pantera going down the street the other day. The distinctive rumble sound made me look up and there it was. Beautiful. Naturally, I thought of this thread.
IP: Logged
01:47 PM
blackrams Member
Posts: 33302 From: Covington, TN, USA Registered: Feb 2003
Rumble huh, hopefully it won't be long and Dave's LT1 will be running in a Pantero, rumble it will.
------------------ Ron If you want to burn our flag, you have the right. Just wrap yourself in it just prior to dousing it with gas and lighting the match.


 ) and they said if the power fails, their linear actuators CANNOT be moved by hand.