Mine should be here by the 6th, I had to hound the WBody store to get mine here by then, They told me the new batch will be made in 2days and they will be overnighting mine (if they had to) So I might be the first to get mine.
IP: Logged
11:00 PM
Nov 2nd, 2006
3.8 SC Member
Posts: 577 From: On the Great Lakes-Ohio Registered: Dec 2003
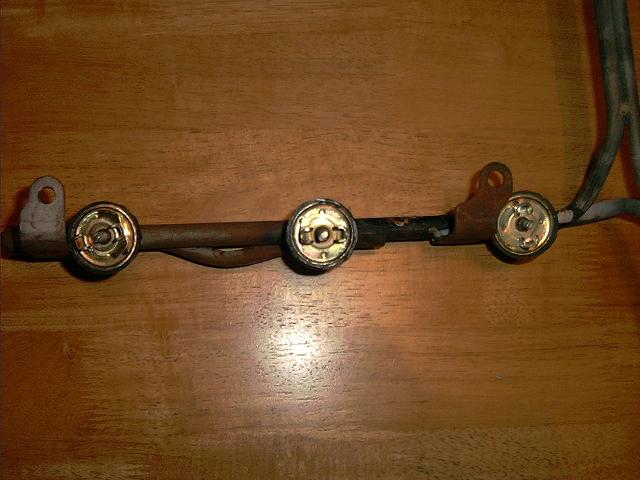
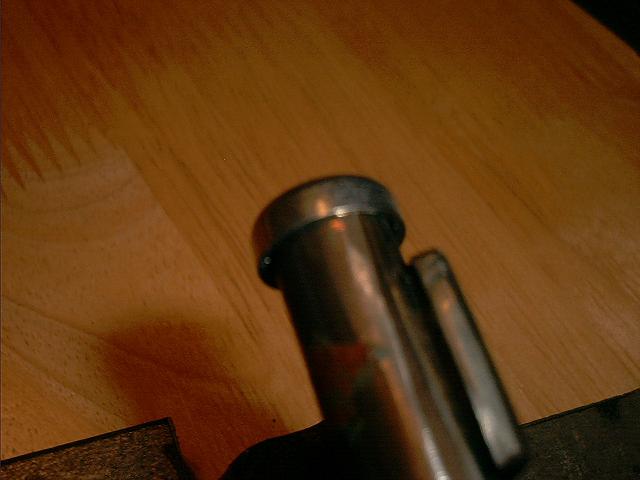
O.K. At the home stretch, now. With the rail complete, remove it move it from the fixture and start plugging the holes for the injectors, regulator, and the return line. Remember, you need to plug the holes with something that can withstand pressure. I have found these little gems at Advance Auto.
Sorry, bad pic.
These are oil pan plugs. Just stick them in the hole and give a little twist. You will need six of them for the injectors and one that is big enough for the regulator. For the retun line, I wedge a peice of rubber in the end of the line and wrapped it with duct tape, to help hold it.
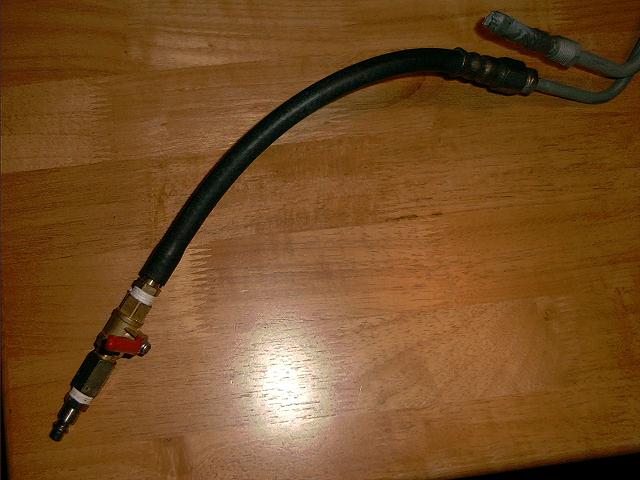
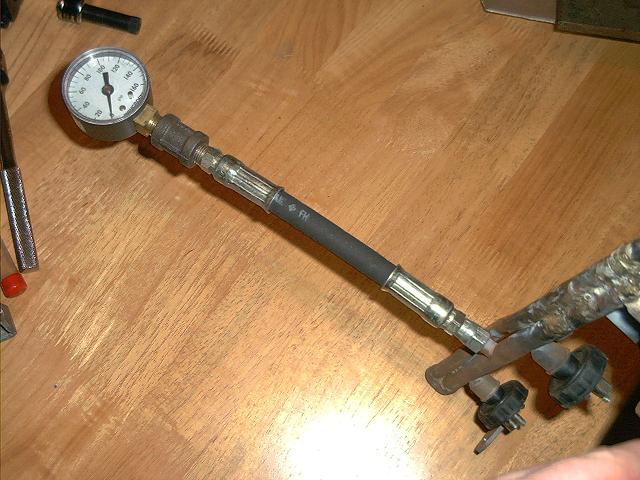
After all the holes are plugged, you will need to have a gauge and a means of suppling air with and shut off valve.
Connect the fuel rail to an air compressor and pump it up to 90 PSI. WARNING - There could be a possible plug that can pop off. Shut the valve to the fuel rail and unplug the compressor. Grab the bottle of soapy water and spray all over the rail and watch for bubbles. Also, keep an eye on the gauge. Watch this for about a half hour. If nothing leaks - CONGRATS! you, now, have a fuel rail. Finish as you see fit. The rail is tuff enough to be sand blasted. Just make sure that you get all of the sand out.
I believe that is it. If you have any questions, post here or send me a PM. If you make a fuel rail, post a pic, I would like to see it.
Thanks for the build. I had an idea on how to, but your step by step write up helped place it in perspective. I need to find a spare rail to work on... I have an idea or two to make one without having to get a swage kit, but I need to experiment with a rail to see if it will work.
these are the kind of threads we need on the forum, so guys like us can build them ourselves... not saying that we want to copy everthing we see but some of us just need a little insight to get started on seemingly overwhellming project when actually they are not, without having to spend hundred of dollars ... nothing worse then ordering a part for $$$$$ and recieving it and saying " **** thats it i could have made that myself " trust me i've done it before. So again i give thanks
Since i'm trying to this conversion for very low buck i will be attempting this myself thanks again
Later JimmyB.
IP: Logged
09:14 AM
PURPLE REIGN Member
Posts: 4080 From: Minnesnowta ------------------ Land of White Gold Registered: Sep 2002
FYI...............sandblast the rail with the plugs still in it and the clean-up will be a 1000 times easier. My previous rail I made I sandblasted & couldn't get all the sand out & FUBAR'ed an injector. Oh well, went to the next upgrade of injectors
IP: Logged
09:52 AM
Nov 6th, 2006
jimmybpei Member
Posts: 354 From: summerside pe canada Registered: Aug 2001
well took the fuel rail to work last nite and blasted it with 420 grit alum. oxide media ...very nice job ..... where i work is great for refinishing auto parts....
later jimmyb.
IP: Logged
12:47 PM
Nov 8th, 2006
3.8 SC Member
Posts: 577 From: On the Great Lakes-Ohio Registered: Dec 2003
Thanks for the writeup! Do you have any brazing tips? I noticed you used mapp gas, what kind/size brazing rod did you use?
You can get the Mapp gas and brazing rod at Advance Auto. This is where I get it at. I use the blue rods. As for a tip, CLEAN!!! Everything must be clean and a little roughing up on the parts being put together. If you have never brazed before, I would practice on some scape peices of tubing, before you start on your fuel rails. I wouldn't want to see you melt a hole in your project.
[This message has been edited by 3.8 SC (edited 11-08-2006).]
IP: Logged
09:44 PM
Nov 9th, 2006
3.8 SC Member
Posts: 577 From: On the Great Lakes-Ohio Registered: Dec 2003
I was thinking of a new design and I sent the idea, to a friend of mine at GM. I have E-mailed him twice and still no response. So, I am throwing it on here to see what you guys think. This is my idea -
Sorry for the crude picture. The idea that I have, is to tee the regulator, off the supply line, before the injector tubes. The problem that I have is, will the tubing need to be increased for more volume or does that matter. This design would simplify construction and free up creativity. Let me know what you guys think.
Don Z.
[This message has been edited by 3.8 SC (edited 11-09-2006).]
I wish I could help you with an answer but I have no clue if it would work or not. The new way looks alot easier to make and cuts down on alot of the work. Maybe send an E-mail to Loyde about your idea, he should be able to give you an answer.
IP: Logged
03:31 PM
topcat Member
Posts: 5486 From: Charleston SC Registered: Dec 2001
Interesting... the only thing that I think could be a problem is that the pressure is reduced before it makes it to the injectors with your modification. That could result in pulses of pressure when a bigger demand is on the fuel suystem. The way GM has it, the regulator is placed in the system after the last injector... that way, the fuel pressure remains more steady thru the range of operation...
Just a therory with nothing but a gut feel to back it.
IP: Logged
03:37 PM
SuperchargedV6 Member
Posts: 1966 From: Hinckley, Oh, US Registered: Jan 2006
I was wondering if Acetone would be good enough to etch the ends you are brazing for cleaness before brazing? Maybe the acid we tried caused the slight problems Don???? What does everyone think about this? SC
IP: Logged
05:02 PM
jimmybpei Member
Posts: 354 From: summerside pe canada Registered: Aug 2001
just rigged up my fixture today so the cutting should begin . one que i have is by the looks of the pic why wouldn't you put the fpr to the backside of the engine to clean it up even better. just an observation
as well why wouldn't you use silver solder ...will handle high pressure ...very strong
keep the write ups comming
later jimmyb.
IP: Logged
09:23 PM
3.8 SC Member
Posts: 577 From: On the Great Lakes-Ohio Registered: Dec 2003
I went with what I was taught to use. Brazing is what we use at work. I will look into your silver solder, idea a little farther. Is it easier to to use or a little more forgiving than brazing? The big problem is keeping things clean and not getting it to hot. I put the FPR on the front side, because of all of the other things that are on the back side. Plus, each swap is different and some use the modified Fiero water neck, the boost control, are all on the back side. I try to keep things clean and make this a universal fit for all 3800 S/C swaps. Look at the photo above and you will see what I am talking about. Just think if there was a boost control there.
Don Z.
[This message has been edited by 3.8 SC (edited 11-09-2006).]
IP: Logged
10:30 PM
Nov 10th, 2006
jimmybpei Member
Posts: 354 From: summerside pe canada Registered: Aug 2001
Just A bump! And I just got conformation that regulator can be placed anywhere in the fuel lines. Even before the injectors. You just need to be sure, you have a good regulator. So, my new idea should work fine. Time to start building.
IP: Logged
11:58 AM
topcat Member
Posts: 5486 From: Charleston SC Registered: Dec 2001
Just A bump! And I just got conformation that regulator can be placed anywhere in the fuel lines. Even before the injectors. You just need to be sure, you have a good regulator. So, my new idea should work fine. Time to start building.
Great news! It will be much easier to build as you had it in the pic with the regulator near the alt stock location. Now I just need to find a rail to play with.
IP: Logged
05:44 PM
Nov 14th, 2006
3.8 SC Member
Posts: 577 From: On the Great Lakes-Ohio Registered: Dec 2003
Well I started work on the new design, Today. If you, guys are wanting to try design II, you will need two of these.
I got them from Advanced Auto. Here are a few pic with them installed and ready for brazing.
Tomorrow, I will go to NAPA and see if they have a 3/8" Tee fitting, that will slip onto 3/8" tubing. Let me know, if you need any help, as you make your own rails!
O.K. Well, I have some bad news. I went to NAPA and a few other places and I was not able to find any steel Tee tubing, that would fit my needs. If you guys come up with something, please post it here. I could sure use your help on this part.
Don Z.
IP: Logged
09:31 PM
Nov 16th, 2006
topcat Member
Posts: 5486 From: Charleston SC Registered: Dec 2001
There is a huge hydraulic supply shop near me. they have all sorts of "T", "Y", and "U" fittings. I can swing by there today to price them. If you have not tried that route yet, look in theyellow pages for hyd supplies.
IP: Logged
04:36 AM
3.8 SC Member
Posts: 577 From: On the Great Lakes-Ohio Registered: Dec 2003
I was looking at the oiling lines on the 86 VTL, today. ( A big machine lathe) I saw a connection, where one line was stuck into the side of another. I am going to try this idea, when I get home. Also, I think, I am going to put the regulator, down near the gas tank. This will eliminate the return line, all together.
IP: Logged
12:59 PM
ohio86se Member
Posts: 1308 From: akron, ohio, summit Registered: Mar 2002
They look like they will work, after I drill out the threads. I will keep them, in mind. But after seeing the connection on the VTL, I think that is the way I want to go. It is one joint to braze, instead of three joints.
Thanks for the help, Don Z.
IP: Logged
02:06 PM
ohio86se Member
Posts: 1308 From: akron, ohio, summit Registered: Mar 2002
They look like they will work, after I drill out the threads. I will keep them, in mind. But after seeing the connection on the VTL, I think that is the way I want to go. It is one joint to braze, instead of three joints.
Thanks for the help, Don Z.
Good luck
------------------
" DRIVE IT LIKE YOU LOVE IT"
IP: Logged
04:58 PM
Nov 19th, 2006
3.8 SC Member
Posts: 577 From: On the Great Lakes-Ohio Registered: Dec 2003
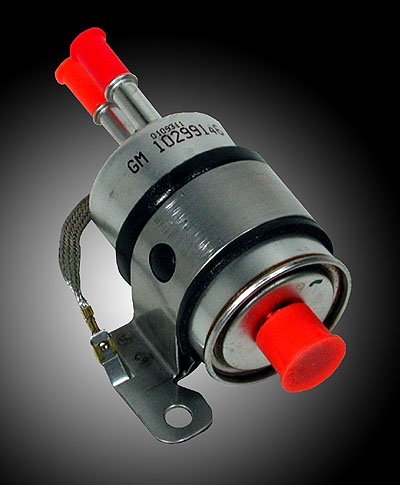
Does anyone know anything about these fuel filters?
This is a filter for a 99 Corvette. It has a built in regulator. The supply and return goes in one side and one goes to the rails, from the other side. Other than that, I don't know much about how it works and I don't see a connection for a vacuum line or know what the PSI is. This would help in simplifying the construction of these fuel rails, if I can use it. Also, I have been told that the Series Three Supercharger is set up with a supply line only. Does it have the same filter/regulator as the Corvette and can it be used?
Don Z.
IP: Logged
11:57 AM
ohio86se Member
Posts: 1308 From: akron, ohio, summit Registered: Mar 2002
"Most adjustable regulators are still one to one or close to that, however you can adjust the pressure at idle or full throttle for fine tuning. There is one other type of regulator that is used with aftermarket forced induction. These are rising rate regulators commonly called FMU's (fuel management unit). These regulators increase fuel pressure at a multiplication factor of boost. So instead of messing with complicated computers and injection duty cycles, these systems just increase fuel pressure to add fuel. They go inline down from the factory regulators and only start to add pressure under boost. So when you are off boost, you maintain factory tuning and drivability. Only as you get boost does the FMU begin to increase fuel pressure."
So I believe we with boosted engines will have to stay with a regulator that will supply additional fuel upon boost.
quote
Originally posted by 3.8 SC:
Does anyone know anything about these fuel filters?
This is a filter for a 99 Corvette. It has a built in regulator. The supply and return goes in one side and one goes to the rails, from the other side. Other than that, I don't know much about how it works and I don't see a connection for a vacuum line or know what the PSI is. This would help in simplifying the construction of these fuel rails, if I can use it. Also, I have been told that the Series Three Supercharger is set up with a supply line only. Does it have the same filter/regulator as the Corvette and can it be used?
Don Z.
------------------
" DRIVE IT LIKE YOU LOVE IT"
[This message has been edited by ohio86se (edited 11-30-2006).]
IP: Logged
02:01 PM
Dec 30th, 2006
ohio86se Member
Posts: 1308 From: akron, ohio, summit Registered: Mar 2002
Hey DonZ are you still in the fuel rail business. Here is something I've run across that you might be able to incorporate into you builds http://www.injector.com/fuelregulators.php
------------------
" DRIVE IT LIKE YOU LOVE IT"
IP: Logged
07:29 PM
Jan 26th, 2007
topcat Member
Posts: 5486 From: Charleston SC Registered: Dec 2001
I saw this thread, pop up again. So I thought, I would see, if anyone has tried this project or has questions! I still haven't figured out the Vette regulator yet. If anyone know anything about it, please chime in. Don Z.
This is a great mod. Thanks 3.8 SC . Have you discovered anything new?
Reading other posts, it seems the "returnless" fuel system actually does have a return line. It is inside the fuel tank or very close to the fuel pump. Therefore you do not see it in the engine compartment. Keeping the return part out of the engine compartment keeps heated fuel out of the tank. I think your idea of using the regulator near the tank has merit. The vacuum line from a vacuum source to the regulator would be your concern, it seems.
Maybe the vette regulator was never meant to vary in pressure?


 So I might be the first to get mine.