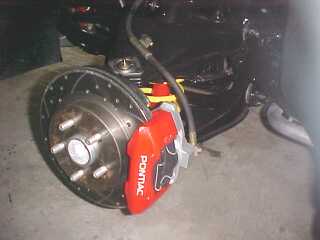
Very nice write up and pictures! I have one question about the way you installed the rotors, though. Does it matter which way the slots go? I have seen them both ways. On my Fiero, I put them the opposite way, because that's the way the place I got them from recommended.
IP: Logged
10:29 AM
Tom Slick Member
Posts: 4342 From: Alvarado, TX Registered: May 2003
Very nice write up and pictures! I have one question about the way you installed the rotors, though. Does it matter which way the slots go? I have seen them both ways. On my Fiero, I put them the opposite way, because that's the way the place I got them from recommended.
quote
Originally posted by Tom Slick:
very nice write up... love the pics.
but are the rotors on wrong? it seems the slots should be going the other way.
i just got my new rotors so i need to know before i put them on.
thanks, toms...
I installed mine according to this info. I found on Brembo rotors. If I understand it correctly then I do believe I have them installed correctly.
If anyone can prove other wise please let us know !!!!!
"The slots are angled to use the rotors� direction of rotation to enhance their performance, which makes the rotors side-specific with left and right side rotors. Brembo Sport slotted brake rotors are sold in axle pairs and the easiest way to verify correct usage is to install the rotors on the side of the vehicle that results in the end of the slot nearest the outer edge of the rotor always contacting the brake pads first."
I have since found out while this may be true for the Brembo rotors it is not the case for the ones you see on my car !!!!!
EDITED TO REMOVE LINKS:
PLEASE NOTE THAT I HAVE CONFIRMED WITH THE VENDOR THAT I PURCHASED THE ROTORS FROM THAT THE WAY YOU SEE THEM IN THE PICTURES I HAVE POSTED IN THE WRITE-UP ARE INCORRECT FOR THESE PARTICULAR ROTORS. THE CURVED SLOTS YOU SEE ON THE ROTOR FACE SHOULD BE GOING IN THE OPPOSITE DIRECTION THAN WHAT I HAVE THEM. NOTE ** THERE ARE PICS LATER ON DOWN IN THIS POST THAT SHOWS THEM CORRECTLY INSTALLED.
[This message has been edited by Zoom88 (edited 09-10-2004).]
I told you earlier and I wanted to let you know again so that you DO decide to do more writeups like this: The documentation is unbelievable! After every little thing I do I wish I had taken pictures and documented more thoroughly. Seeing your car makes me want to work on my front end! Thanks again, --Bryson
I'm still not totally sure. The links you posted are all showing vented rotors, and yes, vented rotors do have to go on a certain way. I've got an 86 with solid rotors, but I bought the drilled/slotted rotors and the directions said to put them on opposite of what you have them. However, I don't think rotors that are vented would have to have the slots going one way, and solid rotors would have them going the opposite way. Another difference is that the rotors I have, ebay rotors, the slots are curved, and the ones you have are straight. I don't think that matters either, but just pointing it out.
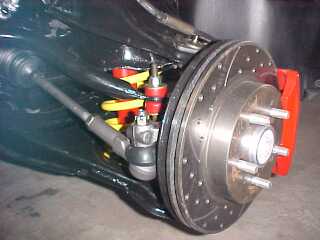
What no greaseable bushing in the picture? Nice pics. BTW, It is recommened to cut/trim the bump stop the same length as the lowering effect or in your case the one cut spring coil drop. I also noticed that you did not use antisize on the caliper bolts. I did notice that loctite! Q: Why did you not use stainless steel brake lines? Q: What is the coefficent of friction number for the pads used?
Overall, it looks nice. Keep it going!
IP: Logged
09:10 PM
1MohrFiero Member
Posts: 4363 From: Paducah, Ky Registered: Apr 2003
Most excellent write up Zoom. Tremendous attention to detail. I hope to get a look at your work in person some day. We are not too far apart. Keep going man!
------------------
IP: Logged
09:30 PM
PFF
System Bot
Tom Slick Member
Posts: 4342 From: Alvarado, TX Registered: May 2003
Wow Cool. I just started working on the front of one of my 88's. Thanks.
BTW I will have to say that the revers sloting dont make sense? I read the links but it just dont line up? If you want the gas "liquid" caused by heating the pads to get out and away from the pads why wipe it to the center of the rotor were it will creep up the face of the rotor by cintrifical force? Seems like the right way to get the stuff out and away from the pads is to throw it to the outter edge of the rotor, not the inner edge?
------------------
Rickady88GT QuadCam 3.5 V6
[This message has been edited by Rickady88GT (edited 09-08-2004).]
IP: Logged
03:40 AM
1MohrFiero Member
Posts: 4363 From: Paducah, Ky Registered: Apr 2003
Say, can you post a complete parts list with numbers, sources, and prices for all the stuff you bought for this project?
JazzMan
Can't promise anything...that is one area I am not very good at is keeping up with cost and part #'s. I can tell you I bought the inner and outer tierod ends, upper and lower ball joints and rack bushing from Rodney Dickman. Can't hardly beat his prices on 88 parts plus you know they are going to work !!! Rotors I purchased off Ebay...I believe I paid $160.00 for all 4 plus shipping which was around $40.00. Brake pads are porterfield http://www.porterfield-brakes.com/cgi-bin/porterfield/pads.cgi R4S Fiero 1988 frt AP378 $79.00 rear AP378 79.00 Rubber mounts for Steering rack I purchased from one of the local Auto Parts...probabaly Advanced Auto Parts. Rubber control arm bushings I found by spending allot of time on the phone calling pontiac parts depts.around the states. I have since found out that the ones used for the rear will work on the front lower control arms , I have a set and they mic out exactly the same.
[This message has been edited by Zoom88 (edited 09-07-2004).]
I'm still not totally sure. The links you posted are all showing vented rotors, and yes, vented rotors do have to go on a certain way. I've got an 86 with solid rotors, but I bought the drilled/slotted rotors and the directions said to put them on opposite of what you have them. However, I don't think rotors that are vented would have to have the slots going one way, and solid rotors would have them going the opposite way. Another difference is that the rotors I have, ebay rotors, the slots are curved, and the ones you have are straight. I don't think that matters either, but just pointing it out.
quote
Originally posted by JazzMan:
Also, it's pretty likely that at the speeds that a Fiero can be driven at the orientation of the slots is irrelevant.
JazzMan
quote
Originally posted by Tom Slick:
thanks for the references. i would of put my rotors on backwards. on my fiero and my camaro.
are you going to do the same write up on the rear rebuild. that's what i need to do on mine next.
thanks, toms...
quote
Originally posted by Rickady88GT:
Wow Cool. I just started working on the front of one of my 88's. Thanks.
BTW I will have to say that the revers sloting dont make sense? I read the links but it just dont line up? If you want the gas "liquid" caused by heating the pads to get out and away from the pads why wipe it to the center of the rotor were it will ceeep up the face of the rotor by cintrifical force? Seems like the right way to get the stuff out and away from the pads is to throw it to the outter edge of the rotor, not the inner edge?
Yeah,...I am not totally convinced yet either. I think we are talking about the same rotors (Ebay) They seem to be of real good quality. But the ones I recieved are vented. I have noticed that two of them are marked "L" for left and two are marked "R"....now which side of the car do they consider the left side ?
[This message has been edited by Zoom88 (edited 09-07-2004).]
What no greaseable bushing in the picture? Nice pics.
I did have poly bushings on the A-arms but they are now all Rubber again. The sway bar bushing is Poly and does have a grease fitting..... not sure what you mean ?
quote
BTW, It is recommened to cut/trim the bump stop the same length as the lowering effect or in your case the one cut spring coil drop. I also noticed that you did not use antisize on the caliper bolts. I did notice that loctite! Q: Why did you not use stainless steel brake lines? Q: What is the coefficent of friction number for the pads used?
Overall, it looks nice. Keep it going!
I do use antiseize sometimes (I like Nickel never-seize) from what I saw during disassembly I decided to go without it and use medium strength Loctite. I did not to use SS lines only because I already had a pretty new set of the rubber ones. With all the projects I have coming up it falls into one of those don't really need at this time catagories ! Plus it is fairly simple to change them out later.
I am sure you are familiar with the pads....Porterfield R4-S
THanks for the compliments !!
[This message has been edited by Zoom88 (edited 09-07-2004).]
Did you drop the front crossmember? What is involved in that?
I had looked at dropping it but everything was in such good condition , no rust etc; I decided it wasn't nessessary. Didn't look like it would be much trouble to do though. Did look like I would have had to remove the coolant lines to remove the back bolts though.
thanks for the references. i would of put my rotors on backwards. on my fiero and my camaro.
thanks, toms...
Don't thank me just yet, I am still not 100% sure they are on correctly. I have an Email out to the place I bought them. I will let you know if they respond back. Look and see if the rotors you got have a sticker on 2 of them with an "L" on it and the other 2 will have an "R" . I am being told that the drivers side of the car is considered the LEFT side. If this is so then the ones Marked "L" go on the drivers side and "R" go on the passenger side.....and mine will be on the wrong sides !!
quote
are you going to do the same write up on the rear rebuild. that's what i need to do on mine next.
I do plan on a rear rebuild, but I did do a quick change out of all the bushings last year and replaced them with Poly. So its not high up on the projects list right now.
Of course these are subject to change but right now this is what my current TO DO schedule looks like.
Next I believe will be my attempt to install a Rockcrawl hood extractor/vent. Have everything ready to go so I guess the project is just waiting on me. Never done any bonding but I think I will give it a shot !! Probably won't do a write up on this since he has an installation procedure on his website.
Depending on the outcome I also have some of the Trans-Am fender vents to install. Not sure whether I will go ahead and do them or replace my tired but still kicking motor !!! Anyway I will most likly do the cradle and rear end at the same time I do the motor. Motor is being planned for this Spring.
IP: Logged
02:54 PM
Tom Slick Member
Posts: 4342 From: Alvarado, TX Registered: May 2003
after reading the baer site and looking at all the cars on pro-touring.com they all have the rotor going is what seems like reverse direction than what i would expect.
i have the same rotors that you have so i'd be very interested in what they have to say.
i'm also, going to run the porterfield brake pads. i found a guy on ebay that sells them. i had to ask if he had them for the fiero and he can get them for a little cheaper ($73.00) than porterfield website ($79.00).
toms...
IP: Logged
05:23 PM
PFF
System Bot
skitime Member
Posts: 5765 From: Akron, PA, USA Registered: Aug 2000
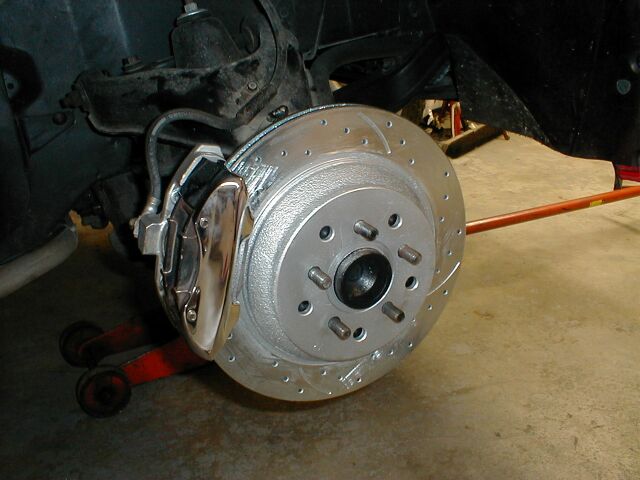
Excellent writeup. Your car gets better and better all the time. I have crossdrilled and slotted Corvette rotors. They are stamped left and right so you know which side to mount them. They are opposite of what you have.
Here is a blow up of that shot and you can see the R for right stamped on the rotor.
------------------ Red 88 GT T-Top 3800 INTERCOOLED SUPERCHARGED White 88 GT Stock Please give me a rating if you appreciate my contribution. History of Skitimes Car
[This message has been edited by skitime (edited 09-07-2004).]
Excellent writeup. Your car gets better and better all the time. I have crossdrilled and slotted Corvette rotors. They are stamped left and right so you know which side to mount them. They are opposite of what you have.
Thanks for the compliments....and the rotor info. I don't know why it has to be so confusing !! They should all be the same !!!
Ok I do have confirmation from the supplier that the type of rotors I have are made to go on the opposite of what I have them in the pictures. (They should be on the same way as the ones in the pics that Skitime posted. Thanks SKI !!!) For anyone who has purchased these you should find a little round sticker on each rotor. It will indicate which side they go on by having either an "L" for left or an "R" for right. Left being the drivers side of the car. As I posted earlier in the thread this was the only think I wasn't really certain about during the build. I want to assure that all information is as accurate as possible.
Once I have swapped mine I will post the correct pictures. Tom Slick if you have any further questions on the rotors or anyone has questions in general about the build feel free to Email me !!
Once again thanks for all the comments and the response !!
[This message has been edited by Zoom88 (edited 09-08-2004).]
IP: Logged
10:56 AM
Tom Slick Member
Posts: 4342 From: Alvarado, TX Registered: May 2003
Ok I do have confirmation from the supplier that the type of rotors I have are made to go on the opposite of what I have them in the pictures. (They should be on the same way as the ones in the pics that Skitime posted. Thanks SKI !!!) For anyone who has purchased these you should find a little round sticker on each rotor. It will indicate which side they go on by having either an "L" for left or an "R" for right. Left being the drivers side of the car. As I posted earlier in the thread this was the only think I wasn't really certain about during the build. I want to assure that all information is as accurate as possible.
Once I have swapped mine I will post the correct pictures. Tom Slick if you have any further questions on the rotors or anyone has questions in general about the build feel free to Email me !!
Once again thanks for all the comments and the response !!
Zoom, thanks for the confirmation. i was just getting ready to ask which was the left and right side of the car cause i went and look at my boxes and the way they are label would make it seem like skitime is correct. if the left side is the driver and the right is the passenger which you just stated. thanks again
I've been so frustrated with my front end rebuild I haven't even bothered to work on it lately. After putting my passenger side back together, my lower ball joint just didn't look right. The way the grease boot is compressed looked way wrong and I just knew I had a bad knucke or something. But it looks almost exactly like the one of your car.
So either mine's ok, or we're both screwed.
Actually, my biggest concern was that when I tightened the LBJ castle nut, by the time it torqued down, it was so low on the LBJ that the cotter pin doesn't contact the castle nut. I had to back the nut off some to get it to lock with the cotter pin. I'm thinking there may be too much wear there, but I'll see how it drives when I get it back together.
IP: Logged
10:28 PM
Sep 10th, 2004
Marvin McInnis Member
Posts: 11599 From: ~ Kansas City, USA Registered: Apr 2002
Rubber control arm bushings I found by spending allot of time on the phone calling pontiac parts depts.around the states. I have since found out that the ones used for the rear will work on the front lower control arms , I have a set and they mic out exactly the same.
Please clarify. Do you mean that the bushings used at the rear of the '88 lower control arm will fit the front of the '88 LCA?
Can you provide part numbers? A lot of '88 owners who don't want to go with polyurethane would appreciate this information. Thanks.
I've been so frustrated with my front end rebuild I haven't even bothered to work on it lately. After putting my passenger side back together, my lower ball joint just didn't look right. The way the grease boot is compressed looked way wrong and I just knew I had a bad knucke or something. But it looks almost exactly like the one of your car.
So either mine's ok, or we're both screwed.
The grease boots are compressed more than normal in the position its in (no weight on the control arms), once the weight is placed on the control arms putting them back in there normal postion or angle the boots will look correct.
quote
[
Actually, my biggest concern was that when I tightened the LBJ castle nut, by the time it torqued down, it was so low on the LBJ that the cotter pin doesn't contact the castle nut. I had to back the nut off some to get it to lock with the cotter pin. I'm thinking there may be too much wear there, but I'll see how it drives when I get it back together.
With the castle nut tight on the LBJ the cotter pin should lineup and work with the castle nut. You should only have to turn the castle nut slightly one way or the other if the hole and the castle nut aren't lined up to where you can install the cotter pin. As you said you may have to much wear in the tapered hole of steering knuckle where the LBJ attachs. Did you notice any wear ?
IP: Logged
01:09 PM
Rickady88GT Member
Posts: 10657 From: Central CA Registered: Dec 2002
Formula88, if you have to back off the nut to get the pin to work your knuckle is no good. There should be NO wear in the tapered hole. You will never get any ball joint to work in that knuckle if it had a ball joint get loose in there. I would get a new knuckle if that were on my car. But if for some reason you got they wrong ball joint in the control arm, replace it.
IP: Logged
01:55 PM
PFF
System Bot
Formula88 Member
Posts: 53788 From: Raleigh NC Registered: Jan 2001
I've got one of Rodney's ball joints. I guess I'll have to take the knuckle back off and re-inspect it. I thought it looked good, though. If that's the case, it could explain the mysterious clunk in my front end. I was thinking it was a worn LBJ, but it could be the knuckle.
Wow, Zoom, this is incredible. I feel like I could just yank my car apart and put it back together just like you did, thanks to this thread. Another '+' for you!
Also, AWESOME attention to detail... looks fantastic!!
------------------ Patrick W. Heinske -- LZeitgeist@aol.com 1988 Red Fiero Formula Convertible
On one of my non fiero cars, the question came up about what direction the slots should go. The problem was horribly confused because one vendor (brembo) claimed the slots should go in one direction, and another vendor (Disk Brakes Australia) claimed they should go the opposite direction. After countless emails with salesmen, I finally got directed to one of the engineers at DBA. I no longer have the email that I received from them, but the bottom line was that the SLOTS don't matter, it is the direction of the INTERNAL VANES of the vented rotor. It turns out that both companies were correct for their respective rotors, because one of the companies had the slots going opposite of the internal vanes and the other company had both in the same direction. In that same email the engineer claimed that if the internal vanes are not curved that the orientation didn't matter.
the slot direction will however affect brake pad residue deposits - having them rake forwards will drag them away fromt he outside of the rotor - raked backwards will deposit them at the outside edge of the rotor.. with most pads i have seen its a non-issue
vents are the important thing to worry about direction of
Wow, Zoom, this is incredible. I feel like I could just yank my car apart and put it back together just like you did, thanks to this thread. Another '+' for you!
Also, AWESOME attention to detail... looks fantastic!!
Thanks I appreciate the comments !!! Makes it all worth while !!! When I swap motors and rebuild the rear I will try and do the same thing.
IP: Logged
07:47 PM
Formula88 Member
Posts: 53788 From: Raleigh NC Registered: Jan 2001
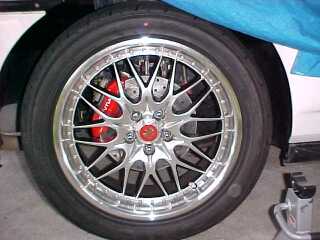
Oh, and what size wheels and tires are you using? I fell in love with the Konig Imagines when I first saw them and every time I see them on a Fiero, I keep thinking I'm going to have to get some. If only I could get them in 17x8 and 17x9 with the Fiero bolt pattern.
Please clarify. Do you mean that the bushings used at the rear of the '88 lower control arm will fit the front of the '88 LCA?
Can you provide part numbers? A lot of '88 owners who don't want to go with polyurethane would appreciate this information. Thanks.
Sorry it took so long to get back with you.
Doing alot of research I have found an OEM rubber bushing for the 88 lower control arm that is an EXACT fit. At some point in time GM changed there part numbers, they may have made a mistake on the listing who knows.
However I do know that most places you go on the net and enter the part number 470722 it will tell you it can't find it. But here is the info from my order.
I purchased mine from Jim Fresard parts and service out of Royal Oak Michigan 11/23/03. Sales person was Bob Roybal. I ordered by phone 1-248-547-6100
Here are the Part numbers for the rubber bushings I used to replace on both the upper and Lower control arms.
Part number for front lower is 470722, cost for 4 - $48.32 Part number for front upper is 462980, cost for 4 - $ 47.24 shipping was - $ 8.95 Don't know how far back they keep Invoices but the number was 105177
[This message has been edited by Zoom88 (edited 09-18-2004).]
Oh, and what size wheels and tires are you using? I fell in love with the Konig Imagines when I first saw them and every time I see them on a Fiero, I keep thinking I'm going to have to get some. If only I could get them in 17x8 and 17x9 with the Fiero bolt pattern.
The wheels are 17 X 7 Tires are: Yokohama AVS 100 FRT - 215/45 - 17 Rear - 235/45 - 17
IP: Logged
07:20 PM
opm2000 Member
Posts: 1347 From: Versailles, Ky USA Heart of the Bluegrass Registered: Dec 2000
A very informative and well done bit of work, Zoom88. I was really pleased to see that an '88 front wheel bearing can be repacked. Can you give us some direction on just how you "carefully remove the dust cover" ?


 I would get a new knuckle if that were on my car. But if for some reason you got they wrong ball joint in the control arm, replace it.