scan current cylinder misfires. It is really quite common to find a bad plug wire, plug, or coil pack.
Well, an update on the thing, I couldnt perform the CASE learn because it thinks the trans is in 2nd gear. I need to figure up a resistor on a switch or something to make it think its in park.
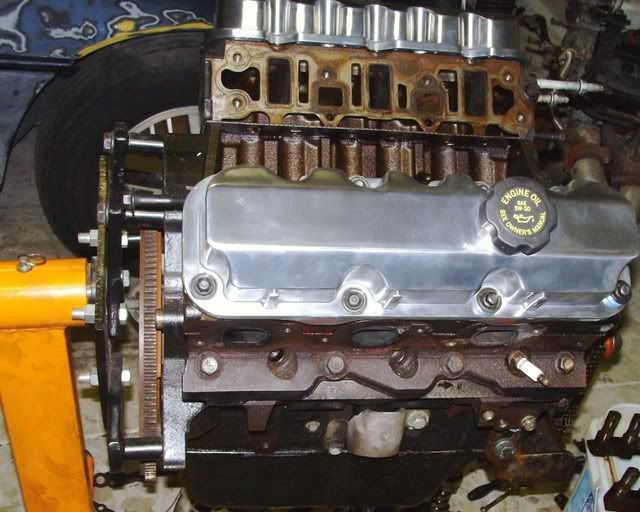
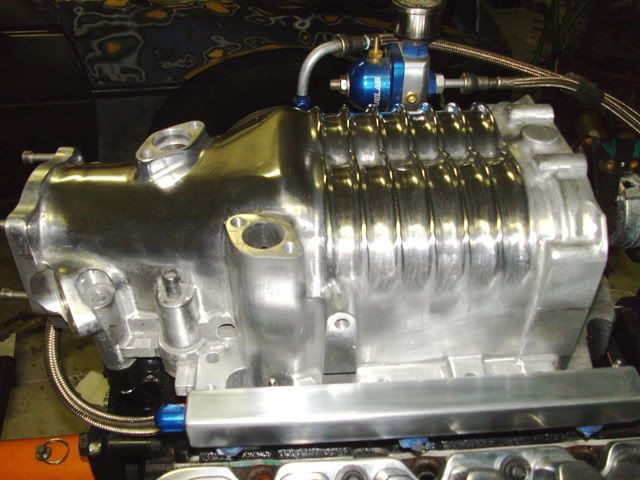
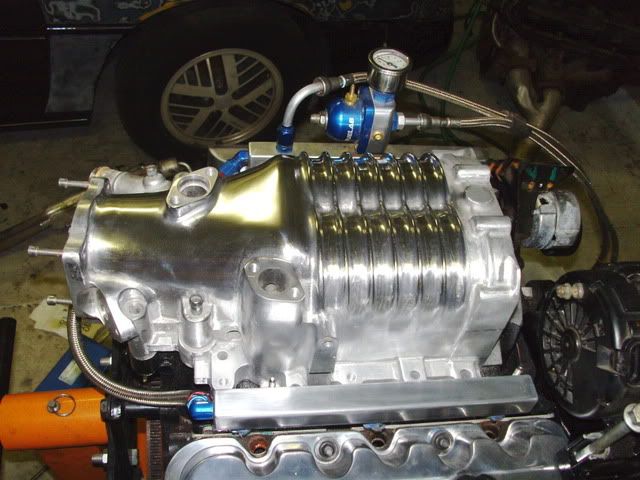
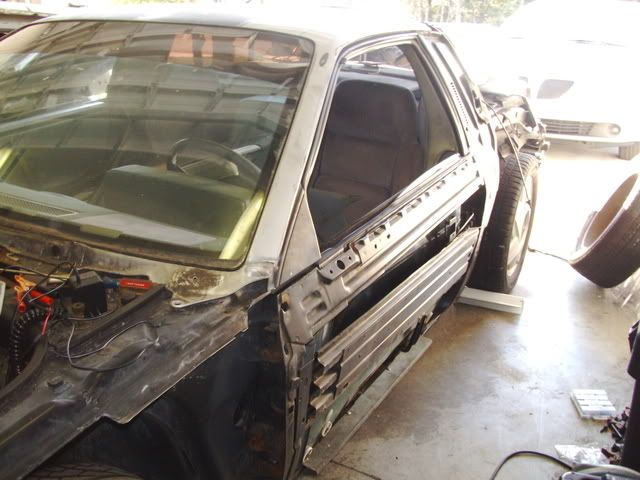
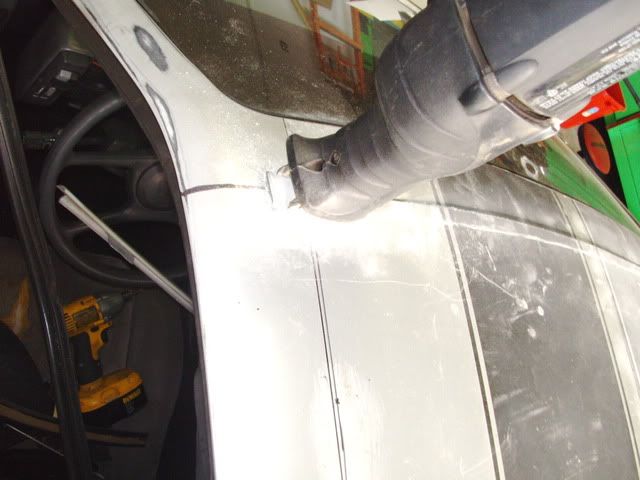
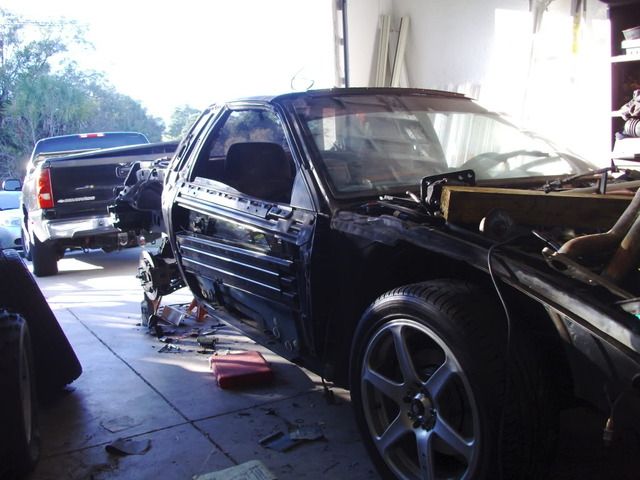
However, the misfire got worse so I scanned it and came up with pretty much a dead cylinder 1 and occasionally cylinder 4. I knew the plug boot for cyl. 1 was awfully close if not touching the header, so I wrapped the wire and boot in header wrap, then put a heat sleeve on it. Apparently it didnt work.
I aint scared to admit when someone else is right. Thanks Dark for pointing that out, you win the cookie.
Now I have the front header off and bringing it back to my buddy's shop to see if we cant get that header to clearance the plug and boot a little better. I actually burnt through 2 wires because after burning the first one, I put an extreme high heat boot on, then did the same wrap job. That only caused more problems for me. It ran good for about 20 min. then misfired again so I parked it. The next day I started it up again and it wasnt misfiring anymore, until about 20 min. into it again. Did the same thing one more day until it misfired, then I took the wire off and realized that the high heat boot was melting once it got real hot and causing the misfire, but after it cooled the boot would "solidify" again, which made it run right until it warmed up and re melted.
Long story short, the boot was way too close and I need to fix it. I am bringing it by tomorrow so hopefully I can get back on the road and take it for some longer trips soon. I am anxious to get it running right so I can tune it properly and drop down to a 3.2 pulley.
-Joe
IP: Logged
11:17 PM
mrjohnishome Member
Posts: 925 From: Charleston, West Virginia Registered: Jun 2005
Joe, It looks like you got a coilover kit from Ebay for maybe a Civic? Is this right? Cause I have one and it looks the same. The spring is really short, did you use yours? How did it work? Was it long enough?
Well, an update on the thing, I couldnt perform the CASE learn because it thinks the trans is in 2nd gear. I need to figure up a resistor on a switch or something to make it think its in park.
I believe that I just had to temporally ground two wires. I also battled with a misfire about a year ago every time it warmed up after 20 minutes and sure enough it was a plug wire. If you have any extra 3800 wires you can take the 90* boot that attaches to the coil pack and make a wire that has the 90* boot on both ends. I had to do this because a wire was a little close to my wastegate tube.
[This message has been edited by Justinbart (edited 03-19-2010).]
IP: Logged
08:51 AM
infinitewill Member
Posts: 2357 From: Overland Park, KS U.S.A. Registered: Mar 2009
I can't believe I have missed this thread! Wow, you sure have made a lot of progress since Jimmy and I dropped by in Nov. Are you going to be able to break out of work for a few days to come to Daytona?
\/\/
IP: Logged
09:10 AM
joesfiero Member
Posts: 2181 From: North Port,FL,USA Registered: Jan 2008
Joe, It looks like you got a coilover kit from Ebay for maybe a Civic? Is this right? Cause I have one and it looks the same. The spring is really short, did you use yours? How did it work? Was it long enough?
Actually I used the MK1 coilover kit for Fieros found on Ebay. There are two kits I believe, one with the top mounts and one without. Mine were in good enough shape so I got the one without them. They seem to be just fine for me. The car is not really going to be going on long trips so the stiffness is okay with me. The few times I have driven it I noticed it was pretty rough on potholes and speedbumps. With the short spring, some people say it would be easier to bottom out the coils or have it jump off the perch, but with this kit, the top centering ring should keep it from getting off center. When the wheels are off the ground the springs do sit a few inches from the top mount, so it is essentially just sitting there unsprung but I have lifted it a few times and never had problems with the springs seating correctly when I lowered it. Also, I dont foresee these springs compressing enough to bottom the coils out, they are very stiff like I said. I know they will soften a little bit but for now I am okay with it.
quote
Originally posted by Justinbart:
I believe that I just had to temporally ground two wires. I also battled with a misfire about a year ago every time it warmed up after 20 minutes and sure enough it was a plug wire. If you have any extra 3800 wires you can take the 90* boot that attaches to the coil pack and make a wire that has the 90* boot on both ends. I had to do this because a wire was a little close to my wastegate tube.
Ill look into getting it into park after the header is fixed. The main problem I had is that we chopped up these headers to refit them and in the process, made the bend for cyl. 1 too close to where the spark plug sits so the boot is right on it. I am dropping the header off at my buddies later on to see if we cant extend that bend and get it away from the plug. I actually am running 90degree boots on it, I used the MSD make em yourself kit for a SBC. After I burnt the first one, I tried a straight boot but that burnt too.
quote
Originally posted by infinitewill:
I can't believe I have missed this thread! Wow, you sure have made a lot of progress since Jimmy and I dropped by in Nov. Are you going to be able to break out of work for a few days to come to Daytona?
\/\/
Will, I am definitely maybe going to be there .
I have planned to be there since last year's Daytona event and I have the hotel booked and all. Daytona was my main goal for getting the car done by now, actually since I have it almost finished but not running right, I am scrambling just to get it running and on to a trailer so I can make it. I have the hotel booked for Friday and Saturday nights, I sent my registration and got the card already so its just a matter of getting a trailer and getting the car running. My wife and kid are coming so thats why we are trailering it, so we can all fit in the truck and have some room.
-Joe
[This message has been edited by joesfiero (edited 03-19-2010).]
IP: Logged
03:09 PM
darkhorizon Member
Posts: 12279 From: Flint Michigan Registered: Jan 2006
Another little update for the few who may be following this thread, I did make it to Daytona with the car but it was on a trailer. The car starts and runs alright but when driving it, it loses power fast. I also have a bad starter which caused me to be the only a$$hole who couldnt start their car on the track at Daytona after the group shot so I had to be push started.
I took the car for a drive after I brought it back home with a fuel pressure gauge and found out I was losing fuel pressure. I am pretty sure it is a wiring issue right now because sometimes it will hold good pressure, sometimes it will drop quicky, and then when it does sometimes it comes right back up and other times it will not build back up for a while. The wiring is shot so I am planning on dropping the tank and rewiring from the tank up.
Before anyone says anything, yes I know how dangerous it is to drive the car lean, no I am not driving it again until it is fixed, and yes I know how lucky I am that I didnt pop a piston.
-Joe
IP: Logged
06:42 PM
joesfiero Member
Posts: 2181 From: North Port,FL,USA Registered: Jan 2008
Oh, also wanted to add, I did take the header off and bring it back to Aaron. He cut the #1 pipe at the flange and put a different bend in the pipe, works great now and no more melted wires.
-Joe
IP: Logged
06:45 PM
Jun 18th, 2010
joesfiero Member
Posts: 2181 From: North Port,FL,USA Registered: Jan 2008
Bumping this a few months later. This car has suffered greatly from a rusty fuel tank issue. The wiring to the fuel pump was indeed fried, but that wasnt my main problem. After fixing it, the car still ran the same. If took the tank out and found large piles of rust in the baffle. I cleaned it as much as possible, flushed it well, dried it, and replaced it after putting a new pump in for good measure. Car ran great for a little while. I noticed slight misfires which I believe to be dirty injectors. It had great power, but under heavy load you could feel slight misses. After driving only 5 miles or so, the car began acting up again, same issue. I guess I didnt clean it as well as I thought I did.
Anywho, I pulled the tank out of my 87 hoping it would be rust free, but nope, it was actually worse. Then I ordered some of the tank sealer and Im awaiting applying that and putting in my shiny new 42lb. injectors I got. Hopefully after I get this fuel issue worked out the car will run good and I can drive it more often. It has been sitting for a couple weeks now and I get more depressed about it as more time passes. As an alternative, I have a very good friend who makes marine gas tanks out of aluminum. I talked to him about it and he thinks he could make me an all new tank for my car for some barter work he wants me to do at his new house. Well see if that pans out or not, it would be great to have a brand new tank.
-Joe
IP: Logged
11:02 PM
Jun 20th, 2010
jsketcham Member
Posts: 434 From: Meadville, Pa, USA Registered: Jan 2009
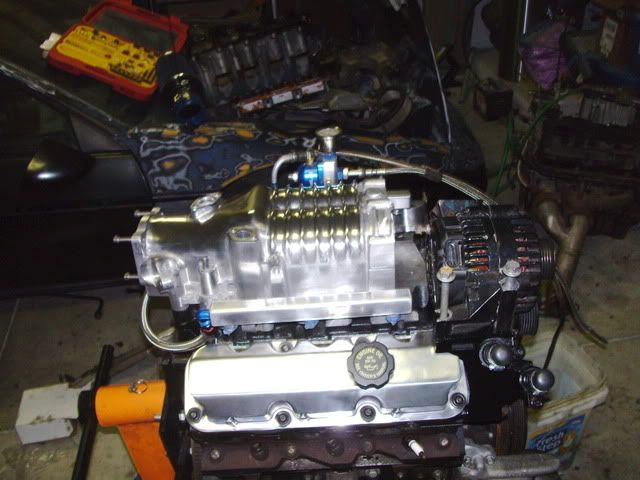
Hi Joe, any chance you can post any pictures of that alt setup? where it shows that plate that is bolted to the Alternator? did you make it or buy it and from who?
IP: Logged
09:02 PM
PFF
System Bot
Jun 21st, 2010
joesfiero Member
Posts: 2181 From: North Port,FL,USA Registered: Jan 2008
Do you want pictures of it off the car? There are some pretty good pics of it on the first page, including the one on JimmyS's car that inspired me to go that route. Its just a black piece of metal welded to a bushing that bolts where the stock dogbone did and it then bolts to the alt. with a spacer on one side to keep it flat. I made it myself pretty easily, you just need access to weld and cut/grind/shape at least 1/4" steel.
-Joe
IP: Logged
09:45 PM
Jun 22nd, 2010
jsketcham Member
Posts: 434 From: Meadville, Pa, USA Registered: Jan 2009
Well, I ran across a couple of deals, so the engine should be coming back out soon, I know I know.
For now, the plan is to get a Series III N/A block, topswap it with all the stuff I already have, and add an NIC cam, Comp OE-R lifters, ZZP hardened pushrods,105# springs, and maybe a double roller chain. I found a block locally for $200 with super low miles on it. I plan on doing the cam and such since the motor will be out anyway. I already bought the lifters and pushrods, they are on the way. Last few things to get are a new gasket set, the cam, chain, and oh yeah a wideband. This build up should only take a couple months if I get time to work on it. Parts should all be ordered soon here and I can begin as soon as they get here.
The official list should look like this: Series III N/A block 9.5:1 topswap ported and smoothed inlet/outlet gen 3 M90 N* throttle body 85mm MAF 42 lb injectors NIC cam Comp OE-R lifters ZZP hardened pushrods 105# valve springs stainless headers with true dual exhaust, 2.5" pipe each side Spec stage 3+ TRE performance 255 fuel pump ZZP MPS 3.4/3.25/3.0 pulleys Wideband O2 DHP powrtuner
That should be it for now, I will try to take better pics as I do the tear down and reinstallation to update this thread.
-Joe
[This message has been edited by joesfiero (edited 06-26-2010).]
IP: Logged
02:28 PM
darkhorizon Member
Posts: 12279 From: Flint Michigan Registered: Jan 2006
I am doing the same build right now for a customer..
I would ditch the 105 springs for LS6 springs, and run the stock timing chain. Make sure your idle is pretty high to help the timing chain last. OE-r lifters / pushrods are not needed at all, and would probably cause more problems than they solve.
IP: Logged
06:15 PM
Jul 15th, 2010
joesfiero Member
Posts: 2181 From: North Port,FL,USA Registered: Jan 2008
Changed the list a bit. Deal fell through on the NA block so I decided to go Gen V instead and keep my block. I also took your advice and went with LS6 springs instead of the 105s after researching them on ClubGP.
now its starting to look like this.
gen V M90 N* throttle body 85mm MAF 42 lb injectors NIC cam Comp OE-R lifters ZZP hardened pushrods 90# LS6 valve springs stainless headers with true dual exhaust, 2.5" pipe each side Spec stage 3+ TRE performance 255 fuel pump ZZP MPS 3.4/3.25/3.0 pulleys Wideband O2 DHP powrtuner
Gen V is on the way, I have the LS6 springs, locks and retainers, OE-R lifters and pushrods so just waiting on buying the cam and gaskets necessary. I tore off the Gen III and it is up for sale on the GP website. I may post it here soon if anyone is interested.
-Joe
IP: Logged
08:47 PM
Jul 16th, 2010
darkhorizon Member
Posts: 12279 From: Flint Michigan Registered: Jan 2006
Most if not all of the parts are here ( I say most because you are never done buying parts).
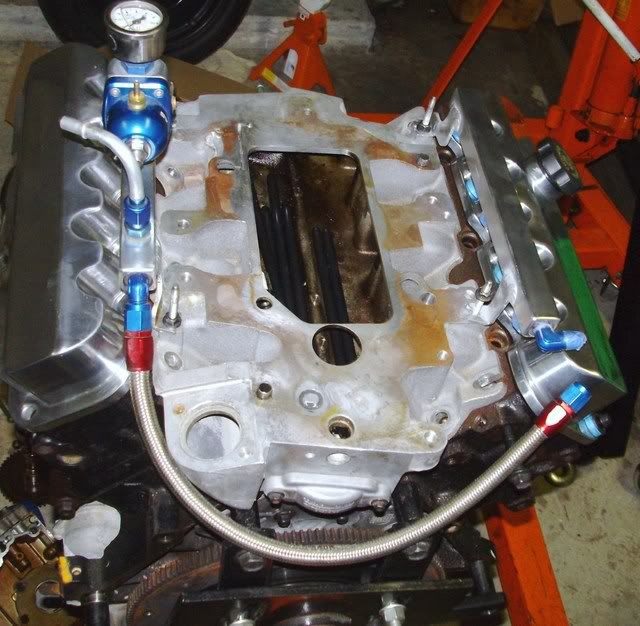
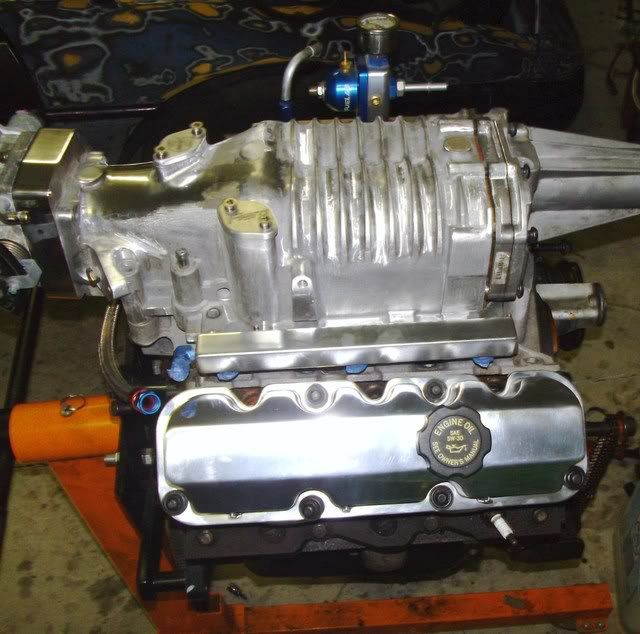
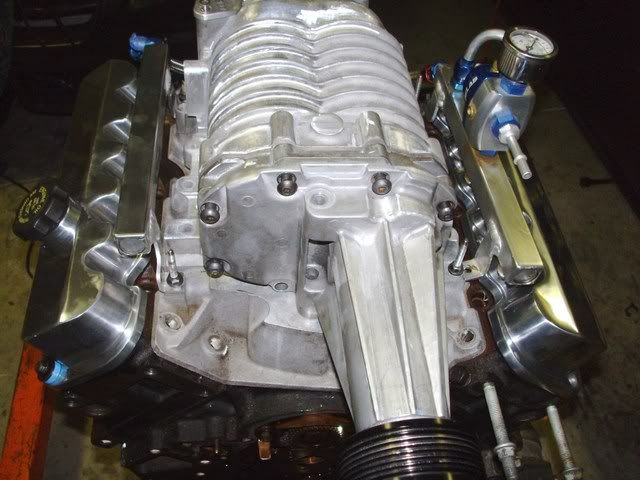
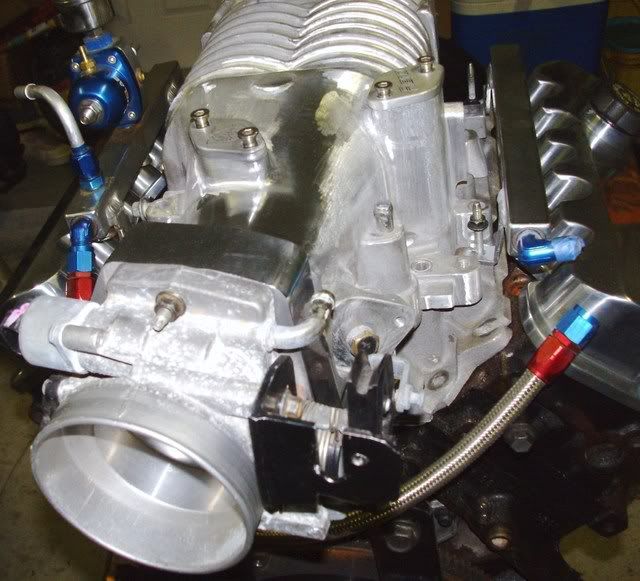
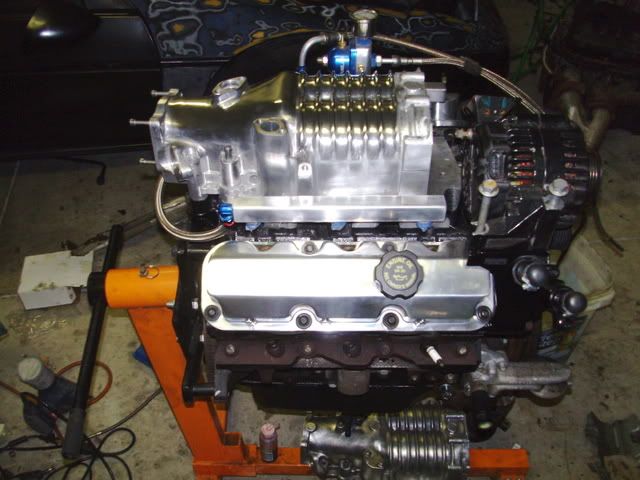
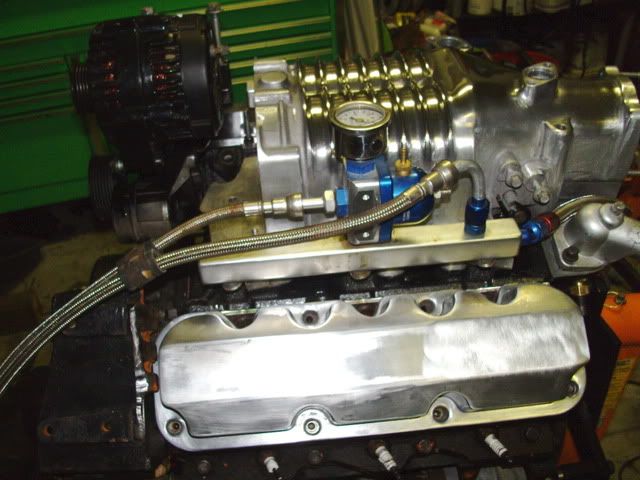
I ended up with a nice Gen V in good condition with a LIM machined for an intercooler if I decide to go that route down the road, a brand new LC-1 Wideband with digital gauge, a set of ZZP's latest fuel logs, polished aluminum valve covers, LS6 valve springs, and an NIC cam as well as all the bolts, bearings, and gaskets necessary to do the work.
Stock, being torn down
When re-using internal parts it is usually important to keep them in the same place and orientation they came out due to wear patterns and such, the lifters in the 3800 have a plastic guide channel that works really well for holding them out of the motor, I was sure to remove them and place them in the holder in such a way that I know how to re-orient them just like they came out.
LS6 yellow springs installed in one of the heads
Aluminum valve covers, they are brand new and someone traded me these for a Gen III that I had for sale. I am planning on polishing them to a little better shine, in fact everything is getting polished on the top of the motor.
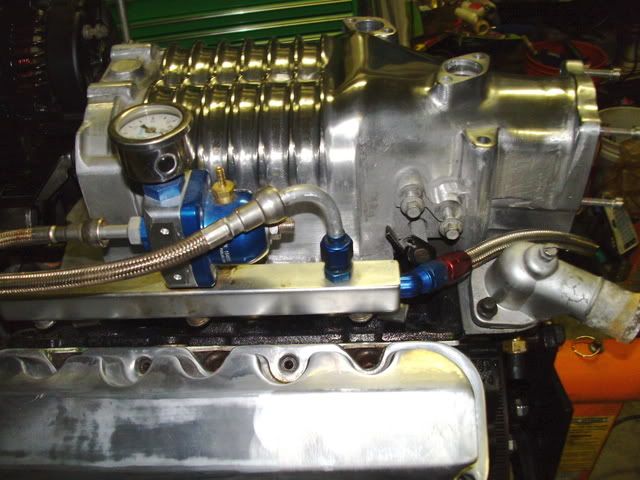
One of the fuel rails, I disassembled them and cleaned them off, I took 220 grit sandpaper to the top of this one to see how well I could get it polished. After working my way to 2000 grit and polishing them with white polish, it came out really good so now to do the rest of them.
And finally the Gen V, this has taken me about 5 hours of sanding/grinding to get all the little nooks sanded and that bigger area almost smoothed all the way.
I also polished my N* adapter plate, it is about done and looks great.
After messing with the adjustable coilovers, I think this is the stance I like the best.
-Joe
IP: Logged
11:52 PM
doublec4 Member
Posts: 8289 From: Oakville, Ontario, Canada Registered: Jun 2003
Still working on the engine, everything is in like the cam and springs but I am still working on polishing the blower and rails before bolting them back on.
I ordered a new sending unit from TFS and it looks great, also I have a buddy that makes aluminum marine gas tanks and I dropped my tank off at his shop in hopes of him making me a whole new tank out of aluminum. He seems like it wont be a problem so we will see.
-Joe
IP: Logged
12:14 AM
Sep 6th, 2010
joesfiero Member
Posts: 2181 From: North Port,FL,USA Registered: Jan 2008
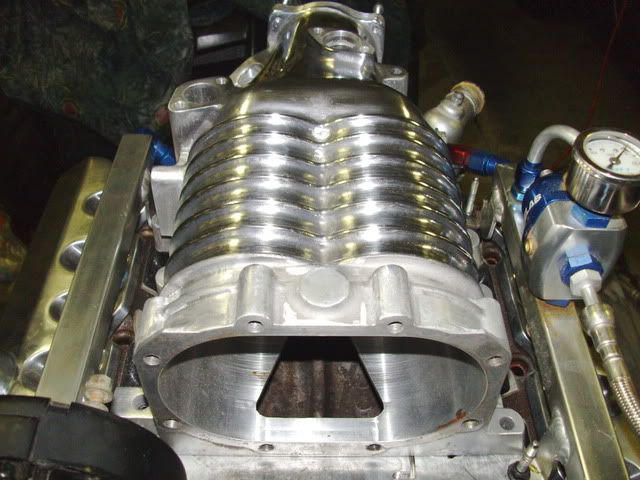
Some more pics of the blower, I havent had a whole lot of time to work on it as its hurricane season so my business is pretty busy right now. That will slow down in a month or so, so I should get to work on this a little quicker coming up.
At this point I have about 20 hours into polishing the blower. The hardest part by far is smoothing the case with 80 grit, there are alot of imperfections in it and doing this by hand is pretty tedious. I was using a dremel with sanding drums, but found out they make more ridges in the case than they are worth, I have to go back over every area by hand that I sanded with the dremel. I had a flapper wheel that was working pretty well but wore out very quickly, I may end up buying more of them because they worked faster than by hand and left a smooth case.
The ridges in the case (where the rotors are) are not anywhere near done. I hit them with some white polish just to get see what it looks like when they are shiny. The inlet area is just about done with some work left on the sides and TB area yet.
Bonus points for anyone that can tell what I did, or rather removed from the Gen V case to clean it up a bit.
When I get to the point where I need to do my cam, lifters, springs and so on, I may need to enlist your help as I have never dealt with the internals of a motor before.
IP: Logged
03:05 AM
Sep 8th, 2010
joesfiero Member
Posts: 2181 From: North Port,FL,USA Registered: Jan 2008
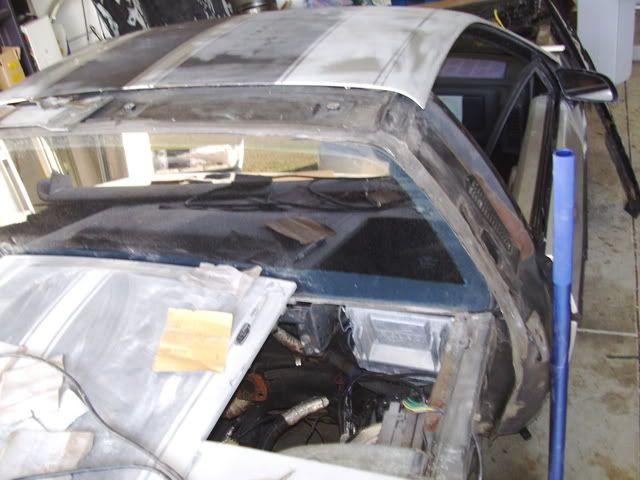
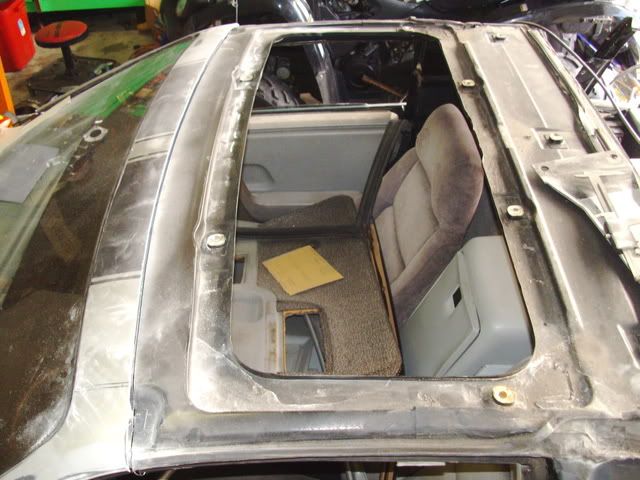
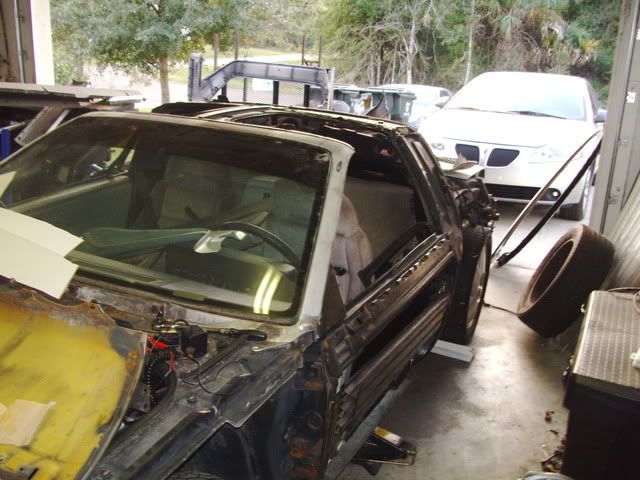
I found a T-top car at the junkyard and cut the whole roof section off today. Hopefully I will document my installation of the tops in this thread soon.
I removed the flat nubs on the top of the charger by the throttle body and on the intake right before the rotor housing. They made the SC look weird in my opinion and I think it looks tons better with them removed.
-Joe
[This message has been edited by joesfiero (edited 09-12-2010).]
IP: Logged
10:59 PM
Sep 20th, 2010
joesfiero Member
Posts: 2181 From: North Port,FL,USA Registered: Jan 2008
Ive been given the go-ahead from the wife to paint the car as soon as its done. JimmyS is planning on helping me and I think I will go with black below the belt line and the same color silver up top. After the paint, T-tops, this swap, and the Lebaron brakes I will try to squeeze new wheels and Mr. Mike's seats into the budget.
-Joe
IP: Logged
08:10 PM
Nov 28th, 2010
joesfiero Member
Posts: 2181 From: North Port,FL,USA Registered: Jan 2008
Work has slowed down, just finishing up some necessities around the house, been working on the car on and off for a few weeks now. I think I can get back to work on it pretty steady for the next few weeks.
I haven't touched the motor since I buttoned it back up, its basically done I just need to finish polishing the GenV and get it put back together. Some more work has piled itself up for one reason or another. I should be doing the T-Top conversion in the next few weeks, I am going to rebuild the Getrag, already have the kit, the body panels are being removed and sanded, putting on Lebaron brakes, and a few other odds and ends to create the car I want. I put on new wheels and got rid of those ugly Olds rims that were on there and got some acrylic sail panel replacements from Ken Hines that eliminate the whole sail panel frame and create a much smoother look. I have on the way some new dew wipes from Stu and have a bunch of replacement clips, screws and rivets from Fiero Jon (cuestickjived).
With the help of JimmyS, the body is to be repainted and the stripes removed. I decided on painting the lower half of the car orange, from a 2009 Nissan 350Z and the upper half a light silver color from a Land Rover. The wing is staying and I am getting a set of scoops from Fiero fiberglass. I tend to start on a project and add more to it than I can handle until I eventually dig myself out of the rut, this time is no exception. Budget was an issue, I did relatively well on the parts that I could get either used or cheap through the forums. I think this go round I may have spent a total of $2500 on upgrade parts and I have everything listed, or at least paid for and on the way.
I am sanding the rough cast case with 80 grit sandpaper until its smooth, then working my way up the grits all the way to 2000 grit paper and finally polishing it with Mothers aluminum polish, the white stuff using a combination of a buffing wheel and elbow grease.
-Joe
IP: Logged
04:03 PM
Nov 30th, 2010
americasfuture2k Member
Posts: 7131 From: Edmond, Oklahoma Registered: Jan 2006
Next time your at the junkyard its only four 7 or 8 MM bolts that hold it in. Snatch one as they provide a lot of protection.
Otherwise, the car is stripped, body panels being sanded right now. JimmyS is getting my new side scoops ready for me and I dropped the paint supplies off to him so he can get them in primer before I bring the rest of the parts. Ill snap some pics tomorrow and get them up here.
-Joe
IP: Logged
04:45 PM
Dec 8th, 2010
joesfiero Member
Posts: 2181 From: North Port,FL,USA Registered: Jan 2008
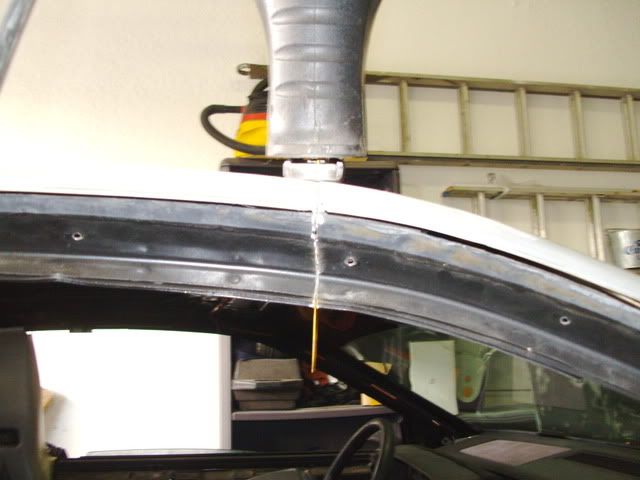
Got my T-tops started today, just need the butyl sealant to finish it off. A thread with the full writeup is here.
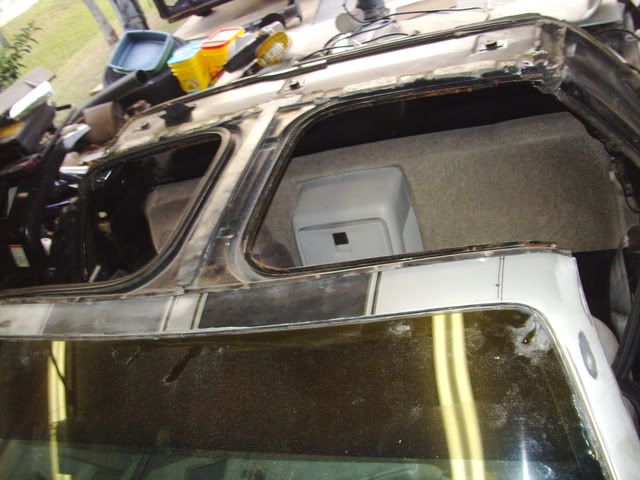
The car is stripped of all body panels at the moment. Most are sanded most of the way, some are done. I just need to get the edges, creases, nooks and crannies on a few before they are done and ready for paint. Some pics of me cutting the roof off
And with the T-top cartridge set in place, its not installed yet because I need to butyl the edges where it meets the body.
Finishing up sanding hopefully in the next week or so, but it needs to be a little warmer before I can paint. Its actually in the high 50s here during the day lately. More to come.
-Joe
IP: Logged
11:58 PM
Jan 22nd, 2011
BMTFIERO Member
Posts: 1187 From: Beaumont, TX Registered: Dec 2007
I have been working steady on the car for a few weeks now. Most of the parts are primed, wet sanded, and ready to paint. There are a few that still need primer and sanding but the majority of it is ready. My problem right now is that I need a mid 70s, no rain, low humidity day when me and JimmyS arent working or doing other stuff. Right now its taking much longer than expected with things coming up for the both of us and the weather not cooperating.
I have been working on the mechanical end of it too. I have the getrag all torn apart ( guess I should take some pics of that too) but had a couple small pieces inside that were broken so I am sourcing them before finishing it. The T-top is coming along, cant get it set and riveted until I get the windshield surround piece painted and reinstalled. I have been working with the seals and I think I am pleased with the way they are sitting now, with a little finesse and some product, I think I can have a leak free top.
Also been working on the brake conversion on and off, one side is done just need to do the other side. I only get to work on it a little at a time usually at night which is why things are coming along so slow. Sorry no pics right now but I think I will get some good ones of everything tomorrow and post them up.
-Joe
IP: Logged
03:54 PM
Jan 27th, 2011
joesfiero Member
Posts: 2181 From: North Port,FL,USA Registered: Jan 2008
The motor as it sits, ready to go in after I bolt the oil pan back on and finish polishing the SC, its a long process.
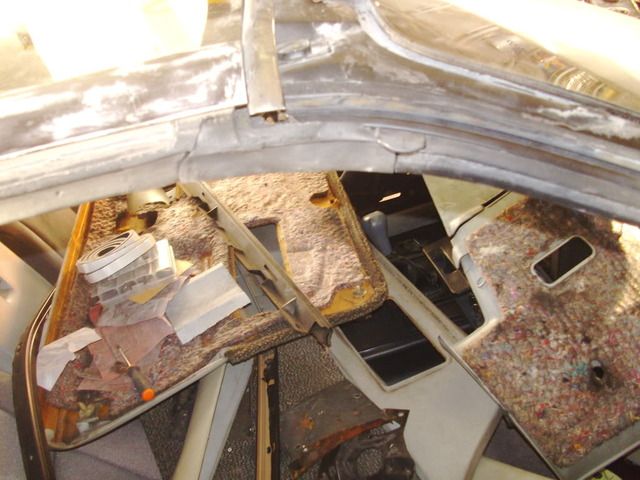
The T-top seals, the ones I got were cut at the A pillar, so I trimmed them to where I wanted them as well as the original door seals, I need to glue them together but heres how they sit now. Dont mind the interior all torn apart.
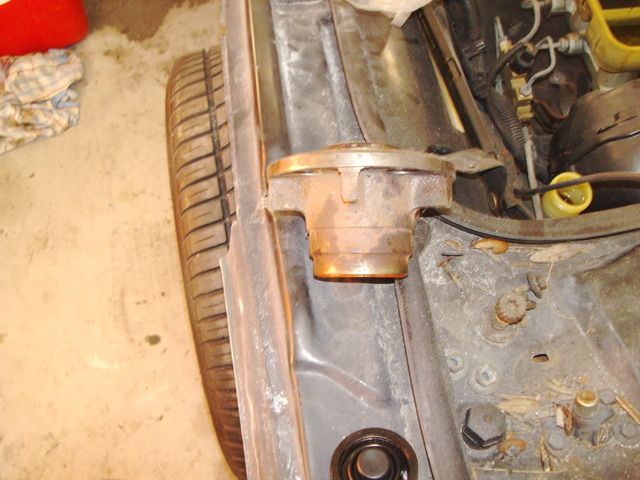
Heres a pic of the hubs I scored at the junkyard a few weeks ago. They are already cut down for the brake conversion, and they had brand new wheel bearings and fresh grease.
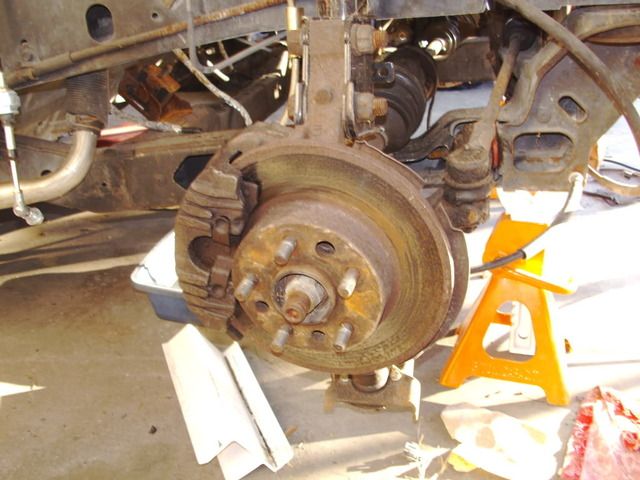
The old brakes, yuck.
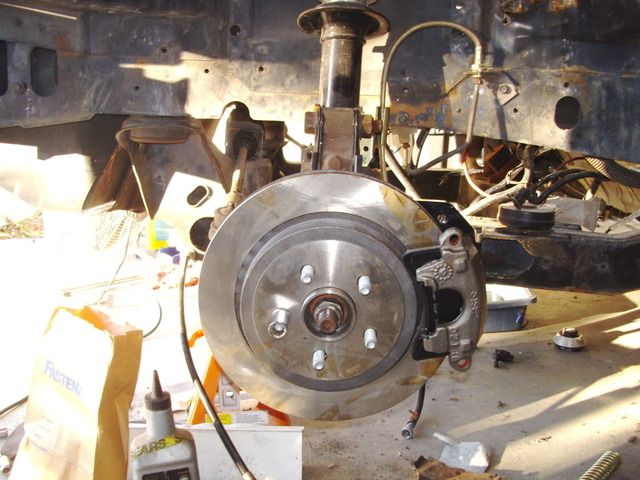
Other side, mostly installed. The brown stuff on the rotors is just from the plastic they were wrapped in, not rust.
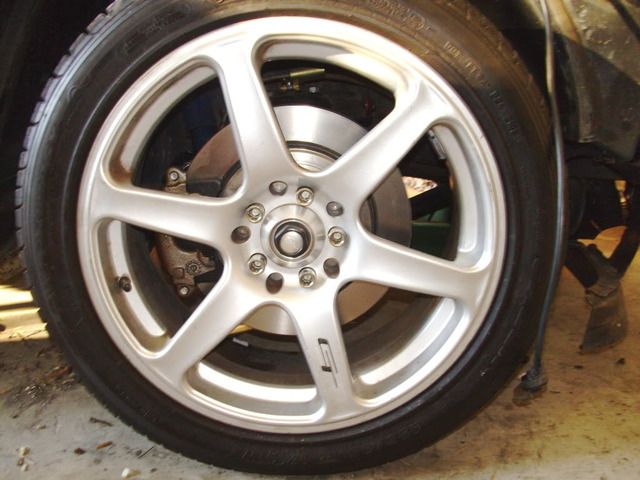
The front lebaron brakes, behind my new 17" wheels
Old messy engine bay firewall insulation, it has been removed and is being replaced by dynamat extreme.
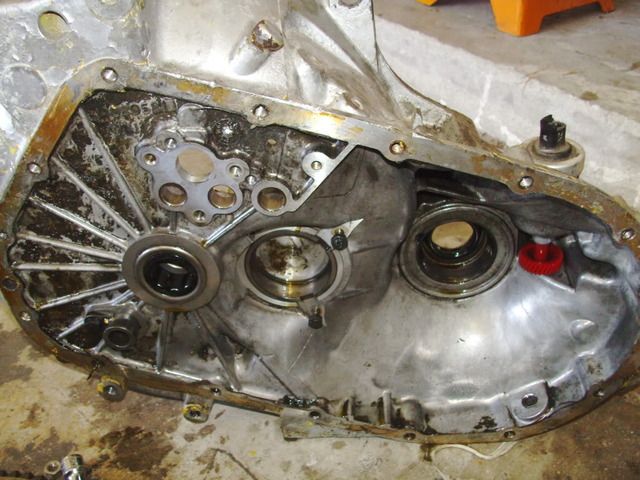
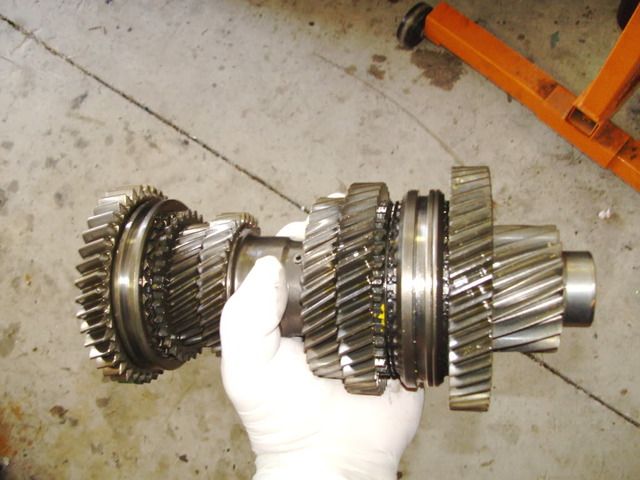
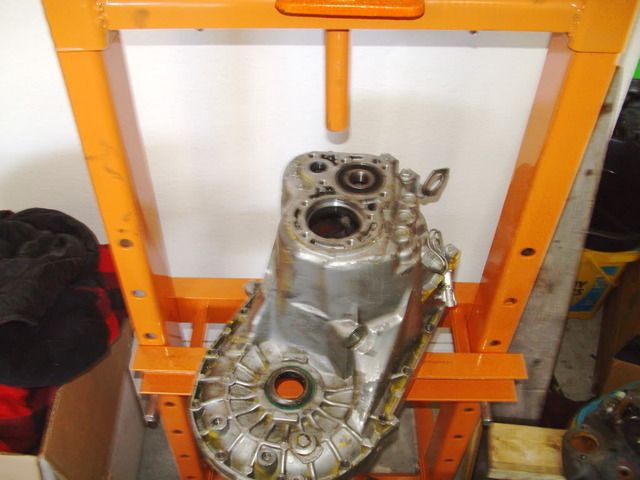
Some pics of the trans rebuild. Case half
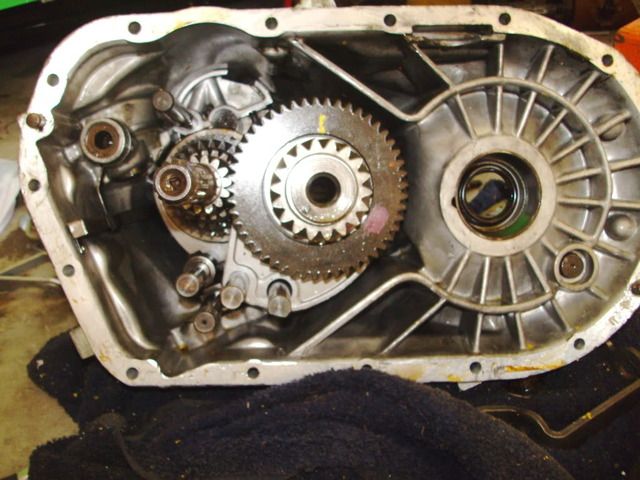
Other half with input/output shafts
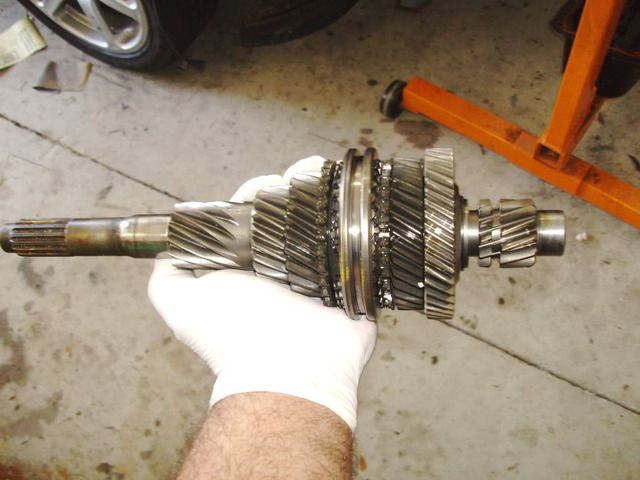
Shafts removed, input shaft
Output shaft
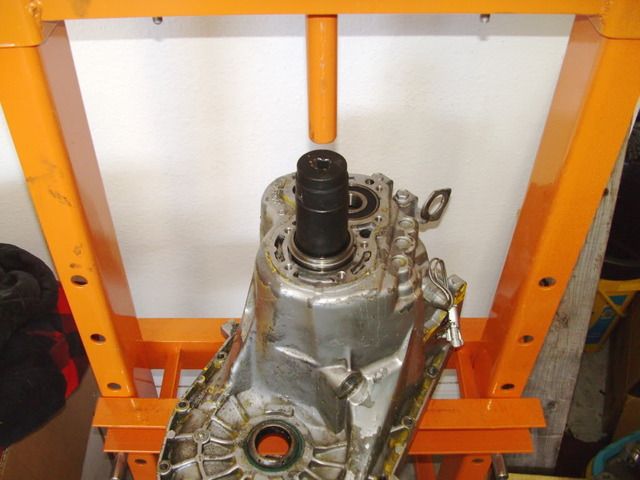
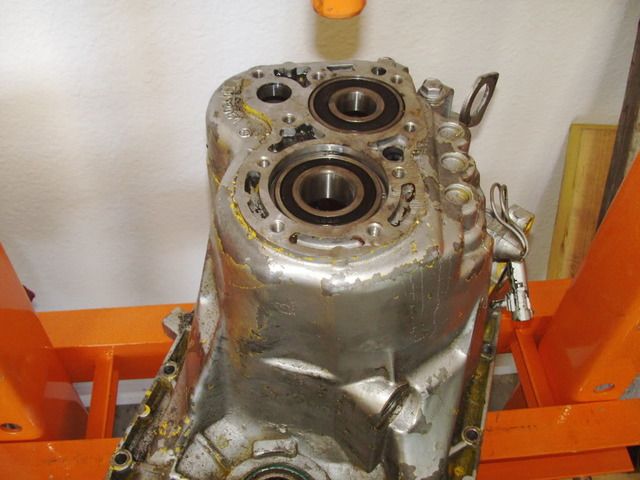
Old output shaft bearing removed, then being installed, and done
And finally a pic of the car right now. I love these wheels on it.
-Joe
[This message has been edited by joesfiero (edited 01-27-2011).]


 Are you going to be able to break out of work for a few days to come to Daytona?
 .
.