Pennock's Fiero Forum
  Technical Discussion & Questions - Archive
  Dugg's Engine Bay Makeover (Page 2)

T H I S   I S   A N   A R C H I V E D   T O P I C
  

Email This Page to Someone! | Printable Version

This topic is 2 pages long:  1   2 
Previous Page | Next Page
Dugg's Engine Bay Makeover by Dougie Murder
Started on: 06-17-2010 07:44 PM
Replies: 54
Last post by: Dougie Murder on 09-08-2010 09:18 PM
Dougie Murder
Member
Posts: 538
From: Toronto, On,Canada
Registered: Sep 2007


Feedback score:    (13)
Leave feedback

Rate this member

Report this Post08-03-2010 02:13 AM Click Here to See the Profile for Dougie MurderSend a Private Message to Dougie MurderDirect Link to This Post
Thanks for the pics Unboundmo,

I actually do have all the heat shields for the coil and all that stuff on the top of the engine, they just were not in the picture after i painted them. Thanks for the info tho!

I'll assume you have a "newer" model Fiero (Getrag trans)....your slave is different than mine (4spd) and the alternator heat shield in your pic looks like it is attached to the exh manifold.
My alt heat shield is actually part of the alternator itself i think.
I am hoping the heat wrap i put on the Y pipe will cut down on the heat and eliminate the need for a heat shield, if not I'll try to convince my old man to fab something up for me...(I aint that handy)

Your last picture, the firewall heat shield, I am missing from my car...must have rusted/fallen off...but again, I am hoping the heat wrap will eliminate the need for it.

Thanks to everyone for their continued help on this...I replaced all the old black plastic wire covers with new ones today, got the valve covers on along with the lower intake and fuel rail.
More updates and questions to come.

[This message has been edited by Dougie Murder (edited 08-03-2010).]

IP: Logged
Dougie Murder
Member
Posts: 538
From: Toronto, On,Canada
Registered: Sep 2007


Feedback score:    (13)
Leave feedback

Rate this member

Report this Post08-04-2010 01:13 AM Click Here to See the Profile for Dougie MurderSend a Private Message to Dougie MurderDirect Link to This Post


It's starting to look like an engine again!!

Got the throttle body coolant lines off, degreased and painted the TB too...

Im working on that PCV mod suggested by BlackTree way back on the first page.
IP: Logged
Dougie Murder
Member
Posts: 538
From: Toronto, On,Canada
Registered: Sep 2007


Feedback score:    (13)
Leave feedback

Rate this member

Report this Post08-05-2010 02:01 AM Click Here to See the Profile for Dougie MurderSend a Private Message to Dougie MurderDirect Link to This Post
here is the cleaned TB with removed the coolant lines. Gave it a couple coats of the high heat aluminum paint.
also cut off and painted the MAP unit.


[This message has been edited by Dougie Murder (edited 08-05-2010).]

IP: Logged
doublec4
Member
Posts: 8289
From: Oakville, Ontario, Canada
Registered: Jun 2003


Feedback score:    (20)
Leave feedback


Total ratings: 150
Rate this member

Report this Post08-05-2010 10:19 AM Click Here to See the Profile for doublec4Send a Private Message to doublec4Direct Link to This Post
Looks like its turning out great!

Sent you a pm yesterday
IP: Logged
Dougie Murder
Member
Posts: 538
From: Toronto, On,Canada
Registered: Sep 2007


Feedback score:    (13)
Leave feedback

Rate this member

Report this Post08-06-2010 05:19 PM Click Here to See the Profile for Dougie MurderSend a Private Message to Dougie MurderDirect Link to This Post
 
quote
Originally posted by doublec4:

Looks like its turning out great!

Sent you a pm yesterday


Thanks brother.

Your pm has been replied to.
IP: Logged
Dougie Murder
Member
Posts: 538
From: Toronto, On,Canada
Registered: Sep 2007


Feedback score:    (13)
Leave feedback

Rate this member

Report this Post08-15-2010 01:57 AM Click Here to See the Profile for Dougie MurderSend a Private Message to Dougie MurderDirect Link to This Post
Well I spent the whole day putting everything back together....
I took my time, I was prepared, I double checked, I torqued, I triple checked,

And my reward for all my hard work..... it wont start.

Engine turns over but wont fire.
New cap, rotor, coil, o-ring and wire set. Spark module was workin when i pulled the dist, but I switched it out with a GM one to see if that was it....no dice.

Lucky there is a ton of info on here about Fiero ignition issues, so some of the troubleshooting ive done so far...
Probably not the spk module...unless i have 2 bad units.
Everything looks to be hooked up properly. Didnt check the fuse on the thin red wire at the battery yet tho.
Coil reads 12V with the ign on so the new coil is ok.
Tach does not move when cranking....

One thing I did notice when i took the cap off to change the module, is that the rotor is pointing in the same direction as when I put the distributor in... shouldnt it move as the engine tries to start?

Oh well... at least it looks good
IP: Logged
Dougie Murder
Member
Posts: 538
From: Toronto, On,Canada
Registered: Sep 2007


Feedback score:    (13)
Leave feedback

Rate this member

Report this Post08-15-2010 07:48 PM Click Here to See the Profile for Dougie MurderSend a Private Message to Dougie MurderDirect Link to This Post

Dougie Murder

538 posts
Member since Sep 2007
 
quote
Originally posted by Dougie Murder:


One thing I did notice when i took the cap off to change the module, is that the rotor is pointing in the same direction as when I put the distributor in... shouldnt it move as the engine tries to start?

Oh well... at least it looks good


Anyone? Sorry if thats a stupid question.

IP: Logged
TONY_C
Member
Posts: 2747
From: North Bellmore, NY 11710
Registered: May 2001


Feedback score: (2)
Leave feedback

Rate this member

Report this Post08-15-2010 08:17 PM Click Here to See the Profile for TONY_CSend a Private Message to TONY_CDirect Link to This Post
Crank the engine with the cap off, make sure the rotor spins. If it does, is it in the correct spot? I could be off 180 degrees if you mistook TDC on the power (ignition) stroke of cylinder #1 for TDC of the intake stroke by mistake.
IP: Logged
Pete Matos
Member
Posts: 2291
From: Port St. Lucie, Florida
Registered: Jan 2010


Feedback score: (2)
Leave feedback

Rate this member

Report this Post08-15-2010 08:38 PM Click Here to See the Profile for Pete MatosSend a Private Message to Pete MatosDirect Link to This Post
Just went thru this same nightmare and basically replaced the entire ignition system..... wound up being the damn rotor button I bought had a flaw and the spark from the coil went right thru the plastic into the disty shaft.... replaced the rotor and started right up.... sometimes it is the stupidest things that drive you nuts. One time when I tore apart my Bronco upper end I just plain forgot to install the rotor and chased my tail for a few frustrating hours to get it working again.... good luck and peace

Pete
IP: Logged
Dougie Murder
Member
Posts: 538
From: Toronto, On,Canada
Registered: Sep 2007


Feedback score:    (13)
Leave feedback

Rate this member

Report this Post08-16-2010 08:37 PM Click Here to See the Profile for Dougie MurderSend a Private Message to Dougie MurderDirect Link to This Post
 
quote
Originally posted by TONY_C:

Crank the engine with the cap off, make sure the rotor spins. If it does, is it in the correct spot? I could be off 180 degrees if you mistook TDC on the power (ignition) stroke of cylinder #1 for TDC of the intake stroke by mistake.


All I did was take the dist. out replace the o-ring and rotor, making sure the rotor was pointing towards my mark when i put it back in...

Now i guess i have to turn it and find TDC since its all messed up now...son of a b*****
IP: Logged
Dougie Murder
Member
Posts: 538
From: Toronto, On,Canada
Registered: Sep 2007


Feedback score:    (13)
Leave feedback

Rate this member

Report this Post08-17-2010 03:07 PM Click Here to See the Profile for Dougie MurderSend a Private Message to Dougie MurderDirect Link to This Post
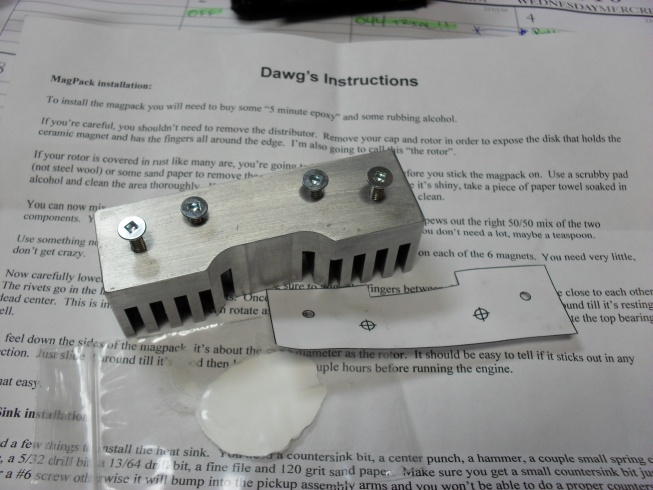
Got a package i was waiting on in the mail today...so in between trying to figure out what the problem is I'll install this bad boy. EDIT: its a V6 distributor heat sink.


See Dawg's thread in The Mall here.
https://www.fiero.nl/forum/Forum4/HTML/049749.html

[This message has been edited by Dougie Murder (edited 08-17-2010).]

IP: Logged
PFF
System Bot
Dougie Murder
Member
Posts: 538
From: Toronto, On,Canada
Registered: Sep 2007


Feedback score:    (13)
Leave feedback

Rate this member

Report this Post09-08-2010 07:45 PM Click Here to See the Profile for Dougie MurderSend a Private Message to Dougie MurderDirect Link to This Post
I finally got some time to myself and completed this project!!!

Got the timing issues worked out and she purrs like a kitten now. Thanks to everyone for all the great tips!

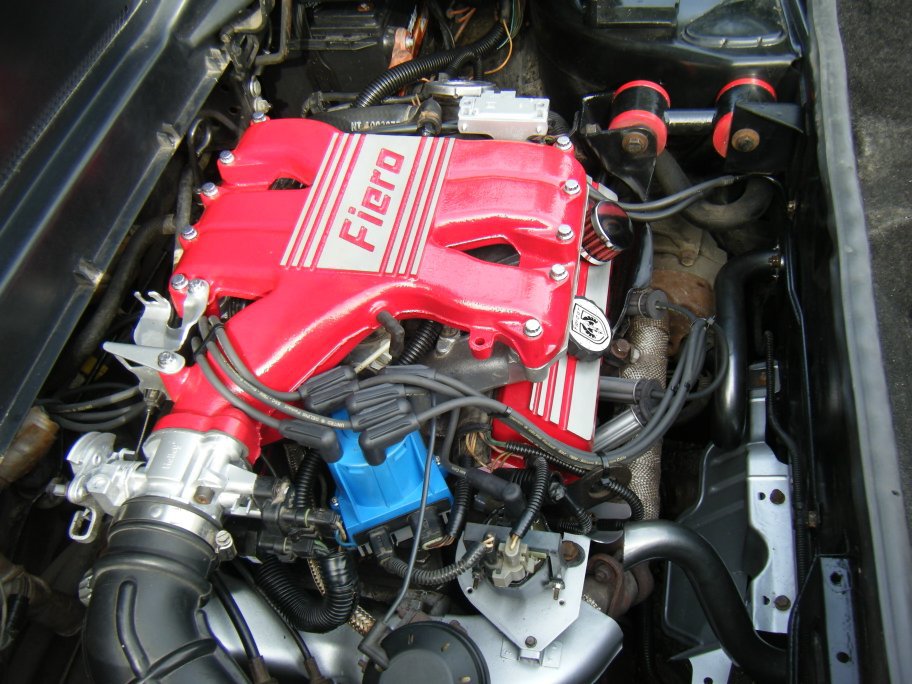
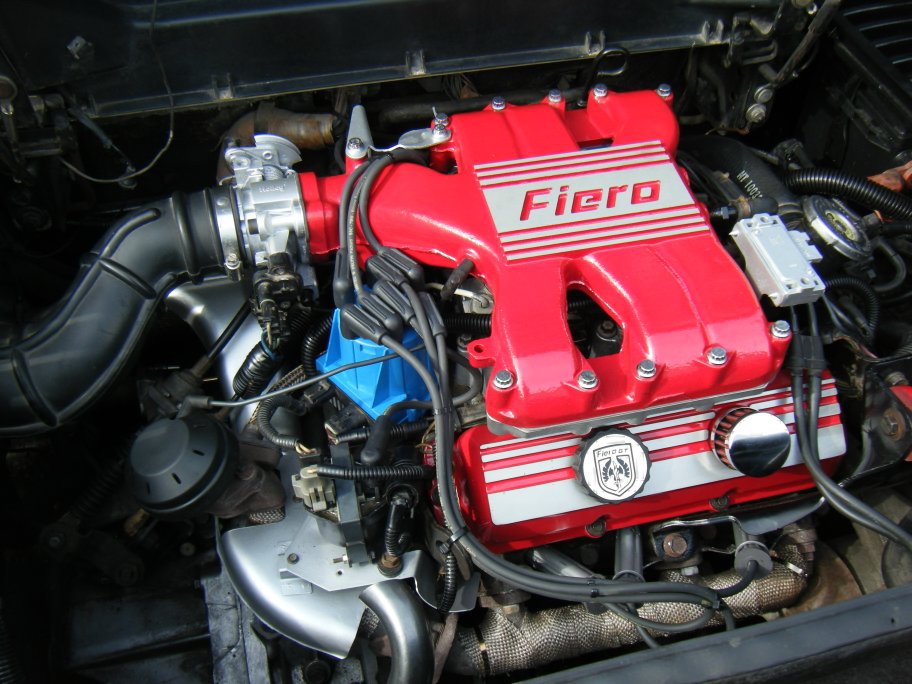
To sum up what i did...
Cleaned up 25 years of grime.
TB coolant lines are gone.
PCV re-routed and chrome filter added.
Engraved Intake + Valve covers powder coated (PFF member Electrathon)
New gaskets everywhere
TB, Map, middle intake, Spk shields & Heat shields painted w/ duplicolor aluminum high heat paint.
Engine bay insulation removed and walls painted w/ duplicolor hihg heat gloss black & clear.
Coil and alt fan tubes powder coated graphite.
Replaced old plastic wire cover stuff
Batt tray was sanded down and painted with rubberized undercoating.
Exhaust manifolds and Y-pipe wrapped w/ header wrap.
New plugs, wires, cap, rotor, coil, ign module (GM) & dist o-ring...and installed ign module heat sink (PFF member Dawg)

The only thing i didnt do was put the cruise back in...but that never worked anyway.
And it only took me 2 and a half months!!!


Here is a vid i took of the first start up!!!
i changed the audio cuz it was just me explaining to my wife what was happening and assuring her it was not going to catch on fire...


P.S - For those with a sharp eye, yes i know my coil heat shield is not on and that the egr line is not hooked up in the video. They are on now...i was too excited.

Thanks again to all!

[This message has been edited by Dougie Murder (edited 03-03-2011).]

IP: Logged
82-T/A [At Work]
Member
Posts: 25005
From: Florida USA
Registered: Aug 2002


Feedback score: (1)
Leave feedback


Total ratings: 201
Rate this member

Report this Post09-08-2010 08:06 PM Click Here to See the Profile for 82-T/A [At Work]Send a Private Message to 82-T/A [At Work]Direct Link to This Post
 
quote
Originally posted by Dougie Murder:

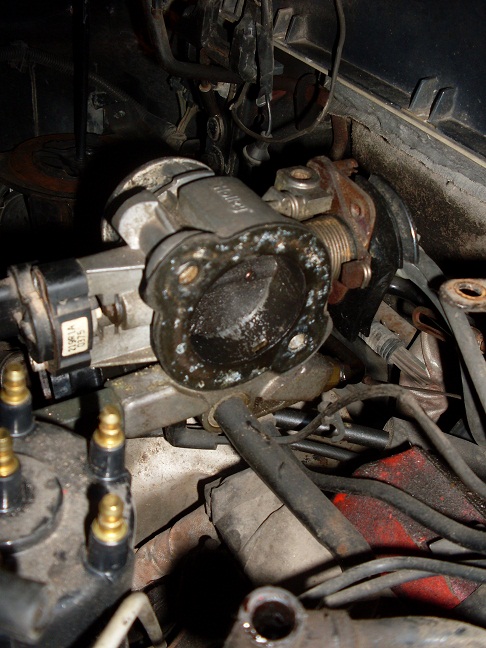
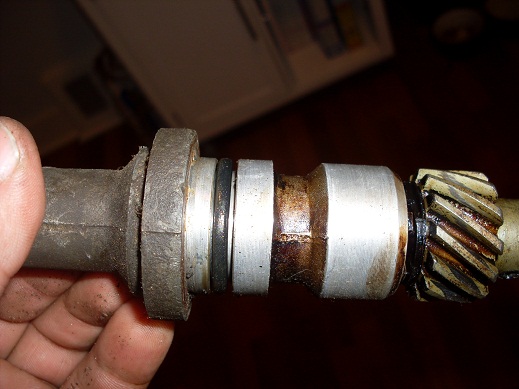
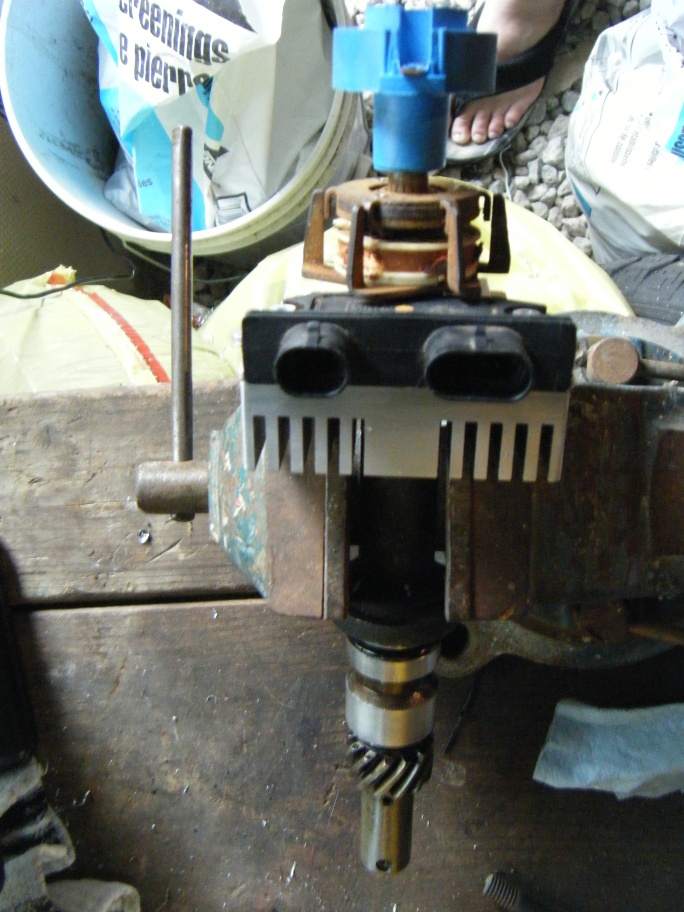
Coming along... i pulled the distributor like you guys said...the O ring looks good...


But the rest looks lke crap and the fingers do in fact rub together. I'll have to contact one of the fine folks on here who rebuild these and sell them.


This looks like a good product
https://www.fiero.nl/forum/Forum4/HTML/050031.html

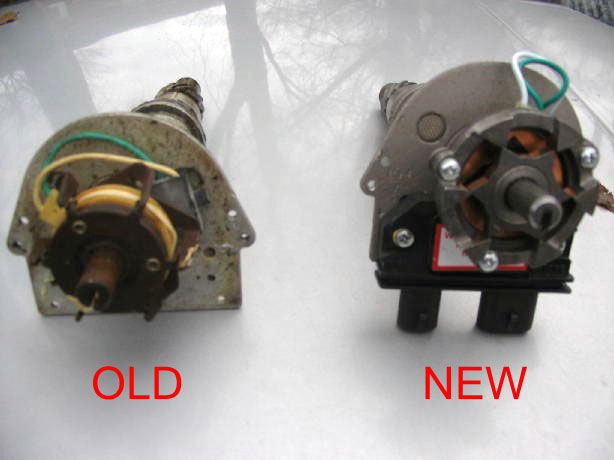
If you ever decide you want to rebuild or replace your distrubutor, I thought I would mention that there is a NEW distributor that you can buy now which drops right in place of the old one. It looks identical from the outside and it IS basically the same distributor. The only difference is that the stators are of a newer more reliable design.

I'm pretty sure that there's a 75% chance you'll get this ANYWAY when you buy a new one... but just thought I would mention it.

------------------
Todd,
2008 Jeep Patriot Limited 4x2
2002 Ford Explorer Sport 2dr 4x2
2002 Ford Crown Victoria LX
1987 Pontiac Fiero SE / V6
1973 Volkswagen Type-2 Transporter

IP: Logged
doublec4
Member
Posts: 8289
From: Oakville, Ontario, Canada
Registered: Jun 2003


Feedback score:    (20)
Leave feedback


Total ratings: 150
Rate this member

Report this Post09-08-2010 08:44 PM Click Here to See the Profile for doublec4Send a Private Message to doublec4Direct Link to This Post
Looks fantastic doug, now the new challenge will be keeping it clean!
IP: Logged
Dougie Murder
Member
Posts: 538
From: Toronto, On,Canada
Registered: Sep 2007


Feedback score:    (13)
Leave feedback

Rate this member

Report this Post09-08-2010 09:18 PM Click Here to See the Profile for Dougie MurderSend a Private Message to Dougie MurderDirect Link to This Post
That new one looks heavy duty man, thx for the info.

i looked into buying a new one but didnt have hundreds of dollars to spend so i just cleaned mine up with a wire wheel as best i could.

[This message has been edited by Dougie Murder (edited 09-08-2010).]

IP: Logged
Previous Page | Next Page

This topic is 2 pages long:  1   2 


All times are ET (US)

T H I S   I S   A N   A R C H I V E D   T O P I C
  

Contact Us | Back To Main Page

Advertizing on PFF | Fiero Parts Vendors
PFF Merchandise | Fiero Gallery
Real-Time Chat | Fiero Related Auctions on eBay


Copyright (c) 1999, C. Pennock