Pennock's Fiero Forum
  Technical Discussion & Questions - Archive
  The Yellow Fiero gets 13" brakes (Page 2)

T H I S   I S   A N   A R C H I V E D   T O P I C
  

Email This Page to Someone! | Printable Version

This topic is 2 pages long:  1   2 
Previous Page | Next Page
The Yellow Fiero gets 13" brakes by yellowstone
Started on: 06-11-2010 09:42 PM
Replies: 61
Last post by: yellowstone on 06-21-2010 09:31 AM
yellowstone
Member
Posts: 9299
From: Düsseldorf/Germany
Registered: Jun 2003


Feedback score: N/A
Leave feedback


Total ratings: 250
Rate this member

Report this Post06-15-2010 07:28 PM Click Here to See the Profile for yellowstoneSend a Private Message to yellowstoneDirect Link to This Post
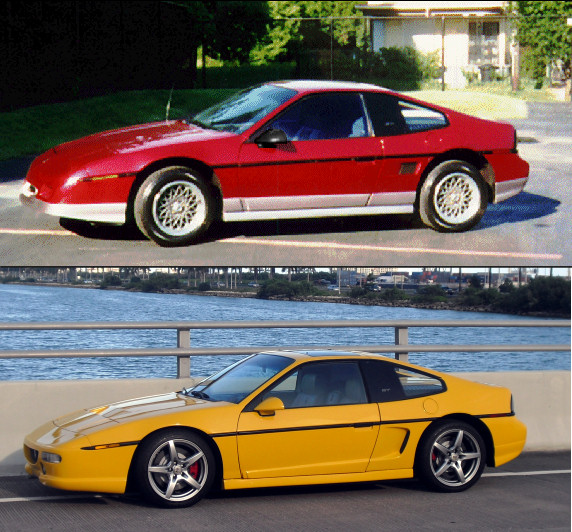
Went to the bridge to Palm Island and snapped the perfect "after" picture with South Beach in the background.

Before (back in Nov. 09):


After (today):


People: I HAVE BRAKES. Everything before today was just pretending...!!!

Clem and I took many build pix which will be posted in this thread. I also want to give a thumbs up to Carlos and Phil from Mr. Mechanic in Hialeah, FL. Check out their website (which I made): http://www.mrmechanicinc.com

[This message has been edited by yellowstone (edited 06-15-2010).]

IP: Logged
yellowstone
Member
Posts: 9299
From: Düsseldorf/Germany
Registered: Jun 2003


Feedback score: N/A
Leave feedback


Total ratings: 250
Rate this member

Report this Post06-15-2010 07:39 PM Click Here to See the Profile for yellowstoneSend a Private Message to yellowstoneDirect Link to This Post

yellowstone

9299 posts
Member since Jun 2003


[This message has been edited by yellowstone (edited 06-15-2010).]

IP: Logged
MountainHiBlue87GT
Member
Posts: 369
From: Yavapai County, AZ
Registered: Jan 2009


Feedback score: N/A
Leave feedback

Rate this member

Report this Post06-15-2010 07:56 PM Click Here to See the Profile for MountainHiBlue87GTSend a Private Message to MountainHiBlue87GTDirect Link to This Post
Yellowstone:

Looks great and you moved really fast!!! How many hours did it take?

Regards,

David
IP: Logged
yellowstone
Member
Posts: 9299
From: Düsseldorf/Germany
Registered: Jun 2003


Feedback score: N/A
Leave feedback


Total ratings: 250
Rate this member

Report this Post06-15-2010 08:06 PM Click Here to See the Profile for yellowstoneSend a Private Message to yellowstoneDirect Link to This Post
It took me about 5 hours to clean everything up and paint it. Installation took about 8 hours over 2 days. The instructions could be more detailed and the pieces could have been marked left/right...

I paid the shop $450 for labor but I helped and they never charge me "normal" prices.
IP: Logged
BlackThunderGT
Member
Posts: 2048
From: The Rock
Registered: Apr 2009


Feedback score: (5)
Leave feedback

Rate this member

Report this Post06-15-2010 08:16 PM Click Here to See the Profile for BlackThunderGTSend a Private Message to BlackThunderGTDirect Link to This Post
I feel so inadequate now


IP: Logged
yellowstone
Member
Posts: 9299
From: Düsseldorf/Germany
Registered: Jun 2003


Feedback score: N/A
Leave feedback


Total ratings: 250
Rate this member

Report this Post06-15-2010 08:48 PM Click Here to See the Profile for yellowstoneSend a Private Message to yellowstoneDirect Link to This Post
 
quote
Originally posted by BlackThunderGT:

I feel so inadequate now


I know how you feel. But there's hope :-)

IP: Logged
madcurl
Member
Posts: 21401
From: In a Van down by the Kern River
Registered: Jul 2003


Feedback score: N/A
Leave feedback


Total ratings: 314
Rate this member

Report this Post06-15-2010 09:02 PM Click Here to See the Profile for madcurlSend a Private Message to madcurlDirect Link to This Post
 
quote
Originally posted by yellowstone:


Nice.
IP: Logged
madcurl
Member
Posts: 21401
From: In a Van down by the Kern River
Registered: Jul 2003


Feedback score: N/A
Leave feedback


Total ratings: 314
Rate this member

Report this Post06-15-2010 09:08 PM Click Here to See the Profile for madcurlSend a Private Message to madcurlDirect Link to This Post

madcurl

21401 posts
Member since Jul 2003
 
quote
Originally posted by MountainHiBlue87GT:

Curly:

Is that a stock Vette rotor or a Wilwood or some such?

Regards,

David


The rotor in the pic are Baer 2-piece Corvette 13" rotors using the C5 calipers and pads. As you mentioned the 1-piece Corvette rotors are extremely heavy, but upgrading to a 2-piece will shave at least 10 pounds (I think?) compared to stock. I have a Corvette 1-piece rotor, but it's on the car.
IP: Logged
RacerX11
Member
Posts: 288
From: Peoria, IL
Registered: Feb 2003


Feedback score: N/A
Leave feedback

Rate this member

Report this Post06-16-2010 01:15 PM Click Here to See the Profile for RacerX11Send a Private Message to RacerX11Direct Link to This Post
 
quote
Originally posted by MountainHiBlue87GT:

Folks:

The Viper 13" rotor weighs 17 lbs per wheel while the 13" Vette rotors are MUCH heavier, I think the front Vette rotor is 27 lbs and the rear Vette rotor is probably lighter than 27 lbs. We weighed the rotors on a shipping scale several years ago, but I cannot remember the Vette's weights. Also, I cannot find the Vette 13" rotor weight on the Internet; maybe someone else can. The weight difference is so significant that WCF no longer offers them, but I am sure if you really want them, WCF will supply them.


David

Are you referring to C4 or C5 Vette rotors? The only way 13"(12.75") C5 Vette setup weighs 27lbs is if you include the calipers, pads, and brackets. My C5 rotors weigh ~18-19lbs. I don't know what a C4 13" rotor weighs.

https://www.fiero.nl/forum/A...070315-2-073007.html
IP: Logged
Fieroseverywhere
Member
Posts: 4242
From: Gresham, Oregon USA
Registered: Mar 2006


Feedback score:    (14)
Leave feedback


Total ratings: 89
Rate this member

Report this Post06-16-2010 01:23 PM Click Here to See the Profile for FieroseverywhereSend a Private Message to FieroseverywhereDirect Link to This Post
Damn those are heavy. I'm using stock 12" vette rotors. They weigh in at 12-13lbs each. I'd bet the 2 piece are easily under 10 lbs each. For that much weight I don't need the extra inch of rotor. Whatever works though.
IP: Logged
Fieroseverywhere
Member
Posts: 4242
From: Gresham, Oregon USA
Registered: Mar 2006


Feedback score:    (14)
Leave feedback


Total ratings: 89
Rate this member

Report this Post06-16-2010 01:25 PM Click Here to See the Profile for FieroseverywhereSend a Private Message to FieroseverywhereDirect Link to This Post

Fieroseverywhere

4242 posts
Member since Mar 2006
 
quote
Originally posted by BlackThunderGT:

I feel so inadequate now


Yours is easy. Simple adapters and 12"-13" vette rotors is all you need. You can keep your stock calipers and master. Upgrades for the 88's are super simple and still work very well.
IP: Logged
PFF
System Bot
Fierobsessed
Member
Posts: 4782
From: Las Vegas, NV
Registered: Dec 2001


Feedback score: N/A
Leave feedback


Total ratings: 147
Rate this member

Report this Post06-17-2010 03:13 AM Click Here to See the Profile for FierobsessedSend a Private Message to FierobsessedDirect Link to This Post
So, now that you have them and they look great...

How do they feel? Pedal travel? Effort? Controllability? How does it perform when you REALLY need to make the car stop now?

Thats what I'm curious about.
IP: Logged
yellowstone
Member
Posts: 9299
From: Düsseldorf/Germany
Registered: Jun 2003


Feedback score: N/A
Leave feedback


Total ratings: 250
Rate this member

Report this Post06-17-2010 09:41 AM Click Here to See the Profile for yellowstoneSend a Private Message to yellowstoneDirect Link to This Post
Actually, in normal driving conditions, there's not much difference.

Brake travel is about the same (stock master cylinder) and the braking is smooth and gradual. The car doesn't veer to any side when braking. The brakes are quieter because the drilled and slotted rotors I had before made a weird whooshing sound.

But just stepping on them a bit more will send everything in the cabin flying forward. The brakes lock up quite easily but not so quickly that it would be dangerous.

The turning radius is not much diminished but to achieve that we relocated the front shock inwards and cut off the outer part of the mounting bracket. I have pix of this that I will publish here.

The ebrake works well and the "one-click to lock" operation is much nicer than the stock Fiero design. The ebrake cable now passes close to the exhaust pipe but I made a protective wrapping for it.

Overall, nice everyday usability with a LOT of safety margin.

I'm happy.

[This message has been edited by yellowstone (edited 06-17-2010).]

IP: Logged
yellowstone
Member
Posts: 9299
From: Düsseldorf/Germany
Registered: Jun 2003


Feedback score: N/A
Leave feedback


Total ratings: 250
Rate this member

Report this Post06-17-2010 06:48 PM Click Here to See the Profile for yellowstoneSend a Private Message to yellowstoneDirect Link to This Post

yellowstone

9299 posts
Member since Jun 2003
AND - due to the rerouted ebrake cables, the ugly cables are no longer visible from behind the car! Big plus!
IP: Logged
yellowstone
Member
Posts: 9299
From: Düsseldorf/Germany
Registered: Jun 2003


Feedback score: N/A
Leave feedback


Total ratings: 250
Rate this member

Report this Post06-17-2010 11:00 PM Click Here to See the Profile for yellowstoneSend a Private Message to yellowstoneDirect Link to This Post

yellowstone

9299 posts
Member since Jun 2003
I was just playing with Photoshop, comparing shots of my Fiero from 1995 to the most recent ones.

Since I made them, I thought I'd share:


Sorry, I'm just a proud parent :-)

[This message has been edited by yellowstone (edited 06-19-2010).]

IP: Logged
Alex4mula
Member
Posts: 7403
From: Canton, MI US
Registered: Dec 1999


Feedback score:    (11)
Leave feedback


Total ratings: 153
Rate this member

Report this Post06-18-2010 02:07 PM Click Here to See the Profile for Alex4mulaSend a Private Message to Alex4mulaDirect Link to This Post
Yellow rocks!

------------------

Red: TPI V8 + 6-Speed Yellow: Nitrous 3.4 + 5 speed
304rwHP/366rwTQ

IP: Logged
madcurl
Member
Posts: 21401
From: In a Van down by the Kern River
Registered: Jul 2003


Feedback score: N/A
Leave feedback


Total ratings: 314
Rate this member

Report this Post06-19-2010 11:08 PM Click Here to See the Profile for madcurlSend a Private Message to madcurlDirect Link to This Post
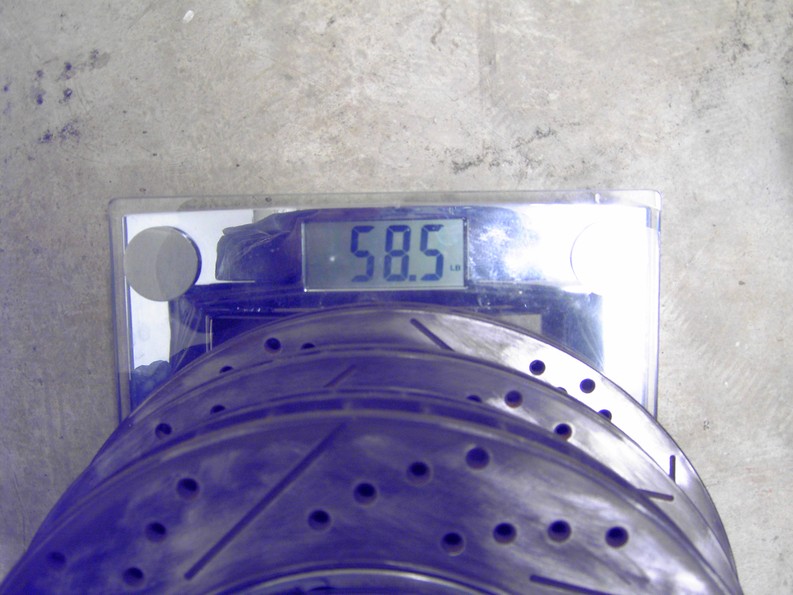
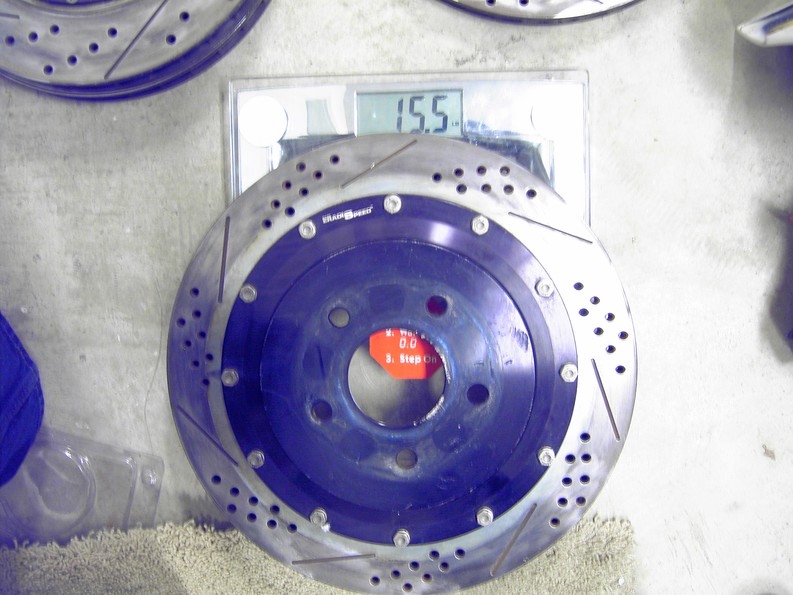
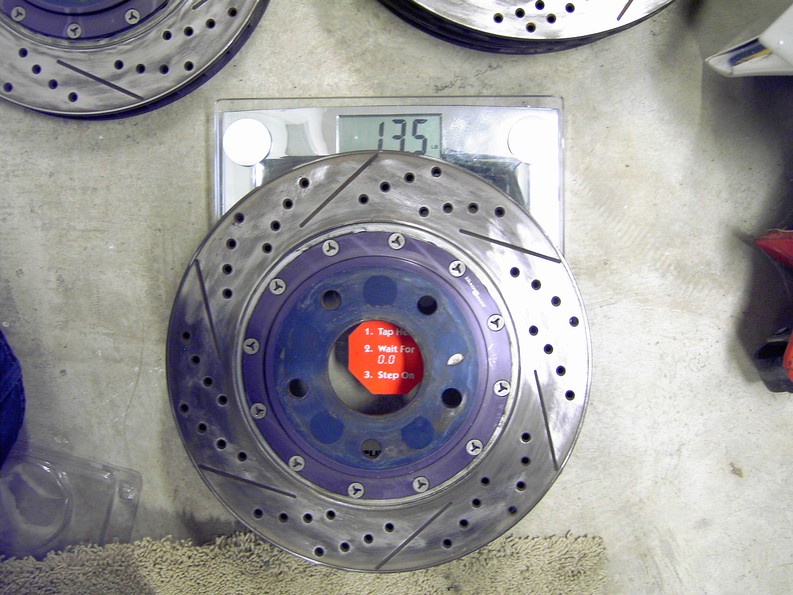
Several options. D1S (13" Corvette), WCF (Viper 13"), Held's 13", and a few homebrews 13". I have D1S 13" on an 88, but D1S is currently having communication issues. You'll save more monies using an homebrew kit (if offered) but I don't know of any issues concerning those kits and neither do I regarding WCFs.

Future plan 13/14 combo; You'll need big boy rims to clear the 14" rear rotor and 18" for the fronts, but certain 17" will clear a 13" rotor.

58.5 pounds total weight for 13/14 combo


14" weight


13" weight

IP: Logged
yellowstone
Member
Posts: 9299
From: Düsseldorf/Germany
Registered: Jun 2003


Feedback score: N/A
Leave feedback


Total ratings: 250
Rate this member

Report this Post06-21-2010 08:02 AM Click Here to See the Profile for yellowstoneSend a Private Message to yellowstoneDirect Link to This Post
Finally, some more pix from the install.

What we started out with:

I rebuilt the stock brakes 4 years ago and added SS brake hoses and aftermarket drilled/slotted rotors.


Comparison old/new rotors (9,25" to 13"):

[This message has been edited by yellowstone (edited 06-21-2010).]

IP: Logged
yellowstone
Member
Posts: 9299
From: Düsseldorf/Germany
Registered: Jun 2003


Feedback score: N/A
Leave feedback


Total ratings: 250
Rate this member

Report this Post06-21-2010 08:19 AM Click Here to See the Profile for yellowstoneSend a Private Message to yellowstoneDirect Link to This Post

yellowstone

9299 posts
Member since Jun 2003
Starting with the front, we first took the old stuff off.


The dust shields were cut to size and spray painted quickly:


Front hub installed (with new wheel bearings):


New rotor installed:


Adapter bracket installed:


What's important here when using the WCF kit is that the round aluminum bushings (is that the right word?) are not of equal length since the front Fiero spindles seem to be different on each side (or the Corvette calipers are). Both of he longer ones go on the drivers side while the shorter ones go on the passenger side.

New caliper installed:


[This message has been edited by yellowstone (edited 06-21-2010).]

IP: Logged
yellowstone
Member
Posts: 9299
From: Düsseldorf/Germany
Registered: Jun 2003


Feedback score: N/A
Leave feedback


Total ratings: 250
Rate this member

Report this Post06-21-2010 08:52 AM Click Here to See the Profile for yellowstoneSend a Private Message to yellowstoneDirect Link to This Post

yellowstone

9299 posts
Member since Jun 2003
After connecting the brake hoses it is obvious how much the turning radius is increased due to the banjo bolt hitting the shock.


(In this picture, the new bolt hole is already drilled and the shock moved back and now its the caliper hitting the bracket)

This is the reason for having to relocate the strut and cutting part of its bracket off.

Remove the lower shock bolt and drill a new hole that moves the shock as far in as possible:


Now cut the bracket to size, finding the equilibrium between maximum movement for the caliper and bracket strength:

[This message has been edited by yellowstone (edited 06-21-2010).]

IP: Logged
yellowstone
Member
Posts: 9299
From: Düsseldorf/Germany
Registered: Jun 2003


Feedback score: N/A
Leave feedback


Total ratings: 250
Rate this member

Report this Post06-21-2010 09:08 AM Click Here to See the Profile for yellowstoneSend a Private Message to yellowstoneDirect Link to This Post

yellowstone

9299 posts
Member since Jun 2003
Now on to the back. This is much simpler and was much quicker (until we got to the ebrake setup).

Take the old rotor and caliper/bracket off.

Cut the little tab or "ear" off the upright:


Also, cut or grind the "ears" on the lower A-arm in front of the ball joint as they will hit the rotor when the car is lowered to the ground (no picture).

Then cut the dust shield to size:


Install new rotor:


Install adapter bracket, caliper bracket, and new caliper:


Connect brake hose to caliper.

Bleed brakes while turning each front caliper upside down in turn due to the bleeder screws being on the bottom of the caliper with this setup.

[This message has been edited by yellowstone (edited 06-21-2010).]

IP: Logged
PFF
System Bot
yellowstone
Member
Posts: 9299
From: Düsseldorf/Germany
Registered: Jun 2003


Feedback score: N/A
Leave feedback


Total ratings: 250
Rate this member

Report this Post06-21-2010 09:31 AM Click Here to See the Profile for yellowstoneSend a Private Message to yellowstoneDirect Link to This Post
Now on to the ebrake setup. The rear C4 calipers that came with the kit already had the ebrake integrated. The Fiero cables hook right up but the routing of the cables is changed. A nice side effect of that is that the (ugly) cables are no longer visible from behind the car.

Remove the stock Fiero cables from their original location.

Loosen the ebrake bracket in the rear drivers side wheel well and reroute the cable:


Drill 1/2" holes in the subframe and push cables through:


Connect them next to the oil pan just as they used to be before the relocation:


I made a sleeve for the ebrake cable where it passes the exhaust to protect it:


Hook up the cables at the at the calipers (much quicker written than done!):


Drill a 3/16" screw hole in the drivers side wheel well to attach the ebrake bracket in the appropriate location (no picture).

Adjust the cables as necessary. Remember that with the new ebrake setup, the ebrake handle only goes up one notch. Do not snap your cables by doing it the old Fiero way!

[This message has been edited by yellowstone (edited 06-21-2010).]

IP: Logged
Previous Page | Next Page

This topic is 2 pages long:  1   2 


All times are ET (US)

T H I S   I S   A N   A R C H I V E D   T O P I C
  

Contact Us | Back To Main Page

Advertizing on PFF | Fiero Parts Vendors
PFF Merchandise | Fiero Gallery | Ogre's Cave
Real-Time Chat | Fiero Related Auctions on eBay


Copyright (c) 1999, C. Pennock