Hey, Flyboy, I know you're trying to get it ready for the Atlanta St. Pats Parade. Just don't turn loose that 340 HP down the middle of Peachtree Street.
Waiting to see your results. I'm kinda-sorta looking for a 3800 NA to go into the 85, or maybe even the 87.
Just a couple quick questions so that I understand the setup better. The rubber pieces are clamped between your mounts and the cradle correct? How much torque will you tighten the bolts to and what kind of nuts washers are you using?
IP: Logged
06:33 PM
Robs Fieros Member
Posts: 723 From: Athens, Tennessee Registered: Oct 2004
That mount has been replaced. We rethunk it and decided it would be better to use something different. We made a bracket to bolt to the craddle then topped it with a regular mount and bolted that to a brackt we made to fit the tranny. I like it alot better.
IP: Logged
08:04 PM
Feb 17th, 2009
Flyboy81 Member
Posts: 357 From: Erwin Tn USA Registered: Nov 2008
Ok so new mount setup is in the car. Its VERY sturdy. Once the dogbone is in place, there wont be much movement at all and vibration will be kept to minimum thanks to a new rubber isolated mount setup. I have run into one problem that I was wondering if anyone could shed some light on. My passenger side axle inner boot rubs my camaro oil filter adapter slightly. Its enough to concern me that under acceleration that it could damage or spin off the oil filter.
I was thinking that maybe there is a low profile boot to be used? I wondered if anyone had that problem in their swap and what could be done.
[This message has been edited by Flyboy81 (edited 02-17-2009).]
IP: Logged
10:12 PM
darkhorizon Member
Posts: 12279 From: Flint Michigan Registered: Jan 2006
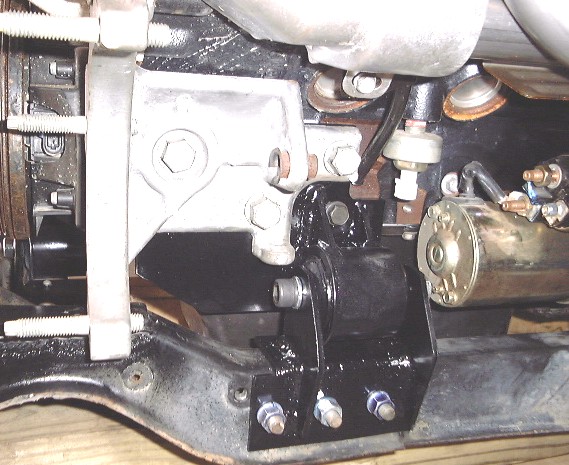
Here are some pics of the new mounts in place on the cradle.
This is still bolt on and we made the front trans mount plate with rubber mount. The front engine mount retains the stock rubber mount. The "prop" is isolated as well and will only be used as a brace for movement on the front of the engine. The rear tranny mount maintains a rubber isolated mount as well. We didnt change its design. We will retain the use of a dogbone as well. We are currently still tryin to get it just right. Its a little tricky.
IP: Logged
10:23 PM
Flyboy81 Member
Posts: 357 From: Erwin Tn USA Registered: Nov 2008
Unfortunately, the stock W-Body adapter will have the cradle in the way of the filter. The engine sits low in the cradle. We considered that as an alternative but it just wont go on.
IP: Logged
10:25 PM
darkhorizon Member
Posts: 12279 From: Flint Michigan Registered: Jan 2006
Thats what we had on it also. My engine is just sitting that low. It is 25 inches from the top of the frame rail to the top of the engine as I recall. I think we measured the 2.8 at 24. I know the 3800 is only an inch taller in the engine bay than the 2.8.
IP: Logged
10:49 PM
Feb 18th, 2009
fierofool Member
Posts: 13001 From: Auburn, Georgia USA Registered: Jan 2002
It doesn't look like there would be a problem with the boot and oil filter. That's the inboard joint and that moves with the engine/oil filter. Its flex movement is limited to up and down, not horizontally. Other than looking like it would be a royal pain to change, it really looks like the filter will work just fine.
IP: Logged
12:01 AM
Feb 19th, 2009
Robs Fieros Member
Posts: 723 From: Athens, Tennessee Registered: Oct 2004
This bolted joint, the one with the rubber sandwhiched in there, is doomed to fail. If you use a standard nut on the back side it will simply loosen itself. If you use some kind of locknut it might stay together but if you torque it down enough to where you dont see wear between the fasteners and the cradle/steel mount then you have made the joint stiff enough that the rubber might as well not be there. I don't think that your bolt size is great enough to get that kind of clamp load though.
I'm not trying to be a jerk. I just want to give you an engineering perspective on the use of rubber in that manner. I am not an expert but have done enough calculations on bolted joints make such statements.
IP: Logged
12:14 AM
Robs Fieros Member
Posts: 723 From: Athens, Tennessee Registered: Oct 2004
When I first saw the mounts I thought they looked different and thought they just might work. But after looking at them mounted up and thinking about the torque the engnes going to be puting out, I'm going to have to agree with you. We've already replaced one of the mounts with another design, and just as soon as I can find a low profile mount to go in the mount in question, I'll replace it as well.
IP: Logged
08:45 AM
Robs Fieros Member
Posts: 723 From: Athens, Tennessee Registered: Oct 2004
Ok the kick stand mount has been changed. The 2 rubber strips have been removed and a regular but taller mount has been added. And we're still sitting just a tad too low. The belt running from the balancer to the A/C compressor is rubbing the cradle, so we'll have to raise the engine about 1 inch to get it to clear.
IP: Logged
09:57 PM
Flyboy81 Member
Posts: 357 From: Erwin Tn USA Registered: Nov 2008
Just FYI, the reason I posted this stuff on here was for your notes and opinions and, for sure, your input. Noone is going to tell me anything thats going to hurt my feelings here. If I wanted to post a thread about how great our work is, I wouldnt have put in here that I am open to your suggestions. I am new at this, this is my first swap and it will NOT be my last. If you feel like something wont work or that something is out of place, say something. Thats what Pennock's is here for is it not? An exchange of ideas. Thanks for your input and since we have reached a point in our work that requires that support needed to be modified, your thoughts and considerations have been taken into account.
IP: Logged
11:53 PM
Feb 22nd, 2009
Flyboy81 Member
Posts: 357 From: Erwin Tn USA Registered: Nov 2008
Well, looks as if our low engine setup has run into a problem of the belt hitting the front framerail. Not a big issue as we will just redo our engine mount and front mount to be taller. The good side is that actually opens up us using a better rubber insulator, such as the dodge truck rubber that everyone mentions. So this should eliminate any doubts of that rear "kickstand" style bracket. The input from you guys has been helpful so please feel free if you see something, say something. Ill show pics of the new stuff when the car is back from the muffler shop.
IP: Logged
03:26 PM
Darth Fiero Member
Posts: 5922 From: Waterloo, Indiana Registered: Oct 2002
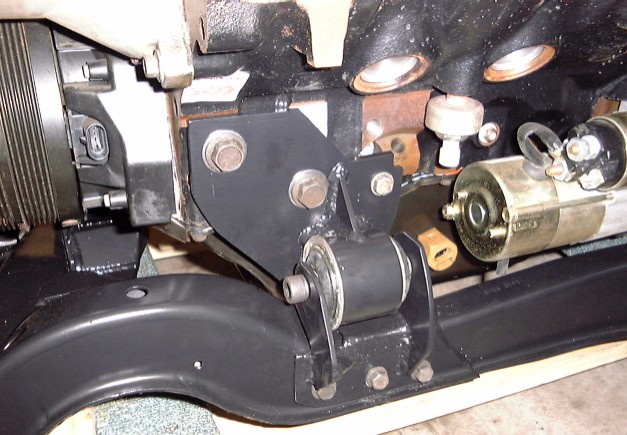
Here are some pics of the new mounts in place on the cradle.
I don't want to step on anybody's toes here either but I also have some suggestions...
The rubber portion aside, I see another problem with the mount in the picture. It appears you are only using one bolt to attach this mount to the engine block. Another bolt is used to attach the mount to the back of the A/C compressor. There is a problem with this design. First off the back of the A/C compressor needs to be supported / attached to the block. This needs to be done in order to take stress off the aluminum mounting bracket at the front of the compressor. The way you have it designed now there is only really one bolt that is holding the mount to the block, at least in the picture I see. And this one bolt is NOT going to hold the amount of torque this mount is going to be subjected to and prevent it from wanting to pivot. And when subjected to torque, this mount will put some of the stress on the back of the A/C compressor -- which can damage the compressor or the compressor mounting bracket. There are three 12mm threaded holes in the engine block in this area, and AT LEAST 2 of those should be utilized for a mount to prevent a pivoting action -- but I recommend using all three if you are using thin steel for your mounting bracket (less than 1/4" thickness). At times I even use the one 8mm threaded hole just under the dipstick hole for my mounts to add support. Just make sure you use a strong bolt in this location (rating of 10.9-12.9).
Here's pictures of some of my mounts so you have some idea of what I do...
The mount pictured above is bolted to the block using all three 12mm holes as it is sandwitched between the block and a/c compressor mount I used. The rubber bushing is a stock replacement 84-87 Fiero cradle mount bushing; I machined a tube to accept this bushing and welded that tube to the brackets I made before pressing in the cradle bushing. The mounts I make these days put the engine/trans as low on the cradle as possible without causing the oil/trans pans to stick below the bottom plane of the cradle. You can see in the picture above that I did have to modify the cradle so it would clear the belt going to the A/C compressor.
Below is a picture of a similar mount that only uses two of the 12mm holes but it is made of 1/4" plate steel...
Again, not trying to knock anybody's work just offering some suggestions...
-ryan
------------------ 5+ years on this same swap -- NO engine or transmission failures... Custom GM OBD1 & OBD2 Tuning | Engine Conversions & more | www.gmtuners.com
IP: Logged
05:33 PM
Rolling Thunder Member
Posts: 1244 From: College Station, TX Registered: Aug 2008
Darth Fiero has a good solution to your sandwiched rubber. You can use two brackets: one that bolts to the engine and one to the frame. They are then connected by a bushing, like the one above. I'd call this a top notch job... as long as the bushing can withstand the punishment.
IP: Logged
08:55 PM
Feb 23rd, 2009
Flyboy81 Member
Posts: 357 From: Erwin Tn USA Registered: Nov 2008
I agree. I believe this is a solid solution to this particular problem for my swap. We've decided to raise the engine up to clear the belt from the frame. This is the kind of insite that I like to hear. Thanks, Darth, for your input on that. I have looked at that setup from Darth in researching what we wanted to try to do. I believe the best option would be to try to do something similar to this setup so that the rigidity can be maintained. The car will be back from the exhaust shop this week. I think we'll get back on that ASAP. Thanks again for the input. Im still open for any other suggestions. Ryan, your suggestions are always welcome as you have been a big help to the success of my swap. But again, I welcome all who have something to suggest to say it. Thats the purpose of this thread.
[This message has been edited by Flyboy81 (edited 02-23-2009).]
IP: Logged
01:15 AM
Feb 24th, 2009
Robs Fieros Member
Posts: 723 From: Athens, Tennessee Registered: Oct 2004
Ok so the car is back from Steve's Custom Exhaust in NC. This is some nice exhaust work! I just thought Id keep it all in one thread to show you guys. The mounts will be done this coming week. We are going to get rid of the "kickstand" completely. Something new will be made in its place. Once done, I will post some pics. Anyway, here are some pics.
IP: Logged
06:18 PM
PFF
System Bot
darkhorizon Member
Posts: 12279 From: Flint Michigan Registered: Jan 2006
This is true, they are not all equal length headers. One MAJOR consideration here is that this engine is not a 7000 or higher RPM engine. This engine is a daily driver engine. Now if I got equal length tubes and true dual exhaust with little or no restriction, I may get, what, a twentieth?? of a second? I mean seriously Im not building a NASCAR or Sprint car here. Just a simple 3800 SC. The exhaust all equalizes in the Y-Pipe and then again in the downpipe into a single 3 inch pipe. Besides, long tube headers benefit from equal length more than mid tube or shorties such as these. Im pretty sure, with equal length headers, I wouldnt see any difference at the track. The man who made this system has done nothing but exhaust since he started his business well over 20 years ago. He has several systems he builds for RACE cars all the time. Im pretty sure, when I asked him to do this project, he had the best interest of the car in mind, in regaurds to performance and to daily driving. The man has a Fiero 3800SC swap with TRUE dual exhaust that he did himself, and turns mid 12's on street tires and pump gas. I would say he is experienced enough to make the exhaust for my car. Im not saying that what you said has no merrit, but for my swap, I dont think the extra 200-300 dollars justifies having equal length tubes on shorty headers. As it is now, I dont see anyone who offers equal length headers for the 3800SC in a Fiero. WCF are not equal length. Im curious to know if you have some equal length headers on your swaps? Id say these flow better than stock manifolds regaurdless.
IP: Logged
08:25 PM
darkhorizon Member
Posts: 12279 From: Flint Michigan Registered: Jan 2006
Not at all. This set, starting from complete scratch and not dropping the cradle out to do them ran me $750. Thats with the tips and 16 hours of labor. I didnt feel it was a bad deal. Steve has done some work for me in the past and always is fair when it comes to his work.
IP: Logged
11:28 PM
Mar 4th, 2009
Robs Fieros Member
Posts: 723 From: Athens, Tennessee Registered: Oct 2004
Not at all. This set, starting from complete scratch and not dropping the cradle out to do them ran me $750. Thats with the tips and 16 hours of labor. I didnt feel it was a bad deal. Steve has done some work for me in the past and always is fair when it comes to his work.
Most people would charge 250 just for installation, so I would say you straight stole that from his shop! If he enjoy'd making them I am sure he could stay busy making them for a few months for people in town.
IP: Logged
12:51 PM
Flyboy81 Member
Posts: 357 From: Erwin Tn USA Registered: Nov 2008
I agree! He said this was the price he would charge to anyone else wanting custom exhaust like this on a Fiero 3800 swap. His Fiero has true duals that he could probably do if someone wanted to pay the extra bit.
We took our first test drive yesterday and the car did great, BUT we did break a mounting bracket. The dogbone bracket broke. So I'm going to do a redesign with a steal bracket instead of using the factory aluminum bracket. The car hooked up great after smoking the tires in first and second. Flyboy you'll have to bring another set of tires when you come to pickup your car.
Yep, there is no place for those darn alum dogbones in swaps... I think everyone knows how much I hate those by now anyway.
My low mount using the GP dogbone must be well made being it has 40K/3 years and many hard launches on it. Maybe I got a proto-type dogbone that is made of titanium.
On the swaps I am doing now the Alt is let up high so I am going to add a 4th mounts by the A/C so I can run without a dogbone setup or a light duty setup.
IP: Logged
10:49 PM
Mar 6th, 2009
darkhorizon Member
Posts: 12279 From: Flint Michigan Registered: Jan 2006
I wouldnt have guessed that in a million years you would do this.... Hell must be freezing over or something.
With the Alt being left up top that doesnt leave alot of options for an upper DB mount like I usually use. It will probally get one but not like the type I have used before.
IP: Logged
11:25 AM
Robs Fieros Member
Posts: 723 From: Athens, Tennessee Registered: Oct 2004
I made a new dog bone out of 3/8" steel and it works better than the original setup I made. Flyboy got to drive it today and he had a huge smile on his face when he got back.
IP: Logged
08:17 PM
Flyboy81 Member
Posts: 357 From: Erwin Tn USA Registered: Nov 2008
That dogbone was WAY better than any aluminum dogbone. VERY nice work. We had a setback with my swap today, the car DID run good for a little bit. Unfortunately, a little PCM problem occured and we have to redo the wiring. NO problem as I have a spare harness and PCM from a 99 Riviera. The lower mounts are holding up EXTREMELY well. OH and to answer the exhaust shop location question, Steve's Custom Exhaust is in Bakersville NC. Hes got a remote shop and does all his own custom exhaust. EXCELLENT work by the way.
IP: Logged
11:41 PM
Mar 8th, 2009
Robs Fieros Member
Posts: 723 From: Athens, Tennessee Registered: Oct 2004