Had to chop & section tham to keep the scoop verticle & make the small window smaller.
David, do you want us to mount them now or do you want to wait until after it's painted?
Archie
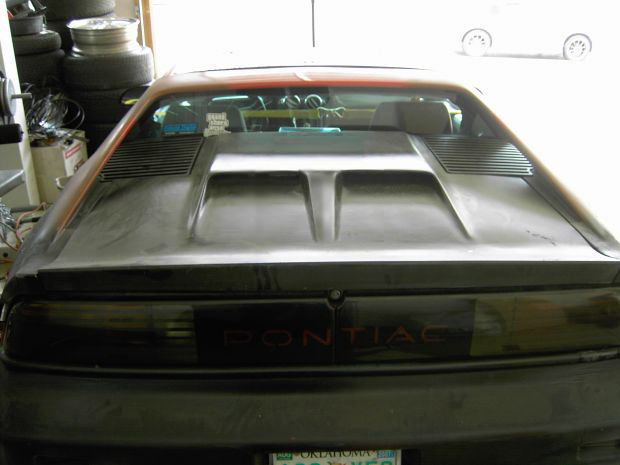
Looks great! Now there choptop can have turbo scoops . Lets test mount them with the mirrors (if the mirrors work) for pictures. I'm thinking about getting it primed flat black before shipping it down for D8.
Thanks Troy & Curley. I'm going to do VERSION "D" with the ramp. What to you think Archie, feasible?
[This message has been edited by FierociousGT (edited 02-07-2008).]
IP: Logged
09:27 AM
madcurl Member
Posts: 21401 From: In a Van down by the Kern River Registered: Jul 2003
Looks great! Now there choptop can have turbo scoops . Lets test mount them with the mirrors (if the mirrors work) for pictures. I'm thinking about getting it primed flat black before shipping it down for D8.
A Daytona Tradition?
D5: #015 Devue
D6: Alex's widebody devue.
Troy @ D7 Devue
and now #025 devue @ D8? This project is going to be very new and interesting so, "all eyes are on you" especially if your choptop is at D8. Do you think you'll have the 19/20 combo on prior to D8? I think your color combination will go very well using the blackened/carbon-like NSX headlamps and black center/chromed DUB lip rims.
Shiney black painted sail window alternative.
Black strips with dark grey paint to match those dark NSX headlamps.
You might want to order the DUBs before you leave Archie's since the Tire Rack is near Archie shop (100 miles or so I heard). That way you'll know exactly what fits. Did you get in contact with Chuck? You'll need at least 4-6 weeks for Tire Rack to get the parts needed to assemble the DUBs.
After you've gotten the correct fitment, it might best be to have the DUBs shipped to FL, unless you plan on leaving your shop rollers at Archie's otherwise, you may need to ship the shop rollers by themselves. If the hauler isn't a in-closed trailer, I wouldn't feel comfortable in shipping a "choptop" w/DUBs on a open trailer. Are you going to have Mark (the painter) primer black #025?
Anyway, it's nice to see you're keeping the bar raised in the Fiero choptop world using different/newer parts not seen in combination on a choptop. No need to buy a replica Lamborghini/Ferrrari when you can create your own modern DNA version of the Fiero.
------------------
"Anyone can make a copy of something, it may look good, but never is the real car. Make something from your imagination, something unique, something nobody has, anything is possible and, ideas can become a reality; Archie and the Crew can make your Dreams into a reality."
[This message has been edited by madcurl (edited 02-07-2008).]
IP: Logged
12:27 PM
Archie Member
Posts: 9436 From: Las Vegas, NV Registered: Dec 1999
Looks great! Now there choptop can have turbo scoops . Lets test mount them with the mirrors (if the mirrors work) for pictures. I'm thinking about getting it primed flat black before shipping it down for D8.
Thanks Troy & Curley. I'm going to do VERSION "D" with the ramp. What to you think Archie, feasible?
Originally posted by madcurl: Black strips with dark grey paint to match those dark NSX headlamps.
You might want to order the DUBs before you leave Archie's since the Tire Rack is near Archie shop (100 miles or so I heard). That way you'll know exactly what fits. Did you get in contact with Chuck? You'll need at least 4-6 weeks for Tire Rack to get the parts needed to assemble the DUBs.
Are you going to have Mark (the painter) primer black #025?
Anyway, it's nice to see you're keeping the bar raised in the Fiero choptop world using different/newer parts not seen in combination on a choptop. No need to buy a replica Lamborghini/Ferrrari when you can create your own modern DNA version of the Fiero.
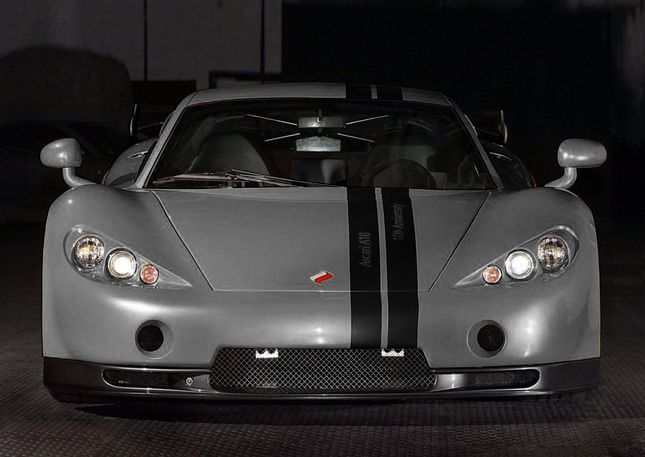
- Already PM Chuck and recieved reply... - I'd like to have Mark primer black #025 - I like this style Black strips better TopGear: Ascari A10
[This message has been edited by FierociousGT (edited 02-07-2008).]
IP: Logged
06:56 PM
madcurl Member
Posts: 21401 From: In a Van down by the Kern River Registered: Jul 2003
Please note, there is no mirror glass, what you see is what you get.
Here is a mirror growing out of a flat piece of fiberglass.....
Well, not really actually growing out of it.
Two hollow interrupted rods run from the base to the mirror section. Inside the rods are 2 coil springs holding the base & the mirror section together. The other ends of these springs are in the mirror section behind the black mirror mount.....
Where the 2 mirror sections come together there is flat rubber stock between the 2 pieces. The rubber was cut very unevenly with a razor knife by a drunk. (hard to see in the pics., easy to see in person)
Here's the funny part that makes you say to yourself "What were they thinking?"
You can see the wire pigtail in the 1st picture I posted & you can see no wires coming out the other end in the 2nd. & 3rd. pics I posted. Here's why, the pigtail was all stuffed in the area around the mirror motor deal.
"What were they thinking?"
Now someone will have to remove the plug from one end of the pigtail remove all the hardware out of the mirror hole. Then weave the 3 wires down one of the rods without tangling in the coil spring. Then put it all back together.
It seems it would have been a lot easier to do all that when the mirror was 1st put together.
Next: We get to go out & see how the mirror is going to fit.
Remember how nice it fit in the photoshops, I'll bet it won't be that easy.
As we hold the big base on the mirror bottom plate up to the car at about the same angle that we used on Curley's & Troy's cars it appears that mirror can be mounted to where it will be level.
Now comes the tough part.......
Here is the opening that we have to mount the mirror into.....
In the past when we mounted the 360 mirrors & the F430 mirrors we used this triangle, with right end of line "C" about 3/4" down into the door panel, to mount them into a chopped Fiero.
However, when you build a triangle with the same "A", "B" & "C" angles around the base of the new mirror you get a lot bigger triangle. You get a much bigger triangle because the base of the mirror where the legs meet the big flat plate, is a much larger & more rectangular area that it was on the Ferrari mirrors.
I've taken a lot of measurements & made some templates, but this last template is the most important one. It represents the minimum area patch that the base of the mirror has to have. This area is identified as "Body" on this template. Note how one of the legs is going to violate the "A" pillar by a couple of inches.
Archie
P.S.
David, give me a call tomorrow, you have some decissions to make.
IP: Logged
11:21 PM
88White3.4GT Member
Posts: 1604 From: Hayward, CA Registered: Dec 2003
Archie, I'll call you in the morning. I'm also going to PM MMBrazil @ KitCentral.com to see if he pops in and can give some ideas regarding his mirrors. Kudos for the detail plotting data & explination in your post.
I have the mirror (glass) template, which I'll take care of down here and if I'm not mistaken those mirrors can separate in the middle. Don't worry about the electrical part, as long as I can access the stock mirror wires.
If there is no other way around the "A" pilar then I will just have you mount the triangle on the doors, cover the original mirror hole and I'll deal w/ the mirrors once #25 is down here.
The power door locks are on the way and I will order the '82-'85 Mustang fiberglass vent today.
TTYL
[This message has been edited by FierociousGT (edited 02-08-2008).]
IP: Logged
05:12 AM
SAFASTRO Member
Posts: 604 From: Calgary, Alberta, Canada Registered: Nov 2006
WOW!!!!! This is coming along just great! I love what you guys are doing here. And if my opinion counts for anything, I like option D the best for your decklid scoop! And those mirrors look awesome!!! Can't wait to see em mounted!
SAFASTRO, yes your opinion does count. I'm going to do VERSION "D" deck vent.
Spoke with Archie about 30min ago regarding the mirrors. If I understood correctly the separation of the bolts is greater then the triangle area on the door. Asked Archie to drill thru the triangle area to confirm if there was a metal plate, negative, so can't relocate the bolts.
Violates "A" pillar.. sounds painful.
We will mount the metal mirror triangle and patch the stock mirror openings. I'll have to modify the replica mirrors bolt spacing here in Orlando. Now it's official, #25 won't be at D8. Now on to the rear deck lid...
PS Archie more kudos for you and your team, Doug from Fiero Warehouse left me a message today that the car looks incredible!
[This message has been edited by FierociousGT (edited 02-08-2008).]
IP: Logged
12:18 PM
madcurl Member
Posts: 21401 From: In a Van down by the Kern River Registered: Jul 2003
We will mount the metal mirror triangle and patch the stock mirror openings. I'll have to modify the replica mirrors bolt spacing here in Orlando. Now on to the rear deck lid...
I'm glad to hear you guys have found a solution otherwise, you'd be eating the cost of those replica mirrors.
Word to the Wise: Photoshoping is nice but, application of the part is a totally different story. It pays to do research, research, and more research.
quote
Originally posted by FierociousGT:
Now it's official, #25 won't be at D8.
I guess all eyes are now on Tony?
[This message has been edited by madcurl (edited 02-08-2008).]
OK, here's the proposed lines for the side of the car as we discussed.
These are just marked up with a black marker.
On the lines extending up into the front fender, remember once you approve these, we will cut them as lines at 1/16" wide & once cut thay can't be changed. They will fade out on the front fender.
Originally posted by Archie: OK, here's the proposed lines for the side of the car as we discussed.
These are just marked up with a black marker.
On the lines extending up into the front fender, remember once you approve these, we will cut them as lines at 1/16" wide & once cut thay can't be changed. They will fade out on the front fender.
The lower lines will be glassed filled & sanded.
Archie
GO!
[This message has been edited by FierociousGT (edited 02-08-2008).]
IP: Logged
05:24 PM
madcurl Member
Posts: 21401 From: In a Van down by the Kern River Registered: Jul 2003
Originally posted by madcurl: If you're following #014's lead, I think your missing a vertical line; otherwise, the horizontal @ the nose is leading to nowhere, right?
Curley, thanks for pointing that out.
Archie let's do this.... Let's add the line from the hood inclined like in the picture. This good thing if the nose every needs to be masked off for painting that specific area.
[This message has been edited by FierociousGT (edited 02-08-2008).]
IP: Logged
08:19 PM
PFF
System Bot
Archie Member
Posts: 9436 From: Las Vegas, NV Registered: Dec 1999
Archie let's do this.... Let's add the line from the hood inclined like in the picture. This good thing if the nose every needs to be masked off for painting that specific area.
Kit c e n t r a l Forum Index Inbox :: Message From: MMBRAZIL To: FierociousGT Posted: Feb 08, 2008 - 05:34 PM Subject: Re: Diablo replica mirrors You can make new holding bolts, cut the old ones off, get new ones, weld a square steel to the foot ( so the bolt doesn�t turn when fixing it to door )and fiberglass it in the position you want. Have someone that works with fiberglass do it, its very simple to solve your problem.
Looking at the pics its very easy to place the mirror in your car, don�t worry I will help you.
tks
IP: Logged
11:04 AM
Archie Member
Posts: 9436 From: Las Vegas, NV Registered: Dec 1999
We already planned to make that line level. It's only off about 1/8" right now.
However, when a picture is taken of it from this angle the line will still appear to run down hill because the surface the line is on runs at an angle to the camera position. Note how the corresponding line on the rear 1/4 panel appears to be level because that surface is closer to a 90* angle to the camera lens.
Archie
[This message has been edited by Archie (edited 02-09-2008).]
IP: Logged
04:36 PM
Archie Member
Posts: 9436 From: Las Vegas, NV Registered: Dec 1999
Archie let's do this.... Let's add the line from the hood inclined like in the picture. This good thing if the nose every needs to be masked off for painting that specific area.
A stock Fiero nose has a seam across the front edge of the hood over to the stock Fender. That line continues down the fender to the molding on the side.
Maybe you guys didn't notice that the hood on #25 doesn't come all the way over to the fender. So there's no "line" to continue down. Maybe you'd like me to cut a new line continuing the line from the front edge of the hood thru custom fiberglassed NSX headlight opening over the top of the fender & down to meet the horizontal line.
I've been against cutting the horizontal line from the beginning. It's going to be very hard controling the depth of the line & imposible to sand & finish the inside & bottom of the cut. This line isn't doing anything for the car that a nice straight black pinstripe wouldn't do after it's painted.
This horizontal line is being cut into the fender to be a contiunation of the body lines on the back of the car. Your paint guy is already going to have a fit painting this horizontal line. Wait until he starts to complain about his paint collecting in the verticle line & causing a run.
Archie
[This message has been edited by Archie (edited 02-09-2008).]


.JPG)


.JPG)
.JPG)

 . Lets test mount them with the mirrors (if the mirrors work) for pictures. I'm thinking about getting it primed flat black before shipping it down for D8.


.JPG)
_1.JPG)
_1.JPG)
.JPG)
.JPG)
.JPG)
.JPG)

_1.JPG)
.JPG)
.JPG)
.JPG)
_1.JPG)


_1.jpg)

.JPG)
.jpg)
.jpg)
.jpg)
.jpg)
.jpg)
.jpg)
.jpg)
.jpg)

_1_1.jpg)
_1.JPG)
_1.JPG)
.JPG)
.JPG)

